3
REPEAT AFTER ME

Everyone talks about the heroism and glamour of space travel, but some of it is routine, repetitive work. When you’re cleaning, gardening in the space station greenhouse, or exercising to keep your strength up, you’re following detailed plans designed to keep the team safe and the space station operating. Luckily, robots take care of some of the drudgery, and they never complain about having to repeat themselves.
Whether you’re programming robots or building games, the loop is one of your basic programming building blocks. A loop is a section of a program that repeats: sometimes it repeats a set number of times, and sometimes it continues until a particular event takes place. Sometimes, you’ll even set a loop to keep going forever. In this chapter, you’ll learn how to use loops to repeat instructions a certain number of times in your programs. You’ll use loops, along with your knowledge of lists, to display a map and draw a 3D room image.
DISPLAYING MAPS WITH LOOPS
In the Escape game, we’ll use loops extensively. Often, we’ll use them to pull information from a list and perform some action on it.
Let’s start by using loops to display a text map.
MAKING THE ROOM MAP
We’ll make a new map for the example in this chapter and use 1 to represent a wall and 0 to represent a floor space. Our room has a wall all the way around the edge and a pillar near the middle. The pillar is the same as a section of wall, so it’s also marked with a 1. I’ve chosen its position so it looks good when we draw a 3D room later in this chapter. The room doesn’t have any other objects, so we won’t use any other numbers at this time.
In IDLE, open a new Python program, and enter the code in Listing 3-1, saving it as listing3-1.py:
listing3-1.py
room_map = [ [1, 1, 1, 1, 1],
[1, 0, 0, 0, 1],
[1, 0, 1, 0, 1],
[1, 0, 0, 0, 1],
[1, 0, 0, 0, 1],
[1, 0, 0, 0, 1],
[1, 1, 1, 1, 1]
]
print(room_map)
Listing 3-1: Adding the room map data
This program creates a list called room_map that contains seven other lists. Each list starts and ends with square brackets and is separated from the next list with a comma. As you learned in Chapter 2, the last list doesn’t need a comma after it. Each list represents a row of the map. Run the program by clicking Run ▸ Run Module and you should see the following in the shell window:
[[1, 1, 1, 1, 1], [1, 0, 0, 0, 1], [1, 0, 1, 0, 1], [1, 0, 0, 0, 1], [1, 0, 0, 0, 1], [1, 0, 0,
0, 1], [1, 1, 1, 1, 1]]
As you saw in Chapter 2, printing the map list shows you all the rows run together, which isn’t a useful way to view a map. We’ll use a loop to display the map in a way that is much easier to read.
DISPLAYING THE MAP WITH A LOOP
To display the map in rows and columns, delete the last line of your program and add the two new lines shown in Listing 3-2. As before, don’t type in the grayed-out lines—just use them to find your place in the program. Save your program as listing3-2.py.
listing3-2.py
--snip--
[1, 0, 0, 0, 1],
[1, 1, 1, 1, 1]
]
➊ for y in range(7):
➋ print(room_map[y])
Listing 3-2: Using a loop to display the room map
RED ALERT
Remember to place a colon at the end of the first new line! The program won’t work without it. The second new line should be indented with four spaces to show Python which instructions you want to repeat. If you add the colon at the end of the for line, the spaces are added automatically for you when you press ENTER to go to the next line.
When you run the program again, you should see the following in the shell:
[1, 1, 1, 1, 1]
[1, 0, 0, 0, 1]
[1, 0, 1, 0, 1]
[1, 0, 0, 0, 1]
[1, 0, 0, 0, 1]
[1, 0, 0, 0, 1]
[1, 1, 1, 1, 1]
That’s a more useful way to view a map. Now you can easily see that a wall (represented by 1s) runs all around the edge. So how does the code work? The for command ➊ is the engine here. It’s a loop command that tells Python to repeat a piece of code a certain number of times. Listing 3-2 tells Python to repeat the print() instruction for each item in our room_map list ➋. Each item in room_map is a list containing one row of the map, so printing them separately displays our map one row at a time, resulting in this organized display.
Let’s break down the code in more detail. We use the range() function to create a sequence of numbers. With range(7), we tell Python to generate a sequence of numbers up to, but not including, 7. Why does it leave out the last number? That’s just how the range() function works! If we give the range() function just one number, Python assumes we want to start counting at 0. So range(7) creates the sequence of numbers 0, 1, 2, 3, 4, 5, and 6.
Each time the code repeats, the variable in the for command takes the next item from the sequence. In this case, the y variable takes on the values 0, 1, 2, 3, 4, 5, and 6 in turn. This matches the index numbers in room_map perfectly.
I’ve chosen y as the variable name because we’re using it to represent which map row we want to display, and the row on the map is referred to as the y-coordinate.
The print(room_map[y]) command ➋ is indented four spaces, telling Python that this is the chunk of code we want our for loop ➊ to repeat.
The first time through the loop, y has a value of 0, so print(room_map[y]) prints the first item in room_map, which is a list containing the data for the first row of the map. The second time through, y has a value of 1, so print(room_map[y]) prints the second row. The code repeats until it’s printed all seven lists inside room_map.
LOOP THE LOOP
Our map output is getting better, but it still has a couple of limitations. One is that the commas and brackets make it look cluttered. The other limitation is that we can’t do anything with the individual wall panels or spaces in the room. We’ll need to be able to handle whatever is at each position in the room separately, so we can display its image correctly. To do that, we’ll need to use more loops.
NESTING LOOPS TO GET ROOM COORDINATES
The listing3-2.py program uses a loop to extract each row of the map. Now we need to use another loop to examine each position in the row, so we can access the objects there individually. Doing so will enable us to have full control over how the items are displayed.
You just saw that we can repeat a piece of code inside a loop. We can also put a loop inside another loop, which is known as a nested loop. To see how this works, we’ll first use this technique to print the coordinates for each space in the room. Edit your code to match Listing 3-3:
listing3-3.py
--snip--
[1, 0, 0, 0, 1],
[1, 1, 1, 1, 1]
]
➊ for y in range(7):
➋ for x in range(5):
➌ print("y=", y, "x=", x)
➍ print()
Listing 3-3: Printing the coordinates
RED ALERT
As every astronaut knows, space can be dangerous. Spaces can, too. If the indentation in a loop is wrong, the program won’t work correctly. Indent the first print() command ➌ with eight spaces so it’s part of the inner x loop. Make sure the final print() instruction ➍ is lined up with the second for command ➋ (with four spaces of indentation) so it stays in the outer loop. When you start a new line, Python indents it the same as the previous one, but you can delete the indentation when you no longer need it.
Save your program as listing3-3.py and run the program by clicking Run ▸ Run Module. You’ll see the following output:
y= 0 x= 0
y= 0 x= 1
y= 0 x= 2
y= 0 x= 3
y= 0 x= 4
y= 1 x= 0
y= 1 x= 1
y= 1 x= 2
y= 1 x= 3
y= 1 x= 4
y= 2 x= 0
y= 2 x= 1
y= 2 x= 2
--snip--
The output continues and ends on y= 6 x= 4.
We’ve set up the y loop the same as before so it repeats seven times ➊, once for each number from 0 to 6, putting that value into the y variable. This is what is different in our program this time: inside the y loop, we start a new for loop that uses the x variable and gives it a range of five values, from 0 to 4 ➋. The first time through the y loop, y is 0, and x then takes the values 0, 1, 2, 3, and 4 in turn while y is 0. The second time through the y loop, y is 1. We start a new x loop, and it takes the values 0, 1, 2, 3, and 4 again while y is 1. This looping keeps going until y is 6 and x is 4.
You can see how the loops work when you look at the program’s output: inside the x loop, we print the values for y and x each time the x loop repeats ➌. When the x loop finishes, we print a blank line ➍ before the next repeat of the y loop. We do this by leaving the print() function’s parentheses empty. The blank line breaks up where the y loop repeats, and the output shows you what the values of x and y are each time through the inner x loop. As you can see, this program outputs the y- and x-coordinates of every position in the room.
CLEANING UP THE MAP
We’ll use the coordinates in the loops to print our map without any brackets and commas. Edit your program to change the inner nested loop as shown in Listing 3-4:
listing3-4.py
--snip--
for y in range(7):
for x in range(5):
print(room_map[y][x], end="")
print()
Listing 3-4: Tidying up the map display
Save your program as listing3-4.py and run the program by clicking Run ▸ Run Module. You should see the following in the shell:
11111
10001
10101
10001
10001
10001
11111
That map is much cleaner and easier to understand. It works by going through the coordinates in the same way the program in Listing 3-3 did. It takes each row in turn using the y loop, and then uses the x loop to get each position in that row. This time, instead of printing the coordinates, we look at what is in the room_map at each position, and print that. As you learned in Chapter 2, you can pull any item out of the map using coordinates in the form room_map[y coordinate][x coordinate].
The way we’ve formatted the output means the map resembles the room: we put all the numbers from one row together, and only start a new line on the screen when we start a new row of the map (a new repeat of the y loop).
The print() instruction inside the x loop finishes with end="" (with no space between the quote marks) to stop it from starting a new line after each number. Otherwise, by default, the print() function would end each piece of output by adding a code that starts a new line. But instead, we tell it to put nothing ("") at the end. As a result, all the items from one complete run of the x loop (from 0 to 4) appear on the same line.
After each row is printed, we use an empty print() command to start a new line. Because we indent this command with only four spaces, it belongs to the y loop and is not part of the code that repeats in the x loop. That means it runs only once each time through the y loop, after the x loop has finished printing a row of numbers.
DISPLAYING A 3D ROOM IMAGE
You now know enough about maps to display a 3D room image. In Chapter 1, you learned how to use Pygame Zero to place images on the screen. Let’s combine that knowledge with your newfound skills in getting data from the room_map, so we can display our map with images instead of 0s and 1s.
Click File ▸ New File to start a new file in Python, and then enter the code in Listing 3-5. You can copy the room_map data from your most recent program for this chapter.
listing3-5.py
room_map = [ [1, 1, 1, 1, 1],
[1, 0, 0, 0, 1],
[1, 0, 1, 0, 1],
[1, 0, 0, 0, 1],
[1, 0, 0, 0, 1],
[1, 0, 0, 0, 1],
[1, 1, 1, 1, 1]
]
➊ WIDTH = 800 # window size
➋ HEIGHT = 800
top_left_x = 100
top_left_y = 150
➌ DEMO_OBJECTS = [images.floor, images.pillar]
room_height = 7
room_width = 5
➍ def draw():
for y in range(room_height):
for x in range(room_width):
➎ image_to_draw = DEMO_OBJECTS[room_map[y][x]]
➏ screen.blit(image_to_draw,
(top_left_x + (x*30),
top_left_y + (y*30) - image_to_draw.get_height()))
Listing 3-5: Code for displaying the room in 3D
Save the program as listing3-5.py. You need to save it in your escape folder, because the program will use the files inside the images folder stored there. Don’t save your file inside the images folder: your file should be alongside it instead. If you haven’t downloaded the Escape game files yet, see “Downloading the Game Files” on page 7 for download instructions.
The listing3-5.py program uses Pygame Zero, so you need to go to the command line and enter the instruction pgzrun listing3-5.py to run the program. See “Running the Game” on page 9 for advice on running programs that use Pygame Zero, including the final Escape game.
The listing3-5.py program uses the Escape game’s image files to create an image of a room. Figure 3-1 shows the room with its single pillar. The Escape game uses a simplified 3D perspective where we can see the front and top surfaces of an object. Objects at the front and back of the room are drawn at the same size.
When you created the spacewalk simulator in Chapter 1, you saw how the order in which objects are drawn determines which ones are in front of the others. In the Escape game and Listing 3-5, the objects are drawn from the back of the room to the front, enabling us to create the 3D effect. Objects nearer to the viewer (sitting at their computer) appear to be in front of those at the back of the room.
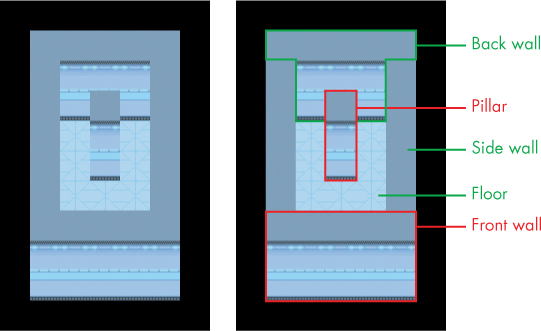
Figure 3-1: Your first 3D room (left) and the same room with the parts labeled (right)
UNDERSTANDING HOW THE ROOM IS DRAWN
Now let’s look at how the listing3-5.py program works. Much of the program will be familiar to you from Chapters 1 and 2. The WIDTH ➊ and HEIGHT ➋ variables hold the size of the window, and we use the draw() function to tell Pygame Zero what to draw onscreen ➍. The y and x loops come from Listing 3-4 earlier in this chapter and give us coordinates for each space in the room.
Instead of using numbers in the range() functions to tell Python how many times to repeat our y and x loops, we’re using the new variables room_height and room_width. These variables store the size of our room map and tell Python how many times to repeat the loops. For example, if we changed the room_height variable to 10, the y loop would repeat 10 times and work through 10 rows of the map. The room_width variable controls how many times the x loop repeats in the same way, so we can display wider rooms.
RED ALERT
If you use room widths and heights that are bigger than the actual room_map data, you’ll cause an error.
The listing3-5.py program uses two images from the images folder: a floor tile (with the filename floor.png) and a wall pillar (called pillar.png), as shown in Figure 3-2. A PNG (Portable Network Graphics) is a type of image file that Pygame Zero can use. PNG enables parts of the image to be see-through, which is important for our 3D game perspective. Otherwise, we wouldn’t be able to see the background scenery through the gaps in a plant, for example, and the astronaut would look like they had a square halo around them.
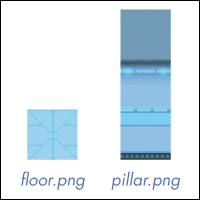
Figure 3-2: The images used to make your first 3D room
Inside the draw() function ➍, we use y and x loops to look at each position in the room map in turn. As you saw earlier, we can find the number at each position in the map by accessing room_map[y][x]. In this map, that number will be either 1 for a wall pillar or 0 for an empty floor space. Instead of printing the number onscreen, as we did before, we use the number to look up an image of the item in the DEMO_OBJECTS list ➎. That list contains our two images ➌: the floor tile is at index position 0, and the wall pillar is at index position 1. If the room_map contains a 1 at the position we’re looking at, for example, we’ll take the item at list index 1 in the DEMO_OBJECTS list, which is the wall pillar image. We store that image in the variable image_to_draw ➎.
We then use screen.blit() to draw this image onscreen, giving it the x and y coordinate of the pixel on the screen where we want to draw it ➏. This instruction extends over three lines to make it easier to read. The amount of indentation on the second and third lines doesn’t matter, because these lines are surrounded by the screen.blit() parentheses.
WORKING OUT WHERE TO DRAW EACH ITEM
To figure out where to draw each image that makes up the room, we need to do a calculation at ➏. We’ll look at how that calculation works, but before we do, I’ll explain how the space station was designed. All the images are designed to fit a grid. The units we use for measuring images on a computer are called pixels and are the size of the smallest dot you can see on your screen. We’ll call each square of the grid a tile. Each tile is 30 pixels across the screen and 30 pixels down the screen. It’s the same size as one floor tile. We position objects in terms of tiles, so a chair might be 4 tiles down and 4 tiles across, measured from the top-left corner.
Figure 3-3 shows the room we’ve just created with a grid laid on top. Each floor tile and pillar is one tile wide. The pillar is tall, so it covers three tile spaces: the front surface of the wall pillar is two tiles tall, and the top surface of the pillar covers another tile space.
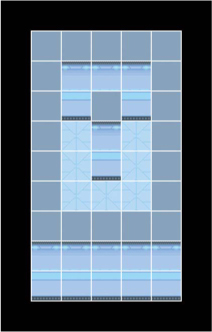
Figure 3-3: The tile grid overlaid on your first room
The top_left_x and top_left_y variables store the coordinates at which we want to start drawing the first image of the room in the window. We never change these variables in this chapter. I’ve chosen to start drawing where x is 100 and y is 150 so we have a bit of a border around the room image.
To work out where to draw a piece of wall or floor, we need to convert our map positions (which range from 0 to 4 in the x direction, for example) into pixel positions in the window.
Each tile space is 30 pixels square, so we multiply the x loop number by 30 and add it to the top_left_x position to get the x-coordinate for the image. In Python, the * symbol is for multiplication. The top_left_x value is 100, so the first image is drawn at 100 + (0 * 30), which is 100. The second image is drawn at 100 + (1 * 30), which is 130, one tile position to the right of the first. The third image is drawn at 100 + (2 * 30), which is 160. These positions ensure that the images sit perfectly side by side.
The y position is calculated in a similar way. We use top_left_y as the starting position vertically and add y * 30 to it to make the images join together precisely. The difference is that we subtract the height of the image we’re drawing, so we ensure that the images align at the same point at the bottom. As a result, tall objects can rise out of a tile space and obscure any scenery or floor tiles behind them, making the room display look three-dimensional. If we didn’t align the images at the bottom, they would all align at the top, which would destroy the 3D effect. The second and third rows of floor tiles would cover up the front surface of the back wall, for example.
Now that you know how to display a 3D room, try to adjust the map to change the room layout, adding new pillars or floor spaces. You can edit the room_map data to add new rows or columns to the map. Remember to change the room_height and room_width variables too.
Perhaps try making a room with more rows and adding a doorway by replacing the 1s used for pillars with 0s. In the final Escape game, each doorway will be three spaces. For best results, design rooms with an odd width and height so you can center the door in the wall.
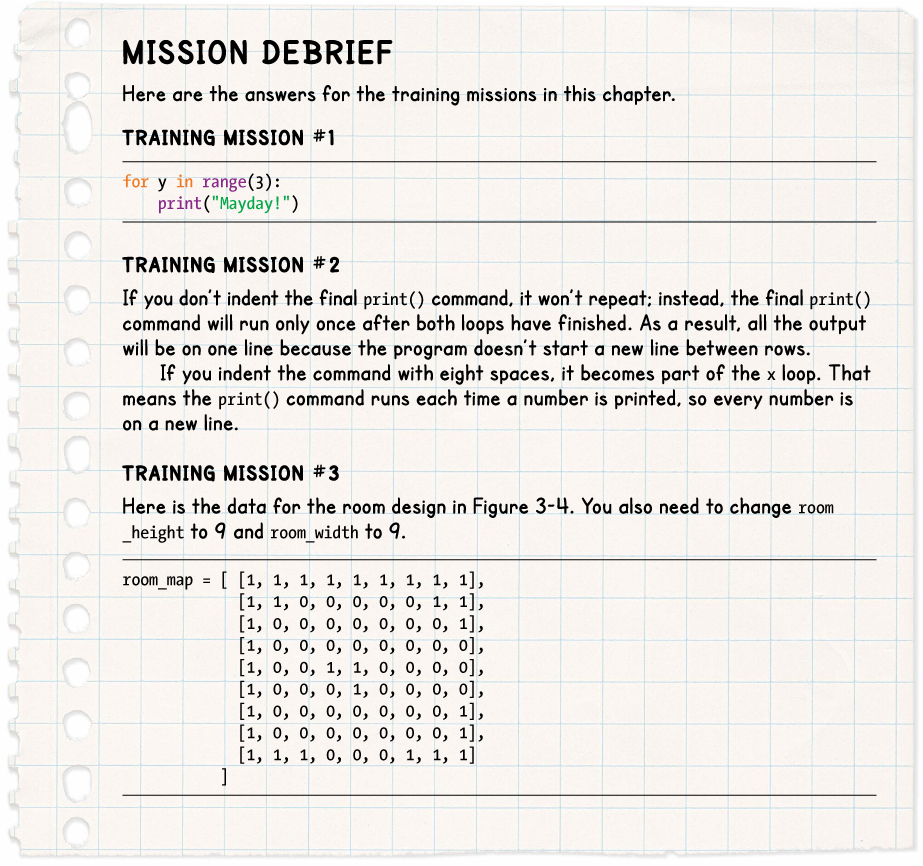
Figure 3-4 shows a room I designed with a width and height of 9. You can try copying my design if you like. I’ve added a grid to make it easier to work out the data for the room_map list. The wall pillars rise two tiles out of the floor, so the grid shown is 11 tiles high. Look at the bottoms of the pillars, not the tops, to work out where to position them. See the end of the chapter for the code to make this room.

Figure 3-4: One possible new room design
In the real Escape game, the tall wall pillars will only be used at the edges of the rooms. They can look a bit odd in the middle of the room, especially if they touch the back wall. When we add shadows to the game later in the book, objects in the middle of the room won’t look like they’re floating in space, which is a risk of this way of simulating a 3D perspective.
ARE YOU FIT TO FLY?
Check the following boxes to confirm that you’ve learned the key lessons in this chapter.
![]() The for loop repeats a section of code a set number of times.
The for loop repeats a section of code a set number of times.
![]() The range() function creates a sequence of numbers.
The range() function creates a sequence of numbers.
![]() You can use range() to tell a for loop how many times to repeat.
You can use range() to tell a for loop how many times to repeat.
![]() The colon at the end of the for line is essential.
The colon at the end of the for line is essential.
![]() To show Python which lines to repeat in the loop, indent the lines using four spaces.
To show Python which lines to repeat in the loop, indent the lines using four spaces.
![]() A loop inside another loop is called a nested loop.
A loop inside another loop is called a nested loop.
![]() Images are aligned at the bottom to create a 3D illusion with tall objects rising up from the floor.
Images are aligned at the bottom to create a 3D illusion with tall objects rising up from the floor.
![]() The room_height and room_width variables store the room size in Escape and are used to set up the loop that displays the room.
The room_height and room_width variables store the room size in Escape and are used to set up the loop that displays the room.