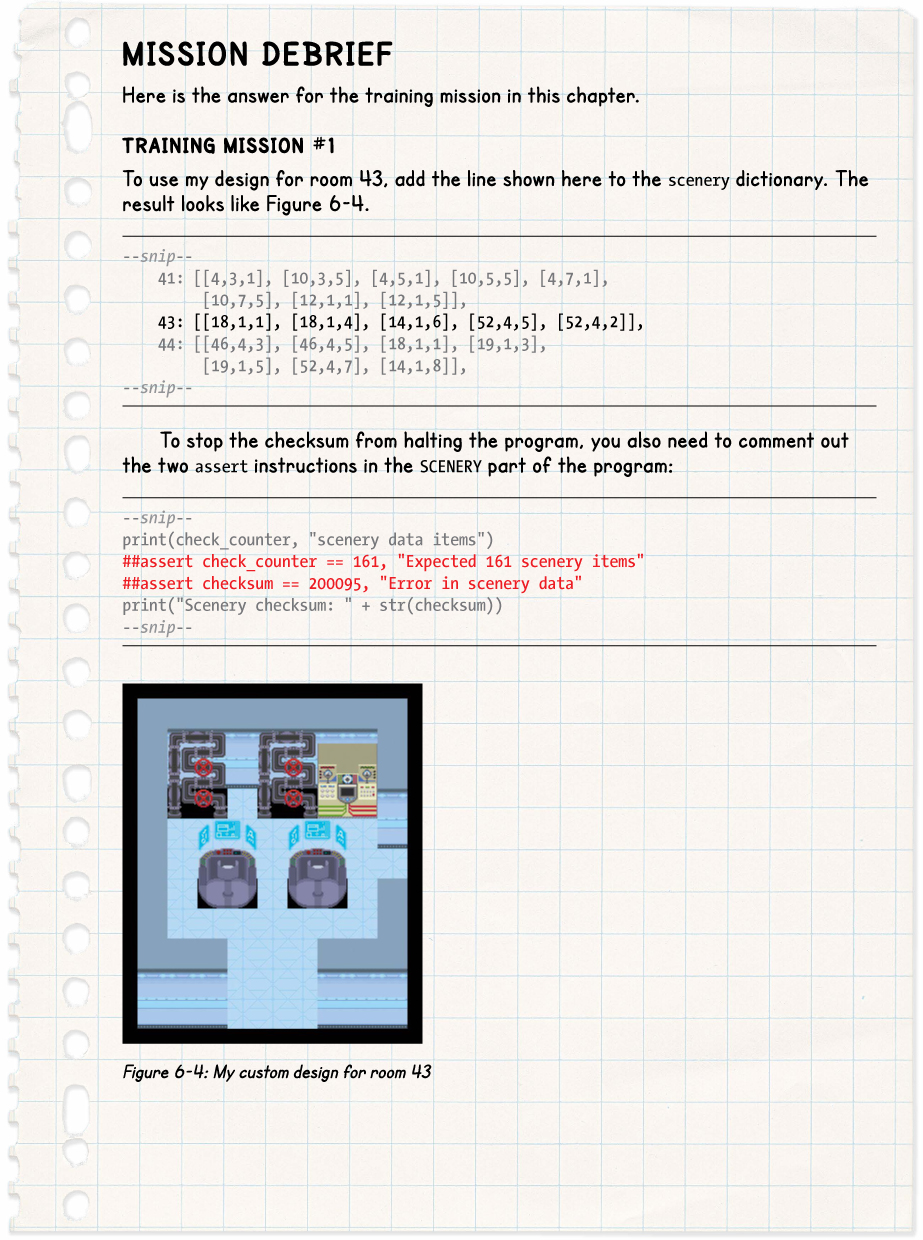
6
INSTALLING THE SPACE STATION EQUIPMENT

In Chapter 5, you prepared information about all the equipment you’ll use on your mission. In this chapter, you’ll install some of that equipment in the space station and use the Explorer to view any room or planet surface location. This is your first chance to explore the design of the Mars base that will become your home.
UNDERSTANDING THE DICTIONARY FOR THE SCENERY DATA
There are two different types of objects on the space station:
- Scenery is the equipment that stays in the same place throughout the Escape game and includes furniture, pipes, and electronic equipment.
- Props are items that can appear, disappear, or move around during the game. They include things the player can create and pick up. Props also include doors, which appear in the room when they’re closed and disappear when they’re open.
The data for positioning scenery and the data for props are stored separately and organized differently. In this chapter, we’ll just add the scenery data.
Our program already knows the image and description to use for all the objects in the game, because they’re in the objects dictionary you created in Chapter 5. Now we’ll tell the program where to put the scenery objects in the space station. To do that, we’ll create a new dictionary called scenery. This is how we’ll structure the entry for one room:
room number: [[object number, y, x], [object number, y, x]]
The key for the dictionary will be the room number. For each room number, the dictionary stores a list, with a square bracket at the start and the end of it. Each item in that list is another list that tells the program where in the room to put one object. Here, I’ve made one object red and the other green so you can see where they start and end.
These are the three pieces of information you need for each object:
The object number This is the same as the number that is used as the key in the objects dictionary. For example, number 5 represents a table.
The object’s y position This is the object’s position in the room, from back to front. The back wall is usually in row 0, so we typically start placing objects at 1. The largest useful number will be the room height minus 2: we subtract 1 because the map positions start at 0 and subtract another 1 for the space the front wall occupies. In practice, it’s a good idea to leave a bit more space at the front of the room, because the front wall can obscure other items. You can check the size of the room in the GAME_MAP code you added in Chapter 4.
The object’s x position This tells the program how far across the room from left to right the object should be. Again, a wall is usually in position 0. The largest useful number will generally be the room width minus 2.
To get a better understanding of these numbers, let’s take a look at Figure 6-1, which shows one of the rooms on the space station as a screenshot and a map. In this image, the sink (S) is in the second row from the back, so its y position is 1. Remember that the wall in the first row at the back is in position y = 0. The sink’s x position is 3. There are two other tile spaces to the left of it, and the wall is in position x = 0.
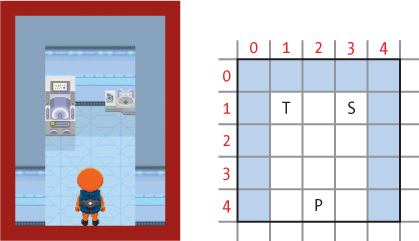
Figure 6-1: An example space station room as seen in the game (left) and represented by a map (right). T = toilet, S = sink, P = player.
Let’s look at the data for this room. Don’t enter this code yet. I’ll give you all the scenery data shortly.
scenery = {
--snip--
30: [[34,1,1], [35,1,3]],
--snip--
}
This code tells the program about the objects in room 30. Room 30 has object number 34, a toilet, in the top-left corner at position y = 1 and x = 1, and object number 35, a sink, at position number y = 1 and x = 3, quite close to the toilet.
You can have the same object in the room several times by adding a list for each position and using the same object number for them. For example, you could fill the room with toilets in different positions if you wanted to, although that would be a rather bizarre thing to do.
You don’t need to include the walls in the scenery data, because the program automatically adds them to the room when it creates the room_map list, as you’ve already seen.
Even though putting the information for each item into a list means adding more brackets, it’s much easier to understand the data at a glance. The brackets help you see how many items are in the room, which numbers are the object numbers, and which are the position numbers.
ADDING THE SCENERY DATA
Open listing5-8.py, the final listing in Chapter 5. This listing contains your game map and objects data. Now we’ll add the scenery data to it.
Listing 6-1 shows the scenery data. Add this new SCENERY section before the MAKE MAP section. Make sure the placement of the brackets and commas is correct. Remember that each piece of scenery needs a list of three numbers, and each list is separated with a comma too. If you prefer not to type all the data in, use the file data-chapter6.py, which is in the listings folder. It contains the scenery dictionary for you to copy and paste into your program.
listing6-1.py
--snip--
items_player_may_stand_on = items_player_may_carry + [0, 39, 2, 48]
###############
## SCENERY ##
###############
# Scenery describes objects that cannot move between rooms.
# room number: [[object number, y position, x position]...]
scenery = {
26: [[39,8,2]],
27: [[33,5,5], [33,1,1], [33,1,8], [47,5,2],
[47,3,10], [47,9,8], [42,1,6]],
28: [[27,0,3], [41,4,3], [41,4,7]],
29: [[7,2,6], [6,2,8], [12,1,13], [44,0,1],
[36,4,10], [10,1,1], [19,4,2], [17,4,4]],
30: [[34,1,1], [35,1,3]],
31: [[11,1,1], [19,1,8], [46,1,3]],
32: [[48,2,2], [48,2,3], [48,2,4], [48,3,2], [48,3,3],
[48,3,4], [48,4,2], [48,4,3], [48,4,4]],
33: [[13,1,1], [13,1,3], [13,1,8], [13,1,10], [48,2,1],
[48,2,7], [48,3,6], [48,3,3]],
34: [[37,2,2], [32,6,7], [37,10,4], [28,5,3]],
35: [[16,2,9], [16,2,2], [16,3,3], [16,3,8], [16,8,9], [16,8,2], [16,1,8],
[16,1,3], [12,8,6], [12,9,4], [12,9,8],
[15,4,6], [12,7,1], [12,7,11]],
36: [[4,3,1], [9,1,7], [8,1,8], [8,1,9],
[5,5,4], [6,5,7], [10,1,1], [12,1,2]],
37: [[48,3,1], [48,3,2], [48,7,1], [48,5,2], [48,5,3],
[48,7,2], [48,9,2], [48,9,3], [48,11,1], [48,11,2]],
38: [[43,0,2], [6,2,2], [6,3,5], [6,4,7], [6,2,9], [45,1,10]],
39: [[38,1,1], [7,3,4], [7,6,4], [5,3,6], [5,6,6],
[6,3,9], [6,6,9], [45,1,11], [12,1,8], [12,1,4]],
40: [[41,5,3], [41,5,7], [41,9,3], [41,9,7],
[13,1,1], [13,1,3], [42,1,12]],
41: [[4,3,1], [10,3,5], [4,5,1], [10,5,5], [4,7,1],
[10,7,5], [12,1,1], [12,1,5]],
44: [[46,4,3], [46,4,5], [18,1,1], [19,1,3],
[19,1,5], [52,4,7], [14,1,8]],
45: [[48,2,1], [48,2,2], [48,3,3], [48,3,4], [48,1,4], [48,1,1]],
46: [[10,1,1], [4,1,2], [8,1,7], [9,1,8], [8,1,9], [5,4,3], [7,3,2]],
47: [[9,1,1], [9,1,2], [10,1,3], [12,1,7], [5,4,4], [6,4,7], [4,1,8]],
48: [[17,4,1], [17,4,2], [17,4,3], [17,4,4], [17,4,5], [17,4,6], [17,4,7],
[17,8,1], [17,8,2], [17,8,3], [17,8,4],
[17,8,5], [17,8,6], [17,8,7], [14,1,1]],
49: [[14,2,2], [14,2,4], [7,5,1], [5,5,3], [48,3,3], [48,3,4]],
50: [[45,4,8], [11,1,1], [13,1,8], [33,2,1], [46,4,6]]
}
checksum = 0
check_counter = 0
for key, room_scenery_list in scenery.items():
for scenery_item_list in room_scenery_list:
➊ checksum += (scenery_item_list[0] * key
+ scenery_item_list[1] * (key + 1)
+ scenery_item_list[2] * (key + 2))
check_counter += 1
print(check_counter, "scenery items")
➋ assert check_counter == 161, "Expected 161 scenery items"
➌ assert checksum == 200095, "Error in scenery data"
print("Scenery checksum: " + str(checksum))
###############
## MAKE MAP ##
###############
--snip--
Listing 6-1: Adding the scenery data
Save your listing as listing6-1.py, and run it using pgzrun listing6-1.py in the command line. We’ve added some data, but we haven’t told the program to do anything with it, so you won’t see any change. But if you made a mistake entering the data, the program should stop and display the message Error in scenery data. In this case, go back and double-check your code against the book. Check that you entered the checksum number correctly first! ➌
The second half of this listing is a safety measure, called a checksum. It checks that all the data is present and correct by making a calculation involving the data and then checking the result against the correct answer. If there’s a mistake in the data you’ve entered, this bit of code will stop the program until you fix it. This stops your game from running with bugs in it. (Some errors could get through, but this code catches most mistakes.)
The program uses the assert instruction to check the data. The first instruction checks that the program has the right number of data items. If it doesn’t, the program stops and shows an error message ➋. The program also checks whether the checksum (the result from the calculation) is the expected number, and if it isn’t, it stops the program ➌. Notice that one of the instructions in Listing 6-1 spreads across three lines ➊: Python knows we haven’t finished the instruction until we close the final parenthesis.
ADDING THE PERIMETER FENCE FOR THE PLANET SURFACE
You might have noticed that we haven’t added any scenery for rooms 1 to 25 yet. Our data starts at room 26. As you might remember, the first 25 locations are outside on the planet surface. For simplicity, we’ll still call them rooms, although they have no walls.
Figure 6-2 shows rooms 1 to 25 on the map. A fence, shown as a dotted line in Figure 6-2, surrounds the outside of these rooms. The fence stops people from wandering out of the compound and off the game map.
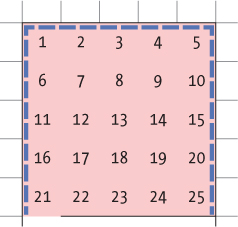
Figure 6-2: Adding the fence around the planet surface locations
We need to add fences at the following locations:
- On the left in rooms 1, 6, 11, 16, and 21
- At the top in rooms 1, 2, 3, 4, and 5
- On the right in rooms 5, 10, 15, 20, 25
Each outside room has one item of planet surface scenery too, which is randomly chosen from a small selection of suitable items that includes rocks, shrubs, and craters. For the game, it doesn’t matter where these items are placed, so they can also be randomly positioned.
Listing 6-2 shows the code that generates the random planet surface scenery and adds the fences. Add the code to the end of the SCENERY section you just created, and save your program as listing6-2.py. You can use pgzrun listing6-2.py to check whether the program reports any errors.
listing6-2.py
--snip--
print("Scenery checksum: " + str(checksum))
for room in range(1, 26): # Add random scenery in planet locations.
➊ if room != 13: # Skip room 13.
➋ scenery_item = random.choice([16, 28, 29, 30])
➌ scenery[room] = [[scenery_item, random.randint(2, 10),
random.randint(2, 10)]]
# Use loops to add fences to the planet surface rooms.
➍ for room_coordinate in range(0, 13):
➎ for room_number in [1, 2, 3, 4, 5]: # Add top fence
➏ scenery[room_number] += [[31, 0, room_coordinate]]
➐ for room_number in [1, 6, 11, 16, 21]: # Add left fence
➑ scenery[room_number] += [[31, room_coordinate, 0]]
for room_number in [5, 10, 15, 20, 25]: # Add right fence
➒ scenery[room_number] += [[31, room_coordinate, 12]]
➓ del scenery[21][-1] # Delete last fence panel in Room 21
del scenery[25][-1] # Delete last fence panel in Room 25
###############
## MAKE MAP ##
###############
--snip--
Listing 6-2: Generating random planet surface scenery
You don’t need to understand this code to enjoy building and playing Escape, but if you want to dig deeper, I’ll explain the code in more detail.
The first section in Listing 6-2 adds the random scenery. For each room, random.choice() ➋ chooses a scenery item randomly. In the same way that random.randint() gave us a random number (like rolling dice), random.choice() gives us a random item (like a grab bag or lucky dip game). The item is chosen from the list [16, 28, 29, 30]. Those object numbers represent a shrub, a large rock, a small rock, and a crater, respectively.
We also add a new entry to the scenery dictionary for the room ➌. This entry contains the random scenery item and random y and x positions for that item. The y and x positions place the item inside the room but not too near the edge.
The != operator ➊ means “not equal to,” so scenery is added only if the room number is not 13. Who knows? Maybe it’ll be useful to have an empty space on the planet surface when you’re on your mission…
In the second part of Listing 6-2, we add the fences. All the planet surface locations are 13 tiles high and 13 tiles wide, so we can use one loop ➍ to add the top and side fences. The loop’s variable, room_coordinate, counts from 0 to 12, and each time around the loop, fence panels are put in place at the top and the sides of the appropriate rooms.
Inside the room_coordinate loop, there are three loops for the room_number. The first room_number loop ➎ adds a fence along the top row of the top rooms. Instead of using a range(), this time we’re looping through a list. Each time through the list, the variable room_number takes the next number from the list [1, 2, 3, 4, 5]. We add a piece of scenery to the scenery list for the room, using += ➏. This is scenery item 31 (a fence), in the top row of the room (at position y = 0). The room_coordinate value is used for the x position. This puts the top fence into rooms 1 to 5, in the top row of those rooms.
There are two other room_number loops inside the room_coordinate loop. The first one adds the left fence to rooms 1, 6, 11, 16, and 21 ➐. This time, the program uses the room_coordinate variable for the y position and uses 0 for the x position ➑. This puts fence panels along the left edge of those rooms. The second loop adds the right edge fence to rooms 5, 10, 15, 20, and 25. This also uses the room_coordinate for the y position of the fence panel but uses 12 for the x coordinate, putting a fence along the right edge of those rooms ➒.
We don’t want side fence panels where the outside area joins the space station wall. Figure 6-3 shows a map of room 21. The bottom-left corner of the room should be wall, so there shouldn’t be a fence panel here. The loops we used just added a fence panel here, though, so we use an instruction ➓ to delete the last item of scenery added to this room, and to room 25, which is on the other side of the compound (see Figure 6-2). It’s easier to add these two panels and take them out again than it is to write code that avoids putting these fence panels in. The index number -1 is a handy shortcut for referring to the last item in a list.
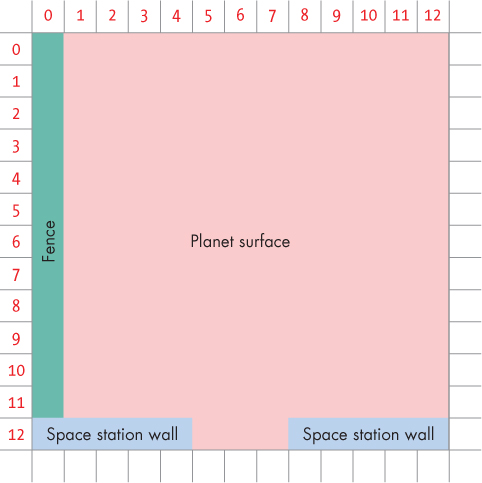
Figure 6-3: Map showing how the fence touches the wall in an outside room next to the space station
Using random scenery and loops to position fences enables us to have a large area to explore without having to type in data for over 200 fence panels and scenery items.
LOADING THE SCENERY INTO EACH ROOM
Now that we’ve added scenery data to the program, let’s add some code so we can see the scenery in the space station! You might remember that the generate_map() function creates the room_map list for the room you’re currently exploring. The room_map list is used to display and navigate the room.
So far, the generate_map() function just calculates the size of the room and where the doors are, and places the floor and walls. We need to add some code to extract the scenery from our new dictionary and add it to the room_map. But first, we’ll make one small but important adjustment to the program. In the VARIABLES section, near the start of the program, add the new line shown in Listing 6-3. Save your program as listing6-3.py.
listing6-3.py
--snip--
###############
## VARIABLES ##
###############
--snip--
LANDER_SECTOR = random.randint(1, 24)
LANDER_X = random.randint(2, 11)
LANDER_Y = random.randint(2, 11)
TILE_SIZE = 30
###############
## MAP ##
###############
--snip--
Listing 6-3: Setting up the TILE_SIZE variable
This line creates a variable to store the size of a tile. Using it makes the program easier to read because we can replace the number 30 with a more meaningful phrase. Instead of seeing the number 30 in the code and having to remember what it represents, we can see the words TILE SIZE instead, which gives us a hint about what the code is doing.
Next, find the MAKE MAP section of the program: it comes before the EXPLORER section. Add Listing 6-4 to the end of the MAKE MAP section to place the scenery in the current room. All the code in Listing 6-4 belongs to the generate_map() function, so we need to indent the first line by four spaces and then indent the remaining lines as shown. Save your program as listing6-4.py.
listing6-4.py
--snip--
def generate_map():
--snip--
➊ if current_room in scenery:
➋ for this_scenery in scenery[current_room]:
➌ scenery_number = this_scenery[0]
➍ scenery_y = this_scenery[1]
➎ scenery_x = this_scenery[2]
➏ room_map[scenery_y][scenery_x] = scenery_number
➐ image_here = objects[scenery_number][0]
➑ image_width = image_here.get_width()
➒ image_width_in_tiles = int(image_width / TILE_SIZE)
➓ for tile_number in range(1, image_width_in_tiles):
room_map[scenery_y][scenery_x + tile_number] = 255
###############
## EXPLORER ##
###############
--snip--
Listing 6-4: Additional code for generate_map() that adds the scenery for the current room to the room_map list
Let’s break this down. The line at ➊ checks whether there’s an entry for the current room in the scenery dictionary. This check is essential because some rooms in our game might not have any scenery, and if we try to use a dictionary key that doesn’t exist, Python stops with an error.
We then set up a loop ➋ that cycles through the scenery items for the room and copies them into a list called this_scenery. The first time through the loop, this_scenery contains the list for the first scenery item. The second time, it contains the list for the second item, and so on until it reaches the final scenery item for the current room.
Each scenery item has a list containing its object number, y position, and x position. The program extracts these details from this_scenery using index numbers and puts them into variables called scenery_number ➌, scenery_y ➍, and scenery_x ➎.
Now the program has all the information it needs to add the scenery item to room_map. You might remember that room_map stores the object number of the item in each position in the room. It uses the y position and x position in the room as list indexes. This program uses the scenery_y and scenery_x values as list indexes to put the item scenery_number into room_map ➏.
If all our objects were one tile wide, that is all we would need to do. But some objects are wider and cover several tiles. For example, a wide object positioned in one tile might cover two more tiles to its right, but at the moment, the program only sees it in that one tile.
We need to add something to room_map in those additional spaces so the program knows the player can’t walk on those tiles. I’ve used the number 255 to represent a space that doesn’t have an object in it but also cannot be walked on.
Why the number 255? It’s a large enough number to give you space to add many more objects to the game if you want to, allowing for 254 items in the objects dictionary. Also, it feels like a nice number to me: it’s the highest number you can write with one byte of data (that mattered when I started writing games in the 1980s, and the computer only had about 65,000 bytes of memory to store all its data, graphics, and program code).
First, we need to figure out how wide an image is so we know how many tiles it fills. We use scenery_number as the dictionary key to get information about the object from the objects dictionary ➐. We know the objects dictionary returns a list of information, the first item of which is the image. So we use the index 0 to extract the image and put it into the variable image_here.
Then we can use Pygame Zero to find out the width of an image by adding get_width() after its name ➑. We put that number into a variable called image_width. Because we need to know how many tiles the image covers, the program divides the image width (in pixels) by the tile size, 30, and makes it an integer (a whole number) ➒. We must convert the number to an integer because we’re going to use it in the range() function ➓, which can only take integers. If we didn’t convert the number, the width would be a floating-point number—a number with a decimal point.
Finally, we set up a loop that adds the value 255 in the spaces to the right of the scenery item, wherever the tile is covered ➓.
If an image is 90 pixels wide, we divide it by the tile size of 30 and store the result, 3, in image_width_in_tiles. Then the loop counts to 2 using range() because we give it a range of 1 to image_width_in_tiles ➓. We add the loop numbers to the x position of the object, and those positions in room_map are marked with 255. Large objects that cover three tiles now have 255 in the next two spaces to the right.
Now our program contains all the scenery and can add it to the room_map, ready for display. Next, we’ll make some small changes to the EXPLORER section so we can tour the space station.
UPDATING THE EXPLORER TO TOUR THE SPACE STATION
The EXPLORER part of the program lets you view all the rooms on the space station and move around the map using the arrow keys. Let’s update that section so you can see all the scenery in place.
If your Explorer code includes any lines for adding scenery to the room_map, you’ll need to switch them off now. Although they’re a good way to experiment with a room design, they force the same scenery into every room and override the real room designs. Because these lines might include your ideas for room designs, rather than deleting them, you can comment them out so Python will ignore them. Click and drag the mouse to highlight all the lines at once, and then click Format ▸ Comment Out Region (or use the keyboard shortcut ALT-3). Comment symbols will be added at the start of the highlighted lines, as shown in Listing 6-5:
listing6-5.py
--snip--
###############
## EXPLORER ##
###############
def draw():
global room_height, room_width, room_map
print(current_room)
generate_map()
screen.clear()
## room_map[2][4] = 7
## room_map[2][6] = 6
## room_map[1][1] = 8
## room_map[1][2] = 9
## room_map[1][8] = 12
## room_map[1][9] = 10
--snip--
Listing 6-5: Commenting out code in the EXPLORER section
Now we need to make a small change to the code that displays the room so it doesn’t try to draw an image for a floor space marked with 255. That space will be covered by an image to the left of it, and we don’t have an entry in the objects dictionary for 255.
Listing 6-6 shows the new line you need to add to the EXPLORER part of the program where indicated. The if statement makes sure the instructions that draw an object run only if the object number is not (!=) 255.
After adding the line, indent the existing code that comes after it by four spaces. The indentation tells Python that those instructions belong to the if instruction. You can either type four spaces at the start of the next two lines, or you can highlight them and click Format ▸ Indent Region.
listing6-6.py
--snip--
###############
## EXPLORER ##
###############
--snip--
for y in range(room_height):
for x in range(room_width):
if room_map[y][x] != 255:
image_to_draw = objects[room_map[y][x]][0]
screen.blit(image_to_draw,
(top_left_x + (x*30),
top_left_y + (y*30) - image_to_draw.get_height()))
--snip--
Listing 6-6: Updating the Explorer so it doesn’t try to show image 255
Now you’re ready to take a tour of the base. Save the program as listing6-6.py and run it by entering pgzrun listing6-6.py. Use the arrow keys to move around the map and familiarize yourself with the layout of the space station. As before, the Explorer program allows you to move any direction around the map, even if a wall would block your path when playing the game.
All the scenery should be in place in the rooms. Wide objects should display correctly now, and you should be able to view all the rooms again because of the changes you made earlier in Listing 6-5. Some objects will still have a black square under them because there’s no floor tile underneath, but we’ll fix that in Chapter 8.
The space station map and scenery are now complete. It’s time to move into the space station. In the next chapter, you’ll teleport down to the surface and set foot on Mars at last.
ARE YOU FIT TO FLY?
Check the following boxes to confirm that you’ve learned the key lessons in this chapter.
![]() Items that cannot move during the Escape game are called scenery.
Items that cannot move during the Escape game are called scenery.
![]() The scenery dictionary uses the room number as its key and provides a list of the fixed items in each room.
The scenery dictionary uses the room number as its key and provides a list of the fixed items in each room.
![]() Each scenery item is stored as a list containing the object number, y position, and x position.
Each scenery item is stored as a list containing the object number, y position, and x position.
![]() Checksums check whether the data has been changed or entered incorrectly.
Checksums check whether the data has been changed or entered incorrectly.
![]() Loops can be used to add items to the scenery dictionary. Some scenery can be positioned randomly, too.
Loops can be used to add items to the scenery dictionary. Some scenery can be positioned randomly, too.
![]() The generate_map() function takes items that are in the current room from the scenery dictionary and puts them in the room_map list. Then the items can be displayed in the room.
The generate_map() function takes items that are in the current room from the scenery dictionary and puts them in the room_map list. Then the items can be displayed in the room.
![]() The number 255 in room_map represents a space that is covered by a wide object, when the object doesn’t start in that space.
The number 255 in room_map represents a space that is covered by a wide object, when the object doesn’t start in that space.