Chapter 7: Administrating Pimcore Sites
In the previous chapter, we learned how to manage images, thumbnails, and assets in Pimcore, using the DAM feature. In this chapter, we will start by seeing how it is possible to enhance Pimcore features through the use of bundles, which are packages created by the Pimcore team or by third-party developers and can be easily installed.
Another fundamental feature that cannot be missed is the organization of users and their permissions. To limit the functionality of the site in the administration and content management sections, we will learn how roles are created, how permissions are created for roles, and how they are assigned to users.
We will also see how it is possible to import and export the settings of our Pimcore installation to other environments. Finally, we will get a little familiar with the Pimcore console, a powerful and useful tool to be able to execute commands, without having to access the web administration panel.
We will cover the following topics in this chapter:
- Installing a bundle
- Exploring Users and Roles
- Managing perspectives
- Importing and Exporting Pimcore settings
- Using the Pimcore Console
By the end of this chapter, we will have learned how to add functionality to our site by installing bundles, configure access to users with different roles and permissions, import and export settings and classes, and use the Pimcore console via the command line.
Technical requirements
To follow this chapter, the only requirement is to have an up and running Pimcore installation and be able to access it via the command line.
If you have installed Pimcore with Docker, just run these simple instructions:
- Run Docker with the following command:
docker-compose up
- It is possible, but not necessary, to restore the local installation settings by running this command:
docker-compose exec php bash restore.sh
Navigate to http://localhost/admin and log in with your admin/pimcore credentials.
Now you are ready to put into practice all the aspects related to this chapter.
Installing a bundle
In this section, we will see how you can add features to Pimcore with the use of bundles. We will then see what a bundle is and how to install it in a few simple steps.
Pimcore offers many features already pre-installed and ready to use, but while these may be sufficient for our needs, it is possible to need additional features that are not available in Pimcore. No problem, because the framework provides a quick and easy way to install new features. Adding functionality to the framework is done by installing packages, or bundles in the Pimcore world, just like in other systems, where they can be identified as plugins, modules, or add-ons. A bundle, in other words, is a package that contains additional components or features that will increase the functionality of Pimcore.
Installing a bundle is a relatively easy operation; let's proceed step by step.
The first thing to do is to identify a bundle to install according to our needs. There's a dedicated page for this on the official Pimcore site, where you can find a large number of bundles, many created by the Pimcore development team and others by third-party developers. This is the link to this page, which is called the Pimcore Marketplace: https://Pimcore.com/en/developers/marketplace.
We can see how the marketplace looks in the following screenshot:

Figure 7.1: Pimcore Marketplace
As we can see in the previous screenshot, it is possible to do a search and filter the search results.
Now we just have to look for what we need. For this chapter, we can assume we need a bundle that allows us to generate continuous numbers. Even if the bundle we are going to install will not add many features to our Pimcore installation, the procedure remains valid for every bundle that we will have to install, regardless of its features.
After a simple search, we found a bundle that will be right for us. The bundle is called Number Sequence Generator, developed by the Pimcore team. In the next screenshot, we see what the page looks like with the search carried out and the results:

Figure 7.2: The Pimcore Marketplace page with a search performed
As we can see in the preceding screenshot, we got a list of results with our search. The search results are represented with cards, where we can read a brief description of the features that we will introduce with the installation of the bundle. There is also other useful information, such as the version number, category, name of the developer, whether it is a reviewed version, and when it was last reviewed.
Now, just click on the bundle and go to the details page. Among all the additional information that we find on the page, click on the GET IT NOW button. This is a link that will send us to the bundle's source code page.
So, let's go a bit further and begin with the installation procedure. It's nothing complicated, but compared to other plugin installation systems, such as WordPress or other similar systems, it requires some additional steps. So, get ready to get your hands a little dirty, and follow these steps:
- Locate and open the composer.json file in the source file repository. In our case, the file looks like this:
{
"name": "Pimcore/number-sequence-generator",
"license": "GPL-3.0+",
"type": "Pimcore-bundle",
"config": {
"sort-packages": true
},
…
}
While familiarity with the composer.json file is certainly useful, in this case, the only thing we are interested in is retrieving the bundle name to install it. We find this by scrolling up the file to the "name" property.
Now that we know the name of the bundle to install, we need to execute one simple command, and compose will do everything for us. To do this, we need to access our command-line installation. If you do not use Docker, just open a shell on the machine where Pimcore is installed. Otherwise, you first need to access the container where Pimcore runs.
- To do that, type the following command:
docker-compose ps
The output of this command shows a list of all the Docker images up and running on the machine, formatted as a table; we are interested in the second column, NAME, related to the Pimcore image.
- Once you have recovered the container ID of the image where Pimcore runs, type this command:
docker-compose exec xxxxxxxxxxxx bash
Here, xxxxxxxxxxxx is the container ID retrieved from the previous command.
- Once you are in, run this command:
composer require pimcore/number-sequence-generator
The preceding command produces some lines of output in the console where it was run because composer downloads and installs the packages needed to add the new bundle. The output of the command can be longer or shorter, depending on the number of packages that need to be installed or whether they are already installed and need to be updated. At the end of the process, the last few lines in the console should look like this:
… (previous console log lines)
Trying to install assets as relative symbolic links.
--- --------------------------------- ------------------
Bundle Method / Error
--- --------------------------------- ------------------
FOSJsRoutingBundle relative symlink
… (some other bundles)
--- --------------------------------- ------------------
[OK] All assets were successfully installed.
If the installation was successful, we will have installed a new bundle in our Pimcore. We just have to go and configure it.
By following the Tools | Bundles menus, you can access the bundle configuration page. In the next screenshot, we see what this page looks like:

Figure 7.3: The Pimcore bundle management page
As we can see in the preceding screenshot, we have two bundles installed; the one on the second line is the bundle we just installed.
Before completing the installation of the bundle, let's stop for a moment and analyze the columns that we see in the table in Figure 7.3.
We can see that there are two types of columns:
- Information columns, which include ID, Name, Version, and Description.
- Action columns, which contain action buttons. In particular, the two columns that are of interest to us are the Enable/Disable and Install/Uninstall columns, and their action buttons.
First of all, we need to enable the bundle. To do that, click on the + icon in the Enable / Disable column, and proceed to enable the bundle. This action will take a few seconds, and when it is finished, a modal will appear on the screen, indicating that the enabling operation was successful.
Now we are ready to install the bundle. Before moving on to this step, we need to clear the cache. You can do this easily by clicking on the button at the top right: Clear cache and reload. The cache cleaning operation is necessary because Pimcore extensively uses caches for different types of data, including bundle files and their configurations. It is not recommended to complete the operation without first clearing the cache and then reloading the page.
After clearing the cache and Pimcore has reloaded, we can return to the bundle management page to verify the correct status of the bundle.
Now that we have enabled the bundle, an icon with + appears in the Install/Uninstall column, as shown in the following screenshot:

Figure 7.4: The Pimcore bundle after being enabled
As we can see from the preceding screenshot, it is now possible to click on the + icon in the Install/Uninstall column of the new bundle to start the installation process.
As for the enabling action, the system notifies us of the result of the operation through a modal containing some information on the operation that was just completed.
Once again, Pimcore reminds us that we need to clear the cache and reload Pimcore. Let's do this for the last time, and the bundle installation is complete.
Now that we have successfully installed the new bundle, we can take advantage of its features. The bundle we have chosen for this chapter allows us to generate continuous numbers, for example, for order numbers or customer numbers. We will not see how this feature works in detail because the purpose of this section is to learn how to install and manage bundles.
In the next section, we're going to see how users and roles are created, and how a user can be profiled to limit access to content.
Exploring Users and Roles
In this section, we will see how we can manage users and their permissions, to limit the functionality of the site in the administration and content management sections. We will see how roles and permissions are created and how they are assigned to users.
During the creation of a site, we often have to manage different parts with different importance. In addition to this, it is possible to differentiate the work we do in the organization. The administration part of the site is important and concerns the creation or editing of contents.
Generally, the part concerning the maintenance and management of the site is the responsibility of the administrator. Thus, tasks such as managing languages, configuring routing rules, or creating users and installing bundles are done by expert users who have the required skills and knowledge, and the privileges to do such actions are dependent on the administrators. The content, on the other hand, is often the responsibility of other people such as the users, often defined as editors or publishers. Once we become aware that the management and maintenance of a site pass through several users, we can therefore take another step and define some basic notions that concern the rules of who does what.
As we have already mentioned, there are different types of users: in our example, we talked about administrators, who manage the configuration parts of the site, and editors or publishers, who enter the content. This distinction, although valid, is however limited because just as in a real company, where there are many people with many different tasks and responsibilities, even on a site, there can be many users with many different roles and responsibilities.
So, how do we distinguish the users who access the site, and above all, how can we allow these users to be able to see and modify certain information that we want them to work on? The answer to this question is simple: through roles.
But what are roles? A role is essentially a set of permissions. If we wanted to create a role for a publisher, referring to the previous example, we would have to put within this role the permissions to create and modify content such as web pages, products of a shop, or articles of a blog. Once the role has been created, it will be possible to give this role to one or more users of the site, effectively allowing these users to do the actions that the role allows.
Setting Users and Roles
In Pimcore, as well as in almost all systems that allow access to multiple people, it is possible to create users and roles and to relate the two entities. For this purpose, there are dedicated sections in the Pimcore Settings menu: Users and Roles.
Following the Settings | Users menu, Pimcore opens a page with a list of registered users. On this page, we can delete, modify, or create new users. To open the role management page instead, simply follow the link in the Settings | Roles menu. Here, we will find the list of roles created in the system, and the possibility of modifying, deleting, or creating new ones.
By clicking on a user, the Configuration tab will open, where you can add or change information such as Firstname and Lastname, Email, and Language, as shown in the following screenshot:

Figure 7.5 – Administration pages for users
In the previous screenshot, we can see the user administration page; by right-clicking the left menu, a pop-up context menu will appear where you can create or delete a user. The role administration page has the same layout and functionality as the user administration page.
In Pimcore, there are two levels of user permissions:
- Permissions on system components
- Permissions on data elements (assets, objects, and documents)
Permissions can be granted to roles or individual users. It is not mandatory to use roles; permissions can be granted to users directly instead. However, it is advised to use roles if there is a larger user group to manage. In the User/Role settings tab, inside the Permission section, it can be decided which permissions are granted to that user or role. An individual user has a few more general settings than the role.
So, let's see how to assign permissions to users. Take a look at how the user configuration page is defined. As you can see in Figure 7.5, the page is divided into four tabs. Describing them all in detail would take a long time and is beyond the scope of this chapter. For our purpose, we will keep the focus on the Settings and Workspaces tabs.
In particular, the Settings tab is divided into sections:
- General: Configures the account user
- Admin: Grants administrator role to the user
- Permission: Sets which system role to grant to the user
- Allowed types to create: Selects the classes allowed to be created
- Editor Settings: Selects the language for the user
- Shared Translation Settings: Manages shared translations
So, let's start with the configuration of user settings. By clicking on the + icon, you discover the various configurations for each section, as we can see in the following screenshot:

Figure 7.6: User administration page: sections inside the Settings tab
As we can see from the previous screenshot, the General section contains all the user information, such as username and password, image, and roles. The Admin section, on the other hand, contains only a checkbox that, if selected, will grant administrator privileges for the user; that is, they will have full control of Pimcore. The third section, Permissions, is a long list of checkboxes, each of which identifies particular permission to perform operations on Pimcore.
Let's check out some of these items and their meaning:
- Assets: Makes the assets tree visible.
- Classes: Makes the object classes editor visible (user can create and modify object classes).
- Clear Cache: Defines whether a user may clear the Pimcore cache.
- Clear Temporary Files: Defines whether a user may delete temporary system files.
- Documents: Makes the documents tree visible.
- Document Types: Allows the user to create and modify predefined document types.
- Emails: The user sees the email history.
- Extensions: Specifies whether a user is allowed to download, install, and manage the extension.
- Objects: Makes the object's tree visible.
- Recycle Bin: The user has access to the recycle bin.
- Redirects: The user can create and modify redirects.
- System Settings: The user has access to system settings.
- Translations: Defines whether a user may view and edit website translations.
- Users: Defines whether a user may manage other users' settings and system permissions.
- Website Settings: The user can create and modify website settings.
Therefore, by selecting some of these checkboxes, it is possible to configure the permissions of a user (or for a role, the configuration section is identical) according to the needs. These permissions are the Pimcore system permissions.
There are also other permissions that can be configured from the Workspaces tab, which looks like this:

Figure 7.7: Managing user permissions on data elements (assets, objects, and documents)
As we can see in the preceding screenshot, a user's access can be restricted on an element basis. This can be done by defining workspaces for a user or role. Provided that a user may generally access documents, it can be specified what a user/role may or may not do with each document or workspace. The same is true for objects and assets.
The user permissions based on the elements are identified by a column, as can be seen in Figure 7.7. We can summarize some of them:
- List: The element can be listed in a tree.
- View: The element can be opened.
- Save: The element can be saved (save button visible).
- Publish: The element can be published (publish button visible).
- Create: New child elements can be created (does not exist for assets).
- Delete: The element can be deleted.
- Versions: Makes the Versions tab available.
Now that we have seen all the components needed to configure and use users and roles, let's move on to a simple practical example.
A practical example of using users and roles
Now that we have a clear idea of how to configure users and roles, let's take a simple practical example.
For this example, we created two users, Tom and Bob, and two roles, tomstuff and bobstuff. Let's assign Tom the tomstuff role and Bob the bobstuff role. This is possible by going to the General section of the User Configuration menu (Figure 7.6) and selecting the appropriate role in the Roles box.
What we need to do now is to select the permissions for each role. This can be done from the group called Permissions inside the Settings tab (see Figure 7.6):
- For tomstuff, we selected Notes & Events | System Settings | Users | Admin Translation | Object.
- For bobstuff, we selected Recycle Bin | Static Routes | Clear Cache | Object.
These are permissions concerning the Pimcore configurations and settings. Now let's set the permissions for the contents. We have created two classes: Book and Film. Class creation is fully described in Chapter 5, Exploring Objects and Classes. We assigned the tomstuff role permissions to manage the books, while bobstuff was given permissions to manage the films. This can be done from the Workspace tab, as seen in Figure 7.7.
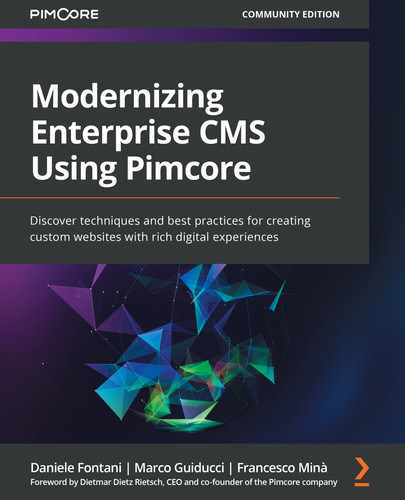
Now that the configuration is completed, let's log in with the two users; in the next screenshot, we can see what the administration looks like by logging in as Tom:

Figure 7.8 – Administration page for Tom
As we can see in the previous screenshot, only some menu items are accessible for Tom, under the permissions of the user's role. We can also see that Tom can only manage book objects, as we specified in the workspace of the tomstuff role. In the next screenshot, instead, we can see what the administration looks like for Bob:
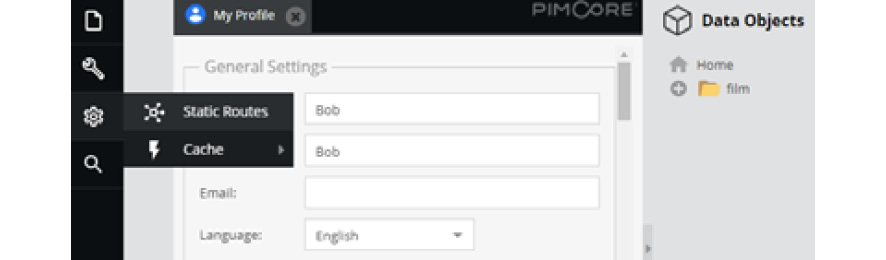
Figure 7.9: Administration page for Bob
Again, in this screenshot, we can see how the menus are limited for Bob, and how it is possible to manage only the film objects.
As we can see from the preceding screenshot, the context menus of the Pimcore administration are different according to the user and their roles. In particular, we can verify that only the actions related to the assigned permissions are visible; everything else is not accessible. Even for the contents, the two users are only enabled for the classes that are accessible through their role; in particular, Tom can manage books, while Bob can manage films.
What we have just seen in this section is a possible solution to the problem of limiting access to certain users based on roles, and it is possible to achieve this without having to write the code, simply by configuring users, roles, and permissions, from the Pimcore administration page.
Pimcore, however, offers a much more complete system for creating special views that is much more complete and configurable than what we have just seen. This Pimcore feature is called perspectives, that is, views created and configured ad hoc for specific users. So, let's see how a perspective can be created, how it is configured, and what the final result will be in our Pimcore.
Managing Perspectives
As we saw in the previous section, it is possible to limit access to Pimcore features by configuring users and roles. We also mentioned, at the end of the previous section, that there is a feature in Pimcore that allows you to obtain the same result, namely the perspective. While the preceding is completely true, there is one important difference to keep in mind: while using permissions on users and roles restricts access to data, perspectives are not intended to be used to restrict access to data. So, although the end result may seem similar, they are two very different things in terms of security. Our advice is to use both, so as to have a perfect result both from the administrative backend side as well as from the security side.
So, let's see how we can create a perspective. The simplest way is to use the bundle developed by the Pimcore dev team. This bundle provides an editor for Pimcore that allows us to do the following:
- Add/remove/edit custom views
- Add/remove/edit perspectives
It also allows us to configure most of the possible configuration options directly in the user interface.
The bundle page can be reached at this address: https://github.com/pimcore/perspective-editor.
As we have seen in the Installing a bundle section of this chapter, to install a bundle it will be enough to follow a few simple steps. We will not explain again how to install the bundle, but as we have already seen, we have to ask a composer to add the bundle to the solution, with the following command:
composer require pimcore/perspective-editor
After installing and activating the bundle on Pimcore, we are ready to use this new feature, starting from the new menu item that we find under Settings | Perspectives / Views, as you can see in the following screenshot:

Figure 7.10: Perspectives / Views Menu item and the Perspectives edit page
As you can see in the previous screenshot, there is a default perspective, which can be changed at will. But in order not to touch the default perspective, let's go and create a new one. By clicking on the Add Perspective button, a modal will open, which will allow us to enter only the name of the new perspective. We will call our new perspective MyFirstPerspective.
As you can also see in Figure 7.10, we have five fields in a perspective, and they are as follows:
- icon: You can select an icon for the perspective.
- Element Tree Left: Within this element, it is possible to add one or more of the following elements: Document, Asset, Object, or Custom View. The added items will be displayed on the left column of the Pimcore admin interface.
- Element Tree Right: This is the same as the preceding item just described, but the items will be displayed on the right column.
- Dashboard: By selecting this element, you would be able to decide which elements can be allowed or forbidden in the dashboard. It is also possible to create new dashboards and, for each one, it is possible to decide which elements it is composed of.
- Toolbar: Through a list of checkboxes, grouped by menu, it is possible to choose whether or not to display a menu, but also to decide which items for a menu should be visible or not. In other words, through this element, it is possible to enable or hide the menu items of the Pimcore administration, and even hide entire menus.
As we have seen, in the two items, Element Tree Right and Element Tree Left, it is possible to add one or more of the document, asset, or object elements. In the next screenshot, we see how to add the document element:

Figure 7.11: Perspective Menu item: add document element tree left
As we can see in the preceding screenshot, for our view we have decided to add a document and asset elements in the left column and an object in the right column. Once you have decided which elements to put where, by selecting each of these elements, it will be possible to decide, through a list of checkboxes, which elements of the contextual menu should be visible for each element. Let's take, for example, the document element, as seen in the following screenshot:
Figure 7.12: Definition of the context menu for the document element
As we can see from the previous screenshot, it is possible to select which context menu items we want to display.
As for the elements of the columns, just seen, through the Toolbar element, it is possible to decide which menus to show or hide, or it is possible to decide which items of a menu or submenu we want to hide. All menus are grouped, and in each group there is a list of checkboxes that act on the menu item, displaying or hiding it. For better understanding, let's take a look at the following screenshot, relating to the settings menu:

Figure 7.13: Selection of items to be displayed in the settings menu
As we can see in the preceding screenshot, each menu item is a group, which can be expanded, revealing the list of checkboxes that identify the various menu items. Each checkbox list group has Hide xxx Menu as its first entry, where xxx is the name of the menu. If we select this item, the menu will be hidden, and subsequent ticks will not be considered.
Once all parts of the perspectives are defined, the perspective item will appear in the file menu, and inside it will be possible to select our new perspective, as we can see in the following figure:

Figure 7.14: File menu with the list of perspectives
As we can see in the preceding figure, in the new menu item called Perspectives, inside the file menu, there are two items: the default perspective and our new perspective, MyFirstPerspective.
Once our perspective is configured as we want, we can associate it to users or roles. This can be done directly in the user or role settings, as we can see in the following figure:

Figure 7.15: Configuration of the perspective for users and roles
As we can see from the preceding screenshot, the selection of the perspective for users and roles is extremely simple: just select the desired perspective from the list and save the settings. We have thus seen how users and roles are managed in Pimcore, and how to create and configure perspectives to be associated with each user or role. In the next section, we will see a very useful feature concerning the maintenance of Pimcore: the import/export of Pimcore settings.
Importing and Exporting Pimcore settings
In this section, we will see how it is possible to export the settings of our Pimcore installation and import them into other environments, a fundamental functionality when we have to work in different environments, such as for development, testing, or production.
As we saw in Chapter 5, Exploring Objects and Classes, when we talked about classes and objects, we learned how to create new entities and use them for our purposes. All the work we do is somehow trapped inside Pimcore, like in a kind of a box. This is completely normal, and when developing a new website, we are used to referring to the various environments, development, testing, staging, and so on, where we have made our changes. The doubt therefore arises: if I work in the development environment, for example, how can I transfer the work done in other environments?
Well, having a tool that allows us to export the work done in a Pimcore installation, to be able to import it into another installation, becomes a necessary, if not indispensable, benefit.
To clarify, let's take a simple example taking the two classes we initially created: Book and Film. If we want to export one of the two classes, or both, to be able to import them into another Pimcore installation in another environment, we can go to the class editing page and click the Export button in the bottom button bar, as you can see in the following screenshot:

Figure 7.16 Class edit page, with the Import/Export buttons
As we can see, the Export button is exactly what we need. Just click on Export and Pimcore will generate a JSON file containing all the necessary information to be able to import it later on in another Pimcore environment. Once it has been exported, all we have to do is access the Pimcore installation where we want to import our class, create it, and then import the previously extracted file using the Import button, as shown in Figure 7.16.
But this is only part of the solution. Let's imagine we have hundreds of classes; exporting and importing them one by one could be a long job, and we could forget some classes along the way. To solve this problem, navigate to Settings | Data Objects and we find two items: Bulk Export and Bulk Import. After clicking on Bulk Export, a modal like this will appear:

Figure 7.17: Bulk export
As we can see, it is possible to select from the list of classes the ones that we want to export.
Also, if you have created or edited field-collections or bricks, you can export these. Field-collections and bricks are internal Pimcore objects that can be added or modified. The management pages of these entities can be found by following the menu items: Data Objects | field-collections and Data Object | bricks. These two objects are described in Chapter 5, Exploring Objects and Classes. For our example, we select only the two classes: Book and Film.
Once we have selected what we want to extract by clicking on Export, Pimcore generates a JSON file containing all the information necessary to import all the elements in another environment. Finally, you can use the Bulk Import command to reload the exported file containing all the exported entities.
The import happens in two steps, as follows:
- Select the JSON file generated during the export. Using the following modal, load the JSON file that was generated during the export stage, which you now want to import:

Figure 7.18: Select local file
- Decide what we want to import from this file. In our example, we selected the two classes we want to import – Book and Film – from the following modal:

Figure 7.19: Select object to import
As you can see in the previous screenshot, Pimcore shows us the list of all the objects that we can import, related to the file we have uploaded. So, let's select what we want to import. Once we have decided, just click on Apply, and Pimcore will do the rest.
At this point in the chapter, we have seen how to install a bundle, how to manage users and roles, and also how we transfer our work between various Pimcore installations. We have done all these activities from the web admin interface that Pimcore makes available to us. But there is also another way to be able to make changes to Pimcore, without having to go through the administration page: using the Pimcore console tool.
Using the Pimcore Console
In this section, we will get a little familiar with the Pimcore console, a powerful and useful tool to be able to execute commands without having to access the web administration panel.
The Pimcore Console can be described as a command-line interface that allows you to install, configure, and maintain your Pimcore using only the terminal. The main goal is to provide a tool for the actions that can normally be performed through the administrative area.
As Pimcore's admin interface is so beautiful and easy to use, the natural question is: why should you use a command-line interface? There are two main reasons:
- The keyboard is faster than the mouse: For advanced users, typing a command can be an order of magnitude faster than pressing a button in a web browser.
- Scripting: You can put several commands in a text file and have it run automatically.
Using a console instead of using the web interface is much faster because it eliminates all the dead time for loading the page and all its components. The console acts directly on the Pimcore core, making the command execution much faster.
So, the first step to using the console is to get on board the machine where Pimcore is running, or inside the Docker container (for more on Docker, see the Installing a bundle section in this chapter to get commands to execute to access the container), and run this command to get a list of available commands:
./bin/console list
The output of this command is very long because many commands can be executed from the console. Let's look at the partial output of the command list:

Figure 7.20: The partial output of the Pimcore console
As we can see in the preceding screenshot, the first part of the output contains useful information about the options for the Pimcore console, and beneath that is the list of the available commands (which for convenience we have cut out in Figure 7.20). Even if the list is very long, the logic for executing commands is always the same: we just have to understand how a command is structured and how to execute it.
Inside the Options section, we can see some parameters that we can pass before each command. For example, if we want as much information as possible when executing a command, we just add -vvv in front of the command. If, on the other hand, we don't want any information to be output to the console, just add the -q parameter before the command.
All commands are divided into namespaces. In other words, a namespace is a label that groups multiple commands. So, all cache-related commands will start with the cache namespace, the Pimcore core commands will start with the pimcore namespace, and so on.
To see the list of all commands for each namespace, you can run the list command followed by the namespace. For example, to get all the cache-related commands, we run the list command followed by the cache namespace:
./bin/console list cache
The output will be the list of all available commands to execute on the Pimcore cache.
Some namespaces are composed of several elements, concatenated by a colon, so if we want to identify the list of commands available for Pimcore bundles, we must execute the following command:
./bin/console list pimcore:bundle
Now that we are familiar with the console commands, let's try running a couple of commands as an exercise. At the beginning of the chapter, we installed a bundle, then we activated it from the web interface. Let's now try to run the same commands but using the console.
First of all, we need to identify which bundles are available in our Pimcore installation by running the following command:
./bin/console pimcore:bundle:list
The output of this command is shown in the following screenshot:

Figure 7.21: The output of the command to get the bundle available in our Pimcore installation
As we can see from this screenshot, the bundle we installed at the beginning of the chapter is enabled. Now let's try to disable it by running the following command:
./bin/console pimcore:bundle:disable NumberSequenceGeneratorBundle
As we can see, at the bottom of the command we have added as a parameter the name of the bundle we want to act on: NumberSequenceGeneratorBundle.
We now execute the command again:
./bin/console pimcore:bundle:list
The output will now look like this:

Figure 7.22: The output of the command to get the bundle available in our Pimcore installation
As we can see, the bundle is now completely uninstalled.
So, we saw how simple it is to execute a command using the Pimcore console. The other thing that makes the console very useful is in the execution of scheduled scripts, in which it is possible to execute several commands in sequence. For example, you can write a script that cleans up the cache and the mail logs, and have this script run every morning, for example, through a scheduler, such as crontab on Unix systems.
We leave you the freedom to try other commands, to become familiar with the Pimcore console, and to understand its potential.
Summary
In this chapter, we learned how it is possible to enhance Pimcore features through the use of bundles, and how they can easily be installed and managed.
We learned how to organize the site's users and their permissions, to limit the functionality of the site in the administration and content management sections, and how to create and configure perspectives, as well as associating them with users or roles.
We also learned how to import and export the settings of our Pimcore installation to other environments.
Finally, we learned how to use the Pimcore console, a powerful and useful tool to be able to execute commands, without having to access the web administration panel.
All these new skills acquired while reading this chapter will allow us to configure our site in the best way, to achieve the aim of creating a site that satisfies all our needs, and even a little of our pleasures.
Now that we have become familiar with all the tools that Pimcore offers us, it is time to get our hands dirty. After this chapter, we will begin to put into practice everything we have seen in the previous chapters, with the aim of creating a site, with blogs, static pages, and a products catalog. For this, in the next chapter, we begin by creating custom CMS pages.