Chapter 11: Finalizing the Website
In the last chapter, we finalized the building of our blog using Pimcore. Thanks to the capabilities of CMS and the data management engine, we were able to achieve complex goals such as creating custom unstructured content (the website's pages) and structured content (blog articles). It was a pleasant journey that makes us autonomous regarding the implementation of any kind of website or portal. Moreover, there are many additional steps that we may need to take to make our work reusable, extensible, and easy to deploy. As the title states, in this chapter we will learn how to finalize our website.
The points that we will cover will be the following:
- Making a Multisite in Pimcore
- Making the bundle installable
- Using a multi-environment configuration
- Using environment variables
Technical requirements
As for the previous chapters, there is a demo in our GitHub repository that you can find here: https://github.com/PacktPublishing/Modernizing-Enterprise-CMS-using-Pimcore.
All you need to do to run the demo connected with this chapter is to clone it and navigate to the Full Demo folder to start the Docker environment.
To do so, just follow these instructions:
- Run Docker with the following command:
docker-compose up
- Then, to restore all the settings on your local machine, type the following:
docker-compose exec php bash restore.sh
- Navigate to http://localhost/admin and log in with your admin/pimcore credentials.
Making a Multisite in Pimcore
Each time you create a website, you need to take time to create the environment, install plugins, and configure all the other Pimcore settings. Moreover, we also need a hosting space, which means extra costs. This is an activity that we have to do each time we are going to create a website, but we would reduce the impact of this activity on each website creation.
For example, think about a scenario where a customer has 10 websites, maybe one for each brand of the company. With the digital exposure that each company has nowadays, it is a plausible use case. Even if we can create a bundle that can be used to port the common components between websites, having separate websites still involves overhead. From the user's point of view, having 10 different websites to admin is very hard to manage.
The solution for this common situation is still Pimcore itself. The Multisite feature lets us manage multiple websites in the same instance, reducing hosting costs and using the same resources (themes, bricks, custom code) in all the websites. With the power of scaling that the cloud provides, we do not expect server load problems, and we can follow this method without side effects.
To cover all the possible scenarios you may have with a real-world website, we will implement a test case where we will transform a branch of a website tree in a standalone website. This will allow users to reach the web pages as if they were browsing an independent website. This is the basic tenet that will let you manage multiple websites in the same Pimcore instance (for example, product1.mywebsite.com and product2.mywebsite.com) and website alias (for example, www.mywebsite.com and mywebsite.com).
In the next example, we will create a generic subsite called subsite1, and we will make it available using a different domain than the default. Moreover, we will use different kinds of domain mapping to cover all the most common scenarios (addresses, aliases, and wildcards):
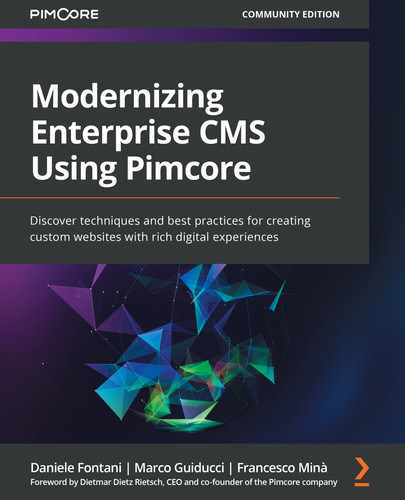
- Add a document to the page tree. Call it subsite1. The name of the page doesn't affect the behavior of the site. In our case, we used our full demo setup, and we have got a web page like the one shown in the following screenshot:
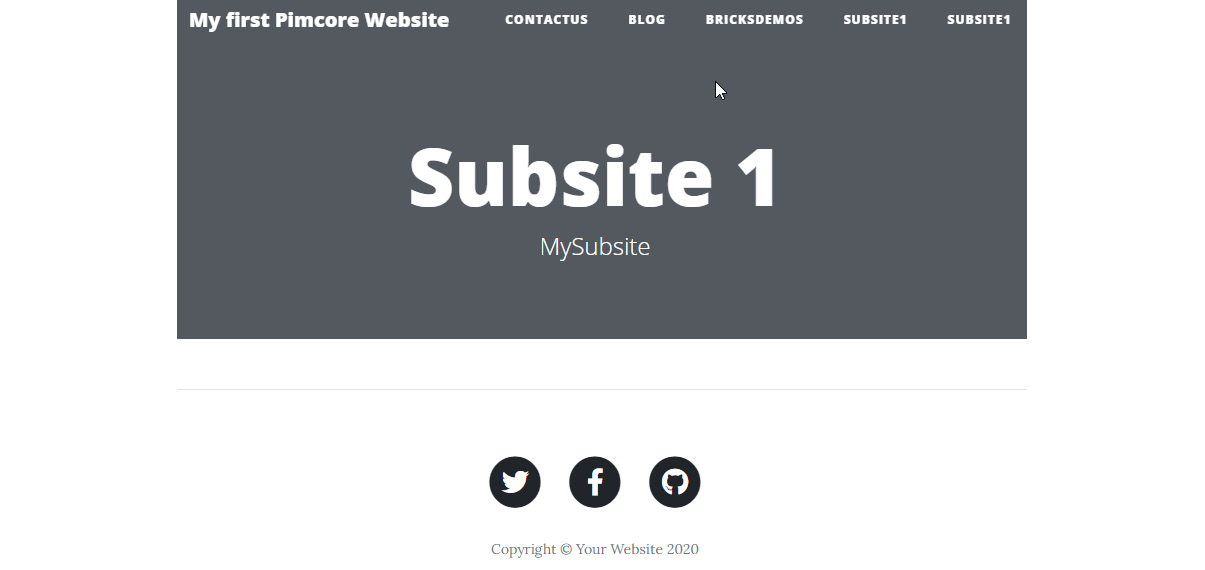
Figure 11.1: The page used for the test
- Navigate through the tree menu and right-click on the subsite1 item. Then click on Use as site:
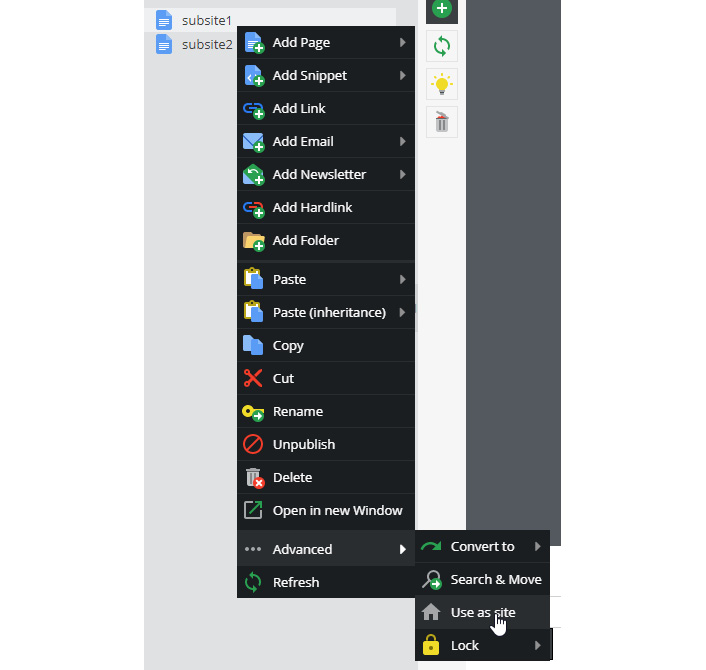
Figure 11.2: The menu used to convert a web page into a website
If you click on the Use as site button, a popup appears:

Figure 11.3: The form for configuring a website
- Fill in the form with the following information:
- Main Domain: subsite1.local.
- Additional Domains: subsite1-alternative.local and *.subsite1.local. These values have to be put on two different lines. This setting applies to the item that we have selected and all its children. This configuration tells Pimcore to serve requests using the pages under the one that we have promoted to a site in step 2. This means that if you navigate to one of the added domains, the pages under this page will be served. So, if you navigate to subsite1.local and subsite1-alternative.local, you will see the converted page; if you look for a path inside the domain (such as subsite1.local/xxx), a page with the same relative path under the page site will be served. The same goes for all the third-level domains of subsite1.local, such as mysubsite.subsite1.local, because we entered a wildcard address.
- Edit your hosts file to reach these fake URLs. Open the hosts file and add the following lines:
127.0.0.1 subsite1.local
127.0.0.1 subsite1-alternative.local
127.0.0.1 test.subsite1.local
- Go to these URLs: http://subsite1.local, http://subiste1-alternative.local, and http://test.subsite1.local. You will always get the same results, which proves that the multisite is well configured.
In this section, we learned how to transform a part of the page tree into a standalone website. This is very useful for hosting multiple websites and reusing themes and components from the same code base. This is a big help for reusable code that can work in conjunction with bundling and sharing the source code. In the next section, we will learn how to create installation processes for creating data and settings during our bundle's installation.
Making the bundles installable
In Chapter 10, Creating Pimcore Bricks, we created all the assets in a single bundle to make them self-contained and portable. The opportunity to start our next Pimcore project by installing a bundle means we don't have to redo certain tasks, making this an attractive option. Anyway, there are some steps that we have done manually through the user interface that have to be replicated. Think back to the class generation in Chapter 9, Rendering Data—they were created manually, but you do not want to replicate this step in every new blog you will create. Even if you only take a few minutes creating them, there is always the risk of entering the wrong field name or making a mistake; they will transform your 5-minute task into a small nightmare.
But never fear! The Pimcore installation system lets you add a special class that can manage the installation process. Some common use cases are as follows:
- Creating or updating the class definition
- Entering seed data (such as standard categories)
- Updating the database schema (add tables, columns, indexes, and so on)
- Importing translations
Installers are, in fact, classes that are used by Pimcore when a bundle is installed.
This topic is covered by two different approaches:
- Installer: A class that manages the installation process that gives you the power to customize all the phases (installation and uninstallation).
- Migrations: This part is designed for managing the database changes and supporting both upgrade and downgrade options.
Let's examine the two options in the next sections.
Installers
While the installer takes care of the initial configuration, migrations keep the database updated. When you install the bundle, an installation process will be run. Then, on each bundle update, you can apply some changes to the database to implement a data migration.
An installer class can inherit AbstractInstaller and has the following anatomy:
class MyInstaller extends AbstractInstaller
{
public function install() {}
public function uninstall() {}
public function isInstalled(){
return true;
}
public function canBeInstalled(){
return false;
}
public function canBeUninstalled(){
return false;
}
public function needsReloadAfterInstall() {
return false;
}
AbstractInstaller has an instance of BufferedOutput that integrates with the console tool and the web UI. That means that if you use it to write logs, the logs will be prompted to the user. The BufferedOutput instance can be accessed by the getOutput() method.
Now we will create an installer that automatically installs the classes related to our project. This is very easy, and we just need to complete the following steps:
- Create a class definition with one or two fields. Call it test. To keep it simple, the class complexity is not relevant for our goal. If you have any doubts about how to create classes, just look at Chapter 5, Exploring Classes and Objects, where this topic is covered.
- Download the class definition by clicking the Export button on the class definition page:

Figure 11.4: Menu bar for class export
- Now create a folder named class_sources inside /bundles/BlogBundle/Resources/install/, making the final path /bundles/BlogBundle/Resources/install/class_sources.
- Copy the JSON file you exported into this folder.
- Create a folder called Setup in your bundle and add the BlogInstaller class inside it. The content should include the following:
<?php
namespace BlogBundleSetup;
... usages
class BlogInstaller extends AbstractInstaller
{
}
- Now we have to register the installer class to make it available for dependency injection. Add the following configuration to the service.yml file:
services:
BlogBundleSetupBlogInstaller:
public: true
autowire: true
Now the dependency injection knows your installer and can create instances of it.
- Open the BlogBundle.php bundle file and add the following method:
public function getInstaller() {
return $this->container->get(
BlogInstaller::class);
}
This function will tell Pimcore that your bundle has its installer and will use it. What happens when you install your bundle is that the event of your installer will be triggered, and you will be able to do all the stuff you need. In the next steps, we will implement the initial configuration.
- The next snippet of code implements the class restore, so add this function (logs and output messages are omitted for brevity):
public function install(){
$files = $this->getClassesToInstall();
foreach ($files as $file) {
$data = file_get_contents($file);
$json= json_decode($data);
$name= $json->id;
$class = ClassDefinition::getById($name);
if($class) continue; // do not overwrite
$class = new ClassDefinition();
$class->setName($json->id);
$class->setId($json->id);
Service::importClassDefinitionFromJson($class, $data, false, true);
}
}
The installation procedure is composed of a few simple steps. First of all, we read the filesystem and fetch all the files in the classes folder (files = $this->getClassesToInstall();). Then, for each one, we check whether the class exists; if it doesn't exist, we create and import the class. If the class exists and we override it with a different definition, we may experience data loss and we do not want that.
- The next snippet contains the getClassesToInstall procedure. Copy it to the installer class:
protected function getClassesToInstall()
{
$realpath = realpath(__DIR__."/../
Resources/install/class_sources/");
$files=glob($realpath.'/*.json');
return $files;
}
The preceding piece of code reads all *.json files in the class_sources folder and returns them to the caller to be installed.
- Now it's time to test the bundle. To make a rigorous test, we should create a new environment, move the bundle to the environment, and test it. However, this way requires time and effort, and it is not relevant for this explanation, so we will use a shortcut.
Because we do not have any database migrations or unreversible activities, we will use the current installation. The first operation is to delete the classes you have exported. That is mandatory because our procedure will otherwise skip the creation (see step 7). You can do that by right-clicking on the class name and then hitting Delete, as shown in the next figure:
Figure 11.5: How to delete a class
- Now we have to trick Pimcore by telling it that our bundle is installable. To do this, implement the canBeInstalled method in the installer class, returning true (which means "yes, it can be installed!"). Copy the following piece of code and paste it to your file:
public function canBeInstalled(){
return true;
}
The next screenshot shows the change before and after the method is implemented:

Figure 11.6: Comparing bundle settings before and after changing the flag
The previous screenshot shows how the installation status changes as we alter the canBeInstalled method. The first flag matrix is the output of the pimcore:bundle:list command, and you can see that the bundle is marked as not installable. After the change in the installer class, the installable flag becomes active and Pimcore will let us install the bundle again.
- Finally, it's time to test the bundle's installer. Go to the Admin UI, navigate to Tools | Bundles, and then click the green plus icon, or run bin/console pimcore:bundle:install BlogBundle from the command line:

Figure 11.7: The extension panel now lets you install the bundle again
As you can see in the previous screenshot, the options available in the UI reflect the information gathered from the console.
- Navigate to the class list. You will find the test class that you deleted on the menu again because it was recreated by the install process:

Figure 11.8: The created class
In this section, we covered how the installation process works. In the next section, we will take care of the schema update and data seeding using migrations.
Migrations
The purpose of migrations is to manage data migration and schema updates. This is very useful if you are working with a custom database structure. The basic concept of migration is that it starts with an existing version that can be incremented by applying a delta of changes. The migration can be reversed by implementing a rollback function. To be more concrete, a migration in Pimcore is a class implementation that has two methods: up (to apply changes) and down (to revert changes).
The migration process is explained in the following diagram:
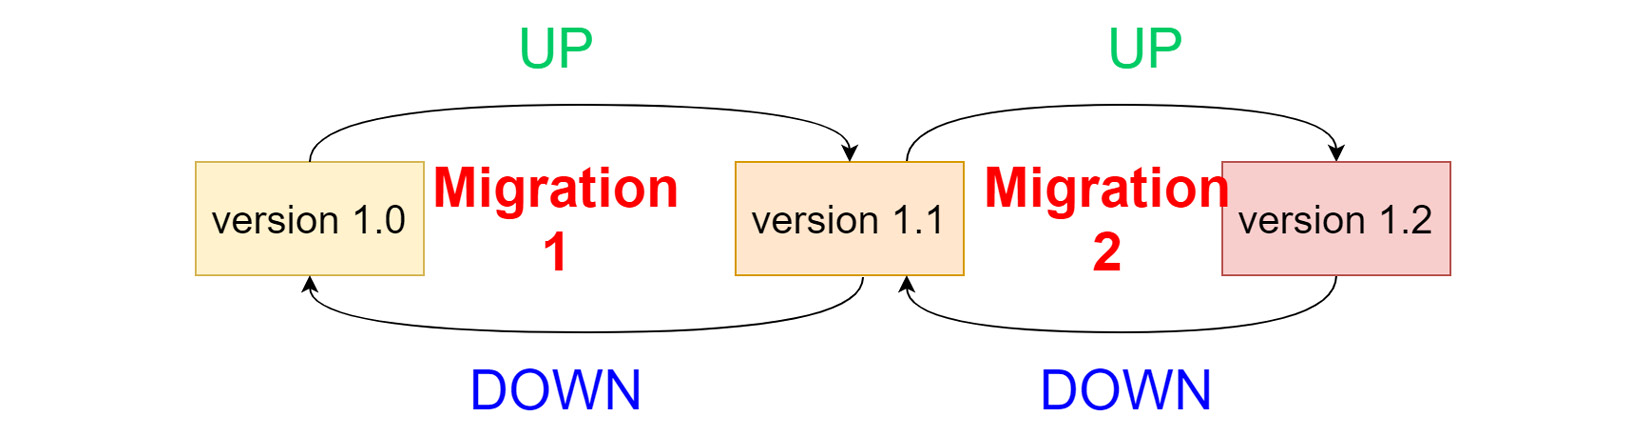
Figure 11.9: The migration process
As you can see in the previous figure, after an update, version 1.0 is updated to 1.1, but if there is a rollback, the down method brings it back to the initial version.
The first step of adding the ability to manage migrations to your application is to map a folder for the migration files to your namespace. To do so, just open the /config/config.yml file and add the following snippet:
doctrine_migrations:
migrations_paths:
'AppMigrations': 'src/Migrations'
The previous piece of code maps your namespace with the related folder.
For creating a migration class, the best method is to invoke the console command:
bin/console doctrine:migrations:generate --namespace=App\Migrations
The preceding command creates a file inside the migration folder of the main application. Each version has a generated name, such as /src/Migrations/Version20210227065641.php, where the Version prefix of the filename is followed by a timestamp.
The created file will look something like the following:
<?php
namespace AppMigrations;
… uses
class Version20210227065641 extends AbstractMigration
{
public function up(Schema $schema) {
//do things here
}
public function down(Schema $schema) {
//do things here
}
}
The Schema object is a doctrine element that lets you manipulate the database structure. The following examples show the most important use cases, such as creating a table, adding fields, and dropping them:
$table = $schema->createTable('foo');
$table->addColumn('title', 'string');
$table->addColumn('description', 'string');
$schema->dropTable('foo');
Important Note
For a complete overview of the Schema object's capabilities, take a look at the Symfony documentation: https://www.doctrine-project.org/projects/doctrine-dbal/en/latest/reference/schema-representation.html.
In this section, we learned how to create an installer to manage the setup of a bundle and manage data migration. This topic is very useful when you want to create a portable bundle or product based on Pimcore. Think, for example, of a bundle with all the bricks and utilities that you can use as the basis for your projects. In the next section, we will cover another important topic when we work with multiple environments in the same code base.
Using a multi-environment configuration
In any modern deployment workflow, we have four environments: local, dev, test, and production. Each of these environments may have different configurations and tunings. Your production environment will probably have to face tons of users and a heavy load in a clustered system, while your local environment will just need to fight with the amount of RAM. What we see is that each environment has different needs, and consequently, needs different configurations. The approach that we want to follow is to keep all the data in a single code base and keep all the settings in the same place. If you are thinking that you'll need to manage a lot of files and complicated logic to switch them, you are wrong.
Fortunately, Pimcore is based on Symfony and extends its very powerful configuration system. Pimcore manages dev, test, and prod environments natively (while others can be added with an additional configuration). To switch the environment, you have to specify the PIMCORE_ENVIRONMENT environment variable. Because our Pimcore instance runs in a container, this setting doesn't have any impact on our PC, as the configuration is limited to the container.
Once the variable is set, Pimcore will load the files following this order:
- config/pimcore/system_{env}.yml
- var/config/system_{env}.yml
- config/pimcore/system.yml
- var/config/system.yml
The configuration files can include other configuration files and inherit properties. The default setup that comes with a fresh Pimcore installation has an incremental configuration from dev to prod of the config.yml file (prod includes test, which includes dev). This mechanism is very useful for sharing settings and overriding them when needed.
If you omit PIMCORE_ENVIRONMENT, the base files will be taken following the next escalation:
- config/pimcore/system.yml
- var/config/system.yml
When you are running Pimcore from the console, you can pass the environment as an argument, like in the following example:
./bin/console --env=dev ...
In a Pimcore environment, it is very important to have different configurations of Pimcore to match the different specifications of the environments where we will work. By the way, not all the configurations can be saved into the settings files for security reasons. In the next section, we will learn how to manage sensitive data, such as passwords and API keys, safely with Pimcore.
Using Environment variables
The modern approach of using containers makes heavy use of environment variables for injecting values into applications. This approach is very convenient because it makes your application agnostic to the environment in which it will be deployed. This process implies that some part of the configuration is pulled from outside the application code.
Moving all the configuration outside the application makes developers unaware of everything going on internally, and this creates misunderstandings between the developer and operations teams when problems occur. You have your local code and you can see it working, but you will have no idea what can happen in the production environment when other settings will be applied. Often, those who manage the operations don't know much about the meaning behind configurations because they are not experts on the applications and usually are not developers. Developers know how the application works and are aware of the impact of settings changes but know little about the infrastructure and cannot make tests to fix the problems that the application may have (they don't have access to the production environment).
What we are going to explain in this section is a solution that can keep production settings safe, share configurations between developers and operations, and is easy to implement with Pimcore. A good compromise is to keep all the configuration in the source code but remove sensitive information that is injected during the deployment. Keeping the sensitive information separate from the configuration lets us share settings with the entire team and makes everybody aware of the configuration chosen but does not open us to security issues. This approach creates a clean division of responsibility and makes our repository safer. In that way, the developers are aware of the configuration in each environment, and operations can manage system settings independently.
This solution has the positive side effect that the developers can test different configurations on their local PCs (but without accessing the production system) and the result is more predictable. But how is it possible to configure Pimcore to separate configurations from sensitive data? In the next example, we will create a configuration that will work in all environments but without adding sensitive data to the source code files.
Using environment variables for managing database connections
We aim to have a Pimcore instance with the same configuration for the local, test, and production environments. The configuration will all be stored in the YAML files, but the right settings will be injected using an environment variable that will change based on the stage (dev, test, prod). The piece of configuration that we want to manage in that way is the configuration string. We will remove the hardcoded connection string of Pimcore, making it parametric. This data is usually set in the config/local/database.yml file, and it is generated by Pimcore at the first installation; it is not usually committed. As we are using a Dockerized environment, all the developers that download the source code work locally in a separate environment, so there isn't any problem with sharing this information.
We can now start work in these settings:
- Delete or rename the database.yml file (we won't need it anymore).
- Add the following code to docker-compose.yml. This configuration will add the settings as environment variables:
services:
…
php:
…
environment:
- PIMCORE_ENVIRONMENT=dev
- PIMCORE_HOST=db
- PIMCORE_DB=pimcore
- PIMCORE_USERNAME=pimcore
- PIMCORE_PASSWORD=pimcore
- PIMCORE_PORT=3306
The next figure shows a bare copy of the MySQL settings on the same file:
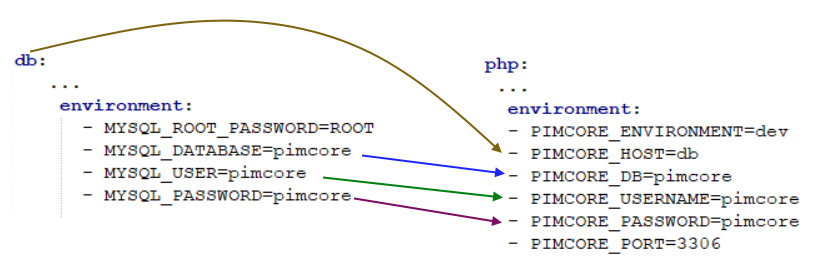
Figure 11.10: Field mapping between containers
- Now we have to tell Pimcore to use this variable's configuration. The chain of dependencies is that config_prod.yml includes config_test.yml and config_dev.yml includes config.yml. So, adding the proper configuration to the config or config_dev file will make it available for all the environments.
- Open config.yml. The first change to make is to disable the import of the database configuration. Just comment out the following line:
# - { resource: 'local/' } removed... it users environments now!
The import of the local resource set is disabled (otherwise, you can just drop the database.yml file).
- Then add the following configuration to the file:
doctrine:
dbal:
connections:
default:
host: '%PIMCORE_HOST%'
port: '%PIMCORE_PORT%'
dbname: '%PIMCORE_DB%'
user: '%PIMCORE_USERNAME%'
password: '%PIMCORE_PASSWORD%'
parameters:
PIMCORE_ENVIRONMENT: '%env(PIMCORE_ENVIRONMENT)%'
PIMCORE_HOST: '%env(PIMCORE_HOST)%'
PIMCORE_DB: '%env(PIMCORE_DB)%'
PIMCORE_USERNAME: '%env(PIMCORE_USERNAME)%'
PIMCORE_PASSWORD: '%env(PIMCORE_PASSWORD)%'
PIMCORE_PORT: '%env(PIMCORE_PORT)%'
The configuration is the same as database.yml but parametric. We define internal parameters that import the environment variable from the container. We used a 1:1 map, reusing the same name of the environment variables for the parameters. This makes the configuration easier to read.
Then we use the parameter in the doctrinedbalconnectiondefault section of the file. This makes sure that Pimcore will activate a connection with this configuration, using the parameters that get values to form the host environment (the docker-compose file in our case).
After this step, we fully decouple the configuration from the data so we can set them separately. You can commit any configuration (dev, test, prod) without the fear that someone will steal sensitive data, and during the deployment, the right values will be injected into the environment (virtual machine or container).
- Open Pimcore and check whether you can log in. Because our changes are about the connection to the database, if we are able to log in, our new settings have been successful.
In this section, we learned how to manage sensitive information in the Pimcore configuration and how to make variables without replicating the settings. Using containers is a useful solution because the container can be deployed as a standalone virtual machine, PC, or cloud service, meaning the solution covers most use cases. Moreover, having all the configurations on the source code makes it available to the developers, sharing a deeper awareness of how the platform will work in production. All the configurations can be easily tested locally and then committed.
Summary
In this chapter, we learned some details of the Pimcore developer that are very important for finalizing our website.
The multisite configuration allows us to use only one Pimcore instance to manage all the company's websites. This is a very interesting feature for saving time and money, using only one Pimcore installation to manage all the company websites.
The installers give us the power to execute installation steps to recreate the configuration needed by our bundle. We can create data assets and perform updates on them. This means that we can take our bundle, install it on another Pimcore instance, and add all the classes and data that the bundle needs to work on. We also learned that we can manage the database changes at a low level.
The multi-environment feature lets UX specify different configurations based on the environment we are using. This is very useful for keeping all the features in one code base. Moreover, we discovered how the powerful inheritance system of the configuration works.
Environment variables can help make the configuration agnostic from the environment, and we learned how to remove sensitive data from files.
Now our journey with the CMS part is almost completed, and we can move to the enterprise solutions that Pimcore has out of the box. In the next chapter, we will learn how to properly collect and store products in Pimcore and spread the information to all other applications. This is very important in enabling a company to use Pimcore as a PIM solution.