Chapter 10. Sharding
Sharding is MongoDB’s approach to scaling out. Sharding allows you to add more machines to handle increasing load and data size without affecting your application.
Introduction to Sharding
Sharding refers to the process of splitting data up and storing different portions of the data on different machines; the term partitioning is also sometimes used to describe this concept. By splitting data up across machines, it becomes possible to store more data and handle more load without requiring large or powerful machines.
Manual sharding can be done with almost any database software. It is when an application maintains connections to several different database servers, each of which are completely independent. The application code manages storing different data on different servers and querying against the appropriate server to get data back. This approach can work well but becomes difficult to maintain when adding or removing nodes from the cluster or in the face of changing data distributions or load patterns.
MongoDB supports autosharding, which eliminates some of the administrative headaches of manual sharding. The cluster handles splitting up data and rebalancing automatically. Throughout the rest of this book (and most MongoDB documentation in general), the terms sharding and autosharding are used interchangeably, but it’s important to note the difference between that and manual sharding in an application.
Autosharding in MongoDB
The basic concept behind MongoDB’s sharding is to break up
collections into smaller chunks. These chunks can be
distributed across shards so that each shard is
responsible for a subset of the total data set. We don’t want our
application to have to know what shard has what data, or even that our
data is broken up across multiple shards, so we run a routing process
called mongos in front of the shards. This router knows
where all of the data is located, so applications can connect to it and
issue requests normally. As far as the application knows, it’s connected
to a normal mongod. The router, knowing what data is on
which shard, is able to forward the requests to the appropriate shard(s).
If there are responses to the request, the router collects them and sends
them back to the application.
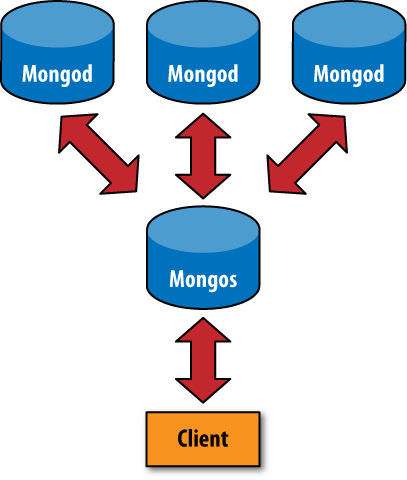
In a nonsharded MongoDB setup, you would have a client connecting to
a mongod process, like in Figure 10-1. In a sharded setup, like Figure 10-2, the client connects to a
mongos process, which abstracts the sharding away from
the application. From the application’s point of view, a sharded setup
looks just like a nonsharded setup. There is no need to change application
code when you need to scale.

Tip
If you are using an old version of MongoDB, you should upgrade to at least 1.6.0 before using sharding. Sharding has been around for a while, but the first production-ready release is 1.6.0.
When to Shard
One question people often have is when to start sharding. There are a couple of signs that sharding might be a good idea:
You’ve run out of disk space on your current machine.
You want to write data faster than a single
mongodcan handle.You want to keep a larger proportion of data in memory to improve performance.
In general, you should start with a nonsharded setup and convert it to a sharded one, if and when you need.
The Key to Sharding: Shard Keys
When you set up sharding, you choose a key from a collection and use that key’s values to split up the data. This key is called a shard key.
Let’s look at an example to see how this works: suppose we had a
collection of documents representing people. If we chose
"name" as our shard key, one shard could hold documents
where the "name" started with A–F, the next shard could
hold names from G–P, and the final shard would hold names from Q–Z. As you
added (or removed) shards, MongoDB would rebalance this data so that each
shard was getting a balanced amount of traffic and a sensible amount of
data (e.g., if a shard is getting a lot of traffic, it might have less
data than a shard with data that is less “hot”).
Sharding an Existing Collection
Suppose we have an existing collection of logs and we want to
shard it. If we enable sharding and tell MongoDB to use
"timestamp" as the shard key, we’ll have a single
shard with all of our data. We can insert any data we’d like, and it
will all go to that one shard.
Now, suppose we add a new shard. Once this shard is up and running, MongoDB will break up the collection into two pieces, called chunks. A chunk contains all of the documents for a range of values for the shard key, so one chunk would have documents with a timestamp value between -∞ and, say, June 26, 2003, and the other chunk would have timestamps between June 27, 2003 and ∞. One of these chunks would then be moved to the new shard.
If we get a new document with a timestamp value before June 27, 2003, we’ll add that to the first chunk; otherwise, we’ll add the document to the second chunk.
Incrementing Shard Keys Versus Random Shard Keys
The distribution of inserts across shards is very dependent on which key we’re sharding on.
If we choose to shard on something like
"timestamp", where the value is probably going to
increase and not jump around a lot, we’ll be sending all of the inserts
to one shard (the one with the [June 27, 2003, ∞] chunk). Notice that,
if we add a new shard and it splits the data again, we’ll still be
inserting on just one server. If we add a new shard, MongoDB might split
[June 27, 2003, ∞] into [June 27, 2003, December 12, 2010) and [December
12, 2010, ∞]. We’ll always have a chunk that will be “some date through
infinity,” which is where our inserts will be going. This isn’t good for
a very high write load, but it will make queries on the shard key very
efficient.
If we have a high write load and want to evenly distribute writes
across multiple shards, we should pick a shard key that will jump around
more. This could be a hash of the timestamp in the log example or a key
like "logMessage", which won’t have any particular
pattern to it.
Whether your shard key jumps around or increases steadily, it is
important to choose a key that will vary somewhat. If, for example, we
had a "logLevel" key that had only values
"DEBUG", "WARN", or
"ERROR", MongoDB won’t be able to break up your data
into more than three chunks (because there are only three different
values). If you have a key with very little variation and want to use it
as a shard key anyway, you can do so by creating a compound shard key on
that key and a key that varies more, like "logLevel" and
"timestamp".
Determining which key to shard on and creating shard keys should be reminiscent of indexing, because the two concepts are similar. In fact, often your shard key will just be the index you use most often.
How Shard Keys Affect Operations
To the end user, a sharded setup should be indistinguishable from a nonsharded one. However, it can be useful, especially when setting up sharding, to understand how different queries will be done depending on the shard key chosen.
Suppose we have the collection described in the previous section,
which is sharded on the "name" key and has three
shards with names ranging from A to Z. Different queries will be
executed in different ways:
db.people.find({"name" : "Susan"})mongoswill send this query directly to the Q–Z shard, receive a response from that shard, and send it to the client.db.people.find({"name" : {"$lt" : "L"}})mongoswill send the query to the A–F and G–P shards in serial. It will forward their responses to the client.db.people.find().sort({"email" : 1})mongoswill query all of the shards and do a merge sort when it gets the results to make sure it is returning them in the correct order.mongosuses cursors to retrieve data from each server, so it does not need to get the entire data set in order to start sending batches of results to the client.db.people.find({"email" : "[email protected]"})mongosdoes not keep track of the"email"key, so it doesn’t know which shard to send this to. Thus, it sends the query to all of the shards in serial.
If we insert a new document, mongos will send
that document to the appropriate shard, based on the value of its
"name" key.
Setting Up Sharding
There are two steps to setting up sharding: starting the actual servers and then deciding how to shard your data.
Sharding basically involves three different components working together:
- shard
A shard is a container that holds a subset of a collection’s data. A shard is either a single
mongodserver (for development/testing) or a replica set (for production). Thus, even if there are many servers in a shard, there is only one master, and all of the servers contain the same data.mongosThis is the router process and comes with all MongoDB distributions. It basically just routes requests and aggregates responses. It doesn’t store any data or configuration information. (Although it does cache information from the config servers.)
- config server
Config servers store the configuration of the cluster: which data is on which shard. Because
mongosdoesn’t store anything permanently, it needs somewhere to get the shard configuration. It syncs this data from the config servers.
If you are working with MongoDB already, you probably have a shard
ready to go. (Your current mongod can become your first
shard.) The following section shows how to create a new shard from
scratch, but feel free to use your existing database instead.
Starting the Servers
First we need to start up our config server and
mongos. The config server needs to be started first,
because mongos uses it to get its configuration. The
config server can be started like any other mongod
process:
$ mkdir -p ~/dbs/config
$ ./mongod --dbpath ~/dbs/config --port 20000
A config server does not need much space or resources. (A generous estimate is 1KB of config server space per 200MB of actual data.)
Now you need a mongos process for your
application to connect to. Routing servers don’t even need a data
directory, but they need to know where the config server is:
$ ./mongos --port 30000 --configdb localhost:20000
Shard administration is always done through a
mongos.
Adding a shard
A shard is just a normal mongod instance (or
replica set):
$ mkdir -p ~/dbs/shard1
$ ./mongod --dbpath ~/dbs/shard1 --port 10000
Now we’ll connect to the mongos process we
started and add the shard to the cluster. Start up a shell connected
to your mongos:
$ ./mongo localhost:30000/admin
MongoDB shell version: 1.6.0
url: localhost:30000/admin
connecting to localhost:30000/admin
type "help" for help
>
Make sure you’re connected to mongos, not a
mongod. Now you can add this shard with the
addshard database command:
> db.runCommand({addshard : "localhost:10000", allowLocal : true})
{
    "added" : "localhost:10000",
    "ok" : true
}
The "allowLocal" key is necessary only if you
are running the shard on localhost. MongoDB doesn’t
want to let you accidentally set up a cluster locally, so this lets it
know that you’re just in development and know what you’re doing. If
you’re in production, you should have shards on different machines
(although there can be some overlap; see the next section for
details).
Whenever we want to add a new shard, we can run the
addshard database command. MongoDB will take care
of integrating it into the cluster.
Sharding Data
MongoDB won’t just distribute every piece of data you’ve ever
stored: you have to explicitly turn sharding on at both the database and
collection levels. Let’s look at an example: we’ll shard the
bar collection in the foo
database on the "_id" key. First, we enable sharding
for foo:
> db.runCommand({"enablesharding" : "foo"})Sharding a database results in its collections being stored on different shards and is a prerequisite to sharding one of its collections.
Once you’ve enabled sharding on the database level, you can shard
a collection by running the shardcollection
command:
> db.runCommand({"shardcollection" : "foo.bar", "key" : {"_id" : 1}}) Now the collection will be sharded by the "_id"
key. When we start adding data, it will automatically distribute itself
across our shards based on the values of
"_id".
Production Configuration
The example in the previous section is fine for trying sharding or for development. However, when you move an application into production, you’ll want a more robust setup. To set up sharding with no points of failure, you’ll need the following:
Multiple config servers
Multiple
mongosserversReplica sets for each shard
wset correctly (see the previous chapter for information onwand replication)
A Robust Config
Setting up multiple config servers is simple. As of this writing, you can have one config server (for development) or three config servers (for production).
Setting up multiple config servers is the same as setting up one; you just do it three times:
$ mkdir -p ~/dbs/config1 ~/dbs/config2 ~/dbs/config3
$ ./mongod --dbpath ~/dbs/config1 --port 20001
$ ./mongod --dbpath ~/dbs/config2 --port 20002
$ ./mongod --dbpath ~/dbs/config3 --port 20003
Then, when you start a mongos, you should
connect it to all three config servers:
$ ./mongos --configdb localhost:20001,localhost:20002,localhost:20003
Config servers use two-phase commit, not the normal MongoDB asynchronous replication, to maintain separate copies of the cluster’s configuration. This ensures that they always have a consistent view of the cluster’s state. It also means that if a single config server is down, the cluster’s configuration information will go read-only. Clients are still able to do both reads and writes, but no rebalancing will happen until all of the config servers are back up.
Many mongos
You can also run as many mongos processes as
you want. One recommended setup is to run a mongos
process for every application server. That way, each application server
can talk to mongos locally, and if the server goes
down, no one will be trying to talk to a mongos that
isn’t there.
A Sturdy Shard
In production, each shard should be a replica set. That way, an
individual server can fail without bringing down the whole shard. To add
a replica set as a shard, pass its name and a seed to the
addshard command.
For example, say we have a replica set named
"foo" containing a server at prod.example.com:27017 (among other
servers). We could add this set to the cluster with the
following:
> db.runCommand({"addshard" : "foo/prod.example.com:27017"})If prod.example.com goes down,
mongos will know that it is connected to a replica
set and use the new primary for that set.
Physical Servers
This may seem like an overwhelming number of machines: three
config servers, at least two mongods per shard, and
as many mongos processes as you want. However, not
everything has to have its own machine. The main thing to avoid is
putting an entire component on one machine. For example, avoid putting
all three config servers, all of your mongos
processes, or an entire replica set on one machine. However, a config
server and mongos processes can happily share a box
with a member of a replica set.
Sharding Administration
Sharding information is mostly stored in the
config database, which can be accessed from any
connection to a mongos process.
config Collections
All of the code in the following sections assume that you are
running a shell connected to a mongos process and
have already run use config.
Shards
You can find a list of shards in the shards collection:
> db.shards.find()
{ "_id" : "shard0", "host" : "localhost:10000" }
{ "_id" : "shard1", "host" : "localhost:10001" }
Each shard is assigned a unique, human-readable
_id.
Databases
The databases collection contains a list of databases that exist on the shards and information about them:
> db.databases.find()
{ "_id" : "admin", "partitioned" : false, "primary" : "config" }
{ "_id" : "foo", "partitioned" : false, "primary" : "shard1" }
{ "_id" : "x", "partitioned" : false, "primary" : "shard0" }
{
    "_id" : "test",
    "partitioned" : true,
    "primary" : "shard0",
    "sharded" : {
        "test.foo" : {
            "key" : {"x" : 1},
            "unique" : false
        }
    }
}
Every database available is listed here and has some basic information available.
"_id" : stringThe
_idis the database’s name."partitioned" : booleanIf
"partitioned"is true, then theenableshardingcommand has been run on this database."primary" : stringThe value corresponds to a shard
"_id"and indicates where this database’s “home” is. A database always has a home, whether it is sharded. In a sharded setup, a new database will be created on a random shard. This home is where it will start creating data files. If it is sharded, it will use other servers as well, but it will start out on this shard.
Chunks
Chunk information is stored in the chunks collection. This is where things get more interesting; you can actually see how your data has been divided up across the cluster:
> db.chunks.find()
{
    "_id" : "test.foo-x_MinKey",
    "lastmod" : { "t" : 1276636243000, "i" : 1 },
    "ns" : "test.foo",
    "min" : {
        "x" : { $minKey : 1 }
    },
    "max" : {
        "x" : { $maxKey : 1 }
    },
    "shard" : "shard0"
}
This is what a collection with a single chunk will look like:
the chunk range goes from -∞ (MinKey) to ∞
(MaxKey).
Sharding Commands
We’ve already covered some of the basic commands, such as adding chunks and enabling sharding on a collection. There are a couple more commands that are useful for administering a cluster.
Getting a summary
The printShardingStatus function will give
you a quick summary of the previous collections:
> db.printShardingStatus()
--- Sharding Status ---
  sharding version: { "_id" : 1, "version" : 3 }
  shards:
      { "_id" : "shard0", "host" : "localhost:10000" }
      { "_id" : "shard1", "host" : "localhost:10001" }
  databases:
      { "_id" : "admin", "partitioned" : false, "primary" : "config" }
      { "_id" : "foo", "partitioned" : false, "primary" : "shard1" }
      { "_id" : "x", "partitioned" : false, "primary" : "shard0" }
      { "_id" : "test", "partitioned" : true, "primary" : "shard0",
          "sharded" : { "test.foo" : { "key" : { "x" : 1 }, "unique" : false } } }
              test.foo chunks:
                  { "x" : { $minKey : 1 } } -->> { "x" : { $maxKey : 1 } } on : shard0
                  { "t" : 1276636243000, "i" : 1 }
Removing a shard
Shards can be removed from a cluster with the
removeshard command. removeshard
drains all of the chunks on a given shard to the other
shards.
> db.runCommand({"removeshard" : "localhost:10000"});
{
    "started draining" : "localhost:10000",
    "ok" : 1
}
As the shard is drained, removeshard will
give you the status of how much remains on the shard.
> db.runCommand({"removeshard" : "localhost:10000"});
{
    "msg" : "already draining...",
    "remaining" : {
        "chunks" : 39,
        "dbs" : 2
    },
    "ok" : 1
}
Finally, when the shard has finished draining,
removeshard shows that the shard has been
successfully removed.