Chapter 8. Administration
Administering MongoDB is usually a simple task. From taking backups to setting up multinode systems with replication, most administrative tasks are quick and painless. This reflects a general philosophy of MongoDB, which is to minimize the number of dials in the system. Whenever possible, configuration is done automatically by the system rather than forcing users and administrators to tweak configuration settings. That said, there are still some administrative tasks that require manual intervention.
In this chapter we’ll be switching gears from the developer perspective and discussing what you need to know to work with MongoDB from the operations or administration side. Whether you’re working for a startup where you are both the engineering and ops teams or you’re a DBA looking to work with MongoDB, this is the chapter for you. Here’s the big picture:
MongoDB is run as a normal command-line program using the
mongodexecutable.MongoDB features a built-in admin interface and monitoring functionality that is easy to integrate with third-party monitoring packages.
MongoDB supports basic, database-level authentication including read-only users and a separate level of authentication for admin access.
There are several different ways of backing up a MongoDB system, the choice of which depends on a couple of key considerations.
Starting and Stopping MongoDB
In Chapter 2, we covered the basics of starting MongoDB. This chapter will go into more detail about what administrators need to know to deploy Mongo robustly in production.
Starting from the Command Line
The MongoDB server is started with the mongod
executable. mongod has many configurable startup
options; to view all of them, run mongod --help from
the command line. A couple of the options are widely used and important
to be aware of:
- --dbpath
Specify an alternate directory to use as the data directory; the default is /data/db/ (or C:datadb on Windows). Each
mongodprocess on a machine needs its own data directory, so if you are running three instances ofmongod, you’ll need three separate data directories. Whenmongodstarts up, it creates a mongod.lock file in its data directory, which prevents any othermongodprocess from using that directory. If you attempt to start another MongoDB server using the same data directory, it will give an error:"Unable to acquire lock for lockfilepath: /data/db/mongod.lock."
- --port
Specify the port number for the server to listen on. By default,
mongoduses port 27017, which is unlikely to be used by another process (besides othermongodprocesses). If you would like to run more than onemongodprocess, you’ll need to specify different ports for each one. If you try to startmongodon a port that is already being used, it will give an error:"Address already in use for socket: 0.0.0.0:27017"
- --fork
- --logpath
Send all output to the specified file rather than outputting on the command line. This will create the file if it does not exist, assuming you have write permissions to the directory. It will also overwrite the log file if it already exists, erasing any older log entries. If you’d like to keep old logs around, use the
--logappendoption in addition to--logpath.- --config
Use a configuration file for additional options not specified on the command line. See File-Based Configuration for details.
So, to start the server as a daemon listening on port 5586 and sending all output to mongodb.log, we could run this:
$ ./mongod --port 5586 --fork --logpath mongodb.log
forked process: 45082
all output going to: mongodb.log
When you first install and start MongoDB, it is a good idea to look at the log. This might be an easy thing to miss, especially if MongoDB is being started from an init script, but the log often contains important warnings that prevent later errors from occurring. If you don’t see any warnings in the MongoDB log on startup, then you are all set. However, you might see something like this:
$ ./mongod
Sat Apr 24 11:53:49 Mongo DB : starting : pid = 18417 port = 27017
dbpath = /data/db/ master = 0 slave = 0  32-bit
****
WARNING: This is development version of MongoDB.
         Not recommended for production.
****

** NOTE: when using MongoDB 32 bit, you are limited to about
**       2 gigabytes of data see
**       http://blog.mongodb.org/post/137788967/32-bit-limitations
**       for more

Sat Apr 24 11:53:49 db version v1.5.1-pre-, pdfile version 4.5
Sat Apr 24 11:53:49 git version: f86d93fd949777d5fbe00bf9784ec0947d6e75b9
Sat Apr 24 11:53:49 sys info: Linux ubuntu 2.6.31-15-generic ...
Sat Apr 24 11:53:49 waiting for connections on port 27017
Sat Apr 24 11:53:49 web admin interface listening on port 28017
The MongoDB being run here is a development version—if you download a stable release, it will not have the first warning. The second warning occurs because we are running a 32-bit build of MongoDB. We are limited to about 2GB of data when running 32 bit, because MongoDB uses a memory-mapped file-based storage engine (see Appendix C for details on MongoDB’s storage engine). If you are using a stable release on a 64-bit machine, you won’t get either of these messages, but it’s a good idea to understand how MongoDB logs work and get used to how they look.
The log preamble won’t change when you restart the database, so feel free to run MongoDB from an init script and ignore the logs, once you know what they say. However, it’s a good idea to check again each time you do an install, upgrade, or recover from a crash, just to make sure MongoDB and your system are on the same page.
File-Based Configuration
MongoDB supports reading configuration information from a file.
This can be useful if you have a large set of options you want to use or
are automating the task of starting
up MongoDB. To tell the server to get options from a
configuration file, use the -f or
--config flags. For example, run mongod
--config ~/.mongodb.conf to use ~/.mongodb.conf as a configuration
file.
The options supported in a configuration file are exactly the same as those accepted at the command line. Here’s an example configuration file:
# Start MongoDB as a daemon on port 5586

port = 5586
fork = true # daemonize it!
logpath = mongodb.log
This configuration file specifies the same options we used earlier when starting with regular command-line arguments. It also highlights most of the interesting aspects of MongoDB configuration files:
Any text on a line that follows the # character is ignored as a comment.
The syntax for specifying options is
option=valueoptionis case-sensitive.For command-line switches like
--fork, the valuetrueshould be used.
Stopping MongoDB
Being able to safely stop a running MongoDB server is at least as important as being able to start one. There are a couple of different options for doing this effectively.
The most basic way to stop a running MongoDB server is to send it
a SIGINT or SIGTERM signal. If the
server is running as the foreground process in a terminal, this can be
done by pressing Ctrl-C. Otherwise, a command like
kill can be used to send the signal. If
mongod has 10014 as its PID, the command would be
kill -2 10014 (SIGINT) or kill 10014
(SIGTERM).
When mongod receives a SIGINT or SIGTERM, it
will do a clean shutdown. This means it will wait for any currently
running operations or file preallocations to finish (this could take a
moment), close all open connections, flush all data to disk, and
halt.
Warning
It is important not to send a SIGKILL message (kill
-9) to a running MongoDB server. Doing so will cause the
database to shut down without going through the steps outlined earlier
and could lead to corrupt data files. If this happens, the database
should be repaired (see Repair) before being
started back up.
Another way to cleanly shut down a running server is to use the
shutdown command, {"shutdown" :
1}. This is an admin command and must be run on the
admin database. The shell features a helper
function to make this easier:
> use admin
switched to db admin
> db.shutdownServer();
server should be down...
Monitoring
As the administrator of a MongoDB server, it’s important to monitor the health and performance of your system. Fortunately, MongoDB has functionality that makes monitoring easy.
Using the Admin Interface
By default, starting mongod also starts up a
(very) basic HTTP server that listens on a port 1,000 higher than the
native driver port. This server provides an HTTP interface that can be
used to see basic information about the MongoDB server. All of the
information presented can also be seen through the shell, but the HTTP
interface gives a nice, easy-to-read overview.
To see the admin interface, start the database and go to http://localhost:28017 in a web browser. (Use 1,000
higher than the port you specified, if you used the
--port option when starting MongoDB.) You’ll see a page
that looks like Figure 8-1.
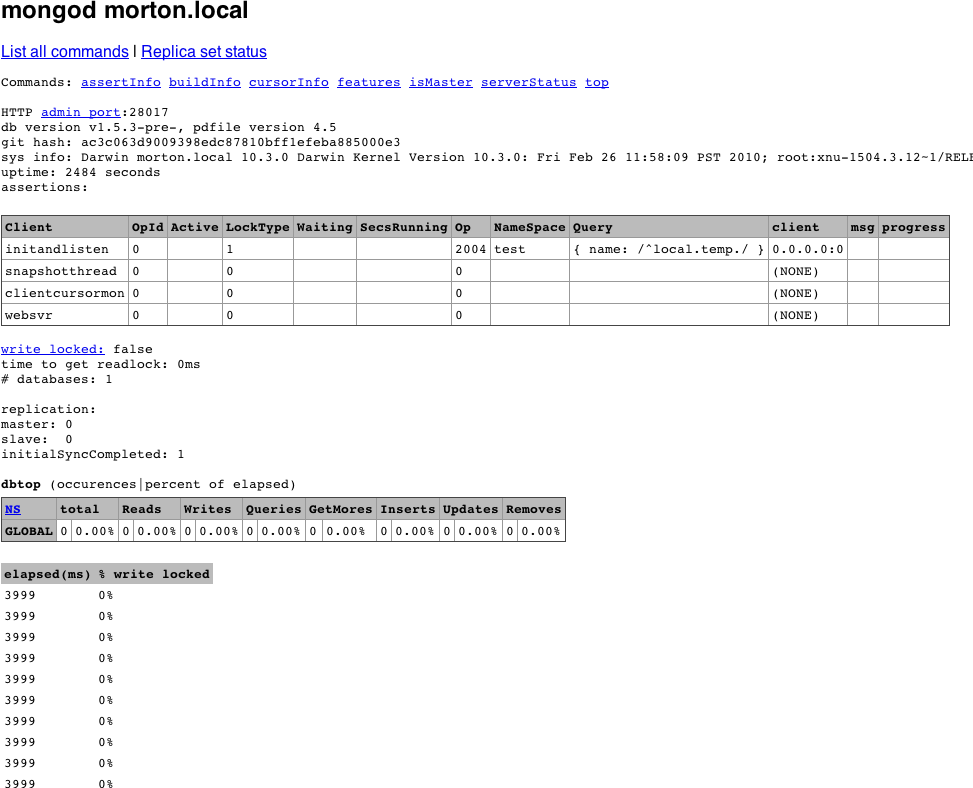
As you can see, this interface gives access to assertion, locking, indexing, and replication information about the MongoDB server. It also gives some more general information, like the log preamble and access to a list of available database commands.
To make full use of the admin interface (e.g., to access the
command list), you’ll need to turn on REST support with
--rest. You can also turn off the admin interface
altogether by starting mongod with the
--nohttpinterface option.
Warning
Do not attempt to connect a driver to the HTTP interface port, and do not try to connect to the native driver port via HTTP. The driver port handles only the native MongoDB wire protocol; it will not handle HTTP requests. For example, if you go to http://localhost:27017 in a web browser, you will see:
You are trying to access MongoDB on the native driver port.
 For http diagnostic access, add 1000 to the port number
Similarly, you cannot use the native MongoDB wire protocol when connecting on the admin interface’s port.
serverStatus
The most basic tool for getting statistics about a running MongoDB
server is the serverStatus command, which has the following
output (exact keys present may vary by platform/server
version):
> db.runCommand({"serverStatus" : 1})
{
    "version" : "1.5.3",
    "uptime" : 166,
    "localTime" : "Thu Jun 10 2010 15:47:40 GMT-0400 (EDT)",
    "globalLock" : {
        "totalTime" : 165984675,
        "lockTime" : 91471425,
        "ratio" : 0.551083556358441
    },
    "mem" : {
        "bits" : 64,
        "resident" : 101,
        "virtual" : 2824,
        "supported" : true,
        "mapped" : 336
    },
    "connections" : {
        "current" : 141,
        "available" : 19859
    },
    "extra_info" : {
        "note" : "fields vary by platform"
    },
    "indexCounters" : {
        "btree" : {
            "accesses" : 1563,
            "hits" : 1563,
            "misses" : 0,
            "resets" : 0,
            "missRatio" : 0
        }
    },
    "backgroundFlushing" : {
        "flushes" : 2,
        "total_ms" : 44,
        "average_ms" : 22,
        "last_ms" : 36,
        "last_finished" : "Thu Jun 10 2010 15:46:54 GMT-0400 (EDT)"
    },
    "opcounters" : {
        "insert" : 38195,
        "query" : 8874,
        "update" : 4058,
        "delete" : 389,
        "getmore" : 888,
        "command" : 17731
    },
    "asserts" : {
        "regular" : 0,
        "warning" : 0,
        "msg" : 0,
        "user" : 5054,
        "rollovers" : 0
    },
    "ok" : true
}
Note
Raw status information can also be retrieved as JSON using the
MongoDB HTTP interface, at the
/_status (http://localhost:28017/_status) URL: this includes the
output of serverStatus, as well as the output of
some other useful commands. See Using the Admin Interface for
more on the admin interface.
serverStatus provides a detailed look at what
is going on inside a MongoDB server. Information such as the current
server version, uptime (in seconds), and current number of connections
is easily available. Some of the other information in the serverStatus response might need some
explaining, however.
The value for "globalLock" gives a quick look
at how much time a global write lock has been held on the server (the
times are given in microseconds). "mem" contains
information on how much data the server has memory mapped and what the
virtual and resident memory sizes are for the server process (all in
megabytes). "indexCounters" gives information on the
number of B-Tree lookups that have had to go to disk
("misses") versus successful lookups from memory
("hits")—if this ratio starts to increase you should
consider adding more RAM, or system performance might suffer.
"backgroundFlushing" tells us how many background
fsyncs have been performed and how long they’ve
taken. One of the most important pieces of the response is the
"opcounters" document, which contains counters for
each of the major operation types. Finally, "asserts"
counts any assertions that have occurred on the server.
All of the counters in the serverStatus output
are tracked from the time the server was started and will eventually
roll over if the counts get high enough. When a rollover occurs for any
counter, all counters will roll over, and the value of
"rollovers" in the "asserts"
document will increment.
mongostat
Although powerful, serverStatus is not exactly
a user-friendly mechanism for monitoring server health and performance.
Fortunately, MongoDB distributions also ship with
mongostat, which puts a friendly face on the output
of serverStatus.
mongostat prints some of the most important
information available from serverStatus. It prints a new line every
second, which gives a more real-time view to the static counters we saw
previously. The columns printed by mongostat have
names like inserts/s,
commands/s, vsize, and
% locked, each of which corresponds exactly to data
available in serverStatus.
Third-Party Plug-Ins
Most administrators are probably already using monitoring packages
to keep track of their servers, and the presence of
serverStatus and the /_status
URL make it pretty easy to write a MongoDB plug-in for any such tool. At
the time of this writing, MongoDB plug-ins exist for at least Nagios,
Munin, Ganglia, and Cacti. For an up-to-date list of third-party
plug-ins, check out the MongoDB documentation on
monitoring tools.
Security and Authentication
One of the first priorities for any systems administrator is to ensure their systems are secure. The best way to handle security with MongoDB is to run it in a trusted environment, ensuring that only trusted machines are able to connect to the server. That said, MongoDB supports per connection authentication, albeit with a pretty coarse-grained permissions scheme.
Authentication Basics
Each database in a MongoDB instance can have any number of users.
When security is enabled, only authenticated users of a database are
able to perform read or write operations on it. In the context of
authentication, MongoDB treats one database as special:
admin. A user in the admin
database can be thought of as a superuser. After authenticating, admin
users are able to read or write from any database
and are able to perform certain admin-only commands, like
listDatabases or
shutdown.
Before starting the database with security turned on, it’s important that at least one admin user has been added. Let’s run through a quick example, starting from a shell connected to a server without security turned on:
> use admin
switched to db admin
> db.addUser("root", "abcd");
{
    "user" : "root",
    "readOnly" : false,
    "pwd" : "1a0f1c3c3aa1d592f490a2addc559383"
}
> use test
switched to db test
> db.addUser("test_user", "efgh");
{
    "user" : "test_user",
    "readOnly" : false,
    "pwd" : "6076b96fc3fe6002c810268702646eec"
}
> db.addUser("read_only", "ijkl", true);
{
    "user" : "read_only",
    "readOnly" : true,
    "pwd" : "f497e180c9dc0655292fee5893c162f1"
}
Here we’ve added an admin user, root, and two users on the
test database. One of those users, read_only, has
read permissions only and cannot write to the database. From the shell,
a read-only user is created by passing true as the
third argument to addUser. To call
addUser, you must have write permissions for the
database in question; in this case we can call
addUser on any database because we have not enabled
security yet.
Note
The addUser method is useful for more than
just adding new users: it can be used to change a user’s password or
read-only status. Just call addUser with the
username and a new password or read-only setting for the user.
Now let’s restart the server, this time adding the
--auth command-line option to enable security. After
enabling security, we can reconnect from the shell and try it:
> use test
switched to db test
> db.test.find();
error: { "$err" : "unauthorized for db [test] lock type: -1 " }
> db.auth("read_only", "ijkl");
1
> db.test.find();
{ "_id" : ObjectId("4bb007f53e8424663ea6848a"), "x" : 1 }
> db.test.insert({"x" : 2});
unauthorized
> db.auth("test_user", "efgh");
1
> db.test.insert({"x": 2});
> db.test.find();
{ "_id" : ObjectId("4bb007f53e8424663ea6848a"), "x" : 1 }
{ "_id" : ObjectId("4bb0088cbe17157d7b9cac07"), "x" : 2 }
> show dbs
assert: assert failed : listDatabases failed:{
    "assertion" : "unauthorized for db [admin] lock type: 1
",
    "errmsg" : "db assertion failure",
    "ok" : 0
}
> use admin
switched to db admin
> db.auth("root", "abcd");
1
> show dbs
admin
local
test
When we first connect, we are unable to perform any operations
(read or write) on the test database. After
authenticating as the read_only user, however, we are able to perform a
simple find. When we try to insert data, we are
again met with a failure because of the lack of authorization.
test_user, which was not created as read-only, is able to insert data
normally. As a nonadmin user, though, test_user is not able to list all
of the available databases using the show dbs helper.
The final step is to authenticate as an admin user, root, who is able to
perform operations of any kind on any particular database.
How Authentication Works
Users of a given database are stored as documents in its
system.users collection. The structure of a user
document is {"user" : . The
username,
"readOnly" : true, "pwd" :
password hash}password hash is a hash based on the
username and password chosen.
Knowing where and how user information is stored makes performing some common administration tasks trivial. For example, to remove a user, simply remove the user document from the system.users collection:
> db.auth("test_user", "efgh");
1
> db.system.users.remove({"user" : "test_user"});
> db.auth("test_user", "efgh");
0
When a user authenticates, the server keeps track of that
authentication by tying it to the connection used for the
authenticate command. This means that if a driver or
tool is employing connection pooling or fails over to another node, any
authenticated users will need to reauthenticate on any new connections.
Some drivers may be capable of handling this transparently, but if not,
it will need to be done manually. If that is the case, then it might be
best to avoid using --auth altogether (again, by
deploying MongoDB in a trusted
environment and handling authentication on the client side).
Other Security Considerations
There are a couple of options besides authentication that should be considered when locking down a MongoDB instance. First, even when using authentication, the MongoDB wire protocol is not encrypted. If that is a requirement, consider using SSH tunneling or another similar mechanism to encrypt traffic between clients and the MongoDB server.
We suggest always running your MongoDB servers behind a firewall
or on a network accessible only through your application servers. If you
do have MongoDB on a machine accessible to the outside world, however,
it is recommended that you start it with the --bindip
option, which allows you to specify a local IP address that
mongod will be bound to. For instance, to only allow
connections from an application server running on the same machine, you
could run mongod --bindip localhost.
As documented in the section Using the Admin Interface, by
default MongoDB starts up a very simple HTTP server that allows you to
see information about current
operations, locking, and replication from your browser. If you don’t
want this information exposed, you can turn off the admin interface by
using the --nohttpinterface
option.
Finally, you can entirely disallow server-side JavaScript
execution by starting the database
with --noscripting.
Backup and Repair
Taking backups is an important administrative task with any data storage system. Often, doing backups properly can be tricky, and the only thing worse than not taking backups at all is taking them incorrectly. Luckily, MongoDB has several different options that make taking backups a painless process.
Data File Backup
MongoDB stores all of its data in a data
directory. By default, this directory is
/data/db/ (or C:datadb on
Windows). The directory to use as the data directory is configurable
through the --dbpath option when starting MongoDB.
Regardless of where the data directory is, its contents form a complete
representation of the data stored in MongoDB. This suggests that making
a backup of MongoDB is as simple as creating a copy of all of the files
in the data directory.
Warning
It is not safe to create a copy of the data directory while
MongoDB is running unless the server has done a full
fsync and is not allowing writes. Such a backup
will likely turn out to be corrupt and need repairing (see the section
Repair).
Because it is not safe in general to copy the data directory while MongoDB is running, one option for taking a backup is to shut down the MongoDB server and then copy the data directory. Assuming the server is shut down safely (see the section Starting and Stopping MongoDB), the data directory will represent a safe snapshot of the data stored when it was shut down. That directory can be copied as a backup before restarting the server.
Although shutting down the server and copying the data directory is an effective and safe method of taking backups, it is not ideal. In the remainder of this chapter, we’ll look at techniques for backing up MongoDB without requiring any downtime.
mongodump and mongorestore
One method for backing up a running instance of MongoDB is to use
the mongodump utility that is included with all
MongoDB distributions. mongodump works by querying
against a running MongoDB server and writing all of the documents it
contains to disk. Because mongodump is just a regular
client, it can be run against a live instance of MongoDB, even one handling other requests
and performing writes.
Note
Because mongodump operates using the normal
MongoDB query mechanism, the backups it produces are not necessarily
point-in-time snapshots of the server’s data. This is especially
evident if the server is actively handling writes during the course of
the backup.
Another consequence of the fact that
mongodump acts through the normal query mechanism
is that it can cause some performance degradation for other clients
throughout the duration of the backup.
Like most of the command-line tools included with MongoDB, we can
see the options available for mongodump by running
with the --help option:
$ ./mongodump --help
options:
  --help                   produce help message
  -v [ --verbose ]         be more verbose (include multiple times for more
                           verbosity e.g. -vvvvv)
  -h [ --host ] arg        mongo host to connect to ("left,right" for pairs)
  -d [ --db ] arg          database to use
  -c [ --collection ] arg  collection to use (some commands)
  -u [ --username ] arg    username
  -p [ --password ] arg    password
  --dbpath arg             directly access mongod data files in the given path,
                           instead of connecting to a mongod instance - needs
                           to lock the data directory, so cannot be used if a
                           mongod is currently accessing the same path
  --directoryperdb         if dbpath specified, each db is in a separate
                           directory
  -o [ --out ] arg (=dump) output directory
Along with mongodump, MongoDB distributions
include a corresponding tool for restoring data from a backup,
mongorestore. mongorestore takes
the output from running mongodump and inserts the
backed-up data into a running instance of MongoDB. The following example
session shows a hot backup of the database test to
the backup directory, followed by a separate call
to mongorestore:
$ ./mongodump -d test -o backup
connected to: 127.0.0.1
DATABASE: test   to     backup/test
    test.x to backup/test/x.bson
         1 objects
$ ./mongorestore -d foo --drop backup/test/
connected to: 127.0.0.1
backup/test/x.bson
     going into namespace [foo.x]
     dropping
     1 objects
In the previous example, we use -d to specify a
database to restore to, in this case foo. This
option allows us to restore a backup to a database with a different name
than the original. We also use the --drop option, which
will drop the collection (if it exists) before restoring data to it.
Otherwise, the data will be merged into any existing collection,
possibly overwriting some documents. Again, for a complete list of
options, run mongorestore --help.
fsync and Lock
Although mongodump and
mongorestore allow us to take backups without
shutting down the MongoDB server, we lose the ability to get a
point-in-time view of the data. MongoDB’s fsync command
allows us to copy the data directory of a running MongoDB server without risking any
corruption.
The fsync command will force the MongoDB server
to flush all pending writes to disk. It will also, optionally, hold a
lock preventing any further writes to the database until the server is
unlocked. This write lock is what allows the fsync
command to be useful for backups. Here is an example of how to run the
command from the shell, forcing an fsync and
acquiring a write lock:
> use admin
switched to db admin
> db.runCommand({"fsync" : 1, "lock" : 1});
{
    "info" : "now locked against writes, use db.$cmd.sys.unlock.findOne() to unlock",
    "ok" : 1
}
At this point, the data directory represents a consistent, point-in-time snapshot of our data. Because the server is locked for writes, we can safely make a copy of the data directory to use as a backup. This is especially useful when running on a snapshotting filesystem, like LVM[1] or EBS[2], where taking a snapshot of the data directory is a fast operation.
After performing the backup, we need to unlock the database again:
> db.$cmd.sys.unlock.findOne();
{ "ok" : 1, "info" : "unlock requested" }
> db.currentOp();
{ "inprog" : [ ] }
Here we run the currentOp command to ensure
that the lock has been released. (It may take a moment after the unlock
is first requested.)
The fsync command allows us to take very
flexible backups, without shutting down the server or sacrificing the
point-in-time nature of the backup. The price we’ve paid, however, is a
momentary block against write operations. The only way to have a
point-in-time snapshot without any downtime for reads
or writes is to backup from a slave.
Slave Backups
Although the options discussed earlier provide a wide range of
flexibility in terms of backups, none is as flexible as backing up from
a slave server. When running MongoDB with replication (see Chapter 9), any of the previously mentioned backup
techniques can be applied to a slave server rather than the master. The
slave will always have a copy of the data that is nearly in sync with
the master. Because we’re not depending on the performance of the slave
or its availability for reads or writes, we are free to use any of the
three options above: shutting down, the dump and restore tools, or the
fsync command. Backing up from a slave is the
recommended way to handle data backups with MongoDB.
Repair
We take backups so that when a disaster occurs, which could be anything from a power failure to an elephant on the loose in the data center, our data is safe. There will unfortunately always be cases when a server with no backups (or slaves to failover to) fails. In the case of a power failure or a software crash, the disk will be fine when the machine comes back up. Because of the way MongoDB stores data, however, we are not guaranteed that the data on the disk is OK to use: corruption might have occurred (see Appendix C for more on MongoDB’s storage engine). Luckily, MongoDB has built-in repairing functionality to attempt to recover corrupt data files.
A repair should be run after any unclean shutdown of MongoDB. If an unclean shutdown has occurred, you’ll be greeted with the following warning when trying to start the server back up:
**************
old lock file: /data/db/mongod.lock. probably means unclean shutdown
recommend removing file and running --repair
see: http://dochub.mongodb.org/core/repair for more information
*************
The easiest way to repair all of the databases for a given server
is to start up a server with --repair: mongod
--repair. The underlying process of repairing a database is
actually pretty easy to understand: all of the documents in the database
are exported and then immediately imported, ignoring any that are
invalid. After that is complete, all indexes are rebuilt. Understanding
this mechanism explains some of the properties of repair. It can take a
long time for large data sets, because all of the data is validated and
all indexes are rebuilt. Repairing can also leave a database with fewer
documents than it had before the corruption originally occurred, because
any corrupt documents are simply ignored.
Tip
Repairing a database will also perform a compaction. Any extra free space (which might exist after dropping large collections or removing large number of documents, for example) will be reclaimed after a repair.
To repair a single database on a running server, you can use the
repairDatabase method from the shell. If we wanted
to repair the database test, we would do the
following:
> use test
switched to db test
> db.repairDatabase()
{ "ok" : 1 }
To do the same from a driver rather than the shell, issue the
repairDatabase command, {"repairDatabase" :
1}.
Repairing to eliminate corruption should be treated as a last resort. The most effective way to manage data is to always stop the MongoDB server cleanly, use replication for failover, and take regular backups.