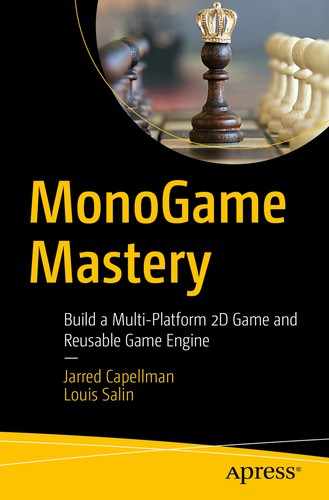
It wouldn’t be a video game without the ability for players to manipulate the state of the game in some way. We are now ready to look into taking inputs from three different sources, namely, a keyboard, a mouse, or a gamepad, and mapping that input to actions that will change the state of the game, like moving the player around the screen and shooting bullets. When we are done with this chapter, you will have a game that looks like Figure 6-1. We promise the bullets look better when they move.
Figure 6-1
Final result
In this chapter, you will
Implement a scrolling background
Learn how to manipulate the player sprite using the keyboard
Build a generic input engine
Learn how to use other input sources using MonoGame
Discussing the Various Input Mechanisms
MonoGame supports almost all of the user input mechanisms used by players worldwide. Whether you are a PC gamer using a keyboard and a mouse, a console player using a gamepad, or someone who likes to play on touch-enabled devices such as smartphones, MonoGame has you covered out of the box. When a player presses a button on their keyboard or gamepad, MonoGame keeps track of that particular input device’s state. Our game simply needs to query that state regularly to react to what the player is trying to accomplish.
To follow along, open up the chapter-06 solution cloned from https://github.com/Apress/monogame-mastery. The chapter-06 directory contains two solutions: start and end. Since we are at the start of this chapter, let’s open up the start solution.
Keyboard State
We briefly discussed keyboard input at the end of Chapter 5. Our two game state classes, SplashState and GameplayState, both implement a HandleInput() function that is continuously called by the MainGame class. The purpose of this function is to monitor our input devices and react to what the player is doing. Let’s review the part of the GameplayState class that is of interest to us at the moment. We have hidden some of the code for brevity, but the chapter-06 end solution will have all the code.
using Microsoft.Xna.Framework.Input;
public class GameplayState : BaseGameState
{
public override void HandleInput()
{
var state = Keyboard.GetState();
if (state.IsKeyDown(Keys.Escape))
{
NotifyEvent(Events.GAME_QUIT);
}
}
Keyboard support in MonoGame is straightforward. Most keys are either pressed down or released, with a few exceptions to this rule for keys that toggle on and off, like Num Lock and Caps Lock. In the preceding code, we start by asking the Keyboard class for its current state. Then, we ask that state for information that is pertinent for our game. Right now, we only want to give the player a way to quit the game using the Escape key. Is the Escape key pressed at the moment? This is what the state IsKeyDown(Keys.Escape) is asking. If so, we fire the GAME_QUIT event and the MainGame class will respond by telling our program to exit.
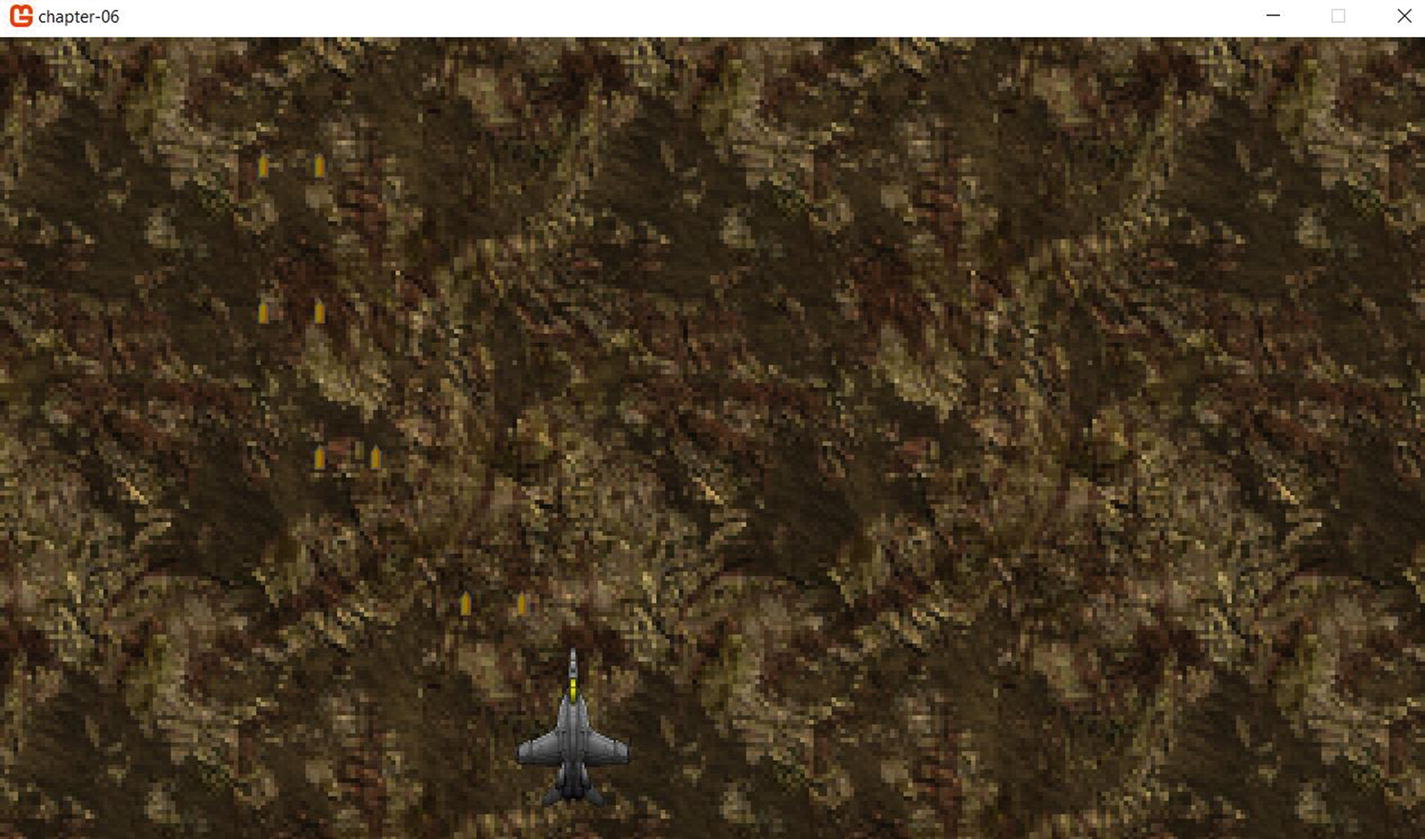
What are the keys we can monitor? There are too many to efficiently list in the book. However, we can use Visual Studio 2019 to inspect the available options using IntelliSense or by inspecting the MonoGame library metadata.
Delete the Escape word from Keys.Escape and press Ctrl+Enter to trigger IntelliSense to pop up. You should see something like the image in Figure 6-2, and scrolling through the options should give you an indication of the wide variety of keys that can be monitored.
Figure 6-2
IntelliSense options for the Keys enum
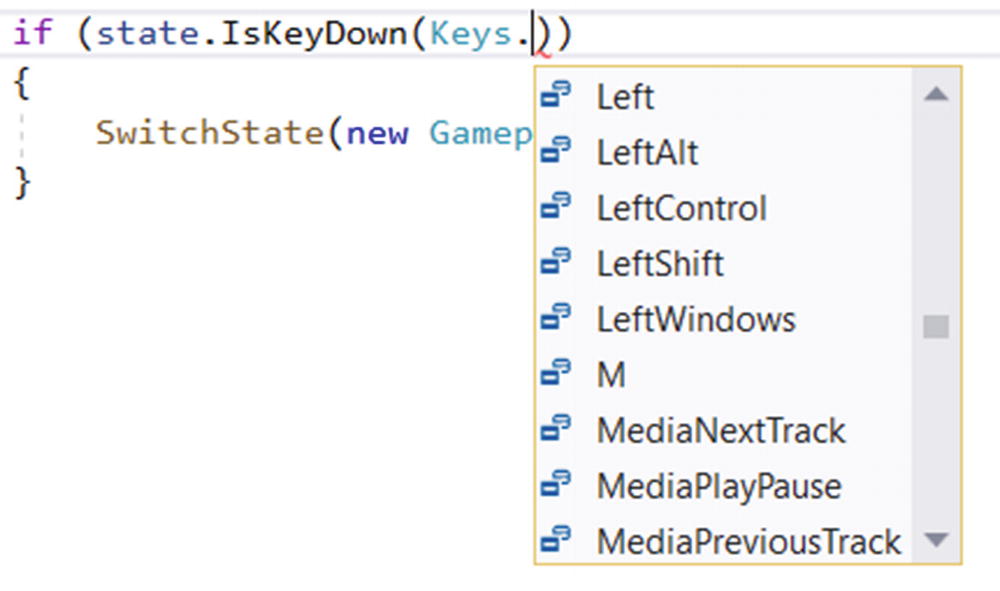
Another way to see options is to inspect the MonoGame library metadata directly. We prefer this approach when exploring what functionality a library exposes to us. Let’s go explore what’s in Microsoft.Xna.Framework.Input.
On the Solution Explorer panel, expand the References list by clicking the arrow to its left. Figure 6-3 shows us that MonoGame.Framework is a reference that we added to our project.
Figure 6-3
List of references used in our game
We can now inspect it by double-clicking the MonoGame.Framework reference. This will open the Object Browser in a new tab in Visual Studio. From there, we can start exploring. Expand MonoGame.Framework and Microsoft.Xna.Framework.Input, and then click Keys. You should see something like shown in Figure 6-4.
Figure 6-4
All the keys pressed that MonoGame can monitor
You can now inspect all the values that are part of that Keys enum. What you can see as well is everything that MonoGame offers us for all our input needs.
Mouse State
Our game will not immediately support using a mouse during gameplay, but we might need to use a mouse to point and click around menus. Most video games use menus to let the player configure the sound or graphics or to offer the player to resume the game or quit.
Normally, the mouse cursor is hidden from the viewport while the game is running. This can be changed by adding this line to the MainGame’s Initialize() function:
this.IsMouseVisible = true;
However, even when the mouse cursor is hidden, the mouse state can still be used to monitor how a player is using their mouse. We can look at the state of the left, middle, and right buttons. We can also monitor the X and Y coordinates of the mouse and changes in the scroll wheel since the game started, which could be useful for implementing a camera zoom functionality.
If we wanted to let the player shoot bullets when pressing the left mouse button, we’d use this code:
var mouseState = Mouse.GetState();
if (mouseState.LeftButton == ButtonState.Pressed)
{
// Perform shooting action!
}
Accessing the X and Y coordinates of the mouse is done using the following:
var mouseState = Mouse.GetState();
var x = mouseState.Position.X;
var y = mouseState.Position.Y;
Note that this will give you an X and Y coordinate based on the (0, 0) origin of the viewport, located at the top left of the game view window, just below the title bar.
Gamepad State
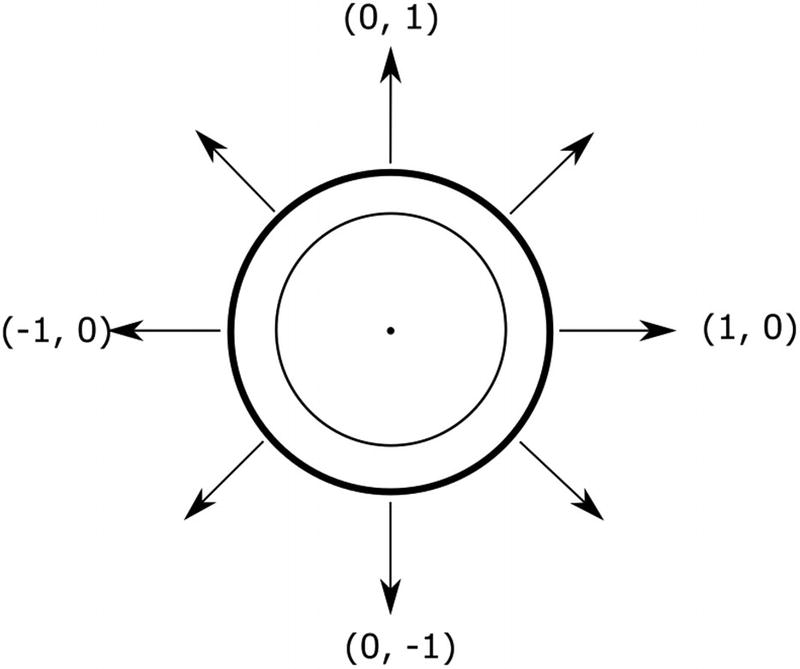
The gamepad is an incredibly useful gaming device. Not only is it the main device used on gaming consoles in living rooms across the world, but players also sometimes elect to use it on their computer. Monitoring the state of a gamepad is no more difficult than what we’ve learned so far. There are a few buttons that can be pressed and the left or right thumbstick state is represented using a 2D vector with X and Y values that are between -1 and 1, where the value zero for both coordinates indicates that the thumbstick is completely at rest, perfectly centered.
Thumbsticks also have a deadzone, which is a small area around its center that does not register any movement (Figure 6-5). This deadzone solves two problems. First, players resting their thumbs on a thumbstick can still cause it to move or jitter but they do not intend to cause their characters on the screen to move around. The deadzone ensures that this jitter remains unnoticed by the game. Second, gamepads wear out over time and thumbstick’s centers can be slightly off from the (0, 0) position. The deadzone in this case prevents the game from noticing any movement. Without it, a player’s character would move even when no one is touching the thumbstick.
Figure 6-5
The thumbstick’s X and Y values in the (x, y) format
To move the player using the thumbstick, you would need two things:
The player speed
The X and Y values from the thumbstick
When the thumbstick is pushed all the way to the left, we would register an X value of -1 and a Y value of 0. If the thumbstick was instead halfway to the left, the X value would be 0.5 instead.
The code to monitor thumbstick input would look like this:
var gamepadState = GamePad.GetState(PlayerIndex.One);
So, if the left thumbstick was completely to the left, the X should be -1 and the Y should be 0, thus moving the character by reducing its old position by the playerSpeed value and without changing its Y position at all.
We also need to specify for which gamepad we want to get the state. Most video game consoles allow for up to four players. In this example, we were interested in what player 1 was up to.
Now that we’ve looked at how various inputs work in MonoGame, we are ready to add some code of our own! Our game will let the player manipulate an aircraft using the arrow keys on the keyboard and shoot down enemies using the spacebar. But before we get to this, we need one more element in our game: a scrolling background.
Scrolling Background
We all know how side scrollers work. Games like Super Mario Bros, where the character can only move sideways to the left or to the right and the background “scrolls” as the character, always located in the middle of the screen, “moves” around. In fact, the character is fixed in place. It is the background that moves and provides the illusion of movement.
How do the game developers achieve this illusion? They do it by moving background blocks on the screen and keeping the character in the center.
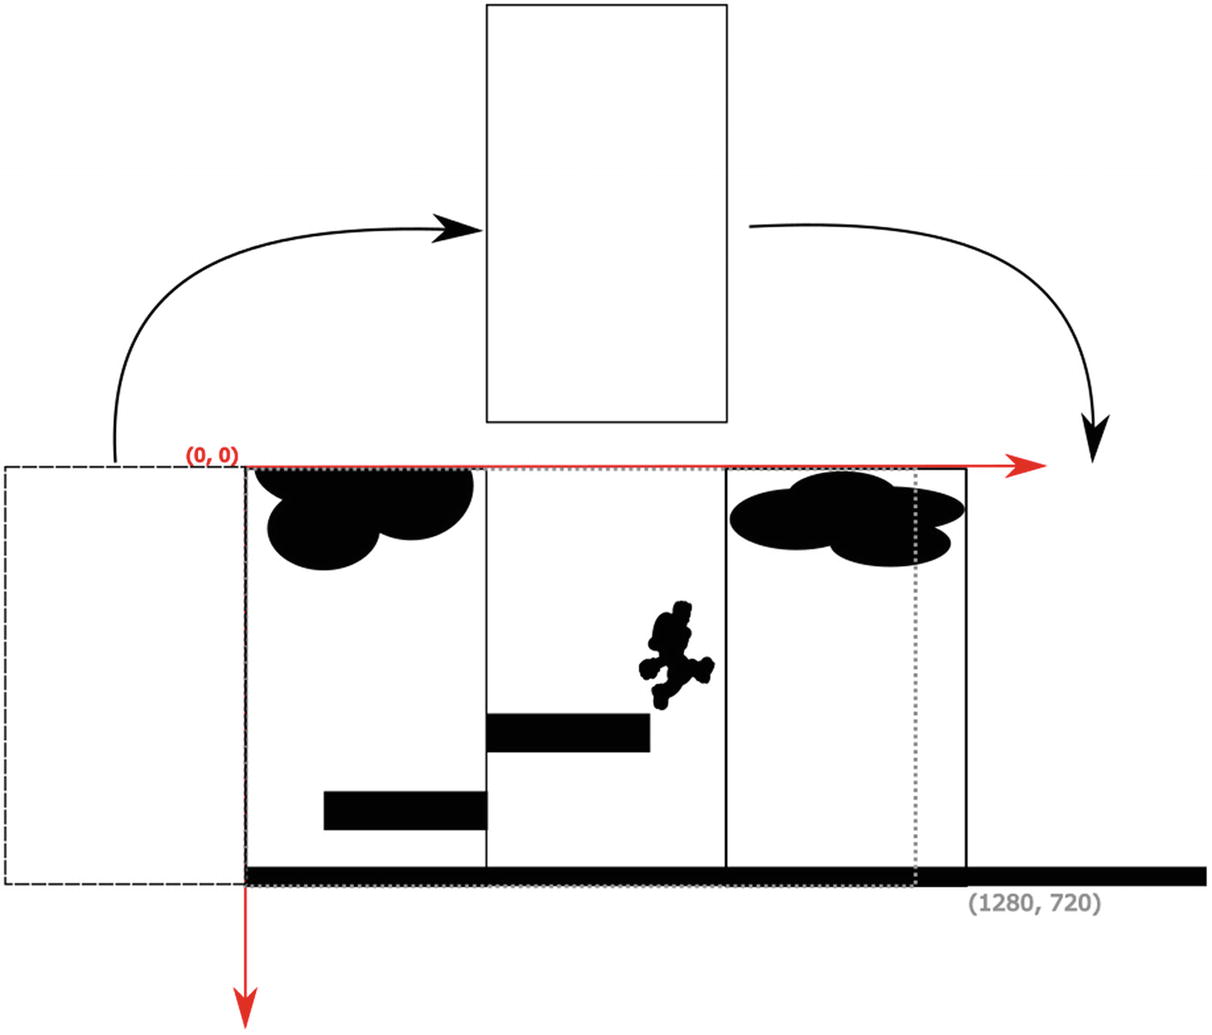
The game is filled with background blocks that overfill the viewport. When the player wants to move the character to the right, we instead take all the background blocks and move them toward the left. If there was no background block out of view, we would notice a gap created on the right edge of the screen. But since we have a background block in that area, it immediately moves in to fill in that gap. As the player keeps moving the character to the right, the leftmost background block is eventually completely offscreen. At that moment, the game will update the position of that block, so it becomes located at the right of the viewport, ready to scroll into view. Moving the character to the left would instead trigger the reverse process. Figures 6-6 and 6-7 show that process as it happens.
Figure 6-6
Background blocks overfill the viewport, represented with a dotted line
Figure 6-7
Our character appears to be moving to the right
Our game will work in a similar way, since we need to provide the illusion that our fighter jet is moving forward, in the up direction, we will instead work on making the background move downward.
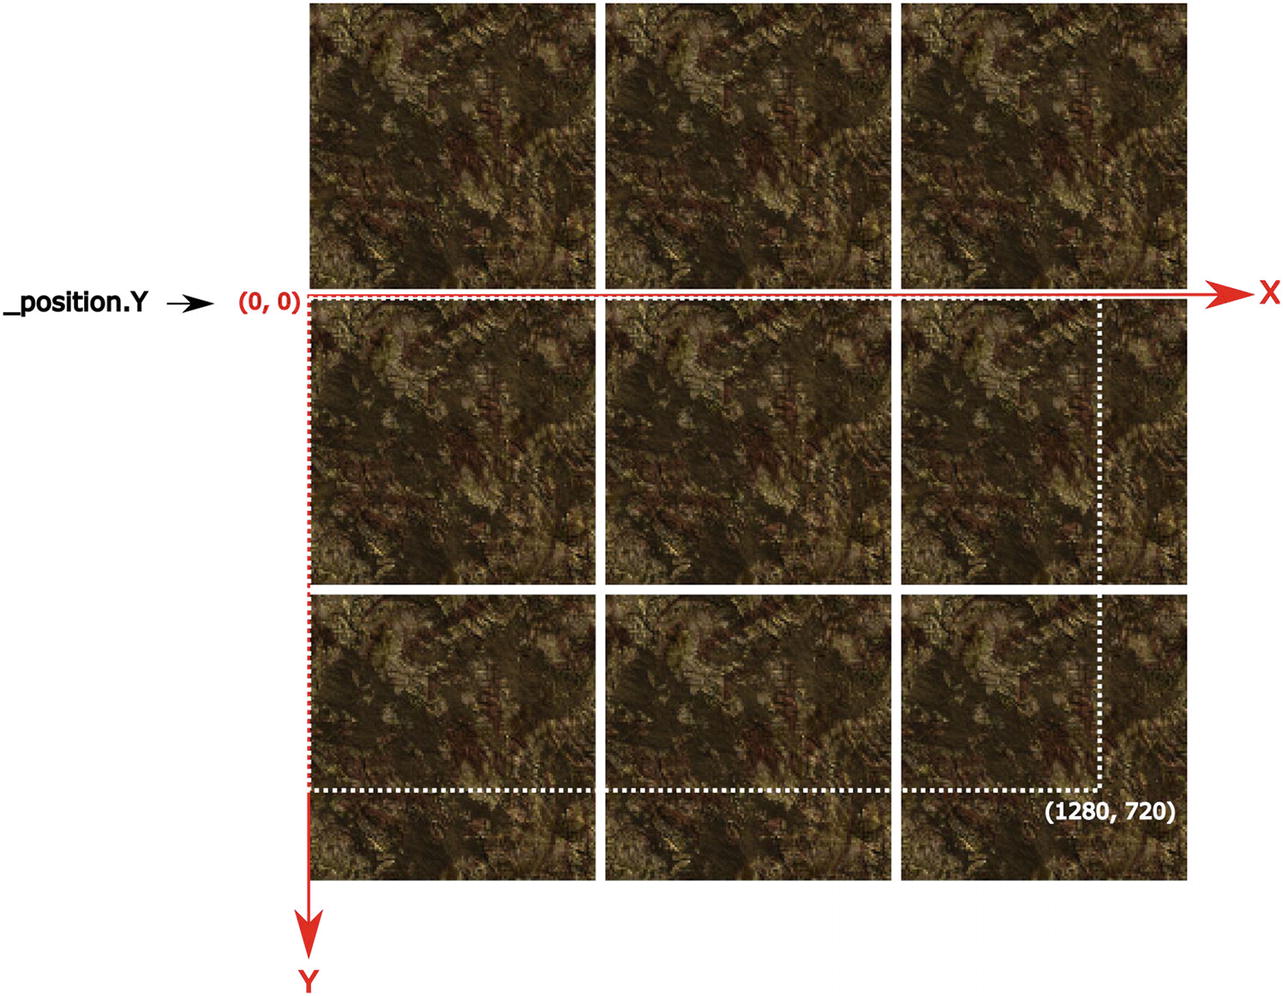
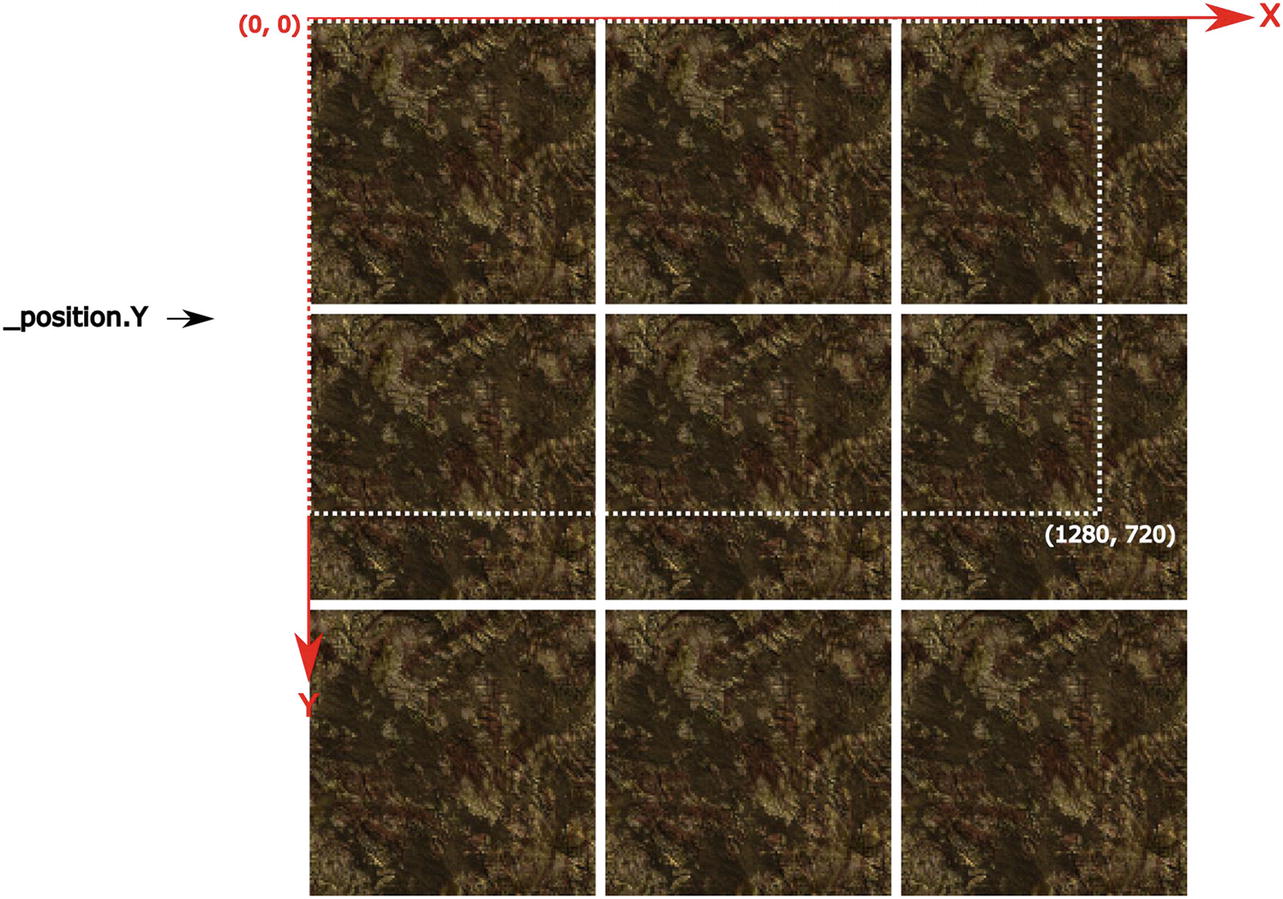
Our first step is to fill up the viewport with our background terrain tile and to add an extra row of tiles just above the viewport, so they are ready to scroll down into view (Figure 6-8). Our background texture has been designed to provide seamless continuity when tiled on all sides. As the game runs and the _position.Y value increases and moves away from the origin, the tiles will move downward, causing the tiles that were offscreen at the beginning are scrolling into view (Figure 6-9). Eventually, the top tile row will be fully visible at the top of the viewport and the background will reset to its original Y position; the scrolling will then resume and create the illusion of an infinite terrain (Figure 6-10).
Figure 6-8
Our tiled background. Blanks are left between the tiles to illustrate how it looks like a grid. In the game, the tiles will touch each other, and no space will be left behind
Figure 6-9
The background appears to scroll down
Figure 6-10
The end of our scrolling system
Let’s create a new class called TerrainBackground and let it inherit BaseGameObject. Just like other base game objects, it should be instantiated with an existing texture and a position, which we set at (0, 0), with the goal of moving this position down along the Y axis to make it scroll.
public class TerrainBackground : BaseGameObject
{
private float SCROLLING_SPEED = 2.0f;
public TerrainBackground(Texture2D texture)
{
_texture = texture;
_position = new Vector2(0, 0);
}
}
Remember that _texture and _position are protected variables on the BaseGameObject parent class, which means that they are available to us inside the TerrainBackground code and in this case we are initializing _texture to the incoming parameter and making sure _position is set at the origin coordinates of (0, 0).
Drawing the background will be a little more complicated than what the BaseGameObject’s Render() method does. Instead of simply drawing the object’s texture at a single position, we must fill the viewport with the texture and also draw a row of terrain above the screen. To do so, we’ll use a different version of the SpritBatch.Draw function that the base class uses.
For reference, this is what the base class’s rendering function looks like:
public virtual void Render(SpriteBatch spriteBatch)
The draw function has many overloads and accepts many different kinds of parameters. Here it limits itself to drawing a specific texture at a specific position that we specified when instantiating our game object. The Color.White parameter is a color mask that doesn’t really concern us at the moment, except that a White mask indicates to MonoGame to render the texture as is.
However, we are going to use a different overloaded Draw function:
We tell the sprite batch here to draw a certain rectangle of our texture to a certain rectangle of the viewport using a white color mask. Specifying the source rectangle is useful when a source texture contains many sprites on the same texture, which is usually the case for games with sprite animations where all animation frames of a game object, like a character bobbing up and down as it stands idle, are arranged in a grid in a single file.
When we specify a destination rectangle of a different size than the source rectangle, MonoGame will stretch or compress the image to fit. However, in our case, both rectangles will be the same size and we will use the entire terrain texture.
Our source and destination rectangles are thus defined like this:
var sourceRectangle = new Rectangle(0, 0, _texture.Width, _texture.Height);
var destinationRectangle = new Rectangle(x, y, _texture.Width, _texture.Height);
As you can see, it has the same width and height as our game object texture and is positioned at an x and y coordinates that mark the location of each terrain block on our grid, computed on the Y axis from -_texture.Height to the height of the viewport and from 0 to the width of the viewport for the X axis. The reason we start at -_texture.Height on the Y axis is to create that extra row of terrain that will scroll down into view.
Let’s fill our texture blocks:
public override void Render(SpriteBatch spriteBatch)
{
var viewport = spriteBatch.GraphicsDevice.Viewport;
var sourceRectangle = new Rectangle(0, 0, _texture.Width, _texture.Height);
We loop over the Y axis first and compute the y position of all our texture blocks. We know how many vertical blocks to draw by dividing the height of the viewport by the height of our texture. The outer loop is designed to go from -1 to the total number of blocks needed to accommodate the extra row we need to draw offscreen. Multiplying that number by the height of the texture, we get the exact Y coordinate where a row of texture blocks needs to be drawn. But there’s a twist… we add the game object’s _position.Y value to the total. That position is initialized to 0, but as the game runs, it will increase and that will cause all the rows to be drawn lower every pass through the Render() function.
Now that we know the Y coordinate of our row, we need to find the X coordinate. Similarly, we know how many texture blocks are needed by dividing the viewport width by the texture width. The inner for loop is designed to go from 0 to the total number of blocks needed to fill the screen. We then multiply that number by the texture width and add the game object’s _position.X (which will always be zero at the moment, but we never know if that will change in the future) and we get each block’s X coordinate.
Armed with the x and y coordinates, we can now compute our rectangles and fill the screen with blocks. When all this is done, we increment _position.Y by SCROLLING_SPEED, which will cause the background to shift down on the screen on the next rendering pass. But here is another twist… There is no need to scroll down more than one texture’s width. When we reach that point, we use the modulo operator to reset the _position.Y value, causing the animation to restart from the beginning.
Okay, we got a lot done and now we are ready to replace our old terrain game object with an actual TerrainBackground object. Open up the GameplayState class, and replace this line in the LoadContent() method
This will use our new TerrainBackground class and it will automatically scroll forever.
Finally, we need to position our fighter at the bottom of this screen, right in the middle. Change the part of LoadContent() that deals with adding our fighter game object with the following code:
_playerSprite = new PlayerSprite(LoadTexture(PlayerFighter));
var playerXPos = _viewportWidth / 2 - _playerSprite.Width / 2;
var playerYPos = _viewportHeight - _playerSprite.Height - 30;
_playerSprite.Position = new Vector2(playerXPos, playerYPos);
This code as is will not compile because we have not yet modified the BaseGameState class to keep a reference to the viewport dimensions used earlier. Instead, replace the _viewportWidth and _viewportHeight by 1280 and 720, respectively, or look at the code supplied at the end of the chapter for the complete solution.
We have now located the fighter 30 pixels above the bottom of the viewport, right in the middle of the screen, and we are finally ready to start working on our generic input manager.
Creating a Generic Input Manager
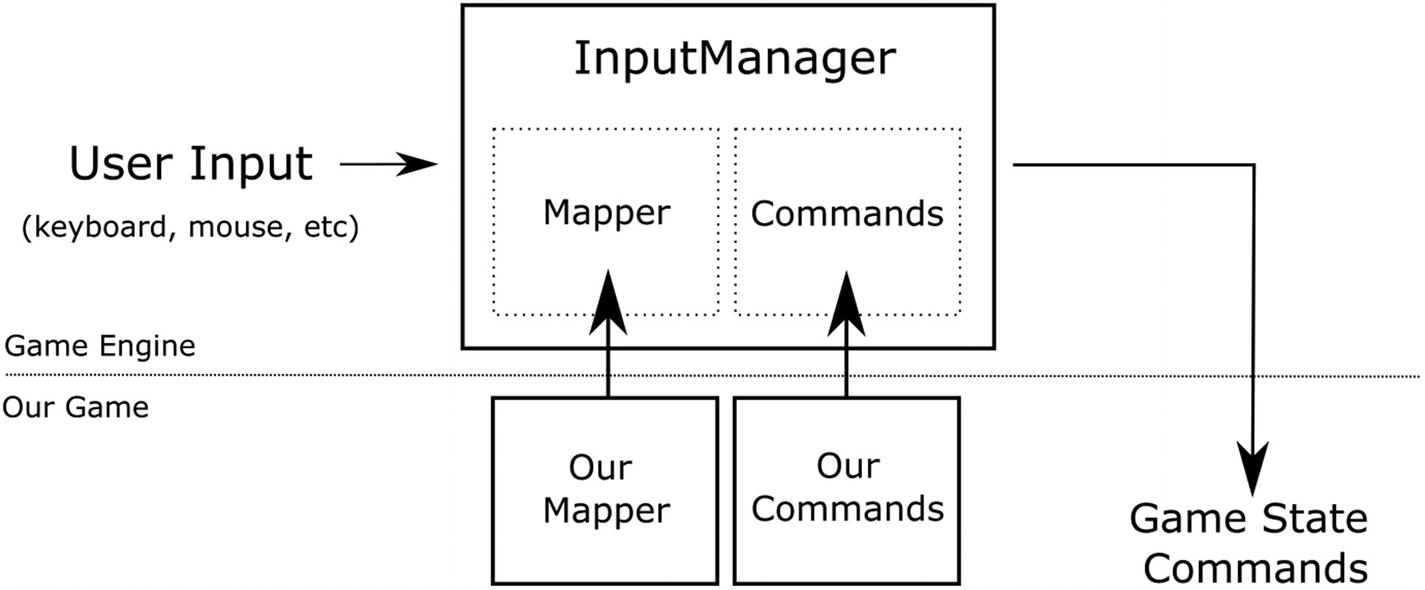
The goal of our input manager is to handle our player’s inputs as much as possible in a set of classes that can be reused in other games with minimal changes to make them work out of the box. We chose a pattern where the game takes in inputs from the keyboard, the mouse, or gamepads and transforms the input into commands that the game can compute. Each of our game state classes, like the GameplayState class, will only handle incoming commands instead of dealing with the input directly. See Figure 6-11.
Figure 6-11
Our game will extend the game engine’s BaseInputMapper and BaseInputCommand classes and provide the extensions to the input manager
For example, pressing the left arrow key on the keyboard during gameplay will generate a PlayerMoveLeft command that the game state will consume and cause the player sprite to move to the left.
Without knowing which commands are used by our game or which game state is currently in effect, the game engine will be able to correctly transform, or map, a player input into a game command. The idea is that each game state, like SplashState or the GameplayState, will provide the InputManager class in our engine with a specific Mapper class that knows how to map inputs to commands that the current state cares about.
It is worth noting at this point that we are not following the popular Command pattern. We simply chose the name “Command” to indicate a class that can be thought of as a command from the player to perform some action based on the user input.
The BaseInputCommand is an empty class, but it is used as a return type by the input manager and the BaseInputCommand classes. We will extend one mapper class and one command class per game state. Let’s look at the GameplayInputCommand class:
public class GameplayInputCommand : BaseInputCommand
{
public class GameExit : GameplayInputCommand { }
public class PlayerMoveLeft : GameplayInputCommand { }
public class PlayerMoveRight : GameplayInputCommand { }
public class PlayerShoots : GameplayInputCommand { }
}
What we see here are a few inner classes that all inherit from GamePlayInputCommand that we’ll use just like we use enums, with the main difference that we can constrain command types to our game states. The main benefit to this approach is that it’ll be easier to reason about which commands belong to which game state. As we add more game states, like menus, option screens, minigames, and so on, it will be important to have an easy way to keep things organized. But first things first, take a look at the GamePlayInputMapper:
public class GameplayInputMapper : BaseInputMapper
{
public override IEnumerable<BaseInputCommand> GetKeyboardState(KeyboardState state)
The preceding mapper is where we take user input from MonoGame, and for each input that we care about, we create a command that we add to a list. When the gameplay state class receives these commands, it will be able to execute on each one and manipulate the game state accordingly.
We now need to inject our mapper and commands into the input manager. Let’s start by adding a reference to the input manager in the BaseGameState class
protected InputManager InputManager {get; set;}
and initialize it in the constructor (here is where we get the viewport dimensions that we discussed higher up):
protected abstract void SetInputManager();
public void Initialize(ContentManager contentMng, int viewportWidth, int viewportHeight)
{
_contentManager = contentMng;
_viewportHeight = viewportHeight;
_viewportWidth = viewportWidth;
SetInputManager();
}
Here the intention is for our game state classes that inherit this base class to implement the SetInputManager() function. The GameplayState class does it like this:
protected override void SetInputManager()
{
InputManager = new InputManager(new GameplayInputMapper());
}
We can see now how the GameplayState class creates a custom-made input manager that will use our own input mapper, which happens to return gameplay commands that we can respond to. The SplashState class also creates its own input manager and has its own set of commands it responds to, which is the GameSelect command that triggers when the player presses the Enter key.
All we have left to do now is to respond to our game commands. Let’s rewrite the GameplayState class’s HandleInput() function.
public override void HandleInput()
{
InputManager.GetCommands(cmd =>
{
if (cmd is GameplayInputCommand.GameExit)
{
NotifyEvent(Events.GAME_QUIT);
}
if (cmd is GameplayInputCommand.PlayerMoveLeft)
{
_playerSprite.MoveLeft();
}
if (cmd is GameplayInputCommand.PlayerMoveRight)
{
_playerSprite.MoveRight();
}
});
}
Try it out! You should see a scrolling background and have the ability to move the fighter to the left and to the right… even offscreen! Wait, this is not supposed to happen. We need to keep our player within the viewport! Let’s add a function to block the player from going offscreen:
private void KeepPlayerInBounds()
{
if (_playerSprite.Position.X < 0)
{
_playerSprite.Position = new Vector2(0, _playerSprite.Position.Y);
}
if (_playerSprite.Position.X > _viewportWidth - _playerSprite.Width)
{
_playerSprite.Position = new Vector2(_viewportWidth - _playerSprite.Width, _playerSprite.Position.Y);
},
if (_playerSprite.Position.Y < 0)
{
_playerSprite.Position = new Vector2(_playerSprite.Position.X, 0);
}
if (_playerSprite.Position.Y > _viewportHeight - _playerSprite.Height)
{
_playerSprite.Position = new Vector2(_playerSprite.Position.X, _viewportHeight - _playerSprite.Height);
}
}
Here we check the position of the player object and reset it if it ever gets out of bounds. If the player moves too far to the left, its Position.X will become lower than zero, so we just readjust it to zero. If it moves too far to the right, the sprite will start going offscreen when its Position.X value becomes bigger than the width of the viewport minus the width of the sprite. In that case we reset that position as well. We also spend some time making sure the player cannot go up or down beyond the screen because we envision that we may want to start moving the aircraft up and down when we start adding enemies to the game.
Now let’s call our function after the player moves:
_playerSprite.MoveLeft();
KeepPlayerInBounds();
and
_playerSprite.MoveRight();
KeepPlayerInBounds();
Shooting Bullets
You may have noticed in the commands we looked at so far that there was a PlayerShoots command. Indeed, our fighter would not be very interesting if it was only able to move left and right. So, let’s shoot some bullets!
Follow the steps described in previous chapters to add the bullet to the game pipeline and create a new BulletSprite class with a function allowing the bullet to move up to the top of the screen.
public class BulletSprite : BaseGameObject
{
private const float BULLET_SPEED = 10.0f;
public BulletSprite(Texture2D texture)
{
_texture = texture;
}
public void MoveUp()
{
Position = new Vector2(Position.X, Position.Y - BULLET_SPEED);
}
}
Now we need to prepare the bullet objects and shoot them when the player hits the space bar. We are going to update the LoadContent() function in the GameplayState class to load the texture, but we won’t create the game object immediately. Instead, we’ll add them to the game only when the player shoots them.
private const string BulletTexture = "bullet";
private Texture2D _bulletTexture;
private List<BulletSprite> _bulletList;
public override void LoadContent()
{
// The rest of the code is omitted for brevity
_bulletTexture = LoadTexture(BulletTexture);
_bulletList = new List<BulletSprite>();
}
We are adding a list of bullets here for the purpose of tracking all the bullets that are going to fill the screen. We’ll want eventually to see if a single bullet has hit an enemy so we need a way to inspect all our bullets in an easy way. The list fits that purpose. When bullets are created, we will add them to the list of game objects (so they get rendered by the game engine) and to our list of bullets.
We also need to track the game time because we don’t want the player to be able to hold the spacebar down and fire an infinite stream of bullets. We want the game to be a little bit difficult and an easy way to do this is to slow down the rate of bullets to say… 5 per second? Here is how it’s going to work: when the player shoots a volley of bullets, we’ll note that the player is currently shooting and remember the current game time. If the player shoots again by keeping the spacebar down or by hitting it again too quickly, we will prevent the player from shooting if there was 0.2 seconds that elapsed since the last successful firing of bullets. So, let’s update the code to keep track of the game time:
private bool _isShooting;
private TimeSpan _lastShotAt;
public override void HandleInput(GameTime gameTime)
{
// ...
if (cmd is GameplayInputCommand.PlayerShoots)
{
Shoot(gameTime);
}
}
private void Shoot(GameTime gameTime)
{
if (!_isShooting)
{
CreateBullets();
_isShooting = true;
_lastShotAt = gameTime.TotalGameTime;
}
}
private void CreateBullets()
{
var bulletSpriteLeft = new BulletSprite(_bulletTexture);
var bulletSpriteRight = new BulletSprite(_bulletTexture);
// Position bullets around the fighter's nose when they get
// fired
var bulletY = _playerSprite.Position.Y + 30;
var bulletLeftX = _playerSprite.Position.X + _playerSprite.Width / 2 - 40;
var bulletRightX = _playerSprite.Position.X + _playerSprite.Width / 2 + 10;
bulletSpriteLeft.Position = new Vector2(bulletLeftX, bulletY);
bulletSpriteRight.Position = new Vector2(bulletRightX, bulletY);
_bulletList.Add(bulletSpriteLeft);
_bulletList.Add(bulletSpriteRight);
AddGameObject(bulletSpriteLeft);
AddGameObject(bulletSpriteRight);
}
Now we need to make our bullets move up on their own. We’ll do that by adding an Update() function that will get called from the main game loop. Let’s add it in our base class first:
public abstract class BaseGameState
{
public virtual void Update(GameTime gameTime) { }
}
Add this line to the MainGame’s Update() function to call our current state class’s Update() function:
_currentGameState.Update(gameTime);
Finally, let’s implement the Update() function in our GameplayState class to make all the bullets in our bullet list move up:
public override void Update(GameTime gameTime)
{
foreach (var bullet in _bulletList)
{
bullet.MoveUp();
}
// Can't shoot more than every 0.2 seconds. If it's been
Writing games is a lot of fun, but eventually there are a lot of tedious details that need to be taken care of. The code we have looked at here creates a lot of bullets that fly up the screen. The only problem is that once the bullets are offscreen, they are still being tracked and their position keeps moving up. Those bullets take up a little bit of memory, and even though computers are fast, iterating through our list of bullets dozens of times per second to update their position will eventually start slowing down the game. To prevent that from happening, we need to clean up bullets from the game after they have disappeared from the screen. After moving our bullets up, let’s clean them up, in the same Update() function:
// Get rid of bullets that have gone out of view
var newBulletList = new List<BulletSprite>();
foreach (var bullet in _bulletList)
{
var bulletStillOnScreen = bullet.Position.Y > -30;
if (bulletStillOnScreen)
{
newBulletList.Add(bullet);
}
else
{
RemoveGameObject(bullet);
}
}
_bulletList = newBulletList;
Summary
We did a lot of work in this chapter and our game is starting to look like a real game! We added a scrolling background after investigating how other games do the same thing. We also added a using input manager that is generic and reusable by simply creating lists of game commands and mapping user input to those commands. We also got a small glimpse of memory management and how we need to keep the game running smoothly.
Feel free to experiment. In the next chapter, we will add a music background track and sound effects when the player shoots bullets and when bullets hit enemies. Oh, that probably means we’ll start adding enemies to our game too!


