Chapter 5
Writing, Rehearsing, Recording, and Performing
In This Chapter
![]() Writing, arranging, and producing your songs and sound
Writing, arranging, and producing your songs and sound
![]() Learning techniques for arranging, recording, and performing
Learning techniques for arranging, recording, and performing
![]() Preparing for performances and recordings
Preparing for performances and recordings
![]() Realizing every show is part of a bigger picture
Realizing every show is part of a bigger picture
One way to become a better and more well-rounded musician is to learn the different aspects of your craft — from composing, writing, and arranging, to understanding the specifics of the room where you perform, and everything in between.
In this chapter, I take you through the different elements that have to work in harmony to enable you to create your music. Different rehearsing techniques can help you explain your sound to other musicians. And different recording techniques can help you produce the music you hear in your head. So by the time you’re performing on stage, your music has the energy and arrangement you envisioned.
 There are many different tips, opinions, and ideas on how to create music, write a song, or build an arrangement. Similar to art, however, they’re all just opinions. Studying different writing techniques can help, but it’s your song and you are the artist. Let your creativity flow and don’t get locked in to the idea of what a song has to be.
Creating and Writing Music with Others
It would be so much easier if the people you worked with could just read your mind, wouldn’t it? Or if you were able to simply get your ideas automatically out of your head and on to paper. Or if you could make your fingers, your voice, or your instruments do what you have in mind to the level you imagine it to be.
For many musicians, it’s a major struggle to explain the magical music they hear in their imagination. The more you can hone in and grow your abilities as a writer, player, communicator, and performer, the easier it is to make that magic happen.
 Learn the piano and the theory that goes with it. Whether you’re a drummer, DJ, singer, guitarist, or sax player, take some piano lessons and music theory classes so you can communicate clearly with other musicians.
Collecting and creating ideas
If you’re in the middle of creating a song and a section doesn’t seem to fit, save that melody, hook, bridge, or whatever for another song instead of just tossing it away. You never know where it could end up, or how it could inspire you later down the line. This is why it’s important to collect and save ideas.
With technology and simple recording programs like Garage Band, it’s easy to track, save, and keep your inspirations. Or if creativity strikes and you don’t know the notes, just hum the tune into your microphone, or you can even save it as a voice memo on your smartphone.
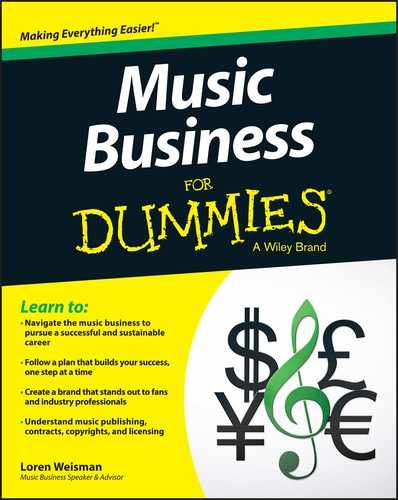
Collect ideas, riffs, melodies, rhythms, or whatever, and name the files accordingly. Don’t just save these bits of inspiration as “track 094.” Think about what you did, name them with clear filenames, and keep a spreadsheet to use like a palette of colors you can visit when you’re writing a song. For example, Figure 5-1 reflects the track name, the track length, and other pertinent info.
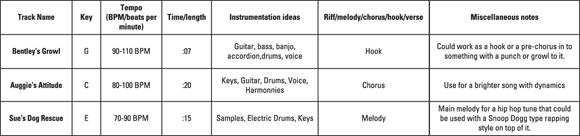
Figure 5-1: A spreadsheet can help organize your collection of ideas.
You can go further into detail, if you like. Make the info in the spreadsheet easy to reference so you can find what you’re looking for when you need it.
For example, say you have 15 hooks that don’t have homes or songs, and you’re working on a piece that has everything except for the hook. You can access your spreadsheet, check out your options, listen to the most appropriate in your collection, and see if there’s a sound you like.
Sometimes just composing pieces can help build up your database of ideas when you are working on full songs. Consider some writing sessions where you’re only coming up with a single section or one idea, instead of trying to create a whole song.
For every formula that this person or that person touts to make hit songs, there are millions of songs that followed that same formula and failed, just as there are many songs that have followed completely different formulas and became hits. Don’t get yourself caught up in the “I must pen a hit” mentality. It will strip you of your creativity.
Writing alone or with others
Do you feel better about writing alone, or do you prefer to have a writing partner, lyricist, arranger, or producer to write with? There are pros and cons to both; it comes down to your personal style, taste, and preference, as much as knowing your strengths and weaknesses.
For example, imagine you have written an amazing song that showcases your composition, arranging, and production abilities, but you have terrible lyrics. If you bring in a lyricist to pen your ideas, however, you showcase the quality of the song across the board.
The main pro and con to writing with others
The main advantage to working with one or more writers is that you have a second set of ears, ideas, reassurances, criticisms, and a second creative force for composing, arranging, and producing.
The main disadvantage is that sometimes too many chefs can spoil the soup. Some people just don’t work that well together, and it can cause miscommunication, hard feelings between two writers, and can show up in the music as well.
The main pro and con to writing alone
On the pro side of working by yourself, you get to be you, write what you want, and have total control of the song. Some writers and personalities find this easier to do. They might bring their songs to others for critique or criticism, but all choices, changes, and edits are for them to make.
On the con side, good or bad, it’s all on you if you write alone. Your songs, your way. Just be aware that your song might be improved with another set of ears.
Writing with and without others: The best of both worlds
Instead of focusing on whether or not you should be a solo writer, have a writing partner, or even writing team, try it all. Write by yourself; write with another person; and maybe try to find a couple different people to write a couple different songs with you. Then try getting together a group of people and writing something as a band or as a writing group.
Explore your creativity and your communication style. Brainstorm and let others expand on your ideas while you expand on theirs. Try different avenues to writing and find out what works best for you when it comes to the composition side of music.
When it comes to songwriting and composition, it’s a very personal thing. Learn how others have approached it, but make sure you’re writing in a way that works for you. The more you learn, the more styles and approaches you bring to writing and composition, the easier it is to find your voice, writing style, and the best writing approach for you.
 Protect yourself and your work as soon as it is created. Whether you write alone, with a writing partner, or as part of a writing team, make sure that it’s very clear how the writing is divided and get that both in writing and copyrighted immediately. When decisions about song spilt agreements (who wrote what and what percentage they get), producer rights agreements (how little or how much the producer receives in royalties or payments), musician releases (either a percentage or the clarification that all they receive is what they were paid to play on the song), and copyrights are taken care of right at the start, pay-outs become worlds easier in the long run. In Chapter 9, all these elements — including copyrights, publishing, and agreements — are discussed in depth. A lot of artists have gotten into horrible situations because the clarification of who wrote what, who owned what, and who got what wasn’t clear. Treat every song you write or write with someone else like it is going to make a million dollars for you. That way regardless if it does or not, you have everything in order, clear, concise, and legal.
Performing your material
After a song is written exactly as you want it, you can test the waters and explore your performance options. Think not only as the writer, but also as the arranger, producer, and even musical director. These are discussed in Chapter 3, where you can learn more about these and other music business careers.
How do you envision your piece being performed? Do you hear specific instrumentation? Does this song lend itself to a male or female voice? What kind of dynamics do you hear in your head? There are plenty of questions you can ask whether you or another musician is performing your work.
Remember that if you have someone else perform your song, they are going to put their touch on it. It’s very rare that you find an artist who will do exactly as you ask them to.
By now, you’ve probably played your song faster, slower, in different keys, with different accents and dynamics, and whatever other ideas you’ve had. The more you explore your music, the better idea you’ll have when you bring that song onto a live stage or in to the recording studio.
Always have a good idea of how you want your music to sound before you go into the studio. A great deal of studio time and money is wasted because the artist hasn’t explored different ways of playing their music. The early stages of performing a song should be considered as part of the writing process. At this point, it leans more toward the arrangement, production, and performance aspects, but it’s still writing and composition. Give your songs a couple of good test drives on a couple of different tracks and in a couple of different races to decide where you want the finish line. This can save you time and money when you get into the studio.
When you record it, you can record it again in a different genre, style, tempo, or feel. Sting’s “Every Little Thing She Does is Magic” was written and initially recorded as a very slow and soft guitar ballad, before it turned into the Police hit that had a wild, up-tempo pop-reggae feel.
Using others peoples’ music
Tread carefully when choosing to perform and record other peoples’ songs. It’s key to get all the permissions in place before you record or add other peoples’ music to yours.
Many have the mindset that it’s simply covering a song, or it won’t sell all that much, but if you get caught using other peoples’ copyrighted music without their permission, you go directly to jail, don’t pass go, and don’t collect $200. Ok, it’s not Monopoly, but the fines can be severe, and it’s not unusual to get caught. More about copyrights and permissions are covered more in depth in Chapter 9.
When covering a song, it’s crucial to find out who holds the publishing for that song so you receive a mechanical license (a license that gives you the right to cover and sell that cover). This enables you to play, interpret, or create an alternative version of the song while still paying a percentage to the copyright holder.
You may also come across publishing companies and estates that are kind and give you permission to use older music for little to no cost. Still, never assume, never second-guess, and never try to pull one over and think someone won’t find out you’ve used others peoples’ music without getting permission.
Always double-check to see if a song is in public domain. Some older songs that are listed as public domain allow artists to play, record, and distribute, but some of those songs now have owners. Also, just because you have verbal permission from an artist to use their material, make sure you run it through both the copyright holder of the song and the person or company that owns the publishing for that song. More about this in Chapter 9. There are artists who think they can give you permission for songs that they don’t have control over, even though they wrote them.
Covering someone else’s music
A great deal of artists cover songs on YouTube and other video channels. Although there’s a bit of a gray area in the legalities of it, if you’re not profiting from the performance and have no kind of ad revenue on the uploaded video, it can be a great way to cross-market your version of a cover and use the name of the song, the name of the artist, and the fact it’s your version to market online. As an extra precaution, tell people where they can find your website for more music and for more information, rather than saying that your music is for sale. Technically, that’s selling — and that can get you into trouble.
Do your due diligence and research before you cover another songwriter’s song. The best option is to avoid covers or having to spend extra time and money to use others peoples music.
The less complex you can make your career, the more revenues you can maintain. Leave the covers and other peoples’ music off the products that have your music on them, and you never have to share or offer up additional profits that should be yours.
Don’t dirty the profit waters. From an EP to an album to a digital release, make it your music or the music of people you are working with. It makes all the numbers cleaner and allows for more profits.
If you’re not a songwriter and working with other peoples’ music, try to connect with a single writer or writing team to reduce too many percentages going to too many people and leaving you with very little or next to nothing.
Rehearsing For Production and Performance
Many musicians see rehearsing as starting at the top of a song and rehearsing it all the way through every time. This can make the beginning of a song very strong but still leave the possibility that potential issues can appear further along in the song and at the end of the song as well.
Other issues with the performance of a song can arise from misunderstandings on sections, changes, chords, dynamics, and overall communication. This is why it’s a crucial step prior to recording in the studio and performing live to rehearse your songs with your band or other musicians.
If you’re hiring session musicians or working with other band members or musicians who are friends, work to get on the same page or chart so the songs sound the best they can.
You have a little more room to move for the imperfections during a live performance, but the problems are put under a microscope when you record. It’s also the reason why recording costs can mount up. Your efforts to rehearse your songs the right way make all performances that much better as well as help you to get a tighter, more professional-sounding recording that saves you a whole lot of money.
Rehearsing for results
The following is a list of techniques for rehearsing your songs for arrangement, production, and performance to achieve the best sounds in the fastest ways. There’s no right or wrong way to rehearse; find the method that works best for you.
- Metronome rehearsing: Practice your music with a metronome. Can you stay in time, or do certain sections fluctuate too much? It’s not about being a robot; it’s about defining the time, tempo, and groove that’s going to work best for the song.
- Heavy dynamics: Try playing across the spectrum of loud! Sometimes the loudest parts can mask and cover issues that need to be addressed to make your music sound that much better.
- A little faster and a little slower tempos: If you have a locked-in tempo for your song, rehearse it a little slower and a little faster than the tempo you have set for it. By practicing on each side of the tempo, you’re able to have a better sense of when something is rushing or when it’s dragging. It also gives you a better sense of the pocket of the song and exactly where you want it to be played.
- Much faster tempos: Whether you know the exact tempo of a song, or you’re just dialing what feels right, rehearse your songs at considerably faster tempos. By rehearsing at a much faster tempo, you can check the technical ability of the band to run through the melody, rhythmic hits, chord changes, and transitions of a song.
- Much slower tempos: By slowing down the song and rehearsing it as slow as possible (with a metronome to keep you in check), you can identify a variety of problems that might come from skipping over an issue that isn’t being caught because of its normal speed. Think about the lick that you know how to play when you play it at a normal tempo, but when it’s slowed down, you trip all over it because there’s more space for things to go wrong.
- Different keys or modulations: Test the waters of different keys or modulating inside of the key to bring a different flavor, but also to see how the song sounds and how you can perform it with another set of notes. Trying different keys can also introduce creative ideas on soloing, or show where you might choose to add a modulation to the key you have for the song. Again, it builds up the strength of the performance and the musicality, too.
- Different time signatures: This is a great one to get your rhythmic and melodic phrasing in check but also to create new approaches and options to a song. Add a beat or subtract a beat from the time signature of a song and see how you phrase ideas with a beat missing or an extra beat added.
- Switch genres: If you have a song with more of a grunge feel, try it as a jazz piece. If you have something that’s more hard rock and punchy, try it with a reggae touch. Experiment with a genre change to reinforce the feel or genre the song is in and give you additional ideas on small nuances and embellishments that you can bring in from one genre to another.
- Minus-one rehearsing: Make the vocals go away, or take out the drums, bass, or even guitar in a song and see how it feels to rehearse it that way. Sometimes certain instruments become a crutch for other player’s ears, and those players might not have their specific parts down solid.
-
Invisible or blind rehearsing: I like this one for musicians who are going into the studio as well as rehearsing for live shows. Turn around so you can’t see each other or literally put on the blindfolds. (Bandanas, ties, and T-shirts work fine, too.) Think Luke Skywalker and Star Wars. You may not feel the force, but can you feel the tune, the changes, and the transitions without eye contact from the other musicians?
In the studio, eye contact might be blocked and you may even be recording a part at a completely different time than the musician you need to lock into. On stage, if the lights are in your eyes, or if the stage is large, you might not have visibility there as well.
- Backward order of the song: Do you know your song front to back? How about back to front? I’m not saying you should practice the song in complete reverse, but by playing each section from the end back to the beginning, you can get a different perspective on transitions and changes that can help when you record or perform the song from the beginning to end in the right order. Even if the song is a simple verse/chorus–verse/chorus type of format, practicing backwards for the dynamics and singing the last verses first can help you see if energy or endurance might be an issue that should be worked on by the singer.
- Looping sections: An offspring from the play-it-backward idea is to loop sections, and play just those sections over and over and over to tighten them up and lock them in. For example, play the bridge — just the bridge and only the bridge — section of a song from start to finish. As you get to the end, start over again at the top of the bridge. (Rinse and repeat!)
- Playing it front to back: And last but not least, practice the song the way you want to record it or perform it.
From slowing down your songs to slowing down the different exercises that you work on when practicing your instrument alone, get out of the mindset of trying to do everything as fast as you can and get into the mindset to play it as well in the faster tempos as you can in the slower. The better the understanding of a song, part, solo, exercise, or rudimentary phrase at the slowest tempo, the better you understand the space, mechanics, and motions that are missed when you try to speed through it.
The extra attention to detail and efforts you put into rehearsing, the better your proficiency, musicianship, technique, and overall ability is in your songs and your performances. It also saves so much time and money in the production process from tracking to improvising elements, to making additions, changes, and embellishments.
Rehearsing to arrange
You have your songs where you want them from a foundational and basic arrangement standpoint, but how do you want to arrange additional overdubs, horn lines, backing vocals, and other layering that builds in to the arrangement? Using many of the ideas from the previous list can help you figure out arrangements as well as who you might want to bring into the rehearsal room and potentially include in your recording.
After you find something you like, test it out with everyone playing together. By playing around with arrangement ideas and embellishments in rehearsals, you have more time to explore different sounds without incurring studio-time costs.
As you finalize arrangements and lock in the parts you want for a live band or the studio, make sure to make charts. Having charts for the song (the roadmap for your songs; charts are covered in Chapter 6) and the arrangement can help session players knock it out instantly in the studio. This also makes it easier when you have to hire a backup or sub player to play these parts live. Get all of your songs charted and have them converted to simple PDFs that you can email to anyone who needs them. It’s that much easier to get that track recorded when everyone is on the same page.
Rehearsing to record
Using the previously mentioned techniques while rehearsing for recording helps make the studio experience go that much better and take much less time.
If you have a producer, talk to him or her about the production plan (discussed in more detail in Chapter 6) and the tracking order to get an idea of what’s going to be recorded when. The more prepared and in the zone you can be for the recording sessions, the better.
See if you can book a rehearsal session in the recording studio where you plan to track. Ask if the studio has any open dates or if you can wrangle a deal to have the final rehearsal in the studio.
The best rehearsing in preparation to record boils down to communication and planning. The more you know about what to expect when you enter the studio, the less surprised and the more effective you’ll be.
If you hire top-notch session players, you won’t have to rehearse as much. Still, adding a little to a rehearsal budget, or booking the studio for a possible rehearsal prior to getting everything set up and going, can get you that much more dialed in with your musicians.
Rehearsing to perform
How do you play on little sleep, little energy, and little drive? Probably not as well as you would if you were well rested, had plenty of energy, and had a full night’s sleep. Still, many bands lose the endurance and energy toward the end of a show and the performance can become weaker.
When performers are tired, a live performance can lose energy. From the heat of the lights to a little too much alcohol, the volume on the stage and everything else, can begin to have an effect on the songs later in the performance.
People talk about how much you have to rehearse to have the best live show. One great way to build up your endurance is to rehearse full sets of full shows when everyone lacks sleep and energy. If you’re in a place where you can rehearse at any hour, try getting everyone in to play and record at two o’clock the morning.
Practice your song transitions, and track them with different set lists. How do you end one song and go into the next? During certain rehearsals, focus on the end of songs and how they segue into the next. There can be magic in a moment of silence or transition. Rehearse the moves between the songs to help the motion of the songs and the sets as a whole.
To see how you look while playing, take video recordings of rehearsals and shows to review later. Take a look at you and your band. Seeing yourself on video can help you determine if you like how you look while performing. Maybe you need to make better eye contact with the audience; maybe you need to move around the stage more. Or maybe you need to move less. A video tells the truth about your appearance while you perform.
From working on projecting your energy when you have none, to how one songs flows into the next, to how you present yourself while playing live, rehearsals that focus on performances can help your live show become more memorable.
Rehearsing communication
Outside of the music, communication is the biggest element that ties everyone together. Good communication is rare in all businesses and artistic forms. Musicians who can connect, resonate, react, supplement, complement, and have a fundamental awareness of the person, the sound, the song, the dynamic, and the motion trumps the best technician or virtuoso type player tenfold.
Intended information and the agreed upon visual cues to the melodic, harmonic, and rhythmic hints and messages that can be shared are great, but also that internal connection is important. Understanding the personalities, the confusion, and the clarity among musicians is key.
Some are dominant communicators; others are submissive communicators. ’Sound weird? I’m not talking about “Fifty Shade of Gray” type of stuff. It’s simple — different people have different personalities that affect how they communicate, how they perform, and how they react to others. It’s about how you feel most comfortable communicating, engaging, reacting, and resonating with different people.
From more dominant personalities both in communication and in technique to the technical and softer styles of others that might musically enjoy someone else to take the lead, it’s all about communicating in a way that works for different people with different needs that present different styles of communication.
It’s not about getting everyone on the same page in a way where musically and creatively everyone agrees. It’s about getting different people, like different notes, to resonate and create harmonies. If everyone agrees on the same points and communicates the same way, then all you have is unison and uniformity. When people are able to work with their differences, similarities, and dissonance of how they play and communicate, that communication, performance, and connection can be so amazing.
Most of the elements of communication and rehearsing come from the foundation of connecting with others when not playing. The better you can connect with other musicians the more practical, creative, and inspirational your connection and communication can be.
Preparing For Performance
All the smallest pieces put together the right way allow for the best results. Just like a chef in the kitchen who knows how to add the smallest splash of this or the lightest touch of that to completely transform a dish, the same can be said for the preparation that goes into a performance.
A great deal of performance prep comes down to preventative maintenance and advanced problem solving. Make sure your musical instrument is ready to for a performance. If you’re a drummer, make certain you have backup drum heads. And if you’re a guitarist, don’t forget those backup strings — and maybe a backup guitar.
Have extras, backups, and the tools to repair the small and large issues that can occur. Invest in the right cases to allow for the safest transport of your equipment because taking care of the gear that enables you to perform your best is some of the best preparation possible.
Your body needs preparation, too. From simple stretching before and after a show from the drummers hands to the vocalists vocal chords, to the exercising and making sure the muscles you use the most often are in shape and able to support you. It might seem obvious, but enough sleep and even a nap before shows can help you stay energized. It’s also important to eat the right types of foods to keep you energized and not weigh you down or tire you out while you’re on stage.
Take care of your main instrument, which is you! Do everything you can to keep your energy up and keep you on top of your game and performance.
Your sound on stage and the sound check
What your music sounds like on stage and what it sounds like in the audience are two very different things. Every room, every stage, every sound person, and sound system is different. You might know exactly what you want to hear, and you think you know what’s being heard out front; however, in most cases, you don’t have a clue And generally speaking, the distance between what you think is being heard and what is actually being heard are worlds apart.
Ask the soundperson what they need from you, and tell them the basics of what are important to your sound. Put together a basic stage plot and input list that outlines the location of the instruments and the usual microphone setups for that configuration. (Stage plot and input list examples are available online.)
The more advanced notice a venue or sound person can have with your setup, the better the sound they can give to the front of the house and on stage.
The sound person works for the venue and is paid for by the venue. They don’t work for you. Being rude to the soundperson that is working to get the best sound for you and helping with your monitors is a bad way to go. Ask nicely instead of telling them what you need. Don’t bark orders or come off as rude. More than likely, you’d rather not go that extra mile to help someone who’s yelling at you. Your sound person is no different.
Even if you’re dealing with an incompetent or inexperienced sound person, work with and talk to them about your ideas with which you’ve had success, or that you’ve seen others do successfully.
Getting the best sound on stage and in the room comes from keeping everything you can in check and running smoothly. In the following sections, I tell you seven things to keep in mind to get the best sound on stage as well as out in the audience.
Keep communication between you and the sound person strong
Ask your sound person if they have any preferred signals to increase or decrease the volume. Get his name, and give him a list of names or the stage plot so he knows your names as well. Also, avoid asking the audience for sound feedback. It’s rude to the sound person. You have someone at the front of house that is working to give you the best sound. Asking people what they want to hear or what they think can come off as rude and unprofessional on your part, while disrespecting the pro.
This also falls under listening to the sound person as he sound checks and giving him what he asks for. If he wants to hear the bass player, don’t start adding guitar lines. If he’s asking for you to play just the bass drum, don’t add some insane drum solo. The quicker he can get the isolated microphones checked and addressed individually, the faster he can get to giving the band the best sound as a whole. The more he has to ask for something again, the longer it takes to complete your sound check.
Keep the tempers and egos in check
It’s a fact of life; things are going to go wrong, and requests you have might not be heard or addressed in a timely fashion. Throwing a fit, yelling at the sound person, throwing a microphone stand, or any other childish, immature action is only going to make you look like the fool and keep the sound person from wanting to help.
Keep the volumes where requested
This goes back to the idea that what you hear on stage is not what’s heard in the room. The volumes are set to help get the best sound for the audience out front. Don’t assume you know what’s going on out front and then make changes that hurt your overall sound. Three universal points are as follows:
- If you are asked to turn an amp down, turn it down.
- If you aren’t sure if it’s being heard in the front of house, ask.
- If you are having trouble hearing it on stage, ask for it to be turned up in the monitors.
Keep aware of changes and problems on stage
Don’t assume that your sound person can see that you have a problem or that he knows your set and your songs. The more you can keep the sound person aware of the dramatic dynamic changes, the issues and the problems, the easier it is to hide those problems or keep problems from happening. The following are five common messages you need to tell the sound person:
- If you break a string, tell the sound person.
- If you are switching guitars, tell the sound person.
- If you are switching from brushes to using drumsticks, tell the sound person.
- If you have a song with major dynamic changes, tell the sound person.
- If anything is happening on stage that has a dramatic effect on the front of house sound, tell the sound person!
- Give the sound person a set list as well. Include basic song times and key changes for songs both dynamically and instrumentally.
Keep hands off the sound equipment
Don’t adjust a microphone on the drums or on the guitar amp without asking first the sound person. Again, every room is different, and most solid sound people know how to capture the best for that room. You can discuss options that worked well in other venues, but remember, this isn’t other venues.
Keep the liquids away from the electronics
Look at where you’re putting your water, beer, or drinks. Make sure you’re not setting cans and glasses in a place that could cause a spill that shorts or destroys equipment. Liquids and electronics don’t mix well.
Keep your feet off the cords (and don’t swing them like Roger Daltrey)
Keep an eye on where you’re stepping and standing. Sometimes there are a lot of cords and occasionally you might step on one, but get off of it as soon as you realize you did. Respect the gear of others like you would want them to respect your gear. On that same note, don’t swing a microphone around by the cord like Roger Daltrey from the Who or toss it on the stage as part of your “vibe” or “intensity.” Find other ways to showcase those elements without damaging other people’s gear.
Drummers, practice playing your drums with microphones on the kit. The main goal is to learn how to move around your drums without hitting the microphones. This is a major complaint both in the studio and in venues. Drummers who don’t have the best technical prowess and ability can end up smacking the hell out of microphones and damaging them. Be aware of where you hit and where you aim. This makes sound people much happier and allows some to put up better microphones to get better sounds because they know you won’t damage their stuff.
Getting your sound on stage sounding its best is a combination of your professionalism, your equipment being in top shape and ready for the stage, and how you work with the sound people. When those three elements are in harmony, your harmonies, melodies, and music sound that much better.
Setting up and breaking down
As crazy at it might sound, practicing and rehearsing your gear setup and breakdown can actually help your career. Setting up and breaking down is more than just the pain-in-the-butt part of any show; it’s something that can help you stand out with producers, venues, managers, other bands, and music business professionals.
Your ability to expedite the fastest setup and get going as well as your proficiency to break down, get off the stage, and out of the way, all while protecting and securing your gear showcases a professionalism to the venue and other bands that is more and more rare these days.
Of course you want everything set just right to allow you to have the best performance and that at-home feel vibe of just sitting down to everything in perfect order, but the reality is that with every recording session and every show you have to break it down from wherever the gear is, load it into where-ever you’re playing, set it up so that’s exactly as you like it, break it down again, load it out, and then load it back into your house or rehearsal space to be set up yet again.
I always used to tell people, I work from the same desk; I just switch offices every day.
Still, the key issue breaks down to these core elements:
- The fastest load-in and load-out
- The fastest setup
- The fastest breakdown
- All while being prompt, professional, and courteous
Load in, load out
Being able to load in quickly and in an organized way has its advantages. Aside from making short work of a hard job, you can likely get your car or truck parked easier. You can even take the extra time to explore the venue and stage, as well as learn the order of the evening. And when you get everything carted in and stored quickly and securely, you can take a big, deep breath. From the venue’s standpoint, you’re giving the impression that you can move and get things done.
Loading out involves accounting for your gear and getting it back to your vehicles safely and securely. Pay attention and make sure there’s no chance of a mix-up where someone takes your gear and you end up with theirs.
The best load-ins and load-outs come from knowing how the puzzle of your gear fits best as it is being loaded into and out of vehicles, and as it’s brought into the venue and up to the stage. Always remember to pack first what you don’t need to unload until last.
Usually the drummer has the most stuff to set up. Packing her items to load out first, especially if you’re loading up onto the stage, allows her to get set up faster and for sound check to get moving sooner.
Number your cases. If you have others that can help you load in or out, color by numbers! Make it easier to know what should go first and what should go last. It can also help with the inventory of cases to be sure that every single one was packed up. If you are like most bands, not every case looks the same; but if you have them all numbered as 2 of 14 and add a sticker with your website, email, phone number, and name, you’re taking fewer chances and making it that much easier to track your equipment back to you.
Setting up
The quicker you can get everything set up, the quicker sound check can start and the more time you have to dial things in. When you have the setup down pat, you get more time to focus on microphone placement, the mix, and the monitors. Certain places allot a specific amount of time for the setup and sound check. If you’re like me, you’d rather spend the bulk of that time in check, instead of getting ready for sound check.
Best practices for your gear in motion
Put in that extra effort and practice the way you load in and out, set up and tear down so you can complete each task faster, more efficiently, and make things easier on yourself at every step.
Practice the load
When it comes to loading in and loading out, it’s a good idea to actually practice this a few times outside of a show. Load-in and load-out from your rehearsal space. And bring a stop watch and time it, too! See what makes it go faster and what makes it drag. Have a loading rehearsal where it’s all about loading in and loading out. As crazy as it may sound, it saves you so much time, effort, and energy.
Saving time on the setup can come from practicing setting up your gear from everything being in cases or boxes to the point that you are plugged in and ready to go. But don’t forget to add two things to the mix to help you set up that much quicker: an emergency case for the stage, and to mark you gear.
Your emergency case has all the extra backup gear and also that extra extension cord or power supply in case the venue doesn’t have it. Never assume a venue has everything. Bring the backups you might need and make sure they are clearly marked as yours. Include extra batteries, duct tape, screw drivers, Alan wrenches, and everything you would personally need in an emergency kit.
And then mark up your gear. Whether you scratch a notch in to a cymbal stand or add a dab of paint or magic marker to that V point on your keyboard stand, mark up your gear so you know exactly where you want to have it be.
Musicians are fickle and they like things a certain way. I know. I had to have my toms at just the right angle, the cymbals perfectly where I wanted them and my stand just in the right locations. Even with my finicky, OCD approach to how I wanted to have my drum kit set up, I could have my large drum set; the one bass drum, four toms, two snare, drums, seven cymbals, and additional percussion up and right where I liked it, in under five minutes. Because everything was marked.
I had a drum rug that had taped markings of where every single stand was supposed to be. Every stand was numbered and marked from where the tripod should be extended to all the way to the angle of the cymbal or the top was supposed to be. That way I could set up and immediately work from the numbers and the markings. I got the exact positioning I wanted and was set up that much faster.
When you make those markings, I recommend using magic marker. It’s easier to clean off and as you adjust your setup as your abilities or styles change, it makes it easy to alter the placement. By marking up your gear, you’re able to achieve that perfect setup with everything in the perfect location that much faster and in turn, you get more time to focus on the sound check.
A picture is worth a thousand words and it could save you a thousand seconds from your setup time (that’s only 16 minutes). Take a picture of your setups, where the knobs are set, or how you like your settings. Whether you need to slightly adjust them for a session or for the sound of one room to another, a simple picture can help to reduce and simplify your setup.
Breaking down and clearing the stage
In situations where there’s an act waiting to go on after you, or if it’s the end of the night and the sound crew is waiting to go home, get off the stage as fast as you can so that the next band can get going or your gear can be loaded out for the night.
You just finished a great set in the middle of a night that has three bands on the bill. Your part of the show is over, and now you’re clearing the stage in respect for the next band that’s coming up.
Breaking down on stage is one of the most disrespectful things you can do, especially when another band and the sound person are waiting for you to clear that stage.
Clear the stage as quickly as you can. As you go back to get something, see if the other band wants help bringing up their stuff. The more aware you are of the night as a whole, the more opportunities and better reputation you achieve.
Find out before the show where you should clear your gear. Take as much as you can in each trip, and take your trash off the stage, too. Broken sticks, strings, set lists, drink cups and water bottles, or whatever else. Leave the stage as you would like to receive it, even if the act before didn’t do it for you. Be the better person and show some class.
Move your cases to the clearing area if you are storing them elsewhere and finish loading out. Leave one person talk to people or run the merchandise table, but get that gear moved and stored. When you leave gear at the side of a stage, you create the opportunity for theft.
Make life easier on yourself and your bandmates by determining the best load-in/load-out order to streamlining your setup to ensure everything is where you want it on stage, and knowing the fastest ways to clear a stage. You appear more professional and respectful and make hard work that much easier all around.
Set lists, set times, getting set!
Focusing on the format and the reactions of a set list can give a whole new and positive edge and effect of a show.
When noticing that certain songs seem to keep the energy of the audience going that much stronger while those same songs in a different order don’t seem to have the same impact, take note and consideration for the order of the set.
Pay attention to how opening with a certain number of songs in one order, bring the people closer to the stage sooner, as opposed to those same songs in a different order. Keeping that awareness of what draws people in and what makes people seem dull can help you lock in much more effective, energetic, and engaging set lists and order.
Set lists can be tricky, and if you don’t track your different set lists and the audience reactions to them, you’re losing out on priceless information that can help you develop the best sets to create the most audience engagement.
Keep every set list you create and break it out into a spreadsheet with specific pieces of information, as shown in Figure 5-2.
Figure 5-2: Your set list spreadsheet should contain pertinent information.
Keeping track of a couple simple pieces of information can help the formation of your set list as well as enable you to know when to make a change or adjustment.
Print out the set lists well before your performance and make sure everyone is on the same page (no pun intended) when playing. You’ll look that much more professional when you’re not calling out song titles throughout the night.
You can add extra notes as helpful reminders between songs. Because sometimes musicians get carried away in the moment, many forget to say the name of their band or promote the latest album or product. Have prompts scattered across the set list to mention the name, the website URL and the social media pages, as well as point out the merchandise table. This helps you market yourself while the spotlight is on.
Organizing and changing up the set lists as you track the reactions helps you create better shows with a better order of songs in them. By adding notes regarding marketing plugs to saying something about the venue, the city, or the place that you are in, you connect that much more with the audience. Let your set list be like a map to a successful night as it leads you through a great show.