14. Participating in LinkedIn Groups
In this chapter, you find out how to participate in LinkedIn groups, manage the groups you join, and create your own group.
![]() Searching for and joining groups
Searching for and joining groups
![]() Participating in group discussions
Participating in group discussions
![]() Using the Jobs tab
Using the Jobs tab
![]() Using the Promotions tab
Using the Promotions tab
![]() Managing your groups
Managing your groups
![]() Creating a group
Creating a group
LinkedIn groups offer a way for like-minded individuals to share and discuss relevant topics related to the focus of the group. With LinkedIn groups, you can network and share ideas with industry peers, discover job leads and recruit quality talent, promote your career or business, and learn about a wide range of professional topics.
Getting Started with LinkedIn Groups
LinkedIn groups take many forms. There are groups for alumni, associations, nonprofit organizations, professional interests, corporations, general networking, conference attendees, and personal interests.
Let LinkedIn Suggest Groups for You
Another way to find good groups to join is to let LinkedIn suggest groups for you. You can view recommended groups in the Groups You May Be Interested In section on the Your Groups page. (Select Groups from the Interests menu.)
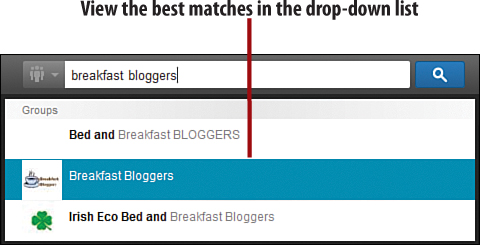
1. Select Groups from the search menu.
2. Enter keywords related to the group you want to find. For example, you could enter the name of a company, school, professional association, skill, or interest.
3. Click the Search button.

Options in the Drop-Down List
Before clicking the Search button, review the options that display in the drop-down list. If you’re searching for a specific group by name, you might find it here and can click that group in the list to open it. If you’re looking for all potential groups on a particular topic, clicking the Search button offers more choices.
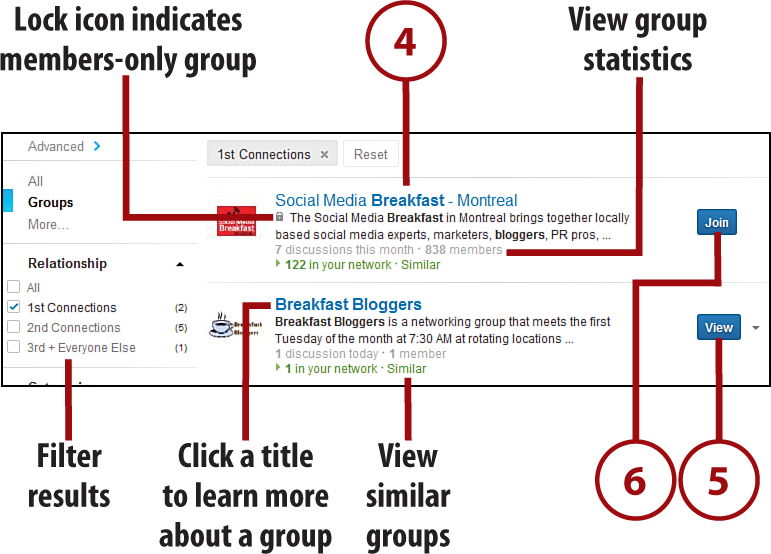
4. LinkedIn displays potential matches.
Keeping Your Group Activity Private
LinkedIn publishes an update to your network when you join a group with notifications enabled. If you don’t want to let your network know when you join a new group, you can keep this activity private. For more information, see the section “Turn Off Group Notifications,” in Chapter 4, “Customizing Your LinkedIn Settings.” Also remember to hide this group’s logo on your home page (see the section “Manage Group Settings,” later in this chapter).
5. Click the View button to preview an open group.
6. Click the Join button to request to join a members-only group.
What Happens Next?
If you click the View button, you can preview the group and click the Join button in that group if you decide to join. You are given immediate access to the group and can modify your group settings. See the section “Manage Group Settings,” later in this chapter.
If you click the Join button, LinkedIn sends the group owner your request. See the section “Follow Up on a Request to Join a Members-Only Group,” next.

Follow Up on a Request to Join a Members-Only Group
You can’t participate in a members-only group until the group owner approves your membership. While you’re waiting for approval, you can follow up with the group owner (give this person at least a week to respond before sending a follow-up request) or withdraw your request to join. If you clicked the Join button by mistake, withdrawing is the easiest way to resolve the problem.
1. Select Groups from the Interests menu.
2. Click the title of the group whose membership is pending.

3. Click the Send Message to the Group Manager link to follow up on your request to join.
4. Click the Withdraw Request to Join link to withdraw your join request.

Participating in Group Discussions
Participating in discussions is one of the greatest values of joining a group. With LinkedIn group discussions, you can view discussion threads for relevant professional information, add a comment to a current discussion, start your own discussion, or share news and links with group members.
Focus on Quality, Professional Discussions
As with everything else on LinkedIn, focus on intelligent, meaningful discussions that add value to a group. Don’t post a sales pitch or irrelevant comment just to lead people to your profile.
2. Click the title of the group you want to open.

3. Click the title of the discussion you want to open.

4. View the discussion’s detail page.

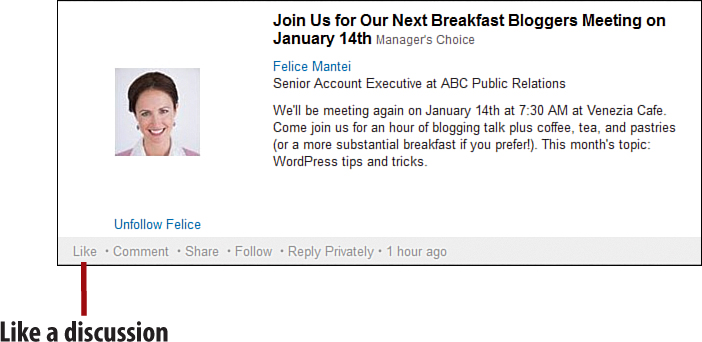
Like a Discussion
If you find a discussion item particularly useful and interesting, you can show your support by clicking the Like link below it. This link is available on the Discussions tab or on a discussion’s detail page. Liking a discussion alerts other group members as well as your followers that you found the discussion worthwhile. If you change your mind or click this link by mistake, you can unlike the discussion by clicking the Unlike link (the Like and Unlike links act as toggles). If others have previously liked a discussion, LinkedIn displays this number in parentheses after the Like link.
Adding a Comment to a Discussion
You can add a comment to a discussion on the Discussions tab or on that discussion’s detail page.
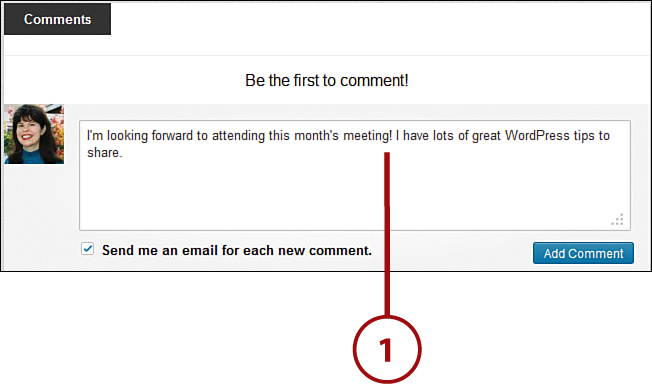
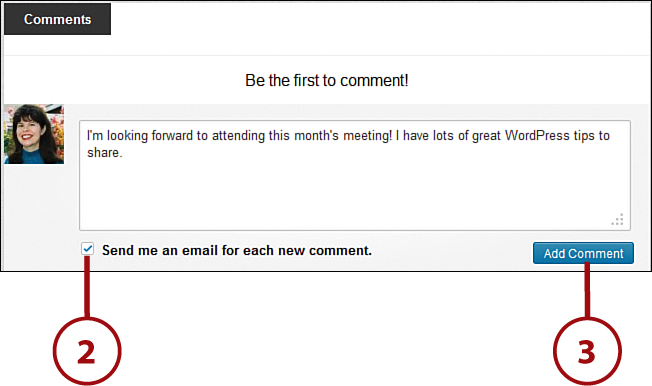
1. Start typing in the Add a Comment box below the post you want to comment on.
Where’s the Add a Comment Box?
If no one has commented on or liked a post, this box doesn’t display. Instead, click the Comment link to open the Add a Comment box.
2. If you want to receive email notification of any new comments in this discussion, select the Send Me an Email for Each New Comment check box.
3. Click the Add Comment button to post your comment.
Editing or Deleting a Comment
After you post a comment, LinkedIn gives you 15 minutes to revise it. Click the Edit Comment link below your comment to make any changes. Click the Delete link to remove your comment from the discussion at any time.
4. LinkedIn displays your comment below the discussion.

Share a Discussion
Sharing discussions on LinkedIn—or on other social sites such as Facebook, Twitter, or Google+—is a good way to gain visibility for open groups. The exact steps to share vary based on the site you’re sharing on, but the concept is the same. In this example, you share a LinkedIn group discussion on your public LinkedIn news feed.
1. Click the Share link below an open discussion.
2. Click your preferred share button: LinkedIn, Twitter, Facebook, or Google+. In this example, you share on LinkedIn.

The Share link displays only on a discussion’s detail page. It doesn’t display below the discussion summaries on the Discussions tab.
3. Enter your comments about this discussion.
4. Optionally, post this discussion in another group.
5. Optionally, share this discussion in a message to one or more LinkedIn connections.
6. Click the Share button.

Follow Group Discussions and Members
If you want to know when someone adds a new comment to a discussion you find particularly relevant, you can follow the discussion. To do so, click the discussion title and click the Follow link on the detail page.

LinkedIn sends you an email anytime someone adds a comment. By default, you follow any discussion you start or comment on unless you specify that you don’t want to receive email notification. If you decide you no longer want to follow a discussion, click the Unfollow link below it. (Unfollow displays only for discussions you’re following.)
To follow a group member, click the Follow [First Name] link below that person’s photo. You can unfollow people by clicking the Unfollow link below their name or by going to the Discussions You’re Following page. (Click the Search tab to access this page.)
Reply Privately to a Discussion
If you don’t want to add a public comment to a discussion, you can send its author a private message using one of the following options:
• On the Discussions tab, click the down arrow to the right of the discussion title and select Reply Privately from the menu, or...
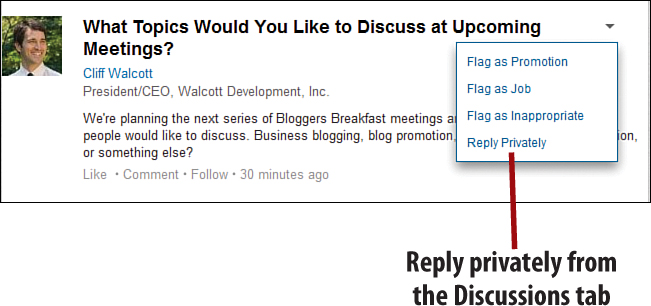
• ...on a discussion’s detail page, click the Reply Privately link below the discussion text.

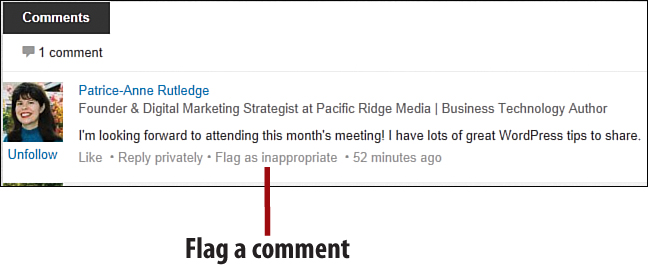
Flag Discussions and Comments
If you find a discussion or comment you feel is inappropriate, you can notify the group owner about it.
• You can flag a discussion as inappropriate (or belonging on the Jobs tab or Promotions tab) by clicking the down arrow to the right of its title on either the Discussions tab or discussion detail page and selecting the appropriate option from the menu.

• To flag a comment, click the Flag as Inappropriate link below it.
Start a Discussion
On the Discussions tab, you can start your own discussion or share relevant links with other group members.
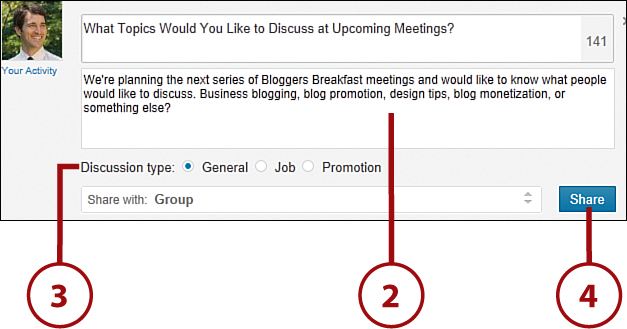
1. Enter up to 200 characters in the Start a Discussion box at the top of the Discussions tab. This text serves as your discussion headline, so consider carefully what you want to enter.

2. The section expands to include a second text box where you can add more details (up to 4,000 characters).
3. Specify a discussion type: General, Job, or Promotion.
4. Click the Share button.
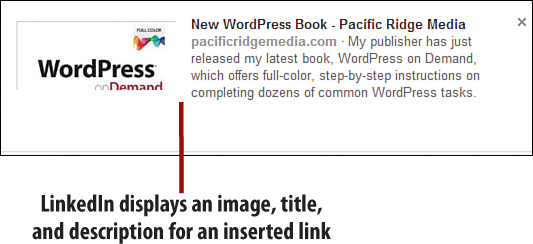
Inserting a Link in a Group Discussion
Optionally, you can insert a link in a group discussion by copying and pasting the URL in the Add More Details text box. LinkedIn searches for this URL and displays a title, description, and photo from the content it finds on this page. Click the title or description to edit.
General, Job, or Promotion?
Selecting General displays your post on the Discussions tab, which is the default setting. Selecting Job displays a job posting on the Jobs tab. Selecting Promotion displays a post on the Promotions tab, which is reserved for sales pitches and other promotional content.
5. LinkedIn displays your discussion on the Discussions tab.

Deleting Your Discussion
You can delete a discussion you posted by clicking the down arrow to the right of its title and selecting Delete from the menu.
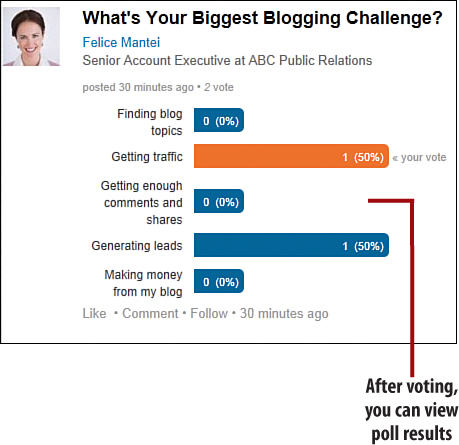
Create a Poll
A group’s Polls feature enables you to poll group members about relevant professional topics and participate in polls other members create. A poll is a short question with the option of providing as many as five answers. Group members select their preferred answers, and the poll tallies the results. Be aware that this is an optional group feature. If you don’t see the Polls icon on the Discussions tab, the group owner didn’t activate polls.
1. Click the Poll icon on the Discussions tab.

2. Enter a question of up to 200 characters in the Ask a Question box.

Poll Character Limits
Poll questions can contain no more than 200 characters, and answers can contain no more than 40 characters. LinkedIn displays the number of characters remaining at the right side of each field. If you go over this limit, a negative number displays, and you need to revise your text. In addition, you can’t include actual numbers or symbols in a poll, only text.
3. Enter your first potential answer of up to 40 characters in the Specify Up to 5 Answer Choices box.
4. Continue adding potential answers, up to a total of five.
5. Click the Share button to post your poll.

6. LinkedIn displays your poll.

Viewing Group Promotions
If the group owner has enabled this feature, a group includes a Promotions tab where members can post promotional content that isn’t appropriate for the general Discussions tab. For example, you should post information about paid products and services, sales, and other promotions on this tab.
To post on the Promotions tab, create a discussion on the Discussions tab and select Promotion as the discussion type. See the section “Start a Discussion,” earlier in this chapter.

Viewing Group Job Postings
A group’s Jobs tab enables you to view and search LinkedIn job postings shared by other group members as well as post job-related discussion items. This is also an optional group feature; the group owner can choose whether or not to include a Jobs tab.
To post a job on this tab, create a discussion on the Discussions tab and select Job as the discussion type. See the section “Start a Discussion,” earlier in this chapter.
View Jobs on the Jobs Tab
Although the LinkedIn Jobs page offers more jobs for you to peruse, a group’s Jobs tab can offer more targeted jobs.
1. Click a group’s Jobs tab.
2. Sort jobs by relevance or date.
3. Filter jobs if the Jobs tab contains numerous postings.

4. Click a title to view the detailed job posting with details on how to apply.
5. Click the Save Job link to save an interesting job.
Viewing Your Saved Jobs
You can view the jobs you save on the Jobs page. (Click the Jobs link on the main LinkedIn menu.)
6. Click the Share link to share this job with other LinkedIn members or on Twitter or Facebook.

Other LinkedIn Job Tools
See Chapter 10, “Finding a Job,” and Chapter 13, “Recruiting Job Candidates,” to learn about more ways to find jobs and recruit candidates on LinkedIn.
Managing Your Groups
LinkedIn offers a lot of flexibility in how you participate in, manage, and view the groups you join. You can also search for and share specific group information and leave a group anytime you want.
View Your Groups
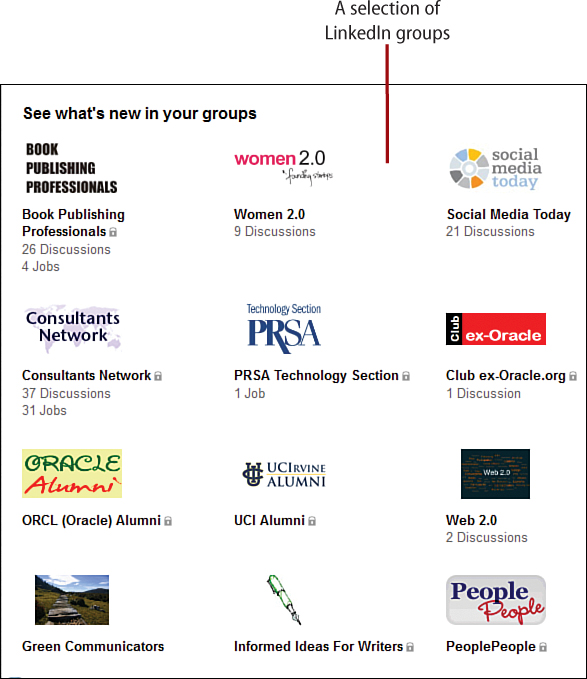
You can view a list of the groups you belong to by selecting Groups from the Interests menu.
Establishing Group Order
On the Account & Settings page, you can specify the order of the groups that display on the Your Groups page. See the section “Specify Group Display Order,” in Chapter 4 for more information.

A lock icon displays to the right of any group that is members-only. If this icon doesn’t display, the group is an open group.
To go to a group’s Discussions tab, click the title of the group.
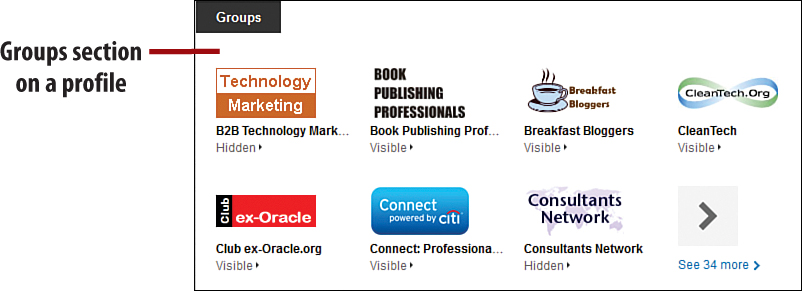
View Your Group Information on Your Profile
You can also view a list of the groups you belong to on your profile.
View Basic Group Information
To view basic information about a group, click the i icon on the group page. This enables you to learn more about a group’s goals as well as its owner, members, rules, and statistics. If you haven’t joined an open group yet, reviewing this information is a good way to determine if the group is right for you.


Search a Group
Finding the right information in a popular group can be difficult. Fortunately, LinkedIn enables you to search groups by keyword and other criteria.
1. Click the Search tab on a group page.
2. Enter a search term.
3. Click the Search button to display matching discussions.

View Group Members
Viewing a list of group members makes it easy to see if you already know other members of your group. You can also send messages to group members from this page (selectively; don’t spam your fellow group members).
1. Click the i icon on a group page.
2. Click the number of members.

3. View of list of group members.
4. Enter search criteria and click the Search button to search for members by name or keyword.
5. Click the See Activity link to view a list of this person’s group activity.
6. Click the Send Message link to send this person a message.

Following and Unfollowing
You automatically follow anyone who is your 1st degree connection. To optionally follow another group member, click the Follow link below that person’s photo.
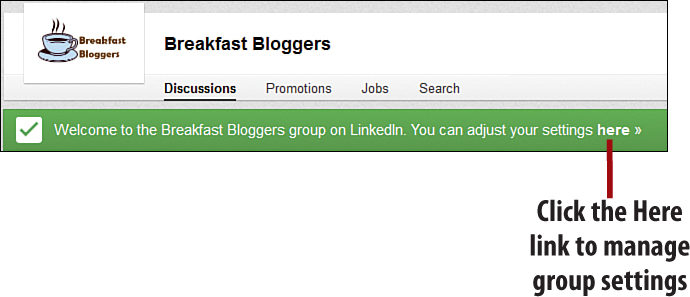
Manage Group Settings
The Settings page enables you to modify the visibility and contact options for that group.
1. Click the i icon on a group page.
2. Click the Your Settings link.

3. Remove the check mark next to the Group Logo check box if you don’t want to display this group’s logo on your home page.
4. Select the email address where you want LinkedIn to email you group news and updates.
5. Select the Activity check box to receive an email every time someone posts a new discussion.
6. Select the Digest Email check box to receive a daily or weekly email digest of all group activity.
7. Select the Announcements check box to allow the group manager to send you email.
8. Select the Member Messages check box to allow other group members to send you email. (They won’t see your personal email address.)
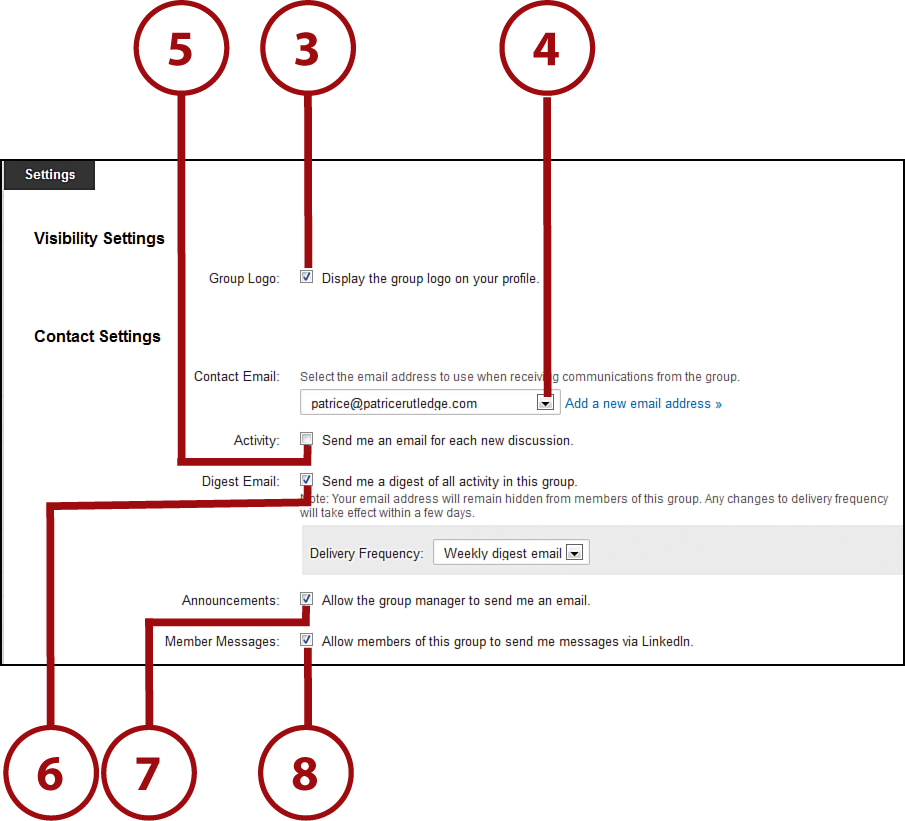
9. Click the Save Changes button.

It’s Not All Good: Avoiding Group Email Overload

Share a Group with Other LinkedIn Users
If you’re a member of a particular group you think your connections would also enjoy, let them know about it by sharing it with them.
1. Click the Share button on any group page.

2. Enter your comments about the group you’re sharing.
3. Optionally, share in another group.
4. Optionally, share this group individually with one or more LinkedIn connections.
5. Click the Share button.
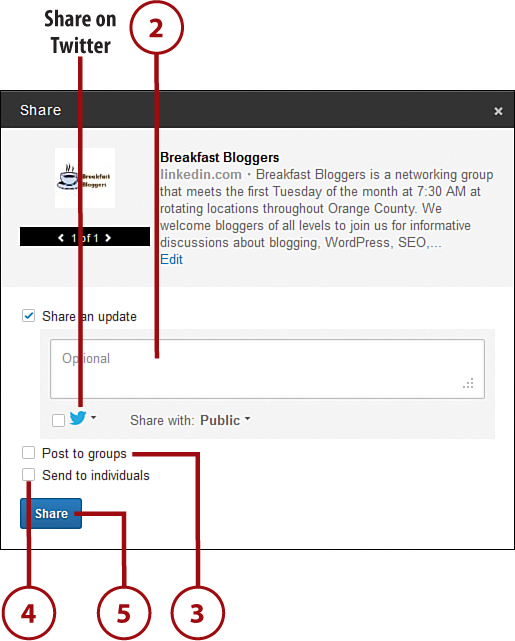
If you want to share a group with one of your connections, start typing the person’s name or email address in the To field and LinkedIn searches for a match. Optionally, you can add more connections or include a customized message.
Leave a Group
If you decide that a group no longer meets your needs or you have to pare down your current group membership to make room for new groups, you can easily leave a group.
To do so, click the Member button in the upper-right corner of any group page. (It becomes the Leave button when you pause over it.) LinkedIn removes you from the group.

Optionally, you can also leave a group by clicking the Leave Group button on a group’s Settings page. See the section “Manage Group Settings,” earlier in this chapter for more information.
Creating and Managing Your Own Group
Creating your own group is a good way to develop a community for a topic, profession, or interest.
Create Your Own Group
Creating a LinkedIn group is easy—managing it and helping it grow is the more difficult part.
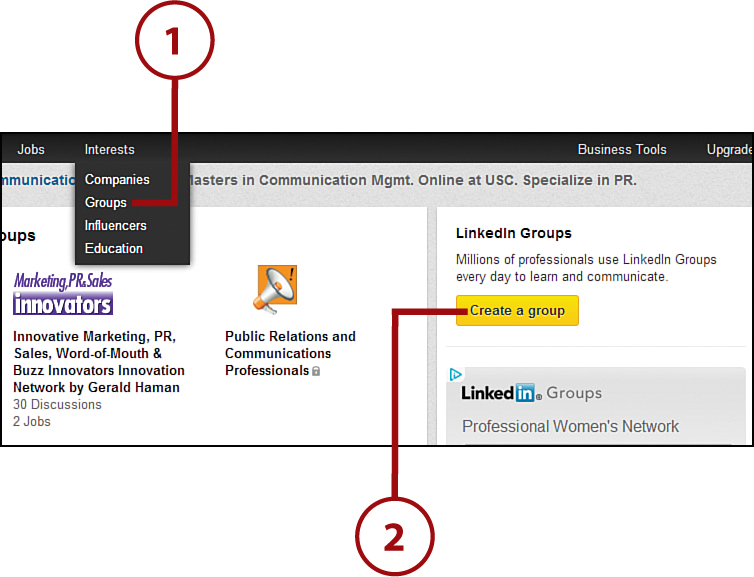
1. Select Groups from the Interests menu.
2. Click the Create a Group button.
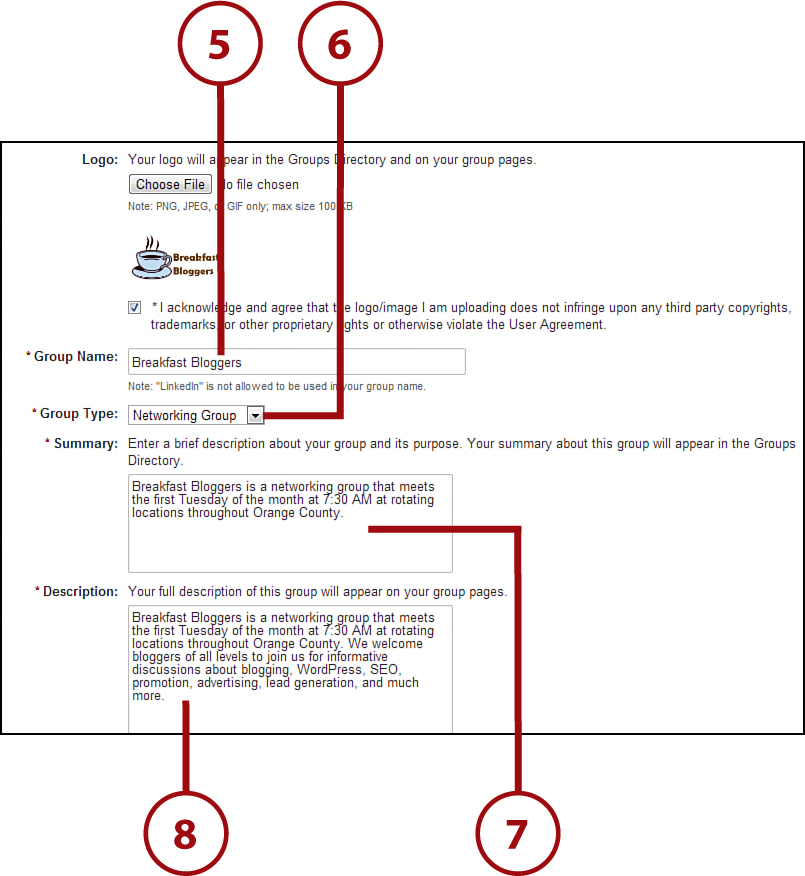
3. Click the Choose File button to select and upload a logo for your group.
Logo Specifications
Supported formats include PNG, JPEG, and GIF files no larger than 100KB.
4. Select the check box below your logo to confirm that you have a legal right to use this image.

6. Select a group type. Options include alumni, corporate, conference, networking, nonprofit, professional, or other groups (such as hobby or special interest).
7. Enter a summary of your group. In this text box, indicate your group’s focus, goals, and any membership benefits your group might provide for LinkedIn members.
8. In the Description text box, enter more details to display on your group pages.
9. If your group has an external website, enter the URL in the Website field.
10. Enter the group owner email. LinkedIn sends all messages about your group to this email address.
11. If you want to approve new group members automatically, select the Auto-Join option button.
12. If you want to approve group membership requests manually, select the Request to Join option button.

LinkedIn sends a message whenever someone requests to join your group, and you must approve the request manually. This requires extra effort on your part, but it ensures that only qualified people join your group. If your group members work for the same organization, you can preapprove members with a specific email domain.
13. If your group is for members who are located in a specific geographic location, select the Location check box and enter the location.
14. If you agree to the Terms of Service, select the check box. The Terms of Service cover your rights to provide LinkedIn with the email addresses of group members and LinkedIn’s rights to use the logo you upload.
15. Click either the Create an Open Group button or the Create a Members-Only Group button to create your group. See the “Open Groups Versus Members-Only Groups” sidebar earlier in this chapter for guidance on which type of group to choose.

16. Optionally, enter the names of connections you want to invite to your group and click the Send Invitations button.

17. LinkedIn displays your new group.

Manage Your Own Group
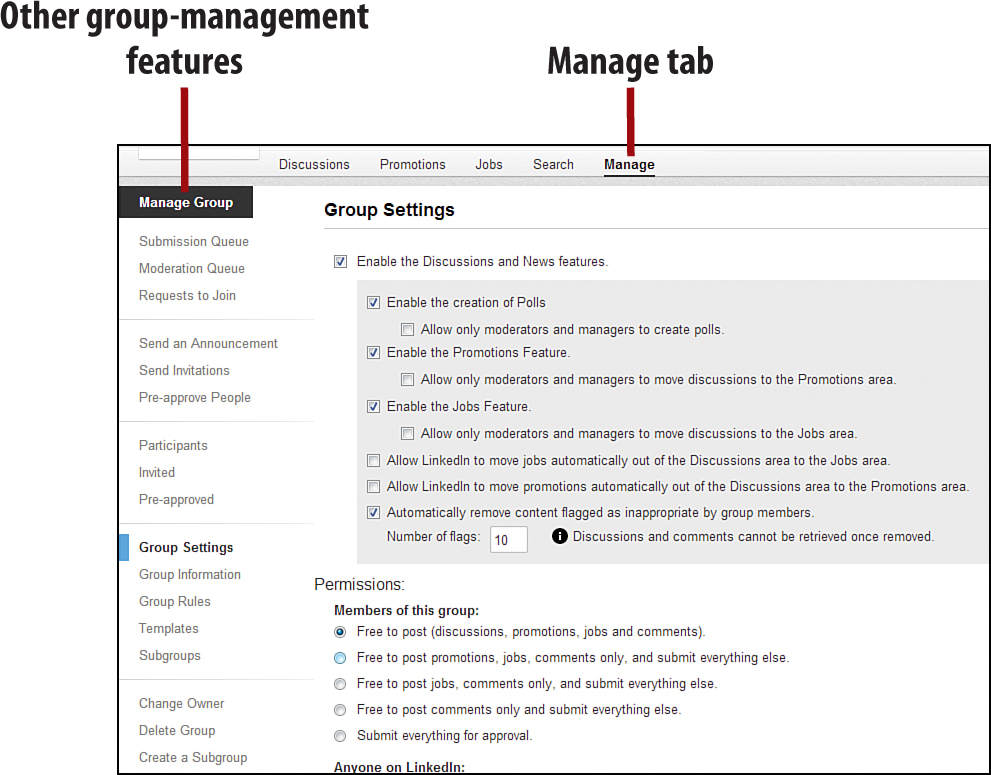
Detailed information about LinkedIn’s extensive group-management features is beyond the scope of this book. Here’s a brief overview of what you can do on your group’s Manage tab (visible only to group owners and managers):
• Control the tabs and features you want to include on your group page (Jobs, Promotions, Polls, and so forth)
• Manage member permissions and restrictions, such as who can post what and whether or not you want to moderate submissions
• Moderate flagged content
• Send invitations and announcements
• Add group rules
• Add and manage other group managers
• Preapprove members
• Create subgroups for specific member interests
• Delete your group