9. Configuring Facebook’s Privacy Settings
In this chapter, you learn how to protect your personal information by configuring Facebook’s privacy settings.
Social media are social media, which means they’re all about sharing one’s personal information with others. If you’d rather not share everything with everybody—if you want to keep some private things private—then you need to configure the privacy settings for each social media network you use.
You learned the basics of social media privacy in Chapter 4, “Using Social Media—Safely and Privately.” Because Facebook is the world’s largest social network, and the one most used by those over age 50, it’s worth exploring Facebook’s various privacy settings. Configuring these settings is essential if you don’t want all your personal information made public.
Determining Who Sees What You Post
Many people worry about their privacy online, and for good reason. Not only are there a lot of companies that would like to get hold of your private information to contact you for advertising and promotional reasons, the Internet is also rife with identify thieves eager to steal your private information for their own nefarious means.
This is why many older users are cautious about getting on Facebook; they’re afraid that the information they post will be needlessly shared with the wrong people. There’s a basis to these fears, as Facebook likes to share all your information with just about everybody on its social network—not just your friends or their friends, but also advertisers and third-party websites.
Fortunately, you can configure Facebook to be much less public than it could be—and thus keep your private information private. You just have to know which settings to tweak.
Configure Facebook’s Default Privacy Settings
The first step to ensuring your Facebook privacy is to determine who, by default, can see all the posts you make. You can do this in a positive fashion, by telling Facebook precisely who can view your new posts. You can also take a more negative (or defensive) approach, by telling Facebook who can’t see your status updates.
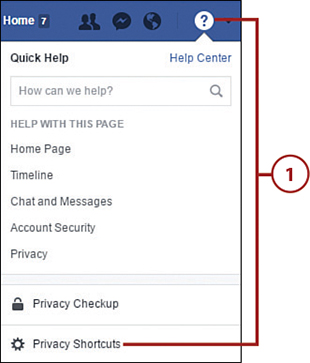
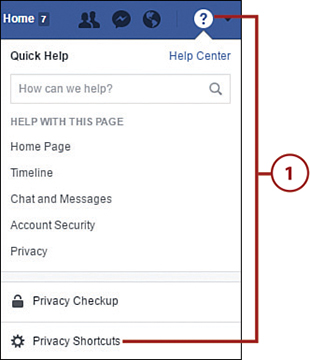
![]() On the Facebook website, click the Help (question mark) button on the Facebook toolbar to display the pull-down menu, then click Privacy Shortcuts. Or...
On the Facebook website, click the Help (question mark) button on the Facebook toolbar to display the pull-down menu, then click Privacy Shortcuts. Or...
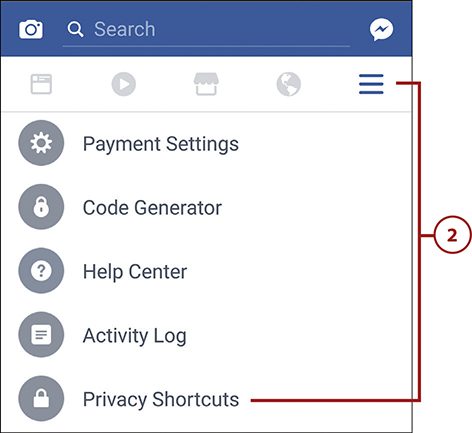
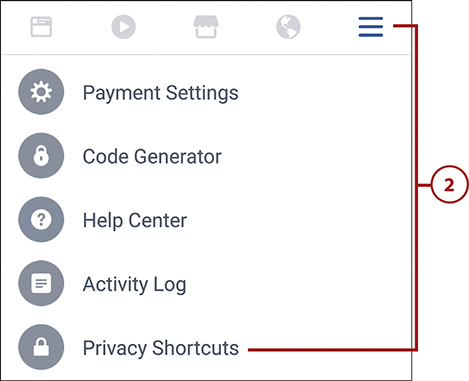
![]() In the Facebook mobile app, tap the More (three line) icon, then scroll down to the bottom of the screen and tap Privacy Shortcuts.
In the Facebook mobile app, tap the More (three line) icon, then scroll down to the bottom of the screen and tap Privacy Shortcuts.
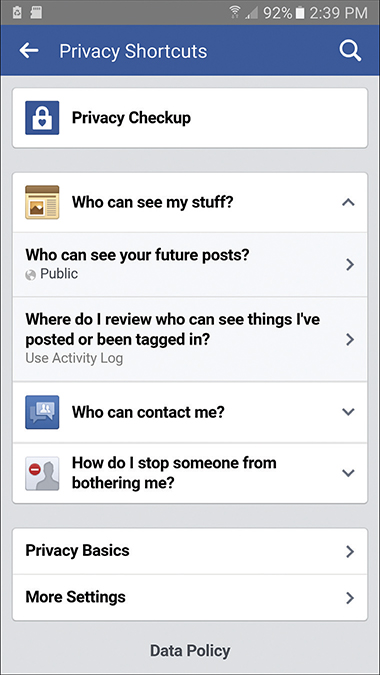
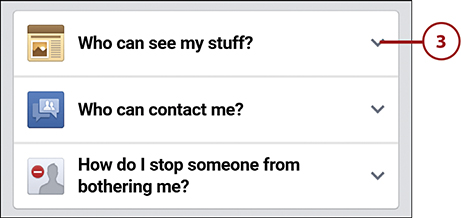
![]() Click or tap Who Can See My Stuff? to expand the menu.
Click or tap Who Can See My Stuff? to expand the menu.
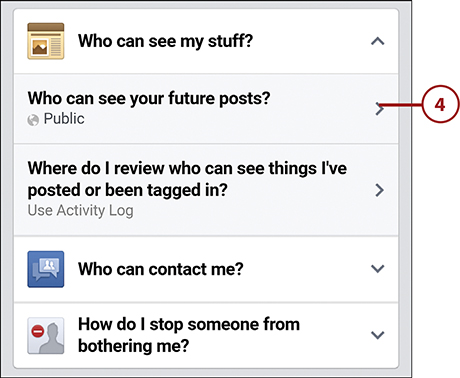
![]() Click or tap Who Can See Your Future Posts?
Click or tap Who Can See Your Future Posts?
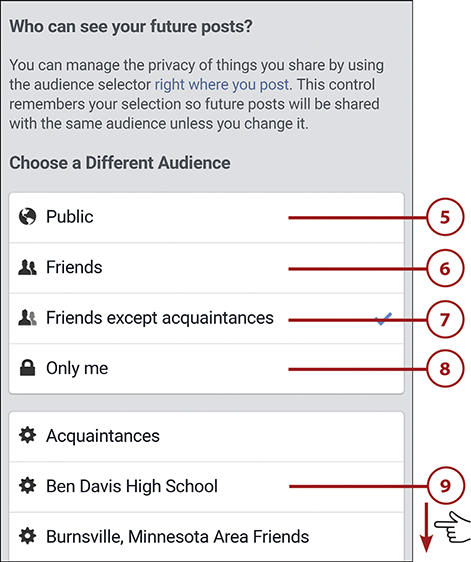
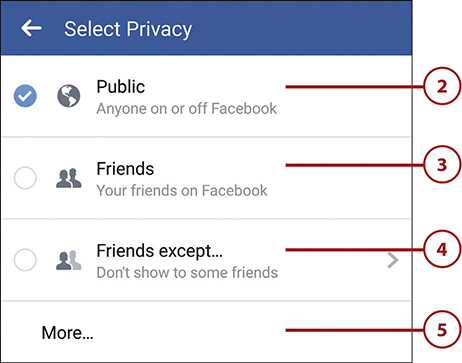
![]() Select Public to let anyone on Facebook see your posts.
Select Public to let anyone on Facebook see your posts.
![]() Select Friends to restrict viewing to only people on your Facebook friends list.
Select Friends to restrict viewing to only people on your Facebook friends list.
![]() Select Friends Except Acquaintances to restrict viewing only to selected friends.
Select Friends Except Acquaintances to restrict viewing only to selected friends.
![]() Click Only Me to keep your posts totally private—that is, to keep anyone from seeing them.
Click Only Me to keep your posts totally private—that is, to keep anyone from seeing them.
![]() On the Facebook website, click More to further expand the menu. In the Facebook app, just scroll down the screen to see more options.
On the Facebook website, click More to further expand the menu. In the Facebook app, just scroll down the screen to see more options.
Select Who Can See (or Not See) Individual Posts
Even after you set global post privacy settings, you can change the privacy setting for any individual post you make. That is, any given post can be sent to a specific list of people that overrides the global settings you made previously.
For example, you might have set your global privacy settings so that your friends can see your posts. But if you have a new post that you only want your immediate family to see, you can configure that single post to go only to your family members, not to everyone else on your friends list.
New Default
When you change the privacy setting for an individual post, that setting becomes the new default for all future posts.
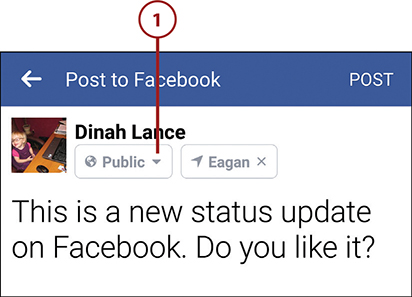
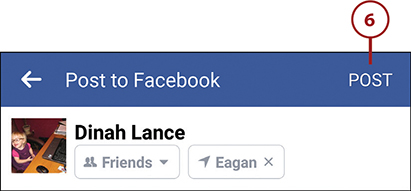
![]() Start a new status update as normal and then click or tap the Post Privacy Setting button and select one of the following options.
Start a new status update as normal and then click or tap the Post Privacy Setting button and select one of the following options.
![]() Select Public to make this post visible to any Facebook user.
Select Public to make this post visible to any Facebook user.
![]() Select Friends to make this post visible to only those on your friends list.
Select Friends to make this post visible to only those on your friends list.
![]() Select Friends Except to select friends you don’t want to see this message.
Select Friends Except to select friends you don’t want to see this message.
![]() Select More to view additional privacy options.
Select More to view additional privacy options.
![]() Click or tap Post to send the post to selected friends.
Click or tap Post to send the post to selected friends.
Control Who Can Send You Friend Requests
Are you getting friend requests from people you don’t know? It’s time to reconfigure your privacy settings to limit contact from complete strangers.
By default, just about anybody who Facebook thinks you might know can ask to be your friend. If you’d rather not be contacted by complete strangers, you can tell Facebook to only let certain people send you friend requests.
![]() On the Facebook website, click the Help (question mark) button on the Facebook toolbar to display the pull-down menu, then click Privacy Shortcuts. Or...
On the Facebook website, click the Help (question mark) button on the Facebook toolbar to display the pull-down menu, then click Privacy Shortcuts. Or...
![]() In the Facebook mobile app, tap the More (three line) icon and then scroll down to the bottom of the screen and tap Privacy Shortcuts.
In the Facebook mobile app, tap the More (three line) icon and then scroll down to the bottom of the screen and tap Privacy Shortcuts.
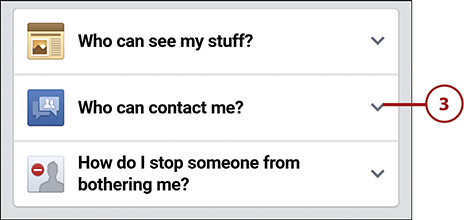
![]() Tap to expand Who Can Contact Me?
Tap to expand Who Can Contact Me?
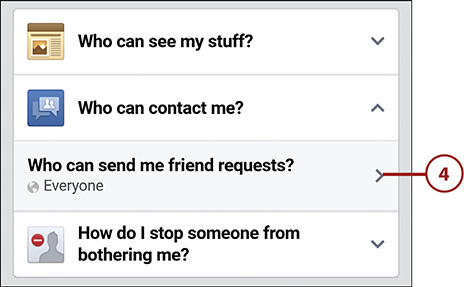
![]() Go to the Who Can Send Me Friend Requests? section and tap the right arrow (mobile app) or the Privacy button (website). (By default, the button says “Everyone.”)
Go to the Who Can Send Me Friend Requests? section and tap the right arrow (mobile app) or the Privacy button (website). (By default, the button says “Everyone.”)
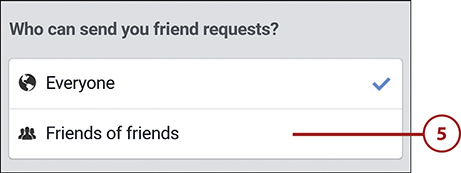
![]() Click Friends of Friends to limit friend requests to people who know the people you know—people who are friends with your Facebook friends. (If you choose this option, however, any long-lost friends who don’t know your other friends won’t be able to contact you.)
Click Friends of Friends to limit friend requests to people who know the people you know—people who are friends with your Facebook friends. (If you choose this option, however, any long-lost friends who don’t know your other friends won’t be able to contact you.)
Controlling Tagging
Facebook likes to connect people with each other. This is often done via tagging, where one user can tag (“who are you with?”) another user in a status update or photo without asking the other person. When you’re tagged, you’re connected to that post or photo, whether you want to be or not—which can be an invasion of your privacy.
Restrict Who Sees Tag Suggestions in Photos That Look Like You
One of the ways that Facebook encourages tagging is by suggesting people to tag when someone posts a photo. Facebook does this via facial recognition technology; it compares a given photo with the millions of other photos uploaded to its site, and tries to match a new face with one it already knows.
So if someone uploads a picture of someone that looks like you, Facebook suggests that you be tagged in that photo. That’s fine, unless that’s not really you—or if the photo is one you’d rather not be associated with. Fortunately, you can turn off these photo tag suggestions.
It’s Not All Good: You Can Still Be Tagged
Just because you turn off Facebook’s ability to suggest your name when someone uploads a photo, that doesn’t mean you can’t be tagged in that photo. The person who uploaded the photo can still manually tag you, even if your name isn’t automatically suggested.
![]() On the Facebook website, click the down arrow on the right side of the toolbar, then select Settings. Or...
On the Facebook website, click the down arrow on the right side of the toolbar, then select Settings. Or...

![]() In the Facebook mobile app, tap the More icon.
In the Facebook mobile app, tap the More icon.
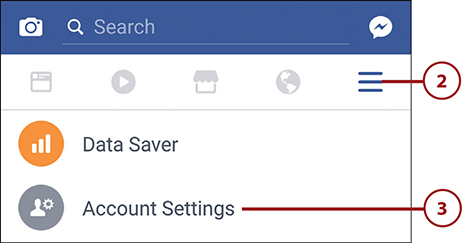
![]() Scroll down the screen and select Account Settings.
Scroll down the screen and select Account Settings.
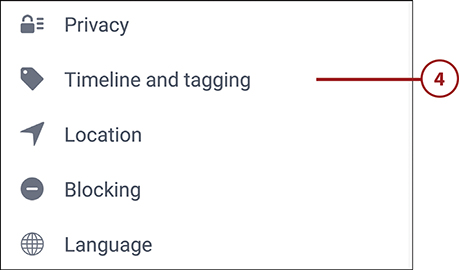
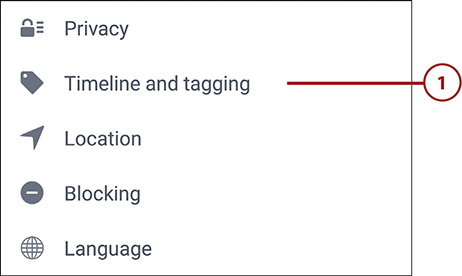
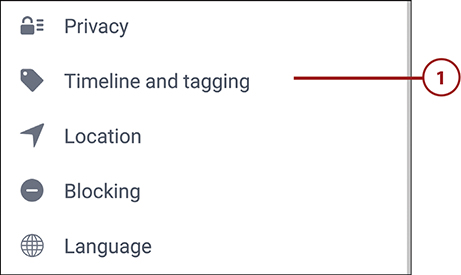
![]() Click or tap Timeline and Tagging.
Click or tap Timeline and Tagging.
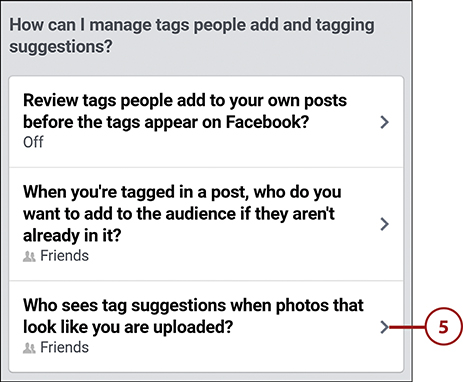
![]() Go to the How Can I Manage Tags People Add and Tagging Suggestions? section and select Who Sees Tag Suggestions When Photos That Look Like You Are Uploaded?
Go to the How Can I Manage Tags People Add and Tagging Suggestions? section and select Who Sees Tag Suggestions When Photos That Look Like You Are Uploaded?
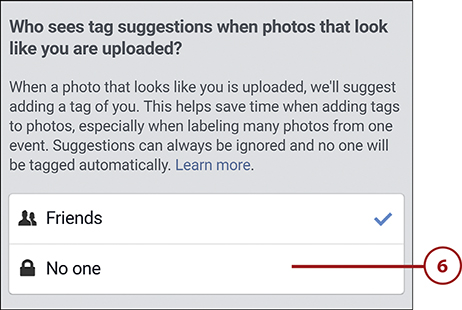
![]() By default, Friends is selected, which means that all of your friends will see your name in their tag suggestions. Tap or click No One to keep your name from appearing as a tag suggestion for anyone, including your friends.
By default, Friends is selected, which means that all of your friends will see your name in their tag suggestions. Tap or click No One to keep your name from appearing as a tag suggestion for anyone, including your friends.
Limit Who Can See Posts You’re Tagged In
As noted, there’s nothing to stop friends from manually tagging you in the posts they make and the photos they upload. What you can do, however, is keep anyone else from seeing those tags—in effect, hiding your name when tagged.
![]() From the Account Settings page, click or tap Timeline and Tagging.
From the Account Settings page, click or tap Timeline and Tagging.
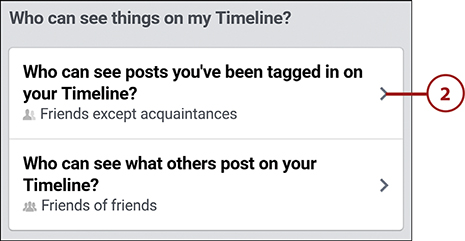
![]() Go to the Who Can See Things on My Timeline? Section and select Who Can See Posts You’ve Been Tagged In On Your Timeline?
Go to the Who Can See Things on My Timeline? Section and select Who Can See Posts You’ve Been Tagged In On Your Timeline?
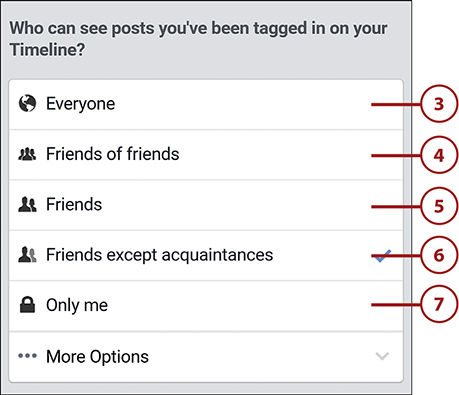
![]() Select Everyone to let everyone see these posts.
Select Everyone to let everyone see these posts.
![]() Select Friends of Friends to let your friends and their friends see these posts.
Select Friends of Friends to let your friends and their friends see these posts.
![]() Select Friends to limit your exposure to only people on your friends list.
Select Friends to limit your exposure to only people on your friends list.
![]() Select Friends Except Acquaintances to limit viewing to people on your friends list you have not previously identified as acquaintances.
Select Friends Except Acquaintances to limit viewing to people on your friends list you have not previously identified as acquaintances.
![]() Select Only Me to hide the post completely from your Timeline.
Select Only Me to hide the post completely from your Timeline.
Approve Tags People Add to Your Posts
Here’s a real invasion of your privacy. You post a picture to Facebook, and someone tags himself in your photo—even if it’s not really a picture of him! Fortunately, Facebook gives you the option of reviewing all tags that people add to the posts you make and the photos you upload—so you can restrict who “associates” with you online.
![]() From the Account Settings page, click or tap Timeline and Tagging.
From the Account Settings page, click or tap Timeline and Tagging.
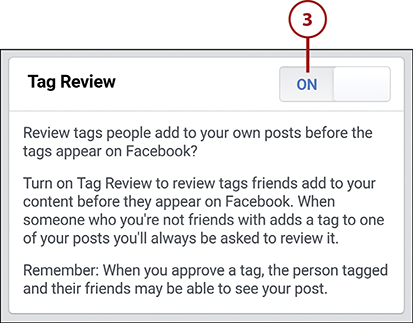
![]() Go to the How Can I Manage Tags People Add and Tagging Suggestions? section and tap or click Review Tags People Add to Your Own Posts Before the Tags Appear on Facebook?
Go to the How Can I Manage Tags People Add and Tagging Suggestions? section and tap or click Review Tags People Add to Your Own Posts Before the Tags Appear on Facebook?
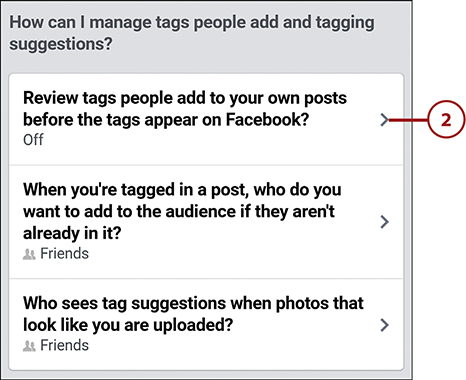
![]() Click Enabled (website) or tap “on” the Tag Review switch (mobile app). You will now be notified whenever someone tries to add his or her tag to one of your posts or photos, and you have the option of approving or rejecting that tag.
Click Enabled (website) or tap “on” the Tag Review switch (mobile app). You will now be notified whenever someone tries to add his or her tag to one of your posts or photos, and you have the option of approving or rejecting that tag.
Managing Who Sees What on Your Timeline
Another place that Facebook displays personal information is on your Timeline, which is your profile page on Facebook. Fortunately, you can limit who can see specific information there—and hide entire sections if you like.
Control Who Sees Specific Information
Any given section in your Timeline has its own privacy settings. That is, you can configure different parts of your Timeline to be visible to different groups of people. For example, you can configure your Timeline so that everyone on Facebook can see your About section, but limit viewing of your Photos section to only people on your friends list.
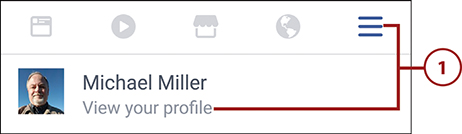
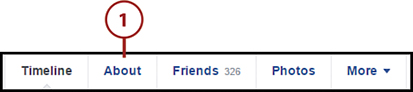
![]() Click your name on the toolbar (website and iOS app) or tap More and then tap View Your Profile (Android app) to display your Timeline page.
Click your name on the toolbar (website and iOS app) or tap More and then tap View Your Profile (Android app) to display your Timeline page.
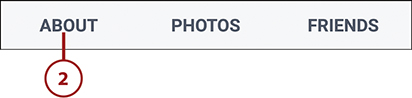
![]() Click or tap About.
Click or tap About.
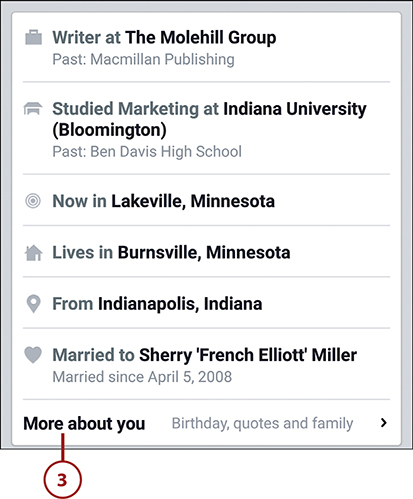
![]() Click Update Profile or Edit Profile (website) or tap More About You (mobile app).
Click Update Profile or Edit Profile (website) or tap More About You (mobile app).
![]() Click Edit (website) or tap the down arrow and select Edit (mobile app) of the item you want to edit.
Click Edit (website) or tap the down arrow and select Edit (mobile app) of the item you want to edit.
![]() Click the Privacy button (website) or tap Sharing With (mobile app).
Click the Privacy button (website) or tap Sharing With (mobile app).
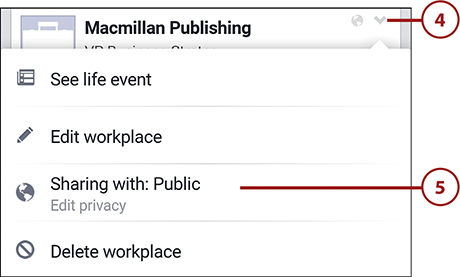
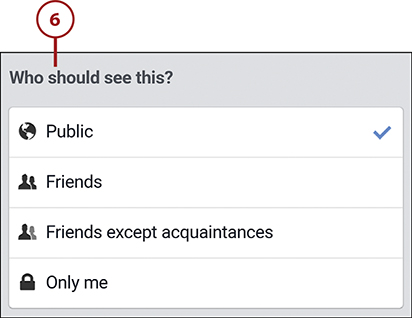
![]() Select who can see this information: Public (everyone on Facebook), Friends (people on your friends list), Friends Except Acquaintances, or Only Me (no one can see it).
Select who can see this information: Public (everyone on Facebook), Friends (people on your friends list), Friends Except Acquaintances, or Only Me (no one can see it).
Hide Sections of Your Timeline
In addition to setting privacy options for individual pieces of information, you can also choose to hide entire sections of your Timeline. For example, if you don’t want anyone to see the Places you’ve been or Music you’ve listened to, you can hide those sections. You do this from the Facebook website.
![]() From your Timeline page, click About.
From your Timeline page, click About.
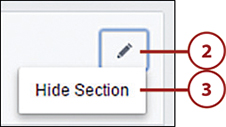
![]() Scroll down to the section you want to hide and click the Manage (pencil) button for that section.
Scroll down to the section you want to hide and click the Manage (pencil) button for that section.
![]() Click Hide Section. (Not all sections let you hide them.)
Click Hide Section. (Not all sections let you hide them.)