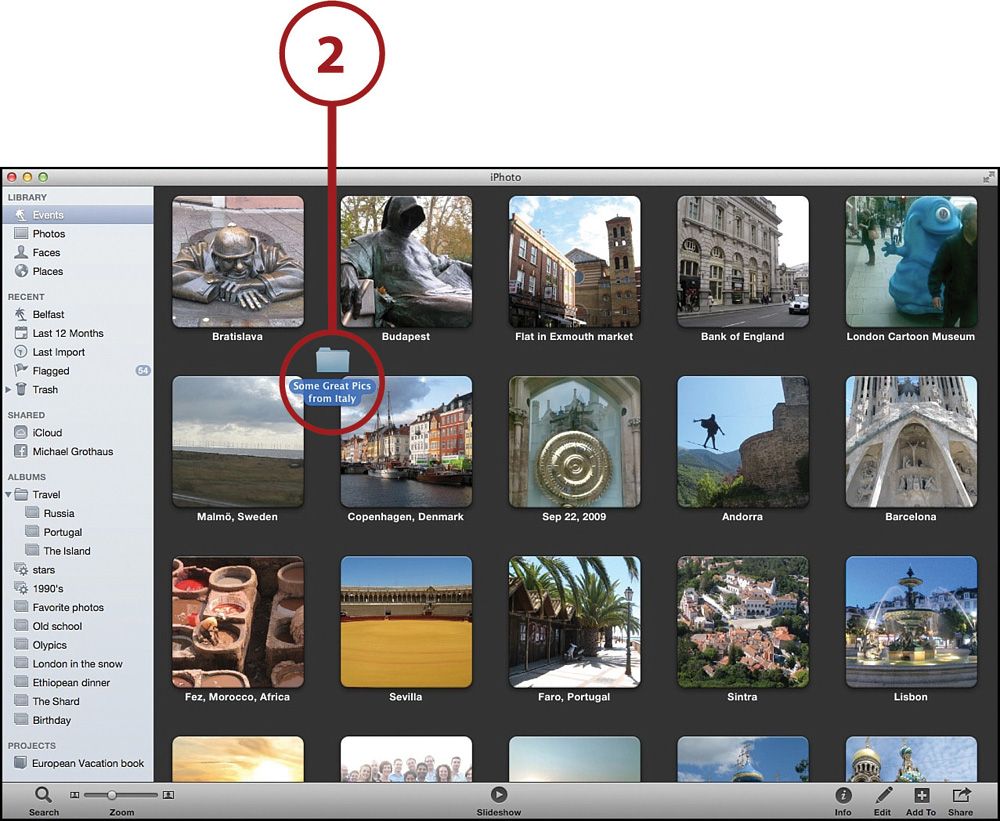
2. Importing Your Photos
Adding photos to your iPhoto Library is called importing. With iPhoto, you can import your photographs several ways. This chapter describes the ways you can import your pictures from various devices.
→ Importing photos from a device
→ Importing photos from a folder or hard drive
→ Importing photos from Mail
→ Turning off automatic imports
→ Dealing with duplicates
→ Finding your iPhoto Library
It used to be that importing photos into a photo application was a big pain. Every different source of the photographs—hard drives, digital cameras, mobile phones—seemed to have a different, complex import process. With the latest version of iPhoto, Apple has simplified that and at least as far as devices go, after you know how to import from one source, you know how to import from the next.
Importing Photos from a USB-Connected Device or SD Card
iPhoto works with virtually any digital camera on the market. Unsurprisingly, this includes all of Apple’s iOS devices that offer camera functionality, such as the iPhone, iPod touch, and iPad. As a Mac user, chances are your primary camera will be one of those iOS devices or a dedicated digital camera, which is handy because the import process is the same for all devices.
1. Plug in your iPhone, iPad, iPod touch, digital camera, or card reader to your Mac’s USB port, or put the digital camera’s SD card into the Mac’s SD card reader. The device you have plugged in is listed in the Devices section.
Turn Your Camera On!
If you have your camera plugged into your Mac and iPhoto does not recognize it, make sure your camera is turned on and has battery power. A camera must be powered on and must usually be in View Images mode or configured to enable USB Mass Storage for iPhoto to recognize it.
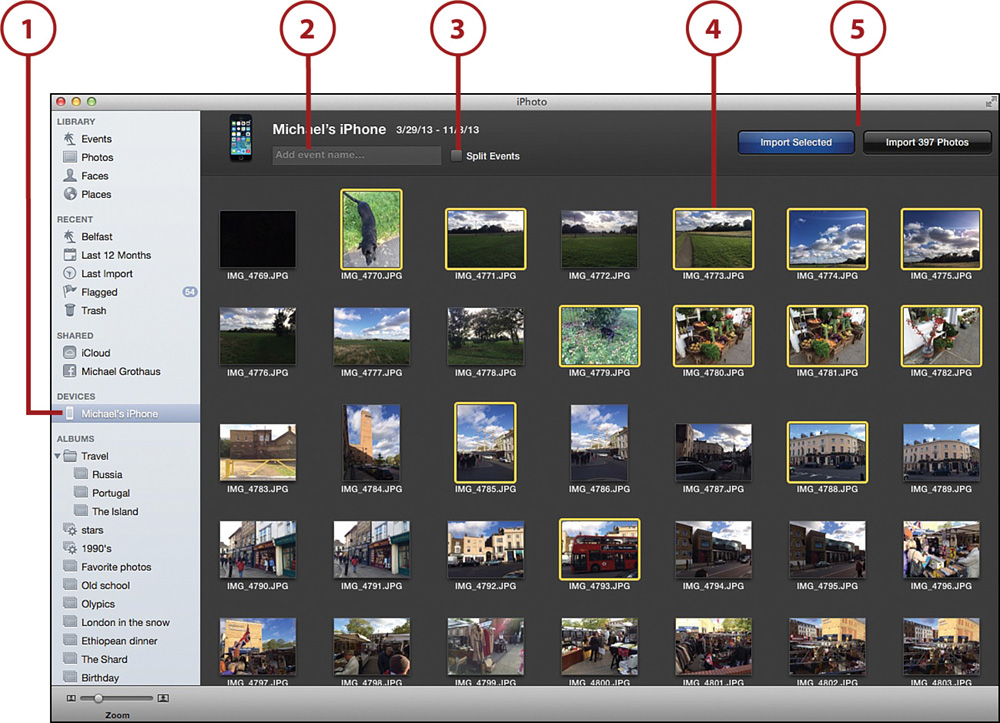
2. Fill in the event name for your import. For example, you might name the photo group “Sally’s party” or “Our Anniversary.” If you leave this blank, the date will be inserted.
3. Click the Split Events check box to toggle the feature on or off. If you turn on Split Events, a new event is created for each day.
Changing Default Event Times
By default, events are split into 24-hour periods, but you can change the setting by going to iPhoto, Preferences and clicking General in the Preferences window. Under the Autosplit into Events setting, choose One Event per Day or Week, or One Event Every Two or Eight Hours.
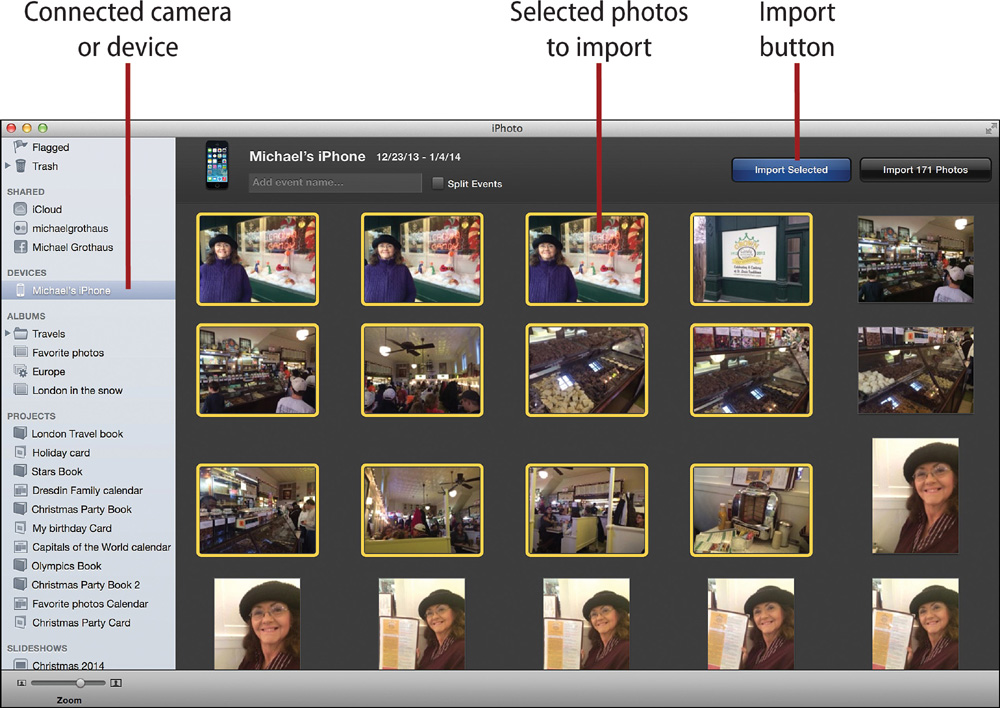
4. Select individual photos to import by holding down the Command key and clicking each photo with your mouse, or you can drag a selection box around certain photos.
5. Click either the Import Selected or Import All button to begin your import. The import begins.
6. The blue Import bar indicates how far along your import is. The Import bar also tells you how many photos are left to import. Click Stop Import if you want to cancel the process before all photos are imported.

7. Choose to delete or keep the imported photos on the device.

Importing from iCloud Photo Stream
If you’re importing from an iPhone or iPad a lot, you don’t even need to connect your device to your Mac. Simply enable iCloud Photo Stream in iOS 7 on your iPad, iPhone, or iPod touch by going to Settings, iCloud, Photos and toggling My Photo Stream to On. As long as you also have My Photo Stream enabled in iPhoto (see Chapter 13, “Sharing Your Photos Digitally”), your photos automatically import from your iOS device without connecting it at all.
Importing Photos from a Folder on Your Mac or from an External Device
Another way you can import photos to iPhoto is directly from your Mac or an external device, such as an external hard drive. There are two ways to import photos that are already on your Mac and on external drives.
Use Drag and Drop
The easiest way to import photos that already exist on your Mac or external device is by dragging and dropping them right into iPhoto.
1. Select the photo or folder of photos on your Mac or external device.
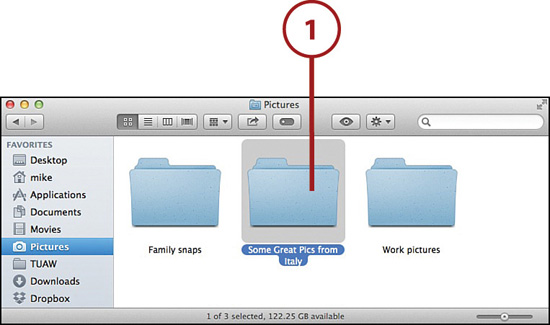
2. Drag the selected item into the body of the iPhoto window. The photos are automatically imported and are added to your iPhoto Library.
Copied, Not Moved
Keep in mind that the photos have been copied to your iPhoto Library. A copy of the photograph still remains in place on your Mac or external device. You can delete either the original copies or the ones you put into iPhoto without affecting the others.
Use the File Menu
If drag and drop isn’t your thing, you can import photos from your Mac or external devices by using the Import to Library command from iPhoto’s menu bar.
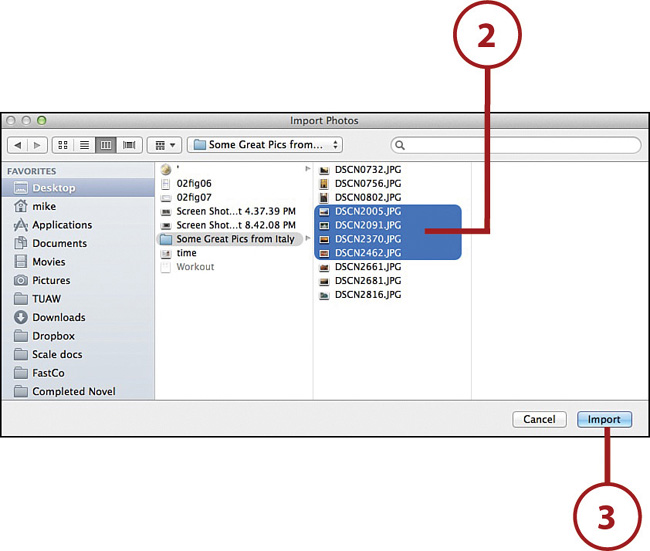
1. Select File, Import to Library.
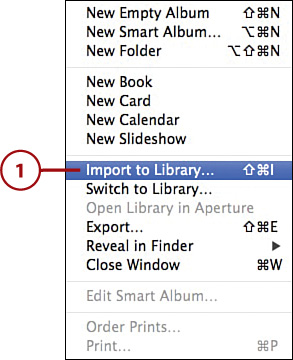
2. Navigate to the photograph or folder of photos you want to import. These photos could be on your Mac’s hard drive or on an external hard drive, CD, DVD, or USB flash drive.
3. Select the photos you want to import, and click the Import button.
Importing Photos from Apple’s Mail App
If you use Apple’s Mail app as your email client, you can save photographs people have emailed to you.
1. Open the Mail app.

2. Select an email with photo attachments. From the email header, click and hold the Attachment button. A drop-down menu appears.
3. Select Export to iPhoto. The images import to iPhoto automatically, and iPhoto opens on your computer.

Viewing Your Last Imported Photos
After you choose to keep or delete the photos from your camera, you are taken to the Last Import window. Last Import is a predefined menu item in iPhoto’s source list. You can always find it under the Recent header.

The Last Import window shows you all the photos from your last import, no matter if your last import was three days or three years ago. The photos in the Last Import window are separated into events based on your Autosplit import settings of one event per day, one event per week, or one event per two- or eight-hour gaps.
From the Last Import window, you can double-click the event’s name to rename it. Even though you might have already chosen an event name during the original import process, that name is applied only to the topmost event. You must manually name subsequent events. If you have multiple events in the Last Import window, you can drag and drop photos from one event into another.
Turning Off Automatic iPhone, iPod Touch, and iPad Imports
By default, when you plug in a camera via the USB port to your Mac or insert a camera card into a card reader that is connected via USB to your Mac, iPhoto automatically opens and asks whether you want to import any photos that are on the camera or card reader.
One sticky point when connecting an iPhone, iPod touch, or iPad to your Mac is that iPhoto automatically opens. This can be annoying because you might not necessarily want to import photos each time you plug in your iOS device.
You would think Apple would have included an option in iPhoto’s preferences for turning off automatic iPhoto launching, but that’s not the case. There’s no option in the iOS device preferences in iTunes either, which is the primary place you go to choose the setting of how your iOS device works when plugged into your Mac. Oddly, Apple decided to put this setting in an application called Image Capture.
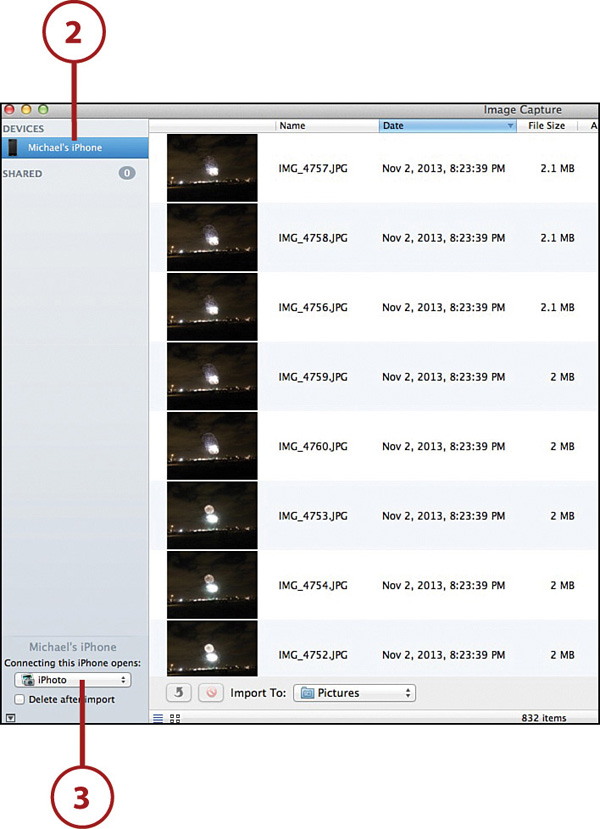
Image Capture is an advanced application that’s in the Applications folder on your Mac. It enables you to upload photos from many different sources, such as network drives, scanners, and cameras, to any folder on your Mac. It’s also the one place where you can disable the function that makes iPhoto auto-launch when an iOS device is installed.
Disable iPhoto Auto-Launch
1. Open Image Capture while your iPhone, iPod touch, or iPad is connected to your Mac. You can find it in your Applications folder on your Mac.

2. Select your iOS device from under the Devices header in the Image Capture source list.
3. Select No Application in the Connecting This iPhone [or iPod touch/iPad] Opens drop-down menu. (By default, it says iPhoto.) If this isn’t visible you might need to click the up arrow to make those controls visible.
Importing Photos from iOS Devices
After you have completed these steps, iPhoto no longer opens automatically every time you connect your iPhone, iPod touch, or iPad. When you do want to import photos from those devices, you need to launch iPhoto manually by clicking its icon in the Dock or double-clicking its icon in the Applications folder. Your connected iPhone, iPod touch, or iPad appears in iPhoto’s source list.
Dealing with Duplicates
When importing images from a CD or a folder on your computer, or even from a camera where you left the original images on the card after a prior import, you run the risk of importing photographs you’ve already imported. Luckily, iPhoto has a built-in duplicate detector.
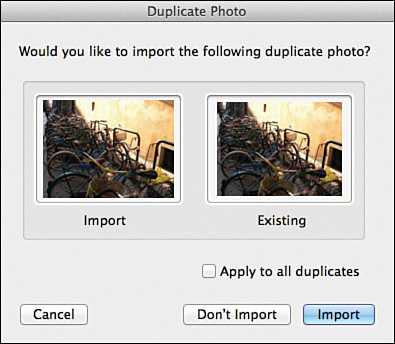
The Duplicate Photo warning gives you the option of reimporting the photograph, which adds another copy of it to your library, or not importing it, which causes iPhoto to skip that single photo and move on to the next. If you check the Apply to All Duplicates check box, iPhoto either imports all duplicates or doesn’t import all duplicates in the current import session, depending on whether you then check the Import or Don’t Import button.
Understanding Where Your Photos Are Stored
It’s important to understand how iPhoto handles file management of imported photographs. When you import an image into iPhoto, by default it is copied to a specific file on your Mac. This file is called iPhoto Library, which is in the User Name, Pictures folder on your Mac.
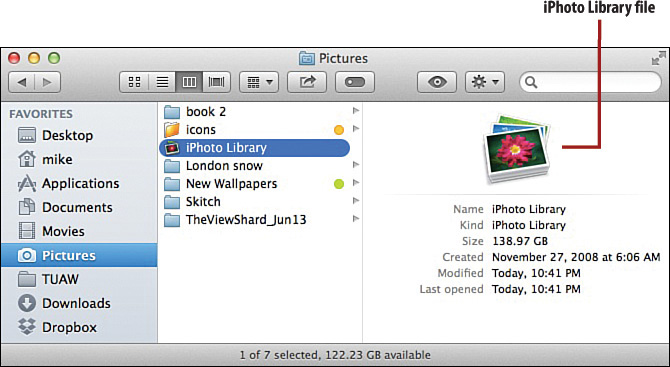
The iPhoto Library file is actually a single database containing all your imported photos organized into a series of folders. These folders preserve the original imported files and also any edits you make.
The advantage of this centralized iPhoto Library file on your computer is twofold:
• It enables you to easily back up your entire photo library by simply copying the iPhoto Library file to an external hard drive.
• It ensures that all the photos on your computer are in one easy-to-find place and eliminates clusters of folders of pictures from being scattered around your Mac.
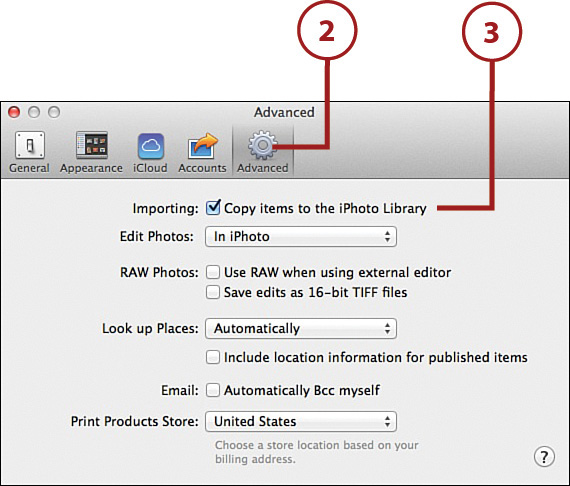
Disabling the Copy Imported Photos Feature
iPhoto copies a photo by default when you add it to your iPhoto Library. This means that when you drag a photo from the Finder into iPhoto, the original photo remains in the Finder. The photo that shows up in iPhoto is a copy of the original file—you now have two copies of the same photo.
If you know you generally prefer to delete the photos from their original locations when you import them, iPhoto gives you the option of turning off the Copy Imported Photos feature in the iPhoto preferences.
1. Click Preferences from the iPhoto menu.
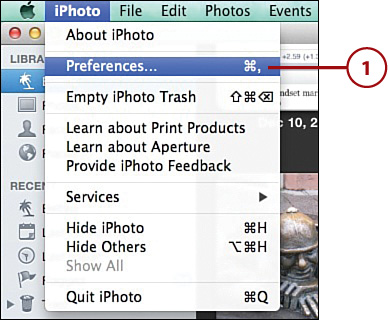
2. Click the Advanced tab.
3. Uncheck Copy Items to the iPhoto Library.