
3. Reading Metadata and Marking Your Photos
In this chapter, you learn how to easily view all the extra information, such as shutter speed and aperture, you recorded when taking your photos and how to mark your imported photos by flagging, rating, and adding keywords to them.
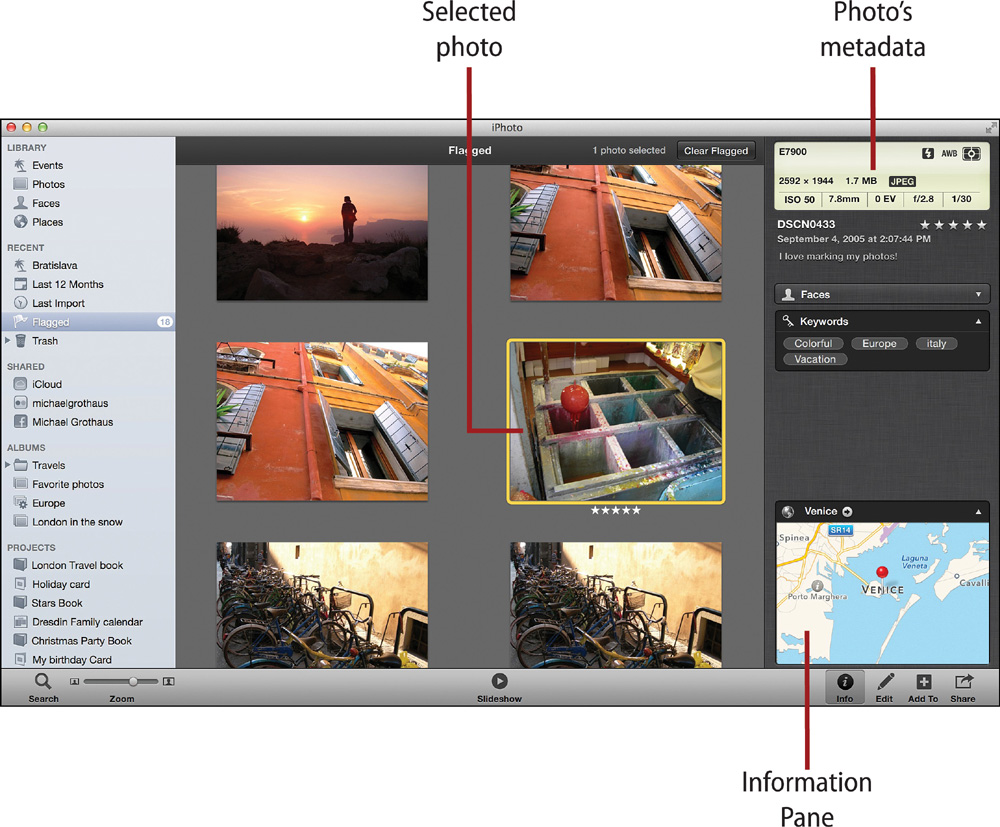
→ Learning about iPhoto’s Information Pane
→ Changing a photo’s name, date, and time
→ Adding and managing keywords
→ Flagging and rating your photos
→ Hiding and deleting your photos
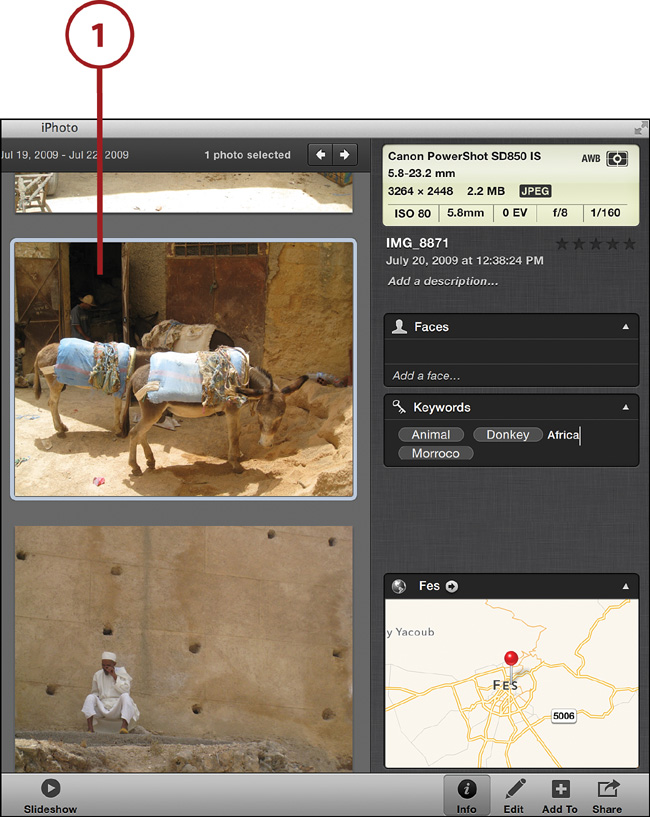
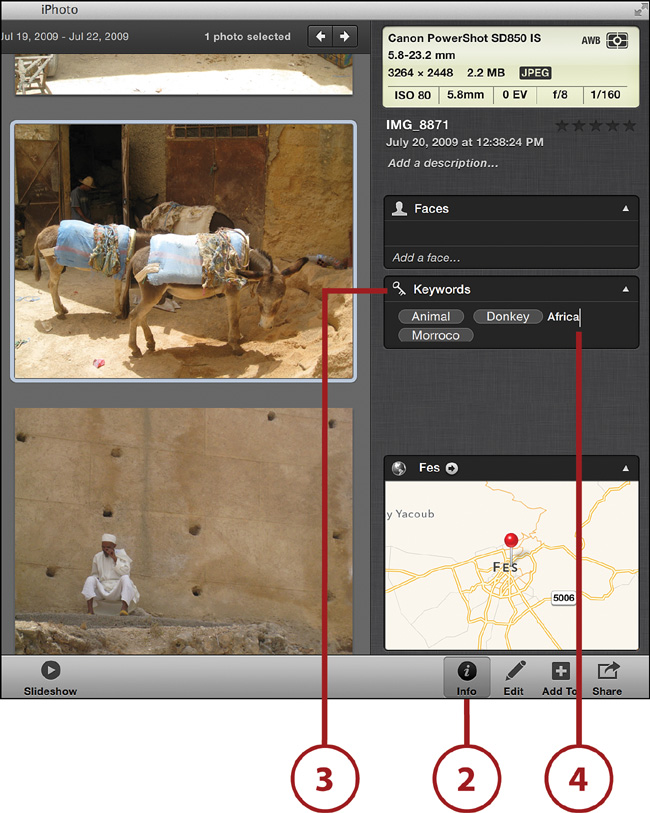
When you take a photograph on a digital camera today, you aren’t just recording an image. You’re also recording dozens of bits of information, or metadata, such as the lens size, the photo resolution, the name of the camera the photo was taken with, the aperture and shutter speed, GPS location coordinates, and more. When you are viewing your photos, this information is of little use. However, when you are organizing and navigating your photos, this information can be invaluable—and you find it all in iPhoto’s Information Pane. You can use the information in the Information Pane when you mark or search through your photos.
1. Click the Info button in the iPhoto toolbar at the bottom of the screen. Or...
2. ...choose View, Info.
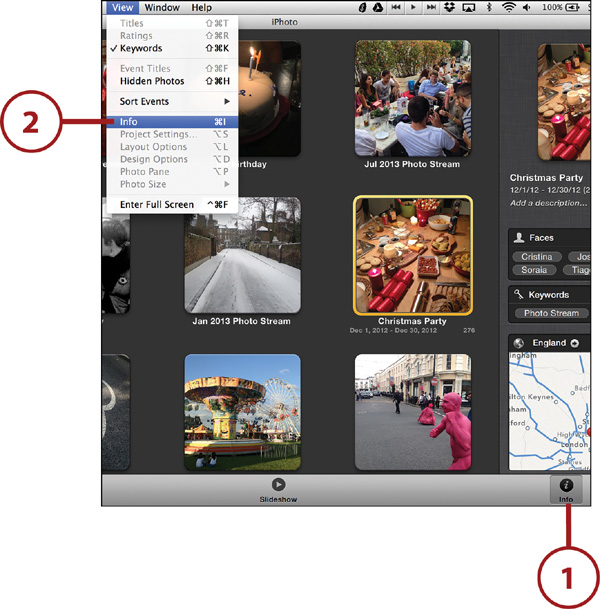
3. Alternatively, press Command+I.
Get to Know the Information Pane
The Information Pane gives you a wealth of information about your selected photo. It also displays lots of information for an event or other group of photos. This chapter explains the Information Pane as it relates to one selected photo. It’s easiest to learn it that way. Then when later chapters discuss albums and events, you’ll already be a whiz at recognizing what the Information Pane is useful for in respect to photo collections.
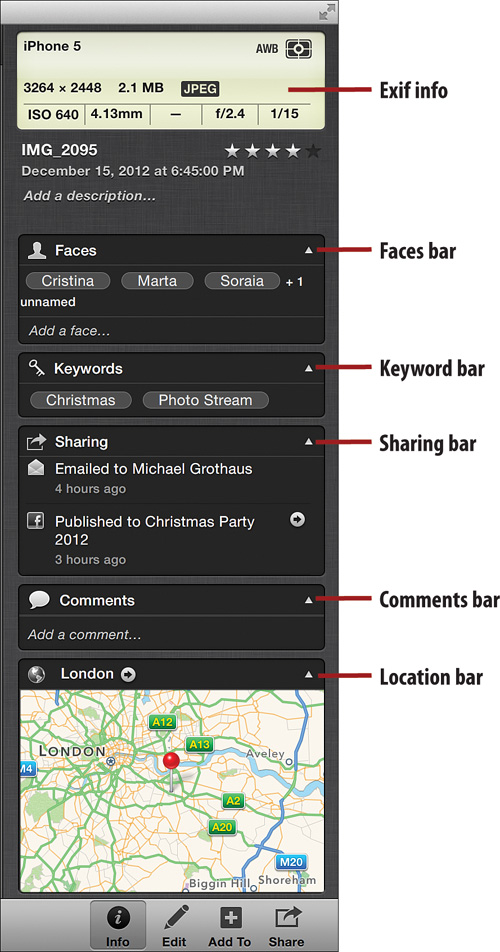
• Exif info: The Information Pane displays the Exchangeable Image File Format (Exif) information, or metadata, of your photo, including the photo’s name, the rating you give it, the time and date it was taken, and a description for your photo.
• Faces bar: The Faces bar displays a list of names of any faces in your photo. You can also add more faces to this list.
• Keyword bar: The Keyword bar enables you to view and add keywords to your photos.
• Sharing bar: The Sharing bar shows you where you have shared the selected photo. Shared places and methods include via email, on Facebook, Flickr, iCloud, and more.
• Comments bar: The Comments bar shows you comments and “likes” people have left for your selected photo on various social media platforms.
• Location bar: The Location bar shows you a map with a pin representing the specific location in the world where you took your photograph. You can zoom in and out on the map.
What Is Exif?
This chapter refers to your photo’s Exif information. What exactly is this? Simply put, Exchangeable Image File Format information is a file format that records associated information with the photo being shot.
Exif information is always displayed at the top of iPhoto’s Information Pane.
It’s Not Mission Critical
If you feel a little freaked out by all the numbers in the Exif information, don’t worry! You don’t need to know what any of the Exif information means to be a good photographer or enjoy editing and organizing your photos in iPhoto. Apple just added this Exif information to iPhoto’s Information Pane for easy reference for those of us who do like to see our photo’s Exif information.
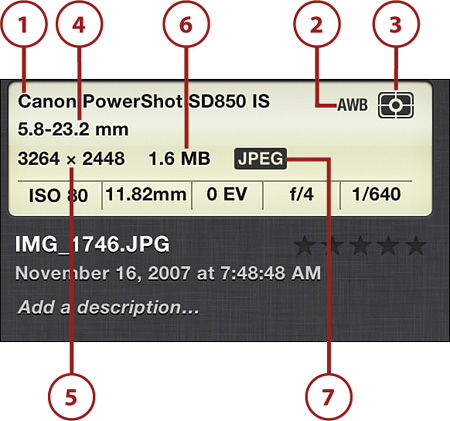
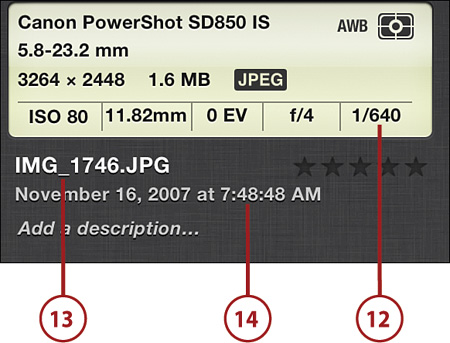
1. Camera name: This is the name of the camera you took the selected photo with. In this case, it was a Canon PowerShot SD850 IS.
2. White balance: The letters AWB signify that the photo was taken using the camera’s automatic white balance. White balancing is a technique that ensures what’s white in real life shows up as white when you take a picture of it.
3. Metering mode: This appears as the crosshairs in a rectangle box in the Exif window. The metering mode tells you the way your camera determined the photo’s exposure.
4. Lens information: This displays the length of the camera’s optical lens, its f-stop, whether it has image stabilization, and more. What is displayed depends on the camera. In this case, iPhoto shows the camera (a Canon PowerShot SD850 IS) had a 5.8–23.2mm lens, but if you were using a more advanced camera—such as the Canon Rebel DSLR kit lens—iPhoto would show more info (such as Canon EF-S 19–55mm f/3.5–5.6 IS).
5. Resolution: This shows you the resolution of the photo in pixels. The selected photo is 3264 pixels wide by 2448 pixels high.
6. File size: This shows the size of the photo. It’s 1.6MB in this case.
7. File type: This shows the file type of the photo. It’s JPEG in this case. Other common formats are TIFF, RAW, and PNG.
8. ISO: ISO is a measure of how sensitive the image sensor in the camera is to the amount of light present. The higher the ISO, the more sensitive the image sensor is, which increases the ability to take pictures in low-light situations or at faster shutter speeds in normal lighting. Many cameras allow multiple ISO settings, the trade-off being that higher ISOs have greater amounts of noise.
9. Focal length: The focal length determines how much your camera can see. It’s the distance between the center of the lens and its focus. In this case, the focal length of the photo is 11.82mm. Also note that in the case of a zoom lens, such as this camera’s 5.8–23.2mm lens, the higher number means a higher amount of zoom.
10. Exposure compensation: Basically, exposure compensation allows your camera to automatically brighten or darken images so you can get the best picture possible. A number followed by the letters EV designates exposure compensation. In this case, the photo’s exposure compensation was 0.
11. Aperture: The aperture is the size of the opening in the camera lens while taking a photograph. This limits the amount of light entering the lens. It is designated by f/ followed by a number. The higher the number, the smaller the aperture. Higher numbers mean less light. The aperture in the example is f/4.

12. Shutter speed: This is the length of time the camera’s shutter is open. Shutter speed is generally longer in night shots because the length of time the shutter is open must be longer in order to take in the appropriate amount of light. The shutter speed of the photo in the example is 1/640—that means the shutter was open for 1/640th of a second.
13. Filename: Camera manufacturers use conventional standards when naming photos you have taken. These names often begin with DSC_ or IMG_; in the example, the name the camera assigned to the photograph is IMG_1746.JPG.
14. Date and time: This is the date and time you took your photograph. This is the only Exif information iPhoto allows you to alter. You find out how to change this later in this chapter.
It’s Universal
Virtually every camera in the world uses the Exif file format for recording a photo’s data. It’s a great tool for professional photographers to track their individual shots, but if you’re like most iPhoto users, you’ll never need to worry about anything you see in the Exif window. But now you know it’s there and what it means.
Changing Your Photo’s Date and Time
As you’ll discover in upcoming chapters, iPhoto is all about organizing and categorizing your photographs. A big way iPhoto helps you do this is with events. For events to work properly, however, your camera must have the correct time and date settings. If it doesn’t, when you search through your events, you might see photos that you took last week show up chronologically in the past—way behind photos you took years ago.
Why Are the Date and Time Wrong?
Why might your photos not show the correct date and time? Usually it’s because your camera’s internal battery ran out of juice. Other causes could be that you never set the correct date and time in the first place or, during long-distance trips, you didn’t change your camera’s time settings to reflect the date and time of the time zone you were in.
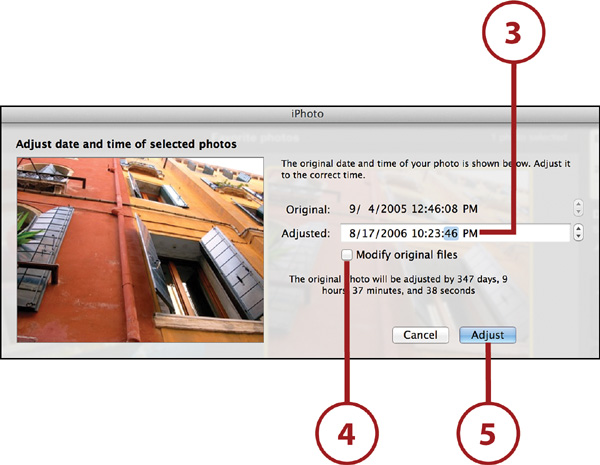
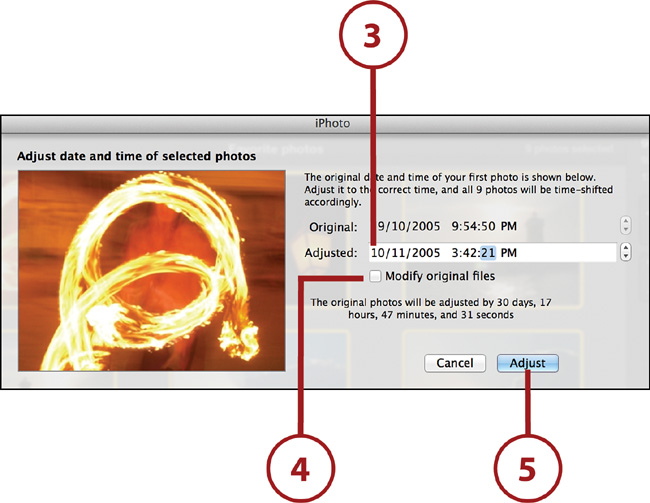
Change a Single Photo’s Date and Time
1. Select the photo so a yellow box highlights its edges.
2. Select Photos, Adjust Date and Time. In the dialog box that appears, you see the photo you have selected as well as the original date and time.
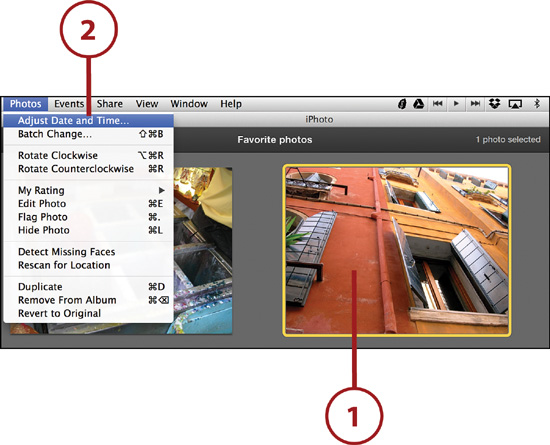
3. Enter the new date and time in the Adjusted field. In the dialog box, you are shown by how much the original date and time will be changed.
4. (Optional) Select Modify Original Files if you want to change the date and time to the photo’s original file in your iPhoto Library file. Selecting this check box changes the embedded Exif date data. If you don’t select this check box, the original Exif data stays the same, and the date change affects the photo only while it’s in your iPhoto Library.
5. Click the Adjust button, and the change is made. The new date and time are reflected in the photo’s Information Pane.
Change Multiple Photos’ Dates and Times
You aren’t limited to changing the date and time of one photo at a time. You can change the date and time for an entire event or a group of photos.
1. Select the event so a yellow box highlights it. If you are selecting multiple photos, make sure all of the ones you want to change are highlighted.
2. Select Photos, Adjust Date and Time. In the dialog box that appears, you see the first photo of the event or group of photos you have selected as well as the first photo’s original date and time.
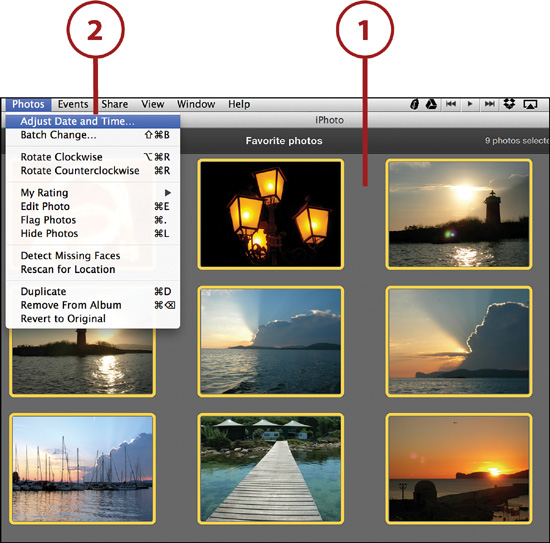
3. Enter the new date and time in the Adjusted field for the first photo. iPhoto uses this date and time to adjust all the other photos accordingly. So, if you change the first photo’s time by adding 37 minutes to it, all the photos that you have selected to change will have 37 minutes added to their times. In the dialog box, you are shown by how much the original date and time will be changed.
4. (Optional) Check Modify Original Files if you want to change the date and time to the photos’ original files in your iPhoto Library file. Selecting this check box changes the embedded Exif date data. If you don’t select this check box, the original Exif data stays the same, and the date change affects only the photos while they’re in your iPhoto Library.
5. Click the Adjust button, and the change is made. The new dates and times are reflected in the photo’s Information Pane.
Changing Your Photo’s Name
iPhoto gives you the ability to replace the boring filenames your camera assigns your photographs (such as IMG_1842.JPG) to anything you want. If you have tens of thousands of photographs, renaming each one might get tedious, but being able to name individual photos can be very helpful for your favorites, especially when it comes to searching through your library.
A Change Here, No Change There
It’s important to note that although this section uses the terms name or filename, iPhoto doesn’t actually let you change the filename of the photo that is stored in the photo’s Exif data. That data is unchangeable. When you change the filename of a photo in iPhoto, you are effectively replacing the name or title iPhoto has given the image (originally taken from the Exif filename) with one of your choosing.
1. Select the photo so a yellow box highlights it.
2. Double-click the photo’s filename in the Information Pane to change it to a text entry field. Type any name you want, and press the Return key on your keyboard to finalize it.
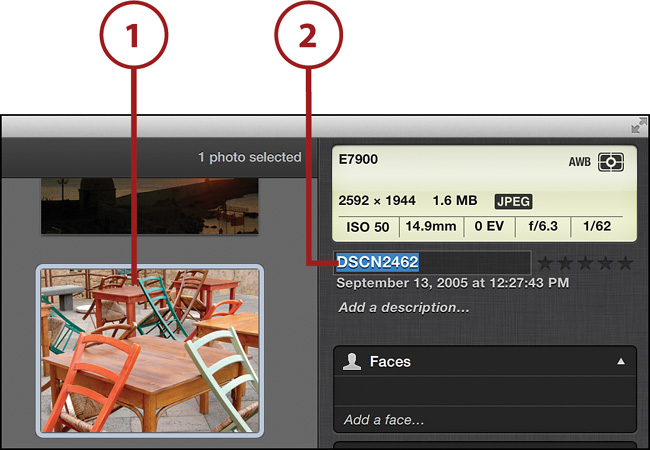
Two Ways to Change a Name
You can also double-click the name of the photo directly under the photo to change it. You won’t see the photo’s name underneath it unless you’ve selected View, Titles from the menu bar.
Adding a Description to Your Photos
iPhoto also enables you to add a description to your individual photos. Descriptions are cool because you can record a little blurb about each photo—something to help you remember it by. Descriptions are also helpful when you are searching your iPhoto Library, as you find out later in this chapter.
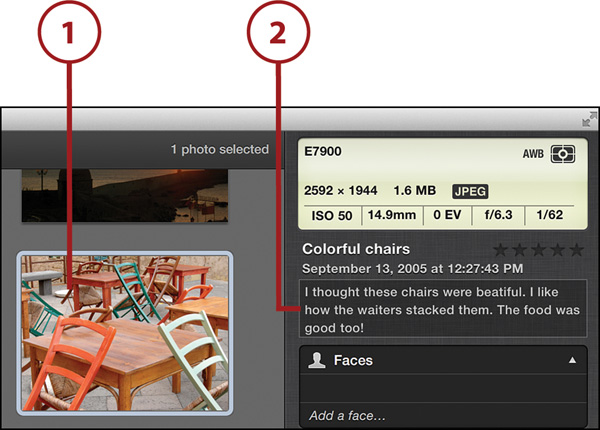
1. Select the photo so a yellow box highlights it.
2. Double-click the Add a Description text in the Information Pane to change it to a text entry field. Type any description you want. Click outside the text field to finalize it. Note that only the first two lines of description are visible, but if you hover your mouse over it, the entire description pops up in a semitransparent box.
Batch Changing Titles, Dates, and Descriptions
iPhoto offers a Batch Change feature if you find you have hundreds and hundreds of photos to add similar titles, dates, or descriptions to.
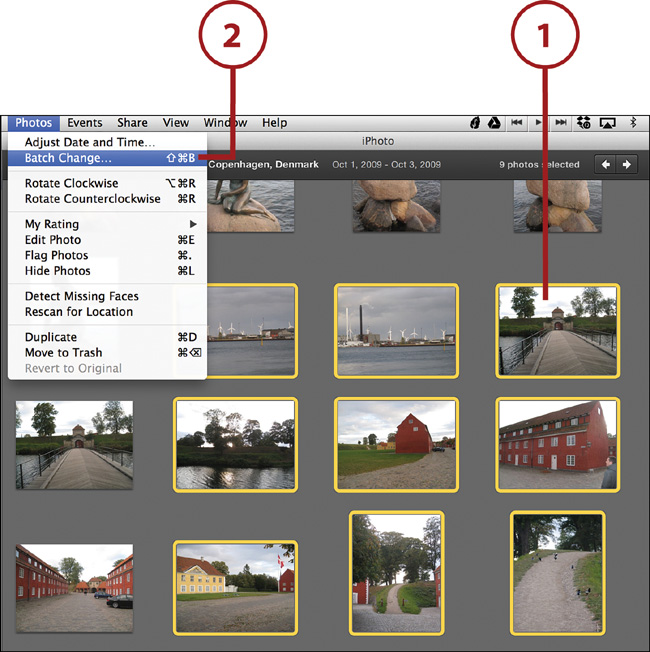
1. Select the photos or events so yellow boxes highlight them.
2. Select Photos, Batch Change.
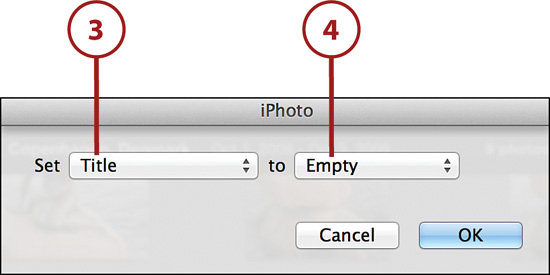
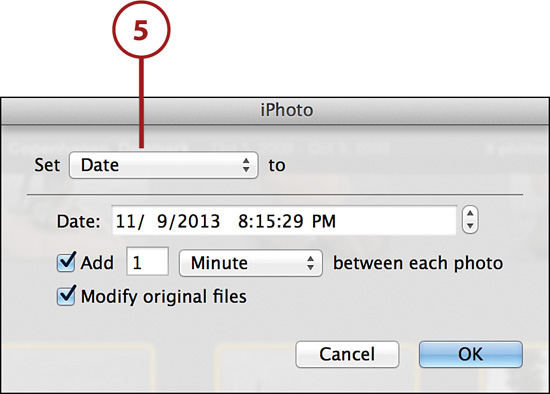
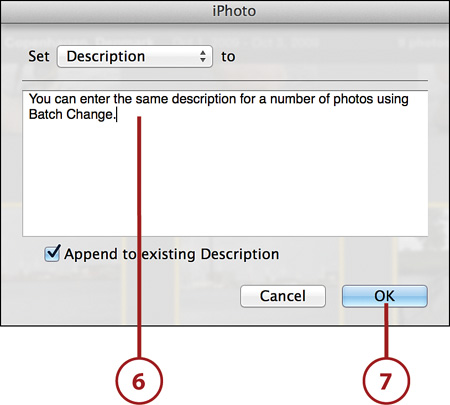
3. Select what you want to change—Title, Date, or Description—from the Set drop-down menu.
4. For Title, you can set the following from the To drop-down menu:
• Empty: This clears any previous title name from the photographs.
• Text: Any text you enter in the text field becomes the photos’ titles. You can check Append a Number to Each Photo to add a sequential number after each one. For example, if you title the photos as “Cool,” all the images selected will be named “Cool – 1,” “Cool – 2,” and so on.
• Event Name: This assigns the name of the photo’s event as the photo’s title.
• Filename: This changes the photos’ names to their individual filenames from their Exif data.
• Date/Time: This changes the titles of each photo to the photos’ dates and times.
5. For Date, you can enter the date and time you want the photos to have. Check the Add check box and set the incremental time between each photo.
6. For Description, you can enter a short description in the text box. Check the Append to Existing Description check box to add the Batch Change description to any existing descriptions.
7. Click the OK button to finalize the batch change.
Adding Keywords to Your Photos
Remember how you used to flip a photo over and write on its backside the names of the people who were in it or maybe where it was taken or what the event was? A digital photo has no such backside, but Apple still lets you append labels to it. This feature is called keywords. A keyword is simply a tag or label that you apply to your photographs. These tags come in handy when you are searching for specific photos.
1. Select the photos or group of photos to which you want to add a keyword. You can also select an event to add keywords to. A keyword that’s added to an event is added to every photo in the event.
2. Click the Info button to open the Information Pane.
3. Click the Keywords bar to expand the Keywords section of the Information Pane. Click where you see Add a Keyword, and then type your keywords into the Keywords field.
4. Press Return after each keyword. This separates one keyword from the next. A completed keyword is enclosed in a little pill-shaped oval. You can add as many keywords to an event or photo as you want.
Deleting Keywords
To delete a keyword from a photo or event, simply select the keyword in the Keywords bar and press your Delete key.
Working with the Keyword Manager
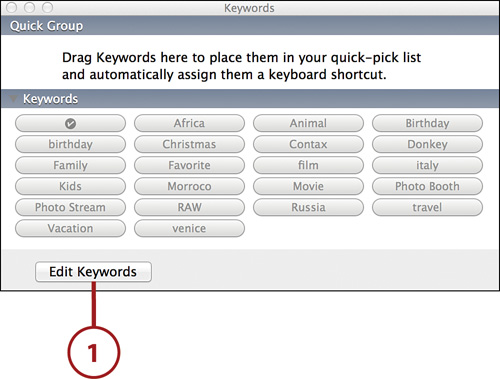
Sometimes it’s easy to go a bit overboard while adding keywords. For example, if you have a photo of a dog, it’s easy to start tagging it with every dog reference you know: “dog,” “puppy,” “hound,” “mutt,” and so on. If you ever want to see all the keywords you’ve created and have the option of editing them, you can find them all in the Keyword Manager.
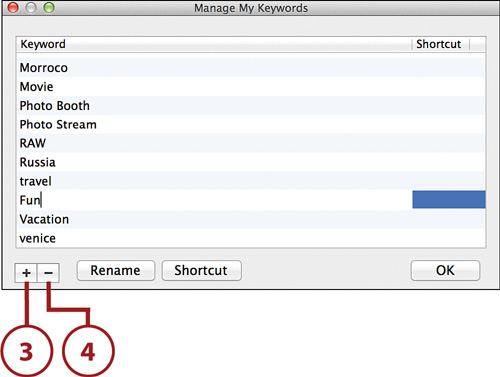
In the Keyword Manager, you’ll see all the keywords you have already added to your photos. You’ll also notice some existing keywords Apple has added, such as “Kids” and “Birthday.” From this Keyword Manager, you can create, edit, delete, and assign shortcut keys to your keywords.
Create, Edit, and Delete Keywords
Each time you label a photo with the steps in the “Adding Keywords to Your Photos” task, that keyword is added to your keyword store automatically. In other words, you’ve created a keyword. Another way to create keywords without having to apply them to photos at the time is through the Keyword Manager.
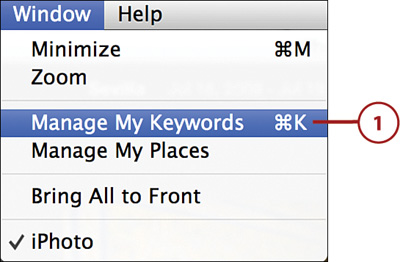
1. Select Window, Manage My Keywords. Alternatively, you can open the Keyword Manager using the Command+K shortcut key.
2. Select Edit Keywords.

3. Click the + button and enter the new keyword in the field that appears.
4. Select a keyword from the list and click the – button to delete that keyword. A window displays to ask, “Are you sure you want to remove the selected keyword?” Below this message, you see how many photos will be affected if you remove the keyword. Deleting a keyword removes that keyword from all the photos that contain it in your iPhoto Library. Click OK to delete the keyword.
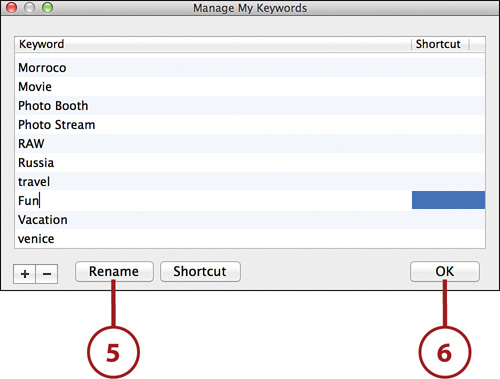
5. Click the Rename button and enter an edit in the text field. Editing a keyword is handy if you’ve labeled hundreds of photographs with a misspelled keyword. Deleting that misspelled keyword would remove it from all the photos, which means you’d have to go back and retag them with a newly created (and properly spelled) keyword. Editing a keyword enables you to fix spelling mistakes and have the changes automatically apply to all the photos that contain the existing keyword.
6. Click OK when you are done editing keywords.
Add Keyboard Shortcut Keys to Keywords
Keywords are terrific tools; however, adding them to many, many photographs can get rather tedious if you have to repeatedly go through the steps outlined previously. An easier way to quickly add keywords to your photographs is by assigning keyboard shortcuts to your keywords.
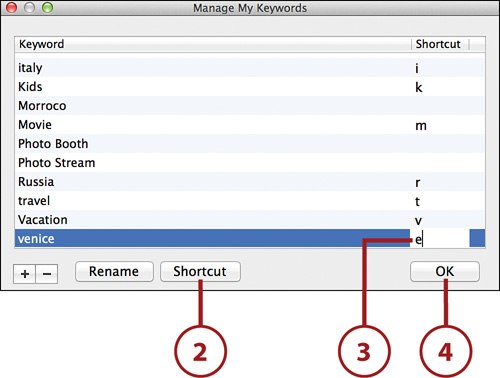
1. In the Keyword Manager, click Edit Keywords.
2. Select a keyword you want to create a shortcut for, and click the Shortcut button.
3. Enter a letter representing that keyword in the shortcut field. Usually it’s a good idea to use the first letter of the keyword. If a letter is already taken by another keyword, you have the option of choosing which keyword you want to use the letter with. You can also use upper- and lowercase letters for separate keywords—for example, B for birthday, and b for something else.
4. Click OK when you are done adding shortcuts.
>>>Go Further: Working with Keywords in the Quick Group
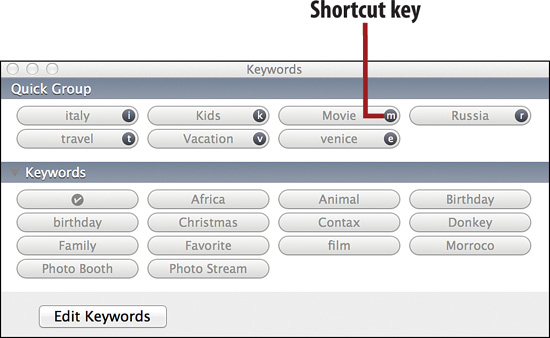
Apply Keywords Using Keyboard Shortcut Keys
After you have your keyboard shortcuts assigned to keywords, you can quickly assign keywords to your photos.
1. Move the Keyword Manager window aside so you can see your photograph in iPhoto.
2. Select your photographs and click the appropriate shortcut key to assign that specific keyword to the photo or group of photos.
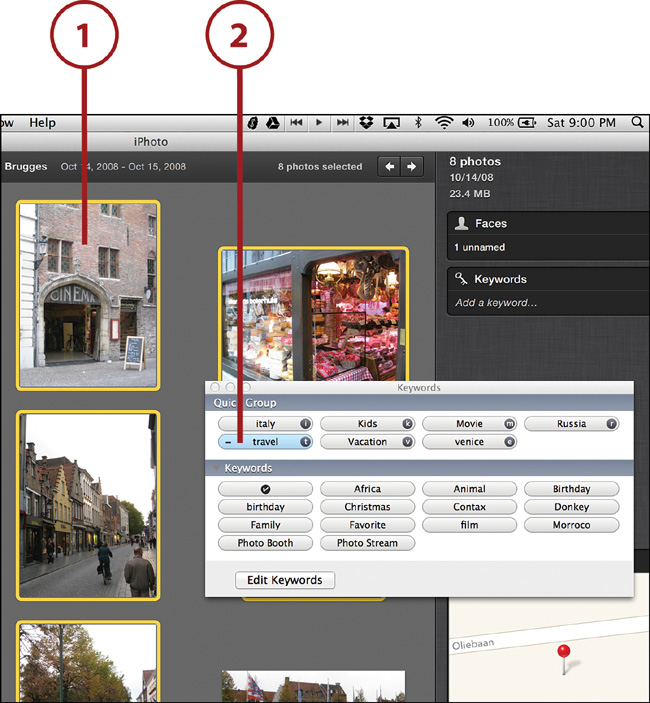
Shortcuts for Shortcuts
There are more ways to use keyboard shortcuts without opening the Keyword Manager and clicking them. For example, you can also simply press the assigned key for the shortcut (along with any modifier key) right on your keyboard. Another way to enter keywords using shortcuts is in the Keywords section of the Info panel. Click in the Keywords section and press the letter key assigned to a shortcut. It gives you the option of continuing to type a new keyword or choose the one mapped to that shortcut key.
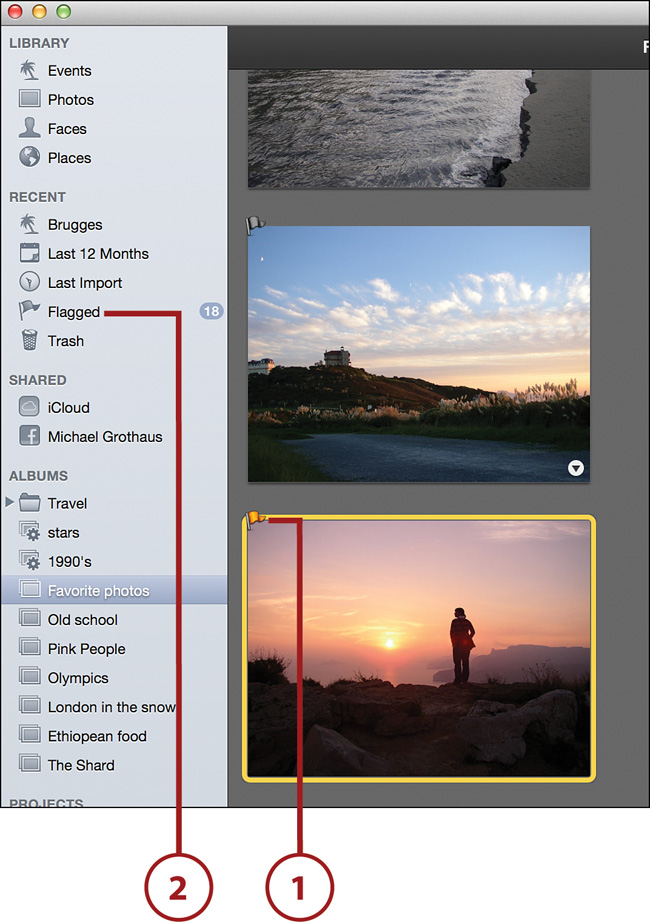
Flagging Your Photos
Similar to how adding keywords to photos duplicates the experience of writing words on the backside of paper photographs, flagging your photos in iPhoto is the equivalent of placing a selected photo to the side in its own special pile while you browse the rest of your photos.
Flag a Photo
1. Select the photo and click the Flag Indicator in the photo’s upper-left corner. Note that the flag indicator does not appear in the corner of a photo until you move your mouse over it.
Raising the Flag
You can also flag a photo (or multiple photos) by choosing Photos, Flag Photo from iPhoto’s menu bar.
2. When you flag a photo in iPhoto, it is added automatically into a special Flagged photo album that always exists under the Recent header in iPhoto’s source list.
Unflag a Photo
1. Select the already flagged photo or photos and click the Flag Indicator in the photo’s upper-left corner.
Removing a Flag
You can also unflag a photo (or multiple photos) by choosing Photos, Unflag Photo from iPhoto’s menu bar. The photos are removed from the Flagged photo album automatically.
2. If you want to unflag all flagged photos in your iPhoto Library, select the Flagged album from the source list and then click the Clear Flagged button at the top of the album, or hover your mouse over the flagged photos number indicator in the source list and click the X that appears.

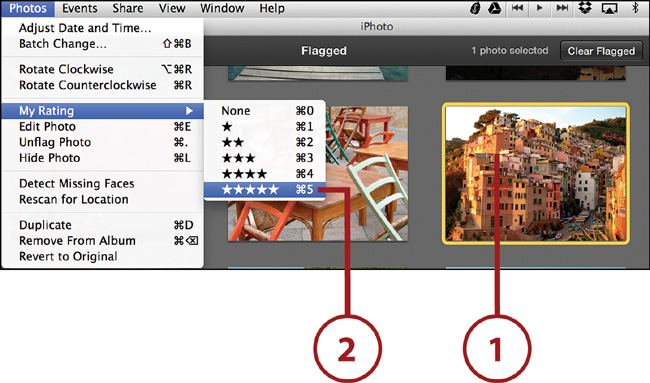
Rating Your Photos
iPhoto enables you to assign ratings to your photos so you can record how much you like each one. iPhoto’s rating system is based on zero to five stars. Rating your photos isn’t just something you do to pass the time. Rating them can help you easily search through your library or create photo albums based on your ratings.
You have five ways to rate your photos, four of which are discussed in this task. (Read about the fifth way in the “Using the Contextual Menu” section later in this chapter.) Like most other marking options in iPhoto, you can rate one photo at a time or group multiple photos together to rate them.
1. Select the photo or photos you want to rate.
2. From iPhoto’s menu bar, select Photos, My Rating and choose None or one to five stars. Or...
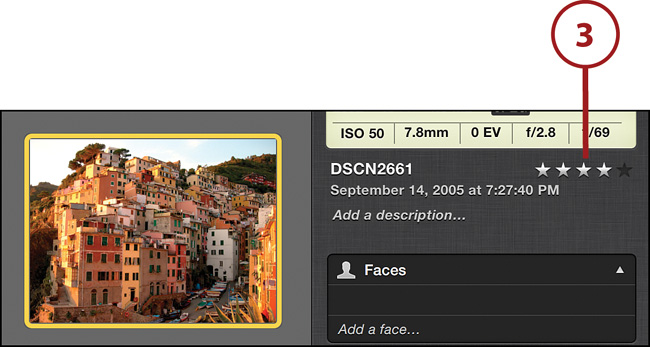
3. ...from iPhoto’s Information Pane, click and drag your mouse over the hollow stars to rate the photo. Or...
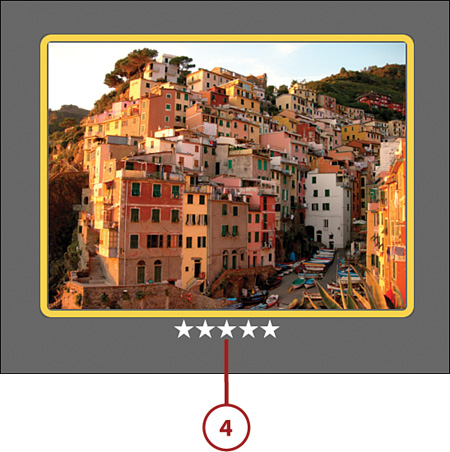
4. ...from underneath a photo, click and drag your mouse over the hollow stars to rate the photo. (To view ratings underneath photos, you must make sure you have selected View, Ratings from the menu bar.) Or...
5. ...from your keyboard, press the Command key on your keyboard and then 0, 1, 2, 3, 4, or 5 to rate the selected photos between zero and five stars.
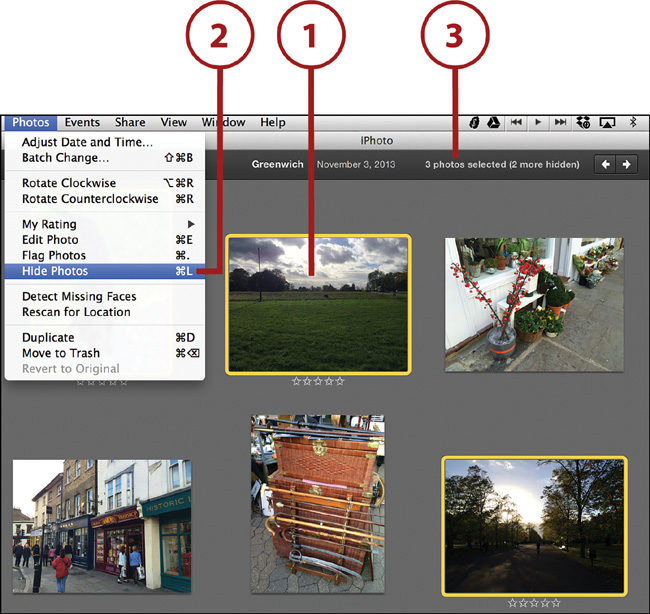
Hiding Your Photos
iPhoto gives you the ability to hide certain photos. I know, all of your photos are amazing, so why would you want to hide any of them? Hiding is useful when you are thinking about deleting photos but aren’t quite sure if you want to do that. In the meantime, choosing to hide photos removes them from view in your iPhoto Library.
Hide a Photo
1. Select the photo or photos you want to hide.
2. From the menu bar select Photos, Hide Photo.
3. The photos are removed from viewing, and at the top of iPhoto’s window you are notified of how many photos are hidden in the particular album, Event, Faces, or Places.
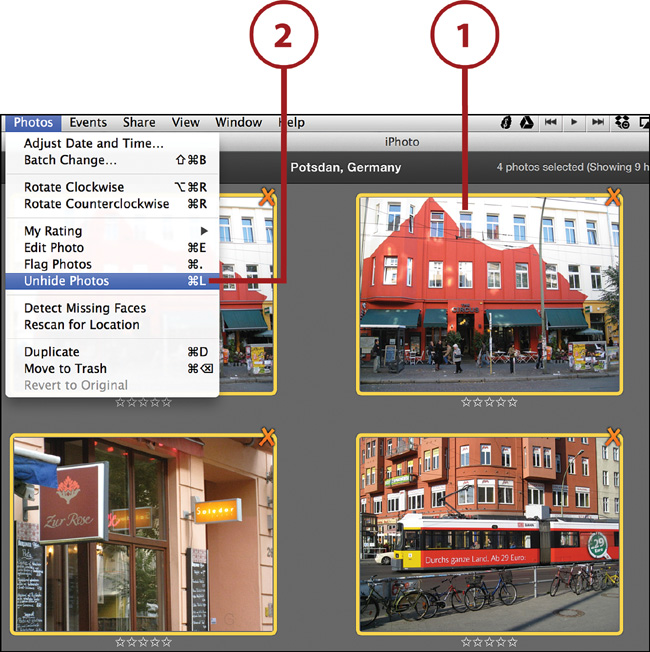
Temporarily View Hidden Photos
1. Select View, Hidden Photos. This does not unhide the photos because they are still marked as hidden. This simply shows you all the photos you have hidden.
2. Hidden photos in this view are marked with an orange X in their upper-right corners. If you select View, Hidden Photos again, the photos you have marked as hidden vanish from view again.

2. Choose Photos, Unhide Photos.
Deleting Your Photos
At times, you might decide to delete some of your photographs. This can be for several reasons. Perhaps the shot is blurry. Maybe the photo is similar to dozens of others you’ve taken of the same thing. Whatever your reason, you want to get rid of it.
Move Photos to the Trash
1. Select the photo or photos you want to delete.
2. Press the Delete key on your keyboard, or choose Photos, Move to Trash.
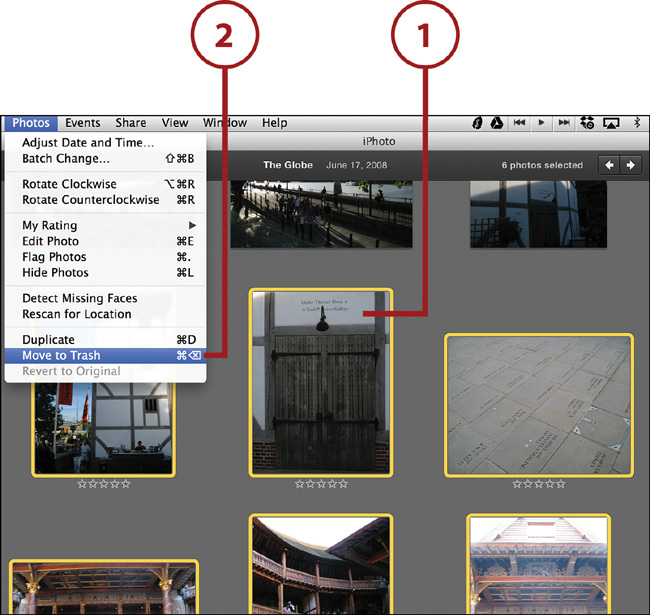
3. Click Delete Photos in the confirmation box.
4. At this point, you haven’t actually deleted your photos from iPhoto. You’ve just moved them to iPhoto’s trash can. iPhoto’s trash can icon is always in the source list. Hovering your mouse over the trash can icon displays a small window that shows you how many photos you have in the trash.
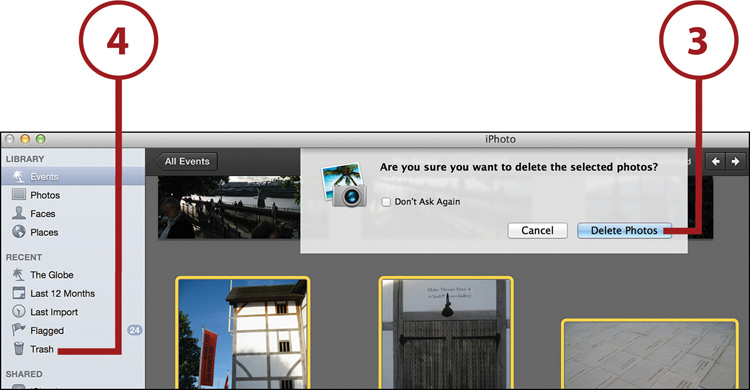
About Trashing Photos
Moving a photo to iPhoto’s trash removes that photo from all albums, events, and projects that photo appeared in—including any books, cards, or calendars you may have created. If you shared the photo online via Flickr, iCloud, or Facebook, it remains there until you remove it.
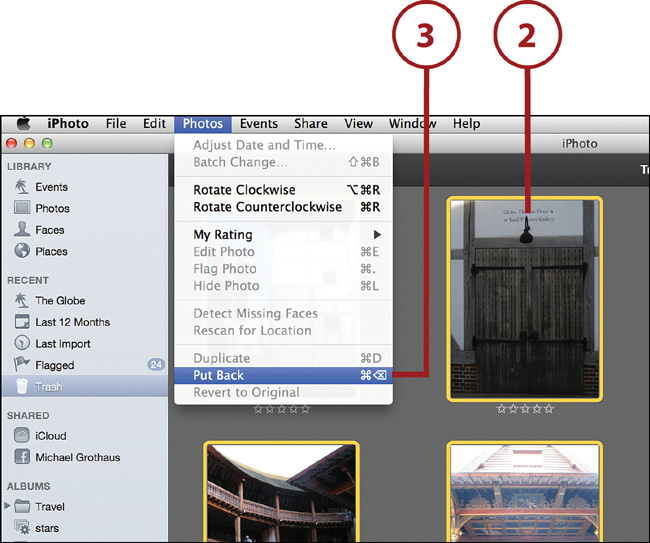
Restore Photos from the Trash
If you’ve changed your mind and don’t want to delete your photos or a few select photos you’ve moved to the trash, you can choose to restore your photos to your iPhoto Library.
1. Select the trash icon in the source list.
2. Select the photo or photos.
3. Choose Photos, Put Back. Your photos are placed back in the albums, events, and projects in which they were located before you moved them to the trash.
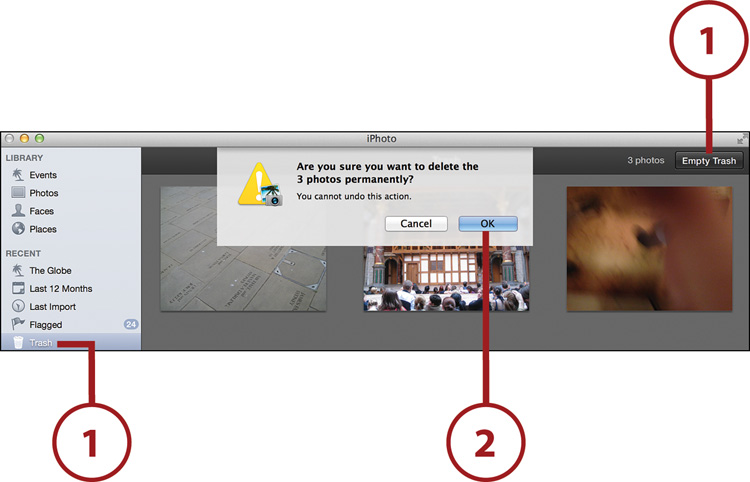
2. Click OK in the dialog box that asks whether you are sure you want to delete the photos permanently.
Trash Technicalities
Technically you have deleted the photos from your iPhoto Library file on your computer. However, until you empty your computer’s trash can by choosing Finder, Empty Trash, your photos remain on your computer, albeit in the trash can. After you empty your computer’s trash, your deleted photos are really, truly gone forever unless you have backed them up.
Using the Contextual Menu
You can also access many of the operations reviewed in this chapter by using a contextual menu built in to iPhoto. To access this contextual menu, move your mouse over a photograph and right-click. (Optionally, you can click the tiny downward-facing arrowhead that appears in the lower-right corner of a photo.)
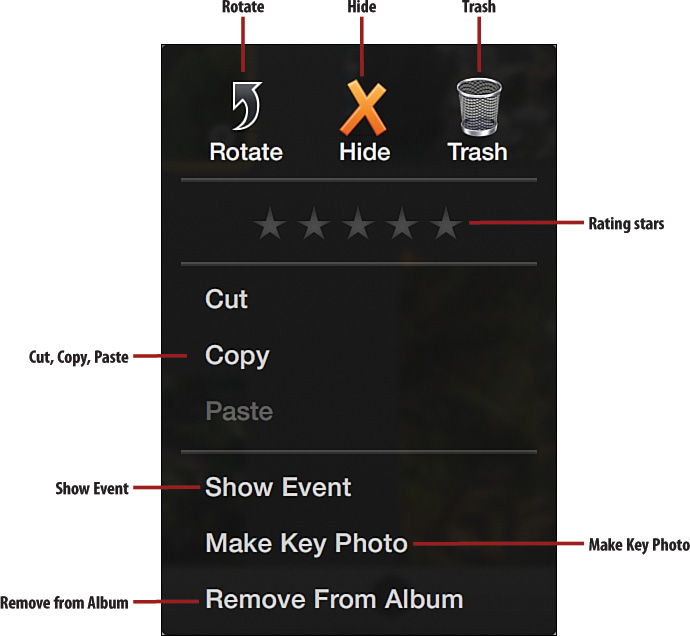
• Rotate: Click this arrow to rotate the selected photo counterclockwise 90 degrees at a time. This is great for easily fixing photos to show right way up in the iPhoto Library.
• Hide: This is another way to hide a photo. Simply click the orange X.
• Trash: Click the trash can icon to move the photo to iPhoto’s trash.
• Rating stars: Click and drag your mouse over these stars to rate the photo.
• Cut, Copy, Paste: Click these commands to cut or copy the selected photo or paste a previously copied photo.
• Show Event: If the photo is in an album, clicking this takes you to that photo’s event.
• Make Key Photo: Click this command to make the selected photo an event’s key photo. You can read about key photos and events in Chapter 5, “Working with Events.”
• Remove from Album: Click this command to remove the photo from the selected album.