3
WORKING WITH CONTAINER OBJECTS AND CUSTOMIZING SPACY

You can divide the main objects composing the spaCy API into two categories: containers (such as Tokens and Doc objects) and processing pipeline components (such as the part-of-speech tagger and named entity recognizer). This chapter explores container objects further. Using container objects and their methods, you can access the linguistic annotations that spaCy assigns to each token in a text.
You’ll also learn how to customize the pipeline components to suit your needs and use Cython code to speed up time-consuming NLP tasks.
spaCy’s Container Objects
A container object groups multiple elements into a single unit. It can be a collection of objects, like tokens or sentences, or a set of annotations related to a single object. For example, spaCy’s Token object is a container for a set of annotations related to a single token in a text, such as that token’s part of speech. Container objects in spaCy mimic the structure of natural language texts: a text is composed of sentences, and each sentence contains tokens.
Token, Span, and Doc, the most widely used container objects in spaCy from a user’s standpoint, represent a token, a phrase or sentence, and a text, respectively. A container can contain other containers—for example, a Doc contains Tokens. In this section, we’ll explore working with these container objects.
Getting the Index of a Token in a Doc Object
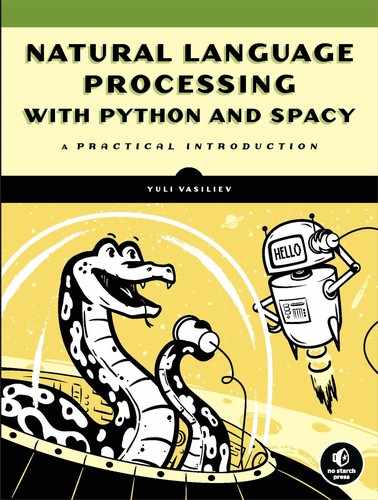
A Doc object contains a collection of the Token objects generated as a result of the tokenization performed on a submitted text. These tokens have indices, allowing you to access them based on their positions in the text, as shown in Figure 3-1.
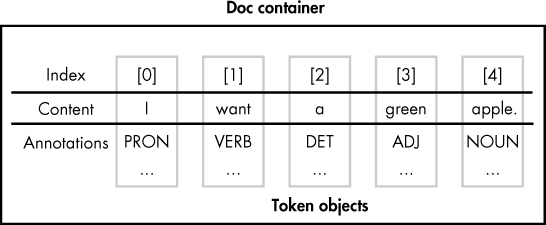
Figure 3-1: The tokens in a Doc object
The tokens are indexed starting with 0, which makes the length of the document minus 1 the index of the end position. To shred the Doc instance into tokens, you derive the tokens into a Python list by iterating over the Doc from the start token to the end token:
>>> [doc[i] for i in range(len(doc))]
[A, severe, storm, hit, the, beach, .]
It’s worth noting that we can create a Doc object using its constructor explicitly, as illustrated in the following example:
>>> from spacy.tokens.doc import Doc
>>> from spacy.vocab import Vocab
>>> doc = Doc(➊Vocab(), ➋words=[u'Hi', u'there'])
doc
Hi there
We invoke the Doc’s constructor, passing it the following two parameters: a vocab object ➊—which is a storage container that provides vocabulary data, such as lexical types (adjective, verb, noun, and so on)—and a list of tokens to add to the Doc object being created ➋.
Iterating over a Token’s Syntactic Children
Suppose we need to find the leftward children of a token in the syntactic dependency parse of a sentence. For example, we can apply this operation to a noun to obtain its adjectives, if any. We might need to do this if we want to know what adjectives are able to modify a given noun. As an example, consider the following sentence:
I want a green apple.
The diagram in Figure 3-2 highlights the syntactic dependencies of interest.

Figure 3-2: An example of leftward syntactic dependencies
To obtain the leftward syntactic children of the word “apple” in this sample sentence programmatically, we might use the following code:
>>> doc = nlp(u'I want a green apple.')
>>> [w for w in doc[4].lefts]
[a, green]
In this script, we simply iterate through the apple’s children, outputting them in a list.
It’s interesting to note that in this example, the leftward syntactic children of the word “apple” represent the entire sequence of the token’s syntactic children. In practice, this means that we might replace Token.lefts with Token.children, which finds all of a token’s syntactic children:
>>> [w for w in doc[4].children]
The result list will remain the same.
We could also use Token.rights to get a token’s rightward syntactic children: in this example, the word “apple” is a rightward child of the word “want,” as shown in Figure 3-1.
The doc.sents Container
Typically, the linguistic annotations assigned to a token make sense only in the context of the sentence in which the token occurs. For example, information about whether the word is a noun or a verb might apply only to the sentence in which this word is located (like the word “count,” discussed in previous chapters). In such cases, it would be useful to have the ability to access the tokens in the document with sentence-level indices.
The Doc object’s doc.sents property lets us separate a text into its individual sentences, as illustrated in the following example:
>>> doc = nlp(u'A severe storm hit the beach. It started to rain.')
➊ >>> for sent in doc.sents:
➋ ... [sent[i] for i in range(len(sent))]
...
[A, severe, storm, hit, the, beach, .]
[It, started, to, rain, .]
>>>
We iterate over the sentences in the doc ➊, creating a separate list of tokens for each sentence ➋.
At the same time, we can still refer to the tokens in a multi-sentence text using the global, or document-level, indices, as shown here:
>>> [doc[i] for i in range(len(doc))]
[A, severe, storm, hit, the, beach, ., It, started, to, rain, .]
The ability to refer to the Token objects in a document by their sentence-level indices can be useful if, for example, we need to check whether the first word in the second sentence of the text being processed is a pronoun (say we want to figure out the connection between two sentences: the first of which contains a noun and the second of which contains a pronoun that refers to the noun):
>>> for i,sent in enumerate(doc.sents):
... if i==1 and sent[0].pos_== 'PRON':
... print('The second sentence begins with a pronoun.')
The second sentence begins with a pronoun.
In this example, we use an enumerator in the for loop to distinguish the sentences by index. This allows us to filter out sentences that we’re not interested in and check only the second sentence.
Identifying the first word in a sentence is a breeze, because its index is always 0. But what about the last one? For example, what if we need to find out how many sentences in the text end with a verb—(not counting any periods, of course)?
>>> counter = 0
>>> for sent in doc.sents:
... if sent[len(sent)-2].pos_ == 'VERB':
... counter+=1
>>> print(counter)
1
Although the lengths of sentences vary, we can easily determine the length of a given sentence using the len() function. We reduce the value of len(sent) by 2 for the following reasons: first, the indices always start at 0 and end at size-1. Second, the last token in both sentences in the sample is a period, which we need to ignore.
The doc.noun_chunks Container
A Doc object’s doc.noun_chunks property allows us to iterate over the noun chunks in the document. A noun chunk is a phrase that has a noun as its head. For example, the previous sentence contains the following noun chunks:
A noun chunk
a phrase
a noun
its head
With doc.noun_chunks, we can extract them as follows:
>>> doc = nlp(u'A noun chunk is a phrase that has a noun as its head.')
>>> for chunk in doc.noun_chunks:
... print(chunk)
Alternatively, we might extract noun chunks by iterating over the nouns in the sentence and finding the syntactic children for each noun to form a chunk. Earlier in “Iterating over a Token’s Syntactic Children” on page 33, you saw an example of how to extract a phrase based on the syntactic dependency parse. Now let’s apply this technique to the sample sentence in this example to compose noun chunks manually:
for token in doc:
➊ if token.pos_=='NOUN':
chunk = ''
➋ for w in token.children:
➌ if w.pos_ == 'DET' or w.pos_ == 'ADJ':
chunk = chunk + w.text + ' '
➍ chunk = chunk + token.text
print(chunk)
Iterating over the tokens, we pick up only nouns ➊. Next, in the inner loop, we iterate over a noun’s children ➋, picking up only the tokens that are either determiners or adjectives for the noun chunk (noun chunks can also include some other parts of speech, say, adverbs) ➌. Then we append the noun to the chunk ➍. As a result, the output of the script should be the same as in the previous example.
Try This
Notice that the words used to modify a noun (determiners and adjectives) are always the leftward syntactic children of the noun. This makes it possible to replace Token.children with Token.lefts in the previous code and then remove the check for the children to be either a determiner or an adjective, as necessary.
Rewrite the previous snippet, incorporating the changes suggested here. The resulting set of noun chunks should remain the same in your script.
The Span Object
The Span object is a slice from a Doc object. In the previous sections, you saw how to use it as a container for a sentence and a noun chunk, derived from doc.sents and doc.noun_chunks, respectively.
The Span object’s usage isn’t limited to being a container for sentences or noun chunks only. We can use it to contain an arbitrary set of neighboring tokens in the document by specifying a range of indices, as in the following example:
>>> doc=nlp('I want a green apple.')
>>> doc[2:5]
a green apple
The Span object contains several methods, one of the most interesting of which is span.merge(), which allows us to merge the span into a single token, retokenizing the document. This can be useful when the text contains names consisting of several words.
The sample sentence in the following example contains two place names consisting of several words (“Golden Gate Bridge” and “San Francisco”) that we might want to group together. The default tokenization won’t recognize these multi-word place names as single tokens. Look at what happens when we list the text’s tokens:
>>> doc = nlp(u'The Golden Gate Bridge is an iconic landmark in San Francisco.')
>>> [doc[i] for i in range(len(doc))]
[The, Golden, Gate, Bridge, is, an, iconic, landmark, in, San, Francisco, .]
Each word and punctuation mark is its own token.
With the span.merge() method, we can change this default behavior:
>>> span = doc[1:4]
>>> lem_id = doc.vocab.strings[span.text]
>>> span.merge(lemma = lem_id)
Golden Gate Bridge
In this example, we create a lemma for the “Golden Gate Bridge” span, and then pass the lemma to span.merge() as a parameter. (To be precise, we pass on the lemma’s id obtained through the doc.vocab.string attribute.)
Note that the span.merge() method doesn’t merge the corresponding lemmas by default. When called without parameters, it sets the lemma of the merged token to the lemma of the first token of the span being merged. To specify the lemma we want to assign to the merged token, we pass it to span.merge() as the lemma parameter, as illustrated here.
Let’s check whether the lemmatizer, part-of-speech tagger, and dependency parser can handle the newly created lemma correctly:
>>> for token in doc:
print(token.text, token.lemma_, token.pos_, token.dep_)
This should produce the following output:
The the DET det
Golden Gate Bridge Golden Gate Bridge PROPN nsubj
is be VERB ROOT
an an DET det
iconic iconic ADJ amod
landmark landmark NOUN attr
in in ADP prep
San san PROPN compound
Francisco francisco PROPN pobj
. . PUNCT punct
All the attributes shown in the listing have been assigned to the “Golden Gate Bridge” token correctly.
Try This
The sentence in the preceding example also contains San Francisco, another multi-word place name that you might want to merge into a single token. To achieve this, perform the same operations as listed in the previous code snippets for the “Golden Gate Bridge” span.
When determining the start and end positions for the “San Francisco” span in the document, don’t forget that the indices of the tokens located to the right of the newly created “Golden Gate Bridge” token have been shifted downward respectively.
Customizing the Text-Processing Pipeline
In the previous sections, you learned how spaCy’s container objects represent linguistic units, such as a text and an individual token, allowing you to extract linguistic features associated with them. Let’s now look at the objects in the spaCy API that create those containers and fill them with relevant data.
These objects are referred to as processing pipeline components. As you’ve already learned, a pipeline set includes—by default—a part-of-speech tagger, a dependency parser, and an entity recognizer. You can check what pipeline components are available for your nlp object like this:
>>> nlp.pipe_names
['tagger', 'parser', 'ner']
As discussed in the following sections, spaCy allows you to customize the components in your pipeline to best suit your needs.
Disabling Pipeline Components
spaCy allows you to load a selected set of pipeline components, disabling those that aren’t necessary. You can do this when creating an nlp object by setting the disable parameter:
nlp = spacy.load('en', disable=['parser'])
In this example, we create a processing pipeline without a dependency parser. If we call this nlp instance on a text, the tokens won’t receive dependency labels. The following example illustrates this point clearly:
>>> doc = nlp(u'I want a green apple.')
>>> for token in doc:
... print(➊token.text, ➋token.pos_, ➌token.dep_)
I PRON
want VERB
a DET
green ADJ
apple NOUN
. PUNCT
We try to print out the following information for each token from the sample sentence: the text content ➊, a part-of-speech tag ➋, and a dependency label ➌. But the dependency labels don’t appear.
Loading a Model Step by Step
You can perform several operations in one step with spacy.load(), which loads a model. For example, when you make this call:
nlp = spacy.load('en')
spaCy performs the following steps behind the scenes:
- Looking at the name of the model to be loaded, spaCy identifies what Language class it should initialize. In this example, spaCy creates an English class instance with shared vocabulary and other language data.
- spaCy iterates over the processing pipeline names, creates corresponding components, and adds them to the processing pipeline.
- spaCy loads the model data from disk and makes it available to the Language class instance.
These implementation details are hidden by spacy.load(), which in most cases saves you effort and time. But sometimes, you might need to implement these steps explicitly to have fine-grained control over the process. For example, you might need to load a custom component to the processing pipeline. The component could print some information about the Doc object in the pipeline, such as the number of tokens or the presence or absence of certain parts of speech.
As usual, more fine-grained control requires you to provide more information. First, rather than specifying a shortcut, you’ll need to obtain the actual model name so you can get the path to the model package.
You can identify the full name of the model as follows:
>>> print(nlp.meta['lang'] + '_' + nlp.meta['name'])
en_core_web_sm
The nlp.meta attribute used in this code is a dictionary that contains the metadata of the loaded model. What you need in this example is the model’s language and the model’s name.
Now that you know the model’s name, you can find its location in your system by using the get_package_path utility function:
>>> from spacy import util
>>> util.get_package_path('en_core_web_sm')
PosixPath('/usr/local/lib/python3.5/site-packages/en_core_web_sm')
The path specified in this code might be different on your machine, depending on your Python installation directory. Regardless, this is not the full path. You’ll need to append one more folder to it. The name of this folder is composed of the model name and the model version appended to it. (This is where the model package is located.) You can determine its name as follows:
>>> print(nlp.meta['lang'] + '_' + nlp.meta['name'] + '-' + nlp.
meta['version'])
en_core_web_sm-2.0.0
You might also want to look at the list of pipeline components used with the model. (It’s important to know what components are supported in the context of the model and therefore can be loaded to the pipeline.) You can obtain this information via the nlp.meta attribute’s 'pipeline' field, as shown here (or via the nlp.pipe_names attribute introduced in the beginning of “Customizing the Text-Processing Pipeline” on page 37):
>>> nlp.meta['pipeline']
['tagger', 'parser', 'ner']
With this information, we can create a script that implements the steps provided at the beginning of this section:
>>> lang = 'en'
>>> pipeline = ['tagger', 'parser', 'ner']
>>> model_data_path = '/usr/local/lib/python3.5/site-packages/en_core_web_sm/
en_core_web_sm-2.0.0'
➊ >>> lang_cls = spacy.util.get_lang_class(lang)
>>> nlp = lang_cls()
➋ >>> for name in pipeline:
➌ ... component = nlp.create_pipe(name)
➍ ... nlp.add_pipe(component)
➎ >>> nlp.from_disk(model_data_path)
In this script, we use spacy.util.get_lang_class() ➊ to load a Language class. Which class we load depends on the two-letter language code specified as the parameter. In this example, we load English. Next, in a loop ➋, we create ➌ and add ➍ the pipeline components to the processing pipeline. Then we load a model from disk, specifying the path to it used on your machine ➎.
Looking at the code in this script, it might seem that the pipeline components become functional once we’ve added them to the processing pipeline. Actually, we can’t use them until we load the model data, so if we omit the last line of code in the script, we won’t even be able to create a Doc object using this nlp instance.
Customizing the Pipeline Components
By customizing pipeline components, you can best meet the needs of your application. For example, suppose you want your model’s named entity recognizer system to recognize the word Festy as a city district. By default, it recognizes it as an organization, as illustrated in the following example:
>>> doc = nlp(u'I need a taxi to Festy.')
>>> for ent in doc.ents:
... print(ent.text, ent.label_)
Festy ORG
The label ORG stands for companies, agencies, and other institutions. But you want to make the entity recognizer classify it as an entity of type DISTRICT instead.
The entity recognizer component is implemented in the spaCy API as the EntityRecognizer class. Using this class’s methods, you can initialize an instance of ner and then apply it to a text. In most cases, you don’t need to perform these operations explicitly; spaCy does it for you under the hood when you create an nlp object and then create a Doc object, respectively.
But when you want to update the named entity recognition system of an existing model with your own examples, you’ll need to work with some of the ner object’s methods explicitly.
In the following example, you’ll first have to add a new label called DISTRICT to the list of supported entity types. Then you need to create a training example, which is what you’ll show the entity recognizer so it will learn what to apply the DISTRICT label to. The simplest implementation of the preparation steps might look as follows:
LABEL = 'DISTRICT'
TRAIN_DATA = [
➊ ('We need to deliver it to Festy.', {
➋ 'entities': [(25, 30, 'DISTRICT')]
}),
➌ ('I like red oranges', {
'entities': []
})
]
For simplicity, this training set contains just two training samples (typically, you need to provide many more). Each training sample includes a sentence that might or might not contain an entity (or entities) to which the new entity label should be assigned ➊. If there is an entity in the sample, you specify its start and end position ➋. The second sentence in the training set doesn’t contain the word Festy at all ➌. This is due to the way the training process is organized. Chapter 10 covers the details of this process in more depth.
Your next step is to add a new entity label DISTRICT to the entity recognizer: but before you can do this, you must get the instance of the ner pipeline component. You can do this as follows:
ner = nlp.get_pipe('ner')
Once you have a ner object, you can add a new label to it using the ner.add_label() method, as shown here:
ner.add_label(LABEL)
Another action you need to take before you can start training the entity recognizer is to disable the other pipes to make sure that only the entity recognizer will be updated during the training process:
nlp.disable_pipes('tagger')
nlp.disable_pipes('parser')
Then you can start training the entity recognizer using the training samples in the TRAIN_DATA list created earlier in this section:
optimizer = nlp.entity.create_optimizer()
import random
for i in range(25):
random.shuffle(TRAIN_DATA)
for text, annotations in TRAIN_DATA:
nlp.update([text], [annotations], sgd=optimizer)
During training, the sample examples are shown to the model in a loop, in random order, to efficiently update the underlying model’s data and avoid any generalizations based on the order of training examples. The execution will take a while.
Once the preceding code has successfully completed, you can test how the updated optimizer recognizes the token Festy:
>>> doc = nlp(u'I need a taxi to Festy.')
>>> for ent in doc.ents:
... print(ent.text, ent.label_)
...
Festy DISTRICT
According to the output, it works correctly.
Keep in mind that the updates you just made will be lost when you close this Python interpreter session. To address this problem, the Pipe class—the parent of the EntityRecognizer class and other pipeline components classes—has the to_disk() method, which allows you to serialize the pipe to disk:
>>> ner.to_disk('/usr/to/ner')
Now you can load the updated component to a new session with the from_disk() method. To make sure it works, close your current interpreter session, start a new one, and then run the following code:
>>> import spacy
>>> from spacy.pipeline import EntityRecognizer
➊ >>> nlp = spacy.load('en', disable=['ner'])
➋ >>> ner = EntityRecognizer(nlp.vocab)
➌ >>> ner.from_disk('/usr/to/ner')
➍ >>> nlp.add_pipe(ner)
You load the model, disabling its default ner component ➊. Next, you create a new ner instance ➋ and then load it with the data from disk ➌. Then you add the ner component to the processing pipeline ➍.
Now you can test it, like this:
>>> doc = nlp(u'We need to deliver it to Festy.')
>>> for ent in doc.ents:
... print(ent.text, ent.label_)
Festy DISTRICT
As you can see, the entity recognizer labels the name Festy correctly.
Although I’ve shown you how to customize the named entity recognizer only, you can also customize the other pipeline components in a similar way.
Using spaCy’s C-Level Data Structures
Even with spaCy, NLP operations that involve processing large amounts of text can be very time-consuming. For example, you might need to compose a list of the adjectives most appropriate for a certain noun, and to do this, you’ll have to examine a large amount of text. If processing speed is critical to your application, spaCy allows you to take advantage of Cython’s C-level data structures and interfaces. Cython is one of the languages in which spaCy is written (the other one is Python). Because it’s a superset of Python, Cython considers almost all Python code valid Cython code. In addition to Python’s functionality, Cython allows you to natively call C functions and declare fast C types, enabling the compiler to generate very efficient code. You might want to use Cython to speed up time-consuming text processing operations.
spaCy’s core data structures are implemented as Cython objects, and spaCy’s public API allows you to access those structures. For details, refer to the Cython Architecture page in the documentation at https://spacy.io/api/cython/.
How It Works
To use Cython code with spaCy, you must turn it into a Python extension module that you can then import into your program, as illustrated in Figure 3-3.

Figure 3-3: Building a Python extension module from a Cython script
You can do this by saving Cython code in a .pyx file and then running a setup.py Python script that first converts Cython code into corresponding C or C++ code and then invokes a C or C++ compiler. The script generates the Python extension module.
Preparing Your Working Environment and Getting Text Files
Before you can start building Cython code, you need to install Cython on your machine and obtain a large text file to work with.
Install Cython on your machine using pip:
pip install Cython
Next, to simulate a time-consuming task and measure performance, you’ll need a large text file. For this, you can use a Wikipedia dump file, which contains a set of pages wrapped in XML. Wikipedia dump files are available for download at https://dumps.wikimedia.org/enwiki/latest/. Scroll down to the enwiki-latest-pages-articles*.xml-*.bz2 files and choose one that is large enough for your tests. But don’t choose one that is too large unless you want to spend hours waiting for your machine to complete your test code. A dump file of 10–100MB should be appropriate.
Once you’ve downloaded the file, extract raw text from it with a tool like gensim.corpora.wikicorpus (https://radimrehurek.com/gensim/corpora/wikicorpus.html), which is designed specifically for constructing a text corpus from a Wikipedia database dump.
Your Cython Script
Now let’s write a Cython script that analyzes the text file. For simplicity, suppose all you want to do is count the number of personal pronouns in the submitted text. That means you need to count the number of tokens with the PRP part-of-speech tag assigned to them.
WARNING
As stated in the documentation, C-level methods intended for use from Cython are designed for speed over safety. Mistakes in the code might cause the execution to crash abruptly.
In a directory in your local filesystem, create a file called spacytext.pyx and insert the following code into it:
from cymem.cymem cimport Pool
from spacy.tokens.doc cimport Doc
from spacy.structs cimport TokenC
from spacy.typedefs cimport hash_t
➊ cdef struct DocStruct:
TokenC* c
int length
➋ cdef int counter(DocStruct* doc, hash_t tag):
cdef int cnt = 0
for c in doc.c[:doc.length]:
if c.tag == tag:
cnt += 1
return cnt
➌ cpdef main(Doc mydoc):
cdef int cnt
cdef Pool mem = Pool()
cdef DocStruct* doc_ptr = <DocStruct*>mem.alloc(1, sizeof(DocStruct))
doc_ptr.c = mydoc.c
doc_ptr.length = mydoc.length
tag = mydoc.vocab.strings.add('PRP')
cnt = counter(doc_ptr, tag)
print(doc_ptr.length)
print(cnt)
We start with a set of cimport statements to import necessary Cython modules, mostly from the spaCy library.
Then we define the Cython struct DocStruct as the container for the text being processed and the TokenC* variable ➊, a pointer to a TokenC struct used in spaCy as the data container for the Token object.
Next, we define a Cython function counter ➋ that counts the number of personal pronouns in the text.
NOTE
The cdef functions won’t be available in the Python code that imports the module. If you want to create a function that will be visible to Python and to take advantage of C-level data structures and interfaces at the same time, you need to declare that function as cpdef.
Finally, we define a cpdef Cython/Python main function ➌ that we can use in Python.
Building a Cython Module
Unlike Python, you must compile Cython code. You can do this in several ways, the best of which is to write a distutils/setuptools setup.py Python script. Create a setup.py file in the same directory as your Cython script. Your setup.py file should include the following code:
from distutils.core import setup
from Cython.Build import cythonize
➊ import numpy
setup(name='spacy text app',
➋ ext_modules=cythonize("spacytext.pyx", language="c++"),
➌ include_dirs=[numpy.get_include()]
)
This is a regular distutils/setuptools setup.py script except for two additions related to the example we’re working with. First, we import numpy ➊ and then explicitly specify where to find the .h files of the library ➌. We do this to avoid the numpy/arrayobject.h compilation error that occurs in some systems. We use the other setup option, language = "c++" ➋ to instruct the setup process to employ a C++ compiler rather than performing C compilation, which is the default.
Now that we have the setup script, you can build your Cython code. You can do this from within a system terminal, as follows:
python setup.py build_ext --inplace
A bunch of messages will display during the compilation process. Some of them might be warnings, but they’re rarely critical. For example, you might see this message, which is not critical for the process:
#warning "Using deprecated NumPy API ...
Testing the Module
After the compilation completes successfully, the spacytext module will be added to your Python environment. To test the newly created module, open a Python session and run the following command:
>>> from spacytext import main
If it displays no errors, you can enter the following commands (this assumes your text data is in a test.txt file):
>>> import spacy
>>> nlp = spacy.load('en')
➊ >>> f= open("test.txt","rb")
>>> contents =f.read()
➋ >>> doc = nlp(contents[:100000].decode('utf8'))
➌ >>> main(doc)
21498
216
You open the file in which you have text data for this example in binary mode to obtain a bytes object ➊. If the file is too big, you can pick up only part of its content when creating a Doc object ➋. Once you’ve created the Doc object, you can test the spacytext module you just created with Cython, invoking its main() function ➌.
The first figure in the output generated by the spacytext.main() function shows the total number of tokens found in the submitted text. The second figure is the number of personal pronouns found in this same text.
Summary
In this chapter, you looked at the most important of spaCy’s container objects. You also learned how to customize your text-processing pipeline and use spaCy’s C-level data structures and interfaces from Cython.