
Chapter 15. Running Nessus
Nessus (http://www.nessus.org) is a free vulnerability scanner that can be used to perform a number of network-wide bulk security checks, significantly reducing the amount of time spent during a penetration test performing manual checks. Tenable Network Security, Inc., is the author and manager of the Nessus Security Scanner. In addition to constantly improving the Nessus engine, Tenable produces most of the plug-ins that implement the security checks available to the scanner, and charges a subscription fee for early access to new plug-ins through their “direct feed.” A free plug-in feed is available with registration, which includes the security checks delayed seven days from release.
Nessus Architecture
The Nessus Security Scanner is structured as client-server architecture. The Nessus client configures the various target, scanning, and plug-in options, and it reports the findings from the scan to the user. The Nessus server performs all of the scanning and security checks, which are implemented as plug-ins written in Nessus Attack Scripting Language(NASL). All communication between the client and the server pass over a Transport Layer Security (TLS) encrypted connection.
At a high level, Nessus can be run in two different modes: with or without authentication credentials. When run without credentials, Nessus will perform remote network-based security checks, testing how the target host responds to specific network probes. When run with credentials, Nessus will additionally log into the remote host and perform a number of local security checks, such as ensuring that the latest security patches have been installed.
This chapter focuses on the installation and use of version 3 of Nessus. Two versions of the Nessus Security Scanner are currently available: Nessus 2 and Nessus 3 (at the time of writing, the current stable versions are Nessus 2.2.10 and Nessus 3.0.6). Nessus 2 is the open source version of the scanner, released under the GNU General Public License (GPL), and as such is commonly distributed as a binary or with source code for a number of Unix-based operating systems. Nessus 3 is the rewritten and improved version, with binary versions available from Tenable under a proprietary license, with significant performance and memory usage improvements over Nessus 2. While most plug-ins can be used interchangeably within both Nessus 2 and Nessus 3, and both versions are actively maintained by Tenable, most users should consider using Nessus 3 (if a version is available for their operating system) due to the increased performance.
Nessus servers and clients are available for a variety of operating systems. As such, the Nessus server can be deployed on one platform (e.g., Linux) and the client deployed on a different platform (e.g., Windows), or both the server and client on the same system (such as a laptop used for network assessments).
The Nessus 3 server is available as a binary installation package for a number of popular operating systems, including Linux (Red Hat Enterprise Server, Fedora Core, SuSE, and Debian), FreeBSD, Solaris, Mac OS X, and Windows (2000, XP, and 2003). Nessus servers for Unix-based environments include only a command-line Nessus client, and so a separate third-party graphical user interface (GUI) client is required. The Nessus server for Windows and Mac OS X, however, already includes command-line and GUI Nessus clients for convenience. A number of standalone Nessus clients are available, including the GUI clients NessusClient 3, NessusClient 1, and NessusWX. In addition, several tools can utilize a Nessus server directly, such as Sensepost’s BiDiBLAH (http://www.sensepost.com/research/bidiblah/) and Inprotect (http://inprotect.sourceforge.net). Nessus servers can also be integrated as part of an enterprise scanning solution by Tenable’s Security Center product.
NessusClient 1 and 3 are available from Tenable for Linux (Red Hat Enterprise, Fedora Core, SuSE, Debian, and Ubuntu), Solaris, and Windows. The source code for NessusClient 1 is available for other Unix-based systems. NessusWX is an older client that is only available on Windows.
Deployment Options and Prerequisites
For a Nessus server scanning a class C network block, Tenable recommends a minimum configuration of a Pentium 3 or PowerPC G4 processor running at 733 MHz with 256MB of memory. For larger scans, at least 1GB of memory should be available.
The Nessus server requires administrative permissions to install on all platforms; therefore, the account used to install should be root or equivalent on Mac OS X and Unix-based systems, and should have Local Administrator rights on Windows.
The Nessus server should have good TCP/IP network connectivity, preferably unrestricted by controls that may be in place throughout the rest of the network. Controls such as host-based firewalls, network firewalls, Network Address Translation (NAT), and Access Control Lists (ACLs) on routers can all have an adverse affect on the reliability and accuracy of scans from a Nessus server, so the deployment location of a Nessus server should be considered. Additionally, when deploying Nessus on Windows, Tenable recommends installing the Nessus server on a Windows server product (such as Windows 2003 Server), as Windows XP SP2 introduced a number of controls that can adversely affect the reliability of scans.
As noted earlier, there are two main options when obtaining the Nessus plug-ins that implement the security checks performed by the Nessus server: purchase a per-server commercial “direct feed” from Tenable, or register for the free “registered feed.” Users will receive an activation code for the registered feed when registering to download Nessus. Activation codes for additional Nessus server installations can be obtained from http://www.nessus.org.
The registered feed contains all of the security checks written by third parties, as well as all of the security checks written by Tenable, delayed by seven days. The registered feed does not include support for some advanced functionality that is included within the commercial direct feed, such as policy compliance auditing and proprietary Supervisory Control And Data Acquisition (SCADA) control system security checks.
Tip
Nessus can also be deployed on a virtual machine, using products such as VMWare. However, this may result in reduced network scanning performance, so you should take care to ensure that the virtual machine is connected directly to the network and is not subject to NAT.
Nessus Installation
Nessus server and client installation packages can be downloaded from the Nessus website at http://www.nessus.org/download/ (with GPG-signed MD5 hashes available for integrity checking at http://www.nessus.org/download/md5.asc).
Server Installation
The following section details how to perform a new installation of the Nessus server. A more detailed server installation guide, including instructions for upgrading from Nessus 2 to Nessus 3, updating Nessus 3 installations, and working with Nessus servers not connected to the Internet, can be found at http://www.nessus.org/documentation/.
Windows and Mac OS X installation
The Nessus server is distributed as an executable installer for Microsoft Windows (Nessus-3.0.6.exe) and a disk image under Mac OS X (Nessus-3.0.6.dmg.gz). By default, this will install Nessus to C:Program FilesTenableNessus under Windows and /Library/Nessus/ under Mac OS X.
The Nessus server installer prompts the user for an activation code during installation. The code that you enter (for either the registered or direct feed) enables the Nessus server to access the appropriate plug-in feed. The installation process then downloads the latest plug-ins upon registering. Additionally, Nessus running on Windows and Mac OS X is automatically configured to allow a local user to connect to the Nessus server with the included client; Nessus can then be run locally without further configuration.
Tip
If you configure the Nessus server to allow remote client
connections, you will be required to set up additional user
accounts. On Windows, you will have the additional task of
configuring the server listener. To do so, use the Nessus
User Management and Scan Server Configuration applications
(select Start → Program Files → Tenable Network Security → Nessus)
to add the user and change the listening IP address from 127.0.0.1 to 0.0.0.0 (or an appropriate IP address).
For Mac OS X, use the Nessus Server
Manager(access /Applications/Nessus/) to add
users.
By default, Nessus running on Mac OS X will perform a plug-in update each day if the server is continuously running. You can manually force a plug-in update using the Server Manager application.
Currently, Nessus will not update plug-ins automatically for Windows. You can update the plug-ins manually using the Plugin Update application or by running updatecmd from the command line (located at C:Program FilesTenableNessusupdatecmd.exe, by default).
Unix-based installation
The Nessus server is available as an installable package for each supported Unix-based operating platform. It is provided as a package in RPM format for Red Hat, Fedora, and SuSE Linux distributions. Table 15-1 shows the commands that should be run as root (or equivalent) to install the Nessus server on each operating system.
Operating system | Installation command(s) |
Debian Linux | dpkg -i <deb file> |
Red Hat, Fedora, and SuSE Linux | rpm -ivh <rpm file> |
Sun Solaris | gunzip <gzipped package file> pkgadd -d ./<unzipped package file> |
FreeBSD | pkg_add <package file> |
Example 15-1 shows the installation process for Nessus 3 on a Debian Linux system.
# dpkg -i Nessus-3.0.6-debian3_i386.deb
Selecting previously deselected package nessus.
(Reading database ... 91118 files and directories currently installed.)
Unpacking nessus (from Nessus-3.0.6-debian3_i386.deb) ...
Setting up nessus (3.0.6) ...
nessusd (Nessus) 3.0.6. for Linux
(C) 1998 - 2007 Tenable Network Security, Inc.

Processing the Nessus plugins...
[##################################################]

All plugins loaded

 - Please run /opt/nessus/sbin/nessus-add-first-user to add an admin user
 - Register your Nessus scanner at http://www.nessus.org/register/ to obtain
   all the newest plugins
 - You can start nessusd by typing /etc/init.d/nessusd start
The Nessus server files are installed under /opt/nessus/ on Linux and Solaris operating systems. Under FreeBSD, the files are installed to /usr/local/nessus/. Once the Nessus server is installed, you must complete two final configuration steps before Nessus can be started:
Add the first (administrative) user
Register Nessus and retrieve the latest plug-ins
Adding the first user
By default, Nessus is remotely accessible when it is
installed on Unix-based platforms, and an administrative account
is required to run, access, and use the server. This first account
is created using the nessus-add-first-user utility (found
under /opt/nessus/sbin/ on
Linux & Solaris, and /usr/local/nessus/sbin/ on FreeBSD).
Additional users can be added using the nessus-add-user utility in the same
directory. Example 15-2
shows how to add an admin
user.
#/opt/nessus/sbin/nessus-add-first-userUsing /var/tmp as a temporary file holder Add a new nessusd user ---------------------- Login :adminAuthentication (pass/cert) [pass] : Login password :secretLogin password (again) :secretUser rules ---------- nessusd has a rules system which allows you to restrict the hosts that admin has the right to test. For instance, you may want him to be able to scan his own host only. Please see the nessus-adduser(8) man page for the rules syntax Enter the rules for this user, and hit ctrl-D once you are done : (the user can have an empty rules set) Login : admin Password : *********** DN : Rules : Is that ok ? (y/n) [y] user added. Thank you. You can now start Nessus by typing : /opt/nessus/sbin/nessusd -D
Registering Nessus and retrieving the latest plug-ins
Nessus is registered and the latest plug-ins are retrieved using the nessus-fetch utility (found under /opt/nessus/sbin/ on Linux & Solaris and /usr/local/nessus/sbin/ on FreeBSD) along with the activation code, obtained by either registering your installation for the free registered feed or by purchasing the direct feed. Example 15-3 shows how the nessus-fetch utility is run to register Nessus and download plug-ins.
# /opt/nessus/bin/nessus-fetch --register 925D-8831-88EF-B947-0065
Your activation code has been registered properly - thank you.
Now fetching the newest plugin set from plugins.nessus.org...

Your Nessus installation is now up-to-date.
If auto_update is set to 'yes' in nessusd.conf, Nessus will
update the plugins by itself.
Once you have added the administrative user, registered Nessus, and updated its plug-ins, you can start the Nessus server. You can do this manually by running nessusd -D (found under /opt/nessus/sbin/ on Linux and Solaris and under /usr/local/nessus/sbin/ on FreeBSD), or by using an operating system-appropriate startup file (i.e., /etc/init.d/nessusd start on many Unix-based operating systems).
Tip
By default, Nessus 3 on Unix-based systems will update its plug-ins once a day (if the server is continuously running and Internet-connected). Where a server is not continuously running, you can force a plug-in update by running the nessus-update-plugins utility. You can find instructions for activating and updating plug-ins on a system not connected to the Internet in the Nessus installation guide.
Client Installation
The following sections detail how to obtain and install a Nessus client. A detailed client installation guide, including details on using the command-line client for scanning, can be found at http://www.nessus.org/documentation/. Three GUI clients are readily available: Tenable NessusClient version 3 and version 1, available from http://www.nessus.org/download/), and NessusWX (http://nessuswx.nessus.org).
NessusClient 3 and 1
NessusClient 3 is distributed as an executable installer for Windows and as an installable package for Unix-based operating systems. For Unix-based systems, the same installation utilities used to install the Nessus server (shown in Table 15-1) should be run as root or equivalent, to install NessusClient 3.
NessusClient 1 is an older client, available as an installable package for many Unix-based operating systems, and as such can be installed using the commands listed in Table 15-1. In addition, NessusClient 1 can be compiled from source code for Unix-based systems.
NessusWX
NessusWX (http://nessuswx.nessus.org) is distributed as a ZIP archive and does not require installation or administrative privileges. As such, you can unzip it to any directory and execute the NessusWX.exe application. NessusWX has not been updated since September 2005, and so I recommend using NessusClient instead.
Configuring Nessus
The Nessus default scanning policy and setup may not suit all situations. Therefore, Nessus supports a large number of options that allow you to tailor scanning to a particular purpose. Several configurable options are:
To run from a smaller system, such as a laptop
To accurately scan firewalled hosts and networks (but maybe more slowly)
To scan delicate systems by not launching aggressive or intrusive tests
General Nessus server options are set in the nessusd.conf file (under Unix-based and Mac OS X platforms), which can be overridden by the Nessus client at runtime. Many of the scan configuration options are plug-in-specific (in fact, each plug-in instructs the client to present configuration options), and so I will only cover Nessus configuration from the client.
Basic Nessus Configuration
When you run a Nessus client, many of the options and configuration settings will not be available until the client has connected to a Nessus server. Figure 15-1 shows the NessusClient 3 client.
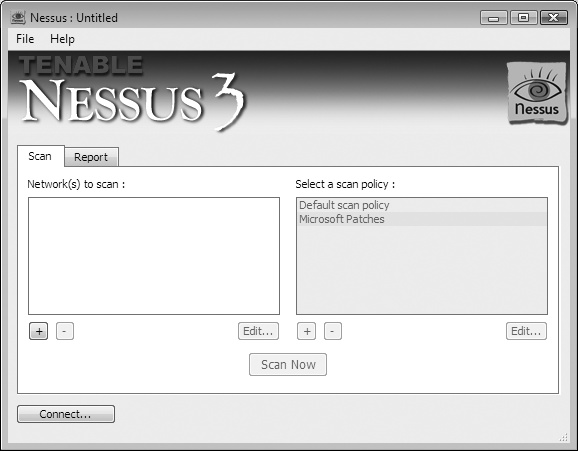
Although each Nessus client has a different graphical interface, they all require the same three key pieces of information in order to connect to a Nessus server and perform a scan:
The IP address and authentication details of the Nessus server to use during scanning; by default, the Nessus server listens on TCP port 1241.
The target network addresses or hosts to be scanned; each client has several ways to specify the target hosts, including specific hostnames or IP addresses, ranges of network addresses, or through supplying a file with a target host on each line.
The options for specifying the type of scanning to perform, including global options, plug-in options, and credential details (if applicable). These are configured as below for different Nessus clients:
- NessusClient 3
All global and plug-in-specific options are configured as part of a Scan Policy.
- NessusClient 1
Global and plug-in-specific options can be defined as a hierarchy at a Global Settings, Task, and Scope level. For most uses, defining all options at the Scope level is the simplest option.
- NessusWX
Global and plug-in-specific options are defined as properties of a scanning session.
NessusClient 3 Scanning Options
When performing vulnerability scanning as part of a network security assessment, you should review the following options to determine their appropriate settings. Figure 15-2 shows the default options for global scan settings and port scanning settings in NessusClient 3.

Tip
The scan options mentioned in this section are particular to NessusClient 3, which has a consistent interface across all of the supported operating systems: Linux, Windows, and Mac OS X. Scan options may be located elsewhere in the configuration for other Nessus clients.
By default, the following options are enabled, as discussed here.
Safe checks
A number of Nessus plug-ins perform intrusive testing, resulting in DoS. The safe checks option, once selected, ensures that these aggressive modules are disabled or run in a nonintrusive way (where specific tests within the plug-in are disabled). A number of plug-ins may report findings based on banners or other enumerated information when the safe checks option is enabled, which may introduce false positives or reporting errors, as banner grabbing is inherently less reliable than full checks.
Nessus TCP scanner
Unix-based Nessus servers use the Nessus TCP scanner by default. Windows Nessus servers use the Nessus SYN scanner, as the Nessus TCP scanner is not available on Windows (due to limitations within the TCP/IP stack). Either scanner should provide fast, reliable results. If installed on the same system as the Nessus server, Nmap is also supported as a port scanner; however, this may significantly increase the scan time.
Ping the remote host
By default, Nessus will attempt to ping remote hosts using a combination of ICMP and TCP probes. If a host does not respond (for example, if the host is firewalled and does not have listening service on the TCP ports that were pinged), no further scanning will be conducted. Where scanning is performed against hardened or firewalled environments, this scan option should be disabled for reliability. Note, however, that doing so may significantly increase the time it takes to complete a scan.
By default, Nessus probes the following TCP ports during this ping process: 21, 22, 23, 25, 53, 79, 80, 111, 113, 135, 139, 161, 443, 445, 497, 515, 548, 993, 1025, 1028, 1029, 1917, 5000, 6000, 8080, 9001, 9100, and 65535.
Number of hosts/checks in parallel
The maximum number of threads used by the Nessus server, and hence the amount of memory and network bandwidth, is the number of hosts multiplied by the number of checks. If you are running Nessus on a system with limited memory or bandwidth, you can improve the results simply by experimenting with these settings. However, Tenable recommends starting with 20 parallel hosts for Unix-based servers and 10 for Windows-based servers, and 3 or 4 parallel checks.
Tip
In Windows XP Service Pack 2, Microsoft introduced a number of Network Protection Technologies for mitigating the spread of malware. One of these limits the number of simultaneous incomplete outbound TCP connection attempts to 10, with additional attempts being queued and potentially dropped. As this can impact the reliability of port scanning and other security checks, Tenable recommends the following settings for Windows XP Nessus servers:
Max number of hosts: 10
Max number of security checks: 4
Max number of packets per second for port scan: 50
NessusClient 3 Plug-in Selection
Figure 15-3 shows the plug-in selection window, which allows you to enable and disable specific plug-ins.
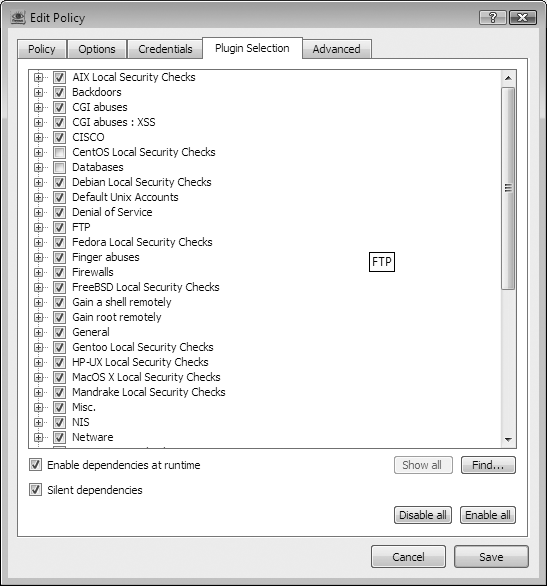
Upon selecting the plug-ins to be used during the test, you should review the following settings.
Enable dependencies at runtime
A number of Nessus plug-ins have dependencies on information gathered by other plug-ins. A number of enumeration and information-gathering plug-ins save information gathered about a host during the scan to a scan knowledge base. An example might be when an HTTP server is detected on a nonstandard port; plug-ins that check for security issues on HTTP servers will then be run against that port. Therefore, if a specified number of security checks are to be run, this option should be enabled or some security checks may not operate as expected.
Silent dependencies
If selected, this option will suppress output from plug-ins that were enabled as dependencies (i.e., plug-ins that you did not specifically enable).
NessusClient 3 Advanced Options
The advanced options window shown in Figure 15-4 allows you to set advanced global and plug-in-specific options.
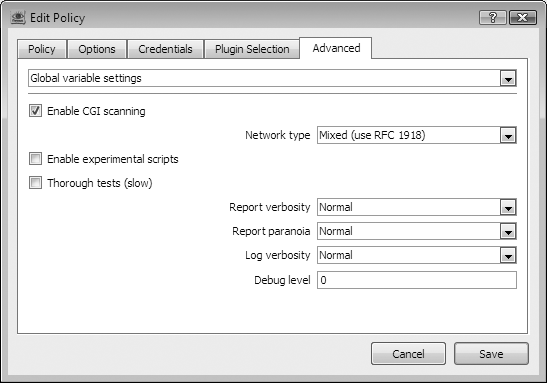
Enable CGI scanning
This option enables a number of plug-ins for testing web applications, run once web services are identified by Nessus. Depending on the setting in use, such as mirroring websites found, this may significantly increase the time a scan will take to complete. You can use this option to find previously unknown cross-site scripting (XSS) or SQL Injection issues in some cases.
Thorough tests
The thorough tests option is disabled by default. When this option is enabled, security checks implementing this option will run a more thorough set of checks, significantly slowing the scan at the expense of a more complete scan.
Optimize test
Enabled by default, the optimize test option will only attempt to run plug-ins that are relevant to the server being tested. For example, where a banner has been detected identifying a service, Nessus will only run checks for that service against that port. This speeds up a scan significantly, at the possible expense of accuracy.
Running Nessus
Once the scan options have been set, you can start the scan. See Figure 15-5 for an example of a scan using NessusClient 3.

Nessus will scan multiple hosts in parallel, up to the maximum specified in the number of hosts scan option. On earlier Nessus clients, security check results were not available until the Nessus server had completed the scan. However, with NessusClient 3, you can view results as the scan is underway, with higher-risk items (security hole and security warning) highlighted in a different color.
Nessus Reporting
Nessus categorizes findings into three severity levels: security hole, security warning, and security info. The most serious, security hole, will often report outdated or exploitable services or systems, but important information for further testing will often be categorized as a security warning or security info, so it may be valuable to review all of the Nessus findings. Figure 15-6 shows a completed scan.

It can also be useful to understand exactly how each finding was made. Each finding within Nessus is reported by one of the plug-ins that implement each security check. Each finding will also have a Nessus Plug-in ID, which uniquely identifies the plug-in that made the finding. Tenable has a page describing each plug-in at a high level, references to additional reading (links to archived BugTraq or Full-Disclosure postings and SecurityFocus bug descriptions), and usually a link to the NASL source code for the plug-in. You can use these resources to fully understand how the plug-in identified the problem, and possibly how the issue could be exploited.
Nessus clients support a number of formats for exporting reports. Most clients support the ability to export reports in a user-friendly HTML format or one or more of the native Nessus formats: NBE or the older NSR format. Some clients also support the ability to either export results in other formats such as XML, PDF, or databases, or to compare two reports for differences.
Running Nessus Recap
The following should be noted when running Nessus:
Ensure that Ping the remote host functionality is disabled if the target host is firewalled or hardened.
The safe checks disabled option may confirm the presence of more vulnerabilities, but you should exercise caution before running this against any production networks or hosts, due to the increased risk of adverse affects resulting in DoS. Consider running another scan with only specific plug-ins enabled, and safe checks disabled in these cases.
Ensure dependencies are enabled when not running all plug-ins to ensure accurate results.
If running on Windows XP Service Pack 2, ensure the scan is configured with the settings recommended by Tenable for scanning reliability.