Chapter 8: Real-World Applications
Although the D3300 has a lot of modes that you can set to achieve specific effects for many types of photography, the key to becoming a really successful photographer is learning which settings to use in different situations to achieve the results you desire. Once you learn how your camera works, you can get predictable results, even in difficult lighting.
This chapter is meant to help you get past the scene modes and learn which settings and what gear to use for different types of photography. Moving past the scene modes allows you to flex your creative muscles and begin creating photographs rather than just taking pictures.
Exposure, composition, camera setting, and equipment choice are all factors in creating an image. The key is to know how to put it all together and make it work in any situation.
Abstract Photography
A common, but incorrect, assumption is that photography is an art form that represents subjects in a realistic way. While this is somewhat true, in reality photography is an abstract art because it takes three-dimensional subjects and depicts them in two dimensions. That in and of itself is an abstraction of reality.
A photographer can further stretch the limits of visual reality by using different tools to create even more abstract concepts. This includes the use of wide-angle lenses to distort spatial relations and long exposures to show a subject as it moves through time and space.
There are two distinct types of abstract photography: objective and nonobjective. Objective abstract photography takes a subject and depicts it in an unorthodox way. The subject is generally recognizable, but takes on a strange or unique look. Nonobjective abstract photography takes a subject and renders it unrecognizable. Breaking the subject down to its base elements, such as lines, forms, colors, or textures, can result in photographic abstractions.
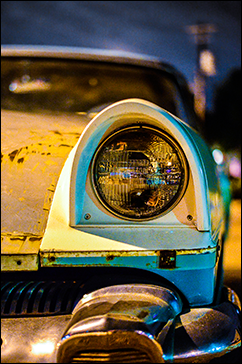
8.1 Here, I closed in and focused on this old car’s headlight. This is an objective abstraction because you can identify what the subject is. Exposure: ISO 100, f/1.8, 1/30 second using a Nikon 35mm f/1.8G.
Equipment
You don’t need a lot of fancy gear to create photographic abstractions. All you need is a creative vision and an eye for details. You can easily create abstract photography using the kit lens that comes with your D3300.
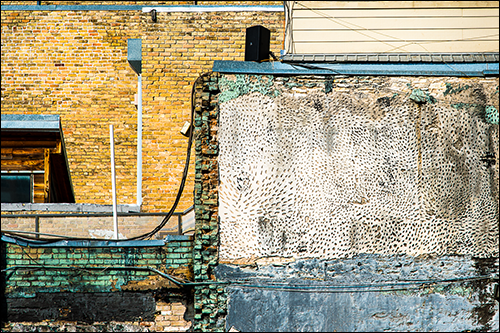
8.2 For this photo, I used a telephoto lens and zoomed in on these neighboring buildings. The compression that the long focal lengths gives the image allows all of the different colors, textures, and patterns to appear flattened as if they are all on one surface. Exposure: ISO 100, f/11, 1/1000 second using a Nikon 70–200mm f/4G VR at 105mm.
That being said, you can also use special lenses, like macros or close-up filters to get extreme close-ups, wide-angle or telephoto lenses to distort the subject, off-camera Speedlights to highlight texture, or color filters to add colorful effects.
You can also use different settings to create abstract effects. For example, you can change the white balance to create unnatural colors, use exposure compensation (![]() ) to purposely under- or overexpose your images, or use the Slow-sync (
) to purposely under- or overexpose your images, or use the Slow-sync (![]() ) or Rear-curtain sync (
) or Rear-curtain sync (![]() ) flash modes.
) flash modes.
Technique
There’s no standard technique that you can embrace to create abstract images. The best one is to keep your eyes and mind open to abstractions. Interesting lines, bright colors, interesting patterns, and odd textures are things to look for when creating abstract images. I don’t typically set out to capture abstract images; they generally appear in unexpected places.

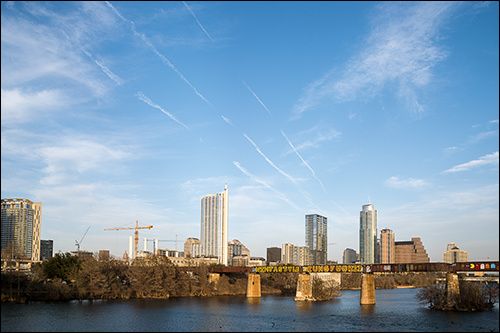
8.3 For this abstract shot, I used the framework and glass windows of a building along with the blue sky to make a composition based on color, line, and form. Exposure: ISO 200, f/8, 1/200 second using a Sigma 35mm f/1.4 | A.
While there is not a foolproof method, there are some techniques that work well for making abstract photographs:
- Get close up with a wide-angle lens to emphasize spatial relations and accentuate and distort lines in your images.
- Use a telephoto lens to photograph the detail of a far-off subject or use compression distortion to reduce the apparent distance between faraway objects.
- Use a macro lens to focus on minute details of a much larger subject; this is great for highlighting texture or individual features.
Action and Sports Photography
Action and sports photography is an entertaining and often exciting endeavor that is popular with many photographers. The D3300 is well suited to this type of photography, with its proven 11-point AF system as well as its 3-D tracking and quick 5-frame-per-second capture rate in Continuous high-speed shooting mode (![]() ). These features all combine to create a good sports camera.
). These features all combine to create a good sports camera.
The attraction that people have to action and sports photography stems from the ability to capture a fraction of a second during an event, which allows the viewer the time to examine the motion of the action in great detail. This is something that is impossible to do with any other art form.
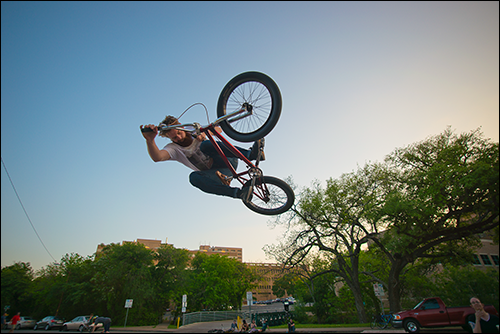
8.4 Using Shutter-priority auto mode and a fast shutter speed, I was able to freeze the motion of this BMX rider as he performed an invert on a ramp. Exposure: ISO 100, f/4, 1/1000 second using a Sigma 17–70mm f/2.8–4 | C at 17mm.
Keep in mind that action photography doesn’t necessarily encompass only sporting events. Action scenes can include nearly any subject — just ask a parent. Capturing a photo of a toddler is more akin to action than portrait photography.
Equipment
Most action and sports photography requires some special equipment. If you’re photographing an organized sporting event such as football, soccer, basketball, or volleyball, it’s pretty much a given that you won’t be allowed on the court or field with the athletes. As a result, a telephoto lens is often a necessary piece of equipment to get great close-up shots from the sidelines.
While a long lens is a necessity for most sports photographers, another aspect to consider is the maximum aperture, or speed, of the lens. For just about any indoor sport such as basketball, hockey, volleyball, or night football, a lens with an aperture of f/2.8 is a necessity. When shooting outdoor sports on sunlit days, you may be able use a slower telephoto zoom lens such as the Nikon 55–200mm f/4–5.6, but on cloudy days you may be pushing the limits of your camera settings.

8.5 I used a telephoto lens to photograph these professional wrestlers because I couldn’t get up close to the ring. Exposure: ISO 6400, f/2.8, 1/400 second, using a 70–200mm f/2.8G.
When shooting individual action sports such as BMX, skateboarding, freestyle motocross, or skiing and snowboarding, you can often use a wide-angle lens to create a more dramatic shot. To make good use of a wide-angle lens, you typically need to get close to the action, so you need to coordinate with the athlete before you jump in and start shooting. You don’t want to hop in and startle the athlete, causing an accident. You must also understand that the closer you get to an athlete who is performing stunts on a wheeled device, the greater the likelihood of you or your camera getting hurt or damaged. When attempting this type of action shot, it’s important to be completely aware of your surroundings and the actions of the athlete. Being able to dodge a flying skateboard or duck under an out-of-control BMX bike is useful. And when it comes to motocross, well, an out-of-control motorcycle could be potentially fatal.
Finally, another good, if not essential, piece of equipment for most sports photographers is the monopod. The monopod reduces camera shake by providing support for the camera and lens, but it doesn’t restrict movement like a tripod can.
Technique
Shooting sports sometimes requires skill sets that are completely different from each other, depending on the way you want to portray the scene. The lens choices are vastly different depending on the technique you use. Either you are far away from the action and you use a telephoto lens to bring the action closer, or you are close to the action and you use a wide-angle lens to add some distortion to accentuate the movement. It’s rare that a sports photographer would need a midrange focal-length lens.
Photographing action to capture movement can be done in two opposing ways. The first, and probably the easiest and most common, is to use a fast shutter speed to freeze the motion and capture the action in sharp detail. Typically, a shutter speed of 1/500 second or faster is required to capture most mid- to fast-paced subjects. The second way to portray speed and motion in an action photograph is to use a slow shutter speed to introduce motion blur. There are a couple of easy ways to do this. One way is to simply keep the camera stationary and use a fast enough shutter speed to freeze the motion of any slow-moving elements in the frame, but not fast enough to freeze the motion of the fast-moving subject. Another way is to use a technique called panning. This is a very common approach that sports photographers use, and it involves following the subject motion with the camera. Moving the camera along with the subject slows down the motion of the subject relative to the camera, which allows you to capture it in focus while making the background a blur that shows that the subject is moving.
You can use a Nikon SC-28 or SC-29 TTL Remote Cord to use a Speedlight off-camera. This creates more dramatic lighting for action shots, while retaining full Through-the-Lens (TTL) metering for easy exposure.
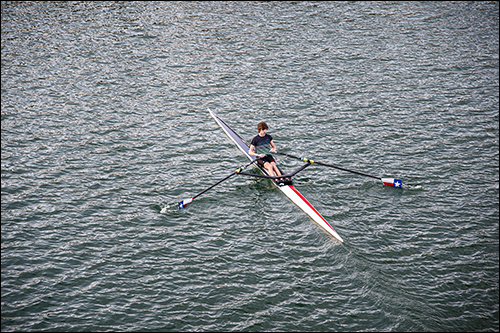
8.6 Not all sports are extremely fast. Taking a photograph of this sculler was more about making the composition interesting than about capturing the action. Exposure: ISO 200, f/5.6, 1/200 second using a Nikon 55–300mm f/4–5.6G.
The speedy 5-fps speed in Continuous high-speed shooting mode (![]() ) is great for firing off rapid shots or creating an action sequence, but the real key to successful action and sports photography is knowing when to take the shot. Every sport has key moments and every motion has a peak. Capturing an athlete at the peak of the motion is the deciding factor in whether your shot is good or great.
) is great for firing off rapid shots or creating an action sequence, but the real key to successful action and sports photography is knowing when to take the shot. Every sport has key moments and every motion has a peak. Capturing an athlete at the peak of the motion is the deciding factor in whether your shot is good or great.
Becoming familiar with the sport you are photographing is the best way to figure out when the key moments occur. Before you start shooting, stand back for a few minutes and simply watch the action.
Knowing where the action is going to take place is obviously a benefit. You don’t have to have a sixth sense to know where the action is — it’s really down to common sense. For example, at a baseball game, there’s nearly always some action at first base, and if there’s a runner on third, you can bet that home plate will see some action. For basketball, the key shots are going to be near the hoop about 90 percent of the time. Some events have action occurring at more than one place, and if you can’t cover all spots from one angle, you need to make a judgment call. For example, you can cover sprinters springing from the starting block, or you can catch them at the end of the line breaking the tape, but you can’t get both. Decide which shot you think makes a more exciting image.
Concert and Live Music Photography
This is probably one of the fastest-growing genres of photography. It seems just about everyone who has an interest in music and photography wants to capture images of his or her favorite performers at work.
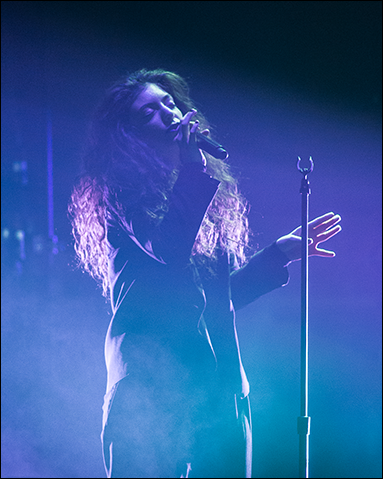
8.7 Sometimes, you won’t be able to get close to the performer, so you need an extra-long lens, like the one I used to get this shot of pop singer Lorde in Austin, Texas. Check with the venue beforehand so you know what to bring. Exposure: ISO 6400, f/4.0, 1/400 second using a 300mm f/4 AF-S and a monopod.
Concert photography is generally done in little to no light, especially when starting out in small venues. When there is light, it is usually sporadic — blinking, flashing, strobe, and moving lights are the norm. When you couple the low light with performers who often move quickly and erratically, you have the recipe for a demanding shoot.
Many photographers, myself included, love the challenge of confronting these obstacles and still capturing the shot at the perfect moment when everything comes together — the lights, the performer, and the photographer — in unison. I think it’s the dream of everyone who photographs music to capture that iconic moment: Kurt Cobain crashing into the drums, Keith Richards with a cigarette dangling from his lips, or Johnny Cash defiantly flipping the bird at the camera.
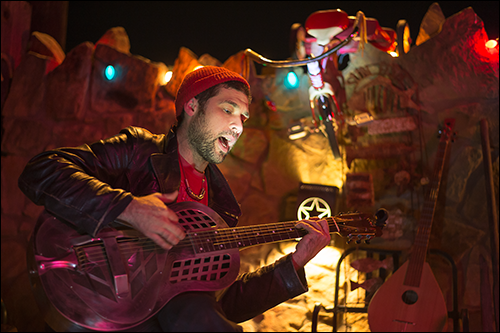
8.8 Small local gigs are the best place to start out with music photography. Smaller venues are more intimate and can have cool backgrounds like the one shown here. Exposure: ISO 6400, f/1.8, 1/50 second using a Sigma 18–35mm f/1.8 | A at 35mm.
Equipment
One of the most important pieces of equipment for concert photography is a camera that has good low-light capabilities. Although the D3300 is not the best camera for this type of photography, it is definitely very capable, as shown in the images in this chapter.
One piece of equipment that I find essential is a fast, standard wide-angle-to-short telephoto lens with a constant aperture of f/2.8. Lately, my favorite lens on the D3300 for concerts is the Sigma 18–35mm f/1.8. It’s an expensive option, costing as much as the D3300 itself, but I find the extra stop is really helpful. However, if you are on a tighter budget, Sigma and Tamron both make fast f/2.8 lenses that won’t break the bank. Having a fast telephoto lens for close-up shots is also nice, but is often not necessary. An ultrawide lens is great for full band shots and special effects, but is more of an option than a necessity.
I often see people on Internet forums insisting that a fast prime lens is the way to go, but from my experience photographing hundreds of shows over the years, the compositional limitations that are imposed by the prime lens are more of a hindrance than the benefit you gain with an extra stop of light, especially considering the incredible low-light capability of today’s cameras. I’d rather have a well-composed shot with a little more high-ISO noise than a clean, badly composed shot. If I know the venue has particularly bad lighting, I’ll bring along a fast prime lens, but this is usually an exception.
That being said, if you can’t afford a fast f/2.8 zoom lens, an inexpensive, fast prime lens like the Nikon 35mm f/1.8 may be the best option for you. The bottom line is that for most concert photography, you’re going to find that the kit lens isn’t practical and a wider lens gets better results. With a wider lens, you can compose loosely and crop in to get a good composition, rather than be stuck with a composition that is too tight from the onset. In fact, assuming that you're close enough to the performer, if you have to choose between a 50mm f/1.8 or a 35mm f/1.8, the 35mm would be the better option.
One thing you should always have with you when photographing concerts is a set of earplugs. If you enjoy music, protect your ears so that you can continue to enjoy it for the rest of your life.
Technique
The last thing you want when shooting a concert is to hear the first chords of a song and realize that your camera isn’t ready to shoot. Always make sure your camera is set up and ready to go before the band starts. Before I even set foot in a venue, my camera is set to the following:
- Metering mode. For a typical concert setting, I use Spot metering (
 ), because the most important part of the scene is your focus point. Setting the camera to meter from this point ensures the focus point is properly exposed. At outdoor concert events during the day, I may use Matrix metering mode (
 ).
). - Single-point AF (
 ). With all the flashing lights and movement, you can’t trust the camera’s autofocus system to make the right choice. You must actively decide where to place the focus point while shooting.
 - Continuous-servo AF (
 ). Rarely does a performer stand still during a show. When shooting wide open, even the slightest movement of a performer can cause a missed focus. This setting ensures that the camera is focusing constantly with every move.
 - Manual mode (
 ). Depending on the lighting and how much the performers are moving, I usually start with 1/125 second at f/2.8 and adjust from there. During fast numbers, 1/125 second is usually enough to freeze the action. If there is little movement, you can slow the shutter speed; if it’s a punk or metal band, you may need to speed it up to 1/250 or even 1/500 second to avoid blur.
 - Auto ISO (
 ). This feature is so well implemented, I almost always use it unless I’m shooting outdoors in the daytime. For the D3300, I set the ISO limit to 3200.
One factor in concert photography that is often overlooked is composition. Most photographers aren’t musicians and as such aren’t aware of some of the subtle nuances that come with composing for music photography. I often see many photographers composing shots like they are shooting a portrait — tight head-and-shoulders compositions. While this may be great for a singer, framing a guitar player in this way isn’t ideal. When shooting a person performing with an instrument, be it a guitar, bass guitar, banjo, or even a ukulele, the instrument should be treated as if it is a part of the performer. Think of it as an arm or a leg and try to keep the whole thing in the frame. Pay particular attention to the guitar headstock. This is where the brand name usually is, and you can’t sell a photo of a guitar player to a guitar magazine or manufacturer if the brand isn’t recognizable.
Getting the right shot when photographing music depends greatly on timing. Fortunately, all music is based on timing and is generally rhythmic. Musicians usually make predictable movements when they are in a groove. This is especially true of drummers (who are the most often overlooked musicians). Guitar, bass, and keyboard players are a little less predictable, but they are still very rhythmic. Lead singers are often the most erratic, but also the most fun to shoot. Stop shooting for a second, listen to the beat, and watch the movements. It only takes a few seconds to get a good idea of what kind of movement is happening. Listening for gradual increases in the loudness and intensity of the music can also help you anticipate some kind of action.
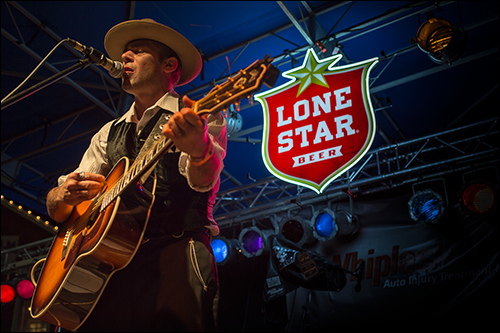
8.9 Including some of the background in the shot is great for adding interest and is also good practice for shooting professionally because event sponsors like to see their brands in the shot. Exposure: ISO 3200, f/4.0, 1/125 second using a Sigma 17–70mm f/2.8–4 | C at 50mm.
Macro Photography
Macro photography (sometimes referred to as close-up photography) involves photographing a subject on a level that is extremely close. It allows the photographer to portray a subject in a way that can’t be seen with the unaided eye. It gives you the ability to show different subjects in an elemental way by breaking them down into minute details.
Because most people don’t get a chance to see subjects such as insects on this level, macro photography is extremely popular, not only with viewers, but also among photographers.
Macro photography relies on the ability to focus close enough on a subject that the image the lens projects onto the camera sensor is the same size as the subject. The relative size of the actual subject to the projected image is defined in terms of a ratio. For example, if your image size is the same as the subject size, you have a ratio of 1:1. Strictly speaking, the true definition of a macro image is one that has a ratio of 1:1 or better. These days, however, the marketing gurus at the camera and lens manufacturing companies have broadened the definition of macro lenses to encompass any lens that allows you to get a ratio of 1:2, or even a little less.
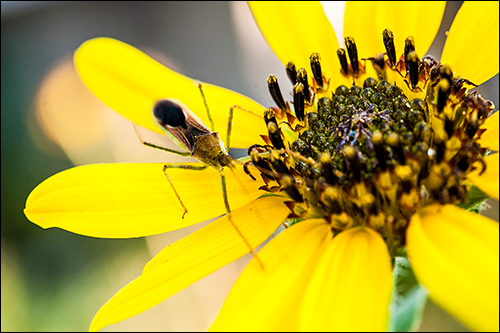
8.10 I just happened to catch this tiny bug as I was photographing this flower. Exposure: ISO 800, f/8, 1/160 second using a Nikon 60mm f/2.8G Macro lens.
Equipment
Starting out in macro photography doesn’t require a lot of equipment, but it does require specialized equipment to do it and get good results. As I mentioned previously, some manufacturers market lenses as macro when they are actually close-focus lenses. Generally, these are telephoto or inexpensive, standard zooms that are midrange in price. This is not meant to disparage these lenses — you can get some great images with them, and some of them are actually more versatile than a dedicated macro lens. For example, one of my favorite lenses is the Sigma 17–70mm f/2.8–4 DC HSM OS Macro (quite a mouthful of a name). While the lens name contains the term macro, it only gets to about 1:2.7 (about one-third the actual size). For close-up photography, this is good, and it also allows you the versatility of a wide-angle to telephoto range, which makes it a great all-around lens.
Nikon calls its macro lenses micro lenses.
If you want to get the best results and take advantage of the high resolution of the D3300 sensor to capture the most detail, the best option is to get a dedicated macro lens. Nikon has a great selection of macro lenses (Micro-NIKKOR in the Nikon lexicon), and while some are relatively expensive, such as the 105mm f/2.8G VR, others like the 40mm f/2.8G are relatively inexpensive and can be used as a very sharp normal prime lens as well. Sigma and Tokina also have a few options for a dedicated macro lens that you might want to look into.
There are a number of different focal lengths when it comes to dedicated macro lenses. Shorter focal length lenses have a shorter working distance, meaning that you must be closer to the subject to get to a 1:1 ratio. Longer focal length lenses allow you to get a bit more distance between the lens and the subject, which is ideal for critters that may be scared off by a lens that is too close. A longer focal length is also good for subjects that need space between the lens and the subject for lighting purpose because shorter focal length lenses can block the light.
A less expensive option that can still yield high-quality results is using extension tubes that place the lens farther from the focal plane. This reduces the minimum focus distance of the lens and allows you to focus closer to the subject, thereby increasing the magnification.
The least expensive option is to use close-up filters that screw onto the end of your lens and act like magnifying glasses. This option doesn’t typically yield the best results but is an inexpensive way to get started in macro photography.
For more information on macro lenses and accessories, see Chapter 4.
A tripod is a very essential piece of equipment for a macro photographer. Unless you’re working with live or moving subjects, there’s no reason not to use a tripod. As you magnify the subject using a macro lens, camera shake is also magnified exponentially. The 1-over-focal length rule doesn’t apply when using close focus. Sometimes you may need to use a shutter speed up to four times faster than normal to compensate for camera shake when handholding the camera. When you combine these fast shutter speeds with the tiny apertures that are required to get a substantial depth of field, you need a lot of light. Using a tripod allows you to use slower shutter speeds.
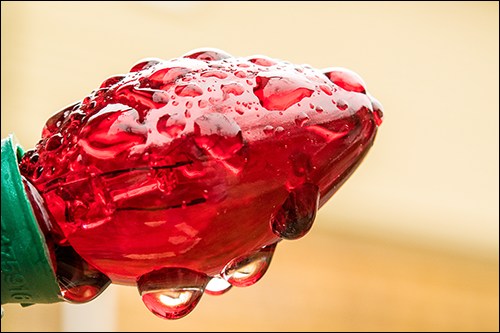
8.11 Stopping down allows you to get the subject completely in focus, but still allows a shallow depth of field for background separation. Exposure: ISO 1600, f/14, 1/80 second using a 60mm f/2.8G Macro lens.
Some macro lenses include a stabilization feature, but at higher magnifications this technology is much less effective.
Of course, using a tripod isn’t always an option, especially when photographing living creatures, such as insects, or even flowers or foliage outdoors in a breeze. In this case, you sometimes need to introduce more light into the scene by using a flash.
When shooting close up, the built-in flash is all but useless because it is blocked by the close proximity of the lens to the subject, and an on-camera Speedlight is too far off axis to be of any use. There are, however, a number of flash systems you can use to provide on-axis lighting to your close-up subject. One is the Nikon R1C1 wireless flash kit. The R1C1 can wirelessly control a number of flashes that attach to a bracket, which then mounts to the lens. However, this kit is rather expensive, so unless you are very serious about macro photography, you probably don’t need it.
The most convenient option is known as a ring flash. These also attach to the end of the lens to provide on-axis light. There are a number of inexpensive, bare-bones ring flashes available. I have a very cheap (around $100) Phoenix 46N ring flash (I've also seen the same flash branded with other names). It works with the Nikon iTTL (flash metering) system. For a little more money, you can step up the quality and get a Metz 15 MS-1 digital ring-form macro flash or a Sigma EM-140 DG macro flash. These units are of higher quality and also work with the Nikon iTTL flash system.
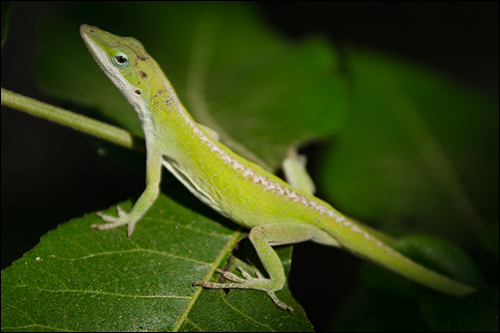
8.12 I held an off-camera Speedlight to the left side of the lens to illuminate this macro shot of a green anole. Exposure: ISO 100, f/4, 1/200 second using a Sigma 17–70mm f/2.8–4 | C at 70mm.
Instead of a ring flash, I often use one of the standard Nikon Speedlights, such as the SB-910, SB-700, or even the SB-400. I use a Nikon SC-28 TTL cable to get the Speedlight off-camera and hold the Speedlight next to the front of the lens. This provides simple, on-axis macro lighting, with the additional benefit of more texture and contour because the lighting only comes from one direction.
Technique
Typically, the most challenging aspect of macro photography is getting enough depth of field to capture the most important aspects of the subject in sharp detail. As you focus closer to the subject and increase the magnification, the depth of field is reduced exponentially. When your lens is less than an inch away from a subject, just breathing in and out, and even the natural movement of your body, are enough to throw off the plane of focus, causing you to miss focus. This is why using a small aperture is usually a necessity to increase the depth of field to workable limits. I say usually because sometimes you may want to use a wide aperture and a shallow depth of field to draw attention to a very specific detail in the subject.
Unfortunately, using a small aperture to increase the depth of field for sharpness is a double-edged sword. Once you stop down to a certain aperture, diffraction limits the sharpness, and stopping down further decreases sharpness and starts to soften the image. The diffraction limit for most lenses is about f/16, and even though this is a small aperture, at close focus the depth of field at this aperture is relatively shallow.
If you find it necessary to handhold your macro shot, I recommend using Continuous-servo AF (![]() ). This allows the camera to focus continuously on the autofocus point because even the smallest movements can shift focus. Point of focus is extremely important when capturing macro photography. For example, when photographing an insect’s face, if the point of focus is just a little bit off, the eyes will be out of focus but the area behind the subject will be sharp. As with any portrait (even those of nonhumans), the eyes should be sharp.
). This allows the camera to focus continuously on the autofocus point because even the smallest movements can shift focus. Point of focus is extremely important when capturing macro photography. For example, when photographing an insect’s face, if the point of focus is just a little bit off, the eyes will be out of focus but the area behind the subject will be sharp. As with any portrait (even those of nonhumans), the eyes should be sharp.
When shooting inanimate or nonmoving subjects (especially in the studio), I recommend using Single-servo AF (![]() ) and, for the most accuracy, Live View mode (
) and, for the most accuracy, Live View mode (![]() ).
).
Nature and Landscape Photography
One of my favorite things about photography is that it gives me a great excuse to get outside and shoot in nature. There are so many opportunities that can present themselves in the outdoors, with vast numbers of subjects out there waiting to be explored. From verdant landscapes to flowers and plants as well as wildlife, if you can’t find something to photograph when you are out in nature, you might have your eyes closed!
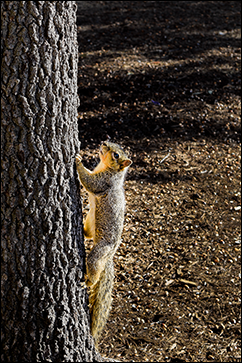
Taking a vacation to an exotic locale might be a great way to find some amazing subjects, but for most of us this just isn’t feasible. The good news is you don’t necessarily need to venture out of your own backyard to create interesting nature photos. You can find landscape scenes just down the road at your local park or possibly at the outskirts of town. You can photograph wildlife that is native to your locale such as deer, squirrels, birds, and insects, or you can even go to a zoo and, with some creative framing and depth of field, you can take photos of exotic animals that appear to be out in nature. Even in greater metropolitan areas, there are usually parks or greenbelts that allow you to get into nature in the middle of the city.
Equipment
The equipment used for nature and wildlife photography is as varied as the subject matter. Just about any type of lens can be employed, and there are many other accessories that may be helpful in some situations, but not in others. If you know what you intend to photograph, packing the right gear is much easier. Think about the type of photography on which you’re likely to focus. If you’re interested in shooting mostly landscapes, you may find a wide-angle lens and tripod are both necessary.
8.13 This “wildlife” shot was taken in the middle of downtown Austin at the Texas State Capitol. Exposure: ISO 140, f/8, 1/100 second using the kit lens at 55mm.
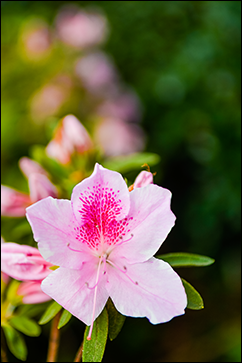
8.14 Be sure to photograph local flora when you’re traveling. This Azalea is indicative of the southern Louisiana area. Exposure: ISO 100, f/2.8, 1/640 second using a Sigma 18–35mm f/1.8 | A.
If you go on an extended trip or long hike, try to pack lenses that can pull double duty, such as a 200mm macro. This lens can capture both distant wildlife and a close-up of a flower.
If your goal is to photograph wildlife and birds, you need a long telephoto lens, a monopod, and possibly a teleconverter. If you shoot a wide variety of subjects, then you may want to get a good, all-in-one super-zoom like the Nikon 18–300mm. It will have you covered for just about anything of interest.
Don’t forget to pack some protection for your camera in case you are caught in inclement weather. You can get two Optech rain sleeves for less than $10. There’s no reason not to have at least one of these in your bag at all times.
Technique
As with the equipment that you may need for nature and landscape photography, the techniques that you use will depend on the subject matter. A common theme in landscape and nature photography is to take your time. Stop what you’re doing and really look at your subject — not just through the viewfinder, but actually look. Don’t get so caught up in the technical aspects that you don’t take the time to enjoy your surroundings and the actual experience of being out in nature.
Here are a few more tips for shooting landscape and nature photos:
- Shoot during the Golden Hour. The Golden Hour is immediately after sunrise or before sunset, when the sun is low in the sky. These are the perfect times of day to shoot just about any outdoor subject, from landscapes and flowers to wildlife. The light is soft and golden, and the shadows are long.
- Experiment with backlighting. Backlight is a good way to add a different quality to your images. It can make plants glow and add a cool lens flare to your landscapes. Backlighting is also essential if you want to create a silhouette.
- Shoot smaller apertures for landscapes. When shooting landscapes you want to create a deep depth of field and capture the sharpest images you can. I recommended shooting in the sweet spot of your lens, which is usually between f/5.6 and f/11.
- Shoot wider apertures for wildlife. When photographing wildlife, using a wide aperture helps to separate it from the background. Most animals blend into their habitat, and a busy, sharp background makes it harder to separate the creature from its surroundings.
- Try creative compositions. Shoot landscape images in portrait orientation and vice versa. Most of my favorite landscape shots weren’t taken in landscape orientation.
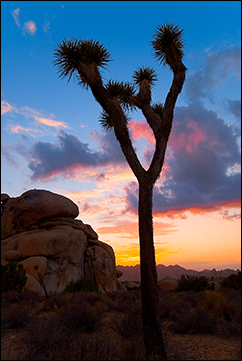
8.15 Shooting this landscape shot of a Joshua tree in portrait orientation adds a little interest to the shot. Exposure: ISO 400, f/11, 1/100 second using a Nikon 10.5mm f/2.8D fisheye.
Night and Low-light Photography
You need light to create a photograph, but sometimes the best photography happens when there is little light. A whole new world opens up for you to capture when the sun goes down. Shooting in the dark enables you to dabble in techniques that can’t be used in the daytime. Just about any type of photography can be done at night or in low light, from land- and cityscapes to portraits, and more. The ultimate goal of low-light photography is to capture the delicate interplay between light and dark, and highlight and shadow to create brightness where there is little illumination.
When confronted by darkness, the first thing most beginning photographers are tempted to do is pop up the flash to add some light to the scene. After all, that's what the flash is for, isn’t it? Yes, but the problem is that flash kills any ambience that exists in a scene. It's best to use the flash sparingly. Instead, increase the ISO setting, open the aperture, or experiment with long exposures.
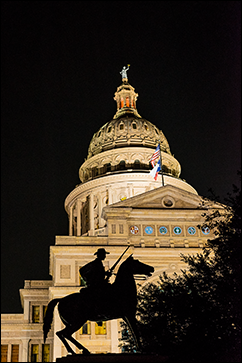
8.16 Not having a tripod handy, I used a wide aperture and higher ISO to capture this low-light image of the Texas State Capitol. Exposure: ISO 3200, f/1.8, 1/30 second using a Sigma 18–35mm f/1.8 | A at 35mm.
Equipment
If you bought your D3300 with one of the kit lenses, you already have a good piece of equipment for low-light photography. The 18–55mm Vibration Reduction (VR) lens is ideal for shooting in low light. Even though it doesn’t have the fast aperture of a pro zoom, the VR lens allows you to handhold the camera at slower shutter speeds so you can capture more of the ambient light without worrying about camera shake. Of course, VR only compensates for camera shake — it can’t freeze moving subjects, but sometimes that’s a good thing. One cool effect is to have a sharp background with a subtle blur in moving subjects within the image.
Of course, Vibration Reduction and handholding your camera only get you so far. I’d say the outside limit for handheld photography with a VR lens at a wide-angle setting is probably about 1/2 second, maybe a bit longer if you’re really steady. To capture long exposures successfully, you need a decent tripod. The tripod holds the camera completely still so that you can capture enough light to make a good exposure without your picture being a blurry mess.
VR should be turned off when using a tripod.
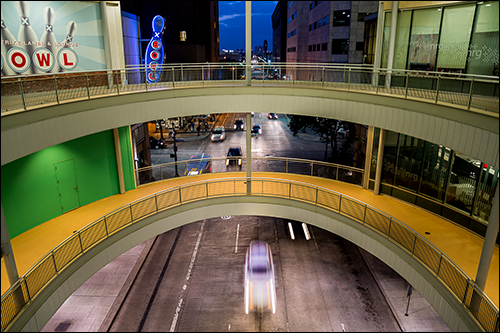
8.17 For this shot, I relied on the VR to get a sharp exposure of the buildings while using a relatively long exposure to capture the blur of the moving vehicles. Exposure: ISO 1600, f/4, 1/2 second using the kit lens at 18mm.
Another option for shooting in low light and at night is to use a fast lens with an aperture of at least f/2.8 or better. Ideally, the faster a lens is, the better, so if you can afford a lens with an f/1.4 aperture, you may want to invest in one if you like to shoot in low light. A number of options are available; probably the best one for the price is the 35mm f/1.8G (DX version). It’s about $200 and offers excellent image quality. The newest and most versatile fast lens for shooting at night is probably the new Sigma 18–35mm f/1.8 | A; while it’s an expensive lens for low-light photography, it can’t be beat.
Another piece of equipment that I find to be a real necessity for long exposures is a remote release. This accessory allows you to trigger the shutter release without touching the camera and causing it to vibrate, because even the slightest movement can cause some blur in your image. The Nikon ML-L3 is an inexpensive wireless remote designed to work perfectly with the D3300, and it’s very simple to operate.
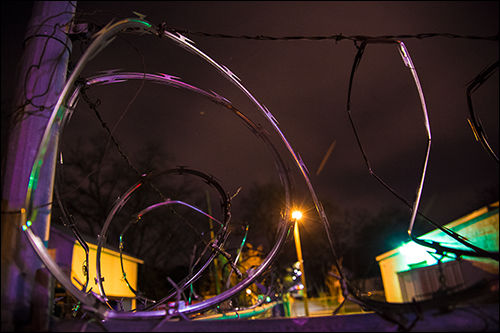
8.18 When shooting at night I look for scenes that have different types of light sources, which cast a myriad of colors into the image. There are no fewer than four different types of light in this scene, giving the photo an almost iridescent look. Exposure: ISO 6400, f/4, 1/10 second using a Sigma 17–70mm f/2.8–4 | C at 17mm.
Technique
The techniques for night and low-light exposures are quite simple: Use a long shutter speed or crank up the ISO setting. While these are both sound approaches, each one comes with its own benefits and drawbacks. The most obvious solution is to increase the ISO until you get the exposure settings that are the best for your subject. This is usually the best way to go if your subject is moving, or if you must handhold the camera for a specific reason (such as when you don’t have a tripod handy).
In these situations, a great setting to use is Auto ISO (![]() ). Using this feature and setting the minimum shutter speed to Auto allows the camera to automatically keep the shutter speed fast enough to avoid camera shake at the given focal length. The only real downside to this is that you will see some increased noise and a loss of resolution as the ISO sensitivity is increased. You can always apply some noise reduction in post-processing. I also find that reducing the image size reduces the size of the noise structure, making it less noticeable. If you don’t need the full 24MP size, you can resize the image and make it a little cleaner.
). Using this feature and setting the minimum shutter speed to Auto allows the camera to automatically keep the shutter speed fast enough to avoid camera shake at the given focal length. The only real downside to this is that you will see some increased noise and a loss of resolution as the ISO sensitivity is increased. You can always apply some noise reduction in post-processing. I also find that reducing the image size reduces the size of the noise structure, making it less noticeable. If you don’t need the full 24MP size, you can resize the image and make it a little cleaner.
Resizing an image isn’t the same as cropping. Although both techniques reduce the height and width of the image, cropping doesn’t reduce the size of the noise grain whereas making the dimensions of the original image smaller reduces the size of the noise grain.
If you’re going for a more artistic approach, you can try using longer shutter speeds. You can use longer shutter speeds while holding the camera, but most of your image is going to be blurry. This isn’t always a bad thing — you can produce some cool effects if you handhold the camera during a long exposure. However, your results will be more consistent if you use a tripod.
There are many advantages to using a tripod. First, your camera is (obviously) going to be more stable, allowing you to use much longer shutter speeds and get sharper images than if you handhold the camera. Second, in seeming contrast to the preceding statement, you can get sharper background images while also achieving motion blur in anything that is moving. Some cool examples of this would be a city scene in which you create blurs of people, trails from car headlights moving through sharp scenery, moving water, or stars traveling across the sky.
Longer shutter speeds capture more motion than shorter ones. Try experimenting with shutter speeds of varying lengths to see the different effects they can produce. For example, if you're shooting in a busy city and use a shutter speed that’s too long, you won’t capture people effectively because they move through the frame too quickly to be adequately recorded. At the opposite end of the spectrum, if you're photographing stars, a shutter speed that is too short won’t allow sufficient time for them to move through the scene and leave a trail.
Generally, when doing this type of photography, I use Manual mode (![]() ) and bracket my exposures. Bracketing allows me to get the exact exposure that I want and, if necessary, I can combine elements of different exposures. For my base exposure, I set the metering mode to Matrix (
) and bracket my exposures. Bracketing allows me to get the exact exposure that I want and, if necessary, I can combine elements of different exposures. For my base exposure, I set the metering mode to Matrix (![]() ) and look at the light meter in the viewfinder. I generally start my exposure settings where the meter says that it’s 1 stop underexposed. I find that this is generally pretty close to the right exposure. I bracket five frames at 1-stop intervals from my base exposure. You can use smaller (1/3) stops or bracket more frames if you want more or less latitude in your exposures.
) and look at the light meter in the viewfinder. I generally start my exposure settings where the meter says that it’s 1 stop underexposed. I find that this is generally pretty close to the right exposure. I bracket five frames at 1-stop intervals from my base exposure. You can use smaller (1/3) stops or bracket more frames if you want more or less latitude in your exposures.
A smaller aperture not only increases your exposure time, but also creates a starburst from points of light in the scene due to diffraction from the aperture blades. The smaller the aperture setting, the more pronounced the points of the starburst.
Portrait Photography
By simple definition, a portrait captures (or portrays) the likeness of a person. While the definition of a portrait is straightforward, what makes a great portrait is more elusive. A great portrait isn’t necessarily a photograph of a beautiful or handsome model with perfect skin, flawless hair and makeup, and just the right lighting and exposure. While these elements can all go into making a portrait, they don’t necessarily make it great.
A portrait, in addition to its primary function of simply showing what a person looks like, should ideally go a little deeper. It should give the viewer a glimpse of the essence (or soul, if you prefer) of the subject. Of course, you can't capture the complete essence of a person in just a fraction of a second, but you can capture the essence of the person in that fraction of a second.
8.19 I used an unmodified, off-camera Nikon SB-900 Speedlight connected with a Nikon SC-27 TTL cable to get this hard-light portrait. Exposure: ISO 400, f/2.8, 1/60 second using a 50mm f/1.8G.
This involves quite a bit of semantics because, although you can capture a very deep and emotional portrait of someone — whether that emotion is happiness, melancholy, anger, or indifference — you can only capture what the subject projects. As a photographer, though, you can also direct what emotion you want portrayed and a good model, like an actor, can convince the viewer that that emotion is real. Such is the dichotomy of the portrait: It should connect the viewer with the subject and project a sort of reality, but the reality is what you make it.
I’d like to differentiate a subset of portrait photography — the headshot. While the headshot is, indeed, a portrait, the purpose is not to portray emotion on any deep level, but rather, to show a person’s face in a generally pleasing manner.
Equipment
The D3300, as it turns out, is an ideal camera for portraiture. The high-resolution, 24MP sensor captures great detail. It also has a very impressive dynamic range for capturing subtle tones. A big pro camera like the Nikon D4s with an 85mm f/1.4 lens can be like looking down the barrel of a cannon for most people, so I find the small size of the D3300 is less intimidating for my subjects, especially if they aren’t used to having a camera pointed at them.
Much of how portraiture is conveyed depends on lens choice. There are general guidelines that most people follow when selecting lenses for customary portraits. The general rule is to use short to medium telephoto lenses. For a DX camera like the D3300, lenses with a focal length from about 50mm to 105mm are ideal. This is because wide-angle lenses create unflattering perspective distortion with facial structures, causing noses to appear too large, ears to appear too small, and just making faces generally appear strange (there are situations in which you can use a wide-angle lens, which I cover shortly). Longer lenses tend to flatten the facial features, which is one reason why telephotos are recommended. However, a lens that is too long can flatten the facial features so much that your portraits might lack depth, not to mention the fact that you start gaining a lot of distance between yourself and the model, which can be a hindrance because you end up being too far to communicate with your subject.
Wide-angle lenses are effective for portraits that show more of the background. These are known as environmental portraits. The key to making a wide-angle lens work with a portrait is to put some distance between you and the subject or to go all the way and make it look intentionally wacky. If you try to be in the middle, the portrait will just look odd, and not in a good way.
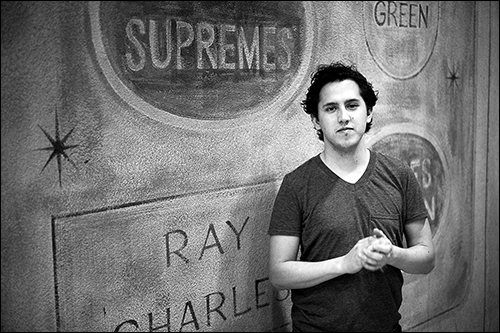
8.20 I used a wide field of view to take this environmental portrait of musician Bennett Jackson. Exposure: ISO 1600, f/1.4, 1/60 second using a Sigma 35mm f/1.4 | A.
Most portrait photographers like to use prime lenses for their more compact size and sharpness. Luckily, Nikon has a plethora of prime lenses from which to choose, and a few of them are very affordable. The 50mm f/1.8G is an inexpensive lens that is often used by photographers who are just getting started with portraiture. One of the best and sharpest lenses (although it’s more expensive than the 50mm f/1.8G) is the 85mm f/1.8G. Some photographers like to use the Nikon 105mm f/2.8G VR macro lens, which is my personal favorite for portraits. Its great focal length and near-perfect image quality make this a great, if somewhat expensive, option. Obviously, it also pulls double duty as a macro lens.
Technique
A whole book could be written about portrait techniques and, indeed, quite a few have been, so for simplicity’s sake, I only touch on the basics here. In Chapter 6, I cover the quality of light, which plays a major role in portrait photography. Essentially, there are two types of portraits: hard light and soft light. For most practical purposes, soft light is preferred for portraits. It’s smooth and generally flattering to just about any facial structure. People just tend to look good in soft light. Women, in general, almost always benefit from it. The downside of soft light is that it can lack the depth and drama that harder directional light can lend to a subject.
The following are some of the ways with which you can create a soft-light portrait:
- Window light. This is by far the easiest way to get great light for just about any subject. Window light has been (and is still) used by photojournalists and fashion photographers alike. Windows act as natural diffusers and filter the sunlight, turning it into pleasing, soft light. There’s simply no easier way to get great portrait lighting than by sitting your model close to a window.
- Bounce flash. If you’re stuck indoors and don’t have access to a window, or if it’s dark and there’s no window light available, you can quickly achieve a decent, soft light effect by using an external Speedlight such as the Nikon SB-400 or SB-700. The key is not to aim the flash directly at your subject, but to tilt or swivel the head and bounce the light from the ceiling or an adjacent wall. Bouncing scatters the light, which softens and diffuses it.
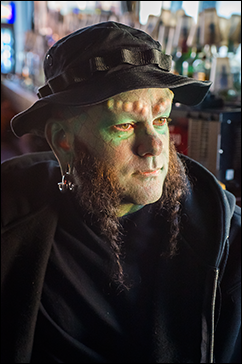
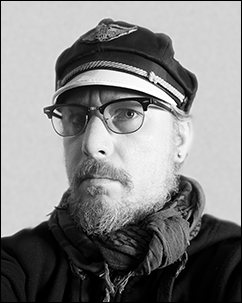
8.21 Using window light usually yields excellent results, as in this portrait of the sideshow artist Lizardman. Exposure: ISO 1600, f/4, 1/60 second using a Sigma 17–70mm f/2.8–4 | C at 50mm.
- Shade. If you find yourself shooting portraits outside, you’ll notice that the bright overhead sun really isn’t the optimum light source for portraits. Move your subject under the shade of a tree or porch overhang. You can also take advantage of the shade provided by clouds on a partly sunny or overcast day.
Soft light isn’t always the best option for portraits. Sometimes, a more directional light source is necessary. This adds depth to a portrait, and it is often used to portray strength and character. Hard light accentuates lines and gives definition, whereas soft light plays down these attributes. Hard light is perfect for accentuating textures. Hard light is used more often on men than women because the definition it provides creates a more masculine effect.
Pay extra-close attention to where shadows fall when shooting hard-light portraits. Errant shadows can ruin a portrait.
- Use off-camera flash. If you use a Speedlight off-camera with a TTL cable or the Nikon Creative Lighting System, it is much easier to get directional light. Of course, you can also use off-camera flash for soft light, but that requires modifiers such as umbrellas or softboxes. For hard light, you can use a Speedlight pointed directly at the subject with no diffusion. The farther away a light source is, the harder the light will be.
- Use a dark background. Hard-light portraits are, by their nature, high in contrast. A dark background creates a more distinct separation between the subject and background. This gives your portrait a stark, moody look.
Try converting your hard-light images to black and white for a more classic look.
Still-life, Product, and Food Photography
The subjects of still-life, product, and food photography are similar in that they are all inanimate objects and relatively static. As a result, these subjects are easy to work with, and knowing how to photograph them is a very good skill to develop. One difference about photographing this type of subject is that, as the photographer, you have almost complete control over the setup. For the most part, you can shoot at your leisure (although, food usually photographs best when it’s fresh). You can change the lighting, composition, and camera settings without being under pressure.
Some people may find shooting inanimate objects unimaginative or boring, but it can actually be as challenging as you want to make it. As with any other type of photography, you can use lens and lighting choice to portray a certain feeling. You can use the techniques covered in this section to create a version of an old master-style still life, photograph a well-prepared meal, or create professional-looking shots for online auctions.
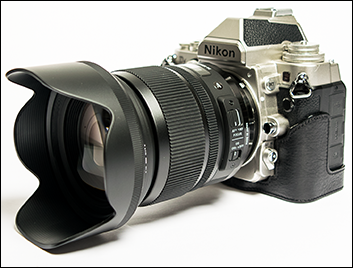
8.22 I used a TTL cord to fire an off-camera SB-600 Speedlight to light this still life of my Nikon Df and Sigma 24–105mm f/4 | A. Exposure: ISO 100, f/5.6, 1/60 second using a Sigma 17–70mm f/2.8–4 at 70mm.
Equipment
The type of equipment you need changes, depending on the scope of what you’re doing. At the very least, a good midrange zoom (like the 18–55mm kit lens) works, but a good macro lens (like the Nikon 40mm f/2.8G, 60mm f/2.8G, or 85mm f/3.5GVR) is best. I tend to avoid wide-angle lenses because of the perspective distortion that occurs when I get close to the subject to fill the frame. If you have plenty of working distance, a telephoto lens is also a good choice. This is also one of the few types of photography where you don’t really need to have a fast lens because more often than not, you will be shooting in the f/5.6–11 range to get a good, sharp image throughout.
I prefer to shoot most products using a tripod. This frees my hands so I can move the subject or lights, or adjust the background without constantly picking up and putting down my camera.
Lights are also very handy — whether it’s an inexpensive set of hot lights, a wireless Speedlight setup, or even studio strobes. Controlled lighting is the best way to give your images a professional look. Along with lights, another necessity is a reflector. This is probably the most essential piece of equipment that I can think of for this type of photography. A small reflector is inexpensive and folds up compactly (a 36-inch reflector folds down to roughly 13 inches). Reflectors can bounce flash, redirect continuous light to brighten shadows, and reflect available light onto the subject to brighten it.
Technique
There are three basic elements that are important for any still-life photograph: background, composition, and lighting. All three must work together if the image is to be successful.
Selecting a background is one of the first things to do (after selecting the subject, of course). Usually, the best background is a simple one that allows the subject to stand out. Some options for backgrounds include seamless paper, poster board, cloth, and black velvet (often used when shooting jewelry to reduce reflections). The main option you’re going to be looking at when choosing a background is the color. Two very simple choices are black or white. Either of these works well with almost any subject. Of course, you can use any color in the rainbow. A dark background gives you a low-key image, while using a white or light-colored background gives you a high-key image. High-key images tend to evoke a lighter feeling. A low-key image is dark with a lot of shadows and contrast. These images tend to be moody and evocative.
Stop at your local fabric store and visit the remnants section to find a lot of great options for background materials for relatively little money.
When using a colored background, remember that it should add to the image, not subtract from, or draw attention away from, the subject. Using complementary colors to set off your subject is a great way to make the subject pop from the background, while using a background with a similar color can add a pleasing monochromatic theme.
Use the D3300 High key (![]() ) or Low key (
) or Low key (![]() ) Effects modes (
) Effects modes (![]() ) to shoot these types of scenes.
) to shoot these types of scenes.
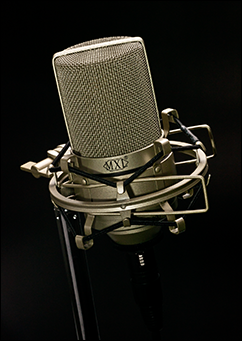
8.23 I used two Speedlights to highlight the fin detail of this microphone. The Speedlights were controlled by a Nikon SU-800 Wireless Infrared Commander. Exposure: ISO 200, f/16, 1/60 second using a Nikon 60mm f/2.8G macro lens.
Often when shooting still-life subjects rather than products, it’s fun to build a scene or use props. For example, you could use a cutting board and knife as a background for a shot with fruit, or a burlap sack with coffee beans for a shot depicting a cup of coffee. The key to building a background is to be sure your background props match your subject. You should also be careful not to add too many pieces to the background — you don’t want to draw attention away from the subject.
When considering lighting, I find that the best approach is to keep it simple, especially when you’re just starting out. Even if you’re using flash, try to make the lighting look natural. Window lighting is always an option, especially for food. However, some photographers like to take it a step further and move the dish to a more brightly lit, but relatively shaded, outside area to get a little more directionality. Using a reflector can sometimes help soften the edges if the shadows start to get too hard.
The easiest way to light still life is with window lighting. This is the preferred method of many food photographers.

8.24 This full English breakfast was lit by nothing more than window light, proving once again that it is the easiest lighting to work with and it looks great. Exposure: ISO 100, f/1.8, 1/250 second using a Nikon 35mm f/1.8G.
When using flash, whether Speedlights or larger studio strobes, I usually modify the flash by bouncing it from a reflector or an umbrella. On location, I sometimes use whatever is on hand. I’ve used everything from a wall to a drink menu. Once you learn the basics of lighting a shot, you can start exploring other possibilities and more advanced techniques. However, you’ll find that, about 80 percent of the time, a simple lighting setup goes a long way.
See Chapter 6 for more information about calculating manual flash exposures.
Street Photography
This type of photography has seen a big resurgence in the past couple of years. Street photography is a type of candid photography that, as its name implies, often takes place out in the streets, from the inner city to the suburbs to the rural areas.
There are many opinions on what street photography is and isn’t, but one thing that can be agreed on is that the ultimate goal of street photography is to capture the essence of everyday life and do it in an interesting way. Street photography is a way for photographers to document society and culture with an impartial eye.
Many street photographs feature people going about their mundane, everyday business or doing interesting things, but street photographs don’t always have to have people in them. Quite often, the subjects in street photos are unaware of the camera, but the key is to catch people doing what they do naturally, not to make it look like a spy photo taken by a private eye. On the other hand, many photographers, including myself, do “street portraits,” where you approach subjects and ask them if you can take a photo of them. If I see someone interesting, I generally stop and talk to them for a few minutes and create a rapport before taking their photos. This makes both the photographer and subject more at ease because the ice has been broken. I have never been turned down when I’ve asked to take someone’s photo, and I’ve met many great new people this way.
Equipment
There’s no list of ‘right’ equipment that a street photographer should have. Many photographers like to use certain pieces of gear because of what other famous street photographers used before them. I don’t adhere to any hard rules, but as an example, many photographers swear by using prime lenses only, generally a fast 35 or 50mm prime. I find that primes work well, but I typically have a midrange zoom lens on my camera so that I can be better equipped for any situation that I encounter. But if I specifically go out to capture street photography, sometimes I will use a prime lens to lighten the camera and make it less conspicuous. Typically, I find a moderate, wide-to-normal focal length (from about 18 to 35mm) is ideal for most street photography.
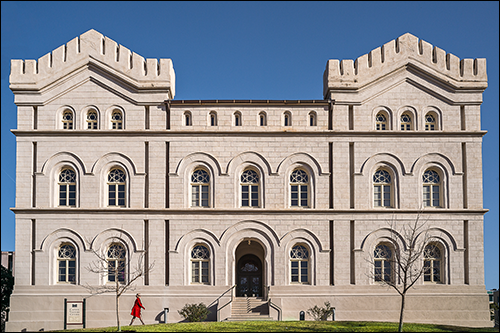
8.25 In street photography, I try to look for odd or eye-catching juxtapositions, such as this lone woman in a bright-red dress walking in front of this enormous, rather dull-colored building. Exposure: ISO 100, f/9, 1/500 second using a Sigma 17–70mm f/2.8–4 at 20mm.
There are some photographers who use flash and surprise as a technique to get street photographs. I don’t recommend this approach, as it is rude and invasive as well as potentially dangerous. In this day and age, people are already wary of anyone pointing a camera in their direction, and being a nuisance photographer doesn’t do any good.
Technique
There are as many techniques for street photography as there are street photographers, and what works for some people won’t work for others. I will say this: street photography isn’t for shy or nervous photographers. On the other hand, if you are shy around strangers, you can use street photography as a confidence-building exercise. Before I started doing street photography, I almost never talked to strangers, and now I talk to random people all the time.
The most common technique is to use a lens with a slightly wide focal length and to get relatively close to your subject. Again, this technique isn’t for the timid but generally makes for the best photos.
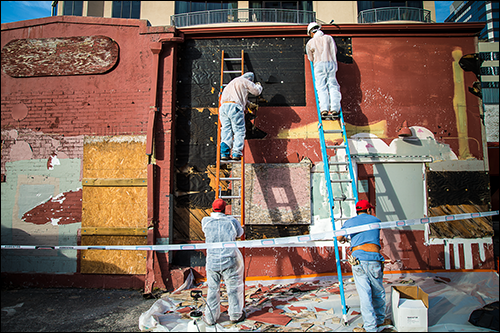
8.26 Sometimes photographing people doing their everyday jobs can create an interesting image. If you are looking too hard, you may miss it when interesting subjects are right in front of you. Exposure: ISO 100, f/16, 1/125 second using the kit lens at 35mm.
One technique that a lot of newcomers to street photography start out with is using a telephoto lens and shooting from afar. This is usually because of timidity. This is a bad habit to get into. Images taken from far away have a voyeuristic, spy-like quality to them that’s not indicative of true street photography. If you want to be a street photographer, the best thing to do is to face your fears and jump right in.
Many street photographers like to be inconspicuous so that they can catch the candid moments that make up daily life, but the key to being successfully inconspicuous is not to look sneaky. This is a difficult hurdle for many to overcome. Being hesitant makes you look suspicious and can cause you to miss out on interesting photographs. Being assertive and owning the moment by picking up your camera and pressing the shutter-release button is important. You have to look, act, and most importantly, feel like you know what you’re doing. Some people may object to having their photos taken, especially if you look guilty when you do it. If you are confronted, simply explain to the person that you are photographing interesting slices of life, and offer to send them a copy of the photo or a link to the photo. I’ve never been personally confronted, but typically, if I take a photo of someone who looks up, I’ll simply take the initiative and go to that person first.
Use your better judgment when choosing your subject. If you see someone who you think might pose a threat or become easily angered, just don’t take the photo. It’s not worth risking your safety to get a picture.
Perhaps the most difficult part of the street photography technique is psychological. The camera settings are pretty easy. In the early days, many street photographers used manual focus lenses and a technique called zone focusing, where the lens is set to a certain aperture and you set the focus of the lens to be within a certain zone by using depth of field. Zone focusing allows a photographer to simply raise the camera and snap when the subject is in the zone without having to focus. The smaller the aperture, the easier it is. Most manual-focus lenses have depth of field scales that allow you to quickly calculate the focus zone.
Autofocus is fast enough and nearly silent, so using autofocus is generally what I suggest when shooting street photos with a D3300. I recommend using the Continuous-servo AF (![]() ) and Dynamic-area AF (
) and Dynamic-area AF (![]() ) modes for the focus points.
) modes for the focus points.
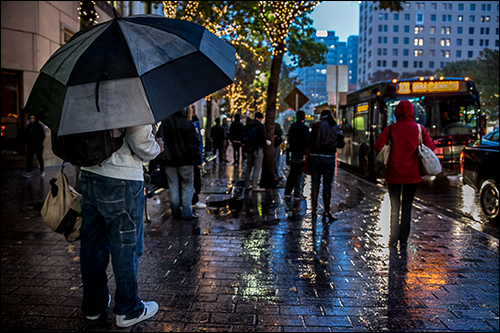
8.27 A great time to shoot street photography is when the weather is less than ideal. People are often too busy to notice you, and wet or cold weather adds something special to the scene. Exposure: ISO 400, f/1.8, 1/30 second using a Sigma 18–35mm f/1.8 | A at 18mm.
When choosing an exposure setting, there isn’t a right one; it depends on what you’re most comfortable using. If I’m just out and about with my camera, I often set it to Programmed Auto (![]() ) for spur-of-the-moment shots. If I’m out specifically to shoot street photographs, I use Manual exposure mode (
) for spur-of-the-moment shots. If I’m out specifically to shoot street photographs, I use Manual exposure mode (![]() ) so I can decide how I want to freeze the motion and control the depth of field. When using Manual exposure mode (
) so I can decide how I want to freeze the motion and control the depth of field. When using Manual exposure mode (![]() ), I typically set Auto ISO (
), I typically set Auto ISO (![]() ) to On. If you’re comfortable that you have enough light to get a fast enough shutter speed for your needs, you can use Aperture-priority auto mode (
) to On. If you’re comfortable that you have enough light to get a fast enough shutter speed for your needs, you can use Aperture-priority auto mode (![]() ) to determine the depth of field. If you want to use a fast or slow shutter speed for effect, but aren’t concerned about the depth of field, you can use Shutter-priority auto mode (
) to determine the depth of field. If you want to use a fast or slow shutter speed for effect, but aren’t concerned about the depth of field, you can use Shutter-priority auto mode (![]() ).
).