
3. Running On Autopilot
Letting the Camera Make Decisions Using Automatic Features
Unlike many amateur DSLR cameras, the D800 does not have an assortment of automatic modes that you can turn to for shooting things like sports or portraits or close-ups. You have now left all that behind and must work with what I like to call “the professional modes.” That being said, there are some features that you can use that will take away some of the heavy lifting and let you concentrate more on the image rather than the camera settings. Let’s take a few minutes to see just what features we can set on autopilot.
Poring Over the Picture

I am fortunate to live near a lot of great sites and attractions. One of my favorites happens to be the National Zoo in Washington, DC. I make a point to visit at least once each year to see all of the amazing animals. Not only is it a great place to see a lot of different animals in one place, it’s also a wonderful venue for practicing my photography techniques.


Poring Over the Picture

City tours are a great way to find new photo locations while touring unfamiliar cities. This particular tour took me to a variety of locations that switched between indoor and outdoor venues. Since we were moving fast and I didn’t have a lot of time to contemplate camera settings, I used the Auto ISO feature to help keep the ISO high enough to get good photos when moving from light to dark areas.


Program Mode—Close to Full Auto
Some people might argue that Program mode is not an automatic mode, but with respect to apertures and shutter speeds, the camera is doing most of the thinking for you. First, let me say that it is very rare that I will use Program mode, because it just doesn’t give as much control over the image-making process as the other professional modes. There are occasions, however, when it comes in handy, like when I am shooting in widely changing lighting conditions and don’t have the time to think through all of my options, or when I’m not very concerned with having ultimate control of the scene. Think about taking pictures at a picnic outdoors in a partial shade/sun environment—you want great-looking pictures, but you’re not looking for anything to hang in a museum. If that’s the scenario, then Program mode might be just what you want.
When to Use Program (P) Mode
Sometimes photographers think that using Program mode is akin to cheating. It’s letting the camera take control and make decisions. This may be true in some respects, but I like to think of Program mode as your free pass to being in the moment. It’s not that you don’t want to make decisions on aperture or shutter speed, but sometimes you just want to click and enjoy—and there’s nothing wrong with that.
The other misconception about Program mode is that you are giving up creative control, which is absolutely not true. First of all, you will need to determine what ISO is right for your setting. This will really set the stage for the settings the camera will choose when determining exposure. Once you have the ISO set (see the sidebar on starting points for ISO selection), you can press the shutter release button halfway to let the camera select a working aperture and shutter speed. There is actually a pretty smart computer at work in your camera that is analyzing the scene and then picking through thousands of reference scenes to choose the best camera settings. When it comes to picking a proper exposure, it will be right much more than it is wrong. But here’s the best part—if you don’t like the settings, you can change them with a flick of your thumb so that the emphasis on the exposure is exactly where you want it.
So what do I mean by this? Well, the camera will select an exposure, but the Main Command dial allows you to shift the exposure to a reciprocal so you can have your choice of aperture or shutter speed, and the camera will adjust accordingly. For example, if I am outside taking pictures of my kids and the camera is offering an exposure of 1/125 of a second at f/11, I will probably get a good photo, but if my kids are running around, I might want to use a slightly faster shutter speed. By rotating the Main Command dial to the right, I can shift the shutter speed to a faster value, like 1/250, and the aperture will automatically shift to f/8 to compensate. Conversely, if there is a need for a smaller aperture for gaining more depth of field, I could roll that Main Command dial to the right to select a smaller aperture, and the shutter speed would increase in duration accordingly. Remember, your camera is using the internal meter to pick what it believes are suitable exposure values, but sometimes it doesn’t know what it’s looking at and how you want those values applied (Figures 3.1 and 3.2).

Figure 3.1. This is my first shot using Program mode. The aperture setting is fairly small, and the fence in front of the animal is visible.

Figure 3.2. By shifting the exposure, I was able to use a faster shutter speed and larger aperture so that the fence was blurred out of view.
As you move forward in the book, you will notice a lot of similarities between the Program, Aperture Priority, and Shutter Priority modes and the way they function. The important thing is that you pick the right mode for your shooting situation.
Let’s set up the camera for Program mode and see how we can make all of this come together.
Setting up and Shooting in Program Mode
1. Turn your camera on. Turn the Main Command dial while holding down the Mode button until the letter P appears in the control panel.
2. Select your ISO by pressing and holding down the ISO button on the top of the camera.
3. Use the Main Command dial to select the desired ISO, which can be viewed in the control panel.
4. Point the camera at your subject, and then activate the camera meter by depressing the shutter button halfway.
5. View the exposure information in the bottom of the viewfinder or in the control panel on the top of the camera.
6. While the meter is activated, use your thumb to roll the Main Command dial left and right to see the changed exposure values.
7. Select the exposure that is right for you and start clicking. (Don’t worry if you aren’t sure what the right exposure is. We will start working on making the right choices for those great shots beginning with the next chapter, “Taking Control.”)
If you use the Program shift, you will notice that a small star will appear above the letter P in the control panel and the rear info display if you rotate the Main Command dial. This star is an indication that you modified the exposure from the one that the camera chose. To go back to the default Program exposure, simply turn the dial until the star goes away or switch to a different mode and then back to Program mode again.
Using Auto ISO
I am not a big fan of using Auto ISO settings, simply because the ISO setting can have a direct correlation to the quality of the image. If the ISO goes too high, there will undoubtedly be some noise introduced into the image. That being said, the D800 allows you to set up parameters so that you can get the benefit of some Auto ISO adjustments and still safeguard the quality of your image. You will need to set up these parameters in the menu; otherwise, the Auto ISO function will use the default values.
Turning on Auto ISO
1. To turn on Auto ISO without setting custom parameters, press and hold down the ISO button.
2. Use the Main Command dial to set your desired low ISO (100 will give you the highest quality).
3. Rotate the Sub-command dial one click in either direction to turn on the Auto ISO function.
4. The Auto ISO designation will appear above the frame counter in the control panel as well as on the right side of the viewfinder display.
As you continue to shoot, the ISO will be continually adjusted as needed to maintain a good exposure. If you are using it in conjunction with Program mode, you should set some parameters so that your camera can operate in the best exposure environment.
Auto ISO Sensitivity Controls
Just because your camera can adjust the ISO doesn’t mean that you want it to go crazy with the settings. It’s a good idea to use the sensitivity controls to set limits for the ISO adjustment so that you can always get the best results. There are three control limits that you can set to maintain these limits. The first was done when you turned on Auto ISO. Whatever your current ISO setting is will be the bottom limit of the ISO range for Auto. That means if you have your ISO set for 400, the camera will not adjust it below that level (Figure 3.3). I like to keep mine at 100 in these circumstances because a lower ISO will only mean a cleaner image. The other settings are controlled in the camera menu and are the upper ISO limit and the minimum shutter speed.
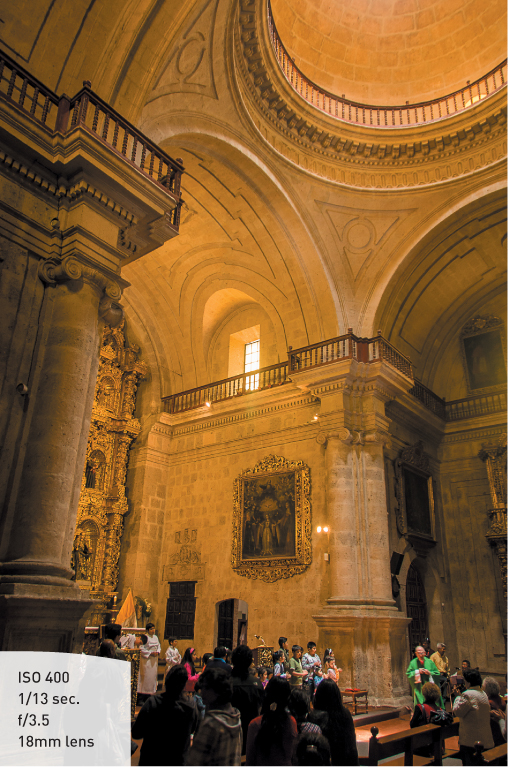
Figure 3.3. Moving between bright outdoor and dark indoor conditions is a great time to set up and use the Auto ISO feature.
The upper limit sets a ceiling for how high your camera will set the ISO, so if you want to keep it leveled off at 3200, you just set that as the maximum sensitivity. If you want to ensure that you are always using a certain shutter speed or faster—for instance, if you are shooting action and don’t want any blur—you can use the minimum shutter speed setting to choose a speed between 1 second and 1/4000 of a second. There is also an Auto setting for this option.
Setting Auto ISO Sensitivity Controls
1. To set your control parameters, press the Menu button and navigate to the Shooting menu.
2. Locate the ISO sensitivity settings option, and press OK (A).

3. If Auto ISO was not already turned on, highlight the Auto ISO sensitivity control option, and press OK (B).
4. Select On and press OK to go back to the previous screen (C).

5. Highlight Maximum sensitivity, and press OK.
6. Select your desired ceiling for the ISO, and press OK (D).
7. Select the Minimum shutter speed selection, and press OK.
8. Select a shutter speed that you want to use as your slowest possible speed, and press OK (E).

Press the Menu button twice to return to shooting mode and start taking photos. As you shoot, you may notice that the Auto ISO indicator will begin to blink. This is an indication that the camera has adjusted the ISO above your base setting.
Autofocus the Easy Way
The final consideration for automatic use of your D800 is which focus mode to use. If you really want to give up total control and be free from making any decisions, the Auto-Area AF mode is what you want. This mode will analyze all subjects within the 51 focus points and then locate what it believes to be the priority subject. It will then use the focus points covering that subject to establish the appropriate focus. So basically all you have to do is point and shoot. It’s not a completely blind system as far as the photographer goes because it will highlight which focus points are being used so that you get an idea of what exactly it is basing its focus on. That way, as you shoot you have some idea what the camera believes the main subject to be.
This is perhaps my least favorite of all the focus modes because it takes all the control out of my hands and makes critical judgments on what should and should not be in focus. I can always fix an exposure problem using image processing software, but there’s just no way to fix an out-of-focus photo. But if you feel the need to be free, here’s how to set it up.
Setting Auto-Area AF
1. Press and hold the AF-mode button located on the front of the camera just below the lens release button.
2. Set the focus mode to AF-S by rotating the Main Command dial and looking for the AF-S symbol in the control panel or rear info display (Figure 3.4).

Figure 3.4. You can use the Info screen to view changes to the autofocus area.
3. While still holding in the AF-mode button, rotate the Sub-command dial until you see Auto in the display.
4. To activate the autofocus system, press the shutter release button halfway and look for the illuminated focus points in the viewfinder (Figure 3.5).

Figure 3.5. The Auto-Area autofocus can utilize multiple focus points within the image to establish the area of focus.
You can also use the Auto-Area AF mode in the continuous focusing mode (AF-C) if you are dealing with moving subjects.
With so many easy-to-use auto features, why would anyone ever want to use anything else? Well, the first thing that comes to my mind is control. It is the number one reason for using a DSLR camera. The ability to control every aspect of your photography will open up creative avenues that just aren’t available with automatic settings. As we move forward through the next few chapters, we will explore many other techniques for focus and exposure that will give you much more control over the entire picture-making process. I’m not saying that full-auto features should never be used, but once you start shooting with the other camera modes, you may never want to go auto again.
Chapter 3 Assignments
These assignments will have you shooting with the various automatic features so that you can experience the advantages and disadvantages of using them in your daily photography.
Starting off with Program mode
Set your camera on Program mode and start shooting. Become familiar with the adjustments you can make to your exposure by turning the Main Command dial. Shoot in bright sun, deep shade, indoors—anywhere that you have different types and intensities of light. While you are shooting, make sure that you keep an eye on your ISO, and raise or lower it according to your environment.
Adding Auto ISO to the equation
Now that you have had some experience shooting in Program mode, go ahead and add the Auto ISO option. Hold the ISO button and rotate the Sub-command dial to turn it on. Now find some areas with contrasting brightness, like heavy shade and bright sun, and see how using the Auto ISO feature affects the settings in Program mode. You will hopefully notice that using the Auto ISO setting will limit the ability to shift exposure values because the ISO is constantly trying to maintain the established exposure values.
Focus on your subject
Handing off focus to the camera is something that is easy to do but may not always give you the results you want. It’s important that you try the focus system in a variety of different situations so that you can anticipate how the camera will react to different types of subjects. Luckily there is some great feedback going on in the viewfinder in the form of illuminated focus points, so you can see what the camera believes the focal point of the picture is. Try shooting a lot of different subjects and see how the camera reacts. Shoot some landscape scenes where everything is off in the distance. Then shoot a subject that is close to the camera. Put the subject in the middle of the frame, and then try one with the subject off to the side. Pay attention to how the camera sees, and you will have a lot of success getting sharp images.
Putting it all together
Now that you have tried using the different automatic features individually, try using them all together for some fully automatic fun. This is as close to full auto as you will get.
Share your results with the book’s Flickr group!
Join the group here: www.flickr.com/groups/d800fromsnapshotstogreatshots