
Chapter 10 NetWare File Access
Instant Access
![]() NetStorage provides a WebDAV server interface for all NetWare 6.5 files and directories.
NetStorage provides a WebDAV server interface for all NetWare 6.5 files and directories.
![]() Use any WebDAV-compliant application, such as Web browsers, Windows Explorer (My Network Places), or Office 2000 to access NetWare 6.5 files and folders.
Use any WebDAV-compliant application, such as Web browsers, Windows Explorer (My Network Places), or Office 2000 to access NetWare 6.5 files and folders.
![]() NetStorage can provide clientless access to iFolder files.
NetStorage can provide clientless access to iFolder files.
![]() NetStorage provides the WebDAV support for the NetDrive client.
NetStorage provides the WebDAV support for the NetDrive client.
![]() NetDrive client is available on the NetWare 6.5 client’s CD-ROM.
NetDrive client is available on the NetWare 6.5 client’s CD-ROM.
![]() Supports access of NetWare 6.5 files and folders using standard protocols: FTP, WebDAV, or iFolder.
Supports access of NetWare 6.5 files and folders using standard protocols: FTP, WebDAV, or iFolder.
![]() Synchronize files between remote clients and a centralized iFolder server, so that user data is available anytime, from anywhere.
Synchronize files between remote clients and a centralized iFolder server, so that user data is available anytime, from anywhere.
![]() Configure and manage iFolder server through the iFolder management console, available through Web Manager after iFolder is installed.
Configure and manage iFolder server through the iFolder management console, available through Web Manager after iFolder is installed.
![]() Use iFolder client to provide synchronization between the iFolder server and regularly used machines.
Use iFolder client to provide synchronization between the iFolder server and regularly used machines.
![]() If you are using a machine for one-time access, use NetStorage to access the iFolder server without having to synchronize all files.
If you are using a machine for one-time access, use NetStorage to access the iFolder server without having to synchronize all files.
![]() Use NetDrive to access the iFolder server without synchronizing the entire directory. Useful when the desktop application is not WebDAV-aware.
Use NetDrive to access the iFolder server without synchronizing the entire directory. Useful when the desktop application is not WebDAV-aware.
![]() iFolder access requires that the iFolder server be installed and configured prior to use.
iFolder access requires that the iFolder server be installed and configured prior to use.
![]() Use preconfigured services to make NetWare 6.5 files, as well as common services such as NetStorage, iPrint, and email, available through a single portal Web site.
Use preconfigured services to make NetWare 6.5 files, as well as common services such as NetStorage, iPrint, and email, available through a single portal Web site.
![]() Configure Virtual Office through the Virtual Office Management link in iManager.
Configure Virtual Office through the Virtual Office Management link in iManager.
![]() Virtual teams are a specialized instance of Virtual Office that you can use to create ad-hoc portals to support a community, group, or team focused on a specific project or topic of discussion.
Virtual teams are a specialized instance of Virtual Office that you can use to create ad-hoc portals to support a community, group, or team focused on a specific project or topic of discussion.
One of the major tenets of Novell’s one Net philosophy is that users should have access to their files and data at anytime, from anywhere. To help you reach this goal, NetWare 6.5 includes a host of methods for accessing network data.
In keeping with Novell’s open standards approach to network services, these access methods are designed to use Internet standards, Web browsers, and thin clients, thereby minimizing the need to add large amounts of workstation software in order to access network resources. Those access methods that do require a client of some sort make installation and configuration as easy as possible, so users can get on with their business.
This chapter takes a look at the new and nontraditional forms of file access available in NetWare 6.5. These include
NetStorage provides a transparent WebDAV interface to NetWare files. This is probably one of the most exciting NetWare 6.5 features that you’ve never heard of. Effectively, NetStorage lets you access files on a NetWare 6.5 server without a NetWare client. NetStorage is integrated with iFolder, NetDrive, and Virtual Office to make accessing your network files as easy and seamless as possible—all without using the traditional Novell Client.
NetStorage leverages a middle-tier architecture, also called X-tier, to provide its services. This same architecture is used to support some of the functionality for Novell’s ZENWorks line of management solutions.
NetStorage can be installed during the installation of the NetWare 6.5 server, or after the fact through iManager or the graphical server console. Typically, you will need to install NetStorage only on one NetWare 6.5 server in your eDirectory tree, or on one server at each geographical site, although very heavy usage might require more than one per site.
To install NetStorage through iManager, complete the following steps:
1. Insert the NetWare 6.5 Operating System CD-ROM into your workstation.
2. Launch iManager and open the Install and Upgrade link in the left navigation frame
3. Select Install NetWare 6.5 Products, and then click Remote Product Install in the right frame.
4. At the Target Server screen, select the server to which you want to install NetStorage and click Next. Authenticate as an Admin user for your eDirectory tree and click OK.
5. At the components screen, click Clear All and select only Novell NetStorage. Click Next.
6. At the Summary screen, click Copy Files. You will be prompted to insert the NetWare 6.5 Products CD-ROM.
7. At the NetStorage Install screen, specify the required information, and click Next. You can change these settings after the installation through iManager by opening the NetStorage link and selecting Authentication Domains.
![]() Primary eDirectory Server: Specify the DNS name or IP address of a server in your eDirectory tree that hosts a master or a read/write replica of eDirectory. This does not have to be the server where NetStorage is being installed. NetStorage will use this server to authenticate users when they attempt to log in to NetStorage.
Primary eDirectory Server: Specify the DNS name or IP address of a server in your eDirectory tree that hosts a master or a read/write replica of eDirectory. This does not have to be the server where NetStorage is being installed. NetStorage will use this server to authenticate users when they attempt to log in to NetStorage.
TIP
If you want NetStorage to search a specific eDirectory context for user information, you can add that context to the end of the DNS name or IP address, separated by a colon (:). If no context is specified, NetStorage searches the entire eDirectory partition stored on the specified eDirectory server for user information.
![]() (Optional) Alternate eDirectory Server: Specify up to two other eDirectory servers to use for user authentication. These can be different servers entirely, or the same server but a different associated context.
(Optional) Alternate eDirectory Server: Specify up to two other eDirectory servers to use for user authentication. These can be different servers entirely, or the same server but a different associated context.
![]() (Optional) iFolder Server: Specify the DNS name or IP address of your iFolder server, as well as the port number used by the iFolder service. This will make iFolder contents available via NetStorage (WebDAV). More information on iFolder is available later in this chapter.
(Optional) iFolder Server: Specify the DNS name or IP address of your iFolder server, as well as the port number used by the iFolder service. This will make iFolder contents available via NetStorage (WebDAV). More information on iFolder is available later in this chapter.
WARNING
If you install NetStorage after the NetWare 6.5 installation, you must restart your NetWare 6.5 server after completing the NetStorage installation.
At the Installation Complete screen, click Close to complete the installation of NetStorage.
Use iManager to configure and manage your NetStorage environment by opening the NetStorage link in the left navigation frame. There really isn’t much in the way of required configuration, but it’s nice to understand the control you do have over NetStorage.
![]() Authentication Domains: This page lets you add/remove/modify authentication domains to NetStorage. These are eDirectory servers that NetStorage will search for user authentication information.
Authentication Domains: This page lets you add/remove/modify authentication domains to NetStorage. These are eDirectory servers that NetStorage will search for user authentication information.
![]() Browse Files: This page lets you actually view the available NetStorage files. You will be required to authenticate as a valid user, and the user must exist in one of the authentication domains defined for this NetStorage server.
Browse Files: This page lets you actually view the available NetStorage files. You will be required to authenticate as a valid user, and the user must exist in one of the authentication domains defined for this NetStorage server.
![]() Current Sessions: Shows a list of current NetStorage sessions.
Current Sessions: Shows a list of current NetStorage sessions.
![]() General: This page lets you configure some basic NetStorage parameters. In most cases you won’t have to change any of these, but they are available if necessary.
General: This page lets you configure some basic NetStorage parameters. In most cases you won’t have to change any of these, but they are available if necessary.
![]() iFolder Storage Provider: This page lets you review and change basic iFolder parameters that relate to its operation with NetStorage. In most cases you won’t have to change any of these, but they are available if necessary.
iFolder Storage Provider: This page lets you review and change basic iFolder parameters that relate to its operation with NetStorage. In most cases you won’t have to change any of these, but they are available if necessary.
![]() NetWare Storage Provider: This page lets you review and change basic parameters related to the use of NetWare mapped drives with NetStorage. In most cases you won’t have to change any of these, but they are available if necessary.
NetWare Storage Provider: This page lets you review and change basic parameters related to the use of NetWare mapped drives with NetStorage. In most cases you won’t have to change any of these, but they are available if necessary.
![]() Resource Usage: This page shows server resources being used in support of the NetStorage middle-tier server environment. It is useful for keeping track of how server resources are being used for troubleshooting server issues.
Resource Usage: This page shows server resources being used in support of the NetStorage middle-tier server environment. It is useful for keeping track of how server resources are being used for troubleshooting server issues.
![]() Statistics: Displays a report with information about server up time, login failures, number of NetStorage sessions, and so on.
Statistics: Displays a report with information about server up time, login failures, number of NetStorage sessions, and so on.
![]() Storage Locations: Use the Storage Locations pages to create/delete/modify storage location objects in your eDirectory tree. Storage location objects are pointers to NetWare directories that can be given more useful names than those typically seen when looking at NetStorage resources. This is particularly useful for common directories shared by multiple users.
Storage Locations: Use the Storage Locations pages to create/delete/modify storage location objects in your eDirectory tree. Storage location objects are pointers to NetWare directories that can be given more useful names than those typically seen when looking at NetStorage resources. This is particularly useful for common directories shared by multiple users.
![]() WebDAV Provider: This page lists the location of the NetStorage WebDAV provider (XDAV.NLM) and the location of NetStorage template files used for building the NetStorage Web interfaces.
WebDAV Provider: This page lists the location of the NetStorage WebDAV provider (XDAV.NLM) and the location of NetStorage template files used for building the NetStorage Web interfaces.
For more detailed information on any of these parameters, see the NetWare 6.5 online documentation.
In order to avoid timestamp issues and confusion over the most current version of a file, Novell recommends that the date and time on the NetStorage server and the WebDAV client be reasonably close, within a few hours of each other.
You can access NetStorage from any WebDAV client. Two of the most obvious of which are Web browsers and Microsoft Windows Web folders. However, there are WebDAV clients for Macintosh and Unix/Linux systems as well. The following process is equally applicable to those environments.
1. From your WebDAV client, enter the magic NetStorage URL, which is the DNS name or IP address of your NetStorage server with /oneNet/NetStorage appended to the end. Remember to include the http:// prefix and remember that URLs are case sensitive. For example:
http://wal-serv1.quills.com/oneNet/NetStorage
NOTE
To use Web folders in Windows 2000, open My Network Places (the Windows WebDAV client) and double-click Add Network Place. This opens a wizard for creating a new folder in My Network Places.
2. At the authentication screen, specify your eDirectory username and password. This User object must be accessible from the eDirectory server(s) you specified during the NetStorage installation.
Once authenticated, your WebDAV client displays the network files and folders that are currently accessible. To do this, NetStorage reads the user’s NetWare login script to determine drive mappings, reads eDirectory User object properties to determine the path to the user’s home directory, and then displays a list of files and folders based on mapped drives and home directories. Figure 10.1 shows NetStorage views from both a Web browser and Windows Web folders.

TIP
If you specified eDirectory servers from different eDirectory trees during the NetStorage installation, NetStorage will read the user login script from only the primary eDirectory server when calculating mapped drives to display. However, NetStorage will read User object properties from all trees and display multiple home directories—as long as the User object has the same name in each tree. This is useful if a user normally logs in to more than one eDirectory tree.
If you have an iFolder account, you will see an iFolder folder in addition to your mapped drives and home directory, as shown in Figure 10.1. The first time you open the iFolder folder, all you will see is a file called PASSPHRASE.HTM. To access the contents of your iFolder directory, open PASSPHRASE.HTM, as shown in Figure 10.2, and specify the passphrase of your iFolder account.
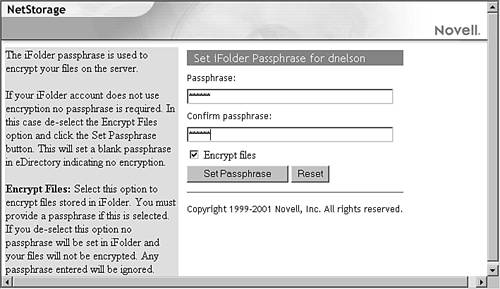
This lets NetStorage decrypt your iFolder files so that it can interpret them properly. The passphrase for NetStorage is stored as an encrypted attribute on your User object, so it is not at risk of discovery.
Once connected to your NetWare files through WebDAV, you have full access to them. You can browse, open, and close folders; copy files to your local drive; and open files with WebDAV-compliant applications such as Web browsers, Microsoft Office 2000, and so on.
In addition, if you use Microsoft Windows Web folders, you can use all the normal Windows mechanisms for copying, cutting, pasting, and renaming files. To perform similar actions from a browser interface, click the Down arrow next to the file or folder with which you want to work.
If you need to use a file with a non-WebDAV application, you will need to copy the file to your local drive so that the application can use normal operating system mechanisms for working with the file. This is the only real drawback to NetStorage: It does not provide low-level integration with the operating system, such as creating a drive letter that lets applications access the files as if they were local.
Novell helps you resolve this issue for Windows workstations with NetDrive, which is described in the next section. The trade-off is having full access to network files as if they were local versus having a clientless solution for accessing your network files.
Novell NetDrive lets you to map a network drive to any NetWare 6.5 server without using Novell client software. This means that with NetDrive, you can access and modify your files from any workstation using just an Internet connection. Once a network drive is mapped, the drive letter that you assigned during the mapping appears in Windows Explorer and functions just like those that are mapped through Novell client. Basically, the capability to map drives has been extracted from the Novell client where it can be used independent of all the other Novell client features. For more information on the Novell client, see Chapter 2.
NetDrive runs on any Windows workstation, including Windows 95/98/Me and Windows XP/2000/NT. You need only 2MB of available space on your hard drive to install and run the NetDrive client.
WARNING
If you are installing the NetDrive client on a Windows 95 workstation, make sure you have installed the Winsock 2 update from Microsoft. It is available on the Microsoft Web site.
NetDrive supports three protocols for accessing network files:
![]() WebDAV: NetDrive integrates with NetStorage to provide a comprehensive file-access solution with very little client overhead. NetStorage must be installed and configured prior to using NetDrive with WebDAV.
WebDAV: NetDrive integrates with NetStorage to provide a comprehensive file-access solution with very little client overhead. NetStorage must be installed and configured prior to using NetDrive with WebDAV.
![]() FTP: NetDrive can access network files using the standard File Transfer Protocol (FTP). An FTP server must be installed and configured on your network before using NetDrive with FTP. You can use the NetWare FTP server, described earlier in this chapter, to provide this type of access.
FTP: NetDrive can access network files using the standard File Transfer Protocol (FTP). An FTP server must be installed and configured on your network before using NetDrive with FTP. You can use the NetWare FTP server, described earlier in this chapter, to provide this type of access.
![]() iFolder: NetDrive can access files from your directory on the iFolder server. iFolder must be installed, and your iFolder account configured, prior to using NetDrive with iFolder.
iFolder: NetDrive can access files from your directory on the iFolder server. iFolder must be installed, and your iFolder account configured, prior to using NetDrive with iFolder.
The choice of protocol depends largely on your network environment. One is not preferable to another. Use the protocol that best fits your network strategy.
The NetDrive client is available on the Novell client’s CD-ROM. To install the NetDrive client, complete the following steps:
1. Insert the Novell client’s CD-ROM. The CD-ROM will auto-play and present you with the Novell Client Installation menu. If the CD-ROM does not auto-play, run WINSETUP.EXE from the root of the CD-ROM.
2. At the Client Installation screen, select Novell NetDrive Client 4.1.
3. Select the language for the installation and click OK.
4. At the Welcome screen, click Next. At the License Agreement screen, click Yes.
5. At the Destination Location screen, specify the location where the NetDrive client should be installed and click Next.
After your workstation reboots, you are ready to use NetDrive to access your files over the network.
With the NetDrive client installed, you can access files on your NetWare 6.5 servers using standard Internet protocols. However, not every protocol is supported on every version of Windows.
![]() iFolder: Windows NT and 2000
iFolder: Windows NT and 2000
![]() FTP: Windows 95, 98, Me, NT, and 2000
FTP: Windows 95, 98, Me, NT, and 2000
![]() WebDAV (HTTP): Windows 95, 98, Me, NT, and 2000
WebDAV (HTTP): Windows 95, 98, Me, NT, and 2000
![]() Secure WebDAV (SSL): Windows NT and 2000
Secure WebDAV (SSL): Windows NT and 2000
The NetDrive installation inserts an icon in the Windows system tray (lower-right corner of the Explorer window). To configure NetDrive and begin using it to access your network files, complete the following steps:
1. Click the NetDrive icon in the system tray.
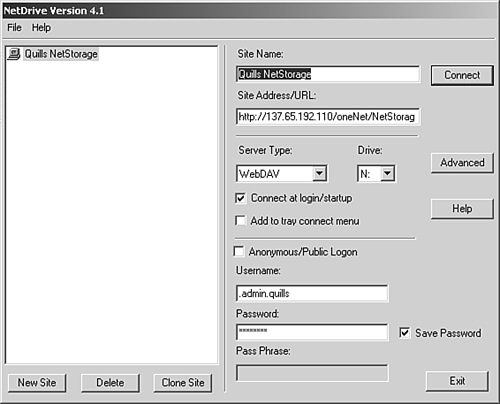
2. From the main NetDrive window, as shown in Figure 10.3, you can create new sites, map network drives, and configure and manage the Web sites to which you have mapped drives.
Each of these functions is discussed in the following sections.
This makes a NetWare 6.5 site available to NetDrive so that drive mapping can take place. To add a site to NetDrive, complete the following steps:
1. In the main NetDrive window, click New Site.
2. At the Add New Site screen, enter the requested information, and click Finish.
![]() Name for your new site: Enter a descriptive name for the new NetDrive site.
Name for your new site: Enter a descriptive name for the new NetDrive site.
![]() Address/URL: For an FTP connection, specify the DNS name or IP address of your FTP server (
Address/URL: For an FTP connection, specify the DNS name or IP address of your FTP server (ftp://ftp.quills.com/files). For a WebDAV connection, specify the DNS name or IP address of the server where NetStorage is installed, along with the NetStorage access path (http://ormserv2.quills.com/oneNet/NetStorage). For iFolder, specify the DNS name or IP address of your iFolder service (http://ifolder.quills.com). If you omit the FTP or HTTP prefix, NetDrive defaults to FTP. If you want to use a nonstandard HTTP port, make sure you append it to the end of the URL.
NOTE
If you want to connect with WebDAV and SSL encryption, remember to specify the HTTPS prefix as part of the URL.
Once you have created a site, the name of the new site and the URL of the NetWare 6.5 server are listed in the main NetDrive window. The rest of the page defaults to common connection options for the file protocol you have chosen (refer to Figure 10.3). However, you can change any of this information after the fact:
![]() Server Type: Specify the protocol that you will use to access this site.
Server Type: Specify the protocol that you will use to access this site.
![]() Drive: Specify the drive letter that you want to use for the mapped drive.
Drive: Specify the drive letter that you want to use for the mapped drive.
![]() Connect at Login/Startup: Check this box to have NetDrive map its drive automatically when your workstation starts.
Connect at Login/Startup: Check this box to have NetDrive map its drive automatically when your workstation starts.
![]() Add Tray Connect Menu: If you right-click the NetDrive icon in the system tray, you will see a Connect To option. Check this box to add the site to those listed in the Connect To menu.
Add Tray Connect Menu: If you right-click the NetDrive icon in the system tray, you will see a Connect To option. Check this box to add the site to those listed in the Connect To menu.
![]() Anonymous/Public Logon: Check this box to bypass user authentication for an FTP connection. Both WebDAV and iFolder access require specific user authentication. Leave this box unchecked if you want to require authentication in order to access the site. If you do this, you will have to enter a valid username and password.
Anonymous/Public Logon: Check this box to bypass user authentication for an FTP connection. Both WebDAV and iFolder access require specific user authentication. Leave this box unchecked if you want to require authentication in order to access the site. If you do this, you will have to enter a valid username and password.
![]() (Conditional) Passphrase: If you are connecting to an iFolder server, enter a passphrase. This is used to encrypt your files as they are transferred over the Internet. iFolder is discussed later in this chapter.
(Conditional) Passphrase: If you are connecting to an iFolder server, enter a passphrase. This is used to encrypt your files as they are transferred over the Internet. iFolder is discussed later in this chapter.
![]() Save Password: Check this box if you want NetDrive to remember your authentication password.
Save Password: Check this box if you want NetDrive to remember your authentication password.
Click the Advanced button to set optional download, caching, and file-locking parameters for the NetDrive site. You won’t normally have to do anything in the Advanced area.
When you are finished configuring site properties, click Connect to actually map the drive. When NetDrive maps the drive, Windows opens a new window corresponding to the drive letter that you have just mapped.
Once NetDrive has successfully mapped a drive to the site, the Monitor window appears. It provides you with connection status, file transfer statistics, and a connection log. With the newly mapped drive, you can copy, cut, and paste files as you would in any other Windows drive.
TIP
If you have problems viewing the mapped directory or connecting to a server using FTP, specify the server IP address instead of the URL. You might also need to enable passive mode if the problem does not go away. Click Advanced and select PASV–Passive Mode. Then try connecting to the Web server again.
For more information on the advanced options available with NetDrive, see the NetWare 6.5 online documentation.
Novell iFolder gives you automatic, secure, and transparent synchronization of files between your hard drive and the iFolder server, which results in easy access to personal files anywhere, anytime.
Being able to access your files from any computer, in any location, eliminates mistakes and the updating that is frequently necessary when your local files are not accessible over the network.
There are three components to Novell iFolder:
![]() iFolder server software: Once you have installed the iFolder server software on your server, users can install the iFolder client in order to access their iFolder files. Administrators use the iFolder Management console and the iFolder Web site to manage iFolder user accounts.
iFolder server software: Once you have installed the iFolder server software on your server, users can install the iFolder client in order to access their iFolder files. Administrators use the iFolder Management console and the iFolder Web site to manage iFolder user accounts.
NOTE
The iFolder Management console lets you perform administrative tasks for all iFolder user accounts. From the iFolder Web site, iFolder users download the iFolder client. It is also where you can access the Java applet and view your iFolder files from a browser. The iFolder Web site can, and should, be customized to fit the look, and feel of your organization.
![]() iFolder client software: Novell iFolder client is compatible with Windows 95/98/Me and Windows XP/2000/NT workstations. The iFolder client must be installed on every workstation that you will use to access your iFolder files. When the iFolder client is installed, it does three things:
iFolder client software: Novell iFolder client is compatible with Windows 95/98/Me and Windows XP/2000/NT workstations. The iFolder client must be installed on every workstation that you will use to access your iFolder files. When the iFolder client is installed, it does three things:
![]() It creates a shortcut to your iFolder directory on your desktop. The iFolder directory, which by default is located in
It creates a shortcut to your iFolder directory on your desktop. The iFolder directory, which by default is located in My DocumentsiFolderuseridHome, is where you will keep the files you want to synchronize with the iFolder server. When a file is placed in the iFolder directory, it is synchronized out to the iFolder server, from which it can be accessed by all workstations that are logged in to your iFolder account.
![]() An iFolder icon is placed in the workstation system tray. Right-clicking the system tray icon gives users access to their user-configurable preferences and the iFolder status screen, which displays a history of the transactions that have occurred between the iFolder server and the client.
An iFolder icon is placed in the workstation system tray. Right-clicking the system tray icon gives users access to their user-configurable preferences and the iFolder status screen, which displays a history of the transactions that have occurred between the iFolder server and the client.
![]() A user account is created on the iFolder server. iFolder user accounts are created automatically when a user downloads and installs the iFolder client. When you log in, iFolder asks you for a username and a password. Next, iFolder prompts you for a passphrase. This passphrase is used to encrypt files that are uploaded to the server.
A user account is created on the iFolder server. iFolder user accounts are created automatically when a user downloads and installs the iFolder client. When you log in, iFolder asks you for a username and a password. Next, iFolder prompts you for a passphrase. This passphrase is used to encrypt files that are uploaded to the server.
NOTE
Uninstalling the iFolder client does not delete the associated user account on the iFolder server. This can be done only from the iFolder Management console.
![]() iFolder Java applet: Use the iFolder Java applet to access iFolder files from a workstation on which the iFolder client is not installed.
iFolder Java applet: Use the iFolder Java applet to access iFolder files from a workstation on which the iFolder client is not installed.
Remember the following prerequisites when you are installing iFolder:
![]() iFolder requires Internet Explorer 5.0 or 5.5 to be installed on every workstation where you are installing the iFolder client.
iFolder requires Internet Explorer 5.0 or 5.5 to be installed on every workstation where you are installing the iFolder client.
![]() You need 10MB of free space on the
You need 10MB of free space on the SYS: volume where you plan to install iFolder.
![]() Novell iFolder is compatible with Windows XP/2000/NT, and 95/98/Me workstations. The iFolder client requires about 2MB of free space on your workstation.
Novell iFolder is compatible with Windows XP/2000/NT, and 95/98/Me workstations. The iFolder client requires about 2MB of free space on your workstation.
Novell iFolder can be installed as part of the NetWare 6.5 server installation, or it can be installed after the fact through either iManager or the graphical server console. To install iFolder with iManager, complete the following steps:
1. Insert the NetWare 6.5 Operating System CD-ROM into your workstation.
2. Launch iManager and open the Install and Upgrade link in the left navigation frame.
3. Select Install NetWare 6.5 Products, and then click Remote Product Install in the right frame.
4. At the Target Server screen, select the server to which you want to install iFolder and click Next. Authenticate as an Admin user for your eDirectory tree and click OK.
5. At the Components screen, click Clear All and select only Novell iFolder Storage Services. Click Next.
6. At the Summary screen, click Copy Files. You will be prompted to insert the NetWare 6.5 product’s CD-ROM.
7. At the iFolder Server Options screen, as shown in Figure 10.4, provide the required information and click Next.
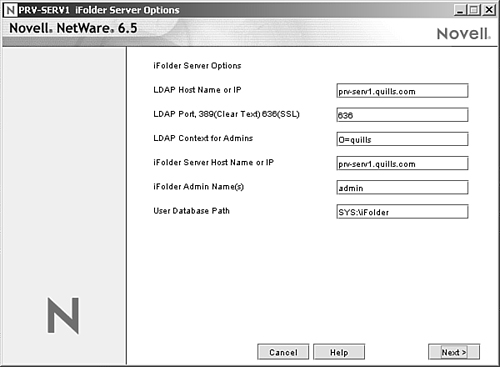
![]() LDAP Hostname or IP: Enter the hostname or IP address of the eDirectory server that will authenticate your iFolder users. This server must have a replica of your eDirectory root partition.
LDAP Hostname or IP: Enter the hostname or IP address of the eDirectory server that will authenticate your iFolder users. This server must have a replica of your eDirectory root partition.
![]() LDAP Port: Enter the LDAP port you want to use. Use the default LDAP port (
LDAP Port: Enter the LDAP port you want to use. Use the default LDAP port (389) for unencrypted communications or port 636 for SSL-encrypted communications. If you use port 389, make sure that your LDAP environment allows clear text passwords. Similarly, if you use port 636, make sure that your LDAP server is configured to support SSL.
TIP
Unencrypted LDAP communications (port 389) is a good choice if iFolder and LDAP are running on the same server, and no LDAP communications have to cross the network. For more information on LDAP configuration, see Chapter 5, “Novell eDirectory Management.”
![]() LDAP Context for Admins: Specify the context for all Admin users who need rights to modify iFolder user account information.
LDAP Context for Admins: Specify the context for all Admin users who need rights to modify iFolder user account information.
![]() iFolder server Hostname or IP:Specify the domain name or IP address of the server on which iFolder services will be running.
iFolder server Hostname or IP:Specify the domain name or IP address of the server on which iFolder services will be running.
![]() iFolder Admin name(s): Specify the User objects that will act as iFolder administrators. Separate multiple names with semicolons, but no spaces.
iFolder Admin name(s): Specify the User objects that will act as iFolder administrators. Separate multiple names with semicolons, but no spaces.
![]() User Database Path: Enter the path to the directory where you want the iFolder user data to be stored on the iFolder server.
User Database Path: Enter the path to the directory where you want the iFolder user data to be stored on the iFolder server.
At the Installation Complete screen, click Close to complete the installation of iFolder.
The first time the iFolder client is installed, a user account is automatically created on your iFolder server. In addition to the default iFolder Web site, another Web site is available for performing server management.
Once iFolder is installed, you can access the iFolder Management console through the following URL: https://<ifolder server DNS or IP address>/iFolderServer/Admin. For example:
https://prv-serv1.quills.com/iFolderServer/Admin
The initial view of iFolder Management console shows you the types of tasks you can perform, but you won’t be able to actually do anything until you actually log in via LDAP. Use an administrative user account you specified during the iFolder installation. Once authenticated, you will get a new authenticated view of iFolder Management console that lets you actually perform the various iFolder administrative tasks (see Figure 10.5). There are four types of iFolder management activities:
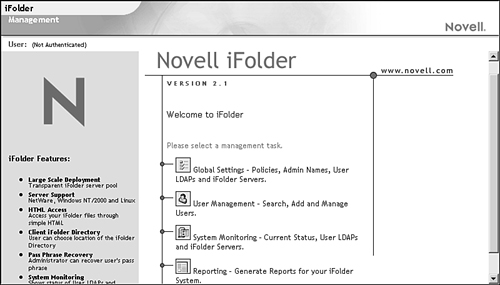
![]() Global settings
Global settings
![]() User management
User management
![]() System monitoring
System monitoring
![]() Reporting
Reporting
When you click the Global Settings button, you will see five links in the left navigation frame (see Figure 10.6):
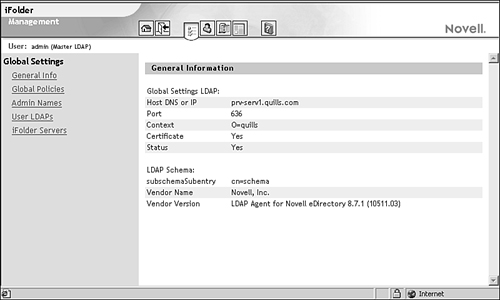
![]() General Info: The General Info link provides basic information about the iFolder server, including DNS name or IP address, port being used, and so on.
General Info: The General Info link provides basic information about the iFolder server, including DNS name or IP address, port being used, and so on.
![]() Global Policies: With the Global Policies page, you can set both server and client policies by clicking the appropriate button. These settings define the default configuration for the iFolder environment.
Global Policies: With the Global Policies page, you can set both server and client policies by clicking the appropriate button. These settings define the default configuration for the iFolder environment.
![]() Admin Names: This page lets you modify the list of Admin objects defined for iFolder. These objects must be located in the Admin context defined during the installation of iFolder.
Admin Names: This page lets you modify the list of Admin objects defined for iFolder. These objects must be located in the Admin context defined during the installation of iFolder.
![]() User LDAPs: The User LDAPs page lets you define the LDAP server that iFolder will use to authenticate users. This is necessary only if your LDAP server and iFolder are not running on the same server.
User LDAPs: The User LDAPs page lets you define the LDAP server that iFolder will use to authenticate users. This is necessary only if your LDAP server and iFolder are not running on the same server.
![]() iFolder Servers: This page lets you add new iFolder servers to the iFolder environment as they are installed.
iFolder Servers: This page lets you add new iFolder servers to the iFolder environment as they are installed.
Use the global settings links to configure the primary characteristics of your iFolder environment.
Before your users can start using iFolder, you have to enable their User objects from the User Management button in the iFolder Server Management console. You can select users individually or in groups. To enable user objects to work with iFolder, complete the following steps:
1. Launch iFolder Server Management and click the User Management button.
2. Click Advanced Search in the left navigation frame.
3. Specify how you want iFolder to search for users and then click Search. You can search by a name, a portion of a name, the context, or even the entire server. Once you perform the search, all user objects located within your defined criteria will be listed (see Figure 10.7).
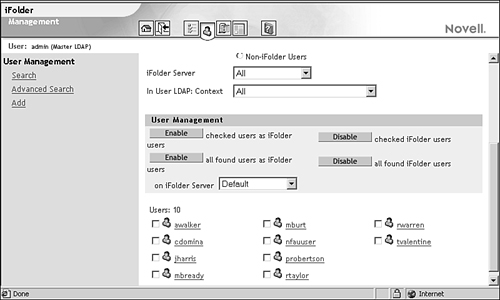
4. Click Enable All Found Users as iFolder Users to allow the User objects that have been found to use iFolder. Alternatively, you can check the boxes next to only those user objects for which you want to provide iFolder access and click Enable Checked Users as iFolder Users.
The System Monitoring button provides a real-time view of the status of your iFolder environment. From this page, you can see a list of all iFolder and LDAP servers in your environment, along with important characteristics of each.
The Reporting button allows you to take the information you can see from System Monitoring and capture it in report format. You can create reports in four categories:
![]() General Information: This report gives you information about the status of your entire iFolder environment.
General Information: This report gives you information about the status of your entire iFolder environment.
![]() iFolder Servers: This report provides configuration information for each iFolder server in your environment.
iFolder Servers: This report provides configuration information for each iFolder server in your environment.
![]() User LDAPs: This report provides configuration information for each LDAP server being used by your iFolder environment for user authentication.
User LDAPs: This report provides configuration information for each LDAP server being used by your iFolder environment for user authentication.
![]() User Accounts: This report provides information about each user object that is using your iFolder environment and how it is making use of iFolder resources.
User Accounts: This report provides information about each user object that is using your iFolder environment and how it is making use of iFolder resources.
You can configure the iFolder reporting environment to fit the needs of your network environment.
Once iFolder is installed and configured on the server and user access has been defined, your users can begin to take advantage of iFolder’s file synchronization capabilities. The first thing iFolder users need to do is install the iFolder client. The iFolder client is available from Web Manager. To install the iFolder client, complete the following steps:
1. From Web Manager, click the iFolder link in the left navigation frame.
2. In the box entitled iFolder Links, select Download iFolder Client.
3. At the File Download screen, choose to either save the client file to disk or run it directly from the server, and then click OK. If you are accessing the server from a remote location, it will probably be faster to download the file prior to installing the iFolder client. If you do this, specify a location for the file. Once the download is complete, execute the file you downloaded.
4. If you get a Security Warning screen from Windows, click Yes.
5. At the Welcome screen, click Next.
6. At the License Agreement Language screen, select the language in which to view the license agreement and click Next. This will open a browser window with the iFolder license agreement. To continue the installation, close the browser window.
7. At the License Agreement screen, click Yes to accept the agreement.
8. At the Destination Location screen, specify the location where you want the iFolder client files to be installed and click Next.
9. At the Installation Complete screen, select Yes, I Want to Restart My Computer Now and click Finish.
10. After your workstation reboots, you will see a Setup Complete message, with instructions on using iFolder. Click Continue to finish the installation.
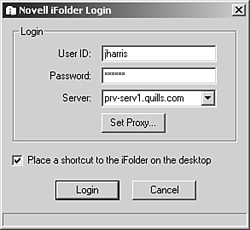
11. The Login screen will be displayed, as shown in Figure 10.8. Specify the required information and click Login. You will provide a username (typically your NetWare username) and password. Typically, the iFolder server information will be provided for you.
12. At the iFolder Location screen, specify the location on your local drive to which your iFolder files will be synchronized and click OK.
13. If you use encryption, provide a passphrase and click OK. The passphrase is used as the cryptographic key to encrypt your files on the iFolder server.
Once you log in, you will see new iFolder icons on your desktop and in the Windows system tray (lower-right corner of the desktop). The desktop icon is a shortcut to your iFolder files. The system tray icon gives you access to iFolder user account information and configuration parameters. To do this, right-click the iFolder icon that appears on the system tray of your workstation. The following major menu options are available:
![]() Logout/login: If currently logged in, the Logout option is displayed, which will log you off of the iFolder server and stop all iFolder synchronization. If currently logged out, the Login option is displayed, which allows you to log in to the iFolder and initiate synchronization activities.
Logout/login: If currently logged in, the Logout option is displayed, which will log you off of the iFolder server and stop all iFolder synchronization. If currently logged out, the Login option is displayed, which allows you to log in to the iFolder and initiate synchronization activities.
![]() Sync Now: Forces synchronization between the workstation and the iFolder server to begin immediately.
Sync Now: Forces synchronization between the workstation and the iFolder server to begin immediately.
![]() Account Information: This option lets you view account settings and synchronization activity, as well as allows you tob set account synchronization preferences. The Account Information screen is shown in Figure 10.9. From the Account Information screen, you can do the following:
Account Information: This option lets you view account settings and synchronization activity, as well as allows you tob set account synchronization preferences. The Account Information screen is shown in Figure 10.9. From the Account Information screen, you can do the following:

![]() Account Information tab: Displays basic account information, including username, iFolder directory location, iFolder servername, account space statistics, and to-be-synchronized statistics.
Account Information tab: Displays basic account information, including username, iFolder directory location, iFolder servername, account space statistics, and to-be-synchronized statistics.
![]() View Activity tab: Lets you view, save, and clear your iFolder account activity log. The log is automatically cleared each time you log in to iFolder.
View Activity tab: Lets you view, save, and clear your iFolder account activity log. The log is automatically cleared each time you log in to iFolder.
![]() Preferences tab: Lets you enable/disable automatic synchronization and define how often files will be synchronized to/from the iFolder server. You can also choose to have the iFolder client remember your iFolder password and passphrase so that you don’t have to type them each time you log in.
Preferences tab: Lets you enable/disable automatic synchronization and define how often files will be synchronized to/from the iFolder server. You can also choose to have the iFolder client remember your iFolder password and passphrase so that you don’t have to type them each time you log in.
![]() Open iFolder: Opens the iFolder directory associated with your iFolder client account. This is equivalent to double-clicking the iFolder icon that is created, by default, on the Windows desktop.
Open iFolder: Opens the iFolder directory associated with your iFolder client account. This is equivalent to double-clicking the iFolder icon that is created, by default, on the Windows desktop.
![]() View Conflict Bin: The conflict bin exists to save files that were deleted or changed during an iFolder synchronization. You can manually review the files in the conflict bin to make sure that the correct version of the file has been synchronized.
View Conflict Bin: The conflict bin exists to save files that were deleted or changed during an iFolder synchronization. You can manually review the files in the conflict bin to make sure that the correct version of the file has been synchronized.
![]() About iFolder: Provides version information for the iFolder client.
About iFolder: Provides version information for the iFolder client.
![]() iFolder Web Site: Selecting this option opens the iFolder Web site associated with your iFolder server. From this page, you can download the iFolder client, view iFolder product information and instructions, and access your iFolder account via a Web browser.
iFolder Web Site: Selecting this option opens the iFolder Web site associated with your iFolder server. From this page, you can download the iFolder client, view iFolder product information and instructions, and access your iFolder account via a Web browser.
![]() Help: Opens the iFolder client help file.
Help: Opens the iFolder client help file.
![]() Exit: This option closes the iFolder client interface, and effectively logs you out of the iFolder server. The icon will disappear from the system tray, so in order to restart the iFolder client, you have to click Start >> Programs >> Novell iFolder >> iFolder Client.
Exit: This option closes the iFolder client interface, and effectively logs you out of the iFolder server. The icon will disappear from the system tray, so in order to restart the iFolder client, you have to click Start >> Programs >> Novell iFolder >> iFolder Client.
As you can see, nearly every feature needed by a user is available through the iFolder icon in the Windows system tray.
iFolder has a browser-based option that eliminates the need for the iFolder client in order to access files in your account on the iFolder server. With iFolder Web access, you can download only the files that you need, as opposed to synchronizing the entire directory. With the iFolder Web access, all you need is Internet access to get to your iFolder account.
To access your iFolder account through a Web browser, complete the following steps:
1. From Web Manager, click the iFolder link in the left navigation frame.
2. In the box entitled iFolder Links, select Open iFolder WebAccess. If a security warning appears, click Yes.
3. Enter your iFolder username, password, and passphrase, and click Connect.
Once logged in, you will see your iFolder files, listed in a directory structure in the browser window, as shown in Figure 10.10. Expand folders by double-clicking them.
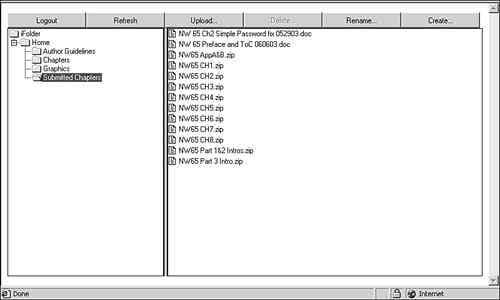
From the browser interface, you can download, upload, delete, create, and rename files. However, after downloading a file, changes will not be synchronized automatically. Make sure you upload files after making changes, so they can be synchronized to all other workstations where you have installed the iFolder client.
Accessing an iFolder server from either NetStorage or NetDrive was described earlier in this chapter in the sections for each of those products. However, the important thing to remember is that you are accessing files on the server only. You don’t get the effects of synchronization between client and server as you do with the iFolder client.
The advantage of this scenario is that you can access files from any workstation without fear of accidentally leaving data on a foreign machine. This might lead some to consider using iFolder without installing the iFolder client. This is a possible solution, but remember that files are not replicated to multiple locations. If the server experienced a problem, or you forget your passphrase, files on the iFolder server could be lost or unrecoverable.
Novell Virtual Office allows network administrators to quickly and easily provide browser-based access to network resources. Effectively, Virtual Office lets you to create personalized user portals through which users can access their data and applications from a single Web site. Not only that, but Virtual Office also provides the capability to create virtual teams, or ad-hoc shared portals that can support a project or any other group that needs access to shared resources.
Virtual Office provides services that allow you to access network resources through the Virtual Office interface. Services are little Java-based servlets or applications that provide access to specific types of network resources. NetWare 6.5 includes several default Virtual Office services for accessing network resources and performing common network tasks:
![]() NetStorage: Provides access to the Novell NetStorage service. NetStorage provides Internet-based access to file storage on a NetWare 6.5 server, including access to iFolder. Both NetStorage and iFolder were discussed earlier in this chapter.
NetStorage: Provides access to the Novell NetStorage service. NetStorage provides Internet-based access to file storage on a NetWare 6.5 server, including access to iFolder. Both NetStorage and iFolder were discussed earlier in this chapter.
![]() iPrint: Provides access to Internet printing via iPrint. For more information on iPrint, see Chapter 7, “NetWare Printing Services.”
iPrint: Provides access to Internet printing via iPrint. For more information on iPrint, see Chapter 7, “NetWare Printing Services.”
![]() Email and calendaring: Provides support for popular email applications and protocols, including Novell GroupWise, Microsoft Exchange, Lotus Notes, Novell Internet Messaging System (NIMS), POP3, and IMAP.
Email and calendaring: Provides support for popular email applications and protocols, including Novell GroupWise, Microsoft Exchange, Lotus Notes, Novell Internet Messaging System (NIMS), POP3, and IMAP.
![]() eGuide: Provides a simplified screen to access phone numbers and other user information stored in eDirectory. For more information on eGuide, see the NetWare 6.5 online documentation.
eGuide: Provides a simplified screen to access phone numbers and other user information stored in eDirectory. For more information on eGuide, see the NetWare 6.5 online documentation.
![]() Password: Links to a page where users can change their password in eDirectory.
Password: Links to a page where users can change their password in eDirectory.
![]() ZENWorks: Provides integration with Novell ZENWorks for Desktops functionality, such as application delivery, through the Virtual Office interface.
ZENWorks: Provides integration with Novell ZENWorks for Desktops functionality, such as application delivery, through the Virtual Office interface.
Perhaps most important to you as a network administrator, Virtual Office doesn’t require any complicated Web development or programming. It’s pretty much ready to go right out of the box.
Virtual Office can be installed as an optional component during the NetWare 6.5 installation or it can be installed later through iManager or the graphical server console.
NOTE
For most networks, you will need to install Virtual Office on only one server in each eDirectory tree.
The only requirement for WebAccess, beyond the minimum requirements for a NetWare 6.5 server, is a browser (Netscape v4.7 or later, or Internet Explorer v5.5 or later). To install Virtual Office using iManager, complete the following steps:
1. Insert the NetWare 6.5 Operating System CD-ROM into your workstation.
2. Launch iManager and open the Install and Upgrade link in the left navigation frame.
3. Select Install NetWare 6.5 Products, and then click Remote Product Install in the right frame.
4. At the Target Server screen, select the server to which you want to install Virtual Office and click Next. Authenticate as an Admin user for your eDirectory tree and click OK.
5. At the components screen, click Clear All and select only Novell Virtual Office. Click Next.
6. At the Summary screen, click Copy Files. You will be prompted to insert the NetWare 6.5 product’s CD-ROM. When the Installation Complete screen appears, click Close.
Once loaded, you can access a default Virtual Office Web page by pointing your browser to the following page: http://<server DNS name or IP address>/vo. For example:
http://wal-serv1.quills.com/vo
This page will include links to all the gadgets you can use from the Virtual Office portal.
There are two aspects to configuring your Virtual Office environment: configuring Virtual Office itself, and configuring Virtual Office services. Most of these tasks are handled through iManager.
To perform the initial configuration of Virtual Office, complete the following steps:
1. Launch iManager and open the Virtual Office Management link.
2. Select Environment Administration (see Figure 10.11).

3. Use each of the tabs provided to configure your general Virtual Office environment:
![]() Team Configuration: Virtual teams let you create virtual ad-hoc groups that can share resources and information through a centralized portal dedicated for that purpose. More information on virtual teams is provided later in this chapter. To configure your virtual team environment, provide the requested information and click Save.
Team Configuration: Virtual teams let you create virtual ad-hoc groups that can share resources and information through a centralized portal dedicated for that purpose. More information on virtual teams is provided later in this chapter. To configure your virtual team environment, provide the requested information and click Save.
![]() Enable Team Creation: Lets you enable virtual team creation. This is enabled by default. When disabled, no virtual team functionality is available.
Enable Team Creation: Lets you enable virtual team creation. This is enabled by default. When disabled, no virtual team functionality is available.
![]() Team File Share: Click Edit to specify the location where virtual team members will be allowed to store shared files. File sharing requires the Native File Access Protocols (NFAP) capabilities of NetWare 6.5 because the location to which virtual team files will be stored must be configured as a CIFS share point. For more information on NFAP and configuring a CIFS share point, see Chapter 2.
Team File Share: Click Edit to specify the location where virtual team members will be allowed to store shared files. File sharing requires the Native File Access Protocols (NFAP) capabilities of NetWare 6.5 because the location to which virtual team files will be stored must be configured as a CIFS share point. For more information on NFAP and configuring a CIFS share point, see Chapter 2.
![]() SMTP Address: Click Edit to specify the IP address or DNS name of your SMTP mail server. This is required if you want Virtual Office to be able to send email notifications to virtual team members.
SMTP Address: Click Edit to specify the IP address or DNS name of your SMTP mail server. This is required if you want Virtual Office to be able to send email notifications to virtual team members.
![]() Chat Server IP Port: Specifies the TCP port that will be used for chat communications for virtual teams.
Chat Server IP Port: Specifies the TCP port that will be used for chat communications for virtual teams.
![]() Manage Team Access: Click Edit to specify those users who have rights to configure virtual teams.
Manage Team Access: Click Edit to specify those users who have rights to configure virtual teams.
![]() Portal Information: This page lets you define how your Virtual Office portal can be used. There are three options on this page:
Portal Information: This page lets you define how your Virtual Office portal can be used. There are three options on this page:
![]() Portal Containers: Sets those contexts from which users can log in and access Virtual Office. Effectively, this restricts the list of potential Virtual Office users to those within the contexts you specify.
Portal Containers: Sets those contexts from which users can log in and access Virtual Office. Effectively, this restricts the list of potential Virtual Office users to those within the contexts you specify.
![]() Portal Locations: If you are running Virtual Office on multiple servers, make sure that all portal addresses are listed here. Remember, you can specify the same storage location for multiple Virtual Office portals.
Portal Locations: If you are running Virtual Office on multiple servers, make sure that all portal addresses are listed here. Remember, you can specify the same storage location for multiple Virtual Office portals.
![]() Teams: Lists all virtual teams that have been created on the selected Virtual Office portal.
Teams: Lists all virtual teams that have been created on the selected Virtual Office portal.
![]() Logging: This page lets you configure the information that will appear in Virtual Office log reports. Virtual Office logs can help you track service usage and diagnose problems. Typically, you won’t use logging because of the overhead that it requires, but it is useful for gathering environment and troubleshooting information.
Logging: This page lets you configure the information that will appear in Virtual Office log reports. Virtual Office logs can help you track service usage and diagnose problems. Typically, you won’t use logging because of the overhead that it requires, but it is useful for gathering environment and troubleshooting information.
![]() Logging: Check this box to enable logging.
Logging: Check this box to enable logging.
![]() Logging Level: Sets the level of logging that will be performed. There are three levels of information you can obtain from the logging report. It’s counter-intuitive, but selecting Low will log all available information, Medium limits logging output, and High restricts log output even more.
Logging Level: Sets the level of logging that will be performed. There are three levels of information you can obtain from the logging report. It’s counter-intuitive, but selecting Low will log all available information, Medium limits logging output, and High restricts log output even more.
![]() Logging Modules: Lets you specify the specific Virtual Office modules that you want to include in the logging. Leave the field blank to log all modules.
Logging Modules: Lets you specify the specific Virtual Office modules that you want to include in the logging. Leave the field blank to log all modules.
![]() Logging to Standard Error: Check this box to log to the defined Standard Error device. By default, this is the Tomcat logger screen.
Logging to Standard Error: Check this box to log to the defined Standard Error device. By default, this is the Tomcat logger screen.
![]() Logging to Standard Out: Check this box to log to the defined Standard Out device. By default, this is the Tomcat logger screen.
Logging to Standard Out: Check this box to log to the defined Standard Out device. By default, this is the Tomcat logger screen.
![]() Logging to File: Check this box to send the log to a file. By default, the log file is
Logging to File: Check this box to send the log to a file. By default, the log file is SYS:TOMCAT4WEBAPPSNPSWEB-INFDEBUG.XML.
Once you have completed the initial configuration of Virtual Office, you can move on to the configuration of the services available through the Virtual Office portal.
There are several default Virtual Office services that ship with NetWare 6.5, but in order to use each you must perform some basic configuration, primarily centered around enabling the service and specifying the location of the service on the network.
NOTE
If you are interested in doing more advanced customization, or in developing your own Virtual Office services, you can use the Novell exteNd development tools for doing this.
Some Virtual Office services are configured through iManager, and others are configured directly from the Virtual Office home page. To configure Virtual Office services from iManager, complete the following steps:
1. Launch iManager and open the Virtual Office Management link.
2. Select Services Administration (see Figure 10.12).

3. Use the eight tabs provided to configure the Virtual Office services. If you uncheck the Enable box on any of these tabs, that service will be removed from your Virtual Office Web page.
![]() Company Info: Use this option to specify the information that will appear in the News field in the Virtual Office Web page. Enter regular text or HTML in the text box to specify the information that should appear in the News field.
Company Info: Use this option to specify the information that will appear in the News field in the Virtual Office Web page. Enter regular text or HTML in the text box to specify the information that should appear in the News field.
![]() NetStorage: You must have NetStorage installed and configured before enabling this service. More information on NetStorage is provided earlier in this chapter. Specify the location of the NetStorage service to be used by Virtual Office. You can run NetStorage from the same server that is running Virtual Office, from a different server, or specify a custom location for the NetStorage service. Unless you are using the default local location for NetStorage, you will have to provide the complete IP or DNS path to the NetStorage service.
NetStorage: You must have NetStorage installed and configured before enabling this service. More information on NetStorage is provided earlier in this chapter. Specify the location of the NetStorage service to be used by Virtual Office. You can run NetStorage from the same server that is running Virtual Office, from a different server, or specify a custom location for the NetStorage service. Unless you are using the default local location for NetStorage, you will have to provide the complete IP or DNS path to the NetStorage service.
![]() iPrint gadget: You must have NDPS and Novell iPrint installed and configured before enabling this service. For more information on iPrint, see Chapter 7. Specify the location of the iPrint service to be used by Virtual Office. You can run iPrint from the same server that is running Virtual Office, from a different server, or specify a custom location for the iPrint service. Unless you are using the default local location for iPrint, you will have to provide the complete IP or DNS path to the iPrint service.
iPrint gadget: You must have NDPS and Novell iPrint installed and configured before enabling this service. For more information on iPrint, see Chapter 7. Specify the location of the iPrint service to be used by Virtual Office. You can run iPrint from the same server that is running Virtual Office, from a different server, or specify a custom location for the iPrint service. Unless you are using the default local location for iPrint, you will have to provide the complete IP or DNS path to the iPrint service.
![]() eGuide gadget: You must have eGuide installed and configured before enabling this service. For more information on eGuide, see the NetWare 6.5 online documentation. Specify the location of the eGuide service to be used by Virtual Office. You can run eGuide from the same server that is running Virtual Office, from a different server, or specify a custom location for the eGuide service. Unless you are using the default local location for eGuide, you will have to provide the complete IP or DNS path to the eGuide service.
eGuide gadget: You must have eGuide installed and configured before enabling this service. For more information on eGuide, see the NetWare 6.5 online documentation. Specify the location of the eGuide service to be used by Virtual Office. You can run eGuide from the same server that is running Virtual Office, from a different server, or specify a custom location for the eGuide service. Unless you are using the default local location for eGuide, you will have to provide the complete IP or DNS path to the eGuide service.
![]() ZENWorks: You must have ZENWorks for Desktops installed and configured before enabling this service. When enabled, certain ZENWorks services can be accessed through Virtual Office, such as application distribution. For more information, see the NetWare 6.5 online documentation.
ZENWorks: You must have ZENWorks for Desktops installed and configured before enabling this service. When enabled, certain ZENWorks services can be accessed through Virtual Office, such as application distribution. For more information, see the NetWare 6.5 online documentation.
![]() Bookmarks: Virtual Office lets you specify Web links that you want to appear on the Virtual Office Navigation bar and/or a User’s Virtual Office Web page. You can only enable/disable this service from iManager. Actual configuration is done directly from the Virtual Office Web page.
Bookmarks: Virtual Office lets you specify Web links that you want to appear on the Virtual Office Navigation bar and/or a User’s Virtual Office Web page. You can only enable/disable this service from iManager. Actual configuration is done directly from the Virtual Office Web page.
![]() Email: You must have an email service installed and configured before enabling this service. There are two steps to making a user’s email available through Virtual Office, as follows. First, you specify the type of email system with which Virtual Office will integrate, and then you click the Edit button next to the server link to specify the type and location (IP or DNS name) of the mail server to which Virtual Office should attach.
Email: You must have an email service installed and configured before enabling this service. There are two steps to making a user’s email available through Virtual Office, as follows. First, you specify the type of email system with which Virtual Office will integrate, and then you click the Edit button next to the server link to specify the type and location (IP or DNS name) of the mail server to which Virtual Office should attach.
![]() Public Web Page: Virtual Office allows individual users to configure personal Web pages that will be accessible through Virtual Office. You can only enable/disable this service from iManager. Actual configuration is done directly from the Virtual Office Web page.
Public Web Page: Virtual Office allows individual users to configure personal Web pages that will be accessible through Virtual Office. You can only enable/disable this service from iManager. Actual configuration is done directly from the Virtual Office Web page.
Virtual Office also permits customization of services directly through the Virtual Office Web page. Users can launch the Virtual Office Web page, which is available at http://<server DNS name or IP address>/vo by default.
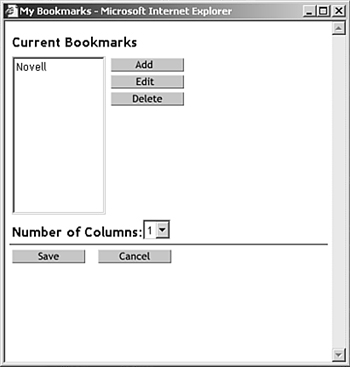
![]() Bookmarks: Click View and Manage My Bookmarks in the Virtual Office, and then click the Personalize link (see Figure 10.13). From this page, you can add, edit, or delete the Web links that will appear on your Virtual Office Web page and/or Menu bar.
Bookmarks: Click View and Manage My Bookmarks in the Virtual Office, and then click the Personalize link (see Figure 10.13). From this page, you can add, edit, or delete the Web links that will appear on your Virtual Office Web page and/or Menu bar.
![]() Change Password: This link lets you reset your user password through Virtual Office.
Change Password: This link lets you reset your user password through Virtual Office.
![]() View and Edit My Webpage: This link lets you specify the personal information that will be presented when a link to your User object is clicked in Virtual Office.
View and Edit My Webpage: This link lets you specify the personal information that will be presented when a link to your User object is clicked in Virtual Office.
A virtual team is an ad-hoc shared portal that can support a project or any other group that needs access to shared resources. To create a virtual team, complete the following steps:
1. Launch the Virtual Office Web page, which is available at http://<server DNS name or IP address>/vo by default.
2. Select Create Virtual Teams in the left navigation bar.
3. Specify a name for the new virtual team and click Create. You can also enter a description for the team you are creating.
Within a virtual team, team members can exchange information, share files, and maintain a calendar of events. Virtual Office lets you create and manage your own virtual teams and/or become a member of teams created by others.
There are certain services that are available only within the context of a virtual team. These special services are designed to enhance communication and productivity between the members of a virtual team. Selecting the Team link in the left navigation frame (see Figure 10.14) will open a Web page from which the team-specific services are available:
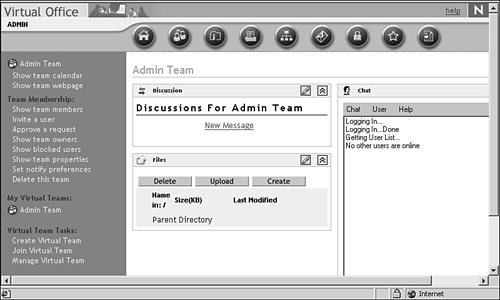
![]() Discussion: Team members can use the Discussion service as a Web log of sorts to capture online discussions, and exchange ideas and messages. The discussion threads are accessible by all members of the team.
Discussion: Team members can use the Discussion service as a Web log of sorts to capture online discussions, and exchange ideas and messages. The discussion threads are accessible by all members of the team.
![]() Files: Team members can use the Files service as a Web-based file-sharing tool. Files can be created, uploaded, deleted, and browsed through this service. The Files service uses the Team File Share location specified during the configuration of Virtual Office, discussed previously.
Files: Team members can use the Files service as a Web-based file-sharing tool. Files can be created, uploaded, deleted, and browsed through this service. The Files service uses the Team File Share location specified during the configuration of Virtual Office, discussed previously.
![]() Chat: Lets members of a virtual team communicate through instant messaging. With the Chat service, you can do instant messaging with the members of your virtual team, but the instant message capabilities have been enhanced so that you can save conversations, invite multiple users to join a single chat session, and indicate when you are not available to chat.
Chat: Lets members of a virtual team communicate through instant messaging. With the Chat service, you can do instant messaging with the members of your virtual team, but the instant message capabilities have been enhanced so that you can save conversations, invite multiple users to join a single chat session, and indicate when you are not available to chat.
![]() Links: The Links service lets you create a list of team-related links that can be shared among team members to facilitate research or collaboration.
Links: The Links service lets you create a list of team-related links that can be shared among team members to facilitate research or collaboration.
In addition to the team-specific services available through the Virtual Team link, there are two other resources available to virtual team members:
![]() Calendar: From the left navigation frame, select Show Team Calendar. From this page, you can schedule team-related events and appointments and share this information with team members.
Calendar: From the left navigation frame, select Show Team Calendar. From this page, you can schedule team-related events and appointments and share this information with team members.
![]() Team Web Site: From the left navigation frame, select Show Team Webpage. The team Web page provides basic information about the virtual team, including its purpose, team members, and lists of published Web links and files that the team wants to make readily available.
Team Web Site: From the left navigation frame, select Show Team Webpage. The team Web page provides basic information about the virtual team, including its purpose, team members, and lists of published Web links and files that the team wants to make readily available.
As the owner of a virtual team, there are several management tasks available to you for configuring and managing your virtual team. Once you have created a virtual team, open the team Web page to perform one or more of the following tasks:
![]() View Team Membership: From the Team Membership column, select Show Team Members, and then click Membership.
View Team Membership: From the Team Membership column, select Show Team Members, and then click Membership.
![]() Invite Someone to Join a Team: From the Team Membership column, select Invite a User, and then click Add. Once invited, a user can choose to accept or reject the invitation.
Invite Someone to Join a Team: From the Team Membership column, select Invite a User, and then click Add. Once invited, a user can choose to accept or reject the invitation.
![]() Accept or Reject a Membership Request: From the Team Membership column, select Approve a Request, and then click Approve or Deny.
Accept or Reject a Membership Request: From the Team Membership column, select Approve a Request, and then click Approve or Deny.
![]() Add Team Owners: From the Team Membership column, select Show Team Owners, and then click Add. Once added, new team owners have the same rights you do, including the capability to remove you as an owner! For this reason, make sure team ownership is handed out carefully.
Add Team Owners: From the Team Membership column, select Show Team Owners, and then click Add. Once added, new team owners have the same rights you do, including the capability to remove you as an owner! For this reason, make sure team ownership is handed out carefully.
![]() Block Users from a Team: From the Team Membership column, select Show Blocked Users, and then click Add. This option lets you manage team membership by exception, rather than having to specify each user who should be a member.
Block Users from a Team: From the Team Membership column, select Show Blocked Users, and then click Add. This option lets you manage team membership by exception, rather than having to specify each user who should be a member.
![]() Edit Team Properties: From the Team Membership column, select Show Team Properties. From this page, you can update the name, description, or services associated with a virtual team.
Edit Team Properties: From the Team Membership column, select Show Team Properties. From this page, you can update the name, description, or services associated with a virtual team.
![]() Set Notify Preferences: From the Team Membership column, select Set Notify Preferences and select each event for which you want team members automatically notified via email.
Set Notify Preferences: From the Team Membership column, select Set Notify Preferences and select each event for which you want team members automatically notified via email.
![]() Delete a Virtual Team: From the Team Membership column, select Delete this Team, and then click Delete twice more. Once a virtual team has served its purpose, you can delete it very easily.
Delete a Virtual Team: From the Team Membership column, select Delete this Team, and then click Delete twice more. Once a virtual team has served its purpose, you can delete it very easily.
As you can see from this list, virtual team owners have several tools at their disposal to manage the operation of the team portal, control access to the team portal, and make sure that usage of the team portal is only for designated purposes.
You must be a member of a virtual team to have access to information and services associated within that virtual team. To request membership in a virtual team, complete the following steps:
1. Launch the Virtual Office Web page, which is available at http://<server DNS name or IP address>/vo by default.
2. Select Join Virtual Team in the left navigation bar.
3. Select the team you want to join from the list of available teams, and click Join.
4. Request membership from the owner of the team and click OK. After the owner approves your request, you become a member of the team and will have access to the virtual team resources.
Any user can request membership to virtual teams, but membership is granted only when approved by the virtual team owner.
NetWare FTP server is based on the standard ARPANET file transfer protocol that runs over TCP/IP and conforms to RFC 959. You can perform file transfers from any FTP client by using the FTP server to log in to the Novell eDirectory tree.
FTP server is a fully functional FTP with many features, such as those in following list. This section provides basic installation and configuration information so you can use FTP file access with NetDrive.
![]() iManager-based management: Use iManager to start and stop FTP server, and configure server, security, user, and log settings. For more information on iManager, see Chapter 3.
iManager-based management: Use iManager to start and stop FTP server, and configure server, security, user, and log settings. For more information on iManager, see Chapter 3.
![]() Run multiple copies of FTP server: Multiple instances of NetWare FTP server software can be loaded on the same NetWare server, providing different FTP services to different sets of users.
Run multiple copies of FTP server: Multiple instances of NetWare FTP server software can be loaded on the same NetWare server, providing different FTP services to different sets of users.
![]() FTP access restrictions: FTP access can be restricted at various levels through comprehensive access rights controls.
FTP access restrictions: FTP access can be restricted at various levels through comprehensive access rights controls.
![]() Intruder detection: Intruder hosts or users who try to log in using an invalid password can be detected and restricted.
Intruder detection: Intruder hosts or users who try to log in using an invalid password can be detected and restricted.
![]() Remote server access: FTP users can navigate and access files from other NetWare servers in the same eDirectory tree, and even from remote IBM servers. Remote servers don’t have to be running an FTP server.
Remote server access: FTP users can navigate and access files from other NetWare servers in the same eDirectory tree, and even from remote IBM servers. Remote servers don’t have to be running an FTP server.
![]() Anonymous user access: Anonymous user accounts can be set up to provide users with basic access to public files.
Anonymous user access: Anonymous user accounts can be set up to provide users with basic access to public files.
![]() Special quote site commands: These are special, NetWare-specific commands used to change or view some NetWare-specific parameters.
Special quote site commands: These are special, NetWare-specific commands used to change or view some NetWare-specific parameters.
![]() Firewall support: If the FTP client is behind a firewall, FTP server supports passive mode data transfer and the configuration of a range of passive data ports.
Firewall support: If the FTP client is behind a firewall, FTP server supports passive mode data transfer and the configuration of a range of passive data ports.
![]() Active sessions display: View details of all active FTP instances in real-time. This includes such information as a list of all instances, details of each instance, all sessions in an instance, and details of individual sessions within an instance.
Active sessions display: View details of all active FTP instances in real-time. This includes such information as a list of all instances, details of each instance, all sessions in an instance, and details of individual sessions within an instance.
![]() Name space support: FTP server supports both DOS and long name spaces. The FTP user can dynamically change the default name space by using one of the quote site commands.
Name space support: FTP server supports both DOS and long name spaces. The FTP user can dynamically change the default name space by using one of the quote site commands.
![]() SNMP error reporting: Simple Network Management Protocol (SNMP) traps are issued when an FTP login request comes from an intruder host or from a node address restricted through Novell eDirectory. SNMP traps can be captured and viewed by any SNMP-compliant management console.
SNMP error reporting: Simple Network Management Protocol (SNMP) traps are issued when an FTP login request comes from an intruder host or from a node address restricted through Novell eDirectory. SNMP traps can be captured and viewed by any SNMP-compliant management console.
![]() FTP logs: The FTP service maintains a log of several activities, including FTP sessions, unsuccessful login attempts, active sessions details, and system error and FTP server-related messages.
FTP logs: The FTP service maintains a log of several activities, including FTP sessions, unsuccessful login attempts, active sessions details, and system error and FTP server-related messages.
![]() Cluster services support: NetWare FTP server can be configured with Novell Cluster Services (NCS) for high availability.
Cluster services support: NetWare FTP server can be configured with Novell Cluster Services (NCS) for high availability.
For detailed information on all FTP server features, see the NetWare 6.5 online documentation.
The FTP server can be installed as an optional component during the NetWare 6.5 installation or it can be installed later through iManager or the graphical server console. To install the FTP server using iManager, complete the following steps:
1. Insert the NetWare 6.5 Operating System CD-ROM into your workstation.
2. Launch iManager and open the Install and Upgrade link in the left navigation frame.
3. Select Install NetWare 6.5 Products, and then click Remote Product Install in the right frame.
4. At the Target Server screen, select the server to which you want to install FTP server and click Next. Authenticate as an Admin user for your eDirectory tree and click OK.
5. At the Components screen, click Clear All and select only NetWare FTP Server. Click Next.
6. At the Summary screen click Copy Files. You will be prompted to insert the NetWare 6.5 product’s CD-ROM.
After the FTP server files are copied, click Close to complete the installation.
Before you start the NetWare FTP server software, you should configure it by setting the configuration parameters in the configuration file. The default configuration file is SYS:/ETC/FTPSERV.CFG. The parameters in this configuration file are commented with their default values.
When the NetWare FTP server is started, the IP address of the host (HOST_IP_ADDR) and the port number of the NetWare FTP server (FTP_PORT), as defined in the configuration file, are used to bind to and listen for FTP client connection requests. If these parameters are not defined in the configuration file, the FTP server binds to all configured network interfaces in the server and uses the standard FTP ports.
Multiple instances of the NetWare FTP server can run on a single machine with different IP addresses or port numbers. The various parameters in the configuration file along with the default values are described in the tables presented later in this chapter.
You can use iManager as an access point for administering the NetWare FTP server. To do so, launch iManager and select File Protocols > FTP in the left navigation frame. The FTP server utility is shown in Figure 10.15.

The FTP server configuration file can be edited manually with any text editor. However, it is much easier to configure and manage FTP server from iManager. iManager also gives you the freedom to manage the FTP server from any network connection and Web browser.
From the FTP Server Administration page, you can start and stop the FTP server as necessary. This loads or unloads NWFTPD.NLM on the NetWare 6.5 server running FTP services. You can also use the Monitor button to view a list of active FTP sessions, with statistics on each.
The server reads the default configuration file SYS:/ETC/FTPSERV.CFG and configures itself accordingly. If there is any change in the FTP configuration file, you should stop and restart the FTP server.
There are four pages of configuration options available to configure and manage FTP server from iManager. Each provides access to specific types of configuration parameters and information, as described in the following sections.
Click the General tab to access general FTP server settings. When finished, click Save to record your settings or click Reset to revert to the previous settings. Table 10.1 lists the available server settings, with a brief description and the equivalent setting in the configuration file.
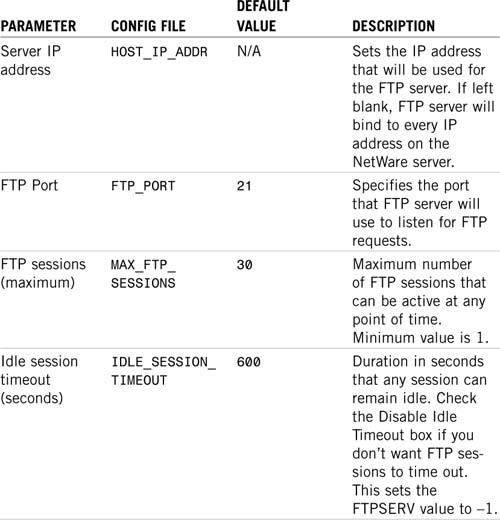
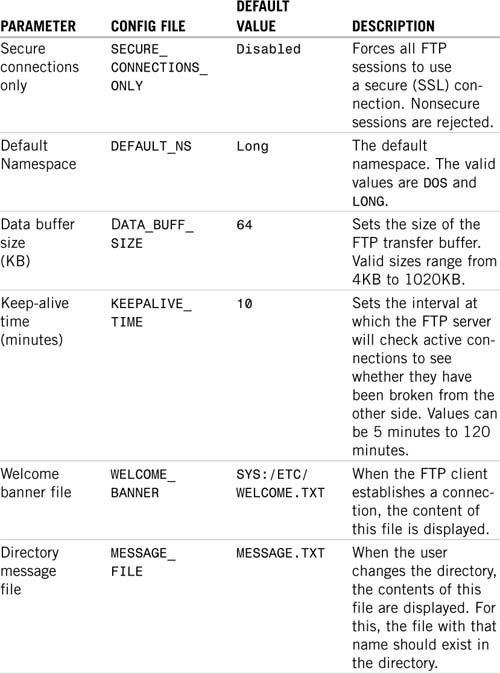

User Settings
Click the User tab to access parameters that control file access and user authentication for FTP server. When finished, click Save to record your settings or click Reset to revert to the previous settings. Table 10.2 lists the available user settings, with a brief description and the equivalent setting in the configuration file.
TABLE 10.2 User Settings in Web Manager
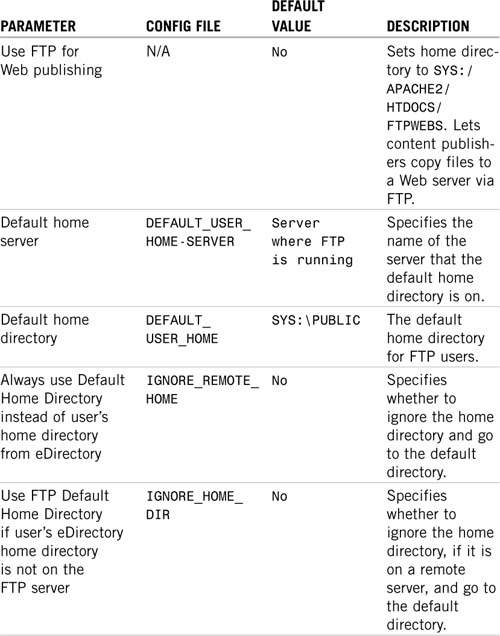
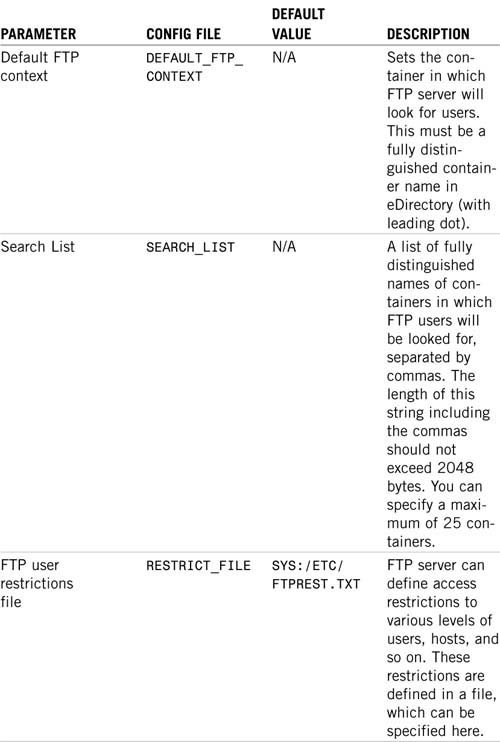

Click the Security tab to access intruder detection parameters for FTP server. When finished, click Save to record your settings or click Reset to revert to the previous settings. Table 10.3 lists the available security settings, with a brief description and the equivalent setting in the configuration file.
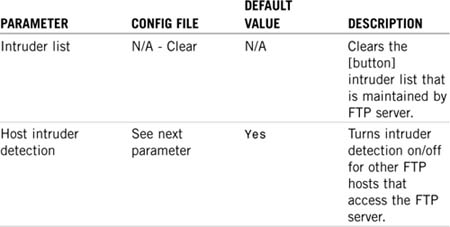

Click the Log tab to access log file parameters for FTP server. All FTP logs are created automatically. You control only the types of messages that are logged and how large the log files will grow. When finished, click Save to record your settings. You can also view current log files by selecting the log you want to see and clicking the View button.
Table 10.4 lists the available log settings, with a brief description and the equivalent setting in the configuration file.
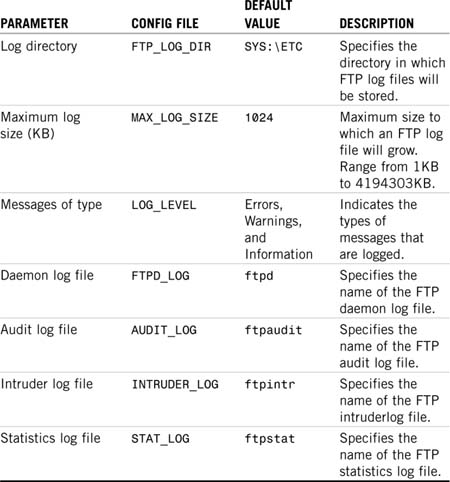
To view any of the log files mentioned in Table 10.4, select it from the Log File drop-down menu and click the View button.
This information will give you an FTP server suitable for use with NetDrive, which was discussed earlier in this chapter. For more information on using an FTP server in more general situations, see the NetWare 6.5 online documentation.