Chapter 11
Objective-C Beyond Mac and iOS
Objective-C is used almost exclusively with Mac and iOS, but it is possible to use Objective-C on other platforms. This chapter discusses how to write and compile Objective-C code on Windows 7 with GNUstep. This chapter also demonstrates Objective-J, a programming language based on Objective-C that is used to make web applications.
In this chapter, you will:
- Install GNUstep on Windows 7
- Write and compile a Hello World Objective-C program on Windows 7
- Download and install the Objective-J and Cappuccino Framework on Mac
- Create a Hello World Objective-J web app for the Safari web browser
11.1 Installing GNUstep on Windows
Problem
You need to install GNUstep on your Windows 7 computer so you can write Objective-C code that will run on a Windows 7 computer.
Solution
Download and install the GNUstep tools, including Foundation and AppKit, on your Windows 7 computer in order to use Objective-C.
How It Works
The purpose of GNUstep is to make Objective-C, Foundation, and AppKit a cross-platform development environment. GNUstep allows you to use the type of code covered in this book on many different systems, including Windows.
But first you need to install GNUstep on your Windows computer. You can do this by going to GNUstep’s Windows Installer page at www.gnustep.org/experience/Windows.html.
You must download and install the following three packages in this order:
- GNUstep MSYS System
- GNUstep Core
- GNUstep Devel
Leave all of the installation settings as the defaults. Upon completion, you will see a new folder on your Windows drive, C:GNUstep. This is where the GNUstep development environment is located.
When you work with GNUstep, you will use a text editor to write code and a command-line Shell (Shell is like the Mac Terminal) to compile code. The text editor can be any program (like Notepad) that can save files as plain text. You can open your Shell window by going to the Windows Start Menu ![]() All Programs
All Programs ![]() GNUstep
GNUstep ![]() Shell.
Shell.
When you open the Shell, you will see a black window with a prompt. You will be located in the home directory of your GNUstep environment (not the Windows root directory). See Figure 11-1 for an example of what the Shell looks like.
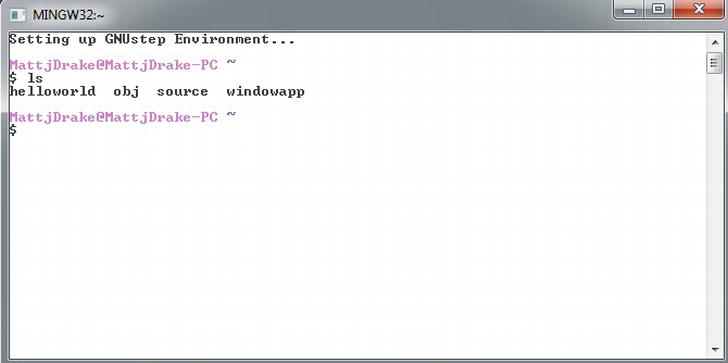
NOTE: Your screen may not list the files you see in Figure 11-1. The ls command will list the files and folders located in the folder you are currently in.
The GNUstep home directory is located at C:GNUstepmsys1.0home[USER-NAME]. Note that [USER-NAME] is your Windows username. This is where you will put the code files that you want to compile.
NOTE: The GNUstep Shell is like a mini Mac, Unix, or Linux command-line utility, so those types of commands will work with the GNUstep Shell. For instance, Figure 11-1 shows the use of the command ls to show a listing of the folders in my GNUstep home directory. You can also use commands like cd to change your current directory and mkdir to make a new directory.
If you can open your GNUstep Shell and have installed all three of the packages from the GNUstep web site, you are ready to move on to the Hello World example shown in Recipe 11.2.
11.2 Objective-C Hello World on Windows
Problem
You want to write and compile a simple Objective-C program on Windows using GNUstep.
Solution
You will need two files to do this on Windows: a text file with the source code and a special text file called a make file. Make files are used to list the settings that compilers need to turn your code into a compiled program.
How It Works
Use a text editor (Notepad is fine) to create a new text file and put this code into the file:
#import <Foundation/Foundation.h>


int main (int argc, const char * argv[]){


         NSAutoreleasePool *pool = [[NSAutoreleasePool alloc] init];


        NSString *helloString = @"Hello World";

        NSLog(@"%@", helloString);


        [pool drain];

        [pool release];


        return 0;

}
This code is very similar to the code you’ve used in previous Hello World Objective-C recipes with one exception. You can see that you are using pre-ARC memory management here. The @autoreleasepool{} block is not supported in GNUstep right now.
Save the file into the GNUstep home directory and make sure to name the file main.m.
NOTE: If you’re using Notepad to edit your text files, take extra care to make sure that Notepad is not appending the txt file extension to your filename. Use the ls command from the GNUstep Shell to see the “real” filename if your Windows file explorer automatically hides file extensions.
Next, you need to write a make file. These files are used by the GNUstep environment to compile your code into a program. Create a new text file and include this text in the file:
include $(GNUSTEP_MAKEFILES)/common.make


TOOL_NAME = main

main_OBJC_FILES = main.m


include $(GNUSTEP_MAKEFILES)/tool.make
The parts of the make file that you will have to change for each program that you want to compile are highlighted in bold. The very first (after TOOL_Name) is the filename that your compiled program will have. This must match the second line (right before the _OBJC_FILES). The last area in bold must match the file name of the file that has the code that you want to compile.
Save the file with the name of GNUmakefile in GNUstep home directory. The file should have no file extension. Open the GNUstep Shell by going to the Windows Start Menu ![]() All Programs
All Programs ![]() GNUstep
GNUstep ![]() Shell. Make sure that you are in the same location as your two files by typing in the
Shell. Make sure that you are in the same location as your two files by typing in the ls command. You should see your two files listed with the file extensions that you expect.
$ ls

GNUmakefile main.m
Now all you have to do is type in the word make and press return. You will see a build log appear in your GNUstep Shell. If there are any errors, they will be reported in here as well. See Figure 11-2 for an example of how this should look.
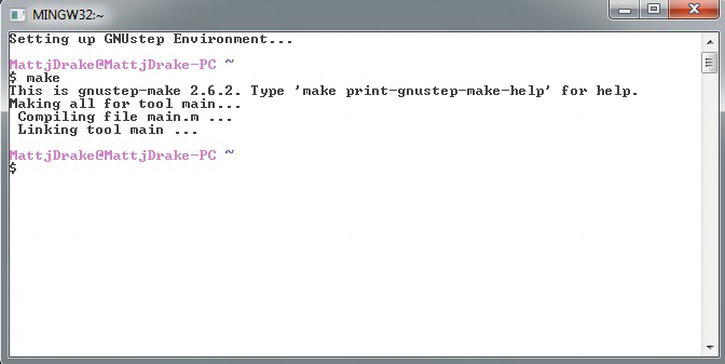
Figure 11-2. Build log from make command
You can test your Objective-C application by typing the name of the program into the GNUstep Shell. The compiled program will be saved in a sub-directory named obj so you will have to type in something like this:
./obj/main
See Figure 11-3 for an example and Listings 11-1 and 11-2 for the code.
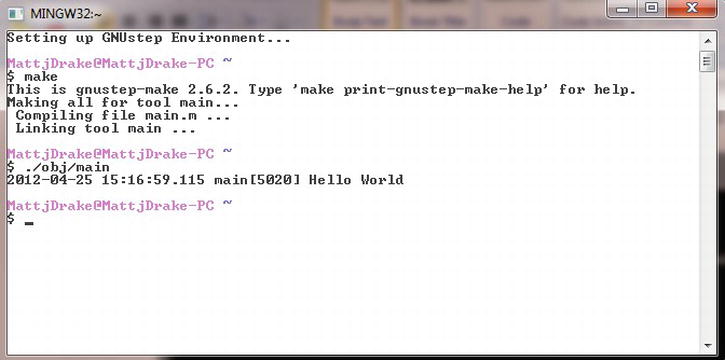
Figure 11-3. GNUstep Hello World output
The Code
Listing 11-1. main.m
#import <Foundation/Foundation.h>


int main (int argc, const char * argv[]){


         NSAutoreleasePool *pool = [[NSAutoreleasePool alloc] init];


        NSString *helloString = @"Hello World";

        NSLog(@"%@", helloString);


        [pool drain];

        [pool release];


        return 0;

}
Listing 11-2. GNUmakefile
include $(GNUSTEP_MAKEFILES)/common.make


TOOL_NAME = main

main_OBJC_FILES = main.m


include $(GNUSTEP_MAKEFILES)/tool.make
Usage
You can use this code as described in the “How It Works” section. You can also try to add some other Objective-C objects to the main.m file to see how they work in your Windows development environment. For example, to see how an array would work, you can change main.m to look like this:
#import <Foundation/Foundation.h>


int main (int argc, const char * argv[]){


         NSAutoreleasePool *pool = [[NSAutoreleasePool alloc] init];


        NSString *helloString = @"Hello World";

        NSLog(@"%@", helloString);


        NSArray *listOfLetters1 = [NSArray arrayWithObjects:@"A", @"B", @"C", nil];

        NSLog(@"listOfLetters1 = %@", listOfLetters1);


        [pool drain];
        [pool release];


        return 0;

}
You would compile this again using the make command from the GNUstep Shell. To see the new results, you can simply open the program by typing ./obj/main again. This will give you output like this:
Hello World

listOfLetters1 = (A, B, C)
You can experiment with other Foundation classes here as well. Keep in mind that even though GNUstep is an open source project and has a goal of supporting all the Foundation components, there are really no guarantees that everything will work as you expect. Obviously, the development environment that you get on Windows is not the same as you are used to with Mac.
GNUstep provides similar functionality as Apple’s Objective-C, but these two things are not identical. If you would like to learn more about this rich framework, go to www.gnustep.org/ to get the current details, tutorials, and documentation.
11.3 Downloading Objective-J for Web Apps
Problem
You want to be able to develop web apps with Objective-J using the same coding patterns used for Mac and iOS apps with Objective-C.
Solution
Download the Starter Package from http://cappuccino.org/download/ to get the frameworks that you need to develop apps using Objective-J.
How It Works
Objective-J brings Objective-C—like code to web apps. Web apps are different than Mac or iOS apps in that they run inside of a browser like Safari. Instead of being deployed to a user’s Mac or iPhone, web apps are deployed to a web server and users get the apps by pointing their browser to the web server. Web apps have been around awhile, but what is neat about Objective-J is that you can use the sophisticated patterns and code used for desktop apps for your web apps. Objective-J was built to closely mimic how Objective-C works and so you will see very similar (but not identical) classes in Objective-J as you do in Objective-C.
The “J” in Objective-J stands for JavaScript, and this underlies the key difference between Objective-J and Objective-C. While Objective-C is an extension of C, Objective-J is an extension of JavaScript (a web app language). You will also see the name “Cappuccino” associated with Objective-J. Cappuccino is the Objective-J equivalent of Objective-C Cocoa. Both words refer to the application frameworks (as opposed to the pure programming languages).
To get started with Objective-J, you will need a text editor like TextEdit on Mac, a web browser like Safari on Mac, and you will need to download the Starter Package from http://cappuccino.org/download/.
The Starter Package comes with a Hello World application already set up. Once you’ve downloaded the Starter Package, just navigate to the folder New Application and open the file named index.html in Safari. You’ll see a web page pop up with the words “Hello World” on a label.
NOTE: This app will not work with Chrome unless you have the Objective-J application deployed to a web server. This is due to Chrome’s security settings.
Usage
In the next recipe, you’ll set up your own Hello World app along with some user controls so you can see how Objective-J is used. When making your own apps, you will generally use the example application provided in the Cappuccino Starter Package as a template.
11.4 Coding a Hello World Objective-J Application
Problem
You want to set up a simple Objective-J application that says Hello World.
Solution
Create a folder for your Objective-J application that includes the Objective-J frameworks that you downloaded with the Starter Package. You will also need these files: Info.plist, index.html, main.j, and AppController.j in the Objective-J application folder.
How It Works
Objective-J applications are not compiled like Objective-C Mac and iOS applications. Instead, you house the files either locally on your desktop while you are developing the application or on a web server when the application is released. When a user points to an Objective-J file, the browser interprets the code in the file and presents the results inside the browser window.
The first thing that you need to make is a new folder named helloworldapp that will house your Objective-J application. You can simply use Finder on the Mac to do this right on your desktop.
NOTE: You can develop these types of applications on any system with any text editor and web browser, but I’ll be using the standard Mac setup for this example.
Next, you need the Objective-J frameworks. Go to the Starter Package that you downloaded in Recipe 11.3 and go into the NewApplication folder and locate the folder labeled Frameworks. Copy the Frameworks folder. Go back into your Objective-J app’s folder and paste the Frameworks folder in.
Info.plist
Now you need an Info.plist file. This file serves the same purpose as the file of the same name does in Mac and iOS applications: it lists parameters that the Objective-J application will need to function.
Add a new text file to your folder named Info.plist and add this code to the file:
<?xml version="1.0" encoding="UTF-8"?>

<plist version="1.0">

<dict>

        <key>CPApplicationDelegateClass</key>

        <string>AppController</string>

</dict>

</plist>
This is XML file that tells the application that the app delegate class name is AppController. This is a simple example. More complicated applications will likely include additional settings in the info.plist file.
index.html
The index.html file is the web page that houses the Objective-J application, so the code will be in HTML. The main purpose of this page is to load up the code files that you are going to set up in the next two files. Like the Info.plist file, add the index.html file to the app’s folder. It should contain this HTML code:
<!DOCTYPE html

    PUBLIC "-//W3C//DTD XHTML 1.0 Strict//EN"

    "http://www.w3.org/TR/xhtml1/DTD/xhtml1-strict.dtd">

<html xmlns="http://www.w3.org/1999/xhtml" xml:lang="en" lang="en">    <head>

        <script type="text/javascript">

            OBJJ_MAIN_FILE = "main.j";

        </script>

        <script type="text/javascript" src="Frameworks/Objective-J/Objective-

J.js"></script>

   <title></title>

   </head>

</html>
This file is doing two major things: specifying the code file where the main Objective-J program is located and pointing to the Objective-J frameworks.
main.j
The main.j file is where the main function is located. This serves the same purpose as the main.m file does in an Objective-C Mac or iOS application, namely main.j launches the application object (which in Objective-J is a CPApplicationMain object).
Create a text file named main.j in your application folder and input this code:
@import <Foundation/Foundation.j>

@import <AppKit/AppKit.j>


@import "AppController.j"


function main(args, namedArgs){

    CPApplicationMain(args, namedArgs);

}
AppController.j
AppController acts as the app delegate for the web app, and like a Mac or iOS application, this is where most of the initial application setup will take place.
NOTE: The app delegate class is specified in the Info.plist file.
Add a text file named AppController.j with this code into your application folder:
@import <Foundation/CPObject.j>


@implementation AppController : CPObject{

}


- (void)applicationDidFinishLaunching:(CPNotification)aNotification{


}


@end
This code probably looks a bit familiar to you since it’s like the app delegate code used in both iOS and Mac applications. In the applicationDidFinishLaunching: method, you put the code that sets up the app user interface.
Add this code to set up an app window and content view:
@import <Foundation/CPObject.j>


@implementation AppController : CPObject{

}


- (void)applicationDidFinishLaunching:(CPNotification)aNotification{


    var theWindow = [[CPWindow alloc] initWithContentRect:CGRectMakeZero()

                                                styleMask:CPBorderlessBridgeWindowMask];


    var contentView = [theWindow contentView];


}


@end
Now that you have a window and view, you can add a label to your web app.
@import <Foundation/CPObject.j>


@implementation AppController : CPObject{

}


- (void)applicationDidFinishLaunching:(CPNotification)aNotification{


    var theWindow = [[CPWindow alloc] initWithContentRect:CGRectMakeZero()

                                                styleMask:CPBorderlessBridgeWindowMask];


    var contentView = [theWindow contentView];


    var label = [[CPTextField alloc] initWithFrame:CGRectMakeZero()];

    [label setStringValue:@"Hello World!"];

    [label setFont:[CPFont boldSystemFontOfSize:24.0]];

    [label sizeToFit];

    [label setCenter:[contentView center]];

    [contentView addSubview:label];


    [theWindow orderFront:self];


}


@end
Use the CPTextField class to create a label here. To display the object, you must add the label to the contentView subview collection with the addSubView: message. This is where you’ll be saying Hello World. You will also notice that you send the orderFront: message to the window. This essentially presents the window in the browser. See Listings 11-3 through 11-6 for the code.
The Code
Listing 11-3. Info.plist
<?xml version="1.0" encoding="UTF-8"?>

<!DOCTYPE plist PUBLIC "-//Apple//DTD PLIST 1.0//EN"

"http://www.apple.com/DTDs/PropertyList-1.0.dtd">

<plist version="1.0"><dict>

        <key>CPApplicationDelegateClass</key>

        <string>AppController</string>

</dict>

</plist>
Listing 11-4. index.html
<!DOCTYPE html

    PUBLIC "-//W3C//DTD XHTML 1.0 Strict//EN"

    "http://www.w3.org/TR/xhtml1/DTD/xhtml1-strict.dtd">

<html xmlns="http://www.w3.org/1999/xhtml" xml:lang="en" lang="en">    <head>

        <script type="text/javascript">

            OBJJ_MAIN_FILE = "main.j";

        </script>

        <script type="text/javascript" src="Frameworks/Objective-J/Objective-

J.js"></script>

    <title></title></head> </html>
Listing 11-5. main.j
@import <Foundation/Foundation.j>

@import <AppKit/AppKit.j>


@import "AppController.j"


function main(args, namedArgs){

    CPApplicationMain(args, namedArgs);

}
Listing 11-6. AppController.j
@import <Foundation/CPObject.j>


@implementation AppController : CPObject{

}


- (void)applicationDidFinishLaunching:(CPNotification)aNotification{


    var theWindow = [[CPWindow alloc] initWithContentRect:CGRectMakeZero()

                                                styleMask:CPBorderlessBridgeWindowMask];
    var contentView = [theWindow contentView];


    var label = [[CPTextField alloc] initWithFrame:CGRectMakeZero()];


    [label setStringValue:@"Hello World!"];

    [label setFont:[CPFont boldSystemFontOfSize:24.0]];

    [label sizeToFit];

    [label setCenter:[contentView center]];


    [contentView addSubview:label];


    [theWindow orderFront:self];

}


@end
Usage
Use this app by opening index.html in the Safari browser. You may use the Safari File menu to open index.html or you can just drag the index.html file into the Safari icon to open the app. You will see the Hello World message presented in your browser window. See Figure 11-4 for an example of what it should look like.

Figure 11-4. Hello World Objective-J application
If you want to deploy an application like this to users, you must provide the entire folder on a web site. Users will just go to your web site to use the application. You can use this app in any modern browser, including Microsoft Internet Explorer. However, if you are using Chrome, you will not be able to test Objective-J programs locally unless you have a web server running locally on your Mac.
Objective-J is a rich platform in its own right and thus can’t be covered in detail here. If you want to learn more about Objective-J, head over to http://cappuccino.org/ to get tutorials and documentation.
11.5 Adding a Button to an Objective-J Application
Problem
You want to add user controls like buttons to your web application.
Solution
Follow the same template that you used for the Hello World application to set up the web app itself. To create a button in your web app, use the CPButton class in the app controller.
How It Works
Set up the web application user controls in the AppController.j file. If there are any controls that you want to keep a reference to, make sure that you declare the object variables outside of a method so that the object variables will stay in scope while the app is active.
Set up the app controller in the file AppController.j.
@import <Foundation/CPObject.j>


@implementation AppController : CPObject{

}


var label;

var contentView;
- (void)applicationDidFinishLaunching:(CPNotification)aNotification{


   var theWindow = [[CPWindow alloc] initWithContentRect:CGRectMakeZero()

styleMask:CPBorderlessBridgeWindowMask];


    contentView = [theWindow contentView];


    var frame = CGRectMake(0, 13.0, 150.0, 24.0);


    label = [[CPTextField alloc] initWithFrame:frame];


    [label setStringValue:@"Press the Button"];

    [label setFont:[CPFont boldSystemFontOfSize:24.0]];

    [label sizeToFit];

    [label setCenter:[contentView center]];

    [contentView addSubview:label];


}


@end
This code is a modified version of the Hello World app in Recipe 11.4. The major difference is that the contentView and label objects are declared outside the function so that they will stay in scope.
To create the button, use the CPButton class and set the button’s properties. CPButton works much like UIButton for iOS, and the pattern of use is about the same. Here is how you add it to applicationDidFinishLaunching: method:
frame = CGRectMake(CGRectGetWidth([contentView bounds])/2.0 - 40,

CGRectGetMaxY([label frame]) + 10, 80, 24)

var button = [[CPButton alloc] initWithFrame: frame];

[button setAutoresizingMask:CPViewMinXMargin |

                            CPViewMaxXMargin |

                            CPViewMinYMargin |

                            CPViewMaxYMargin];

[button setTitle:"Make Gray"];

[button setTarget:self];

[button setAction:@selector(changeBackground:)];

[contentView addSubview:button];
This follows the target-action design pattern. You can see that the app controller here is the target and the action is called changeBackground:.
Here’s the code for changeBackground: method to change the background color of the app and add content to the label:
- (void)changeBackground:(id)aSender{

    var c = [CPColor lightGrayColor];
    [contentView setBackgroundColor:c];

    [label setStringValue:@"Color Changed!"];

}
That’s all you need to do to add a button to this web app! See Listing 11-7 for the code.
The Code
Listing 11-7. AppController.j
@import <Foundation/CPObject.j>


@implementation AppController : CPObject{


}


var label;


var contentView;


- (void)applicationDidFinishLaunching:(CPNotification)aNotification{


     var theWindow = [[CPWindow alloc] initWithContentRect:CGRectMakeZero()


styleMask:CPBorderlessBridgeWindowMask];


     contentView = [theWindow contentView];


     var frame = CGRectMake(0, 13.0, 150.0, 24.0);


     label = [[CPTextField alloc] initWithFrame:frame];


      [label setStringValue:@"Press the Button"];


      [label setFont:[CPFont boldSystemFontOfSize:24.0]];


      [label sizeToFit];


      [label setCenter:[contentView center]];


      [contentView addSubview:label];


     frame = CGRectMake(CGRectGetWidth([contentView bounds])/2.0 - 40,


CGRectGetMaxY([label frame]) + 10, 80, 24);


     var button = [[CPButton alloc] initWithFrame: frame];


      [button setAutoresizingMask:CPViewMinXMargin |
                                    CPViewMaxXMargin |


                                    CPViewMinYMargin |


                                    CPViewMaxYMargin];


      [button setTitle:"Make Gray"];


      [button setTarget:self];


      [button setAction:@selector(changeBackground:)];


      [contentView addSubview:button];


      [theWindow orderFront:self];


}


- (void)changeBackground:(id)aSender{


     var c = [CPColor lightGrayColor];


      [contentView setBackgroundColor:c];


      [label setStringValue:@"Color Changed!"];


}


@end
Usage
To use this app, re-use the template that you set up with the Hello World example in Recipe 11.4. Replace the code in the file AppController.j with the code from Listing 11.7.
Run this app by opening index.html in the Safari web browser. You may use the Safari File menu to open index.html file or you can just drag index.html into the Safari icon to open the app. You will see a button and a label in the browser window. Click the button and see how the label content changes and the background color turns to light gray.