Chapter 21: Performance Optimization
With the help of the Odoo framework, you can develop large and complex applications. Good performance is key to the success of any project. In this chapter, we will explore the patterns and tools you need to optimize performance. You will also learn about the debugging techniques used to find the root cause of a performance issue.
In this chapter, we will cover the following recipes:
- The prefetching pattern for recordsets
- The in-memory cache – ormcache
- Generating differently sized images
- Accessing grouped data
- Creating or writing multiple records
- Accessing records through database queries
- Profiling Python code
The prefetching pattern for recordsets
When you access data from a recordset, it makes a query in the database. If you have a recordset with multiple records, fetching records on it can make a system slow because of the multiple SQL queries. In this recipe, we will explore how you can use the prefetching pattern to solve this issue. By following the prefetching pattern, you can reduce the number of queries needed, which will improve performance and make your system faster.
How to do it…
Take a look at the following code; it is a normal compute method. In this method, self is a recordset of multiple records. When you iterate directly on the recordset, prefetching works perfectly:
# Correct prefetching
def compute_method(self):
for rec in self:
print(rec.name)
But in some cases, prefetching becomes more complex, such as when fetching data with the browse method. In the following example, we browse records one by one in the for loop. This will not use prefetching efficiently and it will execute more queries than usual:
# Incorrect prefetching
def some_action(self):
record_ids = []
self.env.cr.execute("some query to fetch record id")
for rec in self.env.cr.fetchall():
record = self.env['res.partner'].browse(rec[0])
print(record.name)
By passing a list of IDs to the browse method, you can create a recordset of multiple records. If you perform operations on this recordset, prefetching works perfectly fine:
# Correct prefetching
def some_action(self):
record_ids = []
self.env.cr.execute("some query to fetch record id")
record_ids = [ rec[0] for rec in self.env.cr.fetchall() ]
recordset = self.env['res.partner'].browse(record_ids)
for record_id in recordset:
print(record.name)
This way, you will not lose the prefetching feature and data will be fetched in a single SQL query.
How it works...
When you are working with multiple recordsets, prefetching helps reduce the number of SQL queries. It does this by fetching all of the data at once. Usually, prefetching works automatically in Odoo, but you lose this feature in certain circumstances, such as when you split records as depicted in the following example:
recs = [r for r in recordset r.id not in [1,2,4,10]]
The preceding code given will split the recordset into parts, and so you cannot take advantage of prefetching.
Using prefetching correctly can significantly improve the performance of the Object-Relational Mapping (ORM). Let's explore how prefetching works under the hood. When you iterate on a recordset through a for loop and access the value of a field in the first iteration, the prefetching process starts its magic. Instead of fetching data for the current record in the iteration, prefetching will fetch the data for all of the records. The logic behind this is that if you are accessing a field in a for loop, you are likely to fetch that data for the next record in the iteration as well. In the first iteration of the for loop, prefetching will fetch the data for all of the recordsets and keep it in the cache. In the next iteration of the for loop, data will be served from this cache, instead of making a new SQL query. This will reduce the query count from O(n) to O(1).
Let's suppose the recordset has 10 records. When you are in the first loop and access the name field of the record, it will fetch the data for all 10 records. This is not only the case for the name field; it will also fetch all the fields for those 10 records. In the subsequent for loop iterations, the data will be served from the cache. This will reduce the number of queries from 10 to 1:
for record in recordset: # recordset with 10 records
record.name # Prefetch data of all 10 records in the first loop
record.email # data of email will be served from the cache.
Note that the prefetching will fetch the value of all of the fields (except the *2many fields) even if those fields are not used in the body of the for loop. This is because the extra columns only have a minor impact on performance compared to the extra queries for each column.
Note
Sometimes, prefetched fields could reduce performance. In these cases, you can disable prefetching by passing False into the prefetch_fields context, as follows: recordset.with_context(prefetch_fields=False).
The prefetch mechanism uses the environment cache to store and retrieve record values. This means that once the records are fetched from the database, all subsequent calls for fields will be served from the environment cache. You can access the environment cache using the env.cache attribute. To invalidate the cache, you can use the invalidate_cache() method of the environment.
There's more...
If you split recordsets, the ORM will generate a new recordset with a new prefetch context. Performing operations on such recordsets will only prefetch the data for the respective records. If you want to prefetch all the records after prefetch, you can do this by passing the prefetch record IDs to the with_prefetch() method. In the following example, we split the recordset into two parts. Here, we passed a common prefetch context in both recordsets, so when you fetch the data from one of them, the ORM will fetch the data for the other and put the data in the cache for future use:
recordset = ... # assume recordset has 10 records.
recordset1 = recordset[:5].with_prefetch(recordset._ids)
recordset2 = recordset[5:].with_prefetch(recordset._ids)
The prefetch context is not limited to splitting recordsets. You can also use the with_prefetch() method to have a common prefetch context between multiple recordsets. This means that when you fetch data from one record, it will fetch data for all other recordsets too.
The in-memory cache – ormcache
The Odoo framework provides the ormcache decorator to manage the in-memory cache. In this recipe, we will explore how you can manage the cache for your functions.
How to do it...
The classes of this ORM cache are available at /odoo/tools/cache.py. In order to use these in any file, you will need to import them as follows:
from odoo import tools
After importing the classes, you can use the ORM cache decorators. Odoo provides different types of in-memory cache decorator. We'll take a look at each of these in the following sections.
ormcache
This one is the simplest and most-used cache decorator. You need to pass the parameter name upon which the method's output depends. The following is an example method with the ormcache decorator:
@tools.ormcache('mode')
def fetch_mode_data(self, mode):
# some calculations
return result
When you call this method for the first time, it will be executed, and the result will be returned. ormcache will store this result based on the value of the mode parameter. When you call the method again with the same mode value, the result will be served from the cache without executing the actual method.
Sometimes, your method's result depends on the environment attributes. In these cases, you can declare the method as follows:
@tools.ormcache('self.env.uid', 'mode')
def fetch_data(self, mode):
# some calculations
return result
The method given in this example will store the cache based on the environment user and the value of the mode parameter.
ormcache_context
This cache works similarly to ormcache, except that it depends on the parameters plus the value in the context. In this cache's decorator, you need to pass the parameter name and a list of context keys. For example, if your method's output depends on the lang and website_id keys in the context, you can use ormcache_context:
@tools.ormcache_context('mode', keys=('website_id','lang'))
def fetch_data(self, mode):
# some calculations
return result
The cache in the preceding example will depend on the mode argument and the values of context.
ormcache_multi
Some methods carry out an operation on multiple records or IDs. If you want to add a cache on these kinds of method, you can use the ormcache_multi decorator. You need to pass the multi parameter, and during the method call, the ORM will generate the cache keys by iterating on this parameter. In this method, you will need to return the result in dictionary format with an element of the multi parameter as a key. Take a look at the following example:
@tools.ormcache_multi('mode', multi='ids')
def fetch_data(self, mode, ids):
result = {}
for i in ids:
data = ... # some calculation based on ids
result[i] = data
return result
Suppose we called the preceding method with [1,2,3] as the IDs. The method will return a result in {1:... , 2:..., 3:... } format. The ORM will cache the result based on these keys. If you make another call with [1,2,3,4,5] as the IDs, your method will receive [4, 5] as the ID parameter, so the method will carry out the operations for the 4 and 5 IDs and the rest of the result will be served from the cache.
How it works...
The ORM cache keeps the cache in dictionary format (the cache lookup). The keys of this cache will be generated based on the signature of the decorated method and the values will be the result. Put simply, when you call the method with the x, y parameters and the result of the method is x+y, the cache lookup will be {(x, y): x+y}. This means that the next time you call this method with the same parameters, the result will be served directly from this cache. This saves computation time and makes the response faster.
The ORM cache is an in-memory cache, so it is stored in RAM and occupies memory. Do not use ormcache to serve large data, such as images or files.
Warning
Methods using this decorator should never return a recordset. If you do this, they will generate psycopg2.OperationalError because the underlying cursor of the recordset is closed.
You should use the ORM cache on pure functions. A pure function is a method that always returns the same result for the same arguments. The output of these methods only depends on the arguments, and so they return the same result. If this is not the case, you need to manually clear the cache when you perform operations that make the cache's state invalid. To clear the cache, call the clear_caches() method:
self.env[model_name].clear_caches()
Once you have cleared the cache, the next call to the method will execute the method and store the result in the cache, and all subsequent method calls with the same parameter will be served from the cache.
There's more...
The ORM cache is the Least Recently Used (LRU) cache, meaning that if a key in the cache is not used frequently, it will be removed. If you don't use the ORM cache properly, it might do more harm than good. For instance, if the argument passed in a method is always different, then each time Odoo will look in the cache first and then call the method to compute. If you want to learn how your cache is performing, you can pass the SIGUSR1 signal to the Odoo process:
kill -SIGUSR1 496
Here, 496 is the process ID. After executing the command, you will see the status of the ORM cache in the logs:
> 2020-11-08 09:22:49,350 496 INFO book-db-14 odoo.tools.cache: 1 entries, 31 hit, 1 miss, 0 err, 96.9% ratio, for ir.actions.act_window._existing
> 2020-11-08 09:22:49,350 496 INFO book-db-14 odoo.tools.cache: 1 entries, 1 hit, 1 miss, 0 err, 50.0% ratio, for ir.actions.actions.get_bindings
> 2020-11-08 09:22:49,350 496 INFO book-db-14 odoo.tools.cache: 4 entries, 1 hit, 9 miss, 0 err, 10.0% ratio, for ir.config_parameter._get_param
The percentage in the cache is the hit-to-miss ratio. It's the success ratio of the result being found in the cache. If the cache's hit-to-miss ratio is too low, you should remove the ORM cache from the method.
Generating differently sized images
Large images can be troublesome for any website. They increase the size of web pages and consequently make them slower as a result. This leads to bad SEO rankings and visitor loss. In this recipe, we will explore how you can create images of different sizes; by using the right images, you can reduce the web page size and improve the page loading time.
How to do it...
You will need to inherit image.mixin in your model. Here is how you can add image.mixin to your model:
class LibraryBook(models.Model):
_name = 'library.book'
_description = 'Library Book'
_inherit = ['image.mixin']
The mixin will automatically add five new fields to the books model to store images of different sizes. See the How it works… section to learn about all five fields.
How it works...
The image.mixin instance will automatically add five new binary fields to the model. Each field stores image with a different resolution. Here is a list of the fields and their resolutions:
- image_1920: 1,920x1,920
- image_1024: 1,024x1,024
- image_512: 512x1,512
- image_256: 256x256
- image_128: 128x128
Of all the fields given here, only image_1920 is editable. The other image fields are read-only and update automatically when you change the image_1920 field. So, in the backend form view of your model, you need to use the image_1920 field to allow the user to upload images. But by doing so, we are loading large image_1920 images in the form view. However, there is a way to improve performance by using image_1920 images in the form view but displaying smaller images. For instance, we can utilize the image_1920 field but display an image_128 field. To do this, you can use the following syntax:
<field name="image_1920" widget="image"
options="{'preview_image': 'image_128'}" />
Once you have saved the image to the field, Odoo will automatically resize the image and store it to the respective field. The form view will display the converted image_128 as we use it as preview_image.
Note
The image.mixin model is AbstractModel, so its table is not present in the database. You need to inherit it in your model in order to use it.
With this image.mixin, you can store an image with a maximum resolution of 1,920x1,920. If you save an image with a resolution higher than 1,920x1,920, Odoo will reduce it to 1,920x1,920. While doing so, Odoo will also preserve the resolution of the image, avoiding any distortion. As an example, if you upload the image with a 2,400x1,600 resolution, the image_1920 field will have a resolution of 1,920x1,280.
There's more...
With image.mixin, you can get images with certain resolutions, but what if you want to use an image with another resolution? To do so, you can use a binary wrapper field image, as in the following example:
image_1500 = fields.Image("Image 1500", max_width=1500, max_height=1500)
This will create a new image_1500 field, and storing the image will resize it to 1,500x1,500 resolution. Note that this is not part of image.mixin. It just reduces the image to 1,500x1,500, so you need to add this field in the form view; editing it will not make changes to the other image fields in image.mixin. If you want to link it with an existing image.mixin field, add the related="image_1920" attribute in the field definition.
Accessing grouped data
When you want data for statistics, you often need it in a grouped form, such as a monthly sales report, or a report that shows sales per customer. It is time-consuming to search records and group them manually. In this recipe, we will explore how you can use the read_group() method to access grouped data.
How to do it...
Perform the following steps:
Note
The read_group() method is widely used for statistics and smart stat buttons.
- Let's assume that you want to show the number of sales orders on the partner form. This can be done by searching sales orders for a customer and then counting the length:
# in res.partner model
so_count = fields.Integer(compute='_compute_so_count', string='Sale order count')
def _compute_so_count(self):
sale_orders = self.env['sale.order'].search(domain=[('partner_id', 'in', self.ids)])
for partner in self:
partner.so_count = len(sale_orders.filtered(lambda so: so.partner_id.id == partner.id))
The previous example will work, but not optimally. When you display the so_count field on the tree view, it will fetch and filter sales orders for all the partners in a list. With this small amount of data, the read_group() method won't make much difference, but as the amount of data grows, it could be a problem. To fix this issue, you can use the read_group method.
- The following example will do the same as the preceding one, but it only consumes one SQL query, even for large datasets:
# in res.partner model
so_count = fields.Integer(compute='_compute_so_count', string='Sale order count')
def _compute_so_count(self):
sale_data = self.env['sale.order'].read_group(
domain=[('partner_id', 'in', self.ids)],
fields=['partner_id'], groupby=['partner_id'])
mapped_data = dict([(m['partner_id'][0], m['partner_id_count']) for m in sale_data])
for partner in self:
partner.so_count = mapped_data[partner.id]
The previous code snippet is optimized as it obtains the sales order count directly via SQL's GROUP BY feature.
How it works...
The read_group() method internally uses the GROUP BY feature of SQL. This makes the read_group method faster, even if you have large datasets. Internally, the Odoo web client uses this method in the charts and the grouped tree view. You can tweak the behavior of the read_group method by using different arguments.
Let's explore the signature of the read_group method:
def read_group(self, domain, fields, groupby, offset=0, limit=None, orderby=False, lazy=True):
The different parameters available for the read_group method are as follows:
- domain: This is used to filter records. This will be the search criteria for the read_group method.
- fields: This is a list of the fields to fetch with the grouping. Note that the fields mentioned here should be in the groupby parameter, unless you use some aggregate functions. The read_group method supports the SQL aggregate functions. Let's say you want to get the average order amount per customer. In this case, you can use read_group as follows:
self.env['sale.order'].read_group([], ['partner_id', 'amount_total:avg'], ['partner_id'])
If you want to access the same field twice but with a different aggregate function, the syntax is a little different. You need to pass the field name as alias:agg(field_name). This example will give you the total and average number of orders per customer:
self.env['sale.order'].read_group([], ['partner_id', 'total:sum(amount_total)', 'avg_total:avg(amount_total)'], ['partner_id'])
- groupby: This parameter will be a list of fields by which the records are grouped. It lets you group records based on multiple fields. To do this, you will need to pass a list of fields. For example, if you want to group the sales orders by customer and order state, you can pass ['partner_id ', 'state'] in this parameter.
- offset: This parameter is used for pagination. If you want to skip a few records, you can use this parameter.
- limit: This parameter is used for pagination; it indicates the maximum number of records to fetch.
- lazy: This parameter accepts Boolean values. By default, its value is True. If this parameter is True, the results are grouped only by the first field in the groupby parameter. You will get the remaining groupby parameters and the domain in the __context and __domain keys in the result. If the value of this parameter is set to False, it will group the data by all fields in the groupby parameter.
There's more...
Grouping by date fields can be complicated because it is possible to group records based on days, weeks, quarters, months, or years. You can change the grouping behavior of the date field by passing groupby_function after : in the groupby parameter. If you want to group the monthly total of the sales orders, you can use the read_group method:
self.env['sale.order'].read_group([], ['total:sum(amount_total)'], ['order_date:month'])
Possible options for date grouping are day, week, month, quarter, and year.
See also
Refer to the documentation if you want to learn more about PostgreSQL aggregate functions: https://www.postgresql.org/docs/current/functions-aggregate.html.
Creating or writing multiple records
If you are new to Odoo development, you might execute multiple queries to write or create multiple records. In this recipe, we will look at how to create and write records in batches.
How to do it...
Creating multiple records and writing on multiple records works differently for each, under the hood. Let's see each of these records one by one.
Creating multiple records
Odoo supports creating records in batches. If you are creating a single record, simply pass a dictionary with the field values. To create records in a batch, you just need to pass a list of these dictionaries instead of a single dictionary. The following example creates three book records in a single create call:
vals = [{
'name': "Book1",
'date_release': '2018/12/12',
}, {
'name': "Book2",
'date_release': '2018/12/12',
}, {
'name': "Book3",
'date_release': '2018/12/12',
}]
self.env['library.book'].create(vals)
The code snippet will create the records for three new books.
Writing on multiple records
If you are working on multiple versions of Odoo, you should be conscious of how the write method works under the hood. As of version 13, Odoo handles write differently. It uses a delayed approach for updates, which means that it does not write data in the database immediately. Odoo writes the data to the database only when necessary or when flush() is called.
Here are two examples of the write method:
# Example 1
data = {...}
for record in recordset:
record.write(data)
# Example 2
data = {...}
recordset.write(data)
If you are using Odoo v13 or above, then there will not be any issues regarding performance. However, if you are using an older version, the second example will be much faster than the first one because the first example will execute a SQL query in each iteration.
How it works...
In order to create multiple records in a batch, you need to pass value dictionaries in the form of a list to create new records. This will automatically manage batch-creating the records. When you create records in a batch, internally doing so will insert a query for each record. This means that creating records in a batch is not done in a single query. This doesn't mean, however, that creating records in batches does not improve performance. The performance gain is achieved through batch-calculating computing fields.
Things work differently for the write method. Most things are handled automatically by the framework. For instance, if you write the same data on all records, the database will be updated with only one UPDATE query. The framework will even handle it if you update the same record again and again in the same transaction, as follows:
recordset.name= 'Admin'
recordset.email= '[email protected]'
recordset.name= 'Administrator'
recordset.email= '[email protected]'
In the previous code snippet, only one query will be executed for write with final values of name=Administrator and [email protected]. This does not have a bad impact on performance as the assigned values are in the cache and written in later in a single query.
Things are different if you are using the flush() method in between, as shown in the following example:
recordset.name= 'Admin'
recordset.email= '[email protected]'
recordset.flush()
recordset.name= 'Administrator'
recordset.email= '[email protected]'
The flush() method updates the values from the cache to the database. So, in the previous example, two UPDATE queries will be executed; one with data before the flush and a second query with data after the flush.
There's more...
The delayed update is only for Odoo version 13, and if you are using an older version, then writing a single value will execute the UPDATE query immediately. Check the following examples to explore the correct usage of the write operation for an older version of Odoo:
# incorrect usage
recordset.name= 'Admin'
recordset.email= '[email protected]'
# correct usage
recordset.write({'name': 'Admin', 'email'= '[email protected]'})
Here, in the first example, we have two UPDATE queries, while the second example will only take one UPDATE query.
Accessing records through database queries
The Odoo ORM has limited methods, and sometimes it is difficult to fetch certain data from the ORM. In these cases, you can fetch data in the desired format, and you need to perform an operation on the data to get a certain result. Due to this, it becomes slower. To handle these special cases, you can execute SQL queries in the database. In this recipe, we will explore how you can run SQL queries from Odoo.
How to do it...
You can perform database queries using the self._cr.execute method:
- Add the following code:
self.flush()
self._cr.execute("SELECT id, name, date_release FROM library_book WHERE name ilike %s", ('%odoo%',))
data = self._cr.fetchall()
print(data)
Output:
[(7, 'Odoo basics', datetime.date(2018, 2, 15)), (8, 'Odoo 11 Development Cookbook', datetime.date(2018, 2, 15)), (1, 'Odoo 12 Development Cookbook', datetime.date(2019, 2, 13))]
- The result of the query will be in the form of a list of tuples. The data in the tuples will be in the same sequence as the fields in the query. If you want to fetch data in dictionary format, you can use the dictfetchall() method. Take a look at the following example:
self.flush()
self._cr.execute("SELECT id, name, date_release FROM library_book WHERE name ilike %s", ('%odoo%',))
data = self._cr.dictfetchall()
print(data)
Output:
[{'id': 7, 'name': 'Odoo basics', 'date_release': datetime.date(2018, 2, 15)}, {'id': 8, 'name': 'Odoo 11 Development Cookbook', 'date_release': datetime.date(2018, 2, 15)}, {'id': 1, 'name': 'Odoo 12 Development Cookbook', 'date_release': datetime.date(2019, 2, 13)}]
If you want to fetch only a single record, you can use the fetchone() and dictfetchone() methods. These methods work like fetchall() and dictfetchall(), but they only return a single record, and you need to call the fetchone() and dictfetchone() methods multiple times if you want to fetch multiple records.
How it works...
There are two ways to access the database cursor from the recordset: one is from the recordset itself, such as self._cr, and the other is from the environment, in particular, self.env.cr. This cursor is used to execute database queries. In the preceding example, we saw how you can fetch data through raw queries. The table name is the name of the model after replacing . with _, so the library.book model becomes library_book.
If you have noticed, we have used self.flush() before executing a query. The reason behind this is that Odoo uses cache excessively and the database might not have the correct values. self.flush() will push all the delayed updates to the database and conduct all the dependent computations as well, and you will get correct values from the database. The flush() method also supports a few parameters that help you control what is being flushed in the database. The parameters are as follows:
- The fname parameter needs a list of fields that you want to flush to the database.
- The records parameter needs a recordset, and it is used if you want to flush certain records only.
If you are executing INSERT or UPDATE queries, you will also need to execute flush() after executing the query because the ORM might not be aware of the change you made and it might have cached records.
You need to consider a few things before you execute raw queries. Only use raw queries when you have no other choice. By executing raw queries, you are bypassing the ORM layers. You are therefore also bypassing security rules and the ORM's performance advantages. Sometimes, wrongly built queries can introduce SQL injection vulnerabilities. Consider the following example, in which the queries could allow an attacker to perform SQL injection:
# very bad, SQL injection possible
self.env.cr.execute('SELECT id, name FROM library_book WHERE name ilike + search_keyword + ';')
# good
self.env.cr.execute('SELECT id, name FROM library_book WHERE name ilike %s ';', (search_keyword,))
Don't use the string format function either; it will also allow an attacker to perform SQL injection. Using SQL queries makes your code harder to read and understand for other developers, so avoid using them wherever possible.
Information
A lot of Odoo developers believe that executing SQL queries makes operations faster as it bypasses the ORM layer. This is not completely true, however; it depends on the case. In most operations, the ORM performs better and faster than RAW queries, because data is served from the recordset cache.
There's more...
Operations done in one transaction are only committed at the end of the transaction. If an error occurs in the ORM, the transaction is rolled back. If you have made an INSERT or UPDATE query and you want to make it permanent, you can use self._cr.commit() to commit the changes.
Note
Note that using commit() can be dangerous because it can put records in an inconsistent state. An error in the ORM can cause incomplete rollbacks, so only use commit() if you are completely sure of what you're doing.
If you are using the commit() method, then there's no need to use flush() afterward. The commit() method flushes the environment internally.
Profiling Python code
Sometimes, you will be unable to pinpoint the cause of an issue. This is especially true of performance issues. Odoo provides some built-in profiling tools that help you find the real cause of an issue.
How to do it...
Perform the following steps to do this recipe:
- Odoo's profiler is available at odoo/tools/profiler.py. In order to use the profiler in your code, import it into the file:
from odoo.tools.profiler import profile
- After importing it, you can use the profile decorator on the methods. To profile a particular method, you need to add the profile decorator to it. Take a look at the following example. We put the profile decorator in the make_available method:
@profile
def make_available(self):
if self.state != 'lost':
self.write({'state': 'available'})
return True
- So, when this method is called, it will print the full statistics in the logs:
calls queries ms
library.book ------------------------ /Users/pga/odoo/test/my_library/models/library_book.py, 24
1 0 0.01 @profile
def make_available(self):
1 3 12.81 if self.state != 'lost':
1 7 20.55 self.write({'state': 'available'})
1 0 0.01 return True
Total:
1 10 33.39
How it works...
After adding the profile decorator on your method, when you call that method, Odoo will print the full statistics in the log, as shown in the previous example. It will print the statistics in three columns. The first column will contain the number of calls or how many times a line is executed. (This number will increase when the line is inside a for loop or the method is recursive.) The second column represents the number of queries fired with the given line. The last column is the time taken by the given line in milliseconds. Note that the time displayed in this column is relative; it is faster when the profiler is off.
The profiler decorator accepts some optional arguments, which help you to get detailed statistics of the method. The following is the signature of the profile decorator:
def profile(method=None, whitelist=None, blacklist=(None,), files=None,
minimum_time=0, minimum_queries=0):
The following is a list of parameters supported by the profile() method:
- whitelist: This parameter will accept a list of model names to display in the log.
- files: This parameter will accept a list of filenames to display.
- blacklist: This parameter will accept a list of model names that you do not want to display in the log.
- minimum_time: This will accept an integer value (in milliseconds). It will hide logs whose total time is less than the given amount.
- minimum_queries: This will accept an integer value of the number of queries. It will hide the logs whose total number of queries is less than the given amount.
There's more...
One further type of profiler that is available in Odoo generates a graph for the executed method. This profiler is available in the misc package, so you need to import it from there. It will generate a file with statistics data that will generate a graph file. To use this profiler, you need to pass the file path as an argument. When this function is called, it will generate a file at the given location. Take a look at the following example, which generates the make_available.prof file on the desktop:
from odoo.tools.misc import profile
...
@profile('/Users/parth/Desktop/make_available.profile')
def make_available(self):
if self.state != 'lost':
self.write({'state': 'available'})
self.env['res.partner'].create({'name': 'test', 'email': '[email protected]'})
return True
When the make_available method is called, it will generate a file on the desktop. To convert this data into graph data, you will need to install the gprof2dot tool and then execute the following command to generate the graph:
gprof2dot -f pstats -o /Users/parth/Desktop/prof.xdot /Users/parth/Desktop/make_available.profile
This command will generate the prof.xdot file on the desktop. Then, you can display the graph with xdot with the following command:
xdot /Users/parth/Desktop/prof.xdot
The preceding xdot command will generate the graph shown in the following figure:
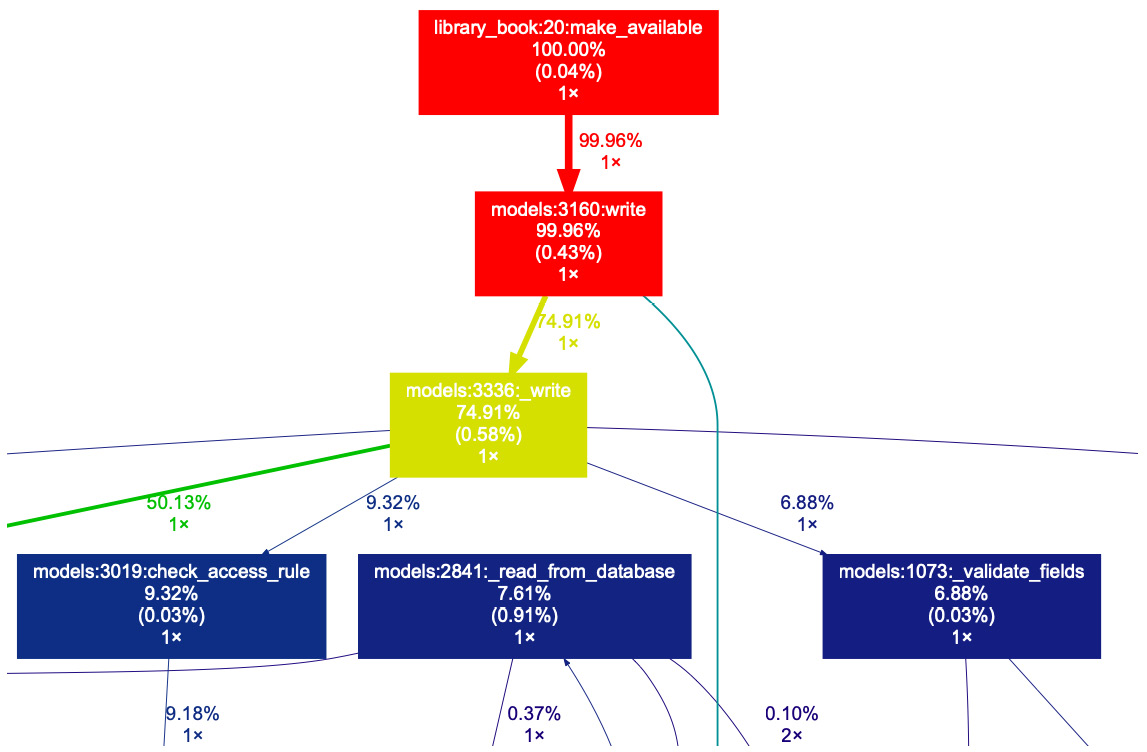
Figure 21.1 – Graph to check execution times
Here, you can zoom in, check the call stack, and look at details of the execution times for the methods.