
Chapter 10: Security Access
In most cases, Odoo is used by multi-user organizations. In every organization, each user has different roles, and they have different access based on their role. For example, the HR manager does not have access to the company's accounting information. With access rights and record rules, you can specify which information the user can access in Odoo. In this chapter, we will learn how to specify access rights rules and record rules.
Such compartmentalization of access and security requires that we provide access to roles as per their permission levels. We will learn about this in this chapter.
In this chapter, we will cover the following recipes:
- Creating security groups and assigning them to users
- Adding security access to models
- Limiting access to fields in models
- Limiting record access using record rules
- Using security groups to activate features
- Accessing recordsets as a superuser
- Hiding view elements and menus based on groups
In order to concisely get the point across, the recipes in this chapter make small additions to an example existing module.
Technical requirements
The technical requirements for this chapter include using the module that we created by following the recipes in Chapter 3, Creating Odoo Add-On Modules. To follow the examples here, you should have that module created and ready to use.
All the code that will be used in this chapter can be downloaded from this book's GitHub repository at https://github.com/PacktPublishing/Odoo-14-Development-Cookbook-Fourth-Edition/tree/master/Chapter10.
Creating security groups and assigning them to users
Security access in Odoo is configured through security groups: permissions are given to groups and then groups are assigned to users. Each functional area has base security groups provided by a central application.
When add-on modules extend an existing application, they should add permissions to the corresponding groups, as shown in the Adding security access to models recipe later.
When add-on modules add a new functional area not yet covered by an existing central application, they should add the corresponding security groups. Usually, we should have at least user and manager roles.
Taking the Library example we introduced in Chapter 3, Creating Odoo Add-On Modules, it doesn't fit neatly into any of the Odoo core apps, so we will add security groups for it.
Getting ready
This recipe assumes that you have an Odoo instance ready with my_library available, as described in Chapter 3, Creating Odoo Add-On Modules.
How to do it...
To add new access security groups to a module, perform the following steps:
- Ensure that the __manifest__.py add-on module manifest has the category key defined:
'category': 'Library',
- Add the new security/groups.xml file to the manifest data key:
'data': [
'security/groups.xml',
'views/library_book.xml',
],
- Add the new XML file for the data records to the security/library_security.xml file, starting with an empty structure:
<?xml version="1.0" encoding="utf-8"?>
<odoo>
<!-- Add step 4 goes here -->
</odoo>
- Add the <record> tags for the two new groups inside the data XML element:
<record id="group_library_user" model="res.groups">
<field name="name">User</field>
<field name="category_id"
ref="base.module_category_library"/>
<field name="implied_ids"
eval="[(4, ref('base.group_user'))]"/>
</record>
<record id="group_library_librarian" model="res.groups">
<field name="name">Librarians</field>
<field name="category_id"
ref="base.module_category_library"/>
<field name="implied_ids"
eval="[(4, ref('group_library_user'))]"/>
<field name="users" eval="[(4, ref('base.user_admin'))]"/> </record>
If we upgrade the add-on module, these two records will be loaded. To see these groups in the UI, you need to activate developer mode. You'll then be able to see them through the Settings | Users | Groups menu option, like so:

Figure 10.1 – Newly added security groups
Important Information
If you are adding a new model, the admin user doesn't get access rights for that model. This means that the menus and views that have been added for that model are not visible to the admin user. In order to display it, you need to add access rules for that model, which we will do in the Adding security access to models recipe. By the way, you can access newly added models through the superuser; to learn more about this, please refer to the Accessing Odoo as a superuser recipe in Chapter 3, Creating Odoo Add-On Modules.
How it works...
Add-on modules are organized into functional areas, or major applications, such as Accounting and Finance, Sales, or Human Resources. These are defined by the category key in the manifest file.
If a category name does not exist yet, it will be automatically created. For convenience, a base.module_category_<category_name_in_manifest> XML ID will also be generated for the new category name in lowercase letters, replacing the spaces with underscores. This is useful for relating security groups to application categories.
In our example, we used the Library category name in the manifest, and it generated a base.module_category_library XML identifier.
By convention, data files that contain security-related elements should be placed inside a security subdirectory.
You also need to register security files in a manifest file. The order in which files are declared in the data key of the module manifest is important, since you can't use a reference of security groups in other views or ACL files before the group has been defined. It's best to place the security data file at the top of the list before the ACL files and the other user interface data files.
In our example, we created groups with the <record> tag, which will create a record of the res.groups model. The most important columns of the res.group model are as follows:
- name: This is the group's display name.
- category_id: This is a reference to the application category and is used to organize the groups in the user's form.
- implied_ids: These are other groups to inherit permissions from.
- users: This is the list of users that belong to this group. In new add-on modules, we usually want the admin user to belong to the application's manager group.
The first security group uses implied_ids as the base.group_user group. This is the Employee user group and is the basic security group all the backend users are expected to share.
The second security group sets a value on the users field to assign it to the administrator user, which has the base.user_admin XML ID.
Users that belong to a security group will automatically belong to its implied groups. For example, if you assign a Librarians group to any user, that user will also be included in the User group. This is because the Librarians group has the User group in its implied_ids column.
Also, access permissions granted by security groups are cumulative. A user has permission if any of the groups they belong to (directly or implied) grant that permission.
Some security groups are shown in the user form as a selection box instead of individual check boxes. This happens when the involved groups are in the same application category and are linearly interrelated through implied_ids. For example, Group A has implied Group B, and Group B has implied Group C. If a group is not related to any other groups through implied_ids, instead of a selection box, you will see a checkbox.
Note
Note that the relationships that were defined in the preceding fields also have reverse relationships that can be edited in the related models, such as security groups and users.
Setting values on reference fields, such as category_id and implied_ids, is done using the related records' XML IDs and some special syntax. This syntax was explained in detail in Chapter 6, Managing Module Data.
There's more...
The special base.group_no_one security group called Extra Rights is also noteworthy. In previous Odoo versions, it was used for advanced features hidden by default, and was only made visible when the Technical Features flag was activated. From version 9.0, this has changed, and the features are visible as long as Developer Mode is active.
Access permissions granted by security groups are cumulative only. There is no way to deny access given by a group. This means that a manually created group used to customize permissions should inherit from the closest group with fewer permissions than those intended (if any), and then add all the remaining permissions needed.
Groups also have these additional fields available:
- Menus (the menu_access field): These are the menu items the group has access to.
- Views (the view_access field): These are the UI views the group has access to.
- Access rights (the model_access field): This is the access it has to models, as detailed in the Adding security access to models recipe.
- Rules (the rule_groups field): These are the record-level access rules that apply to the group, as detailed in the Limiting record access using record rules recipe.
- Notes (the comment field): This is a description or commented piece of text for the group.
In this recipe, we have learned to how create security groups and assign them from the GUI. In the next few recipes, we will use these groups to create an access control list and record rules.
See also
To learn how to access newly added models through the superuser, please refer to the Accessing Odoo as a superuser recipe in Chapter 3, Creating Odoo Add-On Modules.
Adding security access to models
It's common for add-on modules to add new models. For example, in Chapter 3, Creating Odoo Add-On Modules, we added a new Library Books model. It is easy to miss out on creating security access for new models during development, and you might find it hard to see menus and views that have been created. This is because, from Odoo version 12, admin users don't get default access rights to new models. To see the views and menus for the new model, you to need to add security access-control lists (ACLs).
However, models with no ACLs will trigger a warning log message upon loading, informing the user about the missing ACL definitions:
WARNING The model library.book has no access rules, consider adding one example, access_library_book, access_library_book, model_library_book, base.group_user,1,0,0,0
You can also access newly added models through a superuser since this bypasses all security rules. To learn more about this, please refer to the Accessing Odoo as a superuser recipe in Chapter 3, Creating Odoo Add-On Modules. The superuser feature is only available for administrator users. So, for new models to be usable by non-admin users, we need to define their access control lists so that Odoo knows how it should access them, as well as what operations each user group should be allowed to perform.
Getting ready
We will continue using the my_library module from the previous recipe and add the missing ACLs to it.
How to do it...
my_library should already contain the models/library_book.py Python file that creates the library.book model. We will now add a data file that describes this model's security access control by performing the following steps:
- Edit the __manifest__.py file to declare a new data file:
data: [
# ...Security Groups
'security/ir.model.access.csv',
# ...Other data files
]
- Add a new security/ir.model.access.csv file to the module with the following lines:
id,name,model_id:id,group_id:id,perm_read,perm_write,perm_create,perm_unlink
acl_book,library.book_default,model_library_book,base_group_user,1,0,0,0
acl_book_librarian,library.book_librarian,model_library_book,group_library_librarian,1,1,1,1
We should then upgrade the module so that it these ACL records are added to our Odoo database. More importantly, if we sign into a demonstration database using the demo user, we should be able to access the Library menu option without receiving any security errors.
How it works...
Security ACLs are stored in the core ir.model.access model. We just need to add the records that describe the intended access rights for each user group.
Any type of data file would do, but the common practice is to use a CSV file. The file can be placed anywhere inside the add-on module directory, but the convention is to have all the security-related files inside a security subdirectory.
The first step in our recipe adds this new data file to the manifest. The second step adds the files that describe the security access control rules. The CSV file must be named after the model where the records will be loaded, so the name we've used is not just a convention – it is mandatory. Please refer to Chapter 6, Managing Module Data, for details.
If the module also creates new security groups, its data file should be declared in the manifest before the ACLs' data files, since you may want to use them for the ACLs. They must already be created when the ACL file is processed.
The columns in the CSV file are as follows:
- id: This is the XML ID internal identifier for this rule. Any unique name inside the module will do, but the convention is to use access_<model>_<group>.
- name: This is a title for the access rule. It is a common practice to use a access.<model>.<group> name.
- model_id:id: This is the XML ID for the model. Odoo automatically assigns this kind of ID to models with a model_<name> format, using the model's _name with underscores instead of dots. If the model was created in a different add-on module, a fully qualified XML ID that includes the module name is needed.
- group_id:id: This is the XML ID for the user group. If left empty, it applies to all users. The base module provides some basic groups, such as base.group_user for all employees and base.group_system for the administration user. Other apps can add their own user groups.
- perm_read: Members of the preceding group can read the model's records. It accepts two values: 0 or 1. Use 0 to restrict read access on the model and 1 to provide read access.
- perm_write: Members of the preceding group can update the model's records. It accepts two values: 0 or 1. Use 0 to restrict write access on the model and 1 to provide write access.
- perm_create: Members of the preceding group can add new records of this model. It accepts two values: 0 or 1. Use 0 to restrict create access on the model and 1 to provide create access.
- perm_unlink: Members of the preceding group can delete records of this model. It accepts two values: 0 or 1. Use 0 to restrict unlink access on the model and 1 to provide unlink access.
The CSV file we used adds read-only access to the Employees | Employee standard security group and full write access to the Administration | Settings group.
The Employee user group, base.group_user, is particularly important because the user groups that are added by the Odoo standard apps inherit from it. This means that if we need a new model to be accessible by all the backend users, regardless of the specific apps they work with, we should add that permission to the Employee group.
The resulting ACLs can be viewed from the GUI in debug mode by navigating to Settings | Technical | Security | Access Controls List, as shown in the following screenshot:

Figure 10.2 – ACL list view
Some people find it easier to use this user interface to define ACLs and then use the export feature to produce a CSV file.
There's more...
It would make sense for us to give this permission to the Library user and the Librarian groups we defined in the Creating security groups and assigning them to users recipe. If you followed that recipe, then it's a good exercise to follow this one while adapting the group identifiers to the Library ones.
It's important to note that access lists provided by add-on modules should not be directly customized, since they will be reloaded on the next module upgrade, destroying any customization that could have been done from the GUI.
To customize ACLs, two approaches can be used. One is to create new security groups that inherit from the one provided by the module and add additional permissions on it, but this only allows us to add permissions, not remove them. A more flexible approach would be to uncheck the Active flag on particular ACL lines to disable them. The active field is not visible by default, so we need to edit the tree view to add the <field name="active" /> column. We can also add new ACL lines for additional or replacement permissions. On a module upgrade, the deactivated ACLs won't be reactivated, and the added ACL lines won't be affected.
It's also worth noting that ACLs only apply to regular models and don't need to be defined for Abstract or Transient models. If defined, these will be disregarded, and a warning message will be triggered in the server log.
See also
You can also access newly added models through a superuser since this bypasses all security rules. To learn more about this, please refer to the Accessing Odoo as a superuser recipe in Chapter 3, Creating Odoo Add-On Modules.
Limiting access to fields in models
In some cases, we may need more fine-grained access control, and we may also need to limit access to specific fields in a model.
It is possible for a field to only be accessed by specific security groups, using the groups attribute. In this recipe, we will show you how to add a field with limited access to the Library Books model.
Getting ready
We will continue using the my_library module from the previous recipe.
How to do it...
To add a field with access that's limited to specific security groups, perform the following steps:
- Edit the model file to add the field:
is_public = fields.Boolean(groups='my_library.group_library_librarian')
private_notes = fields.Text(groups='my_library.group_library_librarian')
- Edit the view in the XML file to add the field:
<field name="is_public" />
<field name="private_notes" />
That's it. Now, upgrade the add-on module for the changes in the model to take place. If you sign in with a user with no system configuration access, such as demo in a database with demonstration data, the Library Books form won't display the field.
How it works...
Fields with the groups attribute are specially handled to check whether the user belongs to any of the security groups indicated in the attribute. If a user doesn't belong to a particular group, Odoo will remove the field from the UI and restrict ORM operations on that field.
Note that this security is not superficial. The field is not only hidden in the UI but is also made unavailable to the user in the other ORM operations, such as read and write. This is also true for XML-RPC or JSON-RPC calls.
Be careful when using these fields in business logic or in on-change UI events (@api.onchange methods); they can raise errors for users with no access to the field. One workaround for this is to use privilege elevation, such as the sudo() model method or the compute_sudo field attribute for computed fields.
The groups value is a string that contains a comma-separated list of valid XML IDs for security groups. The simplest way to find the XML ID for a particular group is to activate developer mode and navigate to the group's form, at Settings | Users | Groups, and then access the View Metadata option from the debug menu, as shown in the following screenshot:

Figure 10.3 – Menu for viewing a group's XML ID
You can also view the XML ID of a security group via code by using the <record> tag that created the group. However, the most convenient way to find out a group's XML ID is by looking at the metadata, as shown in the previous screenshot.
There's more...
In some cases, we need a field to be available or unavailable, depending on particular conditions, such as the values in a field; for example, stage_id or state. This is usually handled at the view level using attributes such as states or attrs to dynamically display or hide the field according to certain conditions. Please refer to Chapter 9, Backend Views, for a detailed description.
Note that these techniques work at the user interface level only and don't provide actual access security. To do this, you should add checks to the business logic layer. Either add model methods decorated with @constrains, implementing the specific validations intended, or extend the create, write, or unlink methods to add validation logic. You can get further insights into how to do this by going back to Chapter 5, Basic Server-Side Development.
See also
For more details on how to hide and display a field using conditions, please refer to Chapter 9, Backend Views.
For further insights into the business logic layer, please refer to Chapter 5, Basic Server-Side Development.
Limiting record access using record rules
A common need for any application is it to have the ability to limit which records are available to each user on a specific model.
This is achieved using record rules. A record rule is a domain filter expression that's defined on a model that will then be added to every data query that's made by the affected users.
As an example, we will add a record rule to the Library Books model so that users in the Employee group will only have access to public books.
Getting ready
We will continue using the my_library module from the previous recipe.
How to do it...
Record rules are added using a data XML file. To do this, perform the following steps:
- Ensure that the security/security_rules.xml file is referenced by the manifest data key:
'data': [
'security/security_rules.xml',
# ...
],
- We should have a security/security_rules.xml data file with a <odoo> section that creates the security group:
<odoo noupdate="1">
<record model="ir.rule" id="library_book_user_rule">
<field name="name">Library: see only own books</field>
<field name="model_id" ref="model_library_book"/>
<field name="groups"
eval="[(4, ref('my_library.group_library_user'))]"/>
<field name="domain_force">
[('is_public', '=', True)]
</field>
</record>
<record model="ir.rule" id="library_book_all_rule">
<field name="name">Library: see all books</field>
<field name="model_id" ref="model_library_book"/>
<field name="groups"
eval="[(4, ref('my_library.group_library_librarian'))]"/>
<field name="domain_force">[(1, '=', 1)]</field>
</record>
</odoo>
Upgrading the add-on module will load the record rules inside the Odoo instance. If you are using demo data, you can test it through the default demo user to give library user rights to the demo user. If you are not using demo data, you can create a new user with library user rights.
How it works...
Record rules are just data records that are loaded into the ir.rule core model. While the file adding them can be anywhere in the module, the convention is for it to be in the security subdirectory. It is common to have a single XML file with both security groups and record rules.
Unlike groups, in the standard modules, the record rules are loaded into an odoo section with the noupdate="1" attribute. With this, those records will not be reloaded on a module upgrade, meaning that manually customizing them is safe and they will survive later upgrades.
To stay consistent with the official modules, we should also have our record rules inside a <odoo noupdate="1"> section.
Record rules can be seen from the GUI via the Settings| Technical | Security | Record Rules menu option, as shown in the following screenshot:
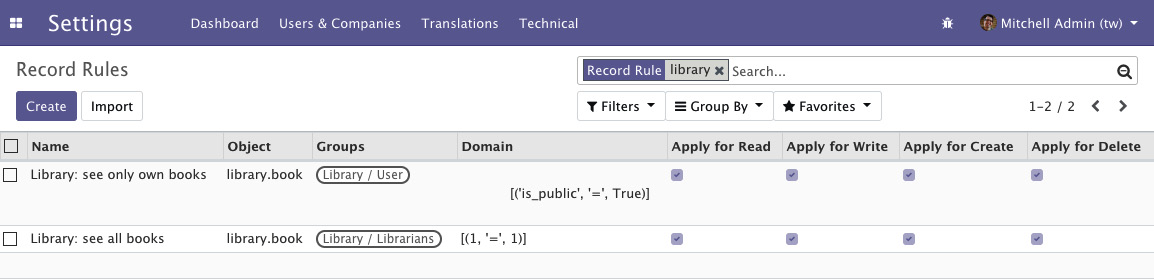
Figure 10.4 – ACLs for the book's model
The following are the most important record rule fields that were used in this example:
- Name (name): A descriptive title for the rule.
- Object (model_id): A reference to the model the rule applies to.
- Groups (groups): The security groups that the rule applies to. If no security group is specified, the rule is considered global and is applied in a different way (continue with this recipe to learn more about these groups).
- Domain (domain): A domain expression that is used to filter the records. The rule is only going to applied to these filtered records.
The first record rule we created was for the Library User security group. It uses the [('is_public', '=', True)] domain expression to select only the books that are available publicly. Thus, users with the Library User security group will only be able to see public books.
The domain expressions that are used in the record rules run on the server side using ORM objects. Due to this, dot notation can be used on the fields on the left-hand side (the first tuple element). For example, the [('country_id.code', '=', 'IN')] domain expression will only show records that contain the country of India.
Since record rules are mostly based on the current user, you can use the user recordset in the right-hand side (the third tuple element) of the domain. So, if you want to show the records for the company of the current user, you can use the [('conpany_id', '=', user.company_id.id)] domain. Alternatively, if you want to show the records that are created by the current user, you can use the [('user_id', '=', user.id)] domain.
We want the Librarian security group to be able to see all the books, independent of whether they are public or private. Since it inherits from the Library User group, unless we do something about it, it will also be able to see only public books.
The non-global record rules are joined using the OR logical operator; each rule adds access and never removes this access. For the Librarian security group to have access to all the books, we must add a record rule to it so that it can add access for all books, as follows:
[('is_public', 'in', [True, False])]
We chose to do this differently here and use the [(1, '=', 1)] special rule instead to unconditionally give access to all book records. While this may seem redundant, remember that if we don't do this, the Library user rule can be customized in a way that will keep some books out of reach from the Settings user. The domain is special because the first element of a domain tuple must be a field name; this exact case is one of two cases where that is not true. The special domain of [(1, '=', 0)] is never true, but also not very useful in the case of record rules. This is because this type of rule is used to restrict access to all the records. The same thing is also possible with access lists.
Important Information
Record rules are ignored if you've activated SUPERUSER mode. When testing your record rules, ensure that you use another user for that.
There's more...
When a record rule is not assigned to any security group, it is marked as global and is handled differently from the other rules.
Global record rules have a stronger effect than group-level record rules and set access restrictions that those can't override. Technically, they are joined with an AND operator. In standard modules, they are used to implement multi-company security access so that each user can only see their company's data.
In summary, regular non-global record rules are joined with an OR operator; they are added together, and a record is accessible if any of the rules grant that access. Global record rules then add restrictions to the access given by regular record rules using an AND operator. Restrictions that have been added by global record rules can't be overridden by regular record rules.
Using security groups to activate features
Security groups can restrict some features so that they can only be accessed by users that belong to these groups. Security groups can also inherit other groups, so they also grant their permissions.
These two features are used to implement a usability feature in Odoo: feature toggling. Security groups can also be used to enable or disable features for some or all the users in an Odoo instance.
This recipe shows how to add options to configuration settings and showcases the two methods you can use to enable additional features: making them visible using security groups or adding them by installing an additional module.
For the first case, we will make the book-release dates an optional additional feature and for the second, as an example, we will provide an option for installing the Notes module.
Getting ready
This recipe uses the my_library module, which was described in Chapter 3, Creating Odoo Add-On Modules. We will need security groups to work with, so you also need to have followed the Adding security access to models recipe in this chapter.
In this recipe, some identifiers need to refer to the add-on module's technical name. We will assume that this is my_library. In case you are using a different name, replace my_library with the actual technical name of your add-on module.
How to do it...
To add the configuration options, follow these steps:
- To add the needed dependency and the new XML data files, edit the __manifest__.py file like this and check that it depends on base_setup:
{ 'name': 'Cookbook code',
'category': 'Library',
'depends': ['base_setup'],
'data': [
'security/ir.model.access.csv',
'security/groups.xml',
'views/library_book.xml',
'views/res_config_settings.xml',
],
}
- To add the new security group that's used for feature activation, edit the security/groups.xml file and add the following record to it:
<record id="group_release_dates" model="res.groups">
<field name="name">Library: release date feature</field>
<field name="category_id" ref="base.module_category_hidden" />
</record>
- To make the book-release date visible only when this option is enabled, edit the field definition in the models/library_book.py file:
class LibraryBook(models.Model):
# ...
date_release = fields.Date(
'Release Date',
groups='my_library.group_release_dates', )
- Edit the models/__init__.py file in order to add a new Python file for the configuration settings model:
from . import library_book
from . import res_config_settings
- To extend the core configuration wizard by adding new options to it, add the models/res_config_settings.py file with the following code:
from odoo import models, fields
class ConfigSettings(models.TransientModel):
_inherit = 'res.config.settings'
group_release_dates = fields.Boolean(
"Manage book release dates",
group='base.group_user',
implied_group='my_library.group_release_dates',
)
module_note = fields.Boolean("Install Notes app")
- To make the options available in the UI, add views/res_config_settings.xml, which extends the settings form view:
<?xml version="1.0" encoding="utf-8"?>
<odoo>
<record id="view_general_config_library" model="ir.ui.view">
<field name="name">Configuration: add Library options</field>
<field name="model">res.config.settings</field>
<field name="inherit_id" ref="base_setup.res_config_settings_view_form" />
<field name="arch" type="xml">
<div id="business_documents" position="before">
<h2>Library</h2>
<div class="row mt16 o_settings_container">
<!-- Add Step 7 and 8 goes here -->
</div>
</div>
</field>
</record>
</odoo>
- In the settings form view, add the option to add a release date feature:
<!-- Release Dates option -->
<div class="col-12 col-lg-6 o_setting_box">
<div class="o_setting_left_pane">
<field name="group_release_dates" class="oe_inline"/>
</div>
<div class="o_setting_right_pane">
<label for="group_release_dates"/>
<div class="text-muted">
Enable relase date feature on books
</div>
</div>
</div>
- In the settings form view, add the option to install the note module:
<!-- Note module option -->
<div class="col-12 col-lg-6 o_setting_box">
<div class="o_setting_left_pane">
<field name="module_note" class="oe_inline"/>
</div>
<div class="o_setting_right_pane">
<label for="module_note"/>
<div class="text-muted">
Install note module
</div>
</div>
</div>
After upgrading the add-on module, the two new configuration options should be available at Settings | General Settings. The screen should look like this:

Figure 10.5 – Library config in general settings
As shown in the preceding screenshot, you will have new settings in the Library section. The first option, Manage book release dates, will enable the release date feature for the books record. The second option, Install Notes app, will install Odoo's Notes app.
How it works...
The core base module provides the res.config.settings model, which provides the business logic behind the activation option. The base_setup add-on module uses the res.config.settings model to provide several basic configuration options that can be made available inside a new database. It also makes the Settings | General Settings menu available.
The base_setup module adapts res.config.settings to a central management dashboard, so we need to extend it to add our own configuration settings.
If we decide to create a specific settings form for the Library app, we can still inherit from the res.config.settings model with a different _name, and then for the new model, provide the menu option and form view for just those settings. We already saw this method in the Adding your own settings options recipe of Chapter 8, Advanced Server-Side Development Techniques.
We used two different methods to activate these features: one by enabling a security group and making the feature visible to the user, and the other by installing an add-on module that provides this feature. The logic that's used to handle both these cases is provided by the base res.config.settings model.
The first step in this recipe adds the base_setup add-on module to the dependencies, since it provides extensions to the res.config.settings model we want to use. It also adds an additional XML data file that we will need to add the new options to the General Settings form.
In the second step, we created a new security group, Library: release date feature. The feature that needs to be activated should only be visible to that group, so it will be hidden until the group is enabled.
In our example, we want the book release date to only be available when the corresponding configuration option is enabled. To achieve this, we can use the groups attribute on the field so that it is made available only for this security group. We did this at the model level so that it is automatically applied to all the UI views where the field is used.
Finally, we extended the res.config.settings model to add the new options. Each option is a Boolean field, and its name must begin either with group_ or module_, according to what we want it to do.
The group_ option field should have an implied_group attribute and should be a string that contains a comma-separated list of XML IDs for the security groups to activate when it is enabled. The XML IDs must be complete, with the module name, dot, and identifier name provided; for example, module_name.identifier.
We can also provide a group attribute to specify which security groups the feature will be enabled for. It will be enabled for all the Employee-based groups if no groups are defined. Thus, the related groups won't apply to portal security groups, since these don't inherit from the Employee base security group like the other regular security groups do.
The mechanism behind the activation is quite simple: it adds the security group in the group attribute to implied_group, thus making the related feature visible to the corresponding users.
The module_ option field does not require any additional attributes. The remaining part of the field name identifies the module to be installed when this option has been activated. In our example, module_note will install the note module.
Important Information
Unchecking the box will uninstall the module without warning, which can cause data loss (models or fields and module data will be removed as a consequence). To avoid unchecking the box by accident, the secure_uninstall community module (from https://github.com/OCA/server-tools) prompts the user for a password before they uninstall the add-on module.
The last step of this recipe is added to the General Settings form view, just before the Business documents group, which has id="business_documents". We used this id for view inheritance. It creates its own div with the module name as the ID, which is good practice because then, other modules that extend my_library can easily add their own configuration items to this div.
There's more...
Configuration settings can also have fields named with the default_ prefix. When one of these has a value, the ORM will set it as a global default. The settings field should have a default_model attribute to identify the model that's been affected, and the field name after the default_ prefix identifies the model field that will have the default value set.
Additionally, fields with none of the three prefixes mentioned can be used for other settings, but you will need to implement the logic to populate their values, using the get_default_ name prefixed methods, and have them act when their values are edited using the set_ name prefixed methods.
For those who would like to go deeper into the details of the configuration settings, take a look at Odoo's source code in ./odoo/addons/base/models/res_config.py, which is extensively commented on.
Accessing recordsets as a superuser
In the previous recipes, we looked at security techniques such as access rules, security groups, and record rules. With these techniques, you can avoid unauthorized access. Sometimes, however, you have complex business cases in which you want to access or modify records, even if the user doesn't have access to them. For example, let's say the public user doesn't have access to the leads records, but by submitting the website form, the user can generate leads records in the backend.
Using sudo(), you can access recordsets as a superuser. We already saw sudo() in the Changing the user that performs an action recipe of Chapter 8, Advanced Server-Side Development Techniques. Here, we will see that even if you have given ACL rules or have added a security group to the field, you can still get access through sudo().
How to do it...
We will use the same my_library module from the previous recipe. We already have an ALC rule that gives read-only access to normal users. We will add a new field with security groups so that only the Librarian has access to it. After that, we will modify the field value for the normal user. Follow these steps to achieve this:
- Add the new field to the library.book model:
report_missing = fields.Text(
string="Book is missing",
groups='my_library.group_library_librarian')
- Add the field to the form view:
<field name="report_missing"/>
- Add the report_missing_book() method to the library.book model:
def report_missing_book(self):
self.ensure_one()
message = "Book is missing (Reported by: %s)" % self.env.user.name
self.sudo().write({
'report_missing': message
})
- Add the button to the form view so that we can trigger our method from the user interface. This should be placed inside the <header> tag:
<button name="report_missing_book"
string="Report Missing Book"
type="object"/>
Restart the server and update the module to apply these changes.
How it works...
In steps 1 and 2, we added a new field called report_missing to the model and form view. Note that we put the my_library.group_library_librarian group on the field in Python, so this field can only be accessed by the Librarian user.
In the next step, we added the report_missing_book() method. We updated the value of the report_missing field inside this method's body. Note that we used sudo() before calling the write method.
Finally, we added a button in the form view to trigger the method from the user interface.
To test this implementation, you need to log in with the non-librarian user. If you have loaded the database with demonstration data, you can log in with the demo user and then click on the Missing book report button in the form view of the book. Upon clicking that button, the report_missing_book() method will be called, and this will write the message into the report_missing field, even if the user doesn't have proper rights. You can check the value of the field through the admin user because this field will be hidden from the demo user.
Upon clicking the Report Missing Book button, we will get the recordset of the current book in the report_missing_book() method as an argument, self. Before we wrote the values into the book recordset, we used self.sudo(). This returns the same recordset but with super user rights. This recordset will have the su=True environment attribute, and it will bypass all access rules and record rules. Because of that, the non-librarian user will be able to write in the book record.
There's more...
You need to be extra careful when you use sudo() because it bypasses all access rights. If you want to access the record set as another user, you can pass the ID of that user inside sudo; for example, self.sudo(uid). This will return a recordset containing the environment of that user. This way, it will not bypass all the access rules and record rules, but you can perform all the actions that are allowed for that user.
Hiding view elements and menus based on groups
In the previous recipes, we've learned how to hide fields from some users with group arguments in the Python field definition. There is another way to hide fields in the user interface: by adding security groups to the XML tags in the view definition. You can also use security groups with menus to hide them from a particular user.
Getting ready
For this recipe, we will reuse the my_library add-on module from the previous recipe. In the previous recipe, we added a button to the <header> tag. We will hide that whole header from a few users by adding a groups attribute to it.
Add the model, the views, and the menus for the book.category model. We will hide the category menus from a user. Please refer to Chapter 4, Application Models, to learn how to add model views and menus.
How to do it...
Follow these steps to hide elements based in security groups:
- Add a groups attribute to the <header> tag to hide it from other users:
...
<header groups="my_library.group_library_user">
...
- Add the groups attribute to the <menuitem> book category so that it's only displayed for librarian users:
<menuitem name="Book Categories"
id="library_book_category_menu"
parent="library_base_menu"
action="library_book_category_action"
groups="my_library.group_library_librarian"/>
Restart the server and update the module to apply these changes.
How it works...
In the first step, we added groups="my_library.group_library_user" to the <header> tag. This means that the whole header part will only be visible to library users and librarians. Normal backend users who don't have group_library_user will not see the header part.
In step 2, we added the groups="my_library.group_library_librarian" attribute to menuitem. This means that this menu is only visible to librarian users.
You can use the groups attribute almost everywhere, including <field>, <notebook>, <group>, and <menuitems>, or on any tag from the view architecture. Odoo will hide those elements if the user doesn't have that group. You can use the same group attributes in web pages and QWeb reports, which will be covered in Chapter 12, Automation, Workflows, Emails, and Printing, and Chapter 14, CMS Website Development.
As we saw in the Accessing recordsets as a superuser recipe of this chapter, we can hide fields from some users using the groups argument in the Python field definition. Note that there is a big difference between using security groups on fields and using Python security groups in views. Security groups in Python provide real security; unauthorized users can't even access the fields through ORM or through RPC calls. However, the groups in views are just for improving usability. Fields that are hidden through groups in the XML file can still be accessed through RPC or ORM.
See also
Please refer to Chapter 4, Application Models, to learn how to add model views and menus.