
Chapter 4
Managing Your Time and Schedule
IN THIS CHAPTER
![]() Understanding how the Calendar works
Understanding how the Calendar works
![]() Scheduling (and rescheduling) appointments and events
Scheduling (and rescheduling) appointments and events
![]() Getting different views of your schedule
Getting different views of your schedule
![]() Scheduling and managing meetings with coworkers
Scheduling and managing meetings with coworkers
The purpose of the Outlook Calendar is to keep you from arriving a day late and a dollar short. Use the Calendar to schedule meetings and appointments. Use it to make the most of your time. This chapter explains how to go from day to day, week to week, and month to month in the Calendar window. It shows you how to schedule and reschedule appointments and meetings, look at your schedule in different ways, and schedule and handle meetings with coworkers.
Introducing the Calendar
Use the Calendar to juggle appointments and meetings, remind yourself where you’re supposed to be, and get there on time. Surveying your schedule in the Calendar window is easy. Merely by clicking a button, you can tell where you’re supposed to be today, any given day, this week, this work week, this month, or any month.
Figure 4-1 shows, for example, someone’s schedule during the work week of August 22 – August 26 (a work week comprises Monday through Friday, not Monday through Sunday). All you have to do to find out how busy you are on a particular day, week, or month is gaze at the Calendar window. When someone invites you to a meeting or wants to schedule an appointment, you can open the Calendar and see right away whether your schedule permits you to attend the meeting or make the appointment.
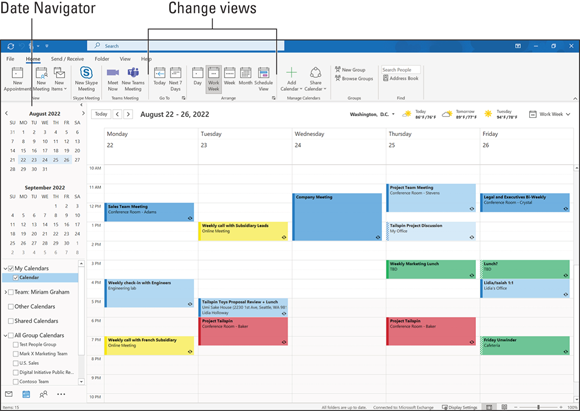
FIGURE 4-1: The Calendar in Work Week view.
Outlook gives you opportunities to categorize meetings and appointments so that you can tell at a glance what they’re all about. Moving a meeting or appointment is simply a matter of dragging it elsewhere in the Calendar window. By double-clicking a meeting or appointment in the Calendar window, you can open a window to find out where the meeting takes place or read notes you jotted down about the meeting. You can even make a bell ring and the Reminder message box appear when a meeting or appointment is forthcoming.
The Different Kinds of Activities
 For scheduling purposes, Outlook makes a distinction between appointments and meetings. You can schedule the following activities:
- Appointment: An activity that occupies a certain day or a certain time period on a certain day. For example, a meeting that takes place between 11 a.m. and 12 p.m. is an appointment. An all-day event such as a retreat is also considered an appointment. An appointment is just for you; it has no invitees.
- Meeting: Same as an appointment except that you can invite others to attend. You can make an online video call part of a meeting. As you choose a time for a meeting, you can view others’ calendars to find the optimal time.
Seeing Your Schedule
Days on which meetings or appointments are scheduled appear in boldface in the Date Navigator, the calendar located in the Folder pane. Following are techniques for getting around in the Calendar window and viewing your schedule in different ways.
Going to a different day, week, or month
Use these techniques to go to different days, weeks, or months in the Calendar window:
- To today: On the Home tab, click the Today button. Clicking this button selects today’s date on your calendar in whatever view you happen to be in.
- To the next seven days: On the Home tab, click the Next 7 Days button to see the next seven days starting with today’s date.
- To a specific day: Click a day in the Date Navigator (located on the Folder pane). You can also press Ctrl+G and select a day in the Go To Date dialog box. If you don’t see the Date Navigator, go to the View tab, click the Folder Pane button, and choose Normal on the drop-down list.
-
To the previous or next day, work week, week, or month: Click a Back or Forward arrow. These arrows are in the upper-left corner of the Calendar window and on either side of the month name in the Date Navigator.
 Here’s a quick way to go from month to month in the Date Navigator: Click the month name in the Date Navigator and hold down the mouse button. You see a list of month names. Drag the pointer to the name of the month you want to go to.
Use the scroll bar on the right side of the window to travel from hour to hour in Day, Work Week, and Week view. In Month view, manipulating the scroll bar takes you from month to month.
Rearranging the Calendar window
To get a sense of what is expected of you and where you’re supposed to be, go to the Home or View tab and click one of these buttons to rearrange your view of the Calendar window:
- Day: Shows today’s date only (press Ctrl+Alt+1).
- Work Week: Shows Monday through Friday of this week (press Ctrl+Alt+2).
- Week: Shows the entire week, Sunday through Saturday (press Ctrl+Alt+3).
- Month: Shows the entire month (press Ctrl+Alt+4).
What constitutes a work week and which day is the first day of the week differs from place to place. If the Calendar doesn’t conform to your notions of what a week is, go to the File tab and choose Options. Then, in the Outlook Options dialog box, go to the Calendar category and choose different Work Time options.
Scheduling Appointments and Meetings
Now that you know how the Calendar window works, the next step is to fill the pages of the Calendar with all kinds of busywork. These pages explain how to schedule events, schedule recurring events, and magically transform an email message into an event. You can find many intriguing shortcuts on these pages.
Scheduling an event: The basics
Follow these basic steps to schedule an appointment, recurring appointment, meeting, or recurring meeting:
-
Select the day in which you want to schedule the event.
If the event occupies a certain time period, you can select the time period in Day, Work Week, or Week view and save yourself the trouble of entering a time period in the Appointment window. To select a time period, drag downward in the Calendar window. To create a half-hour appointment, simply double-click a half-hour slot in Day, Work Week, or Week view. The Appointment dialog box opens with the Start and End time entered already. -
On the Home tab, click the New Appointment button (or press Ctrl+N).
As shown in Figure 4-2, you see the Appointment window for naming the event, stating its starting and ending time, and choosing whether you want to be alerted to its occurrence. In a folder apart from the Calendar, you can display this window by going to the Home tab, clicking the New Items button, and choosing Appointment on the drop-down list.
-
Enter information in the Appointment tab.
Enter a subject, location (you can open the drop-down list and choose one you’ve entered before, start date and time, and end date and time. To enter a recurring meeting or appointment, click the Recurrence button. A recurring event is one that takes place weekly, monthly, or yearly.
-
Open the Reminder drop-down list (located in the Options group) and choose an option if you want to be reminded when the event is imminent (or choose None if you don’t care to be reminded).
Choose an option from the drop-down list to make the Reminder message box appear before the event begins.
-
Click the Save & Close or Send button when you finish describing the appointment.
The appointment is entered in the Calendar window.

FIGURE 4-2: The window for scheduling activities.
Scheduling a recurring appointment
To enter a recurring appointment, click the Recurrence button in the Appointment window (refer to Figure 4-2). You see the Appointment Recurrence dialog box, as shown in Figure 4-3. Describe how persistent the activity is and click OK:
- Appointment Time: Enter the starting and ending time, if you didn’t do so already in the Appointment form.
- Recurrence Pattern: Use the options to describe how often the activity recurs.
- Range of Recurrence: Describe when the recurring events will cease recurring. Choose the No End Date option button if the activity occurs ad infinitum, ad nauseum (that’s Latin for “unto infinity, most nauseously”).
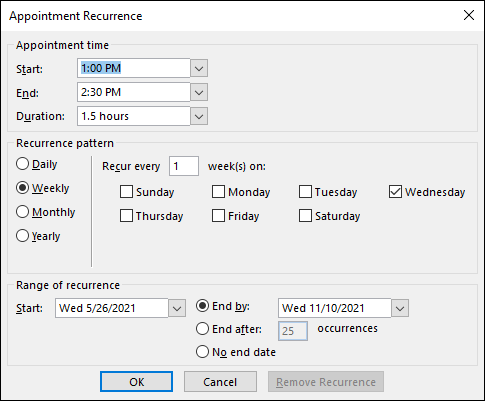
FIGURE 4-3: My, this appointment is persistent!
In the Calendar window, recurring activities are marked by the arrow chasing its tail icon.
Scheduling an all-day appointment
Select the All Day check box in the Appointment window (refer to Figure 4-2) to schedule an all-day appointment. In the Calendar, all-day appointments are listed at the start of the day before appointments and meetings.
Canceling, Rescheduling, and Altering Activities
Canceling, rescheduling, and altering appointments is pretty easy. You can always double-click an activity to open an Appointment window and change the particulars there. And you can take advantage of these shortcuts:
- Canceling: Select an activity, go to the Appointment tab, and click the Delete button. When you click the Delete button to cancel a recurring activity, a drop-down list appears on the Delete button so that you can delete one occurrence of the activity or the entire series.
- Rescheduling: Drag the activity to a new location in the schedule. Release the mouse button when the activity is in the new time slot.
- Changing start and end times: In Day, Work Week, or Week view, move the pointer over the top or bottom of the activity and start dragging when you see the double arrow.
- Changing the description: Click in the activity’s box and start typing or editing.
Managing Meetings with the Calendar
As mentioned earlier in this chapter, a meeting is similar to an appointment, but meetings involve more than one person. Starting in Outlook, you can send meeting invitations to colleagues; in turn, colleagues can accept or decline invitations. When a colleague accepts an invitation to a meeting, the meeting is scheduled automatically on the colleague’s calendar. People who have an Office 365 work or school account can see their colleagues’ calendars, determine when colleagues have free time to attend a meeting, and schedule meetings accordingly.
These pages explain how to schedule and invite colleagues to meetings, accept or decline a meeting invitation, and reschedule or cancel a meeting.
Scheduling and inviting colleagues to a meeting
Schedule and invite colleagues to meetings starting in the Inbox folder by sending them an email message:
-
On the Home tab, click the New Items button and choose Meeting on the drop-down menu.
A message window opens.
- Address the email message to colleagues you want to invite to the meeting.
- Enter a meeting name in the Subject field.
- Enter a preferred Start Time and End Time for the meeting.
-
If you want to schedule a Skype meeting or a meeting by way of Microsoft Teams, click the Add Skype Meeting or Add Teams Meeting link.
Invitees will be able to join the meeting by clicking the meeting link in the invitation (Book 10, Chapter 5 explains online meetings.)
-
On the Meeting tab, click the Scheduling Assistant button.
This button is located in the Show group. The Scheduling Assistant window opens, as shown in Figure 4-4. This window lists colleagues you invited to the meeting; it shows whether their schedules conflict with the meeting time you proposed.
If all is well and there are no scheduling conflicts, skip to Step 8. Otherwise, read on.
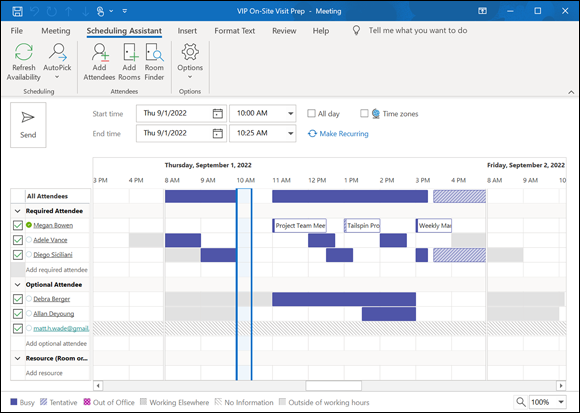
FIGURE 4-4: The Scheduling Assistant window shows whether a time slot is available for a meeting.
-
Use the hourly calendar view to select a time block that is available to all parties.
Use your mouse to drag and drop a time range. If you make a mistake, click outside your selected area and start over. Color codes in the Scheduling Assistant window tell you whether colleagues have free time, are busy, or are otherwise occupied and can’t attend a meeting.
- Click the Appointment button to return to the message window.
-
If your organization lets you book rooms and other resources through Outlook, enter the name of the room where you want to hold the meeting in the Location box.
You can also click the Rooms button to open a list of rooms and select a name there.
-
Click Send.
If you didn’t enter or choose a location for the meeting, Outlook asks whether you want to send the invitation without saying where the meeting is to be held. Click Send to proceed.
The meeting organizer can track all attendees' responses by opening the meeting in their Calendar, going to the Meeting tab, and clicking the Tracking button. The organizer can see at a glance which recipients responded to the meeting request and how they replied to the meeting invitation.
Accepting (or declining) meeting invitations
Meeting invitations arrive by email. Follow these steps to accept or decline a coworker’s meeting invitation:
-
Open the email message.
As shown in Figure 4-5, the invitation comes with options for accepting, tentatively accepting, and declining the invitation. Choosing Tentative tells your coworker you aren’t sure whether you can make it to the meeting.
- Click Accept, Tentative, or Decline.
-
On the drop-down list that appears, choose how to respond to the invitation.
As Figure 4-5 shows, you can edit your response, send the response straightaway, or elect not to respond to the invitation by email. Unless you choose Do Not Send a Response, a notification is sent to the meeting organizer after you
Click the Propose New Time button in the Invitation window (refer to Figure 4-5) if you want to propose a different time for the meeting. Clicking this button opens the Scheduling Assistant so that you can propose a different time to the meeting organizer.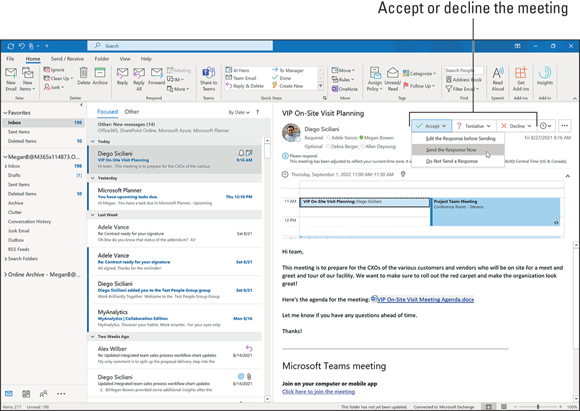
FIGURE 4-5: Choose an option to reply to a meeting invitation.
Canceling and rescheduling meetings
Only the person who proposed a meeting can cancel it. Follow these steps to cancel a meeting:
-
In the Outlook Calendar, double-click the meeting that needs canceling or rescheduling.
The Meeting window opens.
- On the Meeting tab, click Cancel Meeting.
-
Click Send Cancellation.
The meeting is removed from invitees' calendars.
To reschedule a meeting, open the meeting request and start the Scheduling Assistant. After you've proposed a new date and time for the meeting, click Send Update to send the modified meeting request to coworkers.