
Unit 2.2. Oracle 9iAS Configuration
Installation of Oracle 9iAS
There are three types of the Oracle9i Database (Enterprise, Standard, and Personal) and each includes an installation of the Oracle HTTP server in the same Oracle Home directory as the database. The Oracle HTTP server is automatically installed with whatever type of installation you choose (unless you choose the “custom” installation where you choose each component). The Oracle-supplied packages for the PL/SQL Web toolkit will be installed in the SYS schema. The application in this book is developed using the simplest type of the Oracle 9iAS installation, the Personal installation. In Windows NT/2000/XP the default installation will set this up as an automatic service rather than a manual service. This means that the Oracle HTTP server starts every time the server or PC is powered on regardless of whether a user is logged on to the operating system or database. Your setup of the Oracle9iAS using this functionality is sufficient to build the application developed in this book. You need to configure a Database Access Descriptor (DAD) to view Web pages for the application you create in this book. Refer to the section “Configuring a Database Access Descriptor (DAD)” later in this unit.
The Oracle 9iAS also can be installed on its own in a separate Oracle Home or on a separate server. This is necessary if you will be using any of the other features of the Oracle 9iAS, such as Oracle Portal or Oracle Portal to Go. It is also necessary to install the 9iAS separately if you are using an Oracle 8i database, which does not contain the built-in HTTP server. This would be version 8.1.5 and below.
In order to perform the separate 9iAS installation, you need the Oracle CD Pack for the Oracle 9iAS. Remember, if you are installing Oracle 9iAS separately, as opposed to using the 9iAS included with the 9i database, then the 9iAS must be installed in a different Oracle Home. Otherwise, shared components could be overwritten, which might cause problems later on.
An “Oracle Home” is part of the Optimal Flexible Architecture (OFA) standard designed by Oracle to assist users in laying out their databases to support high performance and ease of maintenance. The Oracle Home portion of this standard is simply an Oracle version/product-specific directory. In this way, since Oracle Homes are product- and version-specific, a database server can potentially have multiple Oracle Homes. For example, in NT, an Oracle Home for Oracle9i typically looks like:
C:ORACLEORA91
and in UNIX, an Oracle Home for Oracle9i might be written as:
/u01/app/oracle/product/9.0.1
If you must install Oracle 9iAS separate from the server, you still have some choices to make. After specifying a new Oracle Home to install the Application server, you are given a prompt to choose which type of installation you are performing, as shown in Figure 2.4.
Figure 2.4. Oracle 9iAS installation choices.
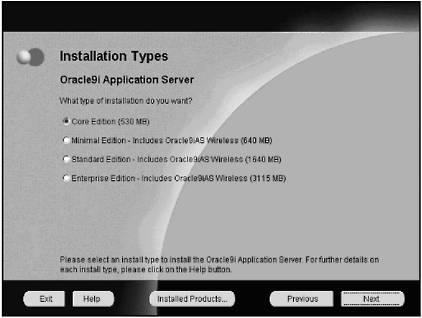
The following is a list of what will be installed with each choice:
Oracle 9iAS Core Edition: Installs Oracle9iAS Containers for J2EE (OC4J), Oracle9iAS Web Cache, and Oracle HTTP Server
Oracle 9iAS Minimal Edition: Installs a subset of the Oracle9iAS Standard Edition components: Oracle9iAS Portal, Oracle9iAS Wireless, Oracle Enterprise Manager Client, and Oracle HTTP Server
Oracle 9iAS Standard Edition (SE): Installs Oracle9iAS Portal, Oracle9iAS Wireless, Oracle Enterprise Java Engine, Oracle Enterprise Manager Client, Oracle HTTP Server, and Oracle Internet File System
Oracle 9iAS Enterprise Edition (EE): Installs Oracle9iAS Database Cache, Oracle9iAS Discoverer, Oracle9iAS Forms Services, Oracle9iAS Portal, Oracle9iAS Reports Services, Oracle9iAS Web Cache, Oracle9iAS Wireless, Oracle Enterprise Java Engine, Oracle Enterprise Manager Client, Oracle HTTP Server, Oracle Internet File System, and Oracle Management Server
If you wish to make use of the additional features available with these four installation types of 9iAS, it is important that you follow the installation instructions very carefully. The CD pack for this installation comes with a full CD of documentation. One of these documents is the complete installation manual.
Configuring a Database Access Descriptor (DAD)
The database access descriptor (DAD) is a mechanism defined through the 9iAS configuration that maps the URL to the correct database schema. Once connected to the database, your PL/SQL code can run and access database information and call PL/SQL subprograms in the PL/SQL Web Toolkit.
In order to create the application developed in this book, it is advised that you install the Oracle 9iAS included as part of the Oracle9i database installation. In this case, the only configuration you need to perform in order to develop and run your application is a correct net service name entry in your tnsnames.ora file and configuring a DAD on the Oracle HTTP Server.
A DAD is a named set of configuration values used for database access. It specifies information such as a database alias, a connect string if the database is remote, and a procedure for uploading and downloading documents.
Navigate to the DAD Configuration Page
1. |
The first step is to go to the main setup page for the Oracle HTTP Server. In the HTDOCS root directory exists a file named index.htm. This is the file you see when you enter the URL for the computer that is running the Oracle 9iAS. If the name of the server is MyServer and you enter http://MyServer:port#/index.html, you will see the main HTTP Server Components page. The literal http://localhost/ will also work when you are viewing these pages from the server terminal (if default port 80 is used, you do not have to enter a port number; in more recent versions, Oracle uses port 7778—check the Oracle documention of your version to verify the port.) You will see the configuration page shown in Figure 2.5. You will not be required to provide any userID or password to access this page. In a production environment, you should add a layer of security to this page. Figure 2.5. Oracle HTTP server components Web page.
| ||
2. |
Click on the mod_plsql link in order to configure a DAD. The next page you see is shown in Figure 2.6. Figure 2.6. Gateway configuration menu.
| ||
3. |
The next step is to click on the lower link “Gateway Database Access Descriptor Settings,” and you will Figure 2.7. (NOTE: At this point, there are two DADs that have been set up already during the initial installation. One is the SIMPLEDAD and the other is the SSODAD. These are just samples; they have not yet been configured for you to make use of.) This page can also be found by going directly to the page: http://<hostname>:<port>/pls/admin_/gateway.htm Figure 2.7. Database Access Descriptor setup page.
| ||
4. |
In order to add a new DAD, click on the link “Add Default,” and you will see the page shown in Figure 2.7 (this is the page where you enter information about the DAD that you are creating). |


Creating an Any DAD
The first DAD that you will create is one that does not have any details regarding Oracle User Name, Password, or Schema. The user is prompted to enter a username and password when the URL is invoked. This setup is ideal in a development or class environment where there will be many developers using various schemas to test procedures. You will name this DAD “ANY” because it can be used for any user.
 | The name ANY has no particular meaning here; you could name your DAD after your own father, for instance, and call it the “BOB” DAD, assuming, of course, that your father is named Bob. |
1. |
Go the companion Web site for this book http://www.phptr.com/ boardman. Follow the directions to install the student schema. This sample schema includes a procedure, Hello_World, that you will use to test the DAD installation. | ||
2. |
In order to configure the DAD you will need to know the Service Name entry in the tnsnames.ora file on the server. This will be explained in more detail later on in this chapter. You can also get by if you know the Oracle SID and the name or IP address of the server where your Database is located. There are numerous ways to find this out if you do not know it. The easiest is to ask the database administration or the system administrator. If this happens to be you, and you still do not know the name of the server, there are a few things you can do. It would be a good idea to get yourself a number of qualified resources to manage an Oracle Database. This would be knowledgeable friends as well as manuals on the database and the operating system of the server that hosts the database.
On UNIX you can also type hostname at a shell prompt and the name of the server will be returned. Connect to the Oracle Database as System and run the following select statement: SELECT instance_name, host_name FROM sys.v_$instance; You will see the SID and host name of the Database in the result set. | ||
3. |
There are only two entries that you have to make in order to configure an ANY DAD. One is the name of the DAD and the other is the CONNECT STRING. The Connect string will be an entry in the tnsnames.ora file. As an alternative you can also create an entry in the format <HOST>:<PORT>:<SID>. For example, if the server was named MyServer, you were using the standard port of 1521 and the name of the database instance was ORCL, then you could enter MyServer:1521:ORCL. | ||
4. |
Test this DAD by using the Hello_World procedure that was installed with the sample student schema. Assuming your server’s name is MyServer, enter the following URL: http://MyServer/pls/any/Hello_World
| ||
5. |
You will be prompted for a Username and Password; use the username Student and the password Learn. You will see a simple Web page that says Hello_World. A method to log off the database (also known as deauthentication) is to add /logmeoff after the DAD in the URL, for example, http://MyServer/pls/myDad/logmeoff. The browser then displays a page that reads: You have been successfully deauthenticated. | ||
6. |
Log off using the logmeoff deauthentication method. |


Creating a Schema-Specific DAD
If your application does not involve each user logging on to a separate schema, then you may wish to create a DAD that has the Oracle user name and password specified by the DAD. This would be an easier setup if you were developing an application on a standalone computer with only one user at a time. In this case you need to fill in the next three properties:
Oracle Schema Name
Oracle User Name
Oracle Password
This is the same username and password combination you would use to connect to SQL*Plus. The schema name refers to the schema whose objects you will be accessing and the connect string indicates the Service Entry from the tnsnames.ora file. To proceed, follow these four steps:
1. |
Create, a DAD named Student that will not ask the user to log in. |
2. |
Start by naming the DAD Student, enter Student for the schema and username. Enter Learn for the password and the same connect string that you just created. |
3. |
Test the Student DAD. Assuming your server is named MyServer, enter the URL: http://MyServer/pls/student/hello_world You will not be asked to login and you will see the same page that you did in the previous exercise. |
4. |
Log off with the logmeoff deauthentication method. |
There are a number of other properties of the DAD you may wish to configure. The most useful will be the Default Home Page. The entry here is the procedure that will run if you do not indicate a procedure. If you specify a default home page of MyHomeProcedure for the DAD named MyDad, then an end user would simply enter the following URL in a browser: http://MyServer/pls/MyDad/ to invoke the procedure MyHomeProcedure, which generates an HTML page to display.
There are two other types of entries here and they will be addressed in later chapters. The properties such as Document Path and Document Procedure relate to storing and retrieving documents from the Database. This will be covered in Chapter 13, “Images.”
The PL/SQL Gateway allows users to log off (clear HTTP authentication information) programmatically through a PL/SQL procedure without having to exit all instances of the browser. Because of the use of cookies, this feature is supported on Netscape 3.0 or higher and Internet Explorer. On other browsers, the user may have to exit the browser to deauthenticate. Cookies are discussed more in Chapter 15, “Maintaining State with Cookies and Tables.”
Starting and Stopping the Oracle 9iAS
In a Windows NT/2000/XP installation the Oracle HTTP Server will be installed so that it is configured as an automatic service that is started when the computer is turned on. You can also start the service manually by going into the Windows Control Panel and running the service setup (under Administrative tools in Windows 2000 and XP), selecting the service, and clicking on the start icon. When you start Oracle HTTP Server, you are starting just the parent process. It loops through the configured modules and initializes them before reading the rest of the configuration files. The parent process then takes care of starting the other (child) processes. This is extremely important because modules implement most of the configuration directives in Oracle HTTP Server configuration files. The main configuration file is httpd.conf.
Note that if you are using a test PC, you can also make a batch file to start and stop the Oracle services. This will make it easier for you to turn on and off the Oracle services when you are performing other tests. You first need to open a DOS session when the services are on. Query the services with NET START. This will give you a list of the services that are running. The service that starts the database will be named “Oracle<OracleHome name><SID Name>”, and the Oracle 9iAS will have the name “Oracle<Oracle Home name>HTTPServer”. To save on typing you can enter these into a text file. To proceed, follow these steps:
1. |
Open a command session and type “Net Start |more”. This will give you the names of the services that are running. |
2. |
Create a batch file called StopIAS.bat and enter one line based on the names you found in step 1: Net Stop Oracle<Oracle Home name>HTTPServer |
3. |
Save this file to your desktop and then double click on it. |
4. |
You will see: “The Oracle<Oracle Home name>HTTPServer service is stopping” and then “The Oracle<Oracle Home name>HTTPServer service was stopped successfully”. You may see the message “The Oracle<Oracle Home name>HTTPServer service is not started”. You can’t stop a service that is not active. |
5. |
Create a second batch file called StartIAS.bat and enter one line based on the name you found in step 1 “Net Start Oracle<Oracle Home name>HTTPServer”. |
6. |
Save this file on your desktop and double click on it. |
7. |
The service will start and you will see the message “The Oracle<Oracle Home name>HTTPServer service is starting” and then “The Oracle <Oracle Home name>HTTPServer service was started successfully”. You can also make a similar file to stop and start your Oracle Listener and database instance. |
 | Go the companion Web site for some tips on troubleshooting the Apache Server. The Web site for this book is http://www.phptr.com/boardman. |
You can also start and stop the Apache Server by going into the Windows NT or 2000 services. Click on the Oracle<OracleHome>HTTPServer service. Right-click and select stop or start.
Starting the Oracle HTTP Server on UNIX
In order to start the iAS on UNIX you must first check that the executable is in the PATH. To do this, type echo $PATH at the command line.
To start iAS on UNIX from the command line, enter the following:
Apachectl start
or
httpd
To have iAS start automatically when the server is turned on, edit:
/etc/rc.d/rc.local
by adding:
$ORACLE_HOME/Apache/Apache/bin/httpd
Stopping the Oracle HTTP Server on UNIX
To shut down the iAS in Unix, enter
apachectl shutdown
or
kill –9 'cat $ORACLE_HOME/Apache/Apache/logs/httpd.pid'
Looking at the Log Files for Oracle 9iAS
Configuration for Oracle HTTP Server
Once the 9iAS is installed, it must be configured for the machine it resides on, and then configured to handle each new application that is created. Making changes to the configuration files known as conf files configures the Oracle HTTP server. There is one directory on the server identified by the 9iAS as the root directory. All files in this root directory and in child directories are served as static Web pages by the Web server component of the Oracle HTTP server. The default root directory is
<OracleHome>ApacheApacheHtdocs
For example, imagine your Oracle Home is C:oracleoracle9, the computer (PC or Server) is named MyServer, and you had a file named HelloWorld.htm. You then place the file in the root directory so the local address on the server ends up being C:oracleoracle9ApacheApacheHtdocsHelloWorld.htm.
In order to view the file in a Web browser you use the following URL: http://MyServer/HelloWorld.htm.
In Chapter 3, “Remote Server Access,” you will learn how to transfer files using the File Transfer Protocol (FTP), so it is important to know where in the directory tree files should be transferred in order to be accessible to the 9iAS. It is also important to note that an FTP account may have its own virtual root directory. For more details, see the section on FTP in Chapter 3.
Directory Structure
By default, these directories are placed in the Oracle Home in which Oracle 9iAS was installed. Remember, if you installed the simple version of the Oracle 9iAS as part of an Oracle 9i database installation then the Home of the Oracle database and the Home of the Oracle 9iAS will be the same. If you used the separate database CD Pack from Oracle, then the Oracle Home for the Oracle 9iAS will be different. You are prompted for this at the beginning of the installation. All the directories listed here are subdirectories of the Apache directory in the Oracle Home where the Oracle 9iAS was installed (<Oracle Home>/Apache/Apache/):
htdocs— This is the default root directory. This directory contains static HTML pages. This directory and those below it are accessible to anyone on the Web and therefore pose a severe security risk if used for anything other than public data.
conf— Contains the configuration files. These are text files that are read when the Oracle HTTP Server is started.
log— Contains the log data, both of accesses and errors.
cgi-bin— Contains the CGI scripts. These are programs or shell scripts that can be executed by the Oracle HTTP Server on behalf of its clients.
Now take a look at your log files to see how the exercises that you have performed in this chapter have been logged. To access your log files, follow these steps:
1. |
Go to your Windows explorer if you are on Windows or whatever file explorer application you use on UNIX. |
2. |
Navigate yourself to the directory $ORACLE_HOME/Apache/Apache/ log and view the files with Windows explorer. You can also view the files in the DOS command window by typing dir on Windows or ls on UNIX. |
3. |
You will see a file named access_log. |
4. |
Open the file in Textpad and have a look. You will see an entry for every page that you have viewed. Here is an example from the access_log: 169.254.104.206 - - [06/Jan/2002:23:56:12 -0500] "GET /pls/student/hello_world HTTP/1.1" 401 511 |
5. |
Try to break down the line and figure out what it means. |
Configuring Security for Oracle 9iAS
There are numerous configuration files in the Apache subdirectories that deal with many different settings such as security issues. In this exercise you will change the security settings to allow Oracle-supplied packages to be run via the Oracle 9iAS.
To begin:
1. |
Open an Internet Explorer Window and view your page HelloWorld with the Oracle-supplied package OWA_UTIL.SHOWSOURCE, as follows: http://MyServer/pls/student/owa_util.showsource?cname=hello_world |
2. |
Note that you might see the following: “You don’t have permission to access /pls/dadname/owa_util.showsource on this server.” In the Oracle 9iAS, prior to Oracle 9iAS version 1.0.2.2, and in all versions of the OAS you could view the source code of a procedure by using the owa_util.showsource in the URL This will not work by default in Oracle 9iAS version 1.0.2.2. Oracle developers made the decision that packages under the SYS schema should be secured from Web viewing unless the decision was made by the administrator to open them up. You are going to need these in later chapters, so now is a good time to make the required changes: |
3. |
Shut down the service Oracle<OracleHome>HTTPServer on your server running the Oracle 9iAS. |
4. |
Make a backup copy of the configuration file $ORACLE_HOMEApache modplsqlcfgwdbsvr.app (note the $ORACLE_HOME refers to the directory on which you installed your Oracle server). |
5. |
Edit the file $ORACLE_HOMEApachemodplsqlcfgwdbsvr.app as follows in the section that starts with: [DAD_any] ;exclusion_list |
6. |
Change the line so it no longer starts with ‘;’ and is as follows: exclusion_list = sys.*, dbms_*, utl_* |
7. |
Start the service Oracle<OracleHome>HTTPServer. |
8. |
Open an Internet Explorer window and enter the URL: http://MyServer/pls/student/owa_util.showsource?cname=hello_world. You will see the PL/SQL source for this Web page. |
 | Go the companion Web site for additional tips on methods to secure your Web site. The Web site for this book is http://www.phptr.com/boardman/. |
 | You can change the default Web server port for the Oracle HTTP server by changing the configuration file found at: <OracleHome>ApacheApacheconfhttp.conf. There will be a line: |
Port 7778
(or another port depending on your version) that should be changed to the desired port. It is recommeneded to change this to port 80. Port 80 is the default port that a browser is calling; if you use port 80 on the server side, the clients do not have to put a port number in their URL. The line would then read:
Port 80
Changes to a configuration file are not dynamic. You need to stop and restart the server for the changes to take effect.
Unit 2.2 Exercises
In order to test your progress, you should be able to answer the following questions.
| a) | What is the purpose of a DAD and what is the minimal amount of information needed to configure a DAD? |
| b) | This chapter details the steps to create an ANY DAD. What is the significance of the word ANY? |
| c) | In which directory on the Application server should you put an HTML document that you wish to be visible by a URL with the name of the server followed by a backslash and the name of the file? How is this different from a stored procedure that is written to called by a URL? What would that URL be? |
Unit 2.2 Exercise Answers
| a) | What is the purpose of a DAD and what is the minimal amount of information needed to configure a DAD? |
| Answer: | The Database Access Description (DAD) defines the method the Oracle IAS will use to connect to a database. The minimal information required is the name of a Service Name from the tnsnames.ora file on the application server. If you do not provide a username and password you will be prompted for one when the DAD is being used. If you provide a username and password in the configuration, that is what will be used when the procedure is called and the user will not be prompted for one. |
| b) | This chapter details the steps to create an ANY DAD. What is the significance of the word ANY? |
| Answer: | The word ANY is an arbitrary name that is used in the creation of a DAD. It was named ANY because the DAD configuration did not include a username and password and thus could be used by any user. If the DAD had been named BOB, it would have worked in the same manner. |
| c) | In which directory on the Application server should you put an HTML document that you wish to be visible by a URL with the name of the server followed by a backslash and the name of the file? How is this different from a stored procedure that is written to called by a URL? What would that URL be? |
| Answer: | The directory would be under Oracle Home as follows: <Oracle_Home>/apache/apache/htdocs/ and a file in this directory would be seen from a Web browser as follows:http://Server_Name/file_name.htm. This is a static page and it is very different from a dynamic page that is generated from an Oracle stored procedure. In order to view the stored procedure, the URL must contain an indication that it is using the mod_plsql module with the /pls/ and the name of the DAD to be user. The URL would be as follows:http://Server_Name/pls/any/procedure_name. |
Summary
In this chapter, you learned many concepts that you should keep in mind when you read the subsequent chapter. These concepts include:
Multi-tier architecture in general and with the Oracle 9iAS
Static versus dynamic Web pages
Oracle HTTP server modules
The PL/SQL module in Oracle 9iAS Mod_plsql
The URL used for PL/SQL pages in Oracle 9iAS
In the chapters of this book you will create an application for maintaining students and teachers in a school database. In the exercises of this chapter you set up your Oracle 9iAS server to perform the exercises in the rest of the book. This consisted of the following:
Downloading and installing the student schema
Finding the DAD configuration page
Creating an “any” DAD and a schema-specific DAD to run PL/SQL procedures via a URL
Stopping and starting the Oracle 9iAS
Viewing the log files for the Oracle 9iAS
Configuring security for Oracle-supplied packages on the Oracle 9iAS
At this point your server is ready to serve both static Web pages and dynamic Web pages generated from an Oracle database. Enjoy the next chapter.