
Today, Compute Cloud is one of the top-notch services on the market. Many cloud providers support the compute service, which makes compute services the basis of many other cloud services, such as Platform as a Service (PaaS ) and Software as a Service (SaaS ) (see Figure 2-1). Compute is a new-generation service for creating new virtual machines that include many platforms. Compute services are integrated by many vendors, such as Oracle, Amazon, Azure, and other local vendors. Moreover, IaaS and PaaS have been developed to easily integrate and build new applications with only a few clicks. Compute services are built through new-generation virtualization technologies that are used in cloud infrastructure; therefore, one service can accommodate many customers from a single point.

Figure 2-1. IaaS cloud pyramid
The biggest advantage of compute cloud services is consolidated management of many compute instances. Furthermore, it requires no extra IT staff or effort, such as database administrators (DBAs) or hardware support staff, thus companies can limit extra cost through compute instances. Old infrastructure providers can’t create new instance dedicatedly, but new-generation vendors do, and this service allows changes in utilization. For example, if one CPU is settled in a compute service by customers but suddenly those customers change their minds about the CPU, the customers can change this CPU shape with new-generation compute services. Computing resources are isolated from one another for each node. All compute nodes are dedicated to your particular usage, and Oracle provides network isolation through a virtual private network (VPN) .
At this point, Oracle is bringing its own experience for building new-generation compute services. Many advantages are accruing with new-generation cloud services, which are easily provisioned to migrate applications and to work virtual machines with scalable performance, securely and with scalability. Oracle services are able to work on many platforms: Linux distributions (Oracle Enterprise Linux, Debian), Solaris, and Microsoft Windows.
Advantages of IaaS
Oracle IaaS offers user experiences through innovative and useful design. In addition, IaaS has fabulous features that are helping to solve many problems for adopting and migrating current solutions. The features include:
Provisioning. The service offers rapid provisioning for creating virtual machines.
Migration. Owing to the ability to select the data center closest to a customer’s location, data can be migrated easily from on-premise to cloud.
Visibility. A control panel is provided to easily monitor and control your service.
Deployment. The service provides multiple deployment options (such as GUI, REST, and API).
Enterprise grade. The service offers secure, high-performance, and high availability options for deploying applications.
Creating an Oracle Compute Service
To find and upload your operating system (Oracle offers many pre-built images based on Oracle Linux and customers’ own uploaded images), you can use Oracle Cloud Market Place to select the operating system that you require, such as Microsoft Windows, Linux Debian, or Oracle Enterprise Linux.
Oracle Market Place can be found at https://cloud.oracle.com/marketplace/faces/homePage.jspx .
A new IaaS service can be obtained easily by taking the following steps:
First, click Compute Cloud Service from the dashboard, and the service page will show account information (Figure 2-2).

Figure 2-2. Clicking Oracle Compute Cloud Service
Check your metrics under “Billing Metrics.” (This metric shows OCPU usages). (See Figure 2-3.)

Figure 2-3. Billing Metrics
Check the quotas status of your service (Figure 2-4).

Figure 2-4. Resource Quotas page
Check your metrics with graphs. Graphs only show information when one or more instances are running (Figure 2-5).

Figure 2-5. Monitoring Metrics
Find “Documents” in the Documents section (Figure 2-6).

Figure 2-6. Documents
Create a service-on-service dashboard (Figure 2-7) and select the Compute option from that dashboard.

Figure 2-7. Instances dashboard
Select Image from the following cloud images. Custom or ready images can also be downloaded from Oracle Market Place (Figure 2-8).

Figure 2-8. Image page
Select the operating system version (Figure 2-9).

Figure 2-9. Image selection
Push the Selected button (Figure 2-10).

Figure 2-10. Selected button
Select the shape for your instance. Shape defines CPU and memory rate at Oracle Public Cloud. As seen, users can select CPU and memory through shape (Figure 2-11).

Figure 2-11. Compute ➤ Shape
Select the Instance page. This page contains all the information necessary for creating a service (Figure 2-12).
Name: Machine name.
Label: The name that will appear to outside users.
Description: Any description for understanding the creation of the machine.
Tags: Any tags for using the machine.
DNS hostname prefix: If required, specify the DNS prefix.
Public IP address: This option allows users to assign IP address with such options as auto.
Security: Use this option to specify a security list.
SSH Keys: This option is used to specify SSH keys.

Figure 2-12. Instance configuration
Let’s take a look at how to generate the public key (with PuTTY ).
Click the Generate button (Figure 2-13).

Figure 2-13. Generating the public key
Move the mouse to fill the bar. If you stop moving the mouse, the generator will stop the generating key (Figure 2-14).

Figure 2-14. Generate key
Save private and public keys for logging in to the cloud system (Figure 2-15). (Save private key is for building new services and the public key for accessing these from this machine.)

Figure 2-15. Enter passphrase key
Fill in the required locations (Figure 2-16).

Figure 2-16. Add public key
Check your information (Figure 2-17).

Figure 2-17. Ready for SSH keys
If you want to specify an IP address prefix for your network, it can be an isolated network with multiple IP networks (Figure 2-18).

Figure 2-18. IP configuration
Select Create Security List and specify the configuration for your traffic (Figure 2-19).
Name: Describe your identity.
Inbound Policy: Controls internal requests. Drop packets deny requests and accept packets allow them.
Outbound Policy: Controls external request policy.
Description: Add any notes here.

Figure 2-19. Create Security List
Select the Add SSH Public key button to add new SSH keys. (Oracle Cloud must connect with asynchronous encryption, thus users have to create public and private keys through PuTTY.)
Name: New SSH key name.
Value: Generated SSH keys with third-party tools, such as PuTTYgen or existing key-generating software on Unix platforms, such as ssh-keygen. To download PuTTY and PuTTYgen, consult www.chiark.greenend.org.uk/~sgtatham/putty/download.html .
Note Be sure to add SSH keys; otherwise, you cannot log in to your instance. SSH keys cannot be changed using the GUI after the Wizard finishes.
Set storage status (Figure 2-20).

Figure 2-20. Storage
Boot Drive: Normally, boot volume is set and used to boot your instance.
Existing storage can be added with this menu (Figure 2-21). (If you have added storage, you must attach existing storage as below.)

Figure 2-21. Attaching existing storage
New storage can be added with this menu (Figure 2-22). (Customers must add new disks to enable high-capacity storage.)

Figure 2-22. New cloud storage
On the Review page of the Wizard, check all your information before clicking the Create button and creating a compute instance (Figure 2-23).
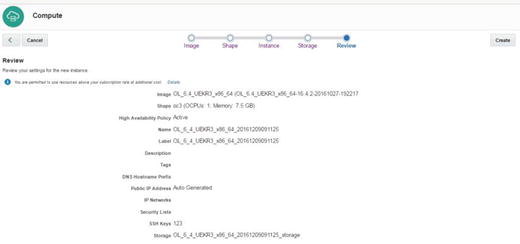
Figure 2-23. Review
Now the compute instance is running and ready for other operations (Figure 2-24).

Figure 2-24. Available instance
After clicking the little computer symbol in front of your instance name, you can see and change the details of the compute instance (Figure 2-25).

Figure 2-25. Instance summary
When enabled, the Logs page displays any logs provided, such as the Console Log (Figure 2-26).

Figure 2-26. Instance logs
Connecting Compute Node
Everything is done, and now we are at the point of accessing our compute node . First, we must do some configuration related to security issues: source and target security lists that aim to connect users to the compute node from the public Internet.
PuTTY or a similar SSH client is required for connecting Linux machines. Remote Desktop can be used for Windows-based instances. The following steps assume the use of SSH (port 22). If Remote Desktop is used, follow the same steps but use port 3389 instead.
Make sure that you are on the Compute Service Console. After clicking the Network tab, select Create Security Rule from Security Rule section (Figure 2-27).

Figure 2-27. Creating security rule
Specify the security list that you initially selected for your new compute instance. We will grant access (for example, for port 22 from the Internet) to this list. Because this security list is connected to your compute instance, the compute instance will be accessible on, for example, port 22 (Figure 2-28). (Specifically, you can select public Internet from the Security IP List.)

Figure 2-28. Security rule
Note If you do not specify security rules, you cannot connect to the instance.
Now, we should be able to connect to our system. Make a note of the compute instance public IP address. Let’s start with PuTTY and enter your public IP address under Host Name (Figure 2-29).

Figure 2-29. PuTTY connection
Enter “opc” in the Auto-login username box (Figure 2-30). (Enter “opc,” if you want to become root with SUDO.)
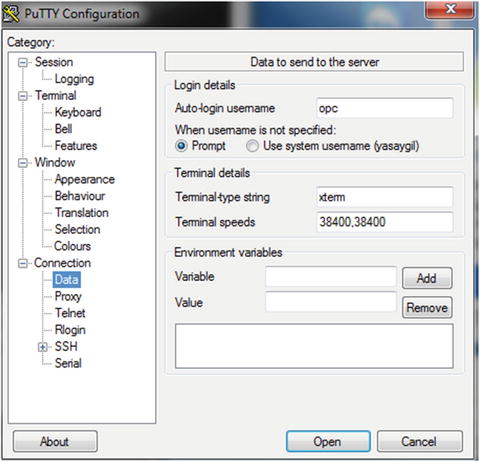
Figure 2-30. Username in Data
Navigate to the Connection-SSH-Auth category and select the private key file that was generated when creating the public key file (Figure 2-31).

Figure 2-31. Configurating private key
For ease of use, click the Session category of PuTTY and save the configuration for future use. After this, click Open (Figure 2-32).

Figure 2-32. IP configuration
Having entered a passphrase during the generation of the private key file, you must enter it now and press Enter (Figure 2-33).

Figure 2-33. Connection with PuTTY
Removing Oracle Compute Service
You have learned how to install the compute node, but I haven’t discussed how to remove this service from the cloud. To remove the compute node, you have to remove the relevant orchestration entries from the Orchestrations tab. All services are started with orchestrations. When you drop the relevant orchestration, the items created by this orchestration (disks, network, CPU, memory, etc.) will be deleted. This is a unique feature because, normally, other cloud service providers do this removal via a machine’s remove section.
Let’s see how removal is done.
Click the orchestration service tab and click to stop the orchestration line for your cloud instance that has the extension “_Master” in the name (Figure 2-34).

Figure 2-34. Orchestration
You will receive a warning that all objects will be deleted and that you should confirm your decision to delete (Figure 2-35).

Figure 2-35. Stopping orchestration
After clicking Yes, this information will be at the top side (Figure 2-36).

Figure 2-36. Orchestration request
Click the storage service page and view the storage status (Figure 2-37).

Figure 2-37. Orchestration detach
Click Yes under Detach Storage Volume (Figure 2-38).

Figure 2-38. Detach confirmation
Now, the disks are detaching from the compute instance (Figure 2-39). (This step stops the instance.)

Figure 2-39. Detach progress
Linux Disk Adding
Mission-critical operations may require increasing disk size day by day. Therefore, disks must be added to avoid any service interruption. Oracle Cloud offers rapid provisions for adding new disks that are used for different purposes. To add disks quickly, do the following:
Use the Oracle Cloud interface to create new storage devices and add them to the compute instance.
Log in to your system, as follows:
Login as: opcAuthenticating with public key "rsa-key-20161201"[opc@d5f7f3 ∼]$Check the new device with the ls listing—command. (After adding the new disk, you will see xvdc.)
[opc@d5f7f3 ∼]$ ls /dev/xvd*/dev/xvdb /dev/xvdb1 /dev/xvdb2 /dev/xvdcConfigure your disk.
[opc@d5f7f3 ∼]$ sudo mkfs -t ext4 /dev/xvdcmke2fs 1.43-WIP (20-Jun-2013)Filesystem label=OS type: LinuxBlock size=4096 (log=2)Fragment size=4096 (log=2)Stride=0 blocks, Stripe width=0 blocks1310720 inodes, 5242880 blocks262144 blocks (5.00%) reserved for the super userFirst data block=0Maximum filesystem blocks=4294967296160 block groups32768 blocks per group, 32768 fragments per group8192 inodes per groupSuperblock backups stored on blocks:32768, 98304, 163840, 229376, 294912, 819200, 884736, 1605632, 2654208,4096000Allocating group tables: doneWriting inode tables: doneCreating journal (32768 blocks): doneWriting superblocks and filesystem accounting information: doneMount the specific disk.
[opc@d5f7f3 ∼]$ sudo mount /dev/xvdc /mntEnter details on the fstab file.
[opc@d5f7f3 mnt]$ sudo vi /etc/fstab/dev/mapper/vg_main-lv_root / ext4 defaults 1 1UUID=7a51e0aa-31d2-48a0-91d9-783a8b9154d8 /boo ext4 defaults 1 2tmpfs /dev/shm tmpfs defaults 0 0devpts /dev/pts devpts gid=5,mode=620 0 0sysfs /sys sysfs defaults 0 0proc /proc proc defaults 0 0disk /mnt disk defaults 0 0Check the new device.
[opc@d5f7f3 mnt]$ df -hFilesystem Size Used Avail Use% Mounted on/dev/mapper/vg_main-lv_root7.3G 885M 6.1G 13% /tmpfs 3.7G 0 3.7G 0% /dev/shm/dev/xvdb1 477M 63M 385M 14% /boot/dev/xvdc 20G 45M 19G 1% /mnt
Oracle Market Place
Many applications are developed by independent software vendors and system integrators. Broadly speaking, they are seeking to promote their own products in the IT sector, thus Oracle is offering a market place from which to develop new business in the cloud. Oracle Market Place makes use of the marketplace more accessible. Oracle Cloud products can be published to a dedicated distribution channel.
Click Create Instance (Figure 2-40).

Figure 2-40. Create Instance
Select Market Place (Figure 2-41).

Figure 2-41. Market Place
For example, search Microsoft Windows for installing an image from Oracle Cloud Market Place (Figure 2-42).

Figure 2-42. Market Place selection
Select the Windows Server 2012 image (Figure 2-43).

Figure 2-43. Selection
Accept the rules and regulations. (If you have selected images, you are accepting the terms under which a price will be charged; Figure 2-44.)

Figure 2-44. Agreement
Click the Install button to continue (Figure 2-44).
Note If you select Review and Create, installation will finish, and you will not be able to connect to your environment, as you have not provided a password for the Administrator user.
Instead, click the Next button (Figure 2-45).

Figure 2-45. Next button
Select OCPU and memory size (Figure 2-46).

Figure 2-46. Shape
Fill in blanks with the necessary information (Figure 2-47).
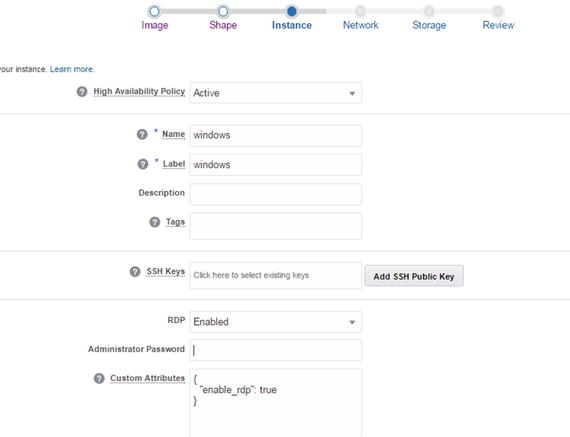
Figure 2-47. Instance configuration
Note Don’t forget to enter an Administrator password, or you will not be able to log in to the machine.
Fill in the blanks with the necessary information (Figure 2-48).

Figure 2-48. Network
Check and update your storage status (Figure 2-49).

Figure 2-49. Storage selection
Check your configuration summary (Figure 2-50).

Figure 2-50. Review
Note Check your summary carefully, because you may not be able to repeat the settings, owing to some improper configurations.
A confirmation e-mail will be sent by Oracle to verify your e-mail address (Figure 2-51).

Figure 2-51. Confirmation e-mail
Application service e-mail will be sent by Oracle to your e-mail address (Figure 2-52).

Figure 2-52. Confirmation e-mail
Your application is now ready to use in our case, on a Windows machine. Now, try to connect to the system.
Connect to a Windows machine through the Remote Desktop Protocol (RDP; Figure 2-53). (Before connecting to the Windows machine through RDP, add the security rule for port 3389.)

Figure 2-53. Remote Desktop Protocol
Enter your username (Administrator) and your password (Figure 2-54).

Figure 2-54. RDP credentials
Note the certification and verification for logging (Figure 2-55).

Figure 2-55. RDP verification
Finally, the machine is connected through RDP (Figure 2-56).

Figure 2-56. Windows server
Adding a Disk to a Windows Machine
We will now look at adding storage to a Windows machine, which is one of the most in-demand operations and can be initiated as follows:
Add a new disk to the compute instance from the Oracle Cloud interface (Figure 2-57). (Add a new disk to the compute instance either by following the provided compute provision steps or from the compute cloud dashboard.)

Figure 2-57. Adding storage volume
Find Server Manager on the Windows machine (Figure 2-58).

Figure 2-58. Search server manager
Find File and Server Manager from Dashboard (Figure 2-59).

Figure 2-59. Configuring Server Manager
Check your new device from the Disks section (Figure 2-60).

Figure 2-60. Disks manager
Find New Volume Wizard (Figure 2-61).

Figure 2-61. New Volume Wizard
Check your device on Wizard (Figure 2-62).

Figure 2-62. Server and disk
Specify your disk size (Figure 2-63).

Figure 2-63. Specifying size
Assign it to a drive (Figure 2-64).

Figure 2-64. Drive letter
Confirm the settings (Figure 2-65).

Figure 2-65. Confirmation
Click volume to find Manage Drive Letter and Access Paths… (Figure 2-66).

Figure 2-66. Manage Drive Letter...
Enter the drive letter and browse the access paths (Figure 2-67).

Figure 2-67. Manage drive letter
Check your new volumes (Figure 2-68).

Figure 2-68. Volume
Check your new device on the compute node (Figure 2-69).

Figure 2-69. Computers
Network
Security is provided at a high level, so that a user cannot engage in any undesirable behavior, owing to the fact that security is designed for, and supported at, every level. (Network security is a real problem, and knowing that this is a critical issue, Oracle seeks to provide secure cloud for customers.) To ensure security, you can specify which IP addresses to connect to the machine, or you can open public Internet for cloud applications. Both scenarios are available from Oracle Cloud.
The network settings are applied to all machines on Oracle Cloud.
Click Security Rules under the Network tab (Figure 2-70).

Figure 2-70. Network
Security Rule is used to specify security lists for source and target machines. For example, you can select public Internet as a source and this can reach your machine. Security applications can be selected by port or port-range. Security Rule is enabled by default, but it can be modified (Figure 2-71) by amending the following:
Status: Whether or not the rule is available
Security application: Selects the application
Source: Selected from a security list or security IP list
Target: Can be selected from a security list or security IP list
Description: Allows comments to be added

Figure 2-71. Create Security Rule
Let’s check out our rule on the security list (Figure 2-72).

Figure 2-72. Security list
If any need arises for changing the default for inbound and outbound network traffic behavior, network configuration can be updated (Figure 2-73).
Name: Specify name.
Inbound: This option can be selected: Deny or Reject.
Outbound: These options can be selected: Deny, Reject, or Allow.
Description: Comments can be added about it.
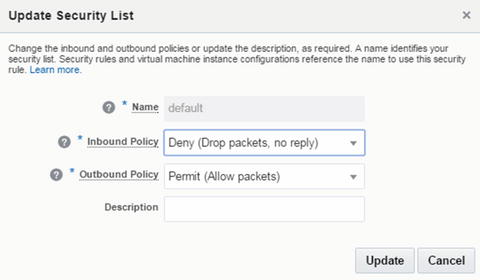
Figure 2-73. Update security rule
Open Security Applications to ensure the desired port type and port range. This option allows users to employ applications through a rule. In fact, it is this security list that allows users to open the port range (Figure 2-74).

Figure 2-74. Summary
Specify applications by creating a new one. This option shows applications details, including name, port type, and port range. (Figure 2-75).
Name: Specify a name.
Port Type: Select the protocol which is to be used.
Port Range Start: Specify the number of which port is to start.
Port Range End: Specify the number of which port is to end.
Description: Add comments here.

Figure 2-75. Create Security Application
Specify the application security IP list (Figure 2-76). (The Security IP list shows available IP subnets or IP addresses that are external to instances.)

Figure 2-76. Security IP list
Note The IP list can include a maximum of 100 entries.
Specify new security IP adresses that are to be enabled for the cloud network (Figure 2-77).
Name: Specify name.
IP List: Specify IP with comma-separated list, in order to admit an external host to the service.
Description: Comments can be added here.

Figure 2-77. Create Security IP List
IP Network allows you to build an IP subnet and, during the creation of the IP network, you can specify an IP prefix. An instance assigned to IP Network can be assigned an IP address in the subnet. Check your IP networks on Oracle Cloud (Figure 2-78).

Figure 2-78. IP Networks
Specify IP Networks configurations, as follows:
Name: Specify a name.
IP Address Prefix: Enter the CIDR prefix format for the IP.
Description: Comments can be entered here.
IP Network Exchanges allow IP networks to to be exchanged with one another. Check your IP address for exchanging (Figure 2-79).

Figure 2-79. IP Exchanges
Specify the IP address for creating and updating the network (Figure 2-80).
Name: Specify a name.
Description: Comments can be entered here.

Figure 2-80. Create IP Exchange
VNIC Set (Virtual NIC set) collects multiple VNICs, so with this feature, you can specify the next destination on route. Check the VNIC setting in the VNIC Set tab (Figure 2-81).

Figure 2-81. VNIC Set
Please specify the VNIC Set name to find a specific VNIC set (Figure 2-82).

Figure 2-82. Create Virtual NIC Set
If a specific route is set by your system, apply it to cloud network settings.
Specify the route name, IP address, and VNIC Set to create a new route (Figure 2-83).

Figure 2-83. Create Route
You can attach a public IP address with this menu, and a public IP address can be reserved from IP Pools. Check reserve IP address settings from this menu to create an IP reservation and its update (Figure 2-84).
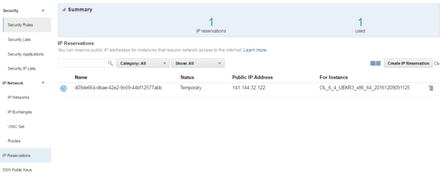
Figure 2-84. IP reservation
Specify a reservation name and instance for creating an IP reservation (Figure 2-85).

Figure 2-85. Create Public IP Reservation
Update reservation IP for status (Figure 2-86).
Name: Specify a name.
Boot image: The image to be selected for imaging is entered here.
Size: Size can be 2000GB.
Status: Normally, if a temporary address is needed, you can select “Temporary”; otherwise, you can select a permanent IP address.

Figure 2-86. Updating IP reservation
Check status for SSH public keys (Figure 2-87).
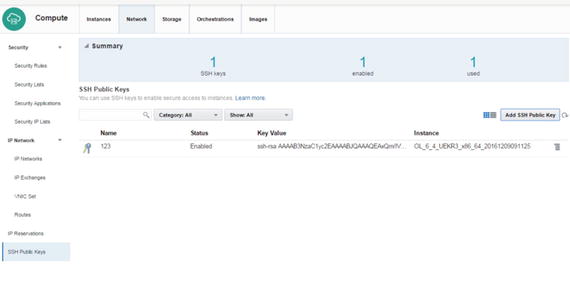
Figure 2-87. SSH public keys
Specify which SSH public key to add (Figure 2-88).
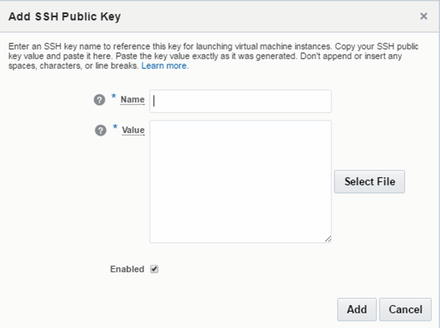
Figure 2-88. Adding an SSH public key
Click View for viewing the SSH public key (Figure 2-89).

Figure 2-89. Viewing the public key
Storage
Many business operations occur within days, and these have many requirements. Some require greater disk space. Oracle Cloud provides fast provisioning in this regard. I’ll show you how to increase storage volume in this section. Click the Storage section to check the storage system of the compute node (Figure 2-90).

Figure 2-90. Storage volumes
Create storage volume and specify size (Figure 2-91).
Name: Specify a name.
Boot Image: Select an image for imaging.
Size: Size can be 2000GB.
Storage Property: There are differences in storage properties. For example, if low-latency high IOPS are desired, storage/latency may be preferred. Otherwise, storage/default can be selected.
Description: Comments can be added here.

Figure 2-91. Create Storage Volume
If necessary, stored data can be backed up on storage volume. In addition, you can take multiple snapshots of storage volume, and all the stored data can be included in the storage volume. Select Create Snapshot from the storage options (Figure 2-92).

Figure 2-92. Creating storage volumes
Enter a name to create a snapshot. To create a snapshot across a site (Figure 2-93), enter the following:
Name: Specify a name.
Colocated: All snapshots are stored at the same location, and as each snapshot uses the same size of storage, the required options can be provisioned quickly.
Description: Comments can be entered here.
Tags: Tags can be added.

Figure 2-93. Create Storage Snapshot
Specify the snapshot schedule . This section allows you to create a snapshot periodically and set snapshot retention (Figure 2-94).
Name: Specify a name.
Enable: Enable options to be selected for start service.
Retention: Options for backup retention.
Interval: Select backup interval.
Every: An interval, such as hourly or weekly, can be selected.
Description: Comments can be entered here.

Figure 2-94. Schedule Snapshots
Check your specific storage status with View (Figure 2-95).

Figure 2-95. Storage volumes
Update storage volume size from this section (Figure 2-96).
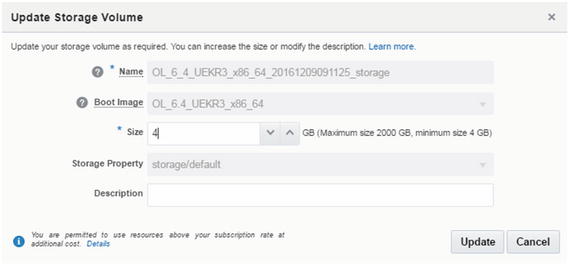
Figure 2-96. Update Storage Volume
Orchestration
New generation IT structures organized with file-based architecture such as puppet and terraform use REST api for creating required orchestration. Oracle Cloud works with orchestration files. This service describes the attributes and interdependencies of gathering network, compute, and storage resources. Following are features of orchestration.
Enter the Orchestrations section (Figure 2-97).
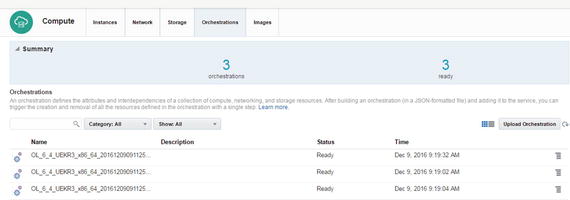
Figure 2-97. Orchestration
Click View for checking status (Figure 2-98).

Figure 2-98. Orchestration options
Check orchestrations status, thereby allowing this service to work with JSON (Figure 2-99).
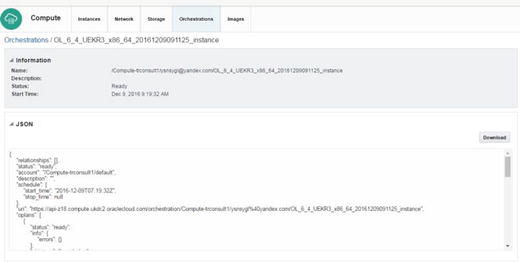
Figure 2-99. Orchestration details
Upload a specific orchestration file for prepared services. The orchestration file provides control provisioning and resources, so that the orchestration file can be created manually. However, it must create a JSON format (Figure 2-100).

Figure 2-100. Upload Orchestration
Click Image for uploading a specific image or creating new associate images (Figure 2-101).

Figure 2-101. New associate image
Bring Your Own Image
It is important to be able to add images in Oracle Cloud, because it is likely the customer’s primary goal to use his or her own images. There are, of course, criteria governing this procedure. The following are the OS versions currently certified in this regard:
6.4, 6.6 UEK3 and UEK4
6.7 UEK4 and UEK4
6.8 ,7.1, 7.2 UEK3
Solaris 13
Note Oracle Linux’s 2.6.36 kernel version must be used for booting the system.
Some network configurations must be set in an interface configuration file (/etc/sysconfig/network-script and ifcfg-interface); otherwise, your virtual machine (VM) may not work properly in the cloud.
Device: The created interface
ONBOOT: This configuration must be yes, because the system is looking for a bootable machine.
TYPE: This configuration must be Ethernet.
BOOTPROTO: This configuration must be DHCP.
PERSISTENT_DHCLIENT: This configuration must be 1.
opc-init can be installed, and you should create an OPC user. Modify /etc/sudoers by using the visudo command and % opc ALL=(ALL) NOPASSWD: ALL.
First, shut down your VM to convert the image.
VDI must be converted with the following command:
VBoxManage internalcommands /your_path/VM.vdi /yourpath/image_file.imgThe image can be shared with the following command, owing to size:
cp --sparse=always /your_path/image_file.img /your_path/image_sparse.imgCreate a tarball for this file with the –s option.
Click the Images tab (Figure 2-102).

Figure 2-102. Private Images
Click Upload Image (Figure 2-103).

Figure 2-103. Upload Image
Enter your credentials (Figure 2-104).

Figure 2-104. Password
Now upload your image through Image File (Figure 2-105).

Figure 2-105. Upload Image
After Upload Image, Associate Image uploads your image (Figure 2-106).

Figure 2-106. Associate Image
User Account Administration
Although many cloud services are presented as ready-to-use, several security problems could arise if your user administration—basically, high-level access to your environment—is insecure. Remember that 80% of all security breaches come from inside an organization. Therefore, spend time on mapping which user should get what (maximum) access to your cloud services.
Open the cloud dashboard (Figure 2-107).

Figure 2-107. Cloud dashboard
Click the Users button at the top-right of your screen (Figure 2-108).

Figure 2-108. Users button
Click the Users section to add a new user (Figure 2-109).

Figure 2-109. Users
A new user can be added with the Add User button. Enter the new user information, such as first name, last name, and e-mail. By default, the username will be the e-mail address. You can choose not to do this, if you prefer (Figure 2-110).

Figure 2-110. Add User
In the bottom half of the screen, you can decide which access rights each user will have. Please note that the Identity Domain Administrator privilege means that this user can change access settings for every user.
The SFTP Users section allows you to set a password for the user account (Figure 2-111).

Figure 2-111. SFTP Users
Note that the functionality of SFTP users is different in each service type. Logging in using this SFTP username and password will not log you in to the compute instance.
The Reset Password section allows you to change a user’s password (Figure 2-112).

Figure 2-112. Reset Password
To make administration easier, you can predefine so-called roles and grant privileges to those roles. Such roles can then be granted to individual users. There are several predefined roles available (Figure 2-113).

Figure 2-113. Role
The administrator can batch-assign roles to users. The list should be in comma-separated values (Figure 2-114).

Figure 2-114. Assigning a role
Custom Roles allows you to view, add, and remove custom roles that assign non-default privileges to roles (Figure 2-115).

Figure 2-115. Custom Role
To add a custom role, add a new role name in the appropriate box (Figure 2-116).

Figure 2-116. Add Custom Role
In the Contacts section, you can specify contact information related to contacts that should receive notifications on maintenance, outages, and security incidents but are not listed as users (Figure 2-117).

Figure 2-117. Contacts
After clicking Add Notification Contact, the following screen will be displayed, from which you can specify the contact information and services this contact should use (Figure 2-118).

Figure 2-118. Add Notification Contact
The SSO Configuration tab is used for configuring SSO (single sign-on). Users can use their own company’s SSO credentials for logging in to the cloud dashboard (Figure 2-119).

Figure 2-119. SSO configuration
In the SSO tabs, you can use the Import identity metadata option or select a manual option to configure SSO (Figure 2-120).

Figure 2-120. SSO configuration
Please check the Oracle manual regarding the exact steps that must be executed, to enable the cloud authentication system to a third-party SSO.
SSO tabs provide an interface to manage client access for using the OAuth 2.0 protocol (Figure 2-121).

Figure 2-121. OAuth administration
The My Profile tab shows information related to the user currently logged in. The user can change his/her password and security questions (needed for password recovery). (See Figure 2-122.)

Figure 2-122. My Profile
Other user-specific preferences (for the user currently logged in) can be found in the Preferences link at the right-top of the page. The Preferences section provides the option to change language, time zone, and notification settings, based on the user’s requirements (Figure 2-123).

Figure 2-123. Preferences
Notifications
All notifications that have been sent to users are listed and can be viewed by clicking the Notifications button, visible at the top-right of the screen (next to the Users button). All provides complete information upon notification, such as Applications, Platform Services, and Notification Preferences (Figure 2-124).

Figure 2-124. Notifications
The Applications section provides only application information at notification (Figure 2-125).

Figure 2-125. Application on notification
The Platform Services section provides only platform service information at notification (Figure 2-126).

Figure 2-126. Platform services are provided on notification
The Notification Preferences tab is used for notification preferences. Here, you can determine which notifications should be e-mailed (or SMS-ed) and which should be displayed only in the Notifications tab (Figure 2-127).

Figure 2-127. Notification preferences
Summary
In this chapter, you have learned how to create a compute service and select an application on it from Oracle Cloud Market Place. Oracle’s Compute Cloud service could be defined as the main service in the Oracle IaaS architecture. Therefore, if you want to understand Oracle IaaS, you must first understand Oracle Compute service fundamentals. In the next chapter, we are going to examine Oracle cloud storage technology and see how to create and use this service.