
Today’s IT market is growing with the development of new products, and purchases are increasing proportionally. The size of the market exceeds 1 billion dollars for IT vendors of on-premise solutions, excepting cloud solutions. Of course, these purchases will not always be beneficial, as many products can be selected that are not suited to certain IT sectors. A lot of money is wasted as a result of these bad choices, and the main reason for this is incorrectly tested products. Therefore, many projects fail, owing to this reason and also because if very expensive purchases lead to bad results, buyers can be removed from their jobs. Oracle’s Ravello service is trying mitigate these problems, putting IT professionals on the right path to purchasing products that yield positive results.
Ravello’s acquisition by Oracle was announced on February 22, 2016 and was completed in March 2017. The product transforms any public cloud, currently Amazon AWS, Google Cloud, and Oracle Public Cloud Service, into the ideal enterprise development and test infrastructure.
Ravello is a product development environment (Figure 4-1). With this service, you can easily use different cloud providers, such as Google Cloud and Amazon Cloud.

Figure 4-1. Ravello and IT environments
Changing enterprise business needs are driving cloud-based solutions. Developers want their own test environment, and customers want to have an online demo or trial environment—all of this simulated as if it were on-premise. Ravello provides rapid deployment and management of all virtualized enterprise environments into its cloud systems. Oracle Ravello is able to run VMware and KVM environments, without network or driver changes, unaltered on the Ravello systems. In addition, virtualized disks and CD/DVDs can be uploaded to start new environments.
HVX
The hypervisor in a virtualization environment is used to translate requests from the virtual machine (VM), for example, a write request or a network request, into the proper format for the underlying hardware. Because most cloud providers use different virtualization technologies, Ravello built a so-called nested hypervisor layer called HVX.
A VM built for VMware will have different requests for disk access than a VM built on Google Cloud. Ravello’s HVX technology “knows” the different kinds of requests the supported source platforms use. Ravello also has drivers for the various cloud platforms it runs on.
So, no matter what your source virtualization technology is, and no matter what your target cloud service is, Ravello will translate all requests from the VM into requests that are accepted by the underlying cloud platform. Currently, Ravello can utilize the following cloud solutions as supported targets:
Oracle Public Cloud
Amazon Web Service
Google Compute Cloud
The customer can decide, based on location of the target cloud provider service, which underlying service is used. Billing is transparent for the user; only Ravello will send him or her an invoice.
Management
Oracle Ravello is a widely available system to simulate all infrastructure services in the cloud. The environments are fully isolated, owing to VXLAN technology, and can be managed by either an impressive GUI or through REST API calls. Ravello allows you to plan the starting and stopping of environments and displays very detailed overviews of costs per application and costs incurred so far.
Network
The Ravello service provides a highly secure network for accessing and managing Oracle Ravello services based on Virtual Extensible LAN (VXLAN) technology . The switches can simulate a Layer 2 network, which includes broadcasting and multicasting. Several network segments will be created automatically, based on the settings in the VM, per network. A Dynamic Host Configuration Protocol (DHCP) and Domain Name System (DNS) simulate, together with the routers and switches that are needed to connect the various networks.
When duplicating an existing Ravello setup, all networks will remain the same in the copy of the original application. Owing to the VXLAN usage, several networks (for copies of ViMs) can be exactly the same (same IP ranges, IP addresses, gateways, etc.), so that it is very easy to roll out several identical setups for demonstration, testing, training, and development purposes.
Advantages of Ravello
Oracle Ravello had many advantages , but one of the best is that it helps to duplicate an IT environment design with drag-and-drop motions or, for a VMware environment, by simply pointing the upload agent to the running VMware system. The upload agent will duplicate the VMware setup as an exact copy into the Ravello environment. Other advantages of Ravello service are the following:
Agility. Ravello reduces provisioning time for testing machines. Create it once, and you can provision it multiple times in seconds.
Cost. Because there is no up-front charge for using this service, fees accrue only when the VMs are actually started, thereby saving you on CAPEX expenses. Owing to the automatic stop and scheduling options, you save on OPEX costs.
Scalability. Users can increase sizing or run multiple environments from any geographical location.
Fidelity. Ravello provides exact clones from existing VMs in your data center and runs them unaltered on the Ravello cloud.
Ravello Import Utility
The easiest way to start a new Ravello VM is to upload an existing VM, virtualized disk, or CD/DVD. Ravello currently accepts KVM, OVA, and OVFA files and also their internal Ravello format. Currently, your VMs can be imported through the Ravello import utility, which is available as a native application for Windows or as a command line interface. On Microsoft Windows, this utility can be installed easily with a few clicks. It will install like a desktop application. When put into service, it can work with the desktop application.
Oracle Ravello is helping to test your environment with a few clicks. Here’s how the installation is done.
Request a trial account from the Oracle Ravello web site ( https://cloud.oracle.com/en_US/ravello ) (Figure 4-2).

Figure 4-2. Ravello trial
Fill in the required information on the registration form (Figure 4-3).

Figure 4-3. Ravello trial form
After receiving an activation e-mail from the Oracle Ravello product team, click the Activate Your Account button (Figure 4-4).

Figure 4-4. Account activation
Please specify your password and fill in the other details (Figure 4-5). (By the way, you can request a $300 trial environment.)

Figure 4-5. Registration
Enter credentials for logging in to Ravello (Figure 4-6).
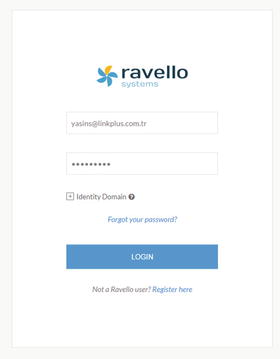
Figure 4-6. Login
An introductory video is provided when you get started on Oracle Ravello (Figure 4-7).

Figure 4-7. Introduction to Ravello
On the dashboard page, new applications can be created with the Create Application button. (Ravello classifies applications through Create Application; therefore, users easily understand which new application is selected.) (See Figure 4-8.)

Figure 4-8. Create Application button
First, before the import process, an application from the Create Application button must be completed (Figure 4-9).

Figure 4-9. Create Application
Now, VM can be uploaded using the Import button. (The time may vary, depending on the size of the VM and the distance from the data center.)
First, download installation.exe and double-click to install the tool.
Select Library from left menu and click VM, then click Import VM and select OS for the downloading import agent. Save the file in a local download location. After the download has finished, start the .exe file. Because the setup file will install an application, local administrator rights might be required.
Click Next (Figure 4-10).

Figure 4-10. Importing the virtual machine
Click Install (Figure 4-11).

Figure 4-11. Installing a location
Wait for the installation (Figure 4-12).

Figure 4-12. Loading bar
Finally, finish the installation (Figure 4-13).

Figure 4-13. Completing the installation
Wait for the next screen (Figure 4-14).

Figure 4-14. Screen
Fill in your credential information (Figure 4-15).

Figure 4-15. Login
You will be shown when the dashboard is available (Figure 4-16).

Figure 4-16. Upload
Click the Upload button (Figure 4-17) or click “+ Upload New Item (Figure 4-16).

Figure 4-17. Upload button
After clicking the upload button, a wizard will start. From here, you can choose what you want to upload. Oracle Ravello supports many VM and VM disk types, such as OVA, VMDK, and ISO (Figure 4-18).

Figure 4-18. Upload page
After selecting the type of file you want to upload, click Start to begin uploading (Figure 4-19).

Figure 4-19. Start button
Select your VMs (or disks) from your computer and click the Upload button (Figure 4-20).

Figure 4-20. Uploading VM
After VM import, your objects will be stored in your library. When selecting your newly created application, you can drag and drop your recently uploaded VMs into the canvas or connect your recently uploaded disks or ISO files to your VMs (Figure 4-21).

Figure 4-21. Importing VM
After dragging and dropping a VM into your application canvas, a network is automatically created for you. You can see your cloud network setup on the Network tab (Figure 4-22).

Figure 4-22. Network tab
Before you can start (“publish,” in Ravello terminology) your application, make sure that all errors are resolved, by clicking on your canvas. If there are any errors, there will be a red warning area at the top of your canvas. Click it to see what the issues are and solve them, until there is no longer a red area.
Now, click the Publish button to start your application (Figure 4-23).

Figure 4-23. Publish
Before starting the environment, Ravello will present you with an overview of your application, for example, a section with CPU, RAM, and Diskspace. It will give you the choice to select a data center (at an additional cost) or to let Ravello decide.
The screen also allows you to automatically stop an environment (for cost-saving purposes) and will give you an overview of the costs per hour for this setup (Figure 4-24).
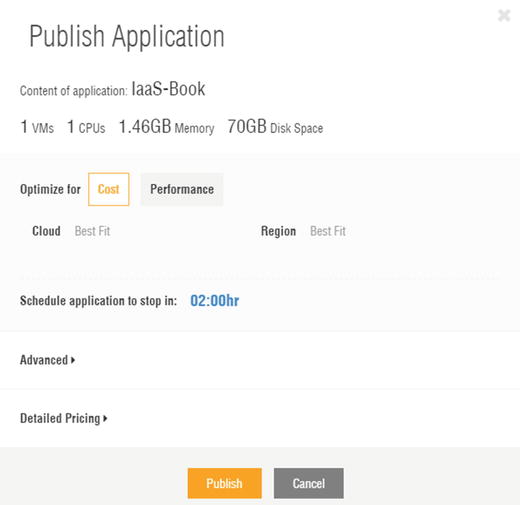
Figure 4-24. Publish Application
If you agree with the review and the costs displayed, click the Publish button again, to deploy (and start) your application.
Once a VM is running, you can connect to the OS console display using the console button (Figure 4-25).

Figure 4-25. Monitor
Blueprint
After creating the perfect setup with perhaps many application VMs connecting to a cluster of database VMs (or simply one very well-created VM), you might want to save the setup for future use or for easy duplication. Ravello can do this by saving your application setup as a so-called Blueprint. The Blueprint consists of the relationship of the VMs in the application but also contains a snapshot of the disk of the VMs in the Blue Print in the state (so with the same contents and status) they had at the time of the Blueprint. First, open your application (canvas). You can now click Save as Blueprint, to make a copy of your application setup (Figure 4-26).

Figure 4-26. Blueprint
There are two ways of getting Blueprint to select options and write names (Figure 4-27).
Shutdown First: This is recommended for taking an image, because a conflict could arise when taking an image.
No Shutdown: If a VN can’t be closed, you can select this option.

Figure 4-27. Saving as blueprint
As a demonstration, save the current application as a Blueprint called “IaaS-Book-bp,” after first shutting down the started VMs. We will use this Blueprint in the following steps.
Your Blueprint will be stored in your library. A screen shows Blueprints that are available for use (Figure 4-28).

Figure 4-28. Blueprints library
When you have sufficient access rights, you can share blueprints with your colleagues or publish them on Ravello Marketplace. Make sure that you have the blueprint saved in your library, as we will use it in the next step.
Under Library, click Blueprints and select your recently created blueprint. A drag-and-drop canvas will appear, similar to the application canvas. This screen displays the contents of the blueprint.
To start this blueprint (again), we must convert it into an application. The original blueprint will stay in our library for future use. Select Create Application, to start a new application based on our previously created blueprint (Figure 4-29).
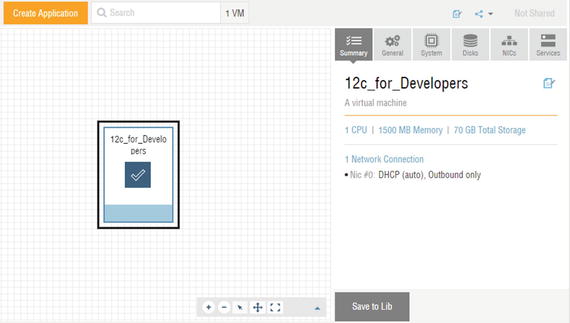
Figure 4-29. Dashboard
Specify the application name for building the new application and click Create (Figure 4-30).

Figure 4-30. Create Application
The blueprint will now be copied and made available as an application. You can now start (publish) your application that was based on a blueprint (Figure 4-31).

Figure 4-31. Readying the blueprint
The same blueprint can be used over and over again, as many times as you require them to refresh your environment or as many times as you need them in parallel for training or testing. All network settings, hostnames, and other options will be the same. The only things that change are the Internet-facing IP addresses.
Summary
Oracle Ravello is a tool for simulating, testing, training, and demoing IT environments. Oracle uses Ravello to simulate information technology environments in enterprise companies. This chapter showed you how to check your system for using any cloud solution. Oracle Ravello offers easy solutions to accommodate your cloud requirements. In addition, the service supports customers’ VM uploads through a tool to scale according to reality-based metrics. Using Ravello will make many projects more useful and time-efficient, so that they are positioned more accurately and money will not be wasted. In the next chapter, we will explore the container cloud service and its uses.