
If you’re not already using some type of version control on your project, you should definitely start now. Whether you’re a single developer or part of a bigger team, version control provides numerous benefits to any project, big or small.
If you’re not familiar with what version control is, it is a system used to capture and record changes in files within your project. It provides you with a visual history of these changes, giving you the ability to go back and see who made the changes, what they changed—both files and the changed contents, when they made the change, and, by reading their commit message, why it was changed. In addition, it provides you with a mechanism to segregate changes in your code, called branches (more on that later).
There are a number of version control systems available, some free and open source, others proprietary and requiring licensing. For the purposes of this chapter, we’ll be focusing on the free and open source Git. Git was first developed by Linus Torvalds for the Linux Kernel project. Git is a distributed version control system (DVCS) that allows you to distribute many copies (mirrors) of your repository to other members of your team so as to be able to track changes. This means that each person with a clone of the repository has an entire working copy of the system at the time of the clone. Git was built to be simple, fast, and fully distributable.
This chapter is meant to give you an overview of Git, covering enough information to get you started using it every day in your projects. Since I only have one chapter in which to cover this, I’ll only touch on the surface of Git’s most commonly used functionality. However, this should be more than enough to get you comfortable with using it. For a more complete, in-depth look at Git, check out Pro Git by Scott Chacon and Ben Straub, available from Apress.
Using Git
To start using Git , you first need to install it on your system. Binaries for Mac OS X, Windows, Linux, and Solaris are available by visiting http://git-scm.com and downloading the appropriate binary install for your OS. In addition to this, Git is also available for RedHat/CentOS systems using the yum package manager or apt-get on Debian/Ubuntu. On Mac OS X, you can get it by installing the Xcode command line tools. In this manuscript, we will use a Linux version of Git.
Git Configuration
Now that Git is installed, let’s do a minimum amount of configuration by setting your name and email address in the Git configuration tool so that this information will be shown for commits that you make (a commit being the act of placing a new version of your code in the repository). We can do this using the git config tool:
$ git config --global user.name "Chad Russell"$ git config --global user.email [email protected]
We can verify that these settings took by using the git config tool again, this time using the property key as the setting we want to check:
$ git config user.nameChad Russell$ git config user.email[email protected]
Notice that you will run the same configuration commands in both Windows and Unix environments.
Initializing Your Repository
To create your first Git repository , you will simply use the git init command. This will initialize an empty Git repository in your source code directory. Once you initialize, you can then perform your first commit to your new repository. For this example, we have an empty directory that we’ll initialize in, then we will add a README file, and finally we’ll add and commit the file to our new repository .
Remember that Git will initiate based on the directory in which the Git command will be called. For instance, if you are in
C:Program Files (x86)Gitthen the result will be
Initialized empty Git repository in C:/Program Files (x86)/Git/bin/.git/We’ll use the following repository and directory as the book progresses to track various code examples that we’ll use:
$ git initInitialized empty Git repository in /Apress/source/.git/
Initial Commit
Now that we have initialized our empty repository, we’ll add a very basic README file to it and then perform our initial commit :
$ echo "This is our README." > README.mdNow, if we look at the current status of our repository using git status we’ll see that we now have one untracked file, meaning one file that isn’t yet added to our repository or being tracked for changes by Git. You can use git status any time you’d like to view the status of the working branch of your repository:
$ git statusOn branch masterInitial commitUntracked files:(use "git add <file>..." to include in what will be committed)README.md
Now, we’ll add the file to our repository using git add:
$ git add README.mdIf we view the git status again, we’ll see our file has been added, but not yet committed (saved) to the repository:
$ git statusOn branch masterInitial commitChanges to be committed:(use "git rm --cached <file>..." to unstage)new file: README.md
Lastly, we’ll commit our change, and our new README will now be in our repository and be tracked for changes going forward:
$ git commit -m "Initial commit. Added our README"[master (root-commit) e504d64] Initial commit. Added our README1 file changed, 1 insertion(+)create mode 100644 README.md
We can see from the message we received back from git commit that our commit was saved. Now, if we check the git status one more time we’ll see we currently have nothing else to commit:
$ git statusOn branch masternothing to commit, working directory clean
Staging Changes
We have our initial tracked file in our repository and have seen how to add a new file to Git to be tracked. Let’s now change the README and then stage and commit this change.
I’ve added a change to the README.md file, altering the initial text we added to something slightly more informative. Let’s run git status again and see what it shows:
$ git statusOn branch masterChanges not staged for commit:(use "git add <file>..." to update what will be committed)(use "git checkout -- <file>..." to discard changes in working directory)modified: README.md
It shows that our README was modified, but that it’s not staged for commit yet. We do this by using the git add command. We’ll add it and check the status one more time:
$ git add README.md$ git statusOn branch masterChanges to be committed:(use "git reset HEAD <file>..." to unstage)modified: README.md
Lastly, we’ll make this new commit, which will wrap up the change to the file we made:
$ git commit -m "Updated README"[master ca476b6] Updated README1 file changed, 1 insertion(+), 1 deletion(-)
Note
The staging changes may be configured a bit differently in a Windows environment.
Viewing History
With all of the changes we’ve just made, it is helpful to be able to go back and view the history of our repository. One of the easiest ways to do this is to use the git log command. When no arguments are passed to it, git log will show you all of the commits in your repository, starting with your most recent changes and descending chronologically from there:
$ git logcommit ca476b6c41721cb74181085fd24a40e48ed991abAuthor: Chad Russell <[email protected]>Date: Tue Mar 31 12:25:36 2015 -0400Updated READMEcommit dc56de647ea8edb80037a2fc5e522eec32eca626Author: Chad Russell <[email protected]>Date: Tue Mar 31 10:52:23 2015 -0400Initial commit. Added our README
There are a number of options and arguments you can pass to git log. You can limit the number of results by passing in a number as an argument; you can view the results for just a specific file; and you can even change the output format using the --pretty argument along with a number of different options. For example, if we wanted to see only the last commit to our README.md file and summarize the commit onto one line, we could use the following:
$ git log -1 --pretty=oneline -- README.mdca476b6c41721cb74181085fd24a40e48ed991ab Updated README
To break down this command, we’re telling it to limit it to -1 one result, to use the oneline pretty format, and -- README.md only for our README.md file.
Note
By far, the most frequent commands you'll use will be git add, git commit, git log, git pull, and git push. These commands add files, commit files to the repository, pull changes from a remote origin, or push local changes to a remote origin (such as a hosted repository—more on that later). However, there are a number of additional commands and sub-commands that Git makes available to perform various tasks. For a full list of commands you can use git --help, and use git --help a to show sub-commands available.
Ignoring Specific Files
There will often be a number of files and directories within your project that you do not want Git to track. Git provides an easy way of specifying this by way of a Git Ignore file , called . gitignore. You can save these anywhere within your project, but usually you’ll start with one in your root project directory.
Once you create and save this file, you can edit it within your IDE or text editor and add the files and/or paths that you want to ignore. For now, I want to ignore the settings files that my IDE, PHPStorm, creates. PHPStorm creates a directory called .idea where it stores a number of files that are specific to my IDE’s settings for this project. We definitely don’t want that in our repository, as it’s not related to the project specifically, and it could cause problems for other developers that clone this code and use PHPStorm. Our initial .gitignore file will now look like this :
# Our main project .gitignore file.idea/*
For now, we have two lines; the first is a comment, which can be added anywhere in the file using the number sign #. The second is the line to tell Git to ignore the .idea folder and anything inside of it, using the asterisk to denote a wildcard match. We will then want to commit this file to our repository so that it’s distributed to anyone else who may clone this repository and contribute back to it.
As your project grows and you have new files or directories that you don’t want in your repository, simply continue to add to this file. Other items that are commonly ignored are configuration files that contain passwords or other system-specific information, temporary files such as caches, other media, or resources that are not directly needed by your project or even maintained within your development team.
Removing Files
At times you will need to remove files from your repository. There are a few different ways to approach removing files depending on the intentions of what you’re doing.
If you want to completely remove a file from both the repository and your local working copy, then you can use the git rm command to perform this task. If you delete the file from your local copy using your operating system or within your IDE, then it will show up as a deleted file that needs to be committed.
Let’s take a look. First, we’ll create a simple text file to add to our repository, commit it, then delete it:
$ touch DELETEME$ git add DELETEME$ git commit -m "Adding a file that we plan on deleting"[master 5464914] Adding a file that we plan on deleting1 file changed, 0 insertions(+), 0 deletions(-)create mode 100644 DELETEME$ git rm DELETEMErm 'DELETEME'$ git statusOn branch masterChanges to be committed:(use "git reset HEAD <file>..." to unstage)deleted: DELETEME$ git commit -m "Removed our temporary file"[master 6e2722b] Removed our temporary file1 file changed, 0 insertions(+), 0 deletions(-)delete mode 100644 DELETEME$ git statusOn branch masternothing to commit, working directory clean
Now, we’ll delete it first on the local system and then remove it from Git, and then we will commit the change:
$ touch DELETEME$ git add DELETEME$ git commit -m "Adding another temporary file to delete"[master b84ad4f] Adding another temporary file to delete1 file changed, 0 insertions(+), 0 deletions(-)create mode 100644 DELETEME$ rm DELETEME$ git statusOn branch masterChanges not staged for commit:(use "git add/rm <file>..." to update what will be committed)(use "git checkout -- <file>..." to discard changes in working directory)deleted: DELETEMEno changes added to commit (use "git add" and/or "git commit -a")$ git rm DELETEMErm 'DELETEME'$ git statusOn branch masterChanges to be committed:(use "git reset HEAD <file>..." to unstage)deleted: DELETEME$ git commit -m "Removing our second temporary file"[master e980b99] Removing our second temporary file1 file changed, 0 insertions(+), 0 deletions(-)delete mode 100644 DELETEME
Lastly, you may find that you want to delete a file from Git so it’s no longer tracked, but you want to keep the file locally. Perhaps you accidentally committed a configuration file that has now been added to your .gitignore file; you want to remove it from Git but keep it locally, for obvious reasons. For that you will use the --cache option along with the git rm command:
$ touch DELETEME$ git add DELETEME$ git commit -m "Adding a temporary file to delete one more time"[master f819350] Adding a temporary file to delete one more time1 file changed, 0 insertions(+), 0 deletions(-)create mode 100644 DELETEME$ git rm --cached DELETEMErm 'DELETEME'$ git statusOn branch masterChanges to be committed:(use "git reset HEAD <file>..." to unstage)deleted: DELETEMEUntracked files:(use "git add <file>..." to include in what will be committed)DELETEME$ git commit -m "Removed temporary file just in the repository"[master 26e0445] Removed temporary file just in the repository1 file changed, 0 insertions(+), 0 deletions(-)delete mode 100644 DELETEME$ git statusOn branch masterUntracked files:(use "git add <file>..." to include in what will be committed)DELETEME
Branching and Merging
Branching is a mechanism that allows you to separate various segments of changes to your code into sub-repositories of a sort. Mergingis the method for bringing this code back together. For example, suppose you have your main-line repository that most development is performed under. Then you have some requirements to build a brand-new set of functionality into your application, but you’ll still be making various unrelated changes and bug fixes to your existing code base. By creating a separate branch just for this new functionality, you can continue to make and track your changes to your main-line code and work on changes for the new functionality separately. Once you’re ready to integrate this change into your main code, you will perform a merge, which will merge your changes into the main-line branch.
Note, however, that Git branches are not like a bridge to Subversion (git svn) branches , since svn branches are only used to capture the occasional large-scale development effort, while Git branches are more integrated into our everyday workflow.
To get started, let’s create a branch for us to explore this functionality with:
$ git branch branch-example$ git checkout branch-exampleSwitched to branch 'branch-example'
We created our new branch, called branch-example, with the first command. The second tells Git to switch to that branch so as to start working in and tracking changes there. Switching between branches is done with the git checkout command. Now, we’ll create a test file for this new branch and commit it:
$ touch test.php$ git add test.php$ git commit -m 'Added a test file to our branch'
If we switch back to our initial branch (master) we’ll see this file isn’t there:
$ git checkout masterSwitched to branch 'master'$ lsREADME.md$ git logcommit e504d64a544d6a1c09df795c60d883344bb8cca8Author: Chad Russell <[email protected]>Date: Thu Feb 26 10:23:18 2015 -0500Initial commit. Added our README
Merging
Once we’re ready for our changes in the test branch to appear in the master branch, we’ll need to perform a merge. When performing a merge , Git will compare changes in both branches and will attempt to automatically merge the changes together. In the event of a collision of changes, meaning that the same lines of code were changed in both branches, it will have you manually intervene to resolve the conflict. Once resolved, this will be tracked as another commit, and you can finish your merge.
Let’s merge our branch-example changes into the master branch:
$ git merge branch-exampleUpdating e504d64..a6b7d2dFast-forwardtest.php | 01 file changed, 0 insertions(+), 0 deletions(-)create mode 100644 test.php
Now that we’ve merged this in, in this case we don’t need our branch-example any longer. We can simply delete it using the git branch command again:
$ git branch -d branch-exampleStashing Changes
There will be many times when working with your project that you might need to pull changes from a remote repository before you’re ready to commit what you’re working on, or you might need to switch to another branch to do some other work before you’re ready to commit and don’t want to lose your changes. This is where the git stash command comes in handy.
To stash your changes, you simply invoke the git stash command. You can view the stashes you’ve saved by passing in the list sub-command, and you can reapply the changes by using the apply sub-command. Let’s see it in action:
$ git statusOn branch masterChanges not staged for commit:(use "git add <file>..." to update what will be committed)(use "git checkout -- <file>..." to discard changes in working directory)modified: test.php$ git stashSaved working directory and index state WIP on master: 08e9d29 adding a test fileHEAD is now at 08e9d29 adding a test file$ git statusOn branch masternothing to commit, working directory clean
You can see we had changes to test.php that weren’t yet committed; after calling git stash we now have a clean working directory. See here:
$ git stash liststash@{0}: WIP on master: 08e9d29 adding a test file$ git stash applyOn branch masterChanges not staged for commit:(use "git add <file>..." to update what will be committed)(use "git checkout -- <file>..." to discard changes in working directory)modified: test.phpno changes added to commit (use "git add" and/or "git commit -a")$ git statusOn branch masterChanges not staged for commit:(use "git add <file>..." to update what will be committed)(use "git checkout -- <file>..." to discard changes in working directory)modified: test.php
We can see the stash we have saved using git stash list. We can reapply it and see it back in our working directory after calling git stash apply. By default, calling git stash apply will apply the most recent stash in the list. If you want to apply a specific stash, then you must supply the stash number that you see when calling git stash list. Using the preceding list output as an example, we would use the following:
$ git stash apply stash@{0}Tagging
Tagging within Git allows you to tag any given commit with a label for future reference. For example, you can use it to tag specific releases of your code or other important landmarks along the way during development.
Git provides two different tag types. There’s lightweight tags, which are just label pointing to a commit. Annotated tags are instead full checksummed objects that contain the name and email of the person tagging, and can include a message. It’s highly recommended that you always use annotated tags unless you need to temporarily tag something, in which case a lightweight tag will do.
Lightweight Tags
Let’s create a simple lightweight tag to demonstrate, then delete it and create an annotated tag.
Create initial lightweight tag:
$ git tag v0.0.1Now show details of the tag:
$ git show v0.0.1commit a6b7d2dcc5b4a5a407620e6273f9bf6848d18d3dAuthor: Chad Russell <[email protected]>Date: Thu Feb 26 10:44:11 2015 -0500Added a test file to our branchdiff --git a/test.php b/test.phpnew file mode 100644index 0000000..e69de29
We can delete a tag using the -d option:
$ git tag -d v0.0.1Deleted tag 'v0.0.1' (was a6b7d2d)
Annotated Tags
Now create the annotated version:
$ git tag -a v0.0.1 -m "Initial Release"Show the details of the annotated tag:$ git show v0.0.1tag v0.0.1Tagger: Chad Russell <[email protected]>Date: Sun Mar 15 18:54:46 2015 -0400Initial Releasecommit a6b7d2dcc5b4a5a407620e6273f9bf6848d18d3dAuthor: Chad Russell <[email protected]>Date: Thu Feb 26 10:44:11 2015 -0500Added a test file to our branchdiff --git a/test.php b/test.phpnew file mode 100644index 0000000..e69de29
As you can see, on the annotated version we have the date, name, and email of the person who created the tag.
Undoing Changes
There will come times when you might accidentally commit something that you want to undo, or where you might want to reset your local working copy back to what it was from the last commit or a given commit within the repository history. Undoing changes in Git can be broken down in the following ways:
Amend
Un-stage
File Reset
Soft Reset
Mixed Reset
Hard reset
Amend
Undoing a previous commit by changing the commit message or adding additional files can be done using the --amend option with git. For example, suppose you have two files to commit, and you accidentally only commit one of them. You can append the other file you wanted to commit to the same file and even change the commit message using the --amend option, like this:
$ git add second.php$ git commit -m "Updated commit message" --amend
Un-stage
This action would un-stage a file that has been staged but not yet committed. Un-staging a file makes use of the git reset command. For example, suppose you accidentally staged two files to commit but you only wanted to stage and commit one of them for now. You would use the git reset command along with the filename to un-stage it, like this:
$ git statusOn branch masterChanges to be committed:(use "git reset HEAD <file>..." to unstage)new file: first.phpnew file: second.php$ git reset HEAD second.php$ git statusOn branch masterChanges to be committed:(use "git reset HEAD <file>..." to unstage)new file: first.phpUntracked files:(use "git add <file>..." to include in what will be committed)second.php
File Reset
A file reset would mean reverting your working changes to a file back to the most recent commit or to an earlier commit that you specify. To reset a file to the most recent commit, you will use git checkout:
$ git statusOn branch masterChanges not staged for commit:(use "git add <file>..." to update what will be committed)(use "git checkout -- <file>..." to discard changes in working directory)modified: first.php$ git checkout -- first.php$ git statusOn branch masternothing to commit, working directory clean
If you wanted to reset a file back to a specific commit, you would use git resetalong with the commit hash and the filename, like this:
$ git reset a659a55 first.phpSoft Reset
A soft reset resets your repository index back to the most recent commit or a specified commit and leaves your working changes untouched and your staged files staged. It is invoked using the --soft option with git reset. You can either specify a commit hash to reset to or omit the commit hash, and it will reset to the most recent commit:
$ git reset –soft 26e0445Mixed Reset
Much like a soft reset, a mixed reset resets your repository index back to the most recent commit or a specified commit, leaving your working changes untouched. However, it removes any files from staging. This is the default action of just using git reset or git resetalong with a commit hash, such as:
$ git reset 26e0445Hard Reset
Lastly, the hard reset is the most dangerous of all options, so use this only when absolutely necessary. It is a hard reset of your repository back to a given commit while discarding all working and staged changes. This action cannot be undone, so make sure you know that you want to do this before doing it:
$ git reset --hard e504337HEAD is now at e504337 Added our first .gitignore file
Version Control in the Cloud: Bitbucket and GitHub
Having a remote-hosted repository is common practice when using Git other than for just your own personal projects. While there are many different ways of accomplishing this, there are two very popular services that allow you to have hosted repositories in the cloud. Enter Bitbucket ( http://bitbucket.com ) and GitHub ( http://github.com ).
Each of these services offers both free and paid plans. The largest difference in the free plan offered by both services is that Bitbucket allows an unlimited amount of private repositories, limited to five collaborators, and GitHub provides only public free repositories. Once you have an account with one of these services and create your repository, you will define this remote repository in your local Git configuration to allow you to push and pull changes to and from it.
Bitbucket
Let’s get started with Bitbucket. When you first visit their site, you will create a new account. Once your account is created, you will log in and be provided with the option to set up a new repository. Before we proceed with creating our repository, there’s a single step we can do that will make interacting with this repository a lot easier for us, which is adding an SSH key to use for authentication.
One of the most important advantages of Bitbucket is that it is JIRA integrated and also supports Mercurial.
SSH Key
You can add an SSH key to your Bitbucket account, which will allow you to interact with it from within Git on your local machine without having to type your Bitbucket password over and over again. To do this, navigate to the Manage Account section and then locate “SSH Keys.” From here, you can add an SSH key from your local machine that will be used as authorization when working with any remote repository under your account. If you haven’t ever set up an SSH key, it’s easily done with Mac OS X and Linux, and by using Git Bash on Windows.
From within Mac OS X or Linux, open a terminal, or on Windows open a Git Bash prompt, then issue the following command and answer the few questions it presents you:
$ ssh-keygen -t rsa -C "[email protected]"It is highly recommended that you accept the default values it provides, including the path to store the new key pair.
Once these steps are finished, you will have both a public and private key pair created. Locate the public key (using the path shown from the ssh-keygen process) and open it using your favorite text editor. You will then copy the contents of the public key to your Bitbucket account and save it. This will complete the key setup for your account.
Creating Your First Remote Repository
With the SSH in place in the Bitbucket account, you can now create your repository. To start, click the Create button located in the top navigation bar, which takes you to the Create form. Enter the information about your project and then click Create Repository. This will take you to the repository configuration page. This will provide you with a few options on what to do with this new repository. If you haven’t yet created your local repository, as we did earlier, then you could use the “Create from scratch” option. However, in our case we want to push our current repository to this new remote Git repository. Following the instructions provided on this screen, let’s link our repository and do the first push to it to copy our current code to it:
$ git remote add origin [email protected]:intuitivereason/pro-php-mysql.git$ git push -u origin --allCounting objects: 6, done.Delta compression using up to 8 threads.Compressing objects: 100% (3/3), done.Writing objects: 100% (6/6), 524 bytes | 0 bytes/s, done.Total 6 (delta 0), reused 0 (delta 0)To [email protected]:intuitivereason/pro-php-mysql.git* [new branch] master -> masterBranch master set up to track remote branch master from origin.
Now that we’ve successfully pushed it, we can click on the “Source” icon on Bitbucket to see our code visible there.
GitHub
Instead of using Bitbucket, you might want to use GitHub, and when comparing them we can say that they have very different billing structures and they also differ in history viewer and collaboration features.
The steps using Github are very similar. You first find and click the New Repository button, which will then present you with a Repository Create form similar to what we had with Bitbucket. From here, you’ll fill out the form and create the repository. On the next screen, you’ll be presented with instructions based on whether this is a new or existing repository, just as with Bitbucket. We can add this repository just like we did with Bitbucket:
$ git remote add origin [email protected]:intuitivereason/pro-php-mysql.git$ git push -u origin --all
Pushing, Pulling, and Conflict Resolution
As we just did to initially push our code to our new remote repository, we’ll use the git push command to continue to push code to it, as well as utilize the git pull command to pull code from the repository that may have been committed by others since our last pull.
For example, suppose you invite another developer to collaborate with you on a project. You pull the latest from the remote repository, then do some work. Developer 2 does the same, but commits and pushes his changes to the remote repository before you do. When you go to push, you’ll receive a message back from Git telling you that your repository version is behind. You’ll then use the git pull command to fetch any changes and attempt to automatically merge and rebase the changes with yours. Then you can push your changes to the repository. You’ll both continue this pattern while both working with the repository.
In the event that both of you work on the sample file and have overlapping changes, Git won’t be able to determine which version is the correct one to use. This is called a conflict. You must manually resolve conflicts, then commit the resolved changes and push back to the remote repository.
Git Tools
There are a number of tools that exist to make working with Git easier. Many IDEs offer integration with Git, and both Bitbucket and Github provide their own GUI tools that make working with Git much easier.
PHPStorm
If you’re not familiar with PHPStorm, it is a popular, cross-platform (Linux, Mac OS X, and Windows) PHP IDE developed by JetBrains. It is the IDE that I use throughout the various examples; however, you do not have to have PHPStorm to do any of the exercises in this book.
You can download PHP Storm at:
https://www.jetbrains.com/phpstorm/download/If you have a Git repository in your project root folder in PHPStorm, it will automatically detect it and provide menu entries to perform a number of different actions, as shown in Figure 1-1.
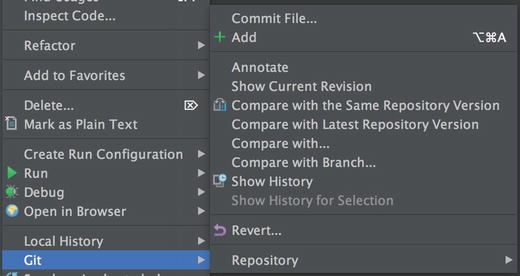
Figure 1-1. PHPStorm Git menu entries
Here we see there are a number of actions available to us when viewing these options while on our test.php file. From here we can commit or add the file, if it hasn’t been added yet. We can also do a diff to compare our local file with the same version in the repository or with what the latest version might be on a remote repository. We can also compare it with another branch within our repository or see the history of all of the changes for this one file. Another function is the “Revert” function, which allows you to quickly revert any uncommitted changes in your file back to the state it was in for the last local commit.
Figure 1-2 shows the Repository sub-menu entry and the actions it provides within this sub-menu.
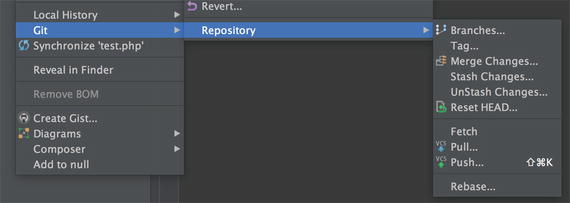
Figure 1-2. Git Repository sub-menu entry in PHPStorm
From this entry we can view branches, tag, merge, stash or un-stash our current changes, or fetch, pull, or push changes from and to a remote repository.
SourceTree
The SourceTree application is a free Git client for Windows and Mac users that is built by Atlassian, the same company that runs Bitbucket. It is a very powerful Git GUI client that makes working and interacting with Git repositories, both locally and remote, quite easy.
Installing SourceTree
SourceTree can be downloaded by visiting http://www.sourcetreeapp.com . Once downloaded, run the installer and follow the instructions to install it on your development machine. The first time you run SourceTree, it will prompt you to log in with an existing Bitbucket or GitHub account. You can either log in or skip this step. If you do choose to log in, you will be able to see your remote repositories within SourceTree’s main bookmark/browser window. You can always choose to add one of these linked accounts later.
Adding a Repository
To add a Git repository to SourceTree, you will click on the New Repository button and choose whether you are cloning an existing remote repository, adding an existing local repository, or creating a new local or remote repository (Figure 1-3).
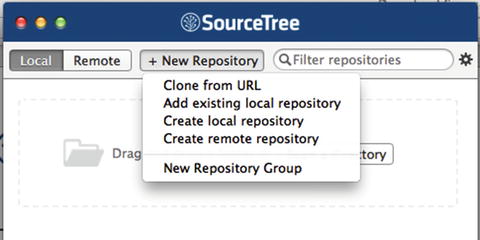
Figure 1-3. Adding a new repository to SourceTree
Add the new repository that you created earlier in this chapter by selecting “Add existing local repository.” This will have you navigate to the directory where the repository was initialized, and then click the Add button. This repository will now be visible in the SourceTree bookmark/browser window. Simply double-click the name of the repository to bring up the full GUI (Figure 1-4).
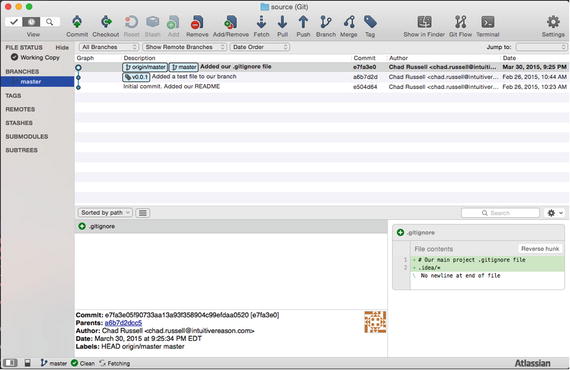
Figure 1-4. SourceTree repository view
From here, you can continue to work with Git for all of the actions we have discussed so far and others, including committing, branching, merging, pushing and pulling to and from a remote repository, and more.
GitHub GUI
GitHub has their own Git GUI that’s freely available as well. It’s very clean and intuitive to use, but lacks some of the advanced features you’ll find in SourceTree. However, if you’re looking for a nice, clean interface to use with Git, it’s definitely worth looking at.
Installing the GitHub GUI
Like SourceTree, GitHub GUI is available for both Windows and Mac users. Mac users can download by visiting https://mac.github.com , and Windows users can download by visiting https://windows.github.com . Once downloaded and installed, GitHub will walk you through the setup process to finish the installation.
Adding a Repository
One interesting feature of the GitHub GUI is that it can find Git repositories on your system and provide them to you during setup, with the option of importing them in to start working with them in GitHub GUI. If you choose not to do that, you can also add or create a new repository later using the menu entry. Once your repository has been added to the GitHub GUI, you will be presented with the repository view, as shown in Figure 1-5.
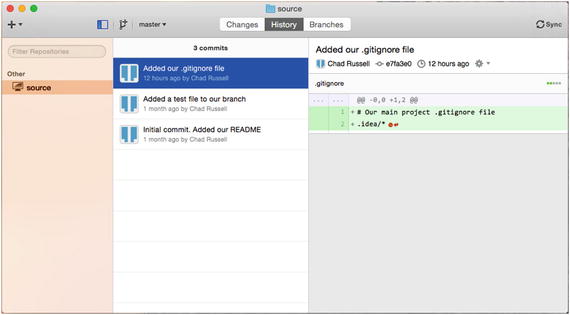
Figure 1-5. GitHub GUI repository view
gitg
gitg is an open source Git GUI that’s made by the Gnome foundation and is for Linux users only.
Installing gitg
gitg is available for installation using both yum and apt-get. gitg doesn’t quite provide the power and usability that is found with SourceTree, GitHub, or even within the PHPStorm IDE. It does, however, provide a nice interface for browsing or searching through a repository’s history on Linux systems.
Adding a Repository
To add a repository using gitg, you click the “cog wheel” icon, which then reveals a sub-menu for opening a local repository or cloning a remote repository. Once added, you can click to open the repository view, as seen in Figure 1-6.
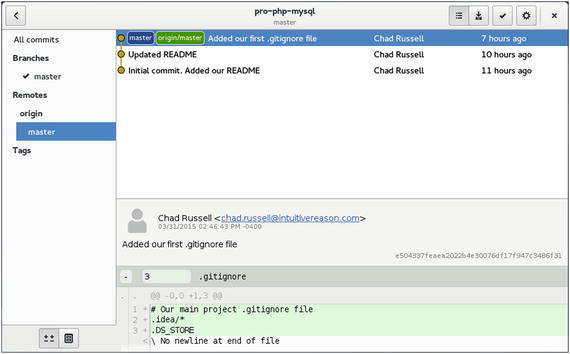
Figure 1-6. gitg repository view
Summary
In this chapter, we introduced the Git distributed version control system (DVCS). We covered the basics of using Git in day-to-day development, such as adding and committing changes, merging, and branching. We also covered working with remote repositories with the popular Github and Bitbucket services. We then discussed working with other developers and managing conflict resolution with committed files before reviewing some tools you can use to make working with Git even easier. Hopefully you’re now moving on with a comfortable knowledge of Git and are able to start using it in your projects right away!
In the next chapter we will discuss virtualizing development environments.