This chapter builds on the previous one by extending the Pos_XmlExporter class to create an RSS feed. There are several RSS formats, but the one I have chosen is RSS 2.0 (www.rssboard.org/rss-specification). As the specification says, RSS stands for Really Simple Syndication, it's a dialect of XML, and it's a format for Web content syndication. The Pos_XmlExporter class does a good job of generating XML from a database, but the content and node names are entirely dependent on the SQL query submitted by the user, making it too generic for RSS. Browsers and newsreaders expect RSS to be in a specific format, so the SQL query needs to be built internally by the extended class.
This chapter covers
Understanding the requirements of the RSS 2.0 format
Extending the
Pos_XmlExporterclass to create an RSS feed from any MySQL-databaseBuilding a utility to extract a specified number of sentences from the beginning of text
As always when designing a class, the first priority is to set out its requirements. Since the purpose of the class is to generate an RSS feed, the main requirements are to be found in the RSS 2.0 specification.
The friends of ED news feed (http://friendsofed.com/news.php) that you used in Chapters 5 and 6 follows the RSS 1.0 format. It's still perfectly valid, but it's complicated by the use of namespaces. The newer RSS 2.0 format eliminates the need for namespaces, making it easier to generate.
Note
I have avoided namespaces in the XML generated by the classes in this chapter and the previous one purely out of a desire to keep things relatively simple. XMLWriter is capable of generating namespaced elements and attributes. For details, see http://docs.php.net/manual/en/book.xmlwriter.php (the relevant methods all end in NS).
RSS 2.0 lives up to the name Really Simple Syndication. There are very few rules, and they're quite simple.
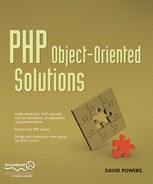
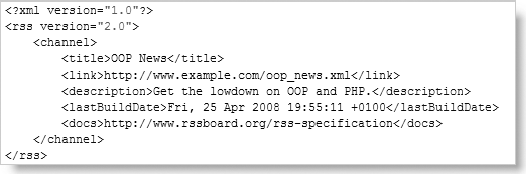
RSS 2.0 is a specialized XML format, so the first requirement is that an RSS feed must be a valid XML document. The root element is always called <rss> and contains the attribute version="2.0". The root element must have a single child element called <channel>. Inside the <channel> element are at least three required elements (<title>, <link>, and <description>) that contain information about the feed, plus any number of elements called <item>. As their name suggests, these contain the individual items that make up the RSS feed. Although there's no limit on the number of <item> elements, it's common to limit them to no more than 30 and often much fewer. Figure 9-1 illustrates the basic structure of an RSS 2.0 feed.
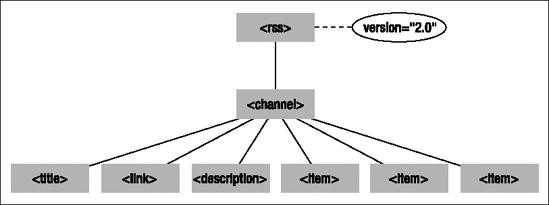
Figure 9.1. The <channel> element of an RSS 2.0 feed contains information about the feed in addition to individual items.
Note
This structure differs from the friends of ED feed that you used in Chapters 5 and 6. In RSS 2.0 (and most other RSS specifications), the <channel> element contains the entire contents of the feed, not just the elements that describe it. The friends of ED feed uses RSS 1.0, which is the odd one out in that it puts the <item> elements outside the <channel> element and at the same level of the XML hierarchy. Although RSS 1.0 remains a valid format, I recommend that you use RSS 2.0 for new feeds.
The role of the <channel> element is to identify the feed and give a brief description. It has three required and 16 optional child elements, which are described in Table 9-1.
Table 9.1. Allowable child elements in an RSS 2.0 <channel> element
Most information in the nodes listed in Table 9-1 is intended for consumption by feed aggregators and doesn't normally appear when the feed is displayed in a browser. The interesting information (we hope) is in the <item> elements, which are also direct children of the <channel> element.
Although this is where the "meat" of an RSS feed can be found, all child elements of an <item> node are optional. However, each <item> must contain at least one of the following: <title> or <description>. Table 9-2 lists all the elements that can be included in an <item> element.
Table 9.2. Allowable child elements of RSS 2.0 <item> elements
Element | Description |
|---|---|
| A brief title describing the item. |
| The body of the item. This is usually kept brief and is used as a "taster" inviting the recipient to read the full item on the main web site. The |
| The URL of the item on the main web site. |
| The author's email address. |
| This is the same as for |
| The URL of a page for comments relating to the item. |
| A media object, such as an MP3 file, attached to the item (see |
| A string that uniquely identifies the item. This is frequently the same as |
| When the item was published. This must be in RFC 822 format (use the PHP constant, |
| The RSS feed that the item came from. This tag has one required attribute, |
Note
The descriptions in Tables 9-1 and 9-2 summarize version 2.0.10 of the RSS 2.0 specification. You can see the full specification at www.rssboard.org/rss-specification. A more detailed set of best practices can be found at www.rssboard.org/rss-profile.
The number of optional elements offers considerable choice, but most RSS feeds seem to use a relatively small subset. For the purposes of this case study, I'm going to do the same. Once you have seen the basic principles underlying the class, you can extend or adapt it to incorporate other options.
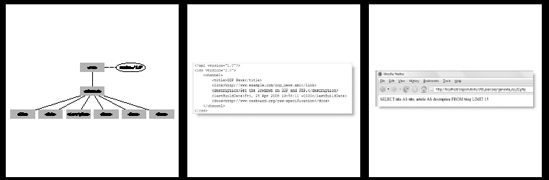
The class, which I have called Pos_RssFeed, creates an RSS 2.0 feed using the following elements to describe the feed:
<title><link><description><lastBuildDate><docs>
Each <item> element contains the following child nodes:
<title><description><pubDate><link>
The resulting XML tree is shown in Figure 9-2 (for space reasons, the figure shows only one <item> element).
The <channel> element and each <item> element contain three identically named child nodes: <title>, <link>, and <description>, so it's important to make sure they don't get mixed up when generating the XML.
The Pos_XmlExporter class in the previous chapter uses the names of the database columns for the child nodes of the top-level elements. However, that won't work for an RSS feed. The tag names are fixed. This time, the SQL needs to be built automatically by the class, using information supplied through setter methods. Since most RSS feeds carry news items or blog entries, I have assumed that all the data used in the feed comes from a single table.
The Pos_RssFeed class extends Pos_XmlExporter, so it inherits all its methods and properties. However, the generateXML() method needs to be overridden, and the setQuery() method is reduced to minor importance. The use of setQuery() becomes optional and is left in purely in case the need arises to build the SQL manually. This might happen if the database query needs to join multiple tables. However, in such a case, it would probably be better to redesign the class. Another significant change is that the usePrimaryKey() method is used internally, but to prevent it from being used accidentally, it needs to be overridden. I'll explain what's happening and the thinking behind it as we get to each section of the code.
With the exception of <lastBuildDate>, all elements that describe the feed have fixed values, so all that's necessary is to create a series of properties and setter methods.
I plan to test the Pos_RssFeed class at various stages of construction, so I suggest you roll up your sleeves and start typing. If you just want to look at the finished code, you can find a fully commented version in the finished_classes folder of the download files. I have also provided versions of the class at different stages of construction in the ch9_exercises folder.
Create a file called
RssFeed.phpin thePosfolder. The class extends thePos_XmlExporterclass, so you need to include it at the top of the script like this:require_once 'XmlExporter.php'; class Pos_RssFeed extends Pos_XmlExporter { }The URL used by the
<docs>element is fixed, so you don't need a property to store a user-specified value. However, the other four all need properties and setter methods. Define the following protected properties:require_once 'XmlExporter.php'; class Pos_RssFeed extends Pos_XmlExporter {protected $_feedTitle;protected $_feedLink;protected $_feedDescription;protected $_useNow;}The meaning of the first three properties is self-explanatory. The fourth one,
$_useNow, stores a Boolean value to determine how to set the value of<lastBuildDate>. If set totrue, the current time is used. Otherwise, the time of the most recently updated item is used instead.Create a setter method for each property. Add the following code inside the class definition below the property definitions:
public function setFeedTitle($title)
{
  $this->_feedTitle = $title;
}
public function setFeedLink($link)
{
  $this->_feedLink = $link;
}

public function setFeedDescription($description)
{
$this->_feedDescription = $description; } public function setLastBuildDate($useNow = true) { $this->_useNow = $useNow; }These methods need no explanation, apart from the fact that the argument passed to
setLastBuildDate()has a default value oftrue.If any of the first three properties is not set, you can't generate the feed, so the overridden
generateXML()method needs to check each one. Add the following code immediately after the code in the previous step:public function generateXML() { $error = array(); if (!isset($this->_feedTitle)) { $error[] = 'feed title'; } if (!isset($this->_feedLink)) { $error[] = 'feed link'; } if (!isset($this->_feedDescription)) { $error[] = 'feed description'; } if ($error) { throw new LogicException('Cannot generate RSS feed. Check thefollowing item(s): ' . implode(', ', $error) . '.'); } }
This initializes a local variable,
$error, as an empty array. A series of conditional statements checks whether the$_feedTitle, $_feedLink, and$_feedDescriptionproperties have been set. If an error is encountered, the name of the property is added to the$errorarray, and aLogicExceptionis thrown. Using an array like this makes sure that all missing elements are identified, rather than throwing an exception at the first problem.At this stage, the code hasn't been added to query the database, so the value for
<lastBuildDate>needs to use the default value, the current time formatted according to RFC 822. PHP has a handy constant (DATE_RSS) that works with thedate()function and produces the date in the correct format. Add the code highlighted in bold to thegenerateXML()method to assign the formatted date to a local variable,$lastBuildDate:public function generateXML() { $error = array(); if (!isset($this->_feedTitle)) { $error[] = 'feed title'; }if (!isset($this->_feedLink)) { $error[] = 'feed link'; } if (!isset($this->_feedDescription)) { $error[] = 'feed description'; } if ($error) { throw new LogicException('Cannot generate RSS feed. Check thefollowing item(s): ' . implode(', ', $error) . '.'); }if ($this->_useNow) {$lastBuildDate = date(DATE_RSS);}}The conditional statement sets a value for
$lastBuildDateonly if the$_useNowproperty equates totrue. Later, you'll add anelseclause to retrieve the time of the most recently updated item in the feed. Until then,$_useNowmust not be set tofalsewhen testing the code.You can now begin to generate the XML for the RSS feed with XMLWriter. The code is very similar to the previous chapter, so refer to Chapter 8 if you need to refresh your memory.
public function generateXML()
{
  $error = array();
  if (!isset($this->_feedTitle)) {
    $error[] = 'feed title';
  }
if (!isset($this->_feedLink)) { $error[] = 'feed link'; } if (!isset($this->_feedDescription)) { $error[] = 'feed description'; } if ($error) { throw new LogicException('Cannot generate RSS feed. Check thefollowing item(s): ' . implode(', ', $error) . '.'); } if ($this->_useNow) { $lastBuildDate = date(DATE_RSS); }$rss = new XMLWriter();if (isset($this->_xmlFile)) {$fileOpen = @$rss->openUri($this->_xmlFile);if (!$fileOpen) {throw new RuntimeException("Cannot create $this->_xmlFile. Checkpermissions and that target folder exists.");}$rss->setIndent($this->_indent);$rss->setIndentString($this->_indentString);} else {$rss->openMemory();}$rss->startDocument();$rss->startElement('rss');$rss->writeAttribute('version', '2.0');$rss->startElement('channel');$rss->writeElement('title', $this->_feedTitle);$rss->writeElement('link', $this->_feedLink);$rss->writeElement('description', $this->_feedDescription);$rss->writeElement('lastBuildDate', $lastBuildDate);$rss->writeElement('docs','http://www.rssboard.org/rss-specification');// Code to generate <item> elements goes here$rss->endElement();$rss->endElement();$rss->endDocument();return $rss->flush();}Note that I have inserted a comment indicating where the code for the
<item>elements will be added later. The first call toendElement()after that comment closes the<channel>node, while the second one closes the root node (<rss>).It's time to test your handiwork. Create a page called
generate_rss.phpin thech9_exercisesfolder. In addition to thePos_RssFeedclass, you needPos_MysqlImprovedConnectionandPos_MysqlImprovedResult, so include all three at the top of the script like this:require_once '../Pos/RssFeed.php'; require_once '../Pos/MysqlImprovedConnection.php'; require_once '../Pos/MysqlImprovedResult.php';
The
Pos_RssFeedclass inherits the parent constructor, so you instantiate an object in the same way asPos_XmlExporterby passing the connection details to the constructor like this:$xml = new Pos_RssFeed('host', 'user', 'password', 'dbName');Next, set the properties for the
<channel>element:$xml->setFeedTitle('OOP News'); $xml->setFeedLink('http://www.example.com/oop_news.xml'); $xml->setFeedDescription('Get the lowdown on OOP and PHP.'); $xml->setLastBuildDate(true);As I mentioned in step 5, the
$_useNowproperty must not be set tofalseuntil theelseclause is added to the conditional statement that sets the value for$lastBuildDate. By default, thesetLastBuildDate()method sets$_useNowtotrue, so the argument is optional. However, I have passed a Booleantrueas a reminder of how the<lastBuildDate>element is being handled in the current test.The class also inherits
setFilePath()from its parent, so let's save the RSS feed to a file calledoop_news.xml. The file doesn't need to exist yet; the class automatically creates it (as long as it has permission to write to the specified location). Finally, wrap everything in atry. . . catch block. The finished code should look like this (it's ingenerate_rss_01.php):try {$xml = new Pos_RssFeed('host', 'user', 'password', 'dbName'); $xml->setFeedTitle('OOP News'); $xml->setFeedLink('http://www.example.com/oop_news.xml'); $xml->setFeedDescription('Get the lowdown on OOP and PHP.'); $xml->setLastBuildDate(true);$xml->setFilePath('oop_news.xml');$result = $xml->generateXML();if ($result) {echo 'XML file created';}else {echo 'Error';}}catch (Exception $e) {echo $e->getMessage();}Load the file into a browser (or use
generate_rss_01.php). If all goes well, you should see XML file created onscreen, andoop_news.xmlshould have been created in thech9_exercisesfolder. The content ofoop_news.xmlshould look similar to Figure 9-3.
Note
If you open the file in Windows Notepad, the formatting will look chaotic. This is because Notepad expects both a carriage return and new line character for each new line. Open the file in a dedicated text editor, and the formatting should be preserved.
If you encounter any problems, there's a copy of the class definition so far in RssFeed_01.php in the ch9_exercises folder.
The <item> elements are what the RSS feed is all about. Whenever new articles or posts are published on the web site, the <item> elements change. So, the Pos_RssFeed class needs to query the database table that stores the items the feed is based on in order to build the <item> elements. However, it's highly unlikely that the database columns use the same names as required by the RSS 2.0 specification. As you can see in Figure 9-4, only one of the columns (title) in the blog table that I used in the previous chapter has a name that matches the RSS specification.
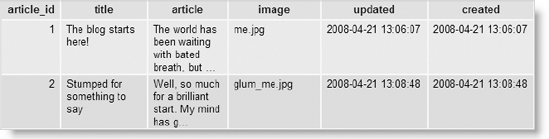
Figure 9.4. The database column names don't match the tag names required by the RSS 2.0 specification.
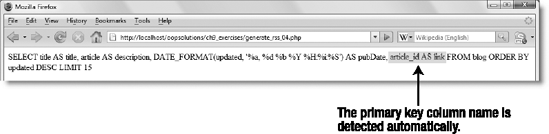
What this means is that the SQL query needs to pair the right column name with the tag name and assign it an alias in the SQL query. I'm going to use the article column for the <description> node, updated column for the <pubDate> node, and article_id as the query string of the URL for the <link> node. An RSS feed normally orders items with the most recently updated one first, and limits the number to 15. So, I need to build a query that looks like this:
SELECT title AS title, article AS description,
updated AS pubDate, article_id AS link FROM blog
ORDER BY updated DESC LIMIT 15
Once the query has been submitted, the generateXML() method loops through the result creating each <item> element and its four child elements: <title>, <description>, <pubDate>, and <link>.
To keep the class flexible I can't hard-code the query, so the challenge is to build it dynamically. If you study the SQL query, you'll see there's an obvious pattern like this:
columnNameAStagName
Since the tag names are fixed, all that's needed is to create an associative array with an element for each tag. The appropriate column name can be assigned to each element through setter methods following this pattern:
$_itemArray['tagName'] =columnName;
So, you end up with an array like this:
$_itemArray['title']         = 'title';
$_itemArray['description']   = 'article';
$_itemArray['pubDate']       = 'updated';
$_itemArray['link']          = 'article_id';
You can then loop through this array to generate the SQL query. This array and its role in building the SQL query for the <item> child elements lie at the heart of the class.
Let's get back to the code. Generating the SQL query dynamically requires a considerable amount of forethought, so I have broken up the process into several stages. To start, you'll concentrate on the <title> and <description> tags, as well as the table name. Once you have seen how the values from the $_itemArray property are mapped to the column aliases, dealing with the more complex code for the <pubDate> and <link> tags should be easier to understand.
Continue working with the class definition from the previous section, or if you want to jump in at this point, copy RssFeed_01.php from ch9_exercises to the Pos folder, and rename the file RssFeed.php.
Add the
$_itemArrayproperty shown here in bold to the definitions at the top of the page:protected $_feedTitle; protected $_feedLink; protected $_feedDescription; protected $_useNow;
protected $_itemArray;The setter method for the
<title>nodes of each<item>is very simple. It takes one argument: the name of the database column you want to use and assigns it to thetitleelement of the$_itemArrayproperty. It doesn't matter where you put this method in the class definition, but I prefer to keep methods in the same order as they're used, so put the following definition betweensetLastBuildDate()andgenerateXML():public function setItemTitle($columnName) { $this->_itemArray['title'] = $columnName; }The setter method for the
<description>element is similar, but the RSS 2.0 specification suggests that this element should be a summary, so you don't want to include the entire article if it's more than a couple of lines long. After all, the idea of an RSS feed is to attract visitors to a site; the<description>element should be a teaser. Unless you have a separate database column for this element, you need to extract the first couple of sentences only. Add the following definition after the one forsetItemTitle():public function setItemDescription($columnName, $numSentences = 2) { $this->_itemArray['description'] = $columnName; $this->_numSentences = $numSentences; }This takes two arguments: the name of the database column to be used for the
<description>element, and the number of sentences you want to extract from the beginning of the text. I have given the second argument a default value of 2, so it becomes optional. The value is assigned to a new protected property called$_numSentences, which you need to add to the list of property definitions at the top of the page. I'll come back later to the extraction of the sentences from the beginning of the text.Building the
<link>and<pubDate>nodes is relatively complex, so before dealing with them, let's turn our attention to building the SQL query. Once you see how the query is built, the code in the remaining methods will make more sense. The query needs to know which table to draw the data from, so you need to create a property for the table name and a setter method for it. You also need to set the maximum number of records to be retrieved.Add
$_tableNameand$_maxRecordsas protected properties to the list of definitions at the top of the page, and insert the combined setter method for both properties after the definition forsetItemDescription(). The code looks like this:public function setTable($tableName, $maxRecords = 15) { $this->_tableName = $tableName; $this->_maxRecords = is_numeric($maxRecords) ?(int) abs($maxRecords) : 15; }The conditional operator (
?:) tests the value passed in as the second argument. If it's a number, the value is assigned to the$_maxRecordsproperty. Sinceis_numeric()accepts fractions and negative numbers, the value of the second argument is cast to an integer and passed to theabs()function, which converts a negative number into its positive equivalent. If the second argument isn't a number, the default value of15is used.You're now ready to build the SQL query. This method is used internally by the class, so it needs to be protected. I usually keep all protected methods together after the public ones. Add the following code to the bottom of the class definition, just inside the closing brace:
protected function buildSQL() { if (!isset($this->_tableName)) { throw new LogicException('No table defined. Use setTable().'); } if (!isset($this->_itemArray['description']) &&!isset($this->_itemArray['title'])) { throw new LogicException('RSS items must have at least adescription or a title.'); } // Initialize an empty array for the column names $select = array(); // Loop through the $_itemArray property to build the list of aliasesforeach ($this->_itemArray as $alias => $column) {$select[] = "$column AS $alias";}// Join the column/alias pairs as a comma-delimited string$select = implode(', ', $select);// Build the SQL $this->_sql = "SELECT $select FROM $this->_tableName"; // Add a LIMIT clause if $_maxRecords is not 0 if ($this->_maxRecords) { $this->_sql .= " LIMIT $this->_maxRecords"; } // Display the SQL for testing purposes echo $this->_sql; }The
foreachloop and the following line highlighted in bold do all the hard work for you. The loop iterates through the elements in the$_itemArrayproperty, assigning the key to$aliasand the value to$column. Inside the loop, the order of the variables is reversed, and they're inserted into a double-quoted string with the SQL keywordASbefore being added to an array called$select. If the current element of the$_itemArrayproperty looks like this:$this->_itemArray['description'] = 'article';
it's added to
$selectin this form:articleASdescription$selectis then joined as a comma-delimited string byimplode()before being incorporated into the$_sqlproperty.The query is built in two parts: the first part selects the columns from the table, while the second part adds a
LIMITclause if the$_maxRecordsproperty is not0. Separating theLIMITclause like this means you can retrieve all records by setting the second argument ofsetTable()to0. Make sure you leave a space at the beginning of theLIMITclause to avoid a SQL syntax error when both halves of the query are joined together.Finally, the
buildSQL()method displays the$_sqlproperty onscreen for testing purposes.Before you can test the revised class, the
generateXML()method needs to call thebuildSQL()method. Insert it after the series of conditional statements that check for errors and just before the code that gets the last build date. The code is shown here in bold with the surrounding lines for context:if ($error) { throw new LogicException('Cannot generate RSS feed. Check thefollowing item(s): ' . implode(', ', $error) . '.'); }if (is_null($this->_sql)) {$this->buildSQL();}if ($this->_useNow) { $lastBuildDate = date(DATE_RSS); }I have wrapped the call to the
buildSQL()method in a conditional statement that checks whether the$_sqlproperty isnull. This allows you to set the SQL manually using thesetQuery()method inherited from the parent class. The only reason you might want to do this is if you need to join two or more tables in the query.Note
If you prefer to disable the
setQuery()method, override it with an empty definition in the same way asusePrimaryKey()in "Creating the <link> elements" later in the chapter.Save
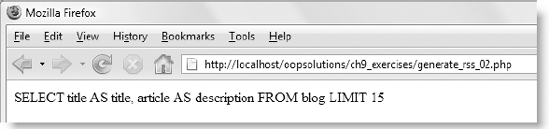
RssFeed.php, and amend thetryblock ingenerate_rss.phplike this (the code is ingenerate_rss_02.php):try { $xml = new Pos_RssFeed('localhost', 'psadmin', 'kyoto', 'phpsolutions'); $xml->setFeedTitle('OOP News'); $xml->setFeedLink('http://www.example.com/oop_news.xml'); $xml->setFeedDescription('Get the lowdown on OOP and PHP.'); $xml->setLastBuildDate(true); $xml->setFilePath('oop_news.xml');$xml->setItemTitle('title');$xml->setItemDescription('article');$xml->setTable('blog')$result = $xml->generateXML(); if ($result) { // echo 'XML file created'; } else { echo 'Error'; } }This sets the columns that you want to use for the
<title>and<description>nodes, as well as the table from which they are to be drawn. If you are using your own database, substitute the names of the columns and tables with the ones you want to use.Note also that I have commented out the line that displays XML file created. This is because I want to display only the
$_sql property.Save
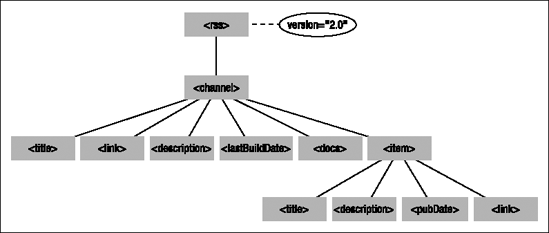
generate_rss.php, and load it into a browser (or usegenerate_rss_02.php). You should see the SQL query displayed onscreen as shown in Figure 9-5. Make sure that the column names and aliases are correct.Change the arguments to the
setTable()method by adding0as the second argument like this:$xml->setTable('blog', 0);Save the page, and test it again. This time, the
LIMITclause should be omitted.Change the second argument to a number other than 15, and test the page again. The
LIMITclause should be restored, but with the new number.If anything goes wrong, you can compare your class definition so far with
RssFeed_02.phpin thech9_exercisesfolder.
Don't remove the echo command at the end of the buildSQL() method just yet. You need it for testing other parts of the class.
Now that you have seen how the SQL query is built, you can turn your attention to setting the <pubDate> and <link> elements. First, <pubDate>.
The <pubDate> element needs to be formatted in the RFC 822 format like this:
Sat, 26 Apr 2008 10:06:59 +0100
The +0100 at the end is the time zone offset from UTC (Universal Coordinated Time). Getting this information from MySQL is complicated, but the PHP DateTime class can normally do the job for you if provided with the date and time in the same format without the time zone offset. So, the setter method for the <pubDate> nodes needs to wrap the name of the column that provides the item's date and time in a MySQL function to format it correctly. The setter method also needs to take into account that MySQL timestamps are based on the calendar date, whereas Unix timestamps represent the number of seconds elapsed since January 1, 1970. Consequently, you need to pass two arguments: the column name and the type of timestamp. I have assumed that most people use MySQL timestamps in their databases, so the default value of the second argument is set to MySQL.
Continue working with the class definition file from the previous section. If you want to jump in at this stage, copy RssFeed_02.php from ch9_exercises to the Pos folder, and rename the file RssFeed.php.
Insert the following code in the
Pos_RssFeedclass definition between thesetItemDescription()andsetTable()methods:public function setItemPubDate($columnName, $type = 'MySQL') { $this->_itemPubDate = $columnName; $rssFormat = '%a, %d %b %Y %H:%i:%S'; if (stripos($type, 'MySQL') === false) { $this->_itemArray['pubDate'] = "FROM_UNIXTIME($columnName,'$rssFormat')"; } else { $this->_itemArray['pubDate'] = "DATE_FORMAT($columnName,'$rssFormat')"; } }If the second argument is anything other than its default value, the
pubDateelement of the$_itemArrayproperty wraps the column name in the MySQLFROM_UNIXTIME()function; otherwise, it uses theDATE_FORMAT()function. Both functions use the same formatting characters, which are stored in$rssFormatto format the output in the way stipulated by the RSS 2.0 specification minus the time zone offset.Because the value of
$_itemArray['pubDate']contains more than just the column name, the setter method needs to store the column name separately in another property:$_itemPubDate. Add this as a protected property to the list of properties at the top of the page.You can now use this property to add an
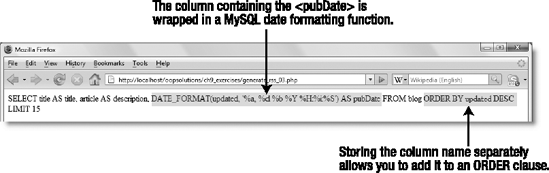
ORDERclause inside the first half of the SQL query. Amend the section of thebuildSQL()method shown here in bold:$select = implode(', ', $select); // Build the SQL $this->_sql = "SELECT $select FROM $this->_tableNameORDER BY $this->_itemPubDate DESC";// Add a LIMIT clause if $_maxRecords is not 0 if ($this->_maxRecords) { $this->_sql .= " LIMIT $this->_maxRecords"; }To test the
setItemPubDate()method, amendgenerate_rss.phpby calling it between thesetItemDescription()andsetTable()methods like this (the code is ingenerate_rss_03.php):$xml->setItemDescription('article');$xml->setItemPubDate('updated');$xml->setTable('blog');Save both pages, and load
generate_rss.php(orgenerate_rss_03.php) into a browser. You should see output similar to Figure 9-6.Make sure that the SQL query is formatted correctly. This is one area where things are likely to go wrong if you get the wrong combination of single and double quotes. A common mistake is to leave a gap between the MySQL function and the opening parenthesis. The problem won't show up until you attempt to run the query, but now is the time to track down any errors.
Amend the code in step 4 to add a second argument to
setItemPubDate(). It doesn't matter what you add, but I used'ts'(for timestamp) like this:$xml->setItemPubDate('updated', 'ts');Save the page, and test it again. This time, the
updatedcolumn should be wrapped in theFROM_UNIXTIME()function.If anything goes wrong, you can compare your code with
RssFeed_03.phpinch9_exercises.
There are two ways to create <link> elements: one is to store the URL in a database column. You might do this if the RSS feed links to long articles with dedicated pages. The other way is to use the item's primary key in the database. You can then create a page that gets the primary key from a query string in the URL, and uses it to display the item. Since both are legitimate ways of creating <link> elements, the Pos_RssFeed class needs separate methods to handle each scenario.
Continue working with the class definition file from the previous section. If you want to jump in at this stage, copy RssFeed_03.php from ch9_exercises to the Pos folder, and rename the file RssFeed.php.
As with the
<pubDate>elements, you need a separate property to refer to the<link>column name. You also need a Boolean property that indicates whether the<link>column contains a URL, or whether the class needs to build one. Begin by adding the two protected properties highlighted in bold to the list at the top of the class definition:protected $_feedTitle; protected $_feedLink; protected $_feedDescription; protected $_useNow; protected $_itemArray; protected $_numSentences; protected $_maxRecords; protected $_itemPubDate;
protected $_itemLink;protected $_useURL;The setter method for a link that's stored in a database column is very similar to those for the
<title>and<description>elements. Add the following code after thesetItemPubDate()method that you defined in the previous section:public function setItemLink($columnName) { if (isset($this->_useURL)) { throw new LogicException('The methods setItemLink() andsetItemLinkURL() are mutually exclusive. Use one or the other.'); } $this->_itemArray['link'] = $columnName; $this->_useURL = false; }The method begins by checking whether the
$_useURLproperty has been set. Although the property is defined at the top of the script, it has no value, soisset()returnsfalseunless a value has been assigned elsewhere. The only time this would happen is if you use bothsetItemLink()andsetItemLinkURL()(you'll define the second method in the next step). Since they're mutually exclusive, you need to throw an exception if this happens.Then the column name is assigned to the
linkelement of the$_itemArrayproperty, and the$_useURLproperty is set tofalse.The method that builds a URL with the primary key is, naturally, more complex. Insert the following code immediately after the preceding method, and I'll explain how it works.
public function setItemLinkURL($url) { if (isset($this->_useURL)) { throw new LogicException('The methods setItemLink() andsetItemLinkURL() are mutually exclusive. Use one or the other.');} if (!isset($this->_tableName)) { throw new LogicException('You must set the table name withsetTable() before calling setItemLinkURL().'); } parent::usePrimaryKey($this->_tableName); if (is_array($this->_primaryKey)) { $this->_primaryKey = $this->_primaryKey[0]; } else { throw new RuntimeException("Cannot determine primary key for$this->_tableName."); } $this->_itemArray['link'] = $this->_primaryKey; $this->_itemLink = $url . "?$this->_primaryKey="; $this->_useURL = true; }The method takes one argument: the URL that you want to use in combination with the record's primary key. Two conditional statements check that it's OK to proceed. The first is the same conditional statement as in
setItemLink(), and it prevents the mutually exclusive methods from being used in the same script. The second conditional statement checks that the$_tableNameproperty has been set by thesetTable()method. This is necessary because you need the table name to find its primary key.Assuming everything is OK, the method passes
$_tableNametoparent:: usePrimaryKey(). AlthoughusePrimaryKey()is inherited from the parent class, I plan to disable it in this class to prevent the wrong primary key from being selected by accident.As you might recall from Chapter 8, the
usePrimaryKey()method returns the name(s) of the primary key column(s) as an array. In the case of a blog or news site, the table should not have a composite primary key, so you're interested in only the first array item.Once the name of the primary key column has been found and assigned to the
$_primaryKeyproperty, the final section of the method prepares the SQL query and builds the URL. These lines are important, so let's take a look at them individually. The following line assigns the name of the primary key column to thelinkelement of the$_itemArrayproperty:$this->_itemArray['link'] = $this->_primaryKey;
This passes the name of the primary key column to the SQL query with
linkas its alias.The next line builds the URL and assigns it to the
$_itemLinkproperty like this:$this->_itemLink = $url . "?$this->_primaryKey=";
$urlis the URL passed as an argument to the method. The rest of the line concatenates a query string on the end of the URL. Let's say the argument passed tosetItemLinkURL()is this:http://www.example.com/detail.php
If the primary key column is called
article_id, the value of$_itemLinkevaluates to this:http://www.example.com/detail.php?article_id=
The value of
article_idis later added dynamically to this URL when thegenerateXML()method loops through the database results.The final line sets the Boolean
$_useURLproperty totrue. This tells thegenerateXML()method to use the base URL stored in$_itemLink.Quite a lot is going on in those few lines!
As I said earlier, I want to prevent anyone from setting the wrong primary key by accident, so add this code immediately after the
setItemLinkURL()method:public function usePrimaryKey() {}This is an empty method. It accepts no arguments and does nothing. The reason for creating it is that you can't change the visibility of an inherited public method. Ideally, I would have liked to make
usePrimaryKey()protected in the child class, but doing so triggers a fatal error. Overriding the method like this renders it harmless, but the parent method is still accessible through theparentkeyword.Save the class definition, and test the
setItemLinkURL()method by adding the following line togenerate_rss.php(the code is ingenerate_rss_04.php):$xml->setTable('blog');$xml->setItemLinkURL('http://www.example.com/detail.php');$result = $xml->generateXML();Save
generate_rss.php, and load it into a browser (or usegenerate_rss_04.php). You should see output similar to Figure 9-7. You can't see the URL, but the table's primary key column has been added to the SQL query withlinkas its alias.Test the
setItemLink()method by commenting out the line you added in step 5 and adding the following code:$xml->setTable('blog'); // $xml->setItemLinkURL('http://www.example.com/detail.php');$xml->setItemLink('url');$result = $xml->generateXML();This time, the SQL should contain url AS link.
Check that the SQL query is being built correctly, and then comment out this line at the end of the
buildSQL()method:// echo $this->_sql;
I recommend disabling the line rather than removing it completely, because you might need to display the SQL query later for debugging.
If you encounter any problems, compare your code with
RssFeed_04.phpinch9_exercises.
The SQL query gathers all the information needed to populate the child elements of each <item>. However, the <description> and <pubDate> elements need a little extra work before you can include them in the RSS feed. The <description> element should normally be relatively short; say, two or three sentences. The <pubDate> also needs the time zone offset to conform to the RSS 2.0 specification. This calls for a couple of helper methods.
Normally, helper methods go inside the class definition as protected or private methods. That's fine for handling the <pubDate> time zone offset, but extracting a specified number of sentences from the beginning of a longer piece of text is something that could be useful in many other situations. So, I'm going to put that in an external class called Pos_Utils. Although it sounds extravagant to have a separate class for a single method, you can add other utility methods to it as you build your own class library.
Extracting sentences from the beginning of text
If you're building all the files yourself, create a file called Utils.php in the Pos folder, and insert the following code (alternatively use the version in the finished_classes folder):
class Pos_Utils
{

  public static function getFirst($text, $number = 2)
  {

    $result = array();
    if ($number == 0) {
      $result[0] = $text;
      $result[1] = false;
    } else {
      // regular expression to find typical sentence endings
      $pattern = '/([.?!]["']?)s/';
      // use regex to insert break indicator
      $text = preg_replace($pattern, '$1bRE@kH3re', $text);
      // use break indicator to create array of sentences
      $sentences = preg_split('/bRE@kH3re/', $text);
      // check relative length of array and requested number
      $howMany = count($sentences);
      $number = $howMany >= $number ? $number : $howMany;
// rebuild extract and return as single string
$remainder = array_splice($sentences, $number);
$result[0] = implode(' ', $sentences);
$result[1] = empty($remainder) ? false : true;
}
return $result;
}
}You might recognize most of this code from some of my earlier books. I make no apology for repeating it here. OOP is all about reusable code.
The getFirst() method is static, so you call it by using the class name and the scope resolution operator (::). It takes two arguments: the text from which you want to extract the first few sentences and the number of sentences to extract. The default value for the second argument is set to 2, so its use is optional. The method returns an array of two elements: the first contains the extracted sentences, and the second is a Boolean value indicating whether any more text remains.
This method is called automatically by the generateXML() method, so I have modified the code from my earlier books to allow the option of displaying all text by setting the second argument to 0. If the second argument is 0, the first element of the returned array contains the whole text, and the second element is set to false.
What I didn't do in my earlier books was explain in detail how the rest of the code works, so here goes. The regular expression /([.?!]["']?)s/ searches for a period, question mark, or exclamation mark, followed by space, with an optional double or single quotation mark in between. In other words, the pattern is looking for the end of a sentence. Everything within the regular expression, apart from the final space, is enclosed in parentheses, making it a subexpression. This captures the punctuation mark(s) at the end of the sentence, but not the space. The text and the regular expression are passed to preg_replace(), which replaces the punctuation mark(s) and space at the end of each sentence with $1bRE@kH3re. The $1 at the beginning of the replacement string is a nifty way of representing the first subexpression. So, in effect, preg_replace() preserves the punctuation at the end of the sentence, but replaces the space with bRE@kH3re, a combination of characters that's highly unlikely to occur in normal text.
This combination of characters is then used with preg_split() to break the text into an array of sentences. The number of sentences is counted and stored in $howMany. This is compared with the number passed as the second argument to the getFirst() method, and the smaller of the two is assigned to $number. This is then passed to array_splice() to split the array of sentences in two. The first half of the array remains in $sentences; the remaining sentences are stored in $remainder. Arrays are numbered from zero, so if $number is 2, array_splice() moves the third and any subsequent sentences into $remainder, leaving just the first two in $sentences.
Finally, the selected number of sentences from the beginning of the text are glued back together with implode() and assigned to $result[0]. The second element of $result is a Boolean value indicating whether the selected sentences contain the full text, or if there is any more. This second element isn't needed for the Pos_RssFeed class, but it comes in useful if you want to display the selected sentences followed by a More link pointing to the full text.
My design discards the remaining sentences. If you want to preserve them, change the last few lines of the method like this:
$result[0] = implode(' ', $sentences);
if (!empty($remainder)) {
  $result[1] = implode(' ', $remainder);
} else {
  $result[1] = '';
}
return $result;
However, it's not a good idea to do this unless you really want the remaining sentences, as they will occupy memory unnecessarily.
Getting the time zone offset
The date and time are formatted the right way for an RSS 2.0 feed, except for the time zone offset. You can add this easily by passing the date and time to the format() method of the PHP DateTime class with the DATE_RSS constant. The DateTime class has been part of core PHP since version 5.2, so it should always be available. Just in case it isn't, it's worth checking to avoid a fatal error. Add the following protected method to the bottom of the Pos_RssFeed class definition:
protected function getTimezoneOffset($pubDate)
{
  if (class_exists('DateTime')) {
    $date = new DateTime($pubDate);
    return $date->format(DATE_RSS);
  } else {
    return $pubDate;
  }
}
Everything is now ready to finish the Pos_RssFeed class.
All that remains is to execute the SQL query and loop through the result set to generate the XML for the <item> elements.
To use the
Pos_Utils::getFirst()static method, you need access to the class definition, so include it at the top of thePos_RssFeeddefinition.require_once 'XmlExporter.php';
require_once 'Utils.php';class Pos_RssFeed extends Pos_XmlExporterThe remaining changes all go inside the
generateXML()method. First, you need to run the SQL query. Add the following line highlighted in bold immediately after the query has been built:if (is_null($this->_sql)) { $this->buildSQL(); }$resultSet = $this->_dbLink->getResultSet($this->_sql);if ($this->_useNow) { $lastBuildDate = date(DATE_RSS); }This is the same as in the parent class, so should need no explanation.
The
$_useNowproperty determines whether the<channel>element<lastBuildDate>uses the current time or the time of the most recently updated<item>. Now that you have the results from the database, you can useLimitIteratorto inspect the first row and get the time from the most recent item. Add anelseclause to the conditional statement that assigns the value of$lastBuildDate like this:$resultSet = $this->_dbLink->getResultSet($this->_sql); if ($this->_useNow) { $lastBuildDate = date(DATE_RSS);} else {foreach (new LimitIterator($resultSet, 0, 1) as $row) {$lastBuildDate = $row['pubDate'];}}$rss = new XMLWriter();The SQL query orders the results with the most recently updated item first, so this takes the value of the
pubDatefield from the first result and assigns it to$lastBuildDate. Because the result set implements theIteratorinterface, you can inspect the first row like this without needing to reset it manually before looping through the entire set of results later.Create the loops to generate the XML for the
<item>elements. Locate the following comment:// Code to generate <item> elements goes here
Replace it with this code:
foreach ($resultSet as $row) {
  $rss->startElement('item');
  foreach ($row as $field => $value) {
    if ($field == 'pubDate') {
      $value = $this->getTimezoneOffset($value);
    } elseif ($field == 'link' && $this->_useURL) {
      $value = $this->_itemLink . $value;
    } elseif ($field == 'description') {
$extract = Pos_Utils::getFirst($value, $this->_numSentences); $value = $extract[0]; } $rss->writeElement($field, $value); } $rss->endElement(); }
The outer foreach loop iterates through each row of the result set and opens an <item> element. The inner foreach loop iterates through each field of the current row. Before creating the child node, a series of conditional statements checks the name of the field and formats the value according to the following criteria:
If the field name is
pubDate, the value is formatted bygetTimezoneOffset().If the field name is
linkand the$_useURLproperty istrue, the value is prefixed by the URL and query string stored in the$_itemLinkproperty.If the field name is
description, the value is passed to thePos_Utils::getFirst()static method along with the$_numSentencesproperty to extract the specified number of sentences from the beginning of the text.
After the child node is created from the current field name and value, the inner loop continues until it reaches the end of the row. The outer loop then closes the <item> element before moving onto the next row in the result set.
That completes the Pos_RssFeed class definition. This section involved changes to several different parts of the generateXML() method, so here is the final version of the method in full:
public function generateXML()
{
$error = array();
if (!isset($this->_feedTitle)) {
$error[] = 'feed title';
}
if (!isset($this->_feedLink)) {
$error[] = 'feed link';
}
if (!isset($this->_feedDescription)) {
$error[] = 'feed description';
}
if ($error) {
throw new LogicException('Cannot generate RSS feed. Check
the following item(s): ' . implode(', ', $error) . '.');
}
if (is_null($this->_sql)) {
$this->buildSQL();
}
$resultSet = $this->_dbLink->getResultSet($this->_sql);
if ($this->_useNow) {
$lastBuildDate = date(DATE_RSS);} else {
foreach (new LimitIterator($resultSet, 0, 1) as $row) {
$lastBuildDate = $row['pubDate'];
}
}
$rss = new XMLWriter();
if (isset($this->_xmlFile)) {
$fileOpen = @$rss->openUri($this->_xmlFile);
if (!$fileOpen) {
throw new RuntimeException("Cannot create $this->_xmlFile.
Check permissions and that target folder exists.");
}
$rss->setIndent($this->_indent);
$rss->setIndentString($this->_indentString);
} else {
$rss->openMemory();
}
$rss->startDocument();
$rss->startElement('rss');
$rss->writeAttribute('version', '2.0');
$rss->startElement('channel');
$rss->writeElement('title', $this->_feedTitle);
$rss->writeElement('link', $this->_feedLink);
$rss->writeElement('description', $this->_feedDescription);
$rss->writeElement('lastBuildDate', $lastBuildDate);
$rss->writeElement('docs',
'http://www.rssboard.org/rss-specification');
foreach ($resultSet as $row) {
$rss->startElement('item');
foreach ($row as $field => $value) {
if ($field == 'pubDate') {
$value = $this->getTimezoneOffset($value);
} elseif ($field == 'link' && $this->_useURL) {
$value = $this->_itemLink . $value;
} elseif ($field == 'description') {
$extract = Pos_Utils::getFirst($value, $this->_numSentences);
      $value = $extract[0];
    }
    $rss->writeElement($field, $value);
  }
  $rss->endElement();
}
$rss->endElement();
$rss->endElement();
$rss->endDocument();
return $rss->flush();
}Test the completed Pos_RssFeed class by uncommenting the following line highlighted in bold in generate_rss.php (or use generate_rss_05.php):
$result = $xml->generateXML();
if ($result) {
  // echo 'XML file created';
}
else {
  echo 'Error';
}
Load generate_rss.php or generate_rss_05.php into a browser. You should see XML file created displayed onscreen. When you open the XML file (mine is called oop_news.xml), you should see a full RSS feed similar to the one shown in Figure 9-8.
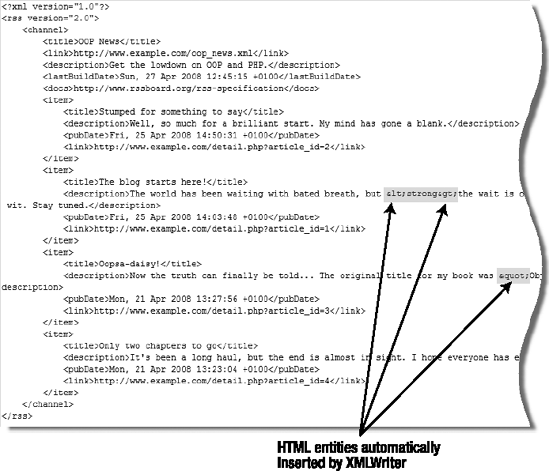
Figure 9.8. The Pos_RssFeed class generates an XML document fully compliant with the RSS 2.0 specification.
If your <description> elements contain HTML tags or quotation marks, you'll see that XMLWriter converts them automatically to HTML entities, as shown in Figure 9-8. Changing the angle brackets of HTML tags into < and > might seem odd, but don't worry; it won't make the HTML break. This is exactly the way that HTML should be rendered inside an XML document (unless you use a CDATA section). You can confirm that this is OK by testing the class to output the RSS feed directly to the browser. Locate the following line in generate_rss.php:
$xml->setFilePath('oop_news.xml');Disable it by commenting it out, and then change the conditional statement at the end of the script like this:
if ($result) {
header('Content-Type: text/xml');
echo $result;
}
else {
echo 'Error';
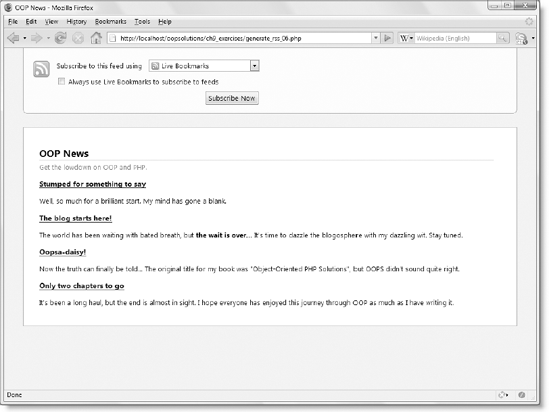
}Save generate_rss.php, and load it into a browser (or use generate_rss_06.php). In a modern browser, you should see the RSS feed displayed as shown in Figure 9-9. As you can see, the <strong> tags in the second item have been rendered correctly.
Note
Eagle-eyed readers will notice that the <description> element of the second item contains three sentences, whereas the others contain the two specified by the default value of Pos_Utils::getFirst(). The reason for this discrepancy is that the end of the first sentence is wrapped in <strong> tags, so it fails to match the regular expression that finds the end of each sentence. This is such a minor issue, I have decided to ignore it.
You can continue testing the class by setting various options, such as setLastBuildDate(), and changing the number of sentences or items displayed, but that completes this case study. It also brings us to the end of this book. As with all classes in this book, you might not agree with all of my design decisions, but you should now be equipped with the knowledge to customize the code to fit your own ideas and requirements.
This case study brings to an end our journey through object-oriented PHP, but I hope you'll regard it as a jumping-off point, rather than an end in itself. As I said at the outset, OOP often requires much more code than a procedural script. Even though Pos_RssFeed inherits from Pos_XmlExporter, the definition of the child class is considerably longer than its parent. However, the advantage of both classes is that the code in your main script becomes much shorter and easier to read. Like all the classes in this book, they have been designed to answer generic problems, rather than specific ones. Pos_RssFeed can be deployed on any site, and generates a valid RSS 2.0 feed with just a few lines of code.
Building your own code like this can be immensely satisfying, but it's also time-consuming. However, the wonderful thing about open source software like PHP is that you don't always need to do everything yourself. A number of PHP OOP frameworks have been developed, putting ready-made class libraries at your disposal. Now that you have a thorough understanding of OOP and how it fits into PHP, you should be ready to take advantage of such a framework. The downside of frameworks is that they entail a learning curve, so it's difficult to choose the right one. You also need to be aware that at the time of this writing two of the most popular, CakePHP (http://cakephp.org/) and CodeIgniter (www.codeigniter.com), still use the obsolete PHP 4 object model. They're designed to be compatible with PHP 5 but don't take advantage of its greatly improved features.
When choosing a framework, it's important not only to make sure that it's based on the object model introduced in PHP 5 but also that it is actively supported. You don't want to base your projects on the latest hot framework only to discover that it fizzles out a few months down the line. Two frameworks that seem particularly worthy of investigation are the Zend Framework (http://framework.zend.com/) and symfony (www.symfony-project.org). Not only are they stable and rich in features but both have the backing of commercial ventures. The Zend Framework is backed by Zend, the company founded by the lead developers of PHP, and symfony is sponsored by Sensio Labs, a French web development company. This doesn't affect their cost; they're free and released under open source licenses.
With solid backing and the support of large development communities, these frameworks have good prospects of surviving and thriving. Both have extensive online documentation, and if you prefer a solid book in your hands, check out The Definitive Guide to symfony by Fabien Potencier and François Zaninotto (Apress, ISBN-13: 978-1-59059-786-6) and The Definitive Guide to Zend Framework (Apress, ISBN-13: 978-1-4302-1035-1). For a project-based approach to the Zend Framework, take a look at Practical Web 2.0 Applications with PHP by Quentin Zervaas (Apress, ISBN-13: 978-1-59059-906-8), which shows you how to build a sophisticated blogging system with the Zend Framework, the Ajax libraries, Prototype and script.aculo.us, and Google Maps.
Whichever route you choose, I hope this book has helped raise your PHP skills to a new level and inspired you to go further.