
There is a myth that all Windows systems are easy to exploit. This is not entirely true. Almost any Windows system can be hardened to the point that it takes too long to exploit its vulnerabilities. In this chapter, you will learn the following:
- How to footprint your Windows network and discover the vulnerabilities before the bad guys do
- Ways to investigate and map your Windows network to find the Windows systems that are susceptible to exploits
In some cases, this will be adding to your knowledge of the top 10 security tools, and in others, we will show you entirely new tools to handle this category of investigation.
You can't find your way without a good map. In this chapter, we are going to learn how to gather network information and assess the vulnerabilities on the network. In the Hacker world this is called Footprinting. This is the first step to any righteous hack. This is where you will save yourself time and massive headaches. Without Footprinting your targets, you are just shooting in the dark. The biggest tool in any good pen tester's toolbox is Mindset. You have to have the mind of a sniper. You learn your targets habits and its actions. You learn the traffic flows on the network where your target lives. You find the weaknesses in your target and then attack those weaknesses. Search and destroy!
In order to do good Footprinting, you have to use several tools that come with Kali. Each tool has it strong points and looks at the target from a different angle. The more views you have of your target, the better plan of attack you have. Footprinting will differ depending on whether your targets are external on the public network, or internal and on a LAN. We will be covering both aspects.
Scanning and using these tools against a machine on the public network if you do not have written permission to do so is a federal crime. In this book, for most of the instances of Kali Linux, we will be using virtual machines running on VMware and Oracle VirtualBox that are built specifically for this book. The instances of Kali that we use on a daily basis are fairly heavily customized, and it would take a whole book just to cover the customizations. For external networks, we will be using several live servers on the Internet. Please be respectful and leave these addresses alone as they are in the authors' Atlanta Cloud Technology server cluster.
Please read the paragraph above again, and remember you do not have our permission to attack these machines. Don't do the crime if you can't do the time.
You can't talk about networking without talking about Nmap. Nmap is the Swiss Army knife for network administrators. It is not only a great Footprinting tool, but also the best and cheapest network analysis tool any sysadmin can get. It's a great tool for checking a single server to make sure the ports are operating properly. It can heartbeat and ping an entire network segment. It can even discover machines when ICMP (ping) has been turned off. It can be used to pressure-test services. If the machine freezes under the load, it needs repairs.
Nmap was created in 1997 by Gordon Lyon, who goes by the handle Fyodor on the Internet. Fyodor still maintains Nmap and it can be downloaded from http://insecure.org. You can also order his book Nmap Network Scanning on that website. It is a great book, well worth the price! Fyodor and the Nmap hackers have collected a great deal of information and security e-mail lists on their site. Since you have Kali Linux, you have a full copy of Nmap already installed! Here is an example of Nmap running against a Kali Linux instance. Open the terminal from the icon on the top bar or by clicking on the menu link Application | Accessories | Terminal. You could also choose the Root Terminal if you want, but since you are already logged in as Root, you will not see any differences in how the terminal emulator behaves.
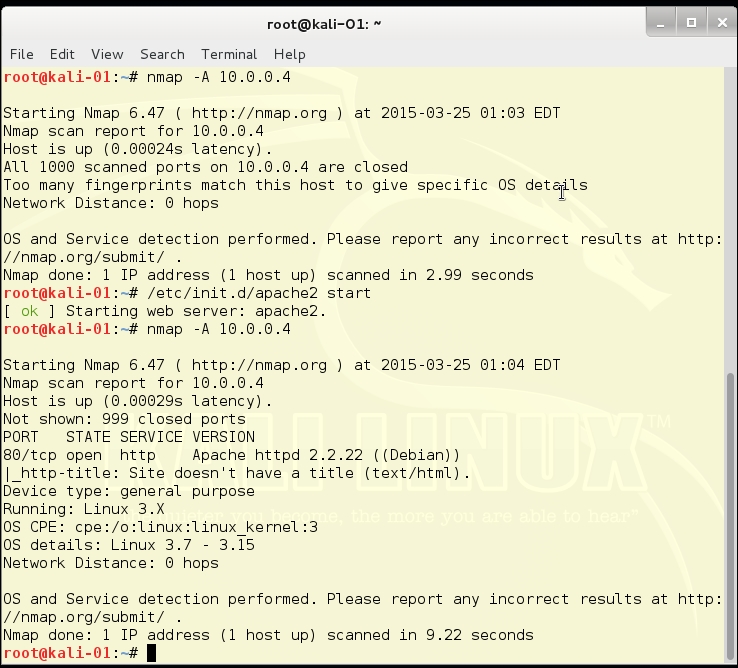
Type nmap -A 10.0.0.4 at the command prompt (you need to put in the IP of the machine you are testing). The output shows the open ports among 1000 commonly used ports. Kali Linux, by default, has no running network services, and so in this run you will see a readout showing no open ports.
To make it a little more interesting, start the built-in webserver by typing /etc/init.d/apache2 start. With the web server started, run the Nmap command again:
nmap -A 10.0.0.4
As you can see, Nmap is attempting to discover the operating system (OS) and to tell which version of the web server is running:
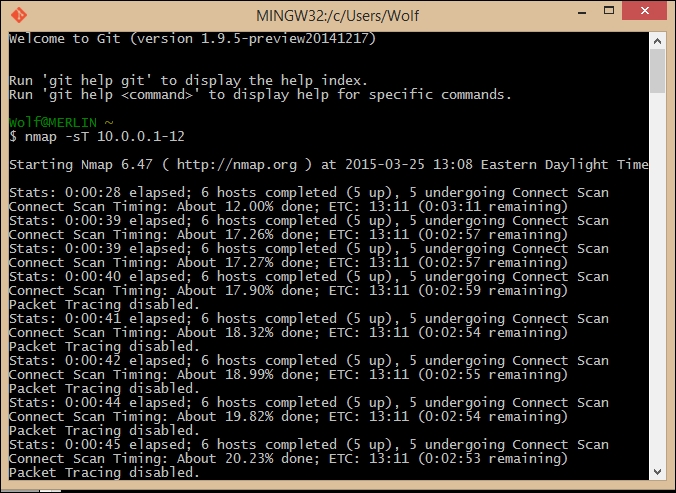
Here is an example of running Nmap from the Git Bash application, which lets you run Linux commands on your Windows desktop. This view shows a neat feature of Nmap. If you get bored or anxious and think the system is taking too much time to scan, you can hit the down arrow key and it will print out a status line to tell you what percentage of the scan is complete. This is not the same as telling you how much time is left on the scan, but it does give you an idea what has been done:
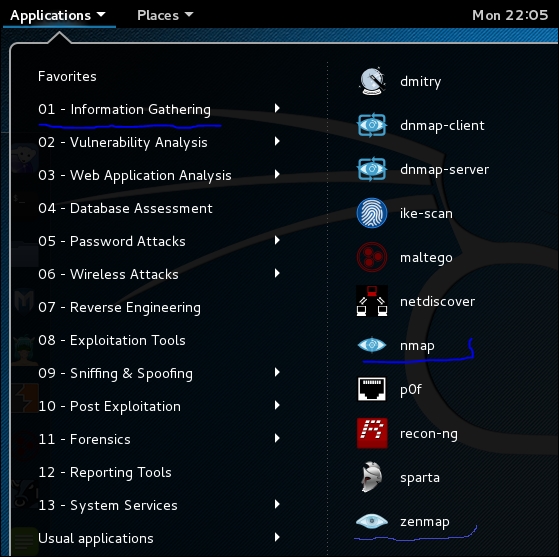
Nmap comes with a GUI frontend called Zenmap. Zenmap is a friendly graphic interface for the Nmap application. You will find Zenmap under Applications | InformationGathering | Zenmap. Like many Windows engineers, you may like Zenmap more than Nmap:
Here we see a list of the most common scans in a drop-down box. One of the cool features of Zenmap is when you set up a scan using the buttons, the application also writes out the command-line version of the command, which will help you learn the command-line flags used when using Nmap in command-line mode.
Tip
Hacker tip
Most hackers are very comfortable with the Linux Command Line Interface (CLI). You want to learn the Nmap commands on the command line because you can use Nmap inside automated Bash scripts and make up cron jobs to make routine scans much simpler. You can set a cron job to run the test in non-peak hours, when the network is quieter, and your tests will have less impact on the network's legitimate users.
The choice of intense scan produces a command line of nmap -T4 -A -v. This produces a fast scan.
- The
Tstands for Timing (from 1 to 5), and the default timing is-T3. The faster the timing, the rougher the test, and the more likely you are to be detected if the network is running an Intrusion Detection System (IDS). - The
-Astands for All, so this single option gets you a deep port scan, including OS identification, and attempts to find the applications listening on the ports, and the versions of those applications. - Finally, the
-vstands for verbose.-vvmeans very verbose: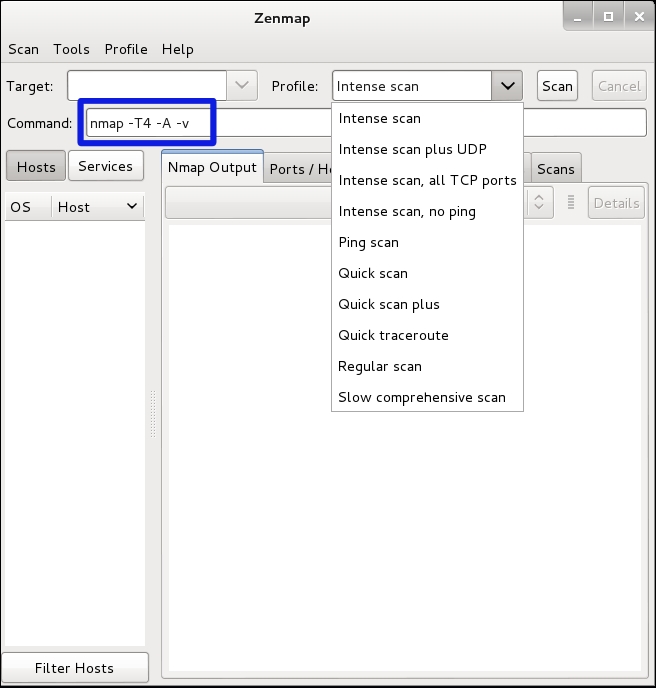
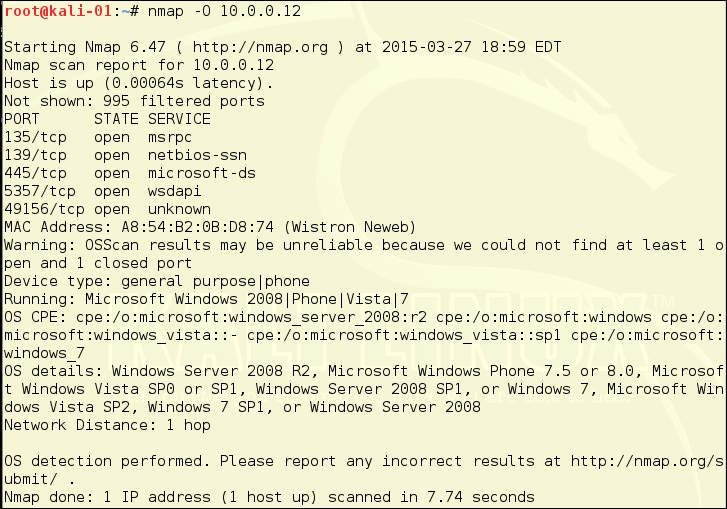
The next three images show the difference verbosity makes in an OS scan. The OS scan includes a Stealth scan, so nmap -O hostname is exactly the same as nmap -sS -O hostname. You can choose to have verbosity levels from 1 to 5 by using the -v option. As an example, we will test a machine running an Apache web server.
First, we will run nmap -A and then we will run it as nmap -A -v. Verbosity gives a lot more information. First we see a normal run. It produces some output. This is the way to test whole networks, because it is quick and produces some useful data:
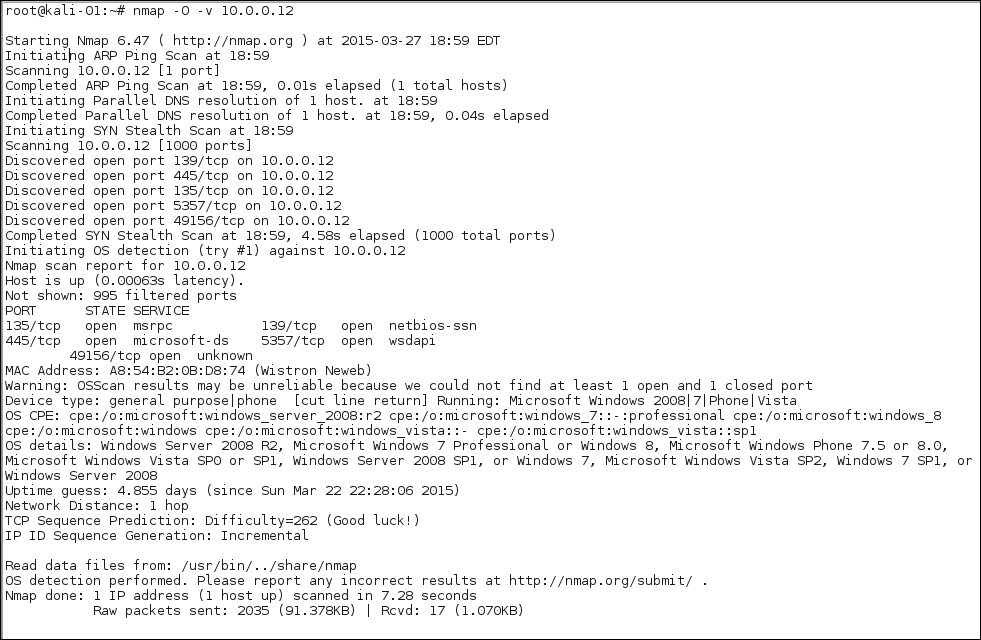
The verbose version, which follows, has been adjusted slightly to fit all the detail into the image. The different scan options have different enhanced content when the -v or -vv options are added to the search strings. It makes sense to use -v or -vv when you have chosen some likely targets using the basic display option:
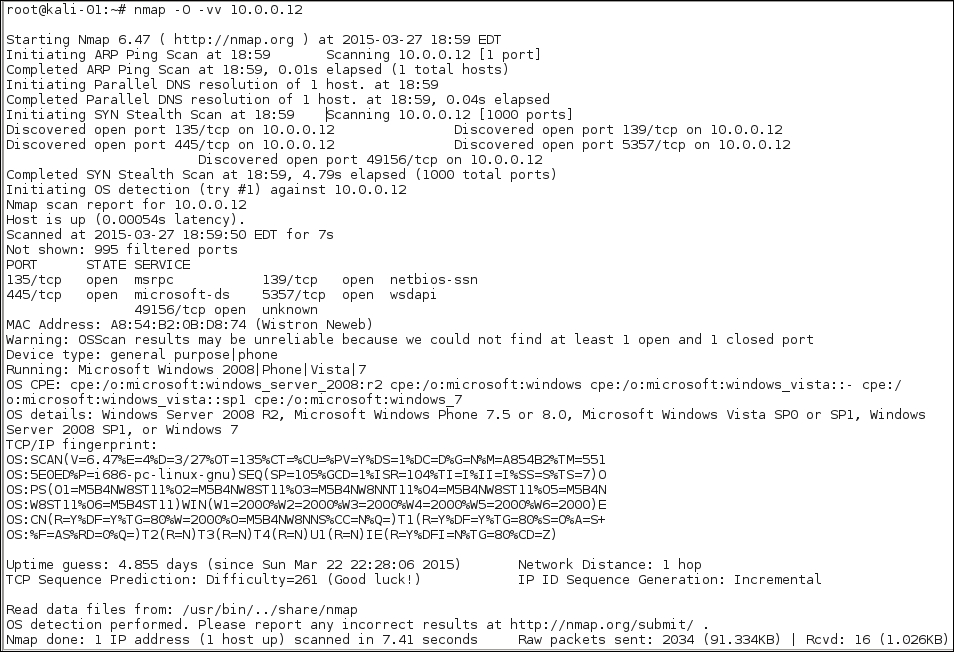
Depending upon the services running on the target machine, -v and -vv may be quite different. You won't know until you try, so if you come across a machine with interesting services, by all means try -vv:
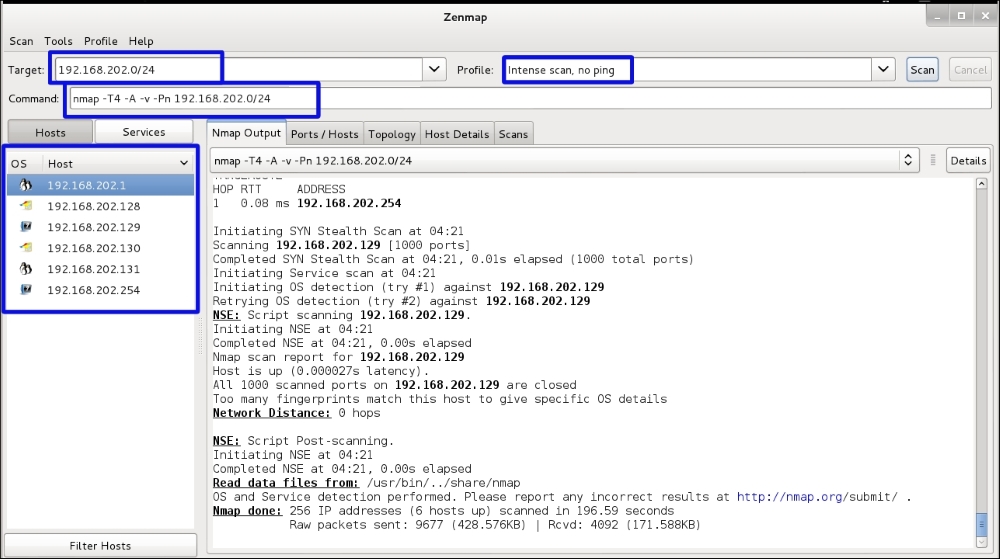
The example below has a network range of 192.168.202.0/24, and the scan type chosen is an intense scan with no ping. You then click the Start Scan button and your scan runs. During the scan you will see the output in the Nmap Output tab on the screen. From our scan, six active hosts are on the network. From the icons next to the IP addresses we can tell we have identified two Windows machines, two Linux machines, and two unknown OS systems.
Note in the Command text box the string you would use in the command line to run the same scan from the command line:
If a network has ICMP turned off, attempting to ping the machines takes a lot of time. It takes almost as long as pinging UDP ports on the target machines. For either case, each machine will take approximately 75 seconds per port. In the first case, that means a ping of six machines takes 450 seconds just to fail the ping test. UDP searches test many more ports per machine. At 1000 ports tested per standard UDP-port scan, you are going to take about 21 hours per machine, just to test UDP. If you don't have a really good reason to check UDP ports with Nmap, it is not a cost-effective exercise.
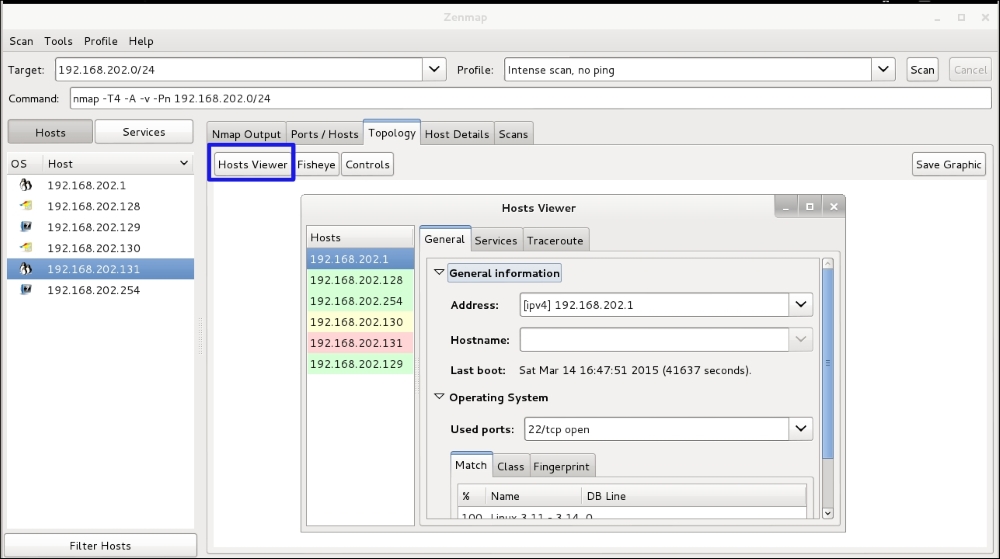
By clicking the Topology tab and then clicking the Hosts Viewer button you get a nice list of the hosts. By clicking the address you can see the details of each host. Note that the addresses are different colors. Nmap picks out the low hanging fruit for you. Green is secured. Yellow and red have vulnerabilities or services that could be exploited:
Zenmap also has a nice feature for comparing scans. You will find it in the Menu bar under Compare Results. In the following screenshot you will see we ran two scans on the network. When we compared the two, a new machine was found on the second scan. The results of the first scan are marked in red and show 192.168.202.131 as Down. In green it is showing it as up and shows the open ports and system information:
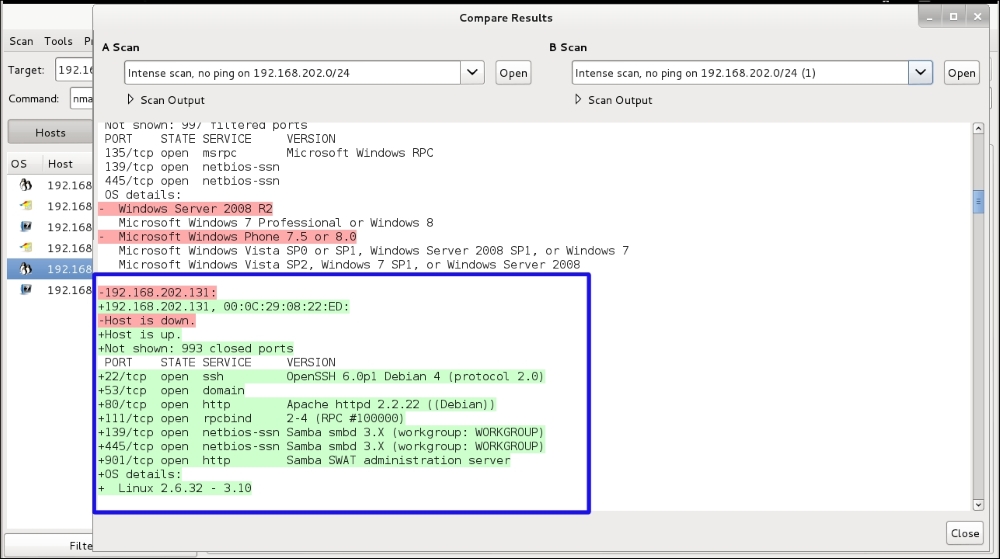
Open ports and system information
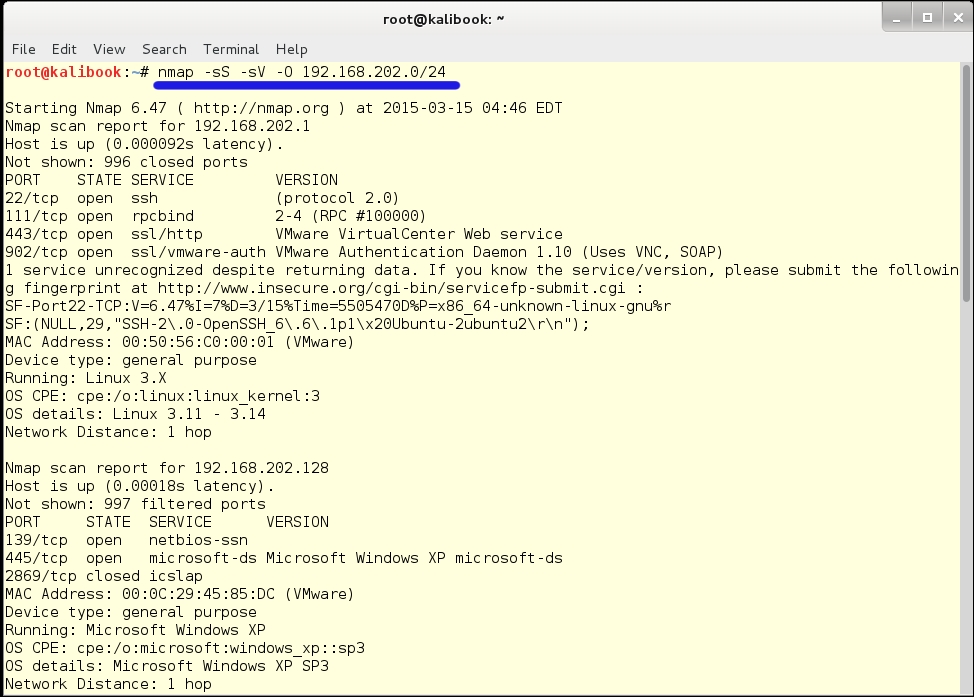
Below is the result of running Nmap from the command line. As you saw previously, Nmap has been ported to Windows. If your company allows it, Nmap can be run on a Windows system by the command line in either the Command window or through Windows Power Shell:
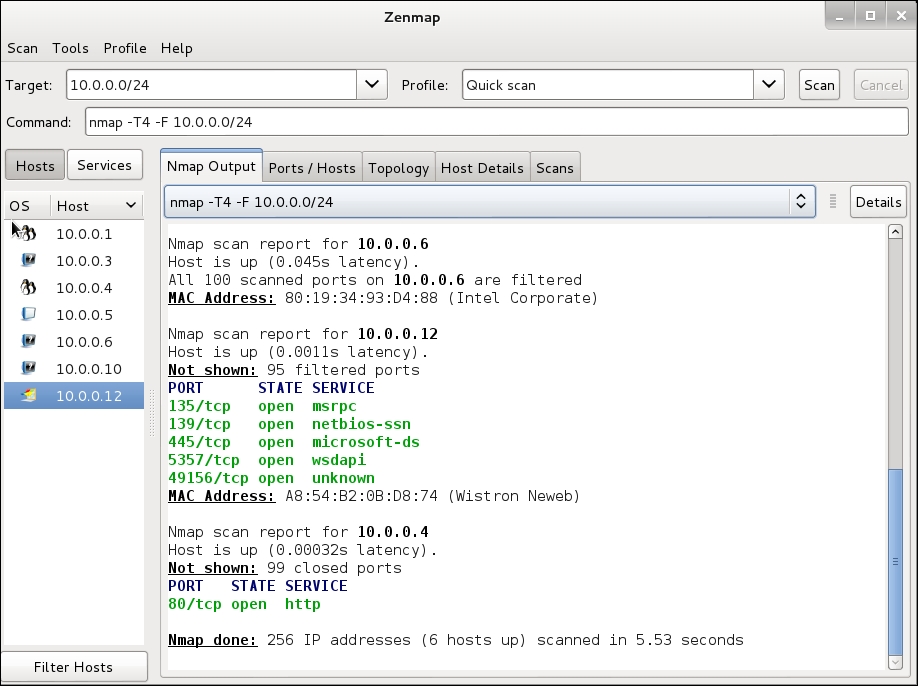
If you have a large network and just want to find the Windows machines, you can focus on Windows vulnerabilities You can run the Quick Scan (nmap -T4 -F 10.0.0.0/24) or the Quick Scan Plus (nmap -sV -T4 -O -F –version-light 10.0.0.0/24). These will give you a good idea of which machines you really want to focus on. It looks like 10.0.0.12 is a Windows machine, based on the fact that four of five open ports are Windows-related:
When you are looking at the Topology, you can adjust the size of the group by changing the values of the controls at the bottom of the window. The size of the graphic is increased by increasing interest factor. The standard view puts the local host at the center of the grouping, but if you click on one of the other hosts, it is brought to the center:
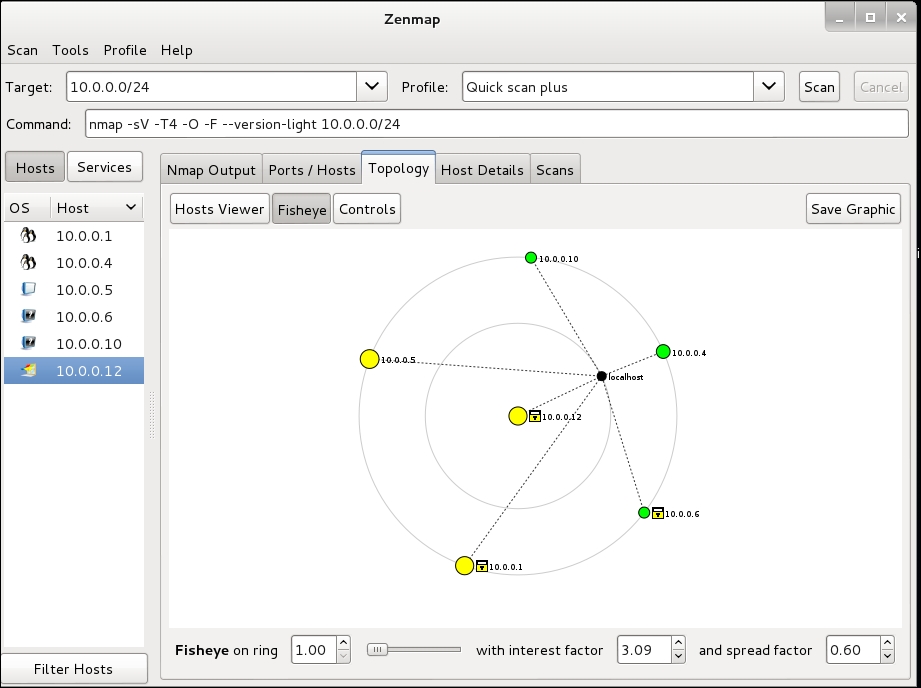
Changing the values of the controls using topology
Even though Zenmap has a short punchy drop-down list of popular and useful scans, there are quite an assortment of commands and options that you can use in customizing your scans. This is a view of the help file that comes with Nmap, with our comments included. You can find much more on the manual page at http://nmap.org/book/man.