
Appendix B. SQL Language Tutorial
B.1 What Is SQL?
When you go to Google and request information, that request is called a query, and the search engine will collect any Web pages that match your query. To narrow the search, you might have to refine your request with more descriptive keywords. The same process applies to database lookups. When you make requests to a database, the request follows a certain format, and the database server will try to locate the information and return a result. The way in which you query the database is defined by the query language you are using. The standard language for communicating with relational databases is SQL, the Structured Query Language. SQL is an ANSI (American National Standards Institute) standard computer language, designed to be as close to the English language as possible, making it an easy language to learn. Popular database management systems, such as Oracle, Sybase, and Microsoft SQL Server, all use SQL, and, although some create their own proprietary extensions to the language, the standard basic commands for querying a database, such as SELECT, INSERT, DELETE, UPDATE, CREATE, and DROP, will handle most of the essential tasks you will need to perform database operations.
The SQL language can be traced back to E. F. “Ted” Cobb, an IBM researcher who first published an article in June 1970 that laid the foundations for the theory of relational databases, an English-like language used to communicate with these databases. Cobb’s article triggered a major research project at IBM to design a relational database system called System/R and a database language called SEQUEL (Structured English Query Language), which is known today as SQL (often pronounced “see-quell”). In the late 1970s, two other companies were started to develop similar products, which became Oracle and Ingres. By 1985, Oracle claimed to have more than 1,000 installations, and by the early 1990s, SQL had become the standard for database management in medium to large organizations, especially on UNIX and mainframes.
B.1.1 Standarizing SQL
Like the English language, with all its dialects, many flavors of SQL evolved. Today’s SQL is based on IBM’s original implementation, with a considerable number of additions. Standards are created to help specify what should be supported in a language. In 1986, the ANSI designated the SQL standard. It was then revised in 1989, 1992, and 1999. The most commonly used standard today is SQL92, representing the second revision of the original specification (SQL2). Most commercial databases (MySQL, Oracle, Sybase, Microsoft Access, and Microsoft SQL Server) support the full SQL and claim to be 100 percent compliant with the standard. However, the standard is quite complex, and as with different dialects of the English language, various vendors have added extensions to their version of SQL, making it difficult to guarantee that an application will run on all SQL server databases.
In this appendix, we focus on the basic SQL language and examine such concepts as table creation, insertion, deletion, and selection of data.
B.1.2 Executing SQL Statements
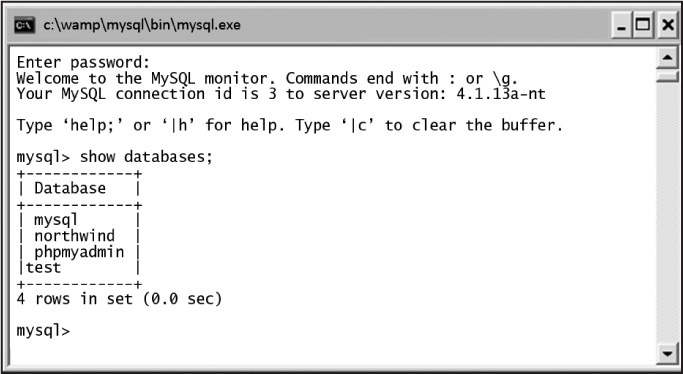
Because the database management system discussed in this book is MySQL, the server being used in the following examples is the MySQL database server, and most of the SQL commands will be executed at the mysql command-line client, although you might prefer to use the MySQL Query Browser. Once connected to the database, you simply type the commands in the mysql console (command-line window, see Figure B.1) as explained in Chapter 15.
The MySQL Query Browser
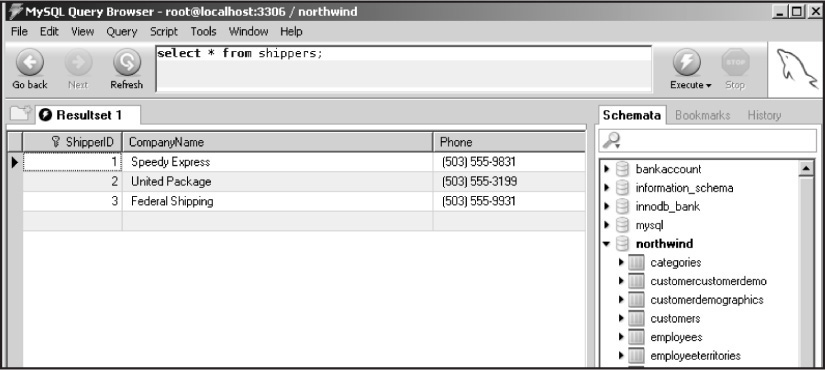
To run SQL commands in the MySQL Query Browser, type them in the box in the top of the application window and click the Execute button.
Once you click the Execute button (the green button to the right of the query window), the result will be displayed in the center of the application as a Resultset tab (see Figure B.2).
B.1.3 About SQL Commands/Queries
SQL is a computer language, and like languages in general, SQL has its rules, grammar, and a set of special or reserved words. Different variants of the language have evolved over the years because different relational database vendors offer additional features to manipulate data in the name of competition. This section covers the basic SQL commands and syntax.
Because SQL has so many commands, they are divided into two major categories: the commands to manipulate data in tables and the commands to manipulate the database itself. There are many excellent tutorials on the Web that cover all the SQL commands and how to use them. See http://www.w3schools.com/sql/default.asp.
English-like Grammar
When you create a SQL statement, it makes a request, or “queries” the database, in the form of a statement, similar to the structure of an English imperative sentence, such as “Select your partner,” “Show your stuff,” or “Describe that bully.” The first word in a SQL statement is an English verb, an action word called a command, such as show, use, select, drop, and so on. The commands are followed by a list of noun-like words, such as show databases, use database, or create databases. The statement might contain prepositions, such as in or from. For example:
show tables in database
select phones from customer_table
The language also lets you add conditional clauses to refine your query, such as:
select companyname from suppliers where supplierid > 20;
When listing multiple items in a query, like English, the items are separated by commas; for example, in the following SQL statement, each field in the list being selected is comma-separated:
select companyname, phone, address from suppliers;
If the queries get very long and involved, you might want to type them into your favorite editor, because once you have executed a query, it is lost. By saving the query in an editor, you can cut and paste it back into the MySQL browser or command line without retyping it. Most important, make sure your query makes sense and will not cause havoc on an important database. MySQL provides a test database for practice.
Semicolons Terminate SQL Statements
When searching with Google for “SQL query,” one of the top results is a Web site called thinkgeek.com, which sells T-shirts and apparel, electronics, gadgets, and home office and computing items. Its ad for the “SQL query” T-shirt reads:
Black tshirt with the following SQL query written in white on front “SELECT * FROM users WHERE clue > 0”. Unfortunately, zero rows are then returned....uh oh. And hey! there is no freakin semi-colon at the end of this query because not everybody under the sun uses the same database with the same console/shell—and there is more than one way to skin a cat. Umkay? Umkay.
The semicolon is the standard way to terminate each query statement. Some database systems do not require the semicolon, but MySQL does (exceptions are the USE and QUIT commands), and if you forget it, you will see a secondary prompt, and execution will go on hold until you add the semicolon, as shown in Figure B.3.
mysql> show databases
->
-> ;
+------------+
| Database |
+------------+
| mysql |
| northwind |
| phpmyadmin |
| test |
+------------+
4 rows in set (0.0 sec)
Figure B.3 Missing semicolon and the secondary prompt.
Naming Conventions
A database and its tables are easier to read when good naming conventions are used.
For example, it makes good sense to make table names plural and field/column names singular. Why? Because a table called Shippers normally holds more than one shipper, but the name of the field used to describe each shipper is a single value, such as Company_Name, Phone, and so on. The first letter in a table or field name is usually capitalized.
Compound names, such as Company_Name, are usually separated by the underscore, with the first letter of each word capitalized.
Spaces and dashes are not allowed in any name in the database.
Reserved Words
All languages have a list of reserved words that have special meaning to the language. The SQL reserved words are listed in Table B.1. Most of these words will be used in this appendix. (See the MySQL documentation for a complete list of all reserved words.)

Case Senstivity
Database and table names are case sensitive if you are using UNIX, but not if you are using Windows. A convention is to always use lowercase names for databases and their tables.
SQL commands are not case sensitive. For example, the following SQL statements are equally valid:
show databases;
SHOW DATABASES;
Although SQL commands are not case sensitive, by convention, SQL keywords are capitalized for clarity, whereas only the first letter of the field, table, and database names is capitalized.
SELECT * FROM Persons WHERE FirstName='John'
If performing pattern matching with the LIKE and NOT LIKE commands, then the pattern being searched for is case sensitive when using MySQL.
The Result Set
A result set is just another table created to hold the results from a SQL query. Most database software systems even allow you to perform operations on the result set with functions, such as Move-To-First-Record, Get-Record-Content, Move-To-Next-Record, and so on. In Figure B.4, the result set is the table created by asking mysql to show all the fields in the table called shippers.
mysql> show fields in shippers;
+-------------------------------------------------------------------+
| Field | Type | Null | Key | Default | Extra |
+-------------------------------------------------------------------+
| ShipperID | int(11) | |PRI | NULL | auto_increment |
| CompanyName | varchar(40) | | | | |
| Phone | varchar(24) | YES | | NULL | |
+-------------------------------------------------------------------+
3 rows in set (0.0 sec)
Figure B.4 The result set is just a table produced from a query.
B.1.4 SQL and the Database
A database server can support multiple databases. For example, an Oracle or MySQL database server might serve one database for accounting, a second for human resources, a third for an e-commerce application, and so on. To see the available databases, SQL provides the show command.
The show databases Command
To see what databases are available on your database server, use the show databases command. The list of databases might be different on your machine, but the mysql and test databases are provided when you install MySQL. The mysql database is required because it describes user access privileges, and the test database, as the name suggests, is provided as a practice database for testing how things work.
The USE Command
The USE command makes the specified database your default database. From that point on, all SQL commands will be performed on the default database. This is one of the few commands that does not require a semicolon to terminate it.
B.1.5 SQL Database Tables
A database usually contains one or more tables. Each table is identified by a name, such as Customers or Orders. The SHOW TABLES IN command displays all the tables within a database, as shown in Figure B.5. The SELECT * FROM command lists all the fields and rows in a specified table. Tables contain rows, called records, and columns, called fields. The table in Figure B.6 contains three records (one for each shipper) and three columns (ShipperID, CompanyName, and Phone).
mysql> show tables in northwind;
+----------------------+
| Tables_in_northwind |
+----------------------+
| categories |
| customercustomerdemo |
| customerdemographics |
| customers |
| employees |
| employeeterritories |
| order_details |
| orders |
| products |
| region |
| shippers |
| suppliers |
| territories |
| usstates |
+----------------------+
14 rows in set (0.03 sec)
mysql> select * from shippers;
+-----------------------------------------------+
| ShipperID | CompanyName | Phone |
+-----------------------------------------------+
| 1 | Speedy Express | (503) 555-9831 |
| 2 | United Package | (503) 555-3199 |
| 3 | Federal Shipping | (503) 555-9931 |
+-----------------------------------------------+
3 rows in set (0.00 sec)
Figure B.6 Display the contents of a particular table.
The SHOW and DESCRIBE Commands
To see what type of data can be assigned to a table, use the DESCRIBE command, specific to MySQL, and SHOW FIELDS IN command, a standard SQL command. The output displayed is the name of each field and the data types of the values that correspond to each field, as shown in Figure B.7. The data type can be a variable string of characters, a date, a number, and so on. For example, the type varchar(40) means a field with up to 40 characters. Also displayed is the primary key that is used to uniquely identify the record.
mysql> show fields in customers;
+-----------------------------------------------------------+
| Field | Type | Null | Key | Default | Extra |
+-----------------------------------------------------------+
| CustomerID | varchar(5) | | PRI | | |
| CompanyName | varchar(40) | | MUL | | |
| ContactName | varchar(30) | YES | | NULL | |
| ContactTitle | varchar(30) | YES | | NULL | |
| Address | varchar(60) | YES | | NULL | |
| City | varchar(15) | YES | MUL | NULL | |
| Region | varchar(15) | YES | MUL | NULL | |
| PostalCode | varchar(10) | YES | MUL | NULL | |
| Country | varchar(15) | YES | | NULL | |
| Phone | varchar(24) | YES | | NULL | |
| Fax | varchar(24) | YES | | NULL | |
+-----------------------------------------------------------+
11 rows in set (0.05 sec)
The shorter DESCRIBE version is shown in Figure B.8.
mysql> describe shippers;
+-------------------------------------------------------------------+
| Field | Type | Null | Key | Default | Extra |
+-------------------------------------------------------------------+
| ShipperID | int(11) | |PRI | NULL | auto_increment |
| CompanyName | varchar(40) | | | | |
| Phone | varchar(24) | YES | | NULL | |
+-------------------------------------------------------------------+
3 rows in set (0.00 sec)
Figure B.8 The MySQL DESCRIBE command.
B.2 SQL Data Manipulation Language (DML)
SQL is a nonprocedural language providing a syntax for extracting data, including a syntax to update, insert, and delete records.
These query and update commands together form the Data Manipulation Language (DML) part of SQL. We cover the following SQL commands in this section:
• SELECT—Extracts data from a database table.
• UPDATE—Updates data in a database table.
• DELETE—Deletes data from a database table.
• INSERT INTO—Inserts new data into a database table.
B.2.1 The SELECT Command
One of the most commonly used SQL commands is SELECT, mandatory when performing a query. The SELECT command is used to retrieve data from a table based on some criteria. It specifies a comma-separated list of fields to be retrieved, and the FROM clause specifies the table(s) to be accessed. The results are stored in a result table known as the result set. The * symbol can be used to represent all of the fields.
Select Specified Columns
To select the columns named CompanyName and Phone from the Shippers table, SELECT is followed by a comma-separated list of fields to be selected FROM the Shippers table. The resulting table is called the result set, as shown in Example B.4.
Select All Columns
To select all columns from the Shippers table, use an * symbol instead of column names, as shown in Example B.5. The * is a wildcard character used to represent all of the fields (columns).
The SELECT DISTINCT Statement
The DISTINCT keyword is used to return only distinct (unique) values from the table. If there are multiple values of a specified field, the DISTINCT result set will display only one.
In the next example, ALL values from the column named ShipName are first selected, and more than 800 records are displayed, but notice that with the DISTINCT keyword, fewer than 90 records are retrieved.
Limiting the Number of Lines in the Result Set with LIMIT
If you do not want to display a huge database, you can limit the number of lines to print by using LIMIT; for example, the tables in the northwind database contain thousands of records. In the previous examples, it would have been better to display a few lines to demonstrate that the query was successful. Because you are getting only a partial list, you might want to know the total number in the table. This can be done by using the SQL_CALC_FOUND_ROWS option and the SQL FOUND_ROWS() function. SQL will calculate the total number of records, and the FOUND_ROWS() function will let you display the results of that calculation.
The WHERE Clause
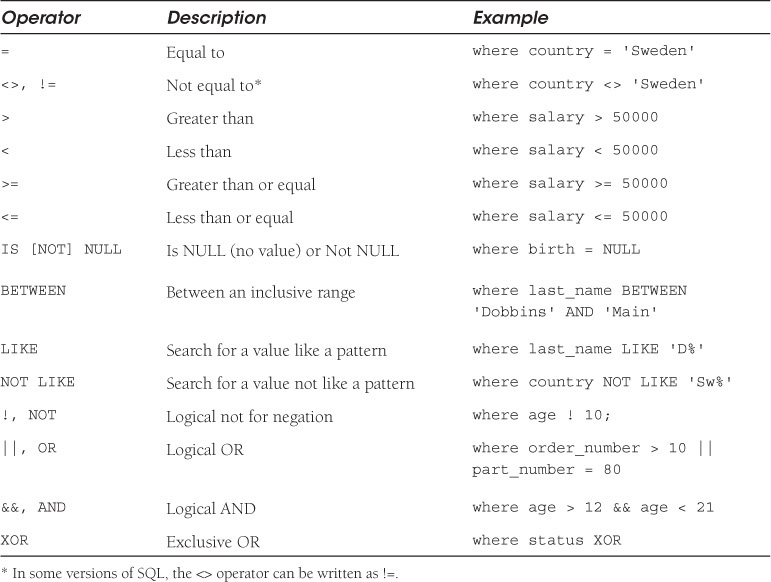
What if you want to select fields only when a certain set of conditions is true? For example, you might want to list all the customers who come from Sweden and were paid more than $50,000 last year. The WHERE clause is optional and specifies which data values or rows will be selected, based on a condition described after the keyword WHERE. To create the conditions, called the selection criteria, SQL provides a set of operators to further qualify what criteria should be specified in the WHERE clause. See Table B.2.
Using Quotes
Quotes are always an issue in programming languages. Should you use a set of single quotes or double quotes, and when should you use them?
SQL uses single quotes around text values (most database systems, including MySQL, also accept double quotes). Numeric values should not be enclosed in quotes.
For text values, this example is correct:
SELECT * FROM Students WHERE FirstName='Marco'
and this example is wrong:
SELECT * FROM Students WHERE FirstName=Marco Marco should be "Marco"
For numeric values, this example is correct:
SELECT * FROM Students WHERE Year>2004
and this example is wrong:
SELECT * FROM Students WHERE Year>'2004' '2004' should be 2004
Using the = and <> Operators
In Figure B.9, the CompanyName and Phone fields are retrieved from the Customers table if the condition following the WHERE clause is true; that is, if the string values in the Country field are exactly equal to the string Italy (they must contain the same number and type of characters). The <> operator can be used to test for “not equal to.”
mysql> select CompanyName, Phone FROM Customers
-> WHERE Country='Italy';
+--------------------------------------------+
| CompanyName | Phone |
+--------------------------------------------+
| Franchi S.p.A. | 011-4988260 |
| Magazzini Alimentari Riuniti | 035-640230 |
| Reggiani Caseifici | 0522-556721 |
+--------------------------------------------+
3 rows in set (0.00 sec)
Figure B.9 The WHERE clause with the = operator.
What Is NULL?
Null means that there is not a value in a field, or it is unknown, but does not mean a value of zero. If a field is NULL, it is empty, and if it is NOT NULL, it has data. Fields have NULL as a default unless they are specified by NOT NULL in the definition of the table.
The > and < Operators
The > and < operators are used to select rows where the value of a field is greater or less than some value, such as:
SELECT product, price FROM table WHERE price > 50;
SELECT product, price FROM table
WHERE price > 50 && price < 100;
You can also use the >= and <= operators to select rows that are greater than or equal to or less than or equal to some value:
SELECT product, price FROM table
WHERE price >=50;
The AND and OR Operators
AND and OR operators are used in a WHERE clause to further qualify what data you want to select from a table. The AND operator tests one or more conditions to see if all the conditions are true; if so, SELECT displays the rows. The OR operator displays a row if only one of the conditions listed is true. The AND operator can be designated by the && symbol, and the OR operator can be designated as ||.
The LIKE and NOT LIKE Conditions
The LIKE pattern-matching operator is a powerful operator that can be used as a condition in the WHERE clause, allowing you to select only rows that are “like” or match a pattern.
A percent sign (%) can be used as a wildcard to match any possible character that might appear before and/or after the characters specified.
A _ is used to match a single character.
The LIKE condition can be used in any valid SQL statement, including SELECT, INSERT, UPDATE, or DELETE.
The next examples will demonstrate how the % and _ are used with LIKE and NOT LIKE as a wildcard in pattern matching.
Pattern Matching and the % Wildcard
The % wildcard is used to represent one or more of any character when performing pattern matching. For example, if you are looking for all phone numbers in the 408 area code, you could say 408%, and the % will be replaced by any characters after 408.
The _ Wildcard
The next example shows how the underscore (_) wildcard character works. Remember that the _ matches only one character.
The BETWEEN Statement
The BETWEEN keyword allows you select a field based on criteria that represent a range of values. The syntax for the BETWEEN clause is as follows.
Sorting Results with ORDER BY
You can display the output of a query in a particular order by using the ORDER BY clause. Rows can be sorted in either ascending (ASC, the default) or descending (DESC) order where the values being sorted are either strings or numbers.
B.2.2 The INSERT Command
The INSERT INTO statement is used to insert new rows into a table. After the VALUES keyword, a comma-separated list of column names follows.
B.2.3 The UPDATE Command
The UPDATE statement is used to modify the data in a table. After the UPDATE command, you list the name of the table where the data will be changed, followed by the SET statement to indicate what field will be changed, and then the new value that will be assigned to the field. The WHERE clause further qualifies what data is to be modified, thereby limiting the scope of the update.
In Example B.23, the key is the use of the WHERE statement to limit the scope of the update.
B.2.4 The DELETE Statement
The DELETE statement is used to delete rows in a table and returns the number of rows that were deleted. DELETE uses the FROM clause to specify the name of the table that contains the data you want to delete, and the WHERE clause specifies the criteria to identify what data should be removed.
Be careful! Without a WHERE clause, all rows are deleted.1
1. You can set up MySQL so that if you use DELETE without a WHERE clause, the rows will not be deleted.
If the ORDER BY clause is specified, the rows are deleted in the order that is specified. The LIMIT clause places a limit on the number of rows that can be deleted.
The DELETE statement is very similar to the UPDATE statement. To delete the previous record, you would enter this query:
DELETE FROM Shippers WHERE CompanyName='Canada Post';
B.3 SQL Data Definition Language
The Data Definition Language (DDL) part of SQL permits database objects to be created or destroyed. You can also define indexes (keys), specify links between tables, and impose constraints between database tables. Often, decisions to create and remove databases are handled by a database administrator, and having permission to create and drop tables depends on what access rights are granted.
The most important data definition statements in SQL are:
• CREATE TABLE—Creates a new database table.
• ALTER TABLE—Alters (changes) a database table.
• DROP TABLE—Deletes a database table.
• CREATE INDEX—Creates an index (search key).
• DROP INDEX—Deletes an index.
B.3.1 Creating the Database
Creating the database is very simple. All you have to do is issue one command, and the only parameter is the database name.
In the earlier examples, we used the northwind database. Now we will create a database for an art gallery.
B.3.2 SQL Data Types
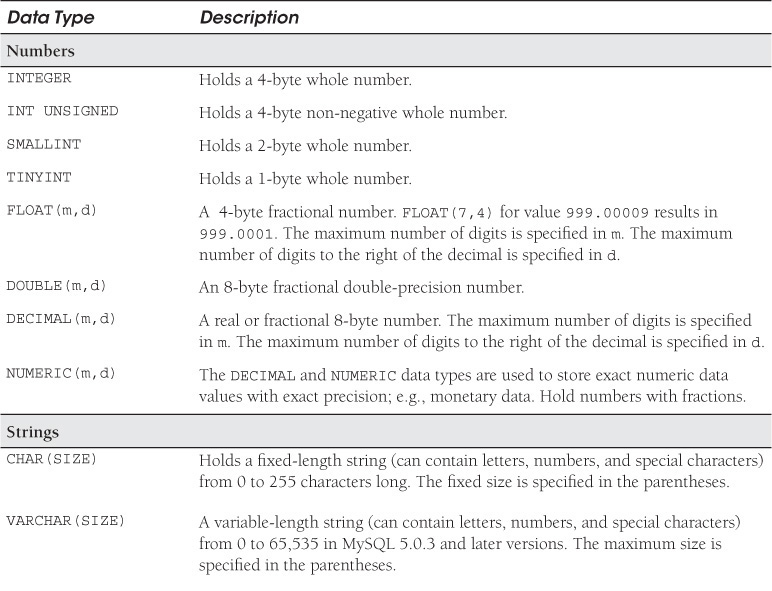
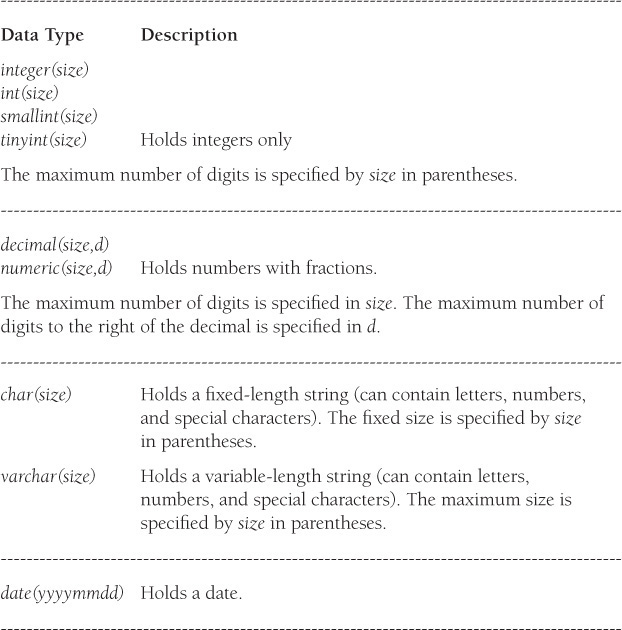
After creating a database, you will add the tables that make up the database. Before creating a table, you have to decide what kind of data will be stored in it; for example, will you have rows of names, dates, part numbers, Social Security numbers, prices, and so on? The data type specifies what type of data the column can hold. The basic types are string, numeric, and date and time types. For a fully documented list, see http://dev.mysql.com/doc/refman/5.0/en/data-types.html.
Table B.3 contains the most common data types in SQL.

B.3.3 Creating a Table
Creating a table is a little more complicated than creating the database. The CREATE TABLE statement is used to create a new table in the database. First, you must name the new table and then specify all the fields that will be included in the table as well as the data types and any other attributes. A data type can be an integer, a floating point (real) number such as 5.4, a string of characters, a date, a time, and so on. Not all databases will specify data types in the same way. To see what data types and attributes are available for MySQL, see Table B.3 or the MySQL documentation.
Designing your tables correctly is important and a subject that merits further research if you have not worked with databases before. See http://databases.about.com/od/specificproducts/a/normalization.htm for an excellent beginner’s tutorial on database design. For now, here are some rules to keep in mind when designing the table.
1. Choose the right data type for your fields; for example, use integer types for primary keys, use float and double types for large numbers, use decimal or numeric types for currency, use the correct date format for times and dates, and give yourself ample field width for strings containing variable numbers of characters, such as names and addresses. If you are saving binary data, such as images and sounds, use a data type that supports large amounts of data, such as blob and text types. See Table B.3.
2. Give columns sensible and concise names. Make them unique within the table. Do not have duplicate columns in the same table, as shown here. These should not be three columns all headed with phone.

3. Store only one value under each column heading in each row; for example, if you have a Phone field, you should not have “cell, home, business” all in one table cell, as shown here:

4. Create separate tables for each group of related items, and give each row a unique column or primary key, as shown here:

5. If you still have redundant data, put it in its own table and establish a relation between the tables with foreign keys.
Now we can insert some data into the new table.
B.3.4 Creating a Key
In real life, people can be identified by Social Security numbers, driver’s license numbers, and employee numbers; books can be identified by ISBN numbers; and a Web store order can be identified by a purchase order number. These identification numbers must be unique so that no two people have the same Social Security number, no two books have the same ISBN number, and so on. Keys are used to uniquely identify a record in a table. There are two types of keys: primary keys and foreign keys.
Primary Keys
Each table typically has a primary key. Primary keys are used to uniquely identify a record in the database. They must be unique, never change, occur only once per table, and are normally numeric types.
You can choose to manually generate this unique number for each record or let the database do it for you. If you let the database generate the primary key, it will generate a unique number, given a starting value (e.g., 1) and then for each new record, increment that number by 1. Even if a record is deleted, that number is never recycled. The database increments its internal counter, guaranteeing that each record will be given a unique “key.”
To set a field as a primay key, use the attribute PRIMARY KEY (field_name), and to tell the database to automatically create the unique number, use the AUTO_INCREMENT attribute following the field definition. The primary key cannot be null.
The following two examples describe a table called categories where the primary key is called CategoryID. It will automatically be incremented each time a new category is added to the table.
Foreign Keys
If a primary key is referenced in another table, it is called a foreign key. Foreign keys are used to create relation between tables. In the following example, two tables are described that both reference the CategoryID key, although it is primary in one and foreign in the other.
B.3.5 Relations
A major advantage of the relational database system is the ability to create relations between tables. Simply put, a relation is a connection between a field of one table and a field of another. This relation allows you to look up related records in the database.
The operation of matching rows from one table to another using one or more column values is called a join. There are several types of join statements, such as fulljoins, crossjoins, leftjoins, and so on, but let’s start with a simple joining of two tables, called an inner join.
Tables can be related to each other with keys. As we discussed earlier, a primary key is a column with a unique value for each row. A matching key in a second table is called a foreign key. With these keys, you can bind data together across tables without repeating all of the data in every table where a certain condition is met.
Consider the previous Example B.30, in which two tables from the northwind database are described. One table is called categories and the other called products. CategoryID is a primary key field in the categories table, and it is a foreign key in the products table. The CategoryID key is used to create a relationship between the two tables.
Two Tables with a Common Key
As discussed previously, both the categories table and the products table have a CategoryID key with the same values, making it possible to create a relation between the two tables.
Let’s create a relation in which all the product names are listed if they are in the Seafood category. Because every product in the products table falls into one of the eight categories in the categories table, the two tables can be bound by their common CategoryID.
Using a Fully Qualified Name and a Dot to Join the Tables
When querying more than one table, a dot is used to fully qualify the columns by their table name to avoid potential ambiguity if two tables have a field with the same name, as shown in Example B.32.
Aliases
To make things a little easier by typing less with complicated queries, SQL provides an aliasing mechanism that allows you to use symbolic names for columns and tables. The alias is defined with the AS keyword and consists of a single character or an abbreviated string. When the alias is used in the WHERE clause to represent a table name, it is appended with a dot and the name of the field being selected from that table.
B.3.6 Altering a Table
When you alter a table, you redefine its structure by adding or dropping new columns, keys, indexes, and tables. You can also use the ALTER command to change column names, types, and the table name.
B.3.7 Dropping a Table
To drop a table is relatively simple. Just use the drop command and the name of the table:
mysql> drop table dog;
Query OK, 20 rows affected (0.11 sec)
B.3.8 Dropping a Database
To drop a database, use the drop database command:
mysql> drop database pets;
Query OK, 1 row affected (0.45 sec)
B.4 SQL Functions
The following functions are used to alter or format the output of a SQL query. Functions are provided for strings, numbers, dates, server and information, and so on. They return a result set. Functions are vendor specific, meaning functions supported by MySQL might not be supported by Microsoft SQL Server. See the MySQL documenation for a list of all functions supported.
When using SELECT with a function, the function, as it was called, is displayed as the name of the column in the result set as shown in Example B.36.
B.4.1 Numeric Functions
Suppose you want to get the sum of all the orders or the average cost of a set of items or to count all the rows in a table based on a certain condition. The aggregate functions will return a single value based on a set of other values. If used among many other expressions in the item list of a SELECT statement, the SELECT must have a GROUP BY clause. No GROUP BY clause is required if the aggregate function is the only value retrieved by the SELECT statement. The functions and their syntax are listed in Table B.4.

Using GROUP BY
The GROUP BY clause can be used with a SELECT to collect all the data across multiple records and group the results by one or more columns. This is useful with the aggregate functions, such as SUM, COUNT, MIN, or MAX. See the following two examples.
B.4.2 String Functions
SQL provides a number of basic string functions, as listed in Table B.5.
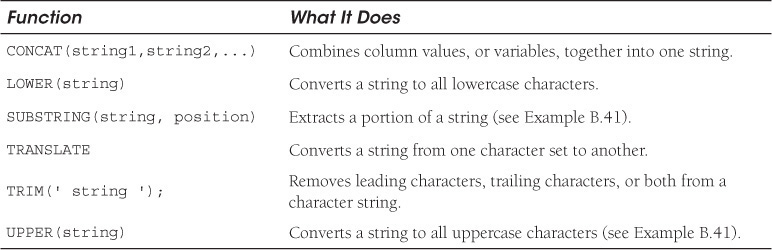
* SQL99 defines a concatenation operator (||) to use with the CONCATENATE() function. MySQL uses the concat() function shown in Table B.5.
Table B.5 MySQL String Functions
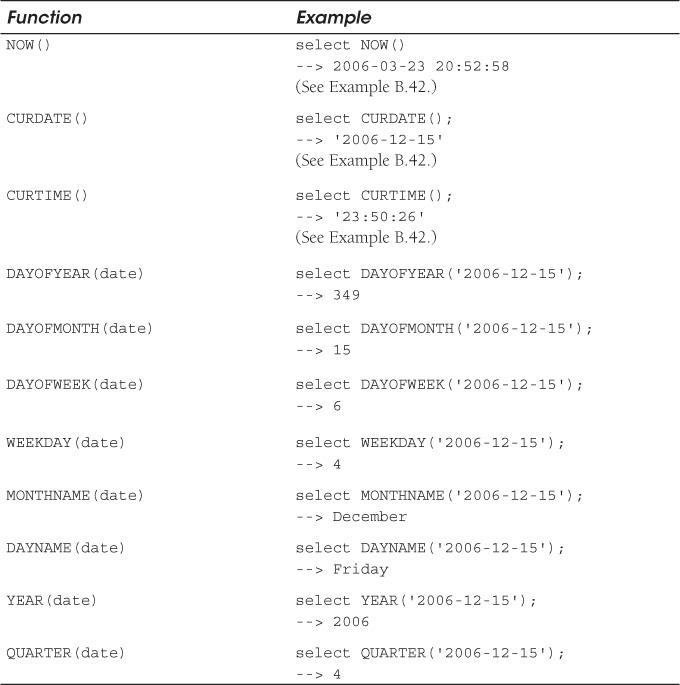
B.4.3 Date and Time Functions
To get the date and time, MySQL provides the functions shown in Table B.6.
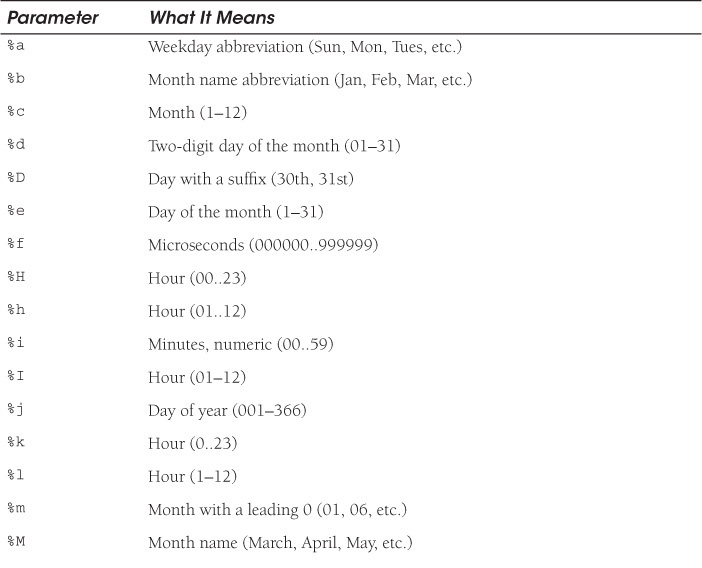
Formatting the Date and Time
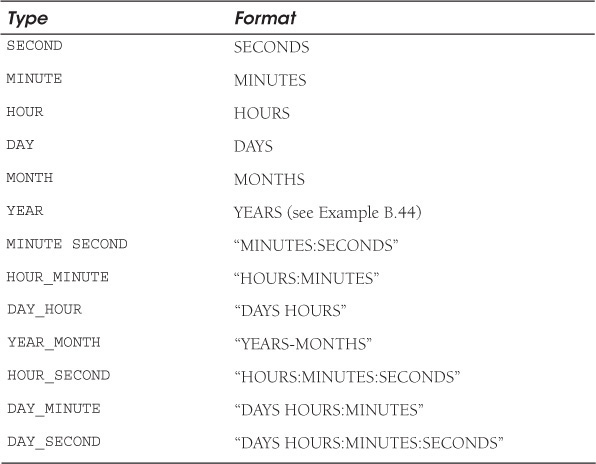
When retrieving dates and times from a table, you might find you want to format the output. For example, when selecting the dates of the orders from the orders table in the northwind database, the result set is not user friendly. Date values in SQL are always saved in MM/DD/YY(YY) format. The DATE_FORMAT() and TIME_FORMAT() functions (see Example B.43) are provided with a list of parameters (see Table B.7) used to specify how the output should be displayed.

The MySQL EXTRACT Command
The EXTRACT command is an example of a MySQL extension, not described in the SQL standard. It allows you to extract different parts of a date or time, as shown in Table B.8.
B.5 Appendix Summary
In this appendix, you learned how to use the SQL language to create database schemas and how to insert, update, retrieve, alter, and delete records from a database.
B.6 What You Should Know
1. How do you retrieve all the records from a database table?
2. How do you retrieve a select set of records or a single record from a table based on specific criteria?
3. How do you select and sort records in a database?
4. How do you select a range of rows from a database?
5. How do you create a database?
6. How do you create database tables?
7. How do you assign a primary key to a field?
8. How are records inserted into the database table?
9. How are records updated in a table?
10. How do you delete a record?
Exercise B: Do You Speak My Language?
1. Go to the MySQL console and use the show command to list all the databases. Use the mysql database. Now display all of its tables.
2. Create a new database called school. Once you create the database, you need to be able to use it: use school;
3. Create a table called student. The table will consist of the following fields:
FirstName
LastName
CellPhone
Major
GPA
StartDate
StudentId (the primary key)
The following information is the type of data you will use to define your table. Go online and look for a table similar to this to use as your guide.
4. Use the SQL describe statement to display the information you used to create the school database.
5. Insert three rows into the table:
Row 1: FirstName: John
LastName: Doe
Email: [email protected]
CellPhone: 408-333-3456
Major: CIS
GPA: 2.8
StartDate: 09/22/2004 (use the correct date format!)
StudentId: 1
Row 2: FirstName: Mary
LastName: Chin
Email: [email protected]
CellPhone: 408-204-1234
Major: Biology
GPA: 3.3
StartDate: 06/22/2003
StudentId: 2
Row 3: FirstName: Sadish
LastName: Pamel
Email: sadi@univ_ab.edu
CellPhone: 415-204-1234
Major: CIS
GPA: 3.9
StartDate: 06/22/2003
StudentId: 2
6. Use the show commands to display all the fields.
7. Use select statements to display the following (write your query in the blank line):
a. The data in all of the columns
b. The first and last names of the students
c. The student’s first and last names and major
d. The student’s cellphone and e-mail addresses
e. Any distinct majors
f. Only 2 rows
8.
a. Select all students who have a GPA over 3.0.
b. Select all students who have a GPA between 3.0 and 4.0.
c. Select students whose cellphones are in the 408 area code.
d. Display rows for students who started in 2003.
e. Select student first and last names who are majoring in CIS and have a GPA over 3.5.
f. Select student first name and e-mail address if the e-mail address ends in .com.
9.
a. Insert a new entry into the table.
b. Sort the student table by last names.
c. Sort the student table by GPA in descending order.
10. Change Mary’s phone number to 650-123-4563.
The next three questions deal with SQL functions:
11. Find the average GPA for all the students.
12. Find the number of rows in the table.
13. Print today’s date using a SQL function.