
exposure and light meters
Mark Galer
essential skills
~ Gain a knowledge and understanding of exposure and its relationship to light sensitive surfaces, depth of field and selective focus.
~ Understand the use of hand-held and TTL light meters.
~ Understand the difference between reflected and incident meter readings and their relationship to lighting ratios and exposure.
~ Create images demonstrating an understanding of metering techniques.
~ Document the progress and development of these skills.
Introduction
An understanding of exposure is without doubt the most critical part of the photographic process. Automatic exposure systems found in many sophisticated camera systems calculate and set the exposure for the photographer. This may lead some individuals to think there is only one correct exposure, when in reality there may be several. The exposure indicated by an automatic system, no matter how sophisticated, is an average. Creative photographers use indicated meter readings for guidance only. Other photographers may interpret the same reading in different ways to create different images. It is essential the photographer understands how the illuminated subject is translated by exposure into a photographic image.
Exposure
Exposure is the action of subjecting a light-sensitive medium to light. Cameras and lenses control the intensity of light (aperture) and the duration of light (time) allowed to reach the film or image sensor. The intensity of light is determined by the size of the aperture in the lens and the duration of light is determined by the shutter.
Exposure is controlled by aperture and time - intensity and duration.
Too much light will result in overexposure. Too little light will result in underexposure. It makes no difference whether there is a large or a small amount of light, the film or image sensor still requires the same amount of light for an appropriate exposure.

Overexposure

Correct exposure
- Line Mollerhaug

Underexposure
Film, unlike image sensors, cannot alter its sensitivity to light. Exposure must be adjusted to compensate for these changes. This is achieved by adjusting either the intensity (aperture) or duration of light (time) or a film of a higher or lower ISO chosen. Increasing the size of the aperture gives more exposure, decreasing gives less. Decreasing the duration of the shutter speed reduces exposure, increasing gives more.
Measuring light
To calculate correct exposure the intensity or level of light has to be measured. Light is measured by a light meter. Understanding the metering techniques of both hand-held light meters and those found in most cameras using their own metering systems is an important skill. All light meters inform the photographer of the amount of light available to obtain an appropriate exposure. This information can be used to set aperture and shutter speed settings in a variety of combinations. Each combination will give different visual outcomes whilst retaining the same overall exposure (depth of field and motion blur). Working in a creative medium such as photography ‘correct exposure’ can sometimes be a very subjective opinion. The photographer may want the image to appear dark or light to create a specific mood.

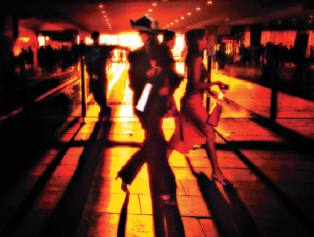
Exposing for highlights - Mark Galer
Appropriate exposure
A light meter reading should only be viewed as a guide to exposure. Film and digital image sensors are unable to record the broad range of tones visible to the human eye. If the camera frames a subject with highlights and shadows the light-sensitive medium may only be able to capture the highlight tones or the shadow tones, not both. An extremely bright tone and an extremely dark tone cannot both record with detail and texture in the same framed image. Underexposure and overexposure in one image is therefore not only possible but common.
It is often necessary for the photographer to take more than one reading to decide on the most appropriate exposure. If a reading is taken of a highlight area the resulting exposure may underexpose the shadows. If a reading is taken of the shadows the resulting exposure may overexpose the highlights. The photographer must therefore decide whether highlight or shadow detail is the priority, change the lighting or reach a compromise. A clear understanding of exposure is essential if the photographer is to make an informed decision.
Intensity and duration
Intensity
Light intensity is controlled by the aperture in the lens. Actual aperture is the size of the diameter of the iris built in to the camera lens. The aperture is a mechanical copy of the iris existing in the human eye. The human iris opens up in dim light and closes down in bright light to control the amount of light reaching the retina. The aperture of the camera lens must also be opened and closed in different brightness levels to control the amount or intensity of light reaching the film or image sensor. The right amount of light is required for correct exposure. Too much light and the light-sensitive medium will be overexposed, not enough light and it will be underexposed.
As the aperture on the lens is opened or closed a series of clicks can be felt. These clicks are called f-stops and are numbered. When the value of the f-stop decreases by one stop exactly twice as much light reaches the film or image sensor as the previous number. When the value of the f-stop increases by one stop half as much light reaches the film or image sensor as the previous number. The only confusing part is that maximum aperture is the f-stop with the smallest value and minimum aperture is the f-stop with the largest value. The larger the f-stop the smaller the aperture. Easy!

ACTIVITY 1
Carefully remove the lens from either a small-format or medium-format camera.
Hold the lens in front of a diffuse light source of low intensity.
Whilst looking through the lens notice how the size of the aperture changes as you alter the f-stop.
Record and discuss the relationship between the size of the aperture and the corresponding f-stop number displayed on the barrel of the lens or in the LCD panel.
Relationship between aperture and f-number
The reasoning behind the values given to the f-stops can be explained by the following example:
~ The diameter of a selected aperture on a standard 50mm lens for a 35mm camera measures 12.5mm.
~ This measurement divides into the focal length of the lens (50mm) exactly four times.
~ The aperture is therefore given the number f4.
~ The diameter of another selected aperture on the same lens measures 6.25mm.
~ This measurement can similarly be divided into the focal length of the lens to give an f-number of f8, thereby explaining why the higher f-numbers refer to the smaller apertures.
Itti Karuson
The diameter of the same f-number may vary for different focal-length lenses but the intensity of light reaching the image plane remains constant. F4 on a long focal-length lens is physically much larger than the same aperture on a shorter focal length lens. The intensity of the light striking the film or image sensor is the same, however, due to the increased distance the light has to travel through the longer focal-length lens. See ‘Inverse square law’.
ACTIVITY 2
Take exposure readings of a subject in bright sunlight and in deep shade. Record all of the different combinations of exposure for each lighting condition. Compare the results between a fixed focal length-lens and a zoom lens.
Duration
Light duration is controlled by the shutter. The time the light-sensitive surface is exposed to light is measured in whole and fractions of a second. This time is regulated by the shutter speed. Until the invention of the focal plane shutter, exposure time had been controlled by devices either attached to or within the lens itself. These shutters regulated the length of exposure. Early cameras had no shutter at all and relied upon the photographer removing and replacing a lens cap to facilitate correct exposure times. Other rudimentary shutters, very similar in appearance to miniature roller blinds, were tried but it was not until the invention of a reliable mechanical shutter that exposure times could be relied upon. As film emulsions became faster (increased sensitivity to light) so did the opportunity to make shorter exposures. Within a relatively brief period exposures were no longer in minutes but in fractions of a second.

Mark Galer
The shutter
The main types of shutter systems used in photography are the digital shutter, the leaf shutter and the focal plane shutter. The primary function of all systems is exposure. When the shutter is released it opens for the amount of time set on the shutter speed dial or LCD. These figures are in whole and fractions of seconds. The length of time the shutter is open controls the amount of light reaching the image plane. Each shutter speed doubles or halves the amount of light entering the camera. Leaving the shutter open for a greater length of time will result in a slower shutter speed. Shutter speeds slower than 1/60 second, using a standard lens, can cause motion blur or camera shake unless you brace the camera or mount it on a tripod.
Using a shutter speed faster than 1/250 or 1/500 second usually requires a wide aperture, more light or a film or image sensor of increased sensitivity. These measures are necessary to compensate for the reduced amount of light passing through a shutter open for a short period of time.
The same exposure or level of illumination can be achieved using different combinations of aperture and shutter speed. For example, an exposure of f11 @ 1/125 second = f8 @ 1/250 second = f16 @ 1/60 second, etc.
Digital shutter
The duration of the exposure can be controlled entirely by electronic means by switching on and switching off the image sensor for the prescribed amount of time. Many digital SLR cameras, however, use a hybrid system of digital and focal plane shutters.
Leaf shutter
Leaf shutters are situated in the lens assembly of most medium-format and all large-format cameras. They are constructed from a series of overlapping metal blades or leaves. When the shutter is released the blades swing fully open for the designated period of time.
Focal plane shutter
A focal plane shutter is situated in the camera body directly in front of the image plane (where the image is focused), hence the name. This system is used extensively in 35mm SLR cameras and a few medium-format cameras. The system can be likened to two curtains, one opening and one closing the shutter’s aperture or window. When the faster shutter speeds are used the second curtain starts to close before the first has finished opening. A narrow slit is moved over the image plane at the fastest shutter speed. This precludes the use of high speed flash. If flash is used with the fast shutter speeds only part of the frame is exposed.
The advantages of a focal plane shutter over a leaf shutter are:
~ fast shutter speeds in excess of 1/1000 second;
~ lenses are comparatively cheaper because they do not require shutter systems.
The disadvantage is:
~ limited flash synchronisation speeds.

Focal plane shutter firing faster than the fastest flash synchronisation speed
ACTIVITY 3
Create exposures of a stationary subject at a variety of shutter speeds between 1/125 and 1/4 second whilst hand holding a camera. Use a standard focal length lens and correct the exposure using the aperture each time the shutter speed is adjusted.
Compare and discuss your results to see who has the least image blur.
Take exposure readings of a subject in bright sunlight and covered shade.
Record all of the different combinations of exposure for each lighting condition.
Hand-held light meters
Accurate exposure is critical to the final quality of the photographic image. It is therefore essential to have a reliable light meter. The ability of the human eye to compensate for variations in light, shade and contrast is far greater than any light-sensitive surface currently available. It is difficult to appreciate how the difference between dark and light tones and the balance between different light sources (lighting ratio) will translate into a photographic image without the use of a meter. Next to a camera the light meter is often considered the most important piece of photographic equipment. Most 35mm cameras and some medium-format cameras have built-in metering systems measuring light reflected from the subject. Although very useful, reflected light meters do not provide information to the photographer about the levels of light falling on the subject. Photographers requiring this information need a separate hand-held meter that will measure reflected and incident light. Without a meter only experience will tell you if there will be detail in the shadows or highlights when the film or image sensor is exposed.
Meter readings
Measuring light for the purpose of exposure can be achieved by taking a reflected or an incident reading.
A reflected reading is when the light-sensitive cell of the meter is pointed at the subject and the light reflected from the subject is measured.
An incident reading is when the meter’s light-sensitive cell is pointed at the camera from the subject and the light falling on the subject is measured. A white plastic diffuser called an ‘invercone’ is placed over the meter’s light-sensitive cell. The invercone collects the light from a wide angle of view (180°) and transmits 18% of that light to the meter’s cell.
Meter indicated exposure
The indicated exposure reading is known as the ‘meter indicated exposure’ (MIE).
Although the photographer sees a subject, the meter sees only a level of light. The meter is calibrated to render everything as a mid-tone regardless of the level of illumination. A meter will therefore give ‘correct’ exposure for a man in a grey flannel suit whether he is in a cellar or sunlight.
18% grey card
The mid-tone to which all meters are calibrated is called an ‘18% grey card’, so called because it reflects 18% of the light falling upon it. It is an exposure and colour standard manufactured by Kodak. If a meter reading is taken from any single tone the resulting MIE will render the tone as a mid-tone. If a reflected meter reading is taken from a black card the resulting MIE will render the black card grey. If a reflected meter reading is taken from a white card the resulting MIE will render the white card grey. This is why snow often comes out grey in many snapshots.
Taking a hand-held meter reading
Incident reading
For an incident reading it is important to place the white plastic dome supplied with the meter over the light-sensitive cell. This is called an ‘invercone’. The purpose of the invercone is to diffuse the light falling on the subject from a wide angle of acceptance (180°) and transmit 18% of that light. The sensitivity or ISO of the film or digital image sensor must then be calibrated into the meter. The light meter is generally taken to the subject and the light-sensitive cell is directed back towards the camera. The reading may default to EV (exposure value), which can be interpreted or changed to an aperture/shutter speed combination. On modern digital meters the photographer is able to pre-select a particular shutter speed or aperture and have the meter indicate the corresponding value to obtain correct exposure.
Matthew Orchard
ACTIVITY 4
Take an incident light reading of a subject in a constant light source.
Note the f-stop at an exposure time of 1/8 second. Increase the number of the aperture by three f-stops.
Note the change in exposure time.
Discuss with other students what the result would be if the duration of time had been increased by a factor of three instead of the aperture.
Reflected reading
For a reflected reading it is important to remove the invercone. The meter’s cell has an angle of acceptance equal to a standard lens (with a spot meter attachment the angle can be reduced to five degrees or less for precise measurements). The film or image sensor’s ISO setting is calibrated into the meter. The meter is pointed towards the subject. The exposure the meter recommends is an average of the reflected light from the light and dark tones present. When light and dark tones are of equal distribution within the field of view this average reading is suitable for exposure. It must be remembered the meter measures only the level of light. It does not distinguish between dark or light tones. If a reading is taken from a single tone the light meter will always indicate an exposure suitable to render this tone as a mid-tone. If the subject is wearing a grey flannel suit a reflected reading from the camera would give an average for correct exposure. However, if the subject is wearing a white shirt and black jeans a reflected reading of the shirt would give an exposure that would make the shirt appear grey and a reflected reading of the jeans would also make them appear grey on film or digital image. When light or dark tones dominate the photographer must increase or decrease exposure accordingly.
General reflected reading
If the reading is taken from the camera position a general reading results. This general reading is an average between the reflected light from the light and dark tones present. When light and dark tones are of equal distribution within the frame this average light reading is suitable for exposing the subject. When light or dark tones predominate in the image area they overly influence the meter reading and the photographer must increase or decrease exposure accordingly.
Specific reflected reading
A more accurate reading can be taken when light or dark tones dominate the scene by moving the light meter closer to a mid-tone. This avoids the meter being overly influenced by the shadow and highlight tones. Care must be taken not to cast your own shadow or that of the meter when taking a reading from a close surface.
If the photographer is unable to approach the subject being photographed, it is possible to take a meter reading from a tone close to the camera. A useful technique is to take a reading from a grey card angled to reflect the same light as the subject or of Caucasian skin (approximately one stop brighter than a mid-tone).

Charanjeet Wadwha
Understanding the meter reading
There are many ways of understanding the information a light meter is giving in relation to exposure. The meter read-out system itself can be confusing. Some photographers refer to EV (exposure value) readings, others t-stops (transmission) and others in zones. In reality they all mean the same. Of all the variations the most common usage is f-stops. All meters usually default to f-stops and all camera lens apertures are calibrated in f-stops. It is important to understand if the exposure is increased by one stop, either by time or aperture, the amount of light entering the camera has doubled (2x). If increased by two stops the amount of light has doubled again (4x). If increased by three stops the light doubles again (8x) and so on. This simple law applies with the opposite result to decrease in exposure. It is also important to set the meter to the chosen ISO rating (measure of film or image sensor sensitivity to light).
Average exposure
If the lighting is even most films and image sensors are able to record a full range of tones. Where the tones are evenly distributed the most appropriate exposure is often the average indicated by the light meter. When light or dark tones dominate, however, underexposure or overexposure may occur as the average exposure is no longer appropriate. It is essential to understand how the light meter reads light to have full control over exposure.
Itti Karuson
ACTIVITY 5
Using a diffuse light source (cloudy sky) take individual reflected light meter readings of three pieces of card, one white, one black and one mid-grey. Adjust the card to avoid specular reflections (the card should not appear shiny). The black card should give a reading different by four stops to the reading off the white card . The mid-grey card should be between the two. If the mid-grey card is two stops apart from each, you have a mid-tone the meter sees as the average tone (18% grey).
Make an exposure of each of the three cards using the reflected MIE of each card.
Photograph the white and black cards again using the MIE of the grey card.
Label the results with the MIE, the actual exposure and the tone of the card.
TTL light meters
TTL or ‘through the lens’ light meters, built into cameras, measure the level of reflected light prior to exposure. They measure only the reflected light from the subject matter within the framed image. The meter averages or mixes the differing amounts of reflected light within the framed image, and indicates an average level of reflected light. The light meter readings are translated by the camera’s CPU and used to set aperture and/or shutter speed.
Centre-weighted and matrix metering
Centre-weighted and selective metering systems (matrix metering), common in many cameras, bias the information collected from the framed area in a variety of ways. Centre-weighted metering takes a greater percentage of the information from the central area of the viewfinder. The reading, no matter how sophisticated, is still an average - indicating one exposure value only. Any single tone recorded by the photographer using a TTL reading will reproduce as a mid-tone, no matter how dark or light the tone or level of illumination. This tone is the midpoint between black and white. If the photographer takes a photograph of a black or white wall and uses the indicated meter reading to set the exposure, the final image produced would show the wall as having a mid-tone.

Centre-weighted TTL metering
Automatic TTL exposure modes
If the camera is set to fully automatic or programme mode both the shutter speed and aperture will be set automatically, ensuring an average exposure in response to the level of light recorded by the meter. In low light the photographer using the programme mode should be aware of the shutter speed being used to achieve this exposure. As the lens aperture reaches its widest setting the programme mode will start to use shutter speeds slower than those usually recommended to avoid camera shake. Many cameras alert the photographer to this using an audible or visual signal. This should not be treated as a signal to stop taking photographs but to take precautions to avoid camera shake, such as bracing the camera or by using a tripod.
Semiautomatic
The disadvantage of a fully automatic or programme mode is it can often take away the creative input the photographer can make to many of the shots. A camera set to fully automatic is programmed to make decisions not necessarily correct for every situation.
If your camera is selecting both the aperture and shutter speed you will need to spend some time finding out how the camera can be switched to semiautomatic and manual operation. Semiautomatic exposure control, whether aperture priority (Av) or shutter priority (Tv), allows creative input from the photographer (depth of field and movement blur) but still ensures MIE is obtained automatically.
Aperture priority (Av)
This is a semiautomatic function where the photographer chooses the aperture and the camera selects the shutter speed to achieve MIE. This is the most common semiautomatic function used by professional photographers as the depth of field is usually the primary consideration. The photographer using aperture priority needs to be aware of slow shutter speeds being selected by the automatic function of the camera when selecting small apertures in low-light conditions. To avoid camera shake and unintended blur the aperture has to be opened and the depth of field sacrificed.
Kata Bayer
Shutter priority (Tv)
This is a semiautomatic function where the photographer chooses the shutter speed and the camera selects the aperture to achieve correct exposure. In choosing a fast shutter speed the photographer needs to be aware of underexposure as light levels decrease. The fastest shutter speed possible is often limited by the maximum aperture of the lens. In choosing a slow shutter speed the photographer needs to be aware of overexposure when photographing brightly illuminated subject matter. Movement blur may not be possible when using fast film or image sensors set to a high ISO in bright conditions.
Interpreting the meter reading
The information given by the light meter after taking a reading is referred to as the ‘meter indicated exposure’ (MIE). This is a guide to exposure only. The light meter should not be perceived as having any intelligence or creative sensibilities. The light meter cannot distinguish between tones or subjects of interest or disinterest to the photographer. It is up to the photographer to decide on the most appropriate exposure to achieve the result required. A photographer with a different idea and outcome may choose to vary the exposure. It is the photographer’s ability to interpret and vary the meter indicated exposure to suit the mood and communication of the image that separates their creative abilities from others.
If light or dark tones dominate, the indicated exposure will be greatly influenced by these dominant tones. Using the MIE will expose these dominant dark or light tones as mid-tones. Minority light and mid-tones will be overexposed or underexposed. If you consider interest and visual impact within a photograph are created by the use of lighting and subject contrast (amongst many other things), the chances of all the elements within the frame being mid-tones are remote. The information, mood and communication of the final image can be altered through adjusting exposure from MIE.
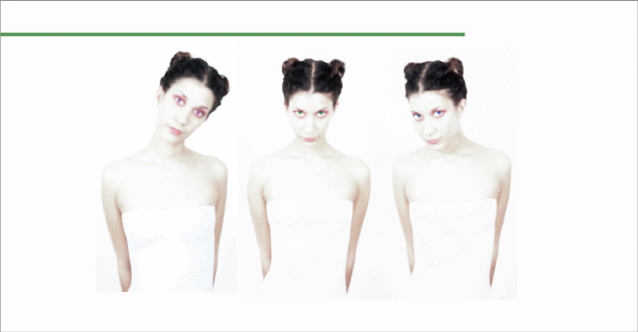
Average tones
A subject of average reflectance (mid-tone) is placed with equal dark and light tones. All three tones are lit equally by the same diffuse light source.
A reflected reading of the mid-tones will give correct exposure. An exposure using the reflected reading of the dark tone will render it grey and overexpose the mid and light tones. An exposure using the reflected reading of the light tone will render it grey and underexpose the mid and dark tones.
An incident reading will give ‘correct’ exposure regardless of which tone it is held in front of because it measures the light falling on the subject, not the light reflected from it. The intensity of the light source is constant but the reflected light from the three tones varies.
ACTIVITY 6
In a constant light source take a reflected light reading, 30cm from the subject, of a light or dark tone.
Note the exposure reading.
Now take an incident reading from the subject with the invercone pointing back towards the camera or a reflected reading 30cm from a grey card positioned next to the subject.
Note the exposure readings.
Expose a subject with dominant mid-tones in both bright and dull illumination using the MIE.
Keep a record of both exposures and label the results.
Discuss the similarities and differences of each image.
Dominant dark tones
A subject of average reflectance (mid-tone) is photographed with dominant dark tones. All three tones are lit equally by the same diffuse light source. A reflected light meter reading is taken from the camera. The dominant dark tones reflect less light than 18% grey so the meter indicates an increased exposure compared to a meter reading taken from a mid-tone. The MIE, if used, will result in the dark tones becoming mid-tones and the mid-tones overexposing. If the tones are to be recorded accurately the exposure must be reduced (less time or less light) from that indicated. The amount of reduction is dictated by the level of dominance of the dark tones.
An incident reading will give ‘correct’ exposure regardless of which tone it is held in front of because it measures the light falling on the subject, not the light reflected from it. The intensity of the light source is constant but the reflected light from the tones varies.
Dominant dark tones
- Itti Karuson
Dominant light tones
- Kata Bayer
Dominant light tones
A subject of average reflectance (mid-tone) is photographed with dominant light tones. All the tones are lit equally by the same diffuse light source. A reflected light meter reading is taken from the camera. The dominant light tones reflect more light than 18% grey so the meter indicates a decreased exposure compared to a meter reading taken from a mid-tone. The MIE, if used, will result in the light tones becoming mid-tones and the mid-tones underexposing. If the tones are to be recorded accurately the exposure must be increased (more time or more light) from that indicated. The amount of increase is dictated by the level of dominance of the light tones.
An incident reading will give ‘correct’ exposure regardless of which tone it is held in front of because it measures the light falling on the subject, not the light reflected from it. The intensity of the light source is constant but the reflected light from the tones varies.
ACTIVITY 7
Photograph a subject requiring adjusted exposure from that indicated by the light meter. State how the dominant tones would have affected the light meter reading and how the image would have looked if you had not adjusted the exposure.
Digital exposure
The colour information in a 24-bit RGB digital image file is separated into three ‘channels’ (8 bits per channel). Each colour channel is capable of storing 256 levels of brightness between black (level 0) and white (level 255). When viewing all three colour channels simultaneously each pixel is able to be rendered in any one of 16.7 million colours (256 x 256 x 256).
These brightness levels can often be displayed as a simple graph or histogram in both the capture device and the image editing software. The horizontal axis displays the brightness values from left (darkest) to right (lightest). The vertical axis of the graph shows how much of the image is found at any particular brightness level. If the subject contrast or ‘brightness range’ exceeds the latitude of the capture device or the exposure is either too high or too low then tonality will be ‘clipped’ (shadow or highlight detail will be lost).

Histograms
During the capture stage it is usually possible to check how the device has handled or interpreted the tonality and colour of the subject. This useful information can often able be displayed as a ‘histogram’ on the LCD screen of high quality digital cameras immediately after capture, or in the scanning software during the scanning process. The histogram displayed shows the brightness range of the subject in relation to the latitude or ‘dynamic range’ of your capture device’s image sensor. Most digital camera sensors have a dynamic range similar to colour transparency film (around five stops).
Note > You should attempt to modify the brightness, contrast and colour balance at the capture stage to obtain the best possible histogram before editing begins in the software.
Optimising tonality
In a good histogram, one where a broad tonal range with full detail in the shadows and highlights is present, the information will extend all the way from the left to the right side of the histogram. The histogram below indicates missing information in the highlights (on the right) and a small amount of ‘clipping’ or loss of information in the shadows (on the left).

Histograms indicating image is either too light or too dark
Brightness
If the digital file is too light a tall peak will be seen to rise on the right side (level 255) of the histogram. If the digital file is too dark a tall peak will be seen to rise on the left side (level 0) of the histogram.
Solution: Decrease or increase the exposure/brightness in the capture device.

Histograms indicating image either has too much contrast or not enough
Contrast
If the contrast is too low the histogram will not extend to meet the sliders at either end.
If the contrast is too high a tall peak will be evident at both extremes of the histogram.
Solution: Increase or decrease the contrast of the light source used to light the subject or the contrast setting of the capture device. Using diffused lighting rather than direct sunlight or using fill-flash and/or reflectors will ensure that you start with an image with full detail.
Optimising a histogram after capture
The final histogram should show that pixels have been allocated to most, if not all, of the 256 levels. If the histogram indicates large gaps between the ends of the histogram and the sliders (indicating either a low-contrast scan or low-contrast subject photographed in flat lighting) the subject or original image should usually be re-captured a second time.

Small gaps at either end of the histogram can, however, be corrected by dragging the sliders to the start of the tonal information. Holding down the Alt/Option key when dragging these sliders will indicate what, if any, information is being clipped. Note how the sliders have been moved beyond the short thin horizontal line at either end of the histogram. These low levels of pixel data are often not representative of the broader areas of shadows and highlights within the image and can usually be clipped (moved to 0 or 255).
Moving the ‘Gamma’ slider can modify the brightness of the mid-tones. If you select a Red, Green or Blue channel (from the channel’s pull-down menu) prior to moving the Gamma slider you can remove a colour cast present in the image. For those unfamiliar with colour correction the adjustment feature ‘Variations’ (Image > Adjustments > Variations) in Photoshop gives a quick and easy solution to the problem. After correcting the tonal range using the sliders click ‘OK’ in the top right-hand corner of the Levels dialog box.

Note > Variations is not available for Photoshop users working in 16 Bits/Channel mode.
Colour
Neutral tones in the image should appear desaturated on the monitor. If a colour cast is present try to remove it at the time of capture or scanning if possible.
Solution: Control colour casts by using either the white balance on the camera (digital) or by using an 80A or 80B colour conversion filter when using tungsten light with daylight film. Use the available colour controls on the scanning device to correct the colour cast and/or saturation.

Jacqui Melville

Itti Karuson
