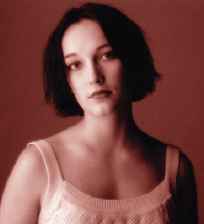
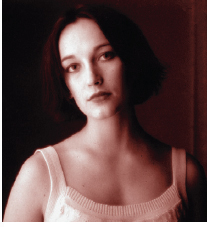
studio lighting
Samantha Everton
essential skills
~ Develop knowledge and understanding of the use of artificial light sources, camera and associated equipment in a studio environment.
~ Develop an awareness of the effect of artificial light in the creation and control of lighting ratios, shade, contrast and exposure.
~ Observe the importance of lighting in the production of photographic images.
~ Produce photographs demonstrating a practical knowledge of the use of light.
~ Compile information relevant to the technique and production of each image.
Introduction
This study guide should be used as a practical source of information to understanding the use of tungsten light and flash in a studio situation. The explanation of how to use the two main light source configurations (floodlight and spotlight) is directly related to providing practical lighting solutions to the activities. It will also provide a basis for completion of the structured assignments in Essential Skills: Studio Photography. It is advisable the technique and lighting approach suggested in each activity be initially followed and then adapted to individual subject matter.
Shaun Guest
Approach
The sun, the dominant light source in the world outside the studio, is the starting point to understanding studio lighting. As you progress through your photographic career other approaches will inevitably influence you but an understanding of how to use a single light source to achieve many varied results is a discipline worth mastering. Try not to attempt too much too soon. Set yourself goals you know you can achieve within your limitations. Aspiring photographers may never have enough time or money but admirably they are exploding with ideas. It is making these ideas work within these constraints and abilities that will give successful results. Set out to achieve what you know is possible, take as much time as is available and exercise patience. If you allow three hours to produce an image use the full three hours. When you have completed the photograph experiment with variations. Every time you move a light or alter its quality you will learn something. You will never take the perfect photograph. If you ever think you have change careers because photographically the learning process has ceased.
Studio lighting
In a photographic studio all light is created by the photographer. An artificial light source can be anything from a large 20kW tungsten lamp to a single candle. These light sources fall into four main categories.
~ Photoflood
~ Tungsten-halogen
~ AC discharge
~ Flash.
Photoflood (3400K)
The photoflood is similar in design to the normal domestic light globe. It is balanced to tungsten and normally used without correction. If balanced to daylight an orange colour cast will be evident. This can be corrected with the use of a blue (80B) filter or saving to RAW format. When used with black and white film slight underexposure will occur. As the name implies this type of lamp is used when a broad, soft light source is required.
Tungsten-halogen (3200K)
The most commonly used photographic artificial light. Light is emitted as the element inside the glass envelope is heated and provides a continuous source of light. All tungsten light forms emit a great deal of heat when operating. It is balanced to tungsten and normally used without correction. If balanced to daylight an orange colour cast will be evident. This can be corrected with the use of a blue (80A) filter or saving to RAW format. These lamps are mainly used where a point source of light is required (spotlight).
AC discharge (5600K)
Referred to as HMIs, AC discharge lamps have a very high output but emit less heat than tungsten when operating. They will maintain correct colour balance throughout the life of the lamp and will render correct colour when balanced to daylight. When balanced to tungsten an orange (85B) filter is required to remove the excess blue cast these lights emit or by saving to RAW format. HMIs are used predominantly in the film industry and in studio car photography.
Flash (5800K)
Flash is a generic term referring to an artificial light source of high intensity and short duration. It will render correct colour when balanced to daylight. When balanced to tungsten an orange filter (85B) would be required to remove the blue cast. There is minimal heat output, and it maintains constant colour balance and intensity. To assess the direction and quality of the light flash heads have built-in tungsten modelling lamps. As the output and intensity of the flash is far greater than the modelling lamps, exposure times will be too short for any tungsten exposure to register.
Health and safety
Power supply
It cannot be stressed strongly enough that the lighting equipment and studio power supply be either installed, or checked in the case of existing supply, by a qualified and licensed electrician. Without question working with powered light sources is the most dangerous part of a photographer’s job. As a photographer it is inevitable light sources are taken for granted and unfortunately familiarity leads to complacency and poor safety practices.
~ Electricity is dangerous. It can kill you.
~ Never attempt to repair lights or wiring unless you are absolutely confident you know what you are doing.
~ Always turn off the power and disconnect the cable before changing a globe.
~ Never touch any part of a light or cable with wet hands.
~ Exercise extreme care when photographing liquids.
~ Always turn off the power to the flash pack when changing flash head outlets.
~ Always be cautious when moving or connecting lights.
~ Never use liquids near electricity.
~ Use heat-resistant gloves when handling tungsten lights.
~ Wear shoes with rubber soles.
~ Ensure you know where and how to use the first aid kit.
~ Ensure you know where and how to use the fire extinguisher.
~ Ensure you are aware of emergency procedures related to work area.
~ Ensure adequate ventilation of the studio area.
Shaun Guest
Light sources
Tungsten
Vacuum tungsten lamps are widely used forms of artificial lighting in photography, film and television. They have a colour temperature between 3200 and 3400K. Despite the extensive use of flash in a commercial studio, prior to any flash exposure the way a subject is lit is determined by the tungsten modelling lamps built into the flash heads. Flash gives a much shorter exposure time and a comparable quality of light to tungsten. It should be taken into account when learning the use of tungsten light that all film and television lighting is tungsten based. Generally they all fall into two major categories, floodlight and spotlight.
Floodlight
A floodlight produces a spread of light across a subject. The light from the globe bounces off the reflector in which it sits and travels forward as a broad light source. This diffuse light gives ‘soft’ edges to the shadows and some shadow detail. The quality of the light is similar to that of sunlight through light cloud.

Kata Bayer
Spotlight
A spotlight can concentrate light at a certain point. The light is directed forward by a hemispherical reflector and focused to a point by a focusing (Fresnel) lens. The shadows will have ‘hard’ edges with no detail. The quality of the light is similar to direct sunlight. Spotlights can be flooded to give a more diffuse quality. This change from spot to flood is achieved by moving the lamp and the reflector inside the lamp housing away from (spot) or closer to (flood) the lens at the front of the light. On ‘full spot’ shadows are harsh with no detail, on ‘full flood’ shadows are softer with some detail. Most spotlights come with barn doors and nets. Barn doors are metal flaps attached to the front of the light and control the shape and amount of light. Nets are pieces of wire gauze of varying densities that reduce the output of the light by diffusing the light at its source without greatly affecting the shadows. They are manufactured in half and one stop increments.
Flash
Flash is a generic term referring to an artificial light source of high intensity and short duration. It has a colour temperature of 5800K, balanced to daylight and is compatible with daylight colour film and black and white film. Unlike tungsten it is not a continuous source of light. Between flashes it has to recycle (recharge) to maximum output before it can be used. Large tungsten lights have an output 100 times greater than the average household light. With a film rated at 100 ISO this will give exposures of around 1/60 second at f4. A modest studio flash with an output of 5000 joules (measurement of output) at the same distance from the subject as the tungsten light will give exposures of around 1/500 second at f11. This is six stops faster or a ratio of 64:1. Its advantage when photographing anything that moves is obvious.

Mick Downes
The advantage of modern flash is its lightweight construction and versatility. Most studio flash systems consist of a power pack, flash heads and attachments. The power pack is usually a separate unit where light output is stored until the instant of exposure. After exposure the power pack recharges ready for the next exposure. Recycling times vary from seconds to fractions of seconds. The faster the recharge to full power the more expensive the unit. The flash heads are the actual light source. The basis of their design is to produce light similar to that produced by floodlights and spotlights. The way in which this is achieved ranges from varying sizes of reflector bowls similar in design to a floodlight to a focusing spotlight equivalent to its tungsten counterpart. Flash, being a non-continuous light source, is generally confined to ‘still’ photography whereas tungsten lighting is used almost exclusively in ‘moving’ photography (film, video and TV). However, the lessons learned with one light source apply equally to any other.
ACTIVITY 1
Using various resource material compile a collection of studio photographs using tungsten or flash as a light source. Divide into the two categories.
Consider why a particular light source was used, its advantages and differences.
Floodlight
Swimming pool, soft box, fish fryer and others are names for variations of a floodlight. In some the light source is placed inside and to the rear of a collapsible tent with direct light transmitted through a diffuse front surface. In others the light is reflected off a white/silver surface before it is transmitted through a diffuse front surface. These sources create a very soft diffuse light with minimum shadows. Soft diffuse light is also created when flash is used in conjunction with a collapsible umbrella. With umbrellas having a white/silver inside surface, light can be directed into the umbrella and reflected back onto the subject creating a quality of light similar to a soft box. With umbrellas having a transparent diffuse surface light can be directed through the umbrella creating a quality of light less diffuse than the reflected light from the white/silver umbrella.
Tim Stammers
Spotlight
The use of an open flash (direct light to subject without diffusion or reflection) will give the same effect as a spotlight. Some brands have focusing capabilities closely imitating Fresnel spotlights. The light will be hard with no shadow detail. Barn doors, nets and filtration of the light source are approached in exactly the same way as a tungsten source.
Mixed light sources
Any source of light can be combined with another to create interesting lighting effects and shifts in colour balance. In a studio situation this can go beyond mixing tungsten with flash and is limited only by one’s imagination. Normal domestic lamps are often used as supplementary and practical sources of light. Candles give a warm glow and very soft shadows. Torch light can be used to great effect when painting with light. When working in colour do not be afraid to change the colour of the light by the use of coloured gels over the lights or filtration of the camera. If it gives off light, try using it!
Mixed tungsten and flash - Fabio Sarraff
ACTIVITY 2
Place the camera on a tripod and attach cable release. Focus on a coin placed on a dark background. Set the shutter speed to T (aperture opens when the cable release is activated and will not close until activated for the second time). Set the aperture to maximum aperture. Darken the studio and open the lens. Using a small torch move its light over the coin as if painting with a brush (large broad strokes) for approximately 10 seconds. This should be done from the camera position.
Bracket exposures one stop either side of normal. Repeat this procedure at every f-stop.
Working with studio lights
Common rules
Common rules of physics apply to the use of artificial light sources. When sunlight passes through greater amounts of particles in the atmosphere at dawn or sunset, exposure times increase compared to a reading taken at noon. This applies to clear and overcast days. Exposure times will obviously be shorter on a clear day. Applying these rules to a studio situation, the greater the impedance to the light (diffusion, reflection, filtration) the longer the exposure. Direct light (no diffusion, reflection, filtration) the shorter the exposure.
Another simple rule. The amount of light falling on a subject decreases to 1/4 of its original intensity when the light to subject distance is doubled, and increases by 4x when the light to subject distance is halved. For example, if a reading of f16 is obtained when the light to subject distance is one metre, at two metres the reading would be f8, at four metres f4. These rules do not change regardless of the light source. It is also important to remember contrast in a studio situation is created not only by the reflectance level of the subject matter (SBR) but also by lighting ratios. When referring to lighting ratios the photographer is also referring to lighting contrast. See ‘Contrast and Compensation’.

Key light one metre from subject

Key light two metres from subject
- Fabio Sarraff
ACTIVITY 3
In a darkened studio place a light one metre from the studio wall and take an incident reading, with the light on, of the light falling upon the wall. Note the reading and move the light on the same axis another one metre away from the wall. Note the reading. Double the distance once more, making a total of four metres. The final reading will be four stops less than the first. What will the distance of the light from the wall have to be to achieve a meter reading of three stops less than the first? Note in Record Book.
Diffusion
Long before the invention of photography painters had been diffusing light. Light passing through certain materials created a light with soft shadows sympathetic to their subjects. Early writings and drawings of Michelangelo show his studio had a type of cheesecloth hung over the windows. This diffused the harsh sunlight and filled the studio with a soft light more suitable to painting. Any light source can be diffused by placing certain translucent materials between the light source and the subject. This has the effect of diffusing and spreading the light over a greater area by altering the direction of the light waves. Diffusion softens the edges of the shadows and increases shadow detail. At the same time the measured amount of light falling on the subject is decreased. The amount of diffusion is also determined by where the diffusion material is placed in relation to the light source and the subject. The closer the diffusing material to the light source the less diffuse the light. The closer the diffusing material to the subject the more diffuse the light, the softer the edges of the shadows and the greater the shadow detail. There are many diffusion products manufactured specifically for the photographic market. These are products such as scrim, nets and silks. Other suitable materials are tracing paper, cheesecloth and window netting, provided they are non-flammable or heat-proof.
Itti Karuson
ACTIVITY 4
In a darkened studio light a semi-reflective object (e.g. a tomato) with an open flash or tungsten spotlight. Place the light approximately 1.5 metres from the subject.
Observe the source of light reflected in the object and lack of shadow detail.
Diffuse the light source with tracing paper (60cm x 60cm) 50cm from the light.
Observe the apparent increase in the size and diffusion of the light source as reflected in the subject, diffusion of the shadows and increase in shadow detail.
Without moving the light place the tracing paper as close to the subject as possible.
The light source has now become the size of the piece of tracing paper. There will be a soft spread of light over most of the subject with the shadow being almost non-existent.
Reflection
Reflected light is most often used as a way of lighting areas the dominant light source (key light) cannot reach. An example is the strong shadow created by a spotlight when it is to one side of the subject. To obtain detail in the shadow area light has to be reflected into the shadows. This is called fill light and is achieved by collecting direct light from the light source and redirecting it with a reflector. Reflectors can be any size, from a very small mirror to large polystyrene sheets measuring 3m x 1.5m.
Reflected light can also be used as the key light. When photographing a reflective object, or a very diffuse (soft) lighting effect is required, the light source can be directed into a reflector. The reflector becomes the light source and no direct light from the light source is directed at or reflected in the subject. When photographing cars in an exterior situation the car is usually positioned so sunrise or sunset is behind the car. With the sun below the horizon, the sky above and in front of the car is acting as a giant reflector. This is one approach to lighting cars and reflective objects in a studio.
There are many reflective products available manufactured specifically for the photographic market. Other more readily available materials are white card, grey card, coloured card, silver foil, aluminium foil and mirrors.
Reflector as light source - Stuart Wilson
ACTIVITY 5
Light a person’s face with open flash or tungsten spotlight from behind and to one side. Observe the deep shadows falling across most of the face.
Using a reflector (white card 1m x 1m) redirect the light into the shadow areas.
Observe how the intensity of the light changes as the reflector is moved closer to and further away from the face.
Expose image at the desired intensity of fill.
Cover the reflector with aluminium foil and repeat the above activity.
Label and keep results for future reference.
Compile results in your Record Book.
Filtration
Filters alter the quality of light by selectively transmitting certain colours or by changing the way light is transmitted. A red filter only transmits red light. A blue filter only transmits blue light and so on. A soft focus filter changes the direction of the light waves in the same way as diffusion material softens a light source. Correction filters alter the colour temperature of the light to make it compatible with the film being used. Neutral density filters reduce the amount of light, and therefore exposure, from a light source without affecting its colour temperature. Glass, plastic and gelatin filters are used for filtration of the camera lens but gelatin filters are used more often in the filtration of the light source. The advantage of filtering the light source is that different filters can be used on each of the lights whereas with filtering the camera all light entering the lens will be subjected to a common filter. Filters used upon a light source are made of heat-resistant coloured gels manufactured to specific safety requirements and colour balance. The effect of filtration is obvious and immediate. When working with correctly colour balanced gels, appropriately balanced film or image sensor and correct exposure ‘what you see is what you get’. When using colour filtration with black and white film a simple way of remembering the effect of a certain filter is that it will lighten its own colour and darken all others. Filtration of the camera is normally used for colour correction of the entire image. This may be caused by the light source being incompatible with the film or to remove an excess of one colour inherent in the light source. However, when capturing RAW file images it is possible to undertake colour correction and in post production. See ‘Characteristics of Light’.
Polarising filters are valuable in the control of unwanted reflections and increased colour saturation. This is because of their ability to selectively transmit certain wavelengths as they are rotated in front of the camera lens or light source. A wide range of ‘effect filters’ such as graduated and star burst are also available for on-camera use and post production software. They can produce some interesting results but should not be used as a substitute for the lack of an original idea or solution to a photographic problem. With camera filtration there will always be some degree of exposure compensation.
Post produced filtration - Itti Karuson
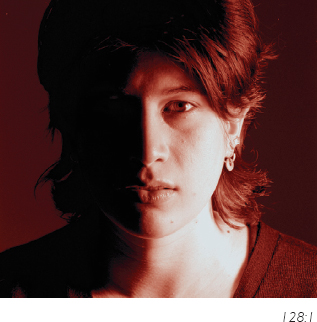
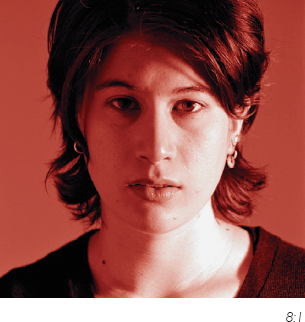
Lighting ratios
Light meters are often incorrectly called exposure meters. Exposure is only one part of its function. It can also be used for measuring lighting ratios. This is achieved by taking an incident reading of the light source from the subject. The meter is pointed at a specific light source to measure the amount of light falling on the subject. If there is more than one light source each light can be measured independently by ensuring only one light source is on at any one time. In this way the ratios between the light sources can be measured. Understanding and controlling lighting ratios will help ensure that the SBR is within the film/image sensor’s latitude.
Lighting ratios and their relationship to film/sensor latitude is best demonstrated and understood at a practical level. Take, for example, a photographer using a film/sensor known to have a latitude of five stops. To make use of this information the photographer would try to light the subject to within this range. A five stop latitude would allow a photographer to use a maximum lighting ratio of 32:1 (five stops). This ratio would retain detail in the highlights and the shadows.
Example 1
In a darkened studio a person is lit with a single light source from the right-hand side at 90 degrees to the subject. An incident light meter reading is taken from the right-hand side of the person’s face directly towards the light source. The aperture is f45 at 1 second. An incident light meter reading is taken from the left-hand side of the person’s face directly towards the opposite side of the studio to where the light is placed. The aperture is f4 at a shutter speed of 1 second. This is a lighting ratio of 128:1 (seven stops).
To reduce this ratio another light or a reflector (fill) is placed on the left-hand side of the subject. The fill is moved towards or away from the subject until an aperture reading no more than three stops lower in number than that from the main light source (f16) is obtained. This is now a lighting ratio of 8:1.
Example 2
The task is to light three sides of a single coloured box with a one stop ratio between each of the sides. Pointing a light meter in the general direction of the subject would give an average reflected reading for ‘correct’ exposure but would not indicate the difference in the light falling on each of the three sides. This can be achieved by taking either a reflected reading of each side or for a more precise measurement taking an incident reading of each of the three light sources. This would give a measure of the actual amount of light falling on the subject. This information can then be used to adjust the balance of the lights to achieve the required lighting ratio.
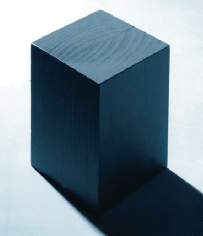
1. Spotlight

2. Spotlight + floodlight
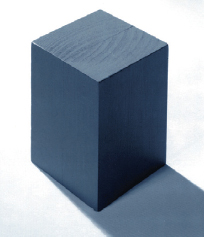
3. Spot, flood + reflector
1. A point source (spotlight) is aimed at the top of a neutral grey box from behind the subject. The shadow falls forward of the subject. An incident reading is taken of the light source by pointing the invercone directly at the spotlight. The reading is f16.
2. A diffuse source (floodlight) is aimed at the left side of the box, ensuring no light affects the top or right side of the box. An incident reading is taken of the floodlight (shield the invercone with your hand to prevent light from the spotlight affecting the reading) by pointing the invercone directly at the floodlight. The reading is f11. This is a lighting ratio between the top and left-hand sides of 2:1 (one stop).
3. A piece of white card is used to reflect light back into the right-hand side of the box. The light reflected is gathered from the spotlight and floodlight. With both lights on, an incident reading is taken of the reflected light by pointing the invercone directly at the piece of white card. The reading is f8. This is a lighting ratio between the left and right sides of 2:1 (one stop), and an overall lighting ratio between the top and left-hand side of 4:1 (two stops).
An incident reading is taken by pointing the invercone from the front of the box back towards the camera. It should be f11. This is an average of the lighting ratio.
Example 3
The task is to photograph a chain and a paper clip on a textured background. The lighting ratio between the most intense area of the background and the subject should be 8:1. The subject should be in focus, the background out of focus. The approach taken is the same as in Example 2, using incident light meter readings to control lighting ratios and exposure.

James Newman
Using a point source (key light) from the right and above the subject, light the staple and chain to create highlights along their top edge. Take an incident reading from the subject to the light source (e.g. f16). Place a diffuse light source (fill light) to the left of the subject. Between this light and the subject place a large sheet of tracing paper (the further the tracing paper from the light source the more diffuse the light. With the key light turned off take an incident reading from the subject to the diffuse light source. Move the light closer to or further away from the subject until a lighting ratio of 2:1 is achieved (e.g. f11).
Position background approximately one metre behind the staple and chain. Adjust the position of the key light to ensure no shadows from the chain fall on the background.Turn off key light and fill. Place a point source of light behind and to the right of the subject. Aim the light across the background to increase the texture of its surface. Adjust the light until the desired highlights are achieved. Take a reflected reading of the most intense highlight on the background. Adjust this reading by three stops to render the highlight white (e.g. f22 to f11). Move the light closer to or further away from the background until a reading equal to the average of the key light and fill is achieved (e.g. average of f16 and f11 = f11.5). Turn on key light and fill. Filter lights and/or camera for effect. Take an incident reading from the subject to the camera. Choose an exposure aperture with sufficient depth of field to retain focus on the staple and chain but not on the background.
Example 4
A photographer has to create a mid key portrait containing a predominance of average tones but with no extreme highlights or shadows. The result is achieved using a large, diffuse light source, creating a soft even lighting quality, combined with selective fill and overexposure by one stop to obtain correct skin tones. This is one of the most commonly used forms of portraiture lighting. It is a relatively simple approach to lighting the human form compared to high and low key lighting and will generally produce good results with most subjects. It does however lack drama and mood and would not enhance subjects with strong individual character, delicacy of form or great physique.
1. Soft box
2. Soft box + fill

3. Soft box + fill + back light
1. Place the subject approximately two metres from a large diffusion screen (background). As viewed from the camera place a soft diffuse light source (flash soft box) in front of and to the left of the subject. Place a diffusion screen larger than the light source between the light source and the subject. The screen should be approximately one-third of the distance from the light to the subject. Take an incident light meter reading from the subject to the camera. A typical reading would be f11 at 1/250 second.
2. Place a large (2m x 3m) white reflector in front of and to the camera right side of the subject. This will reflect light from the key light source back onto the right side of the subject. Adjust the distance of the reflector from the subject until an incident light meter reading from the subject to the reflector is one stop less than the key light. This should be f8 at 1/250 second. This is a lighting ratio of 2:1 between the left and right sides of the face and when used for exposure will overexpose the left side of the face to reduce any skin imperfections.
3. Place behind the diffusion screen in the background a large diffuse light source (flash soft box). Direct the light through the diffusion screen straight back at the camera. Adjust the light source so an incident light meter reading taken from the subject to the background diffusion screen is two stops more than the incident reading of the subject to camera (f8 at 1/250 second). This background reading should be f16 at 1/250 second. If the subject exposure is set to f8 at 1/250 second the background will appear white.
On location
Studio lights need not be limited to the studio. They can be used on location in conjunction with ambient and existing daylight. With colour correction of the light source or camera to balance with the film/image sensor being used, most light sources can produce acceptable and interesting results. RAW file images can be colour corrected in post production. See ‘Characteristics of Light’.
Exterior location
Common examples of studio lighting used on location are the images seen in film and television. The same approach can be taken to still images. Artificial light, whether flash or tungsten, is normally used to supplement the existing light present, usually daylight. In this situation correct colour is achieved by balancing to daylight the film/image sensor (5500K) and filtering the tungsten light source/sources (3200K) with an 80A lighting gel. When using studio flash on location no filtration is required as the colour temperature of the flash is equal to average daylight (5500K).
Mixed light
Mixing the colour temperature of the light sources can give a more ‘natural’ look. Despite the fact the human eye corrects all light sources to what appears to be white light, it is visually accepted, and in most cases to great effect, when we view images created using mixed light sources that there should be a difference between the colour temperature of the various sources of light within the frame.

Balanced daylight and flash - James Newman
Example 5
A photographer has been commissioned to photograph the exterior of a restaurant complex situated in a vineyard. The client has requested there be equal interior and exterior detail. As the building is in constant use the client does not want any introduced lighting placed in the restaurant that may cause health and safety issues for his customers. To achieve this result the photographer decides to create the image by making two exposures, one for the exterior, another for the interior. The camera/film is balanced to daylight. This will record the practical interior lighting, predominantly commercial tungsten (orange/red) and fluorescent lighting (green), as a different colour temperature to the exterior daylight.
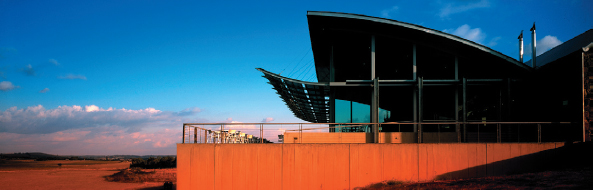
Exterior ambient light - incident - exposure MIE less 1/2 stop
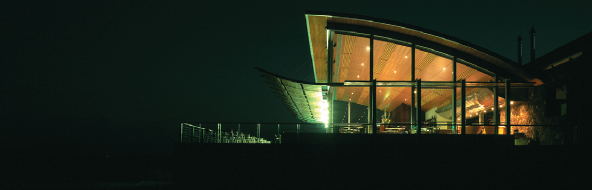
Total darkness - interior lights on - reflected - exposure average highlights and shadows
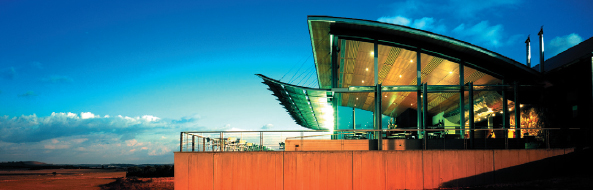
Combination exposure - John Hay
Interior location
There can be many different light sources with varying colour temperatures confronting the photographer on location. This can range from industrial lighting to the glow from a TV. The possibilities and variations are many but the problems they pose can be either corrected with filtration or white balance adjustment to render ‘correct’ colour, or ignored and the differences in colour temperature exploited and used to effect.
Daylight balance
In an exterior location all light sources are balanced to the predominance of daylight (5500K). With an interior location (for example, a furnished room with large windows) there can be a mixture of various light sources. Balancing to daylight (5500K) without filtration of the tungsten light sources (3200K) would make the image appear quite different. Daylight in the image would appear ‘correct’ but any tungsten light source whether artificially introduced (studio) or practical (normal domestic lighting, desk lamps, candles, etc.) would create a warm glow at its source and on subject matter predominantly lit by it. The overall effect would be of white light through the windows, and depending upon the lighting ratio created between the tungsten light and the ambient daylight an overall warm cast to the image.
Tungsten balance
If the camera/film is balanced to tungsten (3200K) without filtration of either the daylight (5500K) or the tungsten light sources (3200K) the result would appear different again. Daylight in the image would appear to have a blue cast and any tungsten light source would appear ‘correct’. The overall effect would be of blue light through the windows and, depending upon the lighting ratio created between the tungsten light and the ambient daylight, a balance of ‘correct’ colour within the room. It should be remembered filtration of the camera to match the dominant light source would also produce similar results. However, filtration of the camera removes the possibility of selectively filtering the various light sources and colour temperatures available to the photographer to create an interesting mix of colours within the frame.

Domestic tungsten light and daylight - James Newman
Example 6
A designer commissions a photograph of a kitchen. As it is in a residential building the owner has requested the minimum amount of disturbance. The client has requested the lighting enhances the space and balances ambient interior and exterior daylight. The photographer decides upon one exposure, balancing the exterior, interior and introduced lighting. The camera/film is balanced to daylight. Exterior daylight will be overexposed to reduce the orange/red colour cast of domestic tungsten lighting.
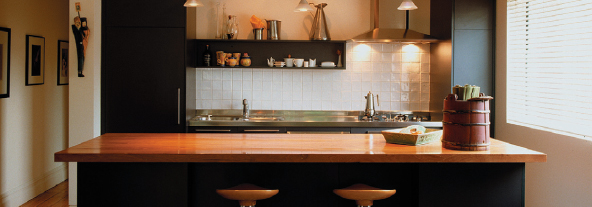
Ambient light - daylight and tungsten - incident - 1 sec .@ f8.5
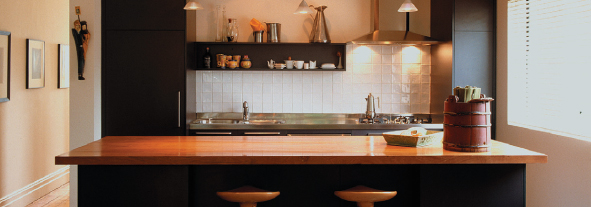
Umbrella flash in hallway balanced to f8.5
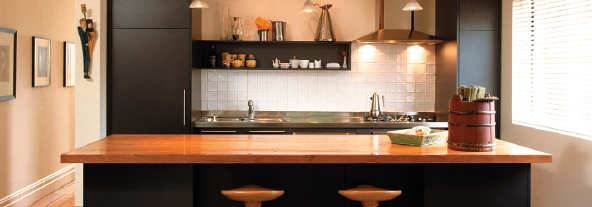
Fill-flash off ceiling balanced to f8 - John Hay