Chapter 3: Seeing the Light
Learning to See Light
Available Light
The Sweet Light: Dawn and Twilight
Using Reflections and Shadows
Photographing in Fog or with Overcast Skies
Finding Contouring Light
Using Soft Window Light
Knowing When to Compromise
Learning to see light not only improves the way your photos look, but it also (and more importantly) changes how your photographs feel. Used correctly, light can add an emotional element to an otherwise ordinary photograph.
To create dramatic and sensitive photographs, you must simply fall in love with light. Slow down and look at the light around you, right now, this minute. Perhaps you are near a window with diffused light spilling into the room. Or perhaps you are reading by the soft glow of a table lamp. Look at the objects in the room and see how their shadows are cast by the angle of the light falling on them. Once you start noticing, you will begin to see the effect of light everywhere you go. It changes your life, whether you have a camera in hand or not. You begin to see how light reveals itself in a soft glow or diagonally, illuminating the shapes and forms of everything before you. You see the light manifest mood, drama, and dreaminess. You might notice how warm, afternoon light tends to exaggerate color, while the light of dawn, just before the sun crests the horizon, tends to diminish or soften color.
Learning to See Light
Ruth Bernhard, a renowned photographer who died in 2007 at the age of 101, once said, “Light is my inspiration, my paint, and brush. It is as vital as the model herself. Profoundly significant, it caresses the essential superlative curves and lines. Light I acknowledge as the energy upon which all life on this planet depends.” Students would spend the first day in one of Bernhard’s workshops without a camera. Her purpose: to engage them with light.
“Light is the Holy Grail of photography.” ~Randy Romano
As clouds passed overhead or the sun backlit a flower, students began to see the world in a completely new way: a world full of light and shadow, reflection, and texture. What Bernhard’s students realized was that their lives would be forever enhanced, with or without a camera in hand, just by learning to look at light. Much like as you would with a meditation, slowing down and taking the time to observe, really seeing the beauty and grace of your surroundings, are the first steps to capturing unique and stunning images.
Light itself can be the focal point of an image, as in 3-1, where the warm light of early evening created a halo on the head of this little girl.
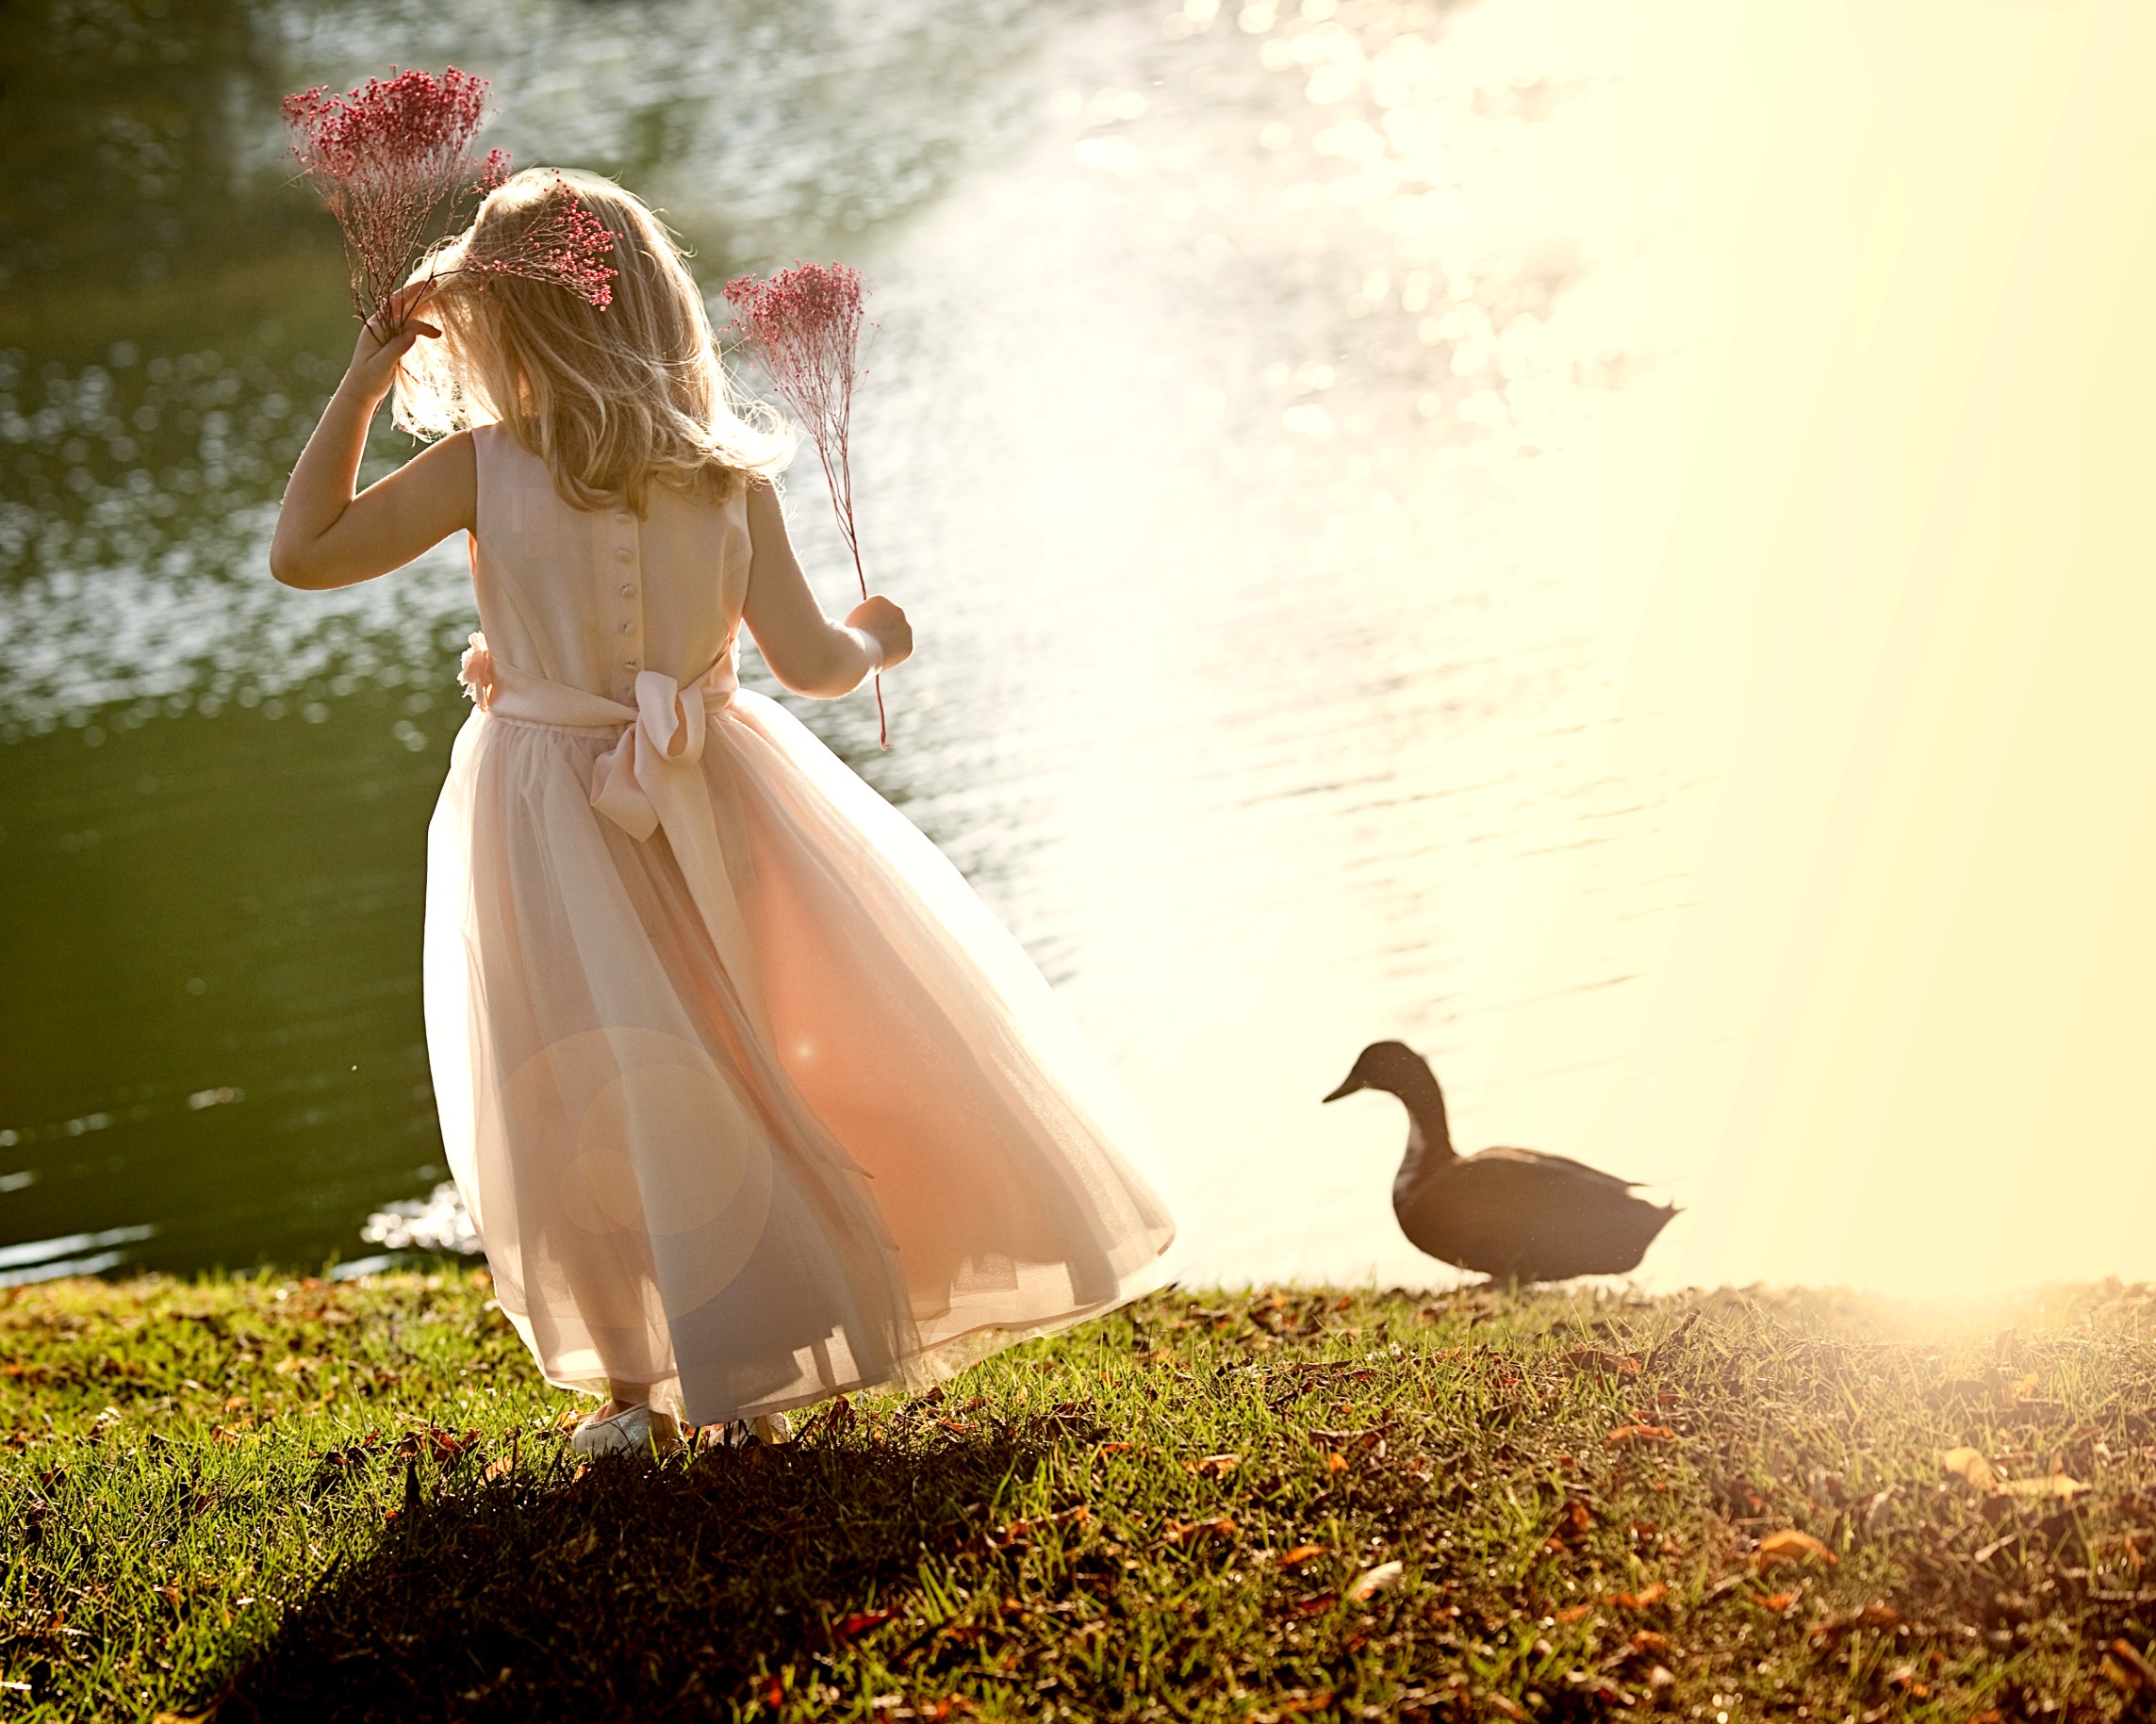
3-1
ABOUT THIS PHOTO The late afternoon created a stunning rim light on the girl in pink as she meandered by the river. Taken at ISO 3230, f/4.0, and 1/500 second. ©Mary Schannen / www.melangephoto.com
Learning to use light in a sculptural and emotional way when photographing children takes attention, presence, and practice. Take time to observe the effects of light in your environment and then watch closely how that same light falls on the children in your life.
If you have observed children in their environment for any length of time, you might have noticed how velvety-soft their skin appears when they are sitting by a bedroom window, or the golden halo effect of the light in their hair as they run around the playground; how those big, brown eyes seem to catch the light just right when they are sitting in their highchair in your well-lit breakfast nook, or when they are up to their neck in bubbles in the big, garden tub with the glass block window just above. All of these situations will open your eyes to the possibilities of photographing children using light to convey your feelings about them and that moment in time.
Consider the next two photos, both of the same child. Typically, when photographing children indoors, the temptation is to let the flash do its thing and get the shot, but there might be a better way. The photo in 3-2 was taken using on-camera flash. You can see how the flash washed out the skin tones in the image and left a harsh shadow around the little girl. Moving her to a doorway with natural light spilling through, as in 3-3, allows the light to wrap around and bathe her, revealing the texture of her skin and, more importantly, lending a completely different emotional feel to the image.

3-2
ABOUT THIS PHOTO On-camera flash washes out skin tones and makes for harsh shadows. Taken at ISO 200, f/2.8, and 1/250 second. ©Allison Tyler Jones / www.atjphoto.com

3-3
ABOUT THIS PHOTO Placing the child inside a doorway with natural light allows the light to wrap around the girl’s face, showing the texture of her skin. Taken at ISO 200, f/2.8, and 1/250 second. ©Allison Tyler Jones / www.atjphoto.com
If you are a beginner, you may want to start out with your camera mode set to Automatic. This way, you can concentrate on seeing light. As you complete the assignments throughout this book, you will want to put into practice what you are learning; camera settings are included in the image captions for those who are practicing with their cameras and for those who have a more advanced understanding of their cameras and want more technical information.
It may seem that photographing outdoors is easier because there is so much light, but remember that quantity isn’t as important as quality. The photo in 3-4 was taken in direct sunlight, making everyone squint and causing harsh shadows on their faces. The photo in 3-5 was shot after considering where the light was coming from and finding open shade to photograph. Moving the family to an area with open shade allows everyone to have natural expressions and gives an entirely different feel to the image. Isn’t it amazing the difference light can make?
Chapter 4 explores manipulating or adding light to a scene.
Chapter 5 explores composition and an explanation of the Rule of Thirds.

3-4
ABOUT THIS PHOTO The family has been positioned in harsh, direct sunlight, causing everyone to squint and the expressions to be less than ideal. Taken at ISO 100, f/3.5, and 1/800 second. ©Allison Tyler Jones / www.atjphoto.com

3-5
ABOUT THIS PHOTO Moving the family to an area with open shade softens the light and allows for more natural expressions. Taken at ISO 100, f/2.8, and 1/125 second. ©Allison Tyler Jones / www.atjphoto.com
Available Light
Many of the images throughout this book show children outdoors captured in beautiful light and natural settings, such as in 3-6, where the sisters sit comfortably on the old steps in front of their home. All the photos in this chapter were taken using available light. Available light is just what it sounds like: no flash or reflectors are used, just the existing light in the environment.
“In the right light, at the right time, everything is extraordinary.” ~Aaron Rose

3-6
ABOUT THIS PHOTO I was thrilled that the soft afternoon light enabled me to use these old steps in front of the beach home that the family has had for generations. The body language of the girls suggests support and connection. Taken at ISO 400, f/4.0, and 1/160 second. ©Ginny Felch / www.photographingchildren.com
Of course, not all available light is great for photographing, but over time and as you peruse this book and photographs, you will begin to recognize that elusive but desirable quality. Available light that is flattering or provides contour or mood, is what you ultimately want to learn to see and to orchestrate. Available light is usually not direct sunlight.
Check sunrise and sunset times for your local area on www.sunrisesunset.com, and try your own photo shoot at about 30 minutes before and after sunrise, or an hour before sunset. Watch carefully how the light changes as the sun moves higher or lower in the sky and what effect that has on the lighting of the child you are photographing.
The sun hitting the blond hair of the little boy and girl in 3-7 gave the subjects an angelic quality and set them apart from the background, while at the same time throwing their shadows ahead of them. Even though there is only a suggestion of their faces, their parents know who they are!
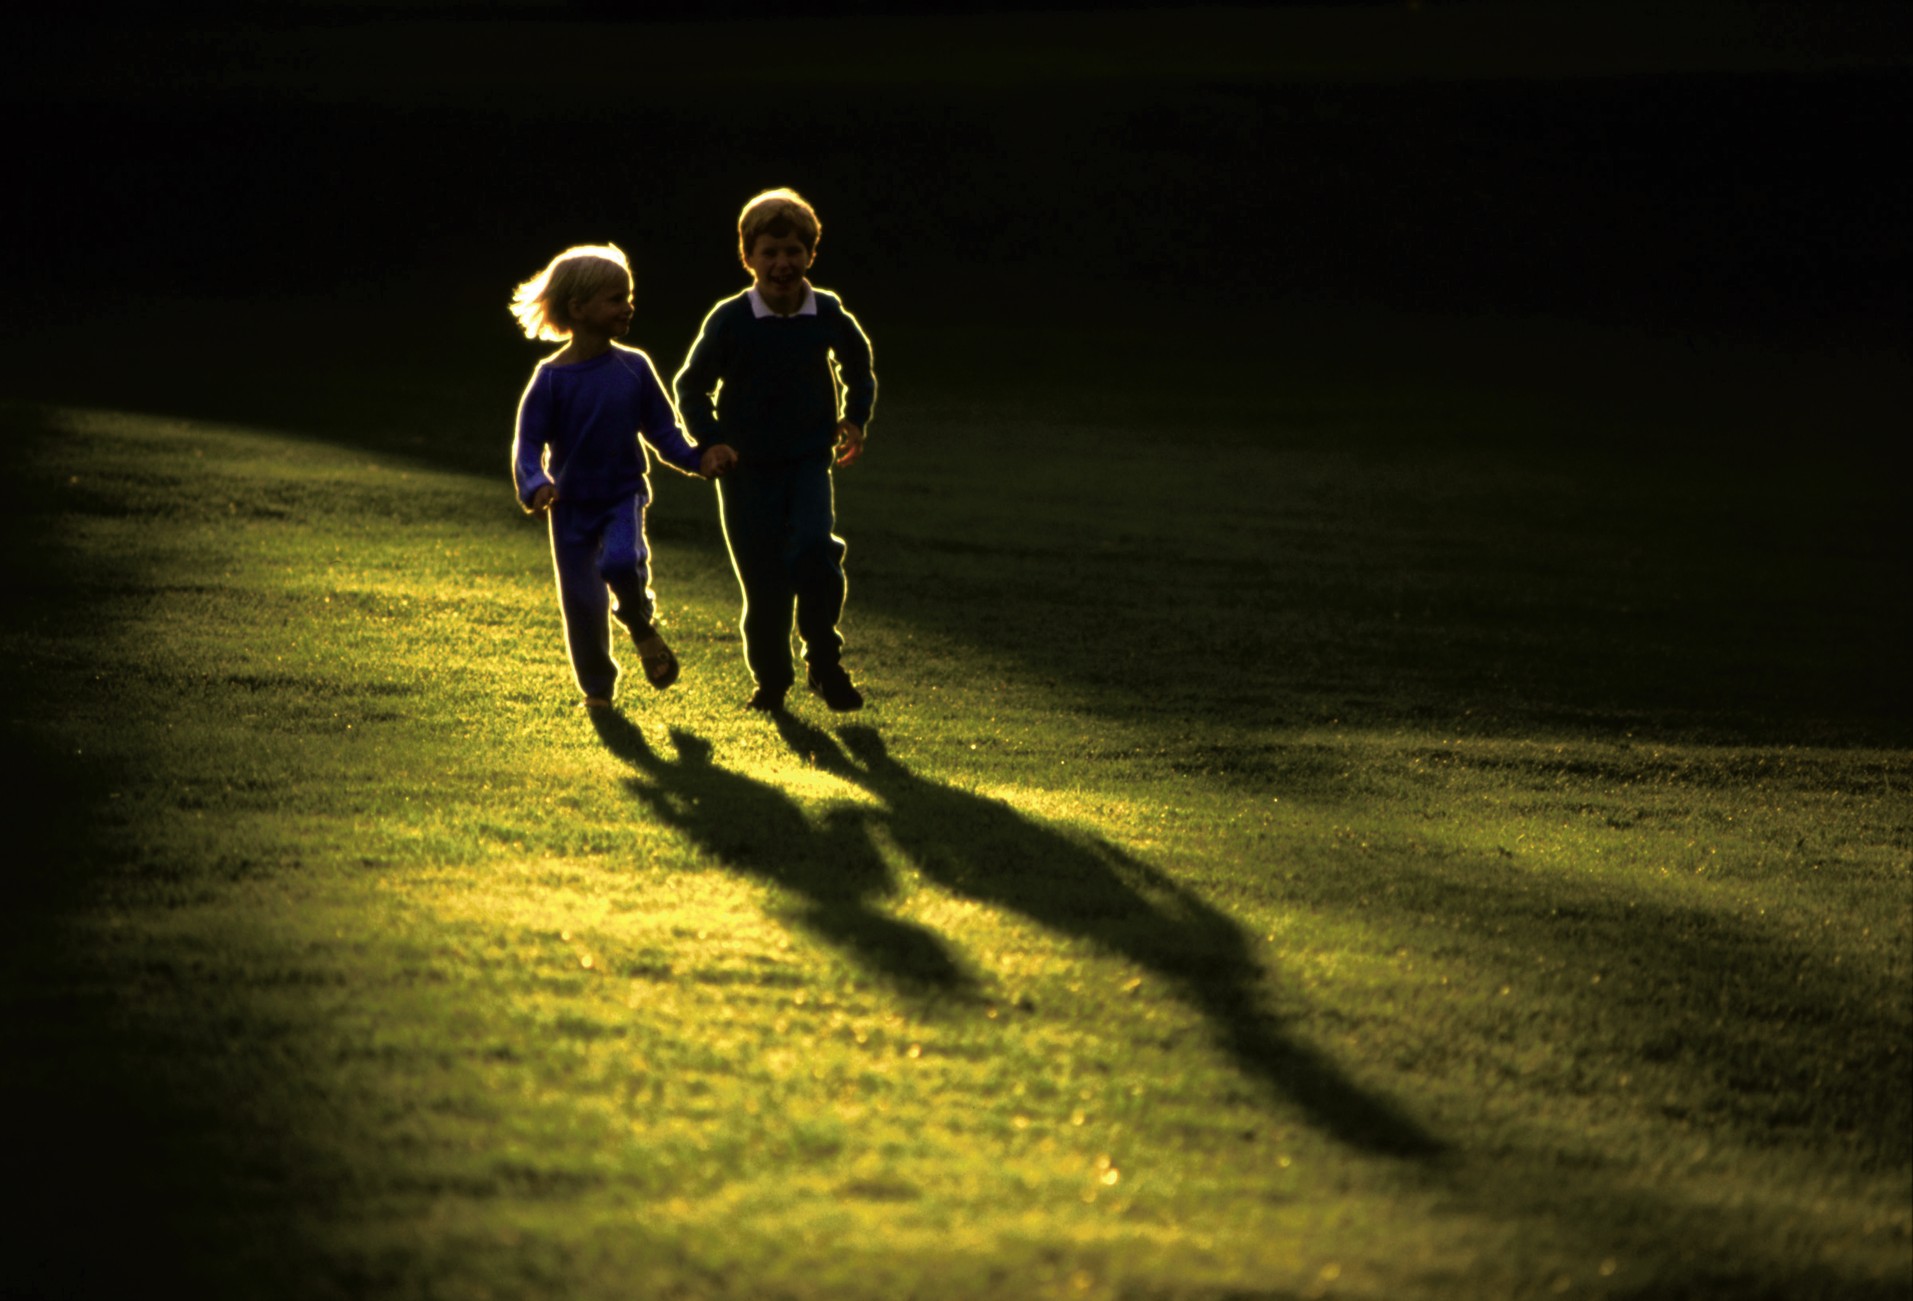
3-7
ABOUT THIS PHOTO The beautiful backlighting, the long, angled shadows, and the heads aligning with the Rule of Thirds, all pay homage to these frolicking children. Taken at ISO 200, f/8.0, and 1/125 second. ©Sherman Hines
The dramatic deluge of filtered light from an attic window inspired the photographer to encourage her son to play freely in 3-8 and 3-9. In 3-10, the photographer reversed the formula for the light and captured the children peeking through the window.
Next, I’ll show you a practical look at different kinds of lighting situations that you can explore for photographing children.
As an exercise, sit in a park at dusk and watch the light. Watch it make haloes and shadows; watch the colorcasts and haze. It is nice to do this when you don’t have the added challenge of photographing children.
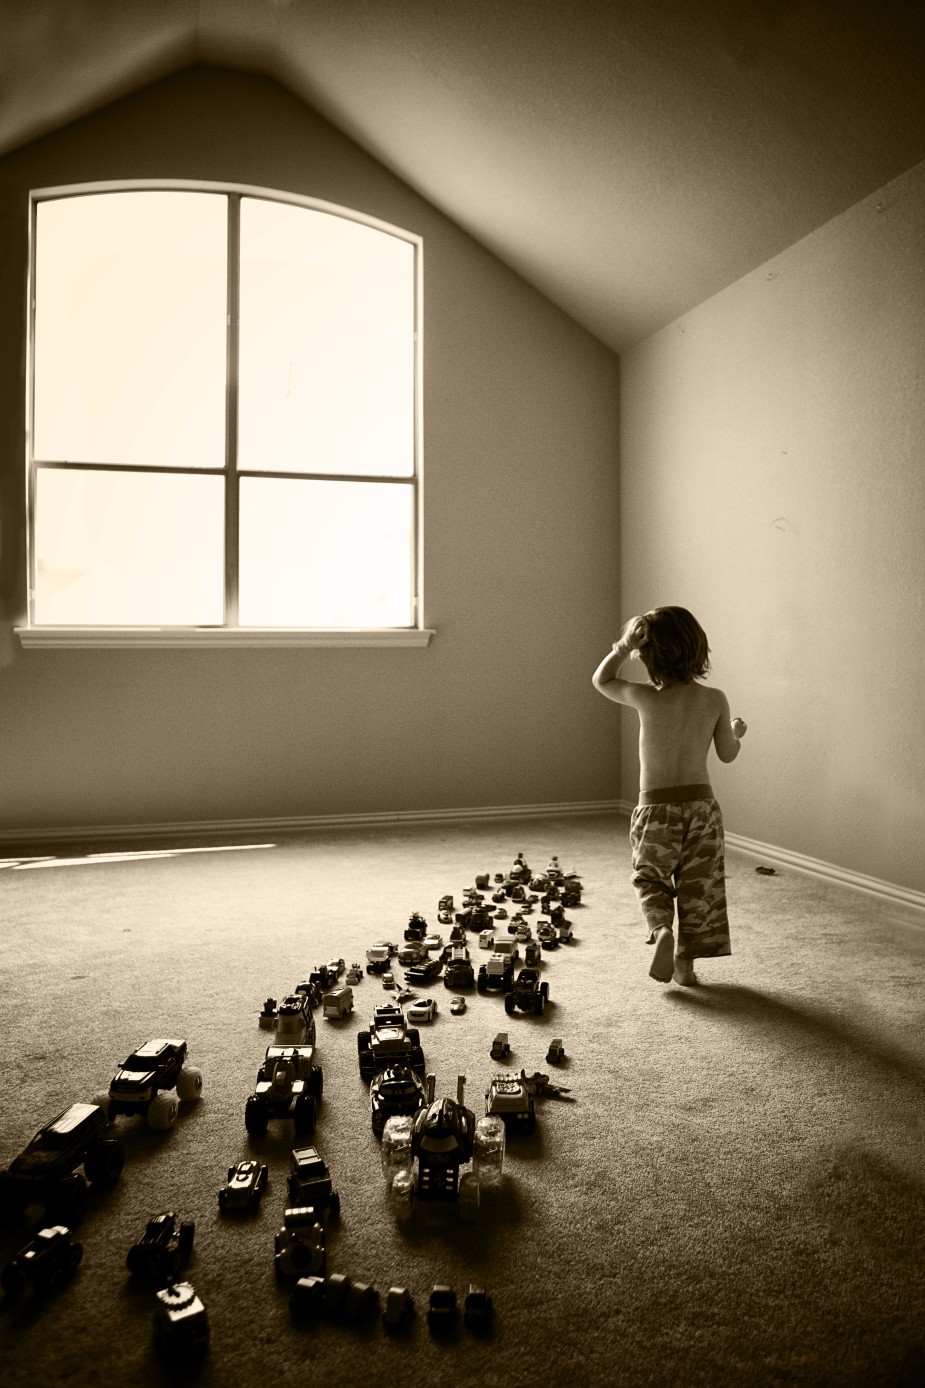
3-8
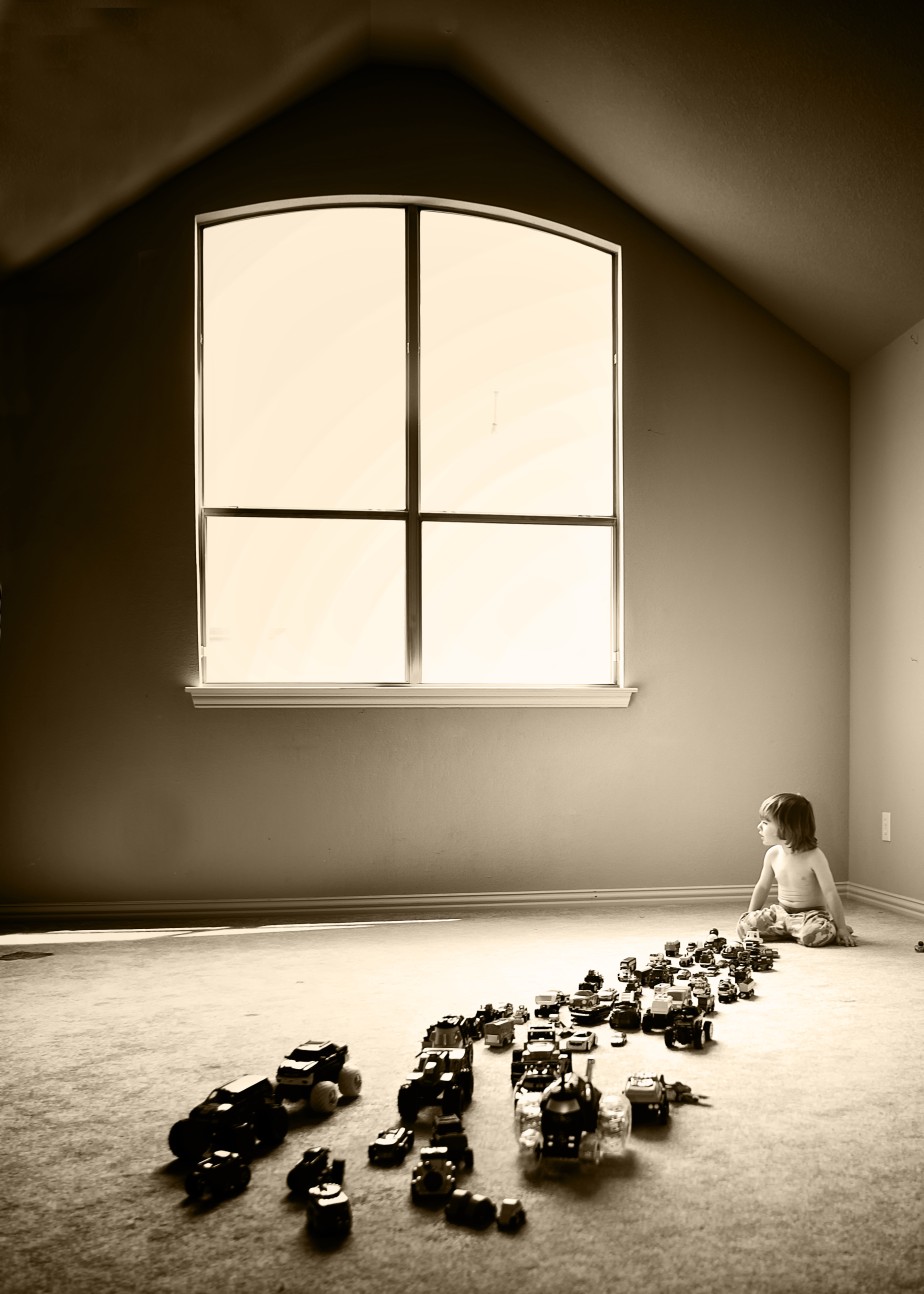
3-9
ABOUT THESE PHOTOS The attic window light and the uncluttered background in 3-8 and 3-9 provided dramatic and story-telling images of a child at play. 3-8 was taken at ISO 1000, f/2.8, and 1/500 second; 3-9 at ISO 100, f/2.8, and 1/30 second. ©Mary Schannen / www.melangephoto.com
The Sweet Light: Dawn and Twilight
Many great photographers only create images during the sweet light, which is the light that occurs at dawn and twilight. This light can be cool in the morning and warm in the evening, each creating its own mood and atmosphere. Because the light is at a greater angle, and often diffused by the atmosphere, a warm and soft glow is more likely (see 3-11 and 3-12).
Light is known to affect mood; you might notice the quiet hush that occurs at dawn and twilight, among both man and nature. What a delightful time to be with a child in a photographic session. The lighting and the atmosphere lend themselves so beautifully to an exploration of nature and lively conversations.

3-10
ABOUT THIS PHOTO The available light outside of the house illuminated the children in the window. The dark background behind them offsets their cheery brightness. Taken at ISO 200, f/3.5, and 1/400 second. ©Jen Sherrick / www.jensherrickphotography.com
One of the challenges of working in this light is that it is fleeting. Just as you are enjoying and making use of the light, it can disappear, often causing frustration. You must learn to work quickly and spontaneously. After missing your opportunities a few times, you realize just how transient this gift of light can be; but when you see the difference it makes in your photographs, you will seek it.
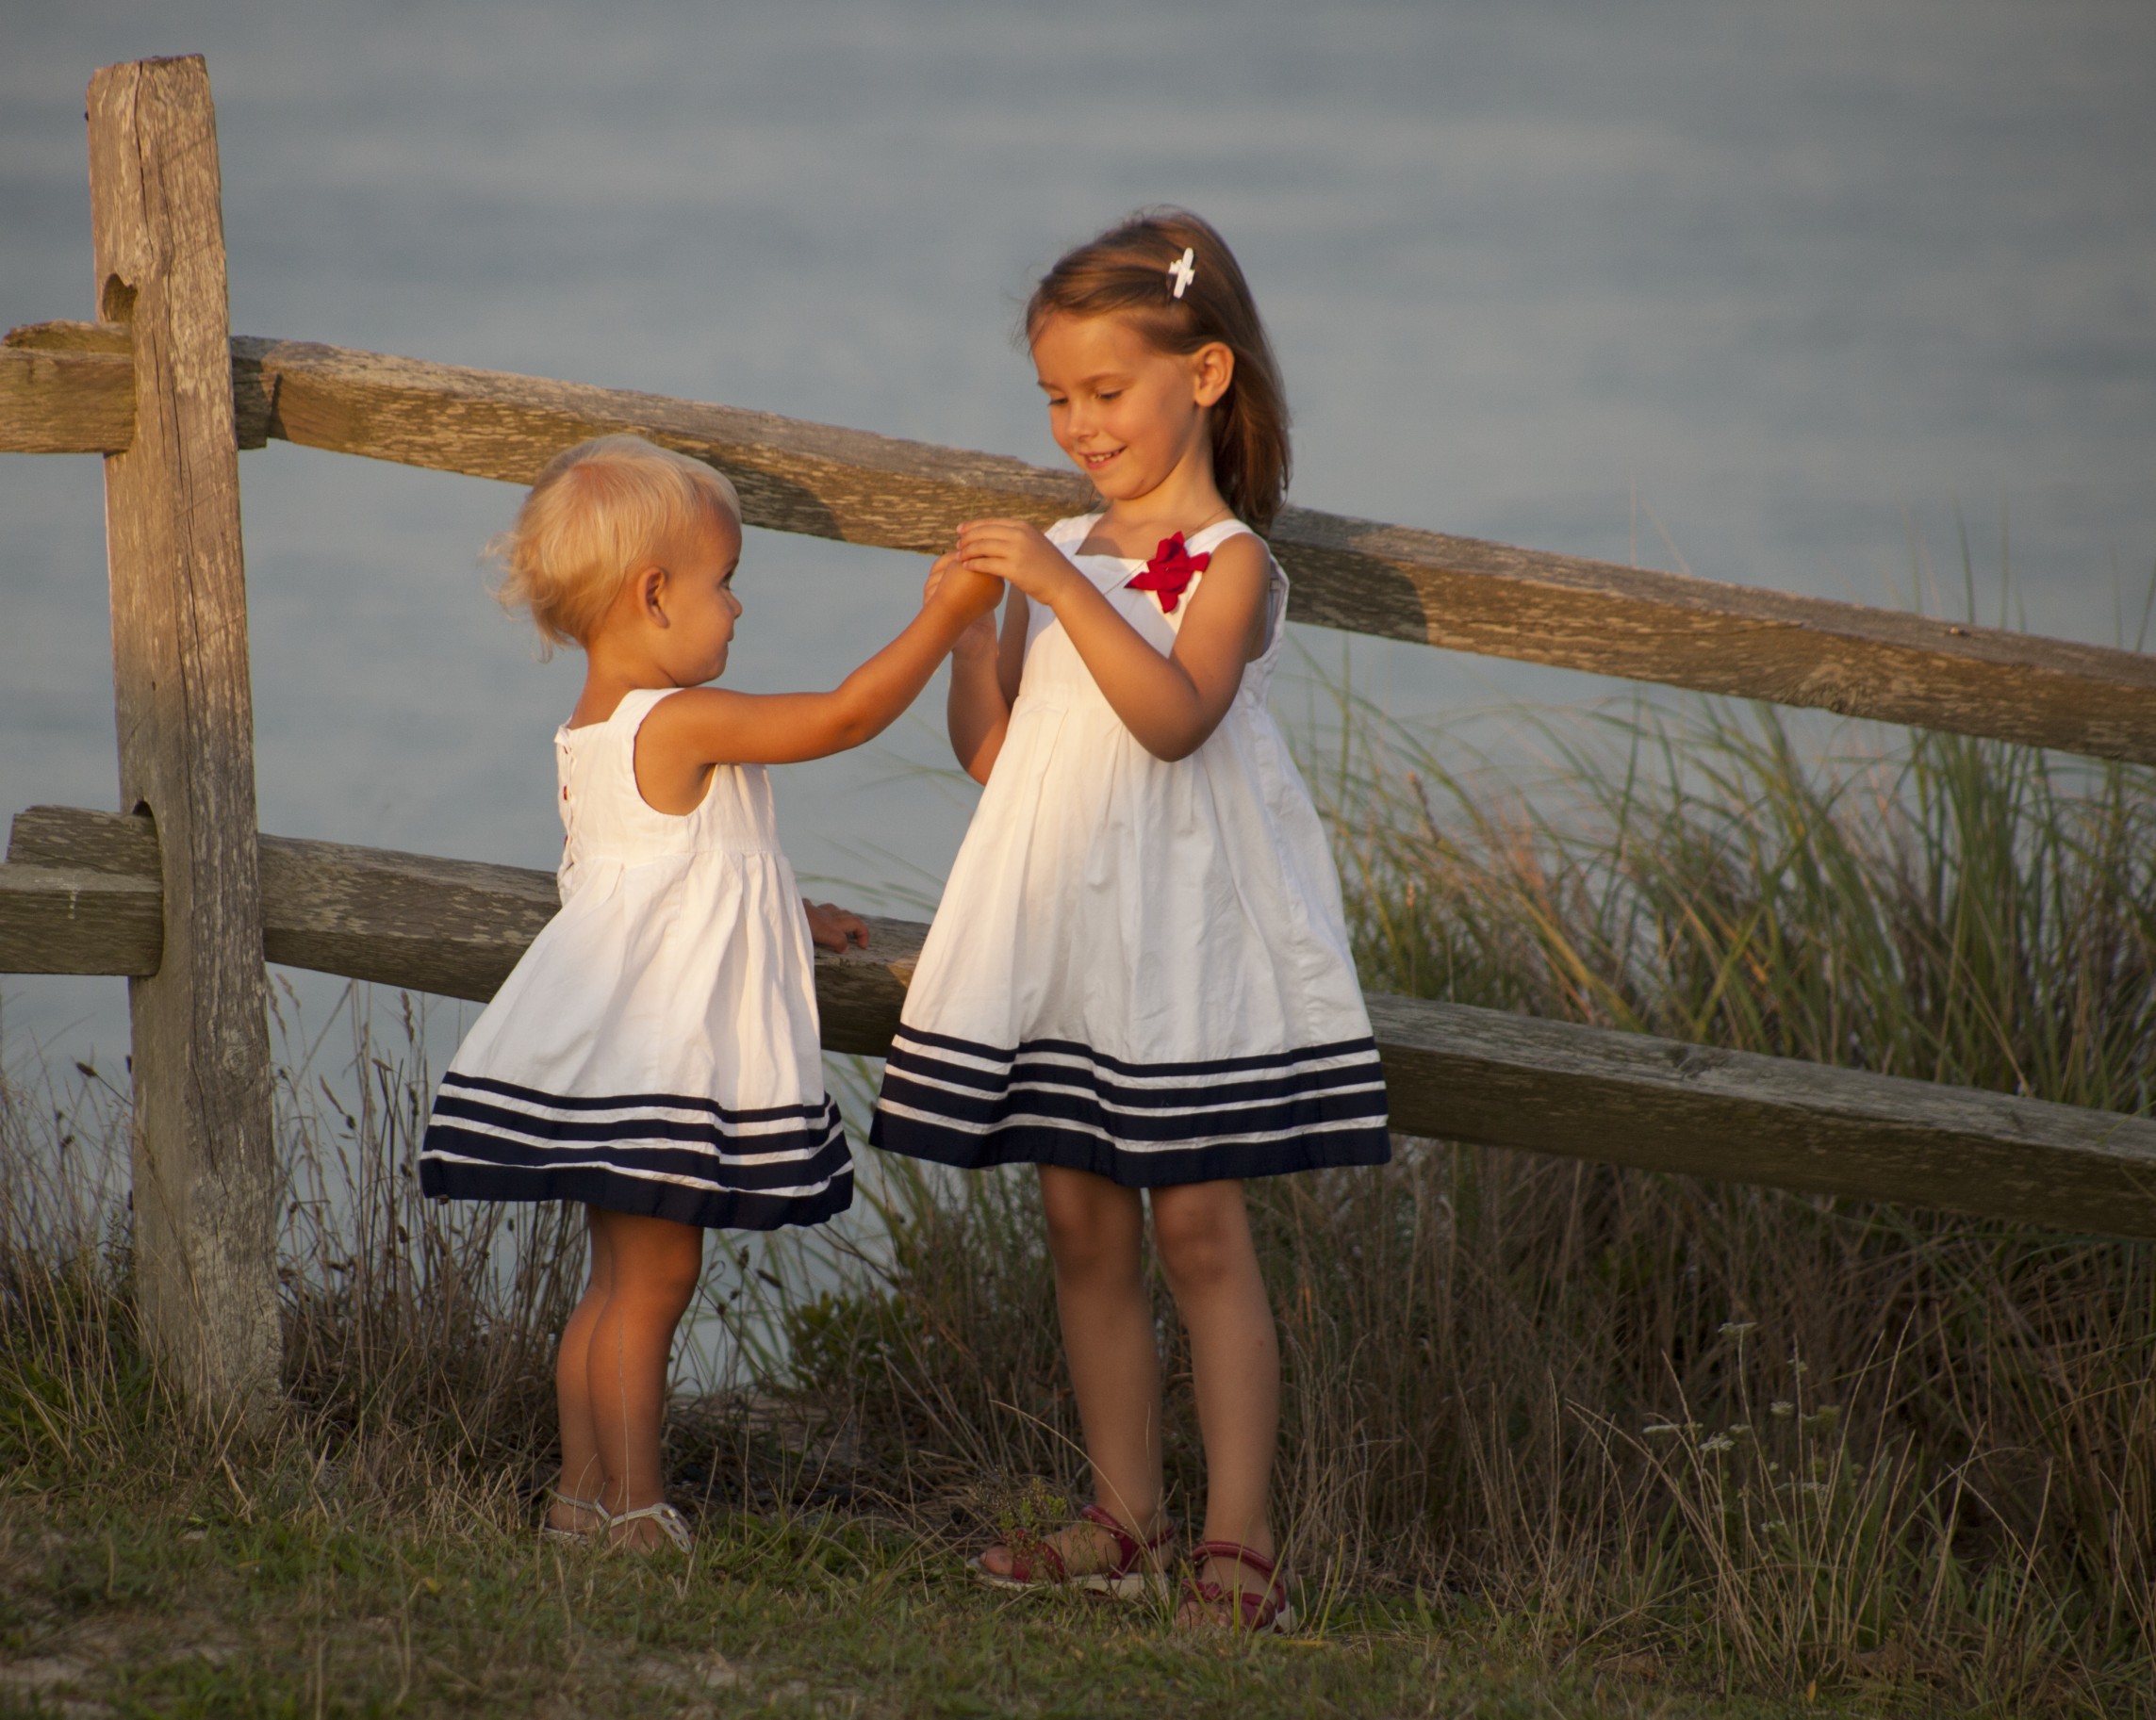
3-11
ABOUT THIS PHOTO A hot, hazy Nantucket evening brought warmth to the skin tones of these enchanting little sisters. I was happy with the way the fence provided an interesting background, keeping them safe from the hillside and water. Taken at ISO 400, f/5.0, and 1/1000 second. ©Ginny Felch / www.photographingchildren.com
Using reflections and shadows
While you are observing light, pay attention to reflections and shadows in the environment. You can use both as a dynamic element of design, adding that something extra to your photograph. Reflections can be found in obvious places, such as in window glass or mirrors but can also be found in less obvious places, such as in rain puddles or the wash of the tide on a sandy beach.
When the sun is at an angle with morning or afternoon light, it creates angular or distorted shadows that can add interest and drama. Shadows speak of time passing, which captures the viewer’s imagination. Shadows and reflections can help you tell a story while adding dimension to your images.
Reflections
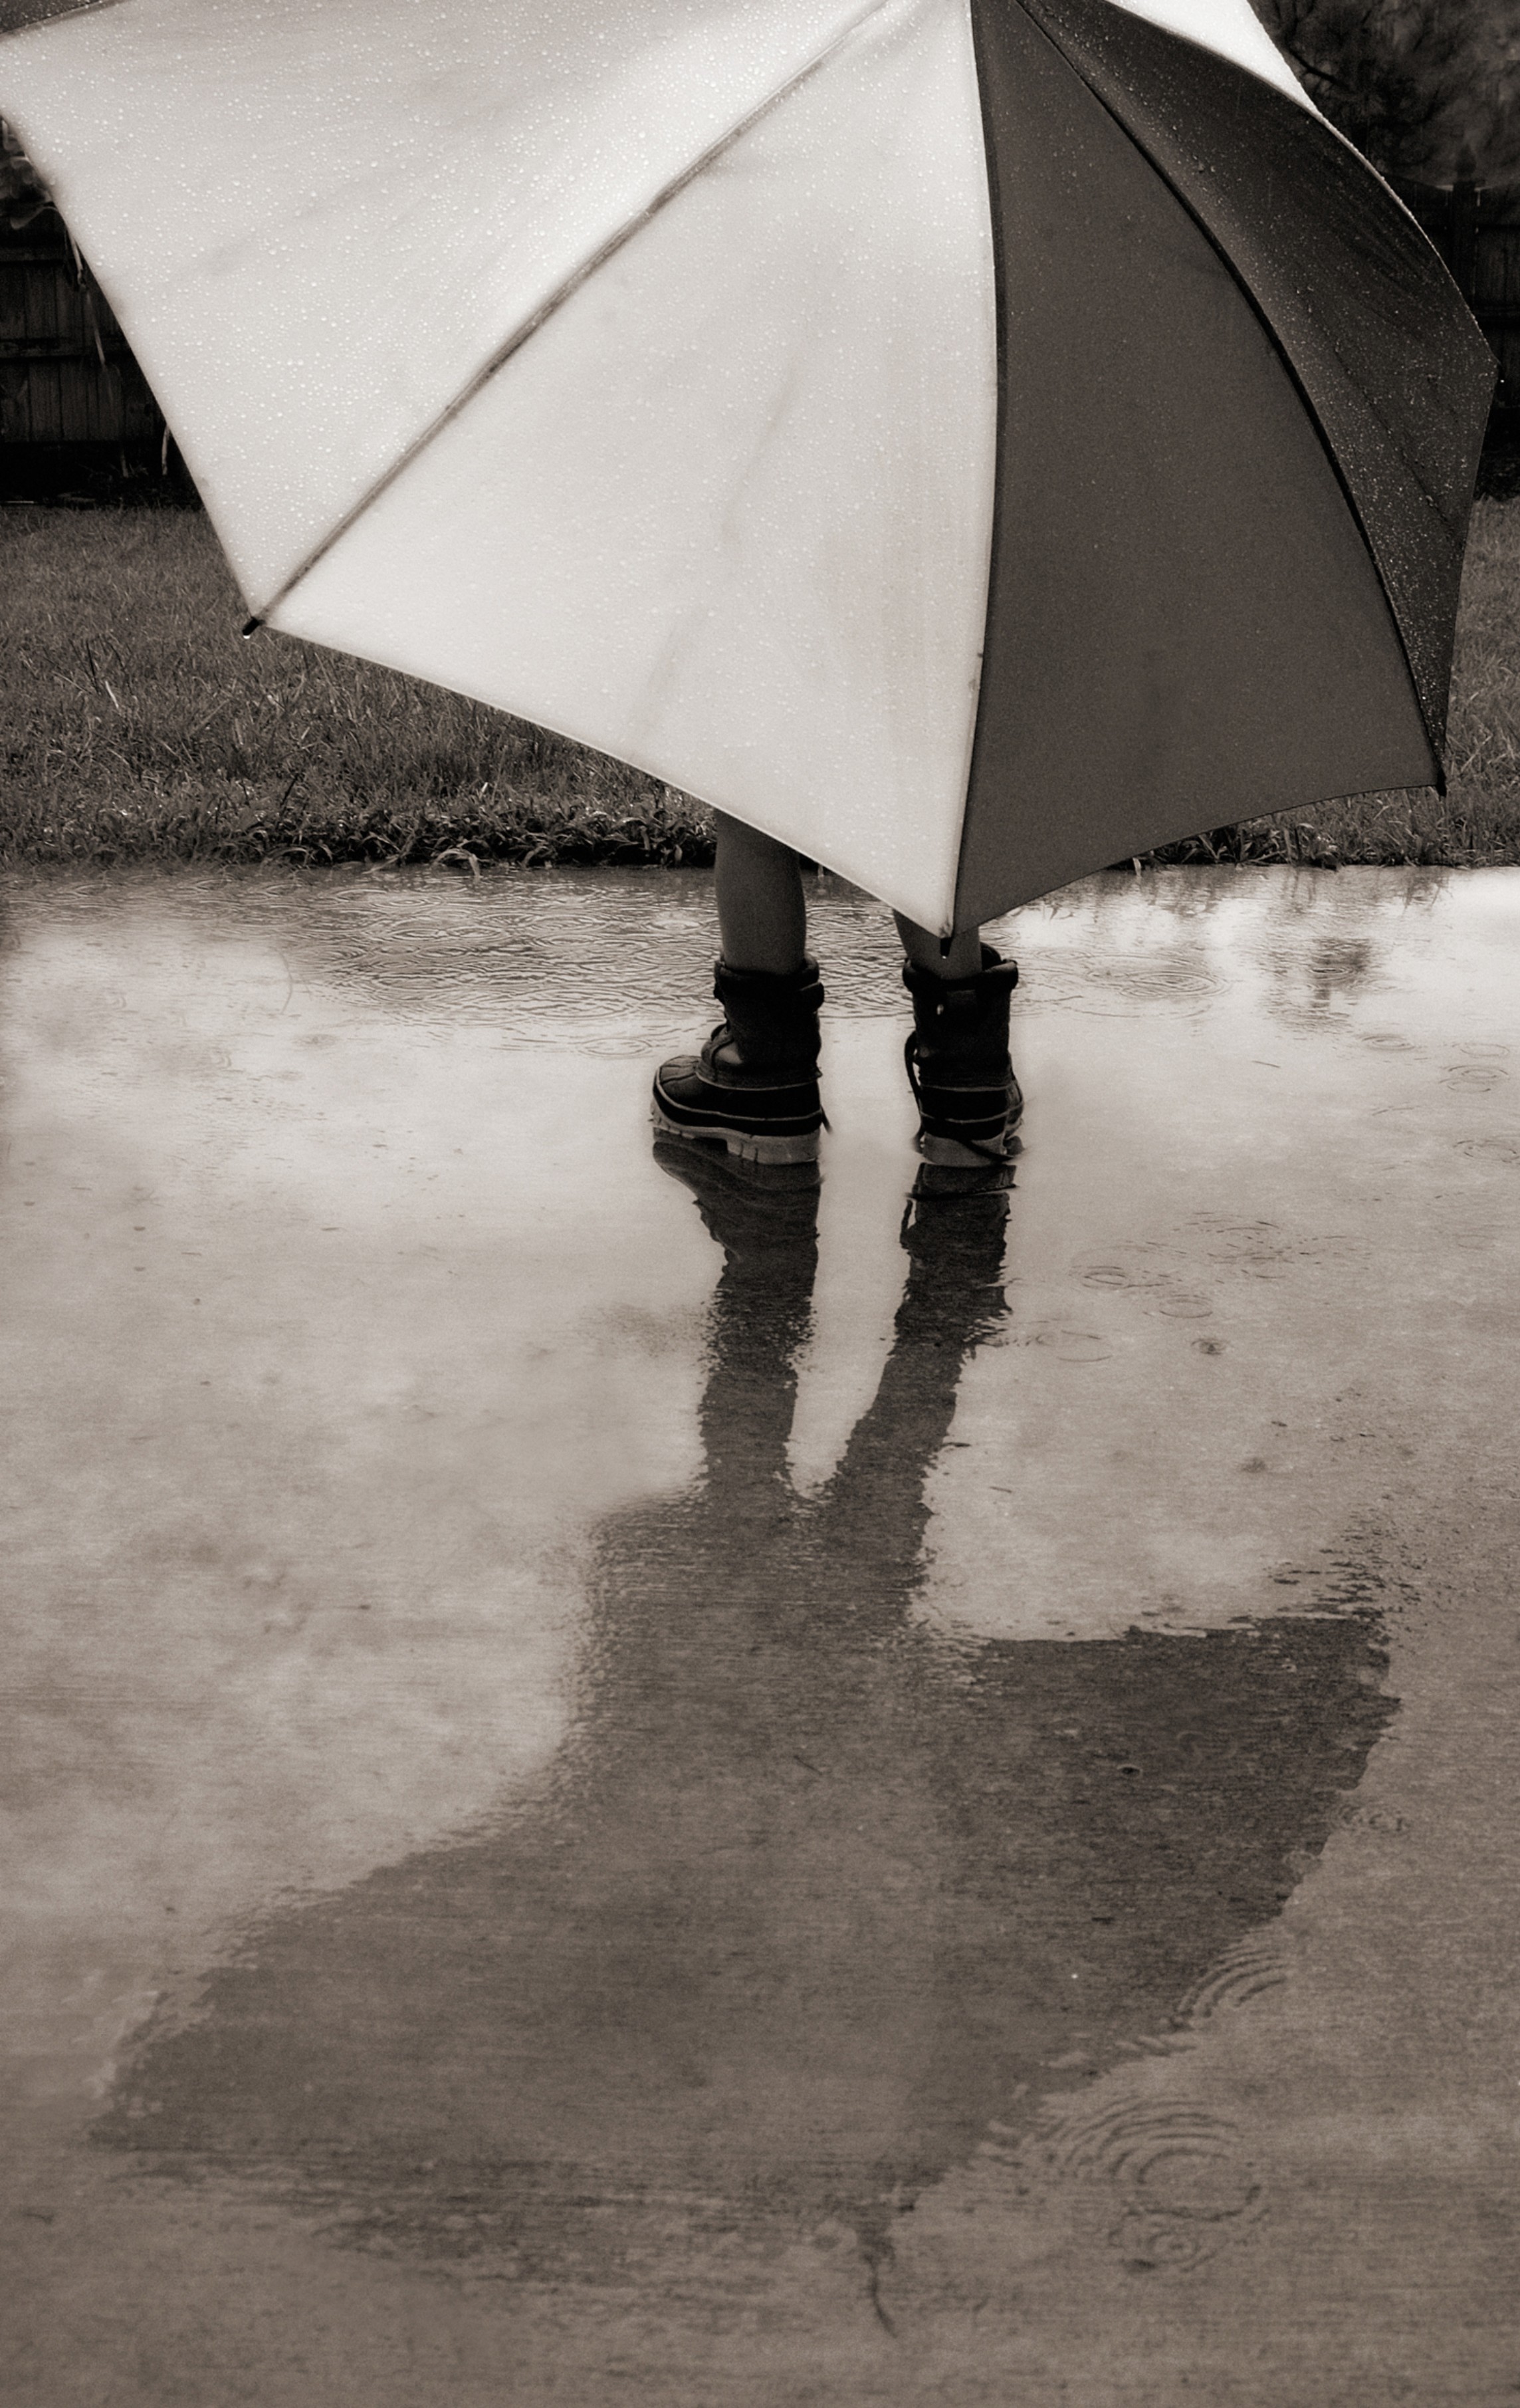
A puddle on a rainy day can tell a story, such as the story of the little boy under the umbrella shown in 3-13.
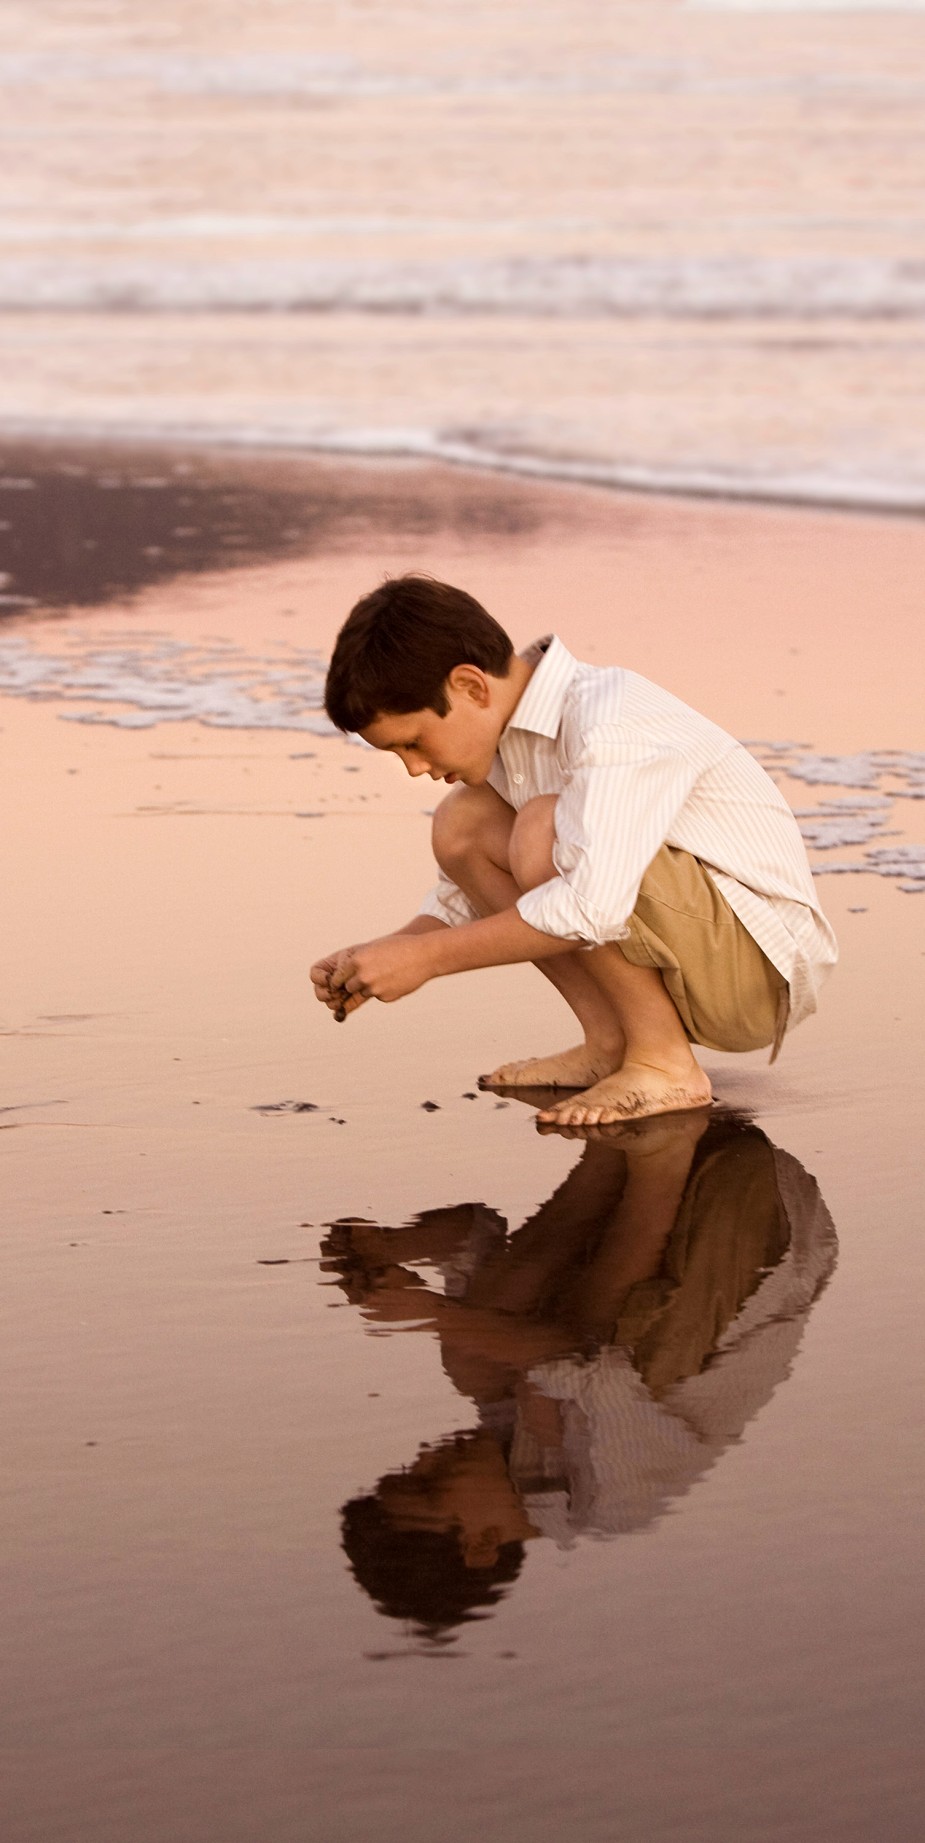
3-12
ABOUT THIS PHOTO Moments after sunset provided a placid and pleasing environment for this boy to seek treasures. I was very pleased with the warm light and the smooth water’s reflection. Taken at ISO 400, f/5.0, and 1/125 second. ©Ginny Felch / www.photographingchildren.com

3-13
ABOUT THIS PHOTO The reflections add depth and dimension to a photo of a little boy considering his mirror image on a rainy day. Taken at ISO 200, f/2.0, and 1/1600 second. ©Stacy Wasmuth / www.bluecandyphotography.com
Reflections of the subject in water or in windows yield a distorted but painterly quality that adds an artistic touch to the photograph.
I love to photograph at low tide on a beach taking advantage of reflections (as in 3-14). The added color, texture, and design can be other elements of your composition that catch the eye. The beauty of reflections is that they suggest the bigger picture without having to show every detail, leaving the viewer’s mind to fill in the rest and create his or her own story about that image.
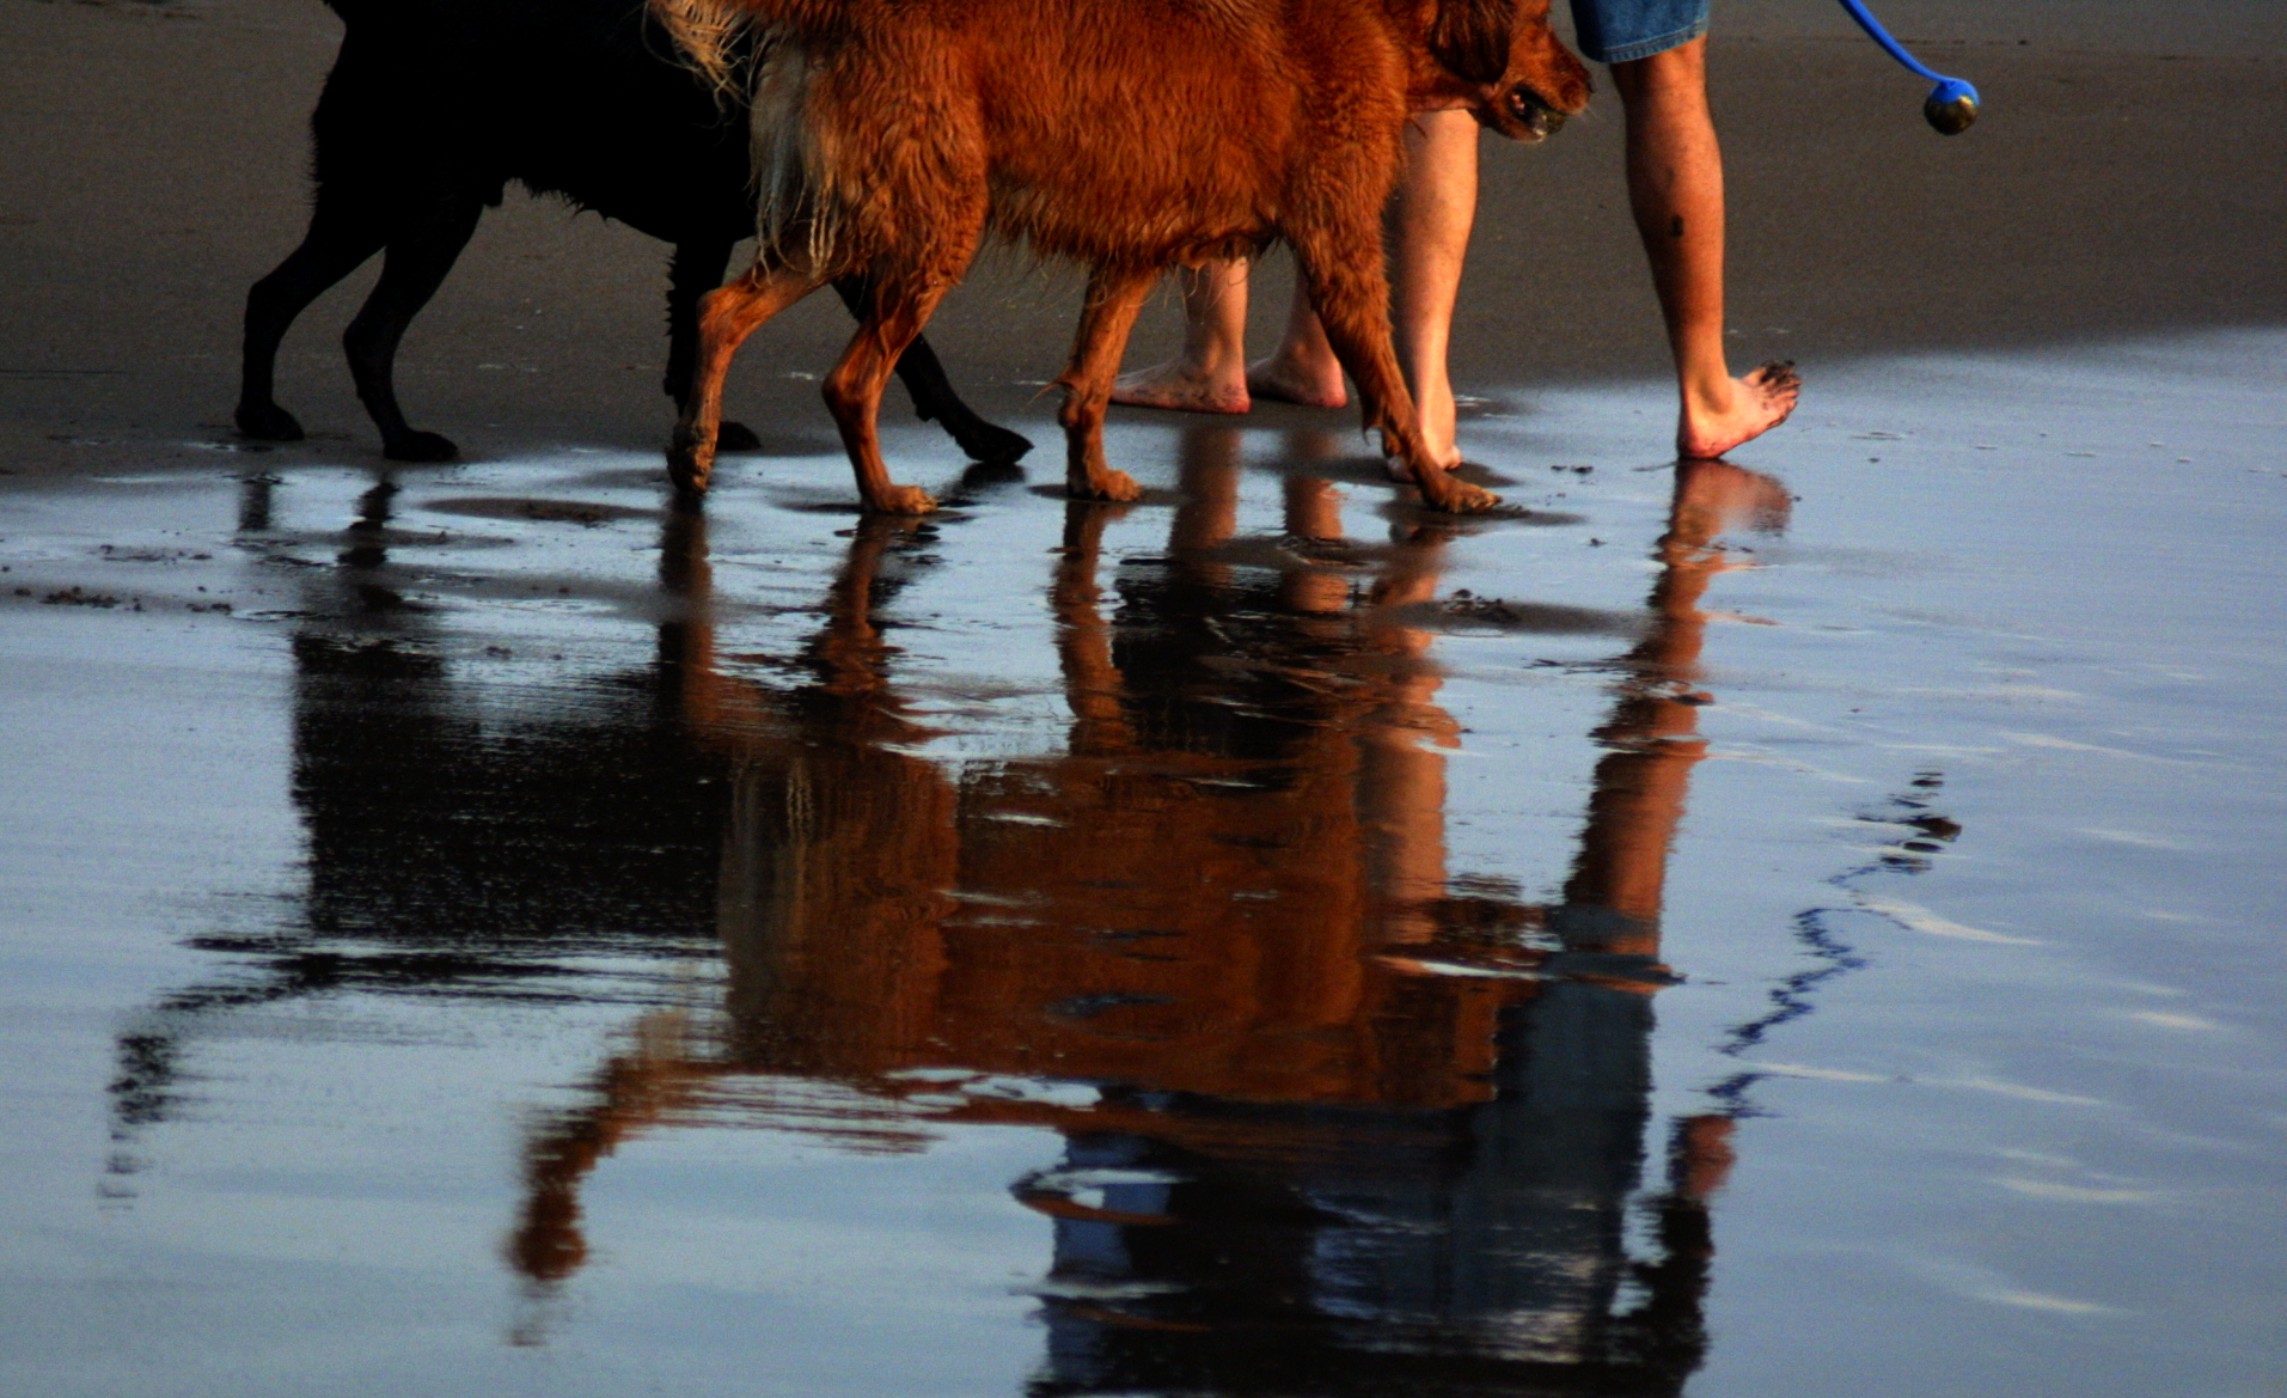
3-14
ABOUT THIS PHOTO The reflection of a boy on a beach stroll with his dogs and a ball-tosser reveals the glow of the late-afternoon sun. Taken at ISO 400, f/5.6, and 1/500 second. ©Ginny Felch / www.photographingchildren.com
When photographing children in a wooded setting, pay attention to the mottled light cast by the movement of leaves in the trees above. Either move your subject and use the light creatively and intentionally, or try the fill flash technique discussed in Chapter 4 to even out the shadows.
Those of you with compact digital cameras should check your manual for information on your flash settings. Does your camera allow you to turn the flash off or set it to a lower setting? This control is helpful as you learn to explore light.
When using the soft light coming from a window, pay attention to your subject’s reflection on the glass. If her head is turned toward the light, you might not be able to see facial details, except for what is reflected back to you. Again, a reflected image is slightly distorted, washed- out, and dreamy looking.
Using reflection as a visual metaphor, you deepen the meaning of your photograph by allowing the viewer to register the obvious and then look a bit closer, see the reflection, and ponder what else is there.
You could also take the reflection idea very literally. Look for mirrors or windows in your environment and take the same shots two ways, as in 3-15 and 3-16.

3-15
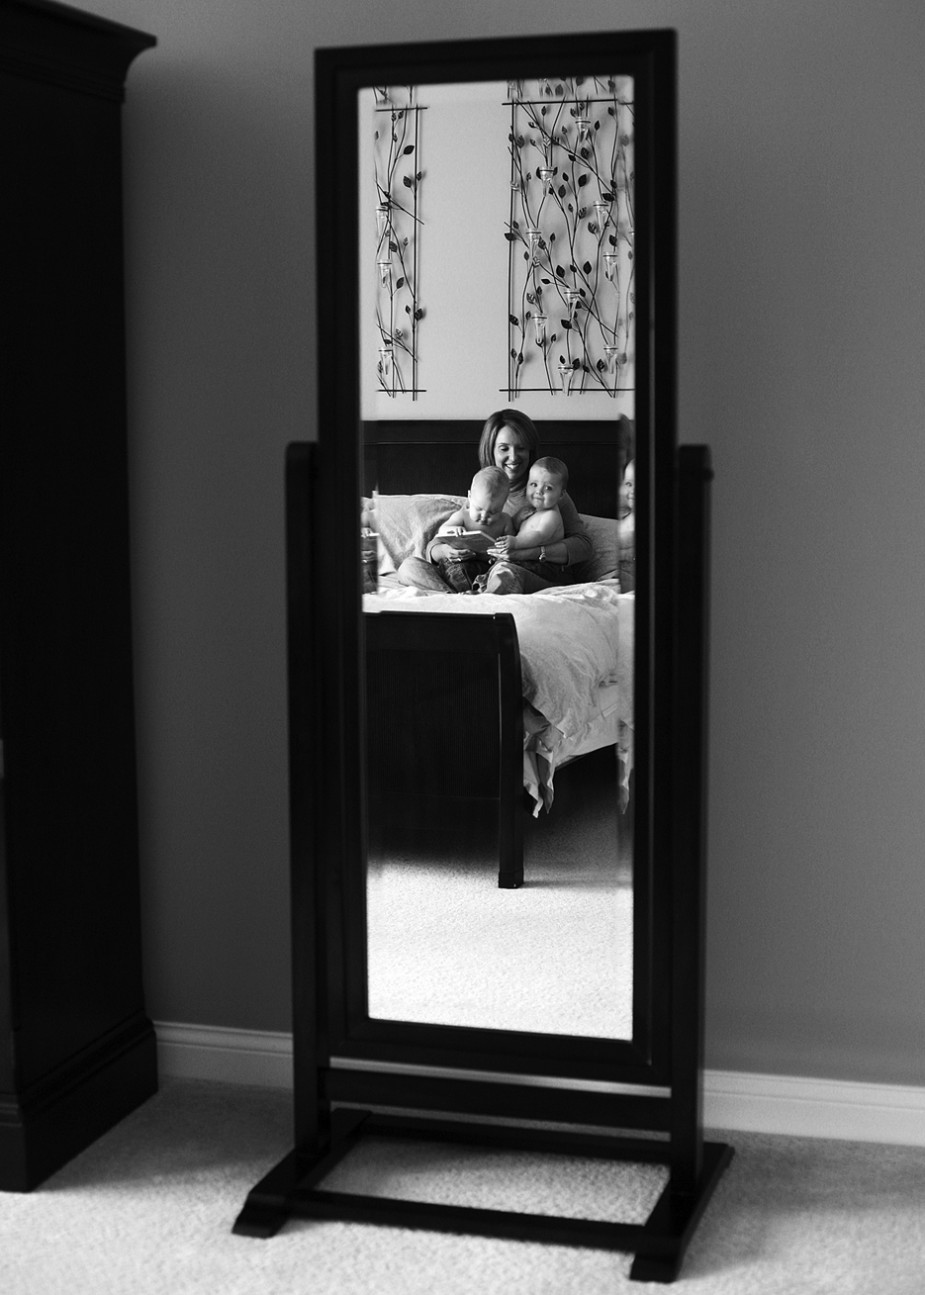
3-16
ABOUT THESE PHOTOS The classic subject of mother and children, shown in 3-15, is given a modern twist by shooting into a mirror in the mom’s bedroom in 3-16. Taken at ISO 600, f/2.8, and 1/250 second. ©Stacy Wasmuth / www.bluecandyphotography.com
Babies love to look at other babies, even when that baby is their own reflection! Take advantage of their curiosity by placing a mirror within their reach, as in 3-17, and then watch what happens.

3-17
ABOUT THIS PHOTO Because babies are naturally curious about other babies, let them play with a mirror while you take advantage of the sweet reflections of babyhood. Taken at ISO 400, f/2.8, and 1/320 second. ©Stacy Wasmuth / www.bluecandyphotography.com
Shadows
When you are first learning photography, it is tempting to avoid shadows for fear that your subject won’t be properly illuminated. Don’t be afraid to make a few mistakes and explore how shadows can creatively affect the photos you take; the payoffs are worth it.
You may first want to explore the shadows that fall on the child you are photographing. Shadows created by light coming through a set of stairs, as in 3-18, or through anything that creates patterns make for an interesting element in a photograph.
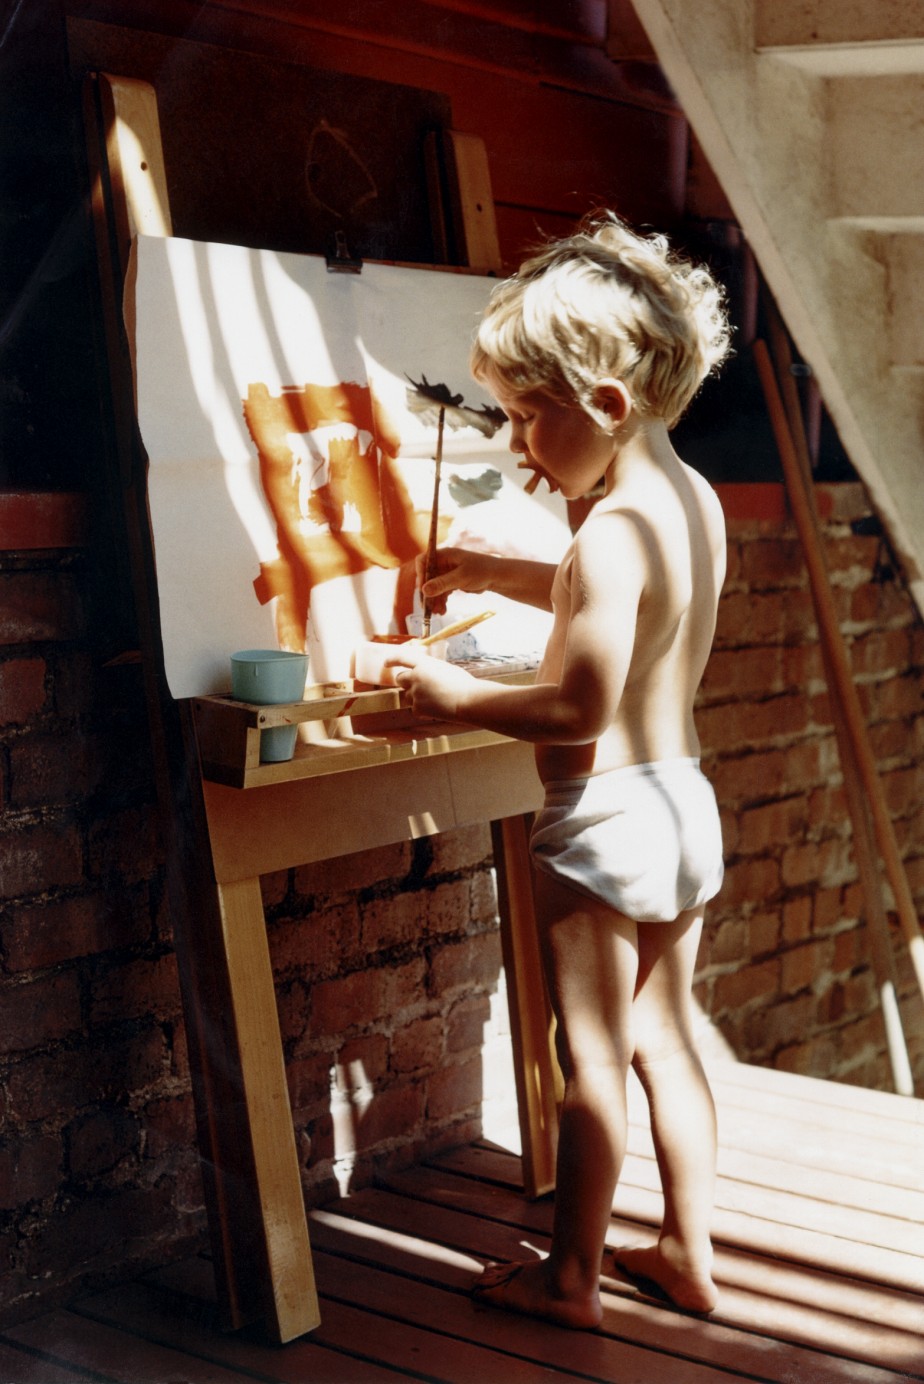
3-18
ABOUT THIS PHOTO My little artist at work on a sunny morning seems embraced by the shadowed light as he concentrates on his colors. Even his cherished pacifier adds a bit to the story. Taken at ISO 200, f/5.6, and 1/125 second. ©Ginny Felch / www.photographingchildren.com
On sunny days, the play of light and shadow can cast shadows that emphasize the shape or profile of the subject, as in 3-19. In 3-20, the shadow enhances the story of the photograph, adding mood and drama.
Shadows can provide a very strong graphic element in a photograph, as in 3-20, where the strong diagonal shadows lead the viewer’s eye in to the engaging family at sunset.
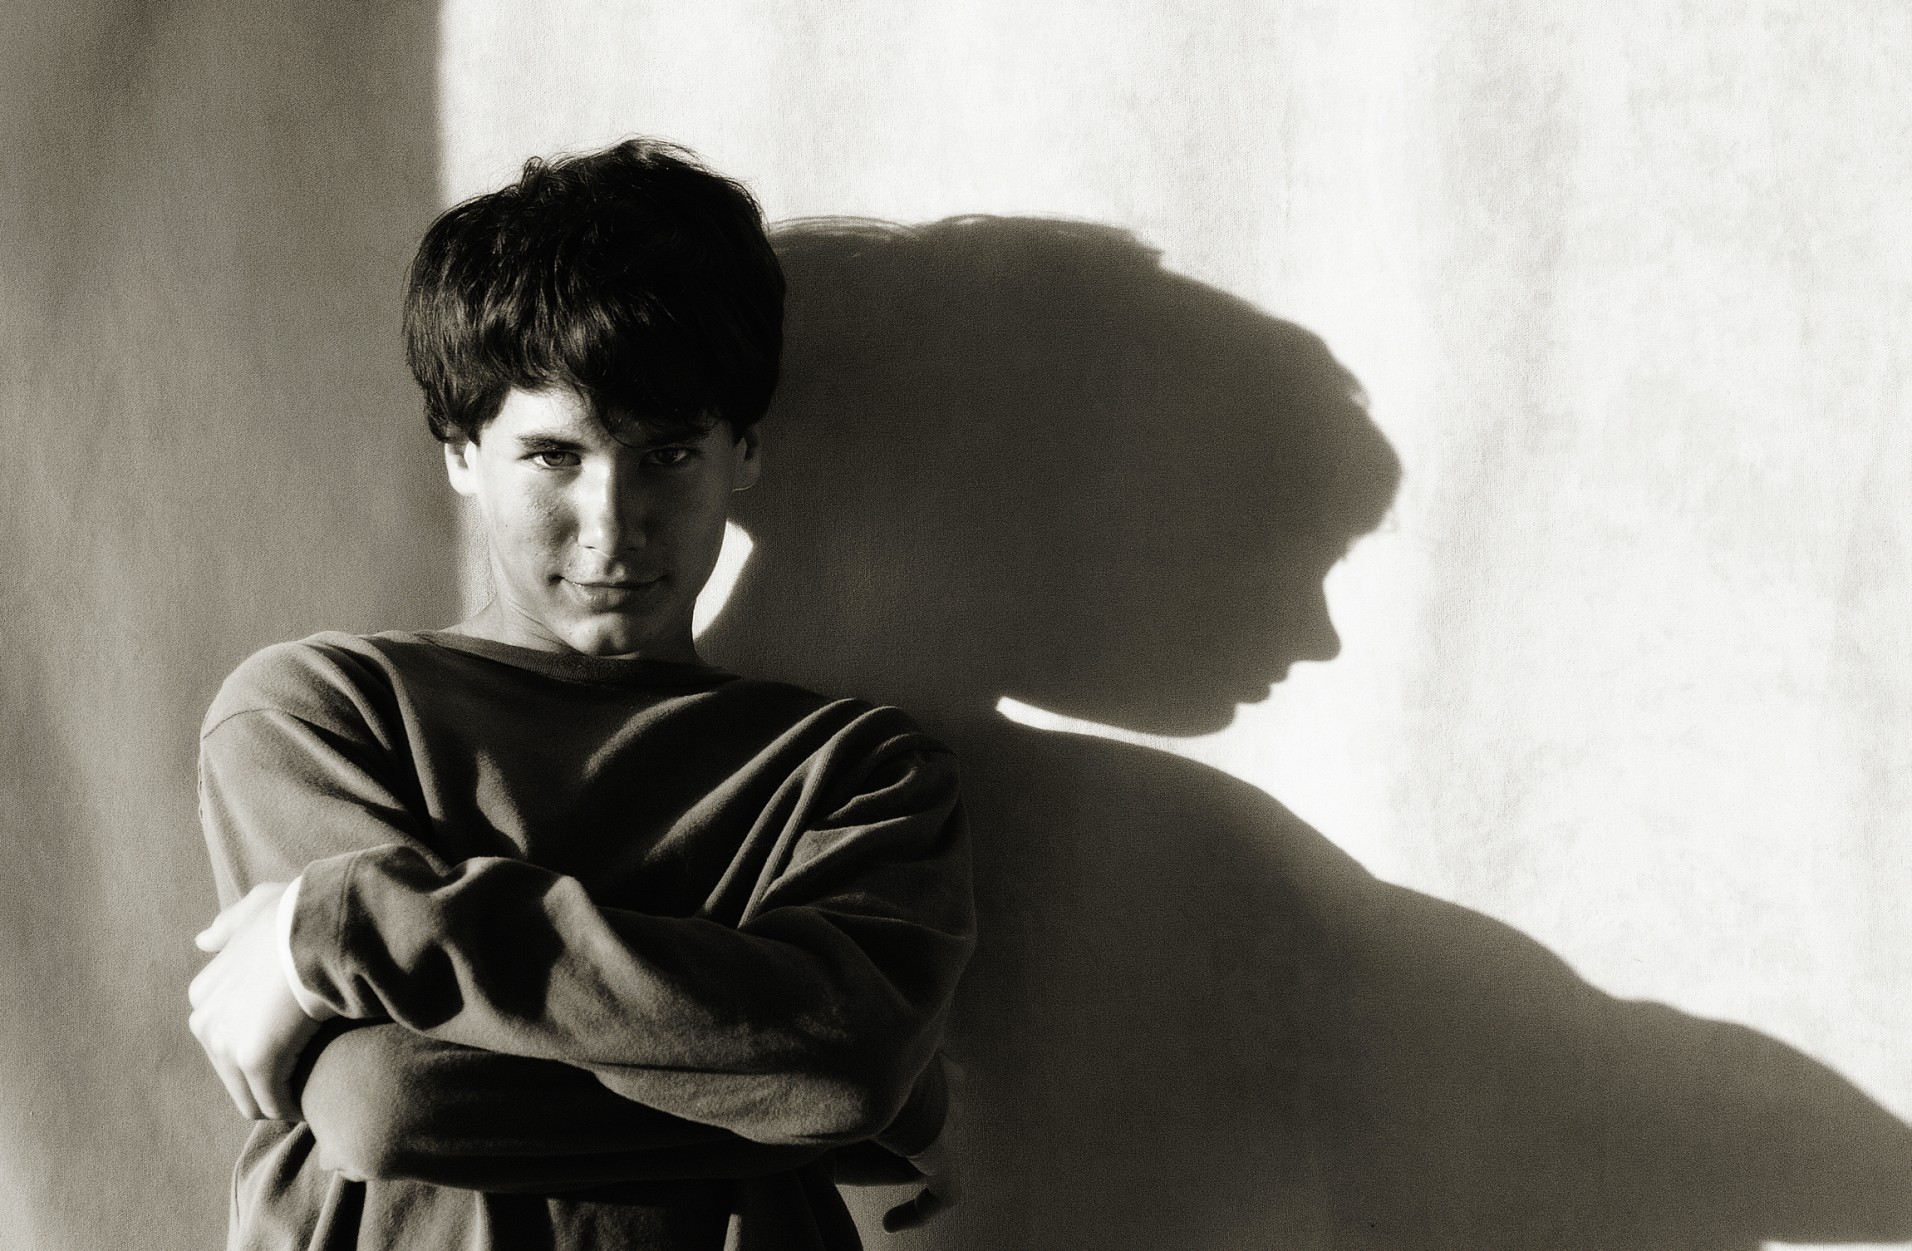
3-19
ABOUT THIS PHOTO The bold, angular light and shadow give this young man a confident look. After they are drawn straight into his eyes, your eyes move toward the distinctive shadow on the wall. Taken at ISO 400, f/5.6, and 1/200 second. ©Scarlett Photography / www.photographybyscarlett.com

3-20
ABOUT THIS PHOTO This silhouetted family photographed at sunset is even more dramatic and compelling because of the angle of the shadows. I love the way my grandson is reaching out to his mommy. Many photographs were made of their walk, and this one really spoke to me. Taken at ISO 400, f/5.6, and 1/1250 second. ©Ginny Felch / www.photographingchildren.com
Photographing in Fog or with Overcast Skies
While many residents of beach communities relish hot, sunny days, some photographers are thrilled when the fog rolls in so they can take advantage of the other-worldly feeling that shooting in foggy light brings to their photos. Foggy skies provide a soft, flattering light that can allow photographers to photograph all day long.
For more technical information on aperture and f-stop, see Chapter 2.
Foggy days
On foggy days, the light is soft; the colors are monochromatic or pastel, and there is less contrast. Fog can be light, thick, high, low, and change by the minute. Its unpredictability adds to its mystery. To use fog to your advantage, you want to avoid high fog because it doesn’t create the beautiful haze needed to cut the contrast in the setting. Look for a low, dense fog that obscures the surrounding hills or vegetation.
Fog behaves differently during the various seasons so you may start out your day with perfect fog but by the time the children show up you might be stuck with harsh sun. It’s the chance you take when relying on Mother Nature to help with lighting. But when the weather cooperates and fog envelops your subjects in a glowing, even light, children can frolic and play and you do not have to worry about from which direction the light is coming. This adds a sense of freedom to your work.
“Think about the photo before and after, never during. The secret is to take your time. You mustn’t go too fast. The subject must forget about you. Then, however, you must be very quick.” ~Henri Cartier-Bresson
If it is a very foggy day, the available light may not be bright enough to work in until about 10 or 11 o’clock in the morning. In the afternoon, don’t wait until too late, or the fog can become gloomy and you won’t have the light you need. As with all things photographic, experimentation is the key.
Keep in mind that a lot of fog can create a low-light situation that might cause your flash to engage on your camera. That will really change your outcome. Don’t forget — you don’t want to use a flash in fog because, among other things, the water droplets reflect the light and end up looking like dots on your image. Photographs of scenes that appear more painterly in this kind of light are considered high-key photographs, light subjects against a light background, as in 3-21 and 3-22. If you plan correctly and have the children wear lighter clothing, the darkest elements in the photograph are the skin tones, which really draw attention to the children. The background and even the clothing are more subdued. All is in a relative wash of light.

3-21
ABOUT THESE PHOTOS This series of three photographs of two sisters playing at the beach shows a unique relationship between the girls and their environment. The pastel tones of the clothing that we carefully chose are pleasing to the eye and give the portrait a painterly look. Taken at ISO 400, f/16, and 1/250 second. ©Ginny Felch / www.photographingchildren.com

3-22
ABOUT THIS PHOTO The foggy day and monochromatic tones set off this family as they interact at the beach. The foggy background delivers a monochromatic and moody image. I love the movement and natural pose of this family. Taken at ISO 400, f/11, and 1/250 second. ©Ginny Felch / www.photographingchildren.com
Overcast skies
Similar to fog, the mood created by overcast skies can be soft and romantic. Because the light is more subdued and has less contrast, it is much easier to achieve lighting with no harsh shadows or overly-bright highlights. This more forgiving light frees you up to concentrate on composition and the expressions of the children in your photograph.
Although overcast skies provide more evenly dispersed lighting than direct sun, photographing in the middle of the day, with light coming from overhead, can cause harsh shadows under the eyes. The next section addresses getting the light at the correct angle to your subject.
Finding Contouring Light
Contouring lighting gives a dimensional look to an otherwise flat piece of paper — your photographic print. That quality of illumination ideally gives three times as much light to one side of the face than the other, or a 3:1 lighting ratio. Don’t panic now; this is not a math quiz! It is a matter of learning to see the light, subtle as it might be, fall on a face.
You can do one very helpful exercise that demonstrates the sculptural or contouring effect of light on a sunny, cloudy, or overcast day. Ideally, you find a spot on the edge of a forest or meadow with trees. Your light source is a low and broad sky without direct sun, as in 3-23.
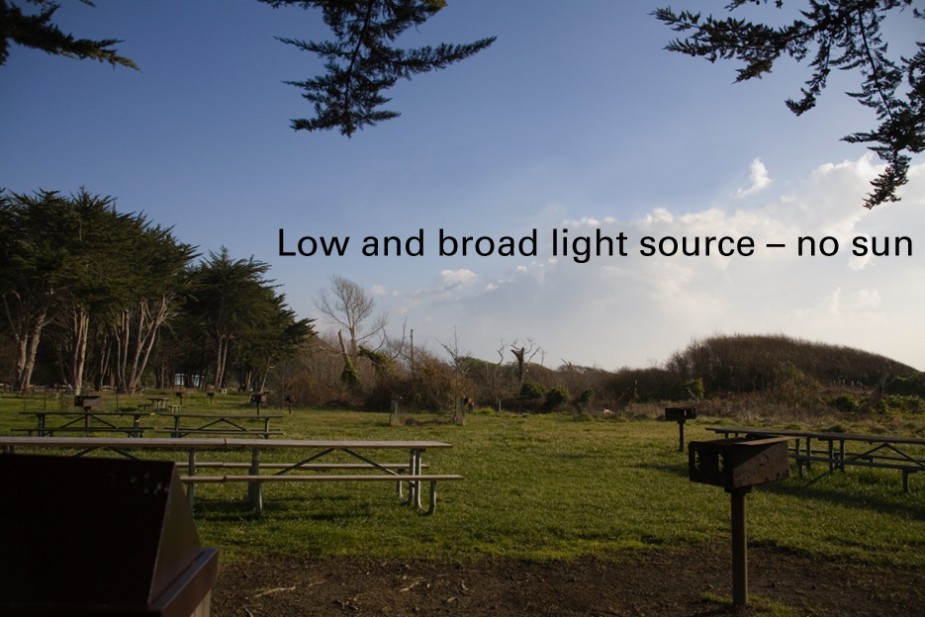
3-23
ABOUT THIS PHOTO This view shows a low and broad light source that I always seek for portraits — the sky with no sun. Taken at ISO 640, f/5.6, and 1/2500 second. ©Ginny Felch / www.photographingchildren.com
In this exercise, you evaluate the light on the trees as you search for a location to photograph. See if you can find an area with light falling more brightly on one side than another and look for the specular highlight, (that is, the bright line dividing the highlight from the shadow) as in 3-24. Don’t worry if the location seems crowded with objects that you don’t want in your final image. As you can see, you can focus on your subject and eliminate the distracting details.
Reflectors and other tools used to manipulate light are discussed in depth in Chapter 4.
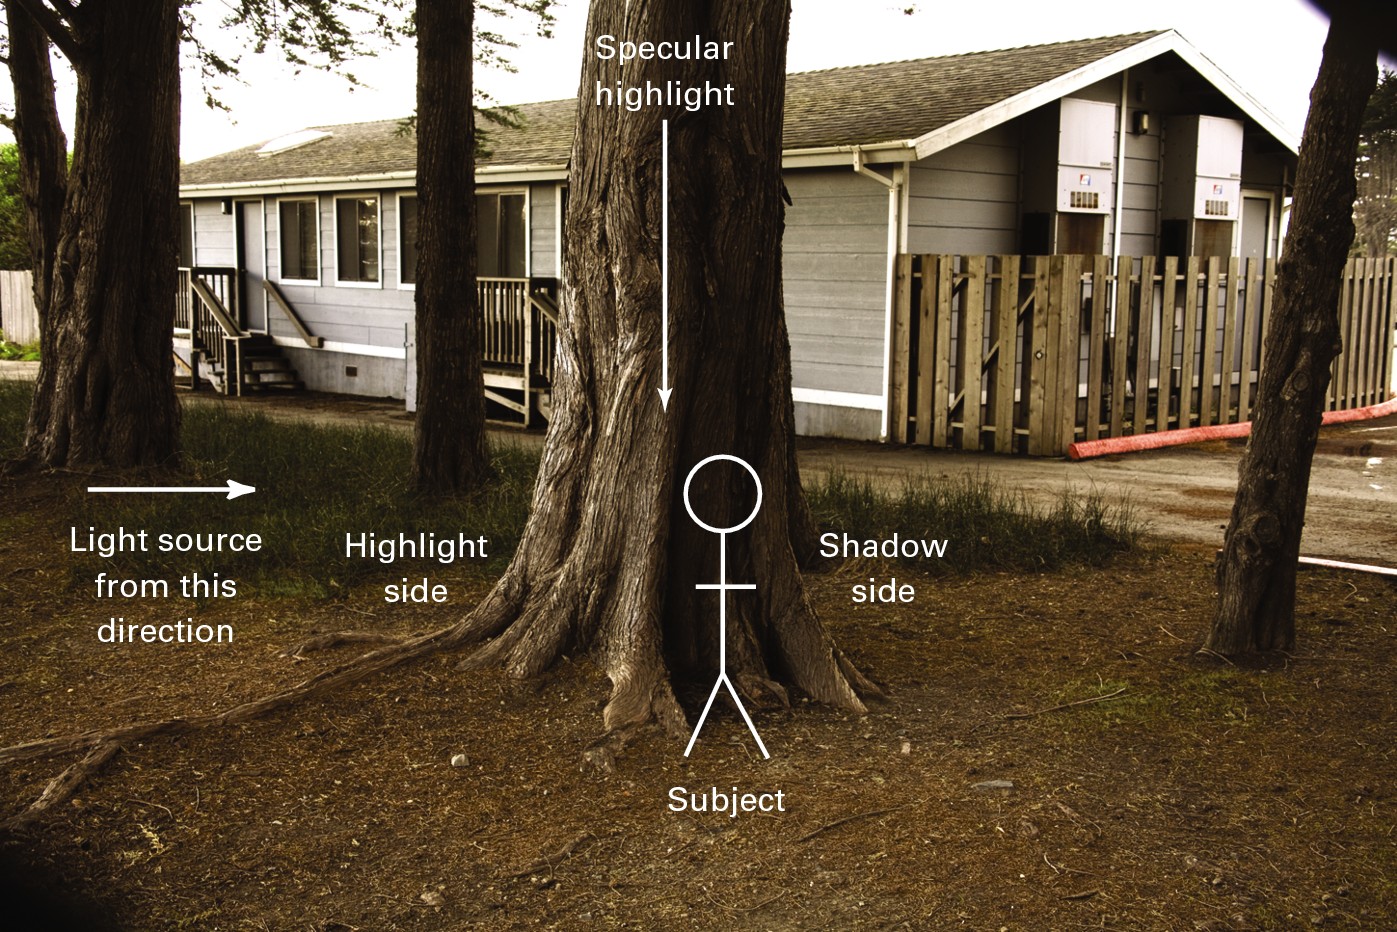
3-24
ABOUT THIS PHOTO This background was chosen because of the sculptural light (see the highlight and shadow side of trunk) on the tree. Even though there is clutter from the building and tree, I isolated the subject and tree in my camera’s viewfinder. Taken at ISO 640, f/5.6, and 1/200 second. ©Ginny Felch / www.photographingchildren.com
If you place a face in that location, as shown in 3-25, you see similar light flowing on it, and the specular highlight can be placed on the subject’s nose. The portrait of Daisy reveals the same light on her face that formerly appeared on the tree. She was asked to turn her head until the light appeared there and the little triangle of light appeared on her left cheek. One side of your subject’s face should have about three times the amount of light on it than the other. If you turn her face just right, you see a little triangle of light on the other cheek before the shadow falls off the face. Study the illustrations and then go out in the field and practice.
This is really an exercise about observing light, so that you can see the subtle differences between light and shadow and use it as you want for illuminating your subjects. It can take years to learn to discern this subtlety.
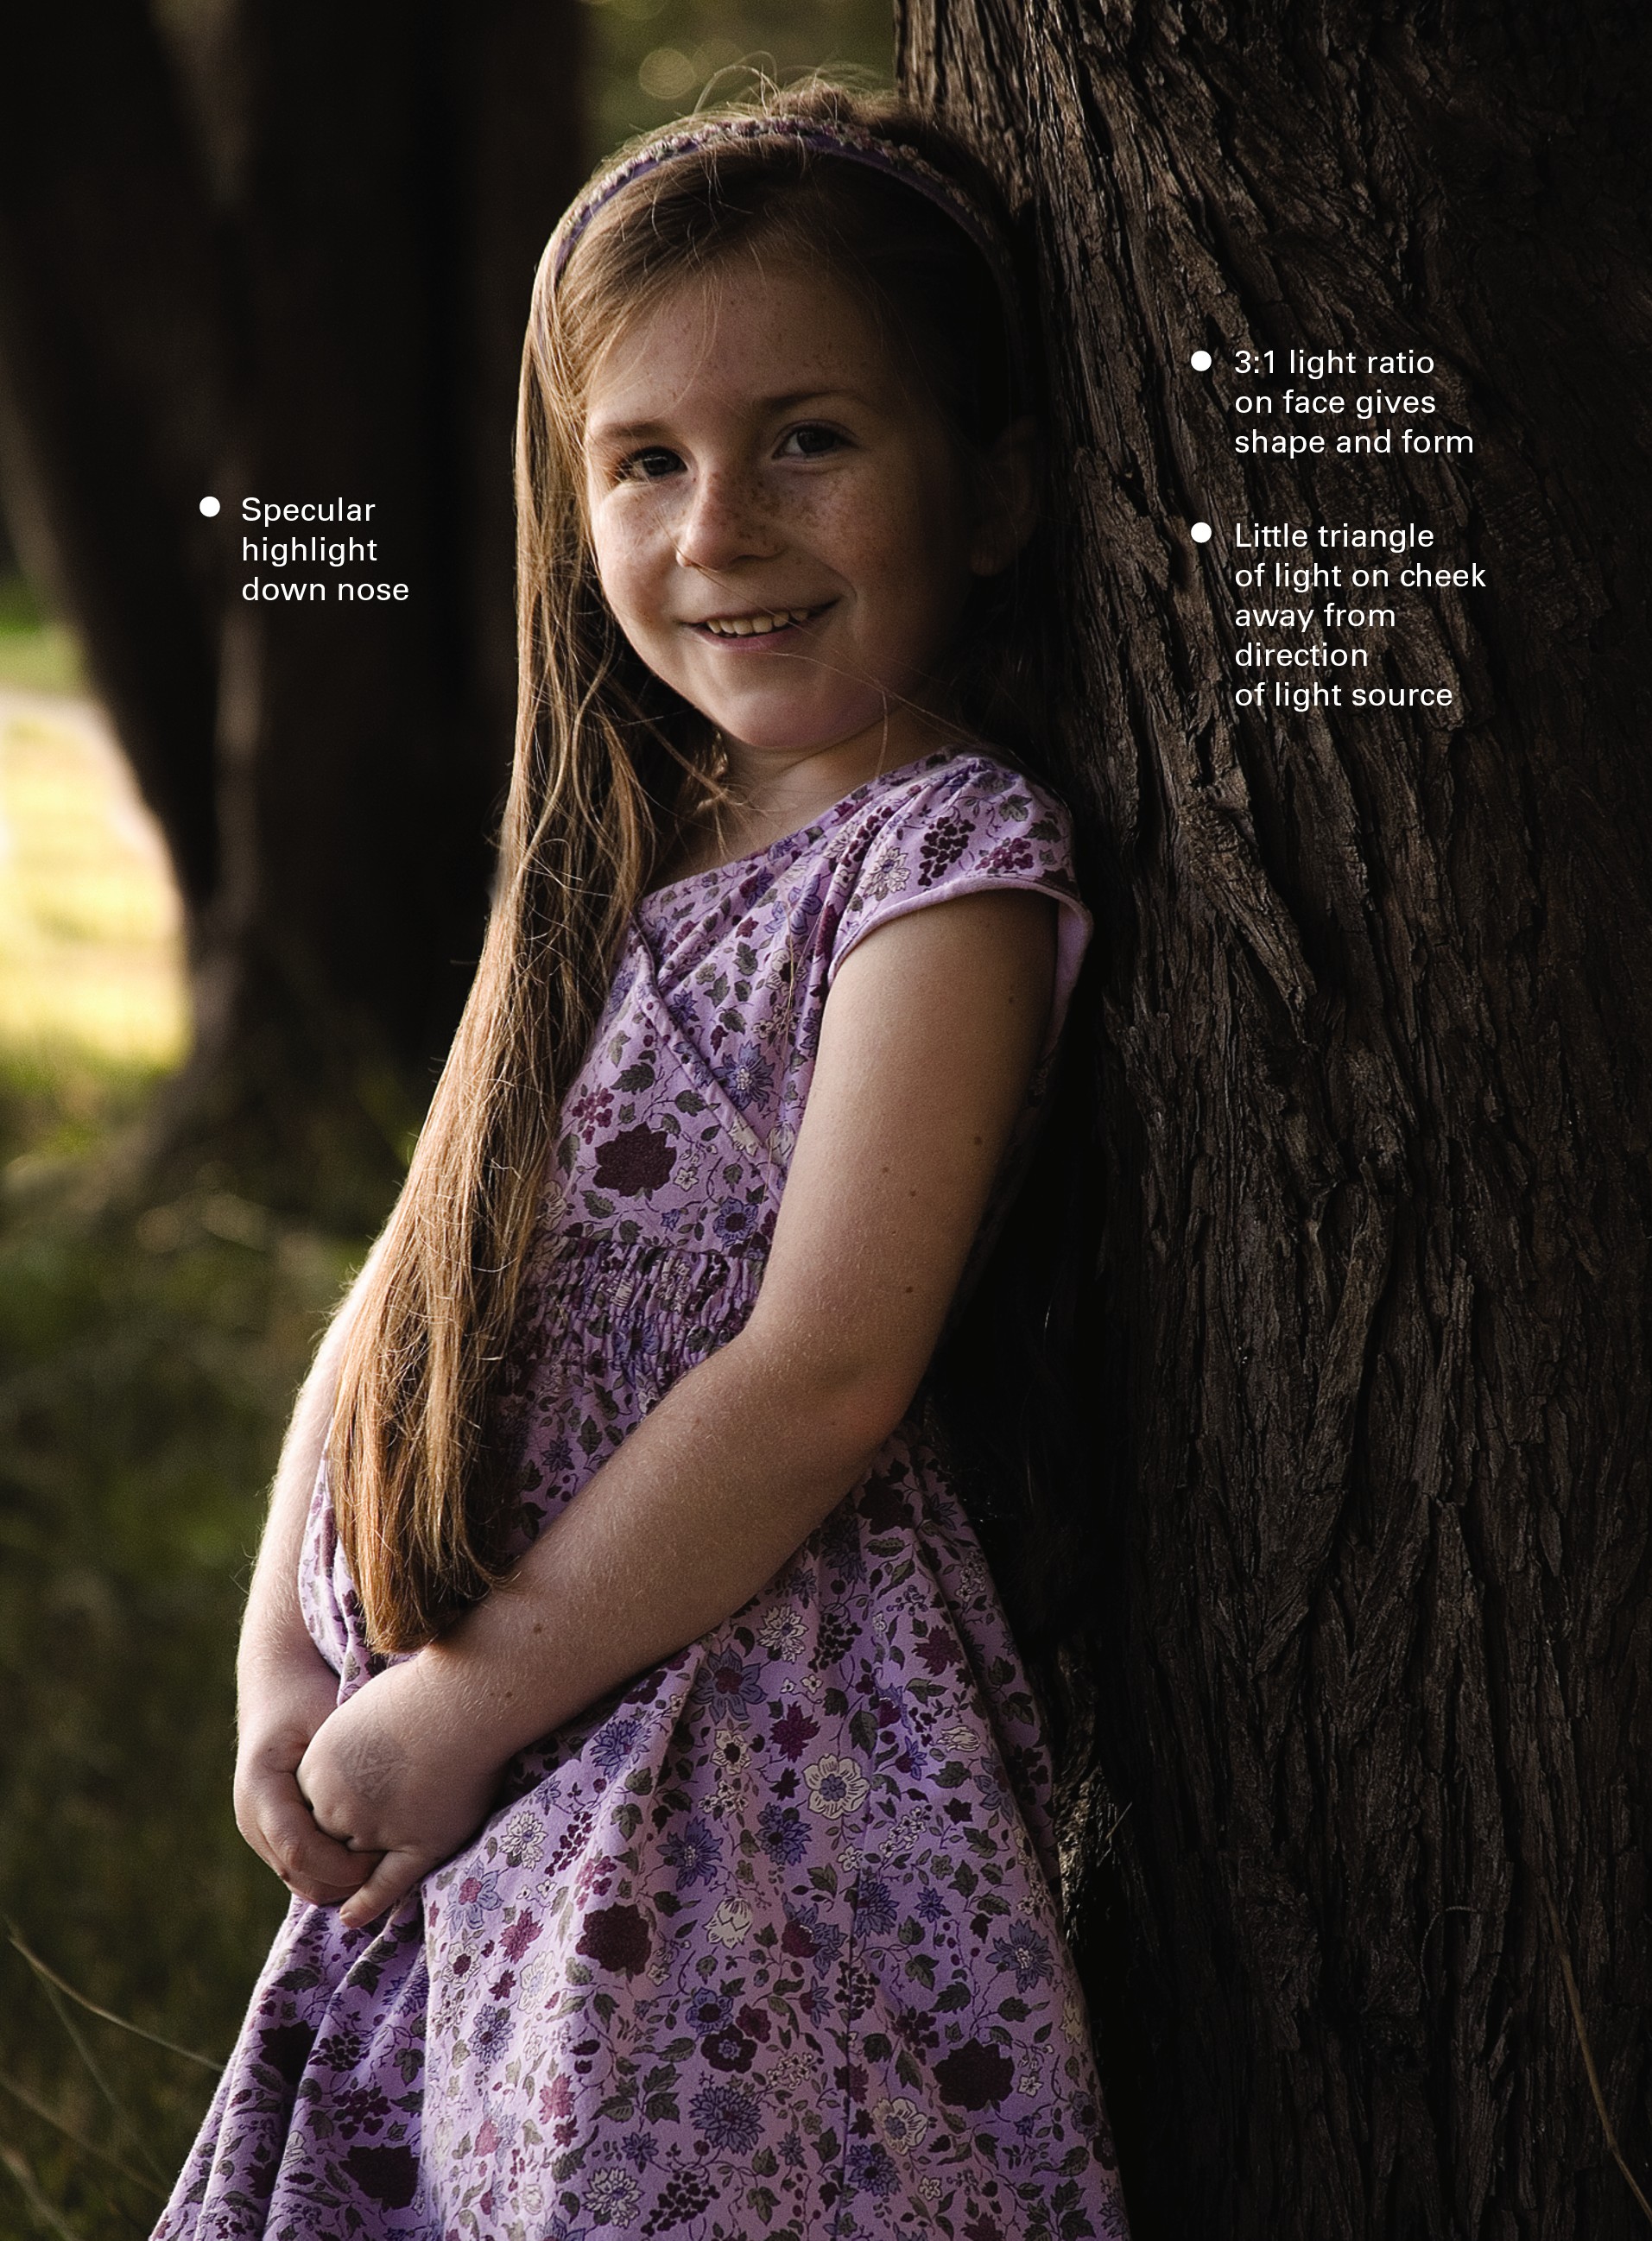
3-25
ABOUT THIS PHOTO The highlight and shadow side give Daisy’s face a more dimensional or sculpted appearance. Notice the specular highlight (brightest line of light) that comes down her nose to add contour to her face. Can you see the subtle triangle of light on her left cheek? Taken at ISO 640, f/5.6, and 1/200 second. ©Ginny Felch / www.photographingchildren.com
Using Soft Window Light
Indirect light that flows in through a window (particularly a window facing north) is an exquisite source of flattering, soft light to use when photographing children. Although northern light is known to be ideal because of the lack of direct sun, you will find light on an overcast day just as acceptable. Using indirect light rather than sunlight is important when using windows as your source.
The exception to this would be if you choose to use direct sun shining through a window to create an image with more contrast. Naturally, this would not produce a soft and diffuse, shadowless light. Also, the closer your subject is to the window, the more harsh the light can be.
Experimentation and your own artistic point of view will serve you well as you learn to use window light. However, a few things help you to control it and use it more effectively. In 3-26, you can see the direction of the light better if you are in a room that doesn’t have other windows bringing in distracting light. This gives you much better control.

3-26
ABOUT THIS PHOTO Olivia’s beautiful profile is caressed by window light, and the colors are soft and harmonious. Her expression relaxes her facial muscles, adding to the velvety look of her skin. Taken at ISO 1600, f/16, and 1/25 second. ©Kim Spilker
The images shown in 3-27 and 3-28 are examples of soft, directional light coming from nearby windows. The children look cherubic with the side light contouring their soft faces.
Of course, you might wish to practice first: Photograph an adult or very cooperative child so that you have the chance to really look at the light by moving the subject and walking around her.

3-27
ABOUT THIS PHOTO I loved using this gorgous Tuscan-looking wall as a background, and the large window beside her graced her lovely face with sculpting light. Taken at ISO 200, f/4.0, and 1/80 second. ©Ginny Felch / www.photographingchildren.com

3-28
ABOUT THIS PHOTO A fleeting, quiet moment in the life of my grandson was captured in the late afternoon window light, which beams in beautifully on his face. Taken at ISO 1250, f/5.6, and 1/125 second. ©Ginny Felch / www.photographingchildren.com
Experiment with having your subject very close to the window and then farther away, as you observe the subtle changes in how the light contours her face. Take a look at the background, making sure it is uncluttered and falls into shadow. To start with, don’t use the window as the background. See how the light comes through and highlights the side of the face closest to the window. The other side of the face falls into shadow, and as you turn the face slowly toward the light source, you see how the light gives the face shape.
As explained earlier in the chapter, ideal contouring light on a face approximates a 3:1 ratio of light to shadow. This means that there is three times the light on the area of the face closest to the window than on the shadow area of the face. Adjust your subject until you see a subtle triangular shape of light falling on the cheeks of the shadow side, as in 3-29. Again, this helps to model the face, giving it shape, depth, and texture.
If you feel that the light coming through is too bright or strong, you can hang sheer curtains or a white bed sheet over the window to diffuse the light. If the shadows are too dark on the shadow side of your subject’s face, you may want to add fill light with a reflector of some kind (you can even use a large piece of white cardboard) on that side. This catches the light coming in through the window, and you can reflect or bounce it back into the shadows. Sometimes, this technique can be used to create a little glint of light in the eyes called catch lights, which can make your subject’s eyes come alive.
Above all, experiment. Now that you have some of the basics regarding window light down, put them into practice: Move your subject, turn your subject, walk around her, have her look at you, look out the window, look away from the window, and so on. Take a photograph from a standing position, then at the same level as the subject’s eyes, and then from below. You get to decide what appeals to you; that is the beauty of it. Don’t forget to look for those beautiful reflections in the window.

3-29
ABOUT THIS PHOTO The photographer took advantage of light from a bedroom window and a very simple background to capture a contemporary portrait of siblings with their dog. Taken at ISO 800, f/3.5, and 1/200 second. ©Jen Sherrick / www.jensherrickphotography.com
Knowing When to Compromise
As you might have gathered by now, the inspired and intentional use of light when photographing children has an enormous visual and emotional impact on your final image, as in 3-30. It is something to seek and to recognize. But what if the light isn’t perfect or something great is happening and there is no unusual light to be found?
At these times it is helpful to remember the work of renowned photographer Henri Cartier-Bresson, who is famous for what he termed the decisive moment, which is that fraction of a second when visual and narrative elements come together, and reveal the intention or attitude of the photographer.

3-30
ABOUT THIS PHOTO Learning to notice light in your environment allows you to use that light to tell a story, such as how the warmth of the window light in this photo of siblings welcoming their new baby sister matches the subjects’ emotions. Taken at ISO 800, f/5.0, and 1/125 second. ©Allison Tyler Jones / www.atjphoto.com
Children’s photographers can learn a great deal about observing those decisive moments by further researching his work. Cartier-Bresson’s decisive moment can be elusive, but it is worth striving for that moment when expression, light, and composition all fall together in one glorious moment. As you progress, you figure out exactly when that is. When it happens, simply express gratitude and run with it.
Is all else a compromise? Absolutely not! If you capture a marvelous expression or a great composition and your lighting isn’t spectacular, you can still make a successful portrait.
You have a secret now embedded in your deepest creative recesses that enables you to recognize when you see dramatic light and you also have some clues as to where you might start looking.
Children’s portraiture will always be an art of the soul and of the heart. First, keep the child and his or her personality and well-being in mind; then using the tools of light and shadow, convey the mood and emotion you want the viewer to feel about this child.
Assignment
And Then There Was Light!
For this assignment, choose one of the lighting situations described in this chapter. Choose one that inspired you or caught your attention as you were reading along, so that you enjoy the process of discovery. Create a portrait of a child or children using light. In this photograph, make a statement about light and your use of it. Make sure that your flash is turned off or that you set your ISO high enough so the flash does not fire so that you can see and use the available light in the setting.
My example, in this photograph of my grandson, a large window to his left provides a soft directional light, giving his face shape, form, and texture. I favor window light if the quality is as nice as it is here. Taken at ISO 400, f/4.0, and 1/60 second.

©Ginny Felch / www.photographingchildren.com
Remember to visit www.pwsbooks.com after you complete this assignment and share your favorite photo! It’s a community of enthusiastic photographers and a great place to view what other readers have created. You can also post comments, read encouraging suggestions, and get feedback.