

Chapter 2: The Look of a Photograph
You Don’t Need to Know Everything
Going Beyond Automatic: Exposure Basics
Shutter Speed and Freezing Motion
Aperture and Depth of Field
ISO
Using Program Modes
What Do You Want?
While intimidating at first, learning the more technical aspects of photography and how to use your camera will, in the end, give you more tools at your fingertips. These tools enable you to repeat those lucky shots you get from time to time and, later on, to realize your creative vision for photographing children.
If you are a beginner, try working through the assignments at the end of each chapter using your camera’s automatic mode and autofocus. Then, when you feel ready for the next challenge, you can gain more control by placing your camera into specific program modes or priority modes. If you have a point-and-shoot camera that limits your choices, you can still apply much of the information in this book. As you read through the book, notice that under each photograph there is a description of the image as well as technical information provided that gives you information as to how the photographer got that shot, as in 2-1. This chapter helps you understand what those numbers mean and how they can affect the look of every photograph you take.
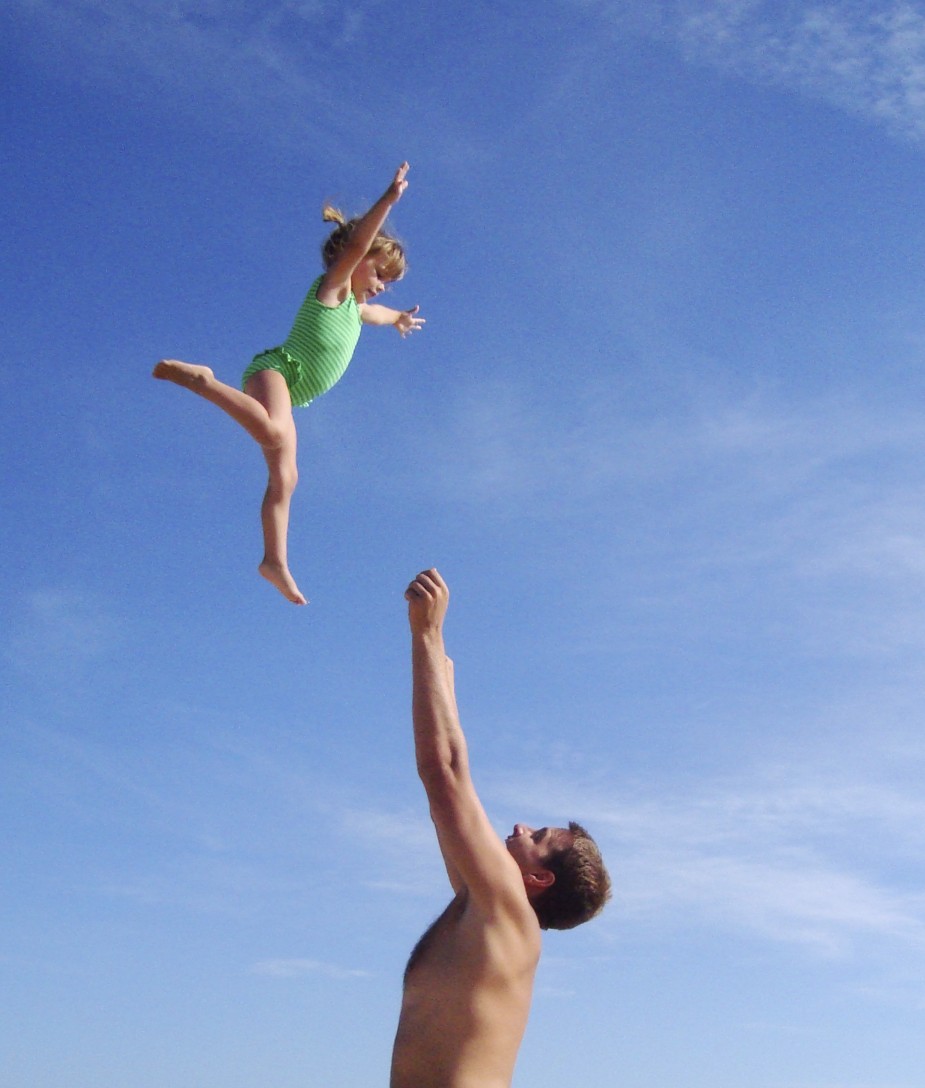
2-1
ABOUT THIS PHOTO In her greatest ballerina form, this girl was caught midair, as her dad waits carefully in anticipation. The camera was in Program mode. Taken at ISO 400, f/7.1, and 1/1600 second. ©Sarah Felch
You Don’t Need to Know Everything
You don’t have to know everything about the mechanics of your camera to make great improvements in your photography. If you do nothing else, both learning to see and recognize beautiful light and working on your compositional skills will greatly improve your work. However, if you plan to pursue photography as a more serious hobby or are considering making photography of children a sideline or full-time career, learning the more in-depth workings of your camera will help you to achieve the photographs you envision.
“Only a fraction of the camera’s possibilities interests me — the marvelous mixture of emotion and geometry, together in a single instant.” ~Henri Cartier-Bresson, Aperture 129, Fall 1992
Beginning photographers are consistently befuddled about the issues of exposure, depth of field, and settings on their cameras. While new technology makes it easier than ever to make a proper exposure, the bells and whistles that come on today’s cameras can further compound the problem.
“When asked what camera he used: ‘You don’t ask an artist what paints and brushes he uses. You don’t ask a writer what typewriter he uses — anyway, I regard the camera as an aid.’” ~Man Ray
Knowing that this part is confusing to just about everyone should help you feel a little better. However, there is no substitute for practice, and the more you practice with your camera settings, the quicker you learn to use your camera. If you have already advanced to other modes (besides Auto) on your camera, the following information should help you to better understand what you are doing and why.
Going Beyond Automatic: Exposure Basics
If you are using Auto mode, you may have discovered that it often results in a photograph with everything in focus — foreground and background. When Auto isn’t giving you the results you’re looking for, you may need to change the settings on your camera to capture your subject differently.
Cameras come from their manufacturers with set defaults that allow them to create a good image in most situations. However, there are times when you need to do something more specific to the settings to accommodate the situation in which you are shooting. For example, maybe you want to capture your child dancing in a rain puddle and freeze every single drop of water in the splashes she’s making. Maybe you want to get a shot of your boys running through a meadow of grass with the golden light in their hair but still capture light in their faces. Both of these situations would present some problems for the typical camera in Auto mode.
If you are using Auto mode, you may have also discovered that it often results in a photograph with everything in focus — foreground and background — which is the default choice made by the computer elements in your camera. What if you want to make an image more like some in this book, where the subject is in focus and the background is blurred? You can achieve the image you want in all sorts of situations by learning more about exposure.
Exposure is what happens when the shutter on your lens opens and lets light into your camera, exposing the film or digital sensor to create an image.
There are three key elements to exposure:
• Shutter speed
• Aperture
• ISO
Each of these elements (when set correctly) creates a properly exposed image. Understanding these elements so you can use them in creative ways can dramatically change the look of a photograph.
Shutter Speed and Freezing Motion
Shutter speed is relatively easy to understand. It is, essentially, time. Specifically, it is the amount of time that your shutter is open to light in order to record an image on your camera’s digital sensor. Shutter speeds for photographing children are usually in the range of 1/60–1/500 second.
How long the shutter is open determines whether the image will be tack sharp or soft and blurry with regard to the movement of your subject. A fast shutter speed, such as 1/1000 second, freezes movement, whereas a slow shutter speed, such as 1/15 second, blurs movement. The longer the shutter is open, the more likely it is that movement will be recorded. The faster the shutter speed, the more likely it is that any movement will be frozen.
In most situations, you want your subject to be sharp and in focus so your shutter speed needs to be fast enough to accomplish this. For example, if you want to freeze the movement of your son at the peak of his jump off the diving board, a fast shutter speed is called for. If, instead, you’d like to capture the blur of the movement of a child kicking sand (see 2-5), you might want to try a slower shutter speed. A fast shutter speed of 1/320 second was used to capture the girls in 2-2 playing ring-around-the rosy.
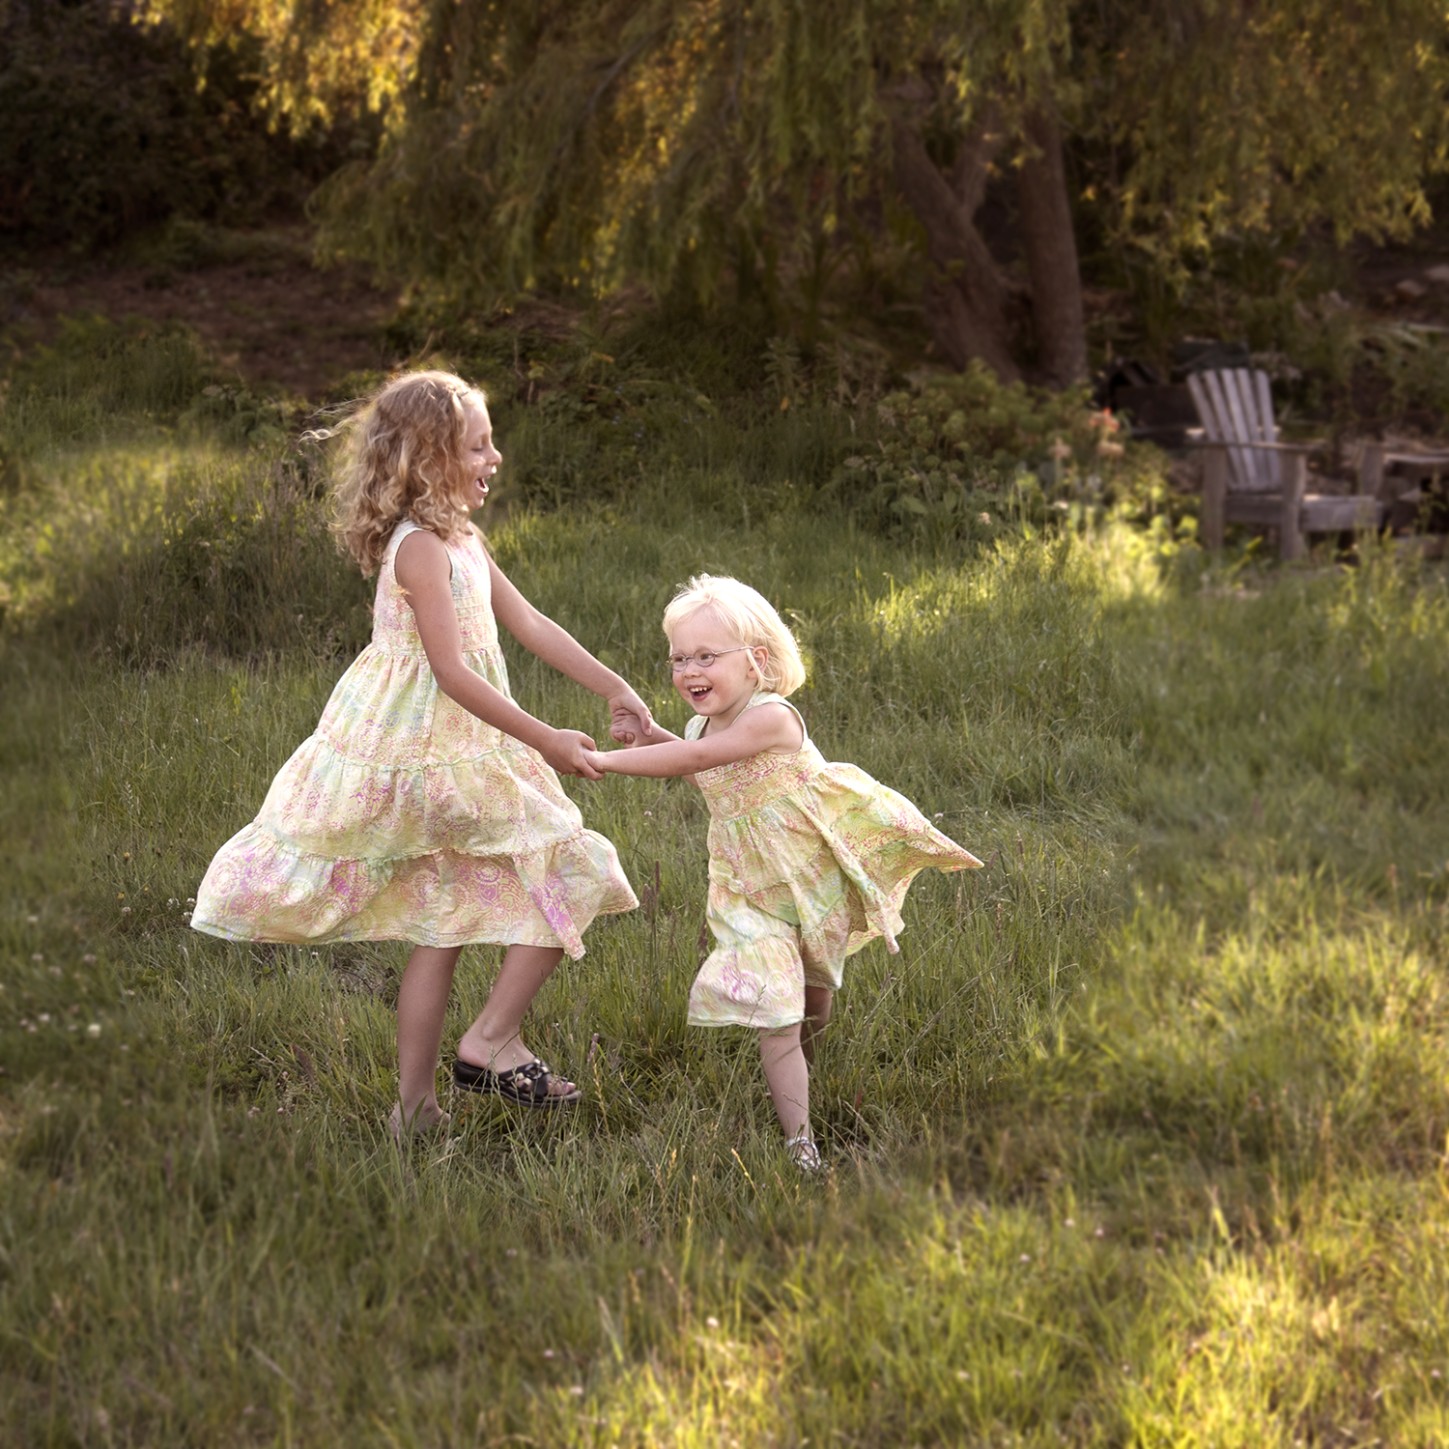
2-2
ABOUT THIS PHOTO I chose the shutter speed of 1/320 second to freeze these sisters playing ring-a-round-the rosy. Taken at ISO 400, f/4.5, and 1/320 second. ©Ginny Felch / www.photographingchildren.com
Movement
Choosing your shutter speed then, is based on movement. Is your subject a wiggly preschooler or a more mature adolescent? The too-slow shutter speed and (as in 2-3), can cause unwanted blurring. Remember, your subject isn’t the only person who’s moving. If you are holding the camera in your hands (also known as shooting handheld) you have to take your own movement into consideration. Many shots have been ruined due to camera shake, which is when the photographer moves, causing the camera to shake resulting in a blurry photo.
2-3
ABOUT THIS PHOTO The shutter speed of 1/60 second was too slow to freeze the droplet of water that the little girl was kicking up and camera shake caused the rest of the photo to be out of focus. Taken at ISO 100, f/2.8, and 1/60 second. ©Allison Tyler Jones / atjphoto.com
If you examine the blurry photo carefully, it’s usually easy to tell when there is camera movement versus a moving subject. Camera shake blurs the whole photo; in a photograph with a moving subject; only the part of the subject that is moving is blurred.
Inexperienced photographers usually cannot hold a camera steadily with a shutter speed of less than 1/60 second and might be better off using 1/100 second or faster. In other words, if your camera (in an Auto mode) chooses 1/60 second or faster, you should be able to hold your camera steadily without a tripod, which is explained in more detail in the next section. If your camera selects a shutter speed below 1/60 second and you don’t have a tripod, try the following tricks to steady your camera:
• Take a deep breath, let it go, and as you exhale, press the shutter release button.
• Rest or lean the camera against a conveniently located still surface such as a fence post or wall.
• Hold your arms very tightly against your body and widen your stance, making your body into a kind of tripod.
Some camera lenses offer “image stabilization,” a device in the lens that compensates for camera movement and the resulting blur. This device is very handy for photographing in low-light conditions and prevents accidental blurring.
Because this is a book about photographing children, it is assumed that, for the most part, you will be handholding your camera. Working with tripods and chasing toddlers don’t often mix.
Shutter Speed Tips
Here are some shutter speed tips for when you are handholding your camera, assuming you are using lenses commonly used for portraits, i.e. 50mm, 85mm and 100mm:
• Too slow for handholding (that is, you need a tripod unless you are experienced or have a very steady hand): 1/4, 1/8, 1/15, 1/30 second
• 1/60 second is borderline if you don’t have steady hands
• Fast enough for hand-holding: 1/125, 1/250, 1/500, 1/1000, 1/1500 second
• To freeze movement: 1/250, 1/500, 1/1000, 1/1500 second
Shutter speed selection
A good rule of thumb for choosing a shutter speed that ensures your subject is in focus is to select a shutter speed that is at least the reciprocal of the lens’ focal length. On the front of your lens you will find numbers such as 18-70mm or 50mm. For example, if you are shooting with a 50mm lens and you want your subject in focus, you don’t want to shoot with a shutter speed any slower than 1/60 second. You can always set a faster shutter speed; you just don’t want to go slower because there is a greater chance of blurring the image. If you have an 18-70mm zoom lens, you should be shooting with a shutter speed of no less than 1/100 or 1/125 second; either of these is fine. Determine the focal length of your lens, such as 50mm, and set your shutter speed accordingly. If you aren’t sure what the focal length is, you can find it printed on the barrel of your lens.
Table 2-1 offers some shutter speed settings that are a good starting point to achieve non-blurry photos in a variety of child photography situations.
Table 2-1
Common Shutter Speed Settings
|
Situation/Subject |
Shutter Speed |
|
Sleeping baby |
1/60 to 1/125 |
|
Roaming toddler |
1/125 to 1/250 |
|
Kids running |
1/250 to 1/500 |
|
Child on swing |
1/500 to 1/1000 |
Freezing movement
If you are photographing fast-moving subjects such as children swinging, running, riding, and so on, you might need an even faster shutter speed to freeze the movement. Shutter speeds of 1/250, 1/500, 1/1000 second, and faster stop almost any action. The movement in the photo shown in 2-1 of a little girl being tossed into the air by her dad was frozen by a fast shutter speed. In 2-4, the ebullient little girl’s jumping movement was also stopped by a fast shutter speed.
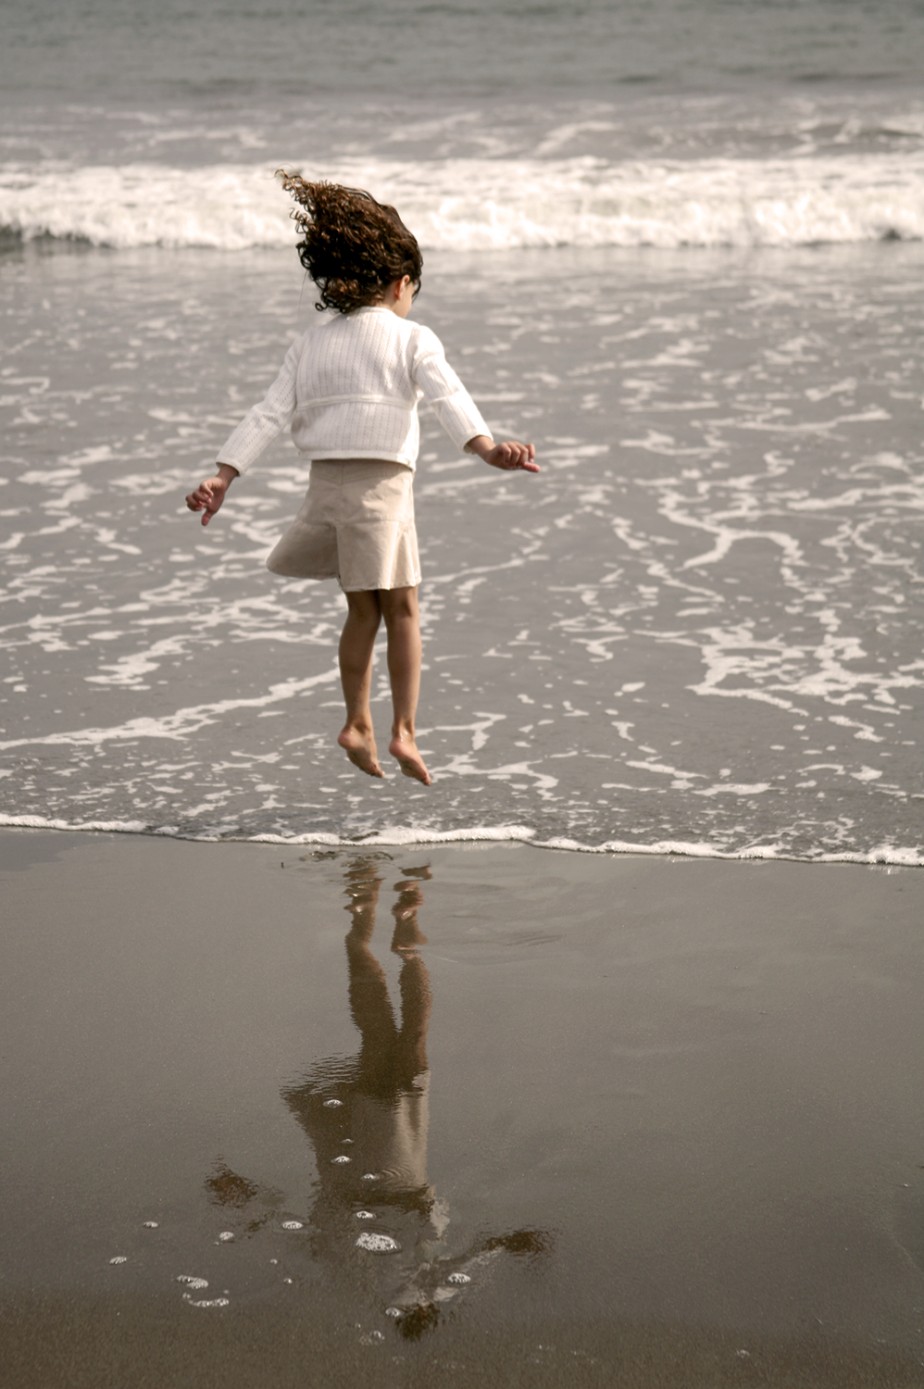
2-4
ABOUT THIS PHOTO I used a shutter speed that was fast enough to freeze the motion of this exuberant little girl as she jumped in the surf. Taken at ISO 100, f/5.0, and 1/1000 second. ©Ginny Felch / www.photographingchildren.com
An easy way to remember which way f-stops go is to think of f-stop numbers as fractions — where f/2.8 becomes 1/2.8 and f/11 becomes 1/11 — then it makes more sense that the smaller numbers are larger openings.
Blurring movement
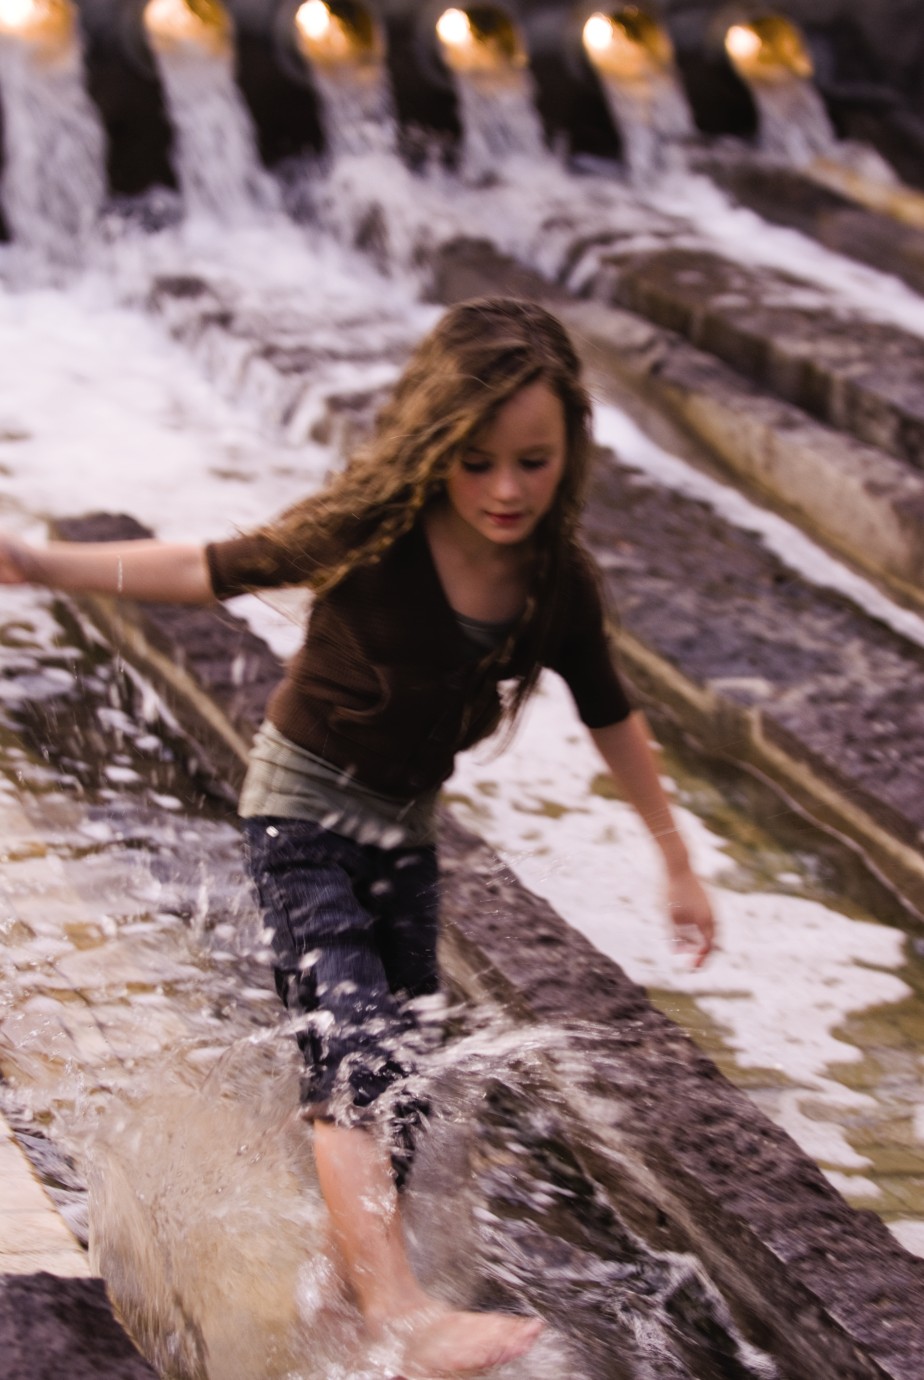
If you’re feeling a bit more adventurous, you might want to try blurring the movement of your subject on purpose for a creative effect. Kids on a playground or a little girl kicking sand at the beach, as in 2-5, are all good subjects for trying your hand at blurring movement in your photos. Choose a slower shutter speed but not too slow; you want the moving subject to blur but everything else to be in focus.
Aperture
In photography, aperture refers to the opening in the lens of your camera. When the shutter is released, the aperture determines how much light is allowed to come through the lens into your camera. Aperture is measured in f-stops, such as f/2.8, f/5.6, f/8, f/11, f/16, and so on. The smaller the number, the larger the opening in the lens — f/2.8 is a much larger opening than f/16 (see 2-6 and 2-7).
“Photographs are not made by cameras, which are only tools. We make images with our hearts and minds. What must be brought to photography is an ever-open and seeking mind.” ~Arnold Newman
Thinking about shutter speed and aperture together is easier when you think of your eyes. Your eyelid is the shutter of your eye, and it is either open or closed. Your pupil is the aperture of your eye. When it’s bright outside, your pupil contracts (or closes down) to let less light into your eye. When light is low, your pupil dilates (opens up), letting in the maximum possible light so you can see. What do most people do when they can’t see something very well? They squint. They are closing down the aperture of their eye to allow more of what they are looking at to be in focus. This is an easy way to remember how aperture works when the numbers get confusing.

2-5
ABOUT THIS PHOTO Photographing children always provides the opportunity to capture action; here the slow shutter speed blurred the kicking, sandy feet to liven up the photograph. Taken at ISO 400, f/4.5, and 1/30 second. ©Zofia Waig / www.zofiaphoto.com
Now that you know what aperture is technically, how do you think it can affect your photograph? It is really quite simple. Your choice of aperture determines just how much of your photograph is actually in focus. That brings us to depth of field.
The aperture or f-stop you choose determines the depth of field in your photograph. Depth of field is the field or area in the photograph that is in focus. Choosing a small aperture, such as f/16 or f/22, creates a photograph with everything in focus from front to back, as in 2-8. This is called a wide or deep depth of field.
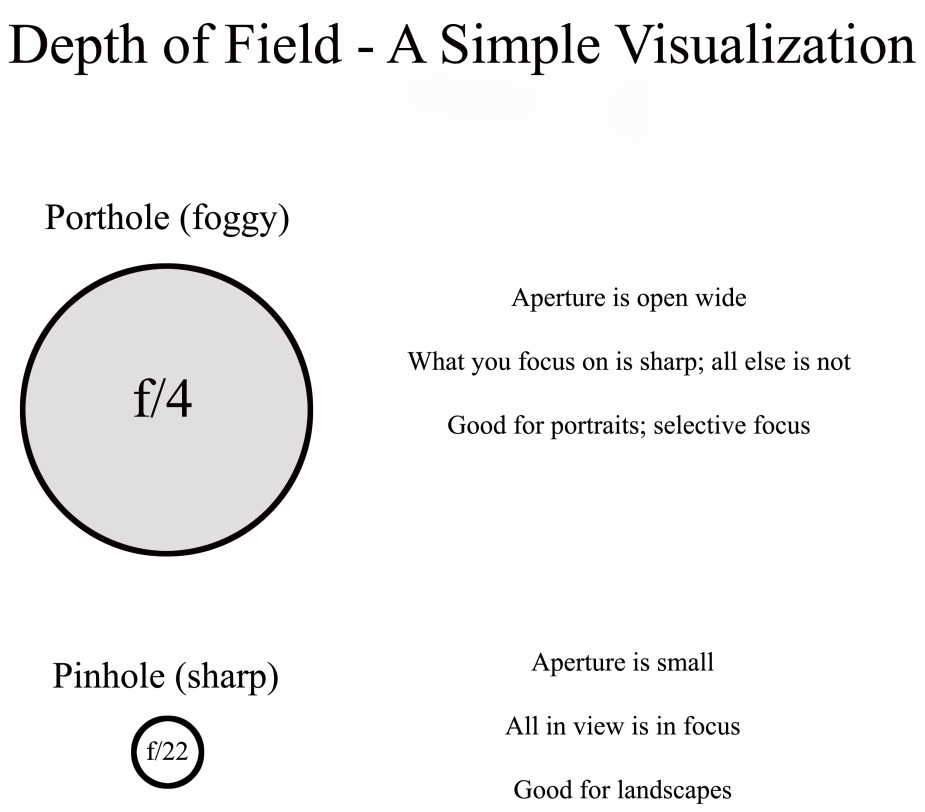
2-6
ABOUT THIS FIGURE This very simple diagram reveals the relative sizes of the aperture openings of the lens, or f/stops. Notice that the larger the opening, the smaller the number – because the number is actually a fraction.
A photograph where just the family is in focus but everything else in the foreground and background is out of focus would have a narrow or shallow depth of field, as in 2-9. Have you noticed that many of the portraits that grab your eye are not in focus throughout? In these cases, the subjects are in focus, but the foreground and background are out of focus. This is how your eyes perceive things as well. If you are looking at someone, the foreground and the background are not sharp. Aperture choice gives the photographer the ability to show the viewer what is important using focus and lack thereof.
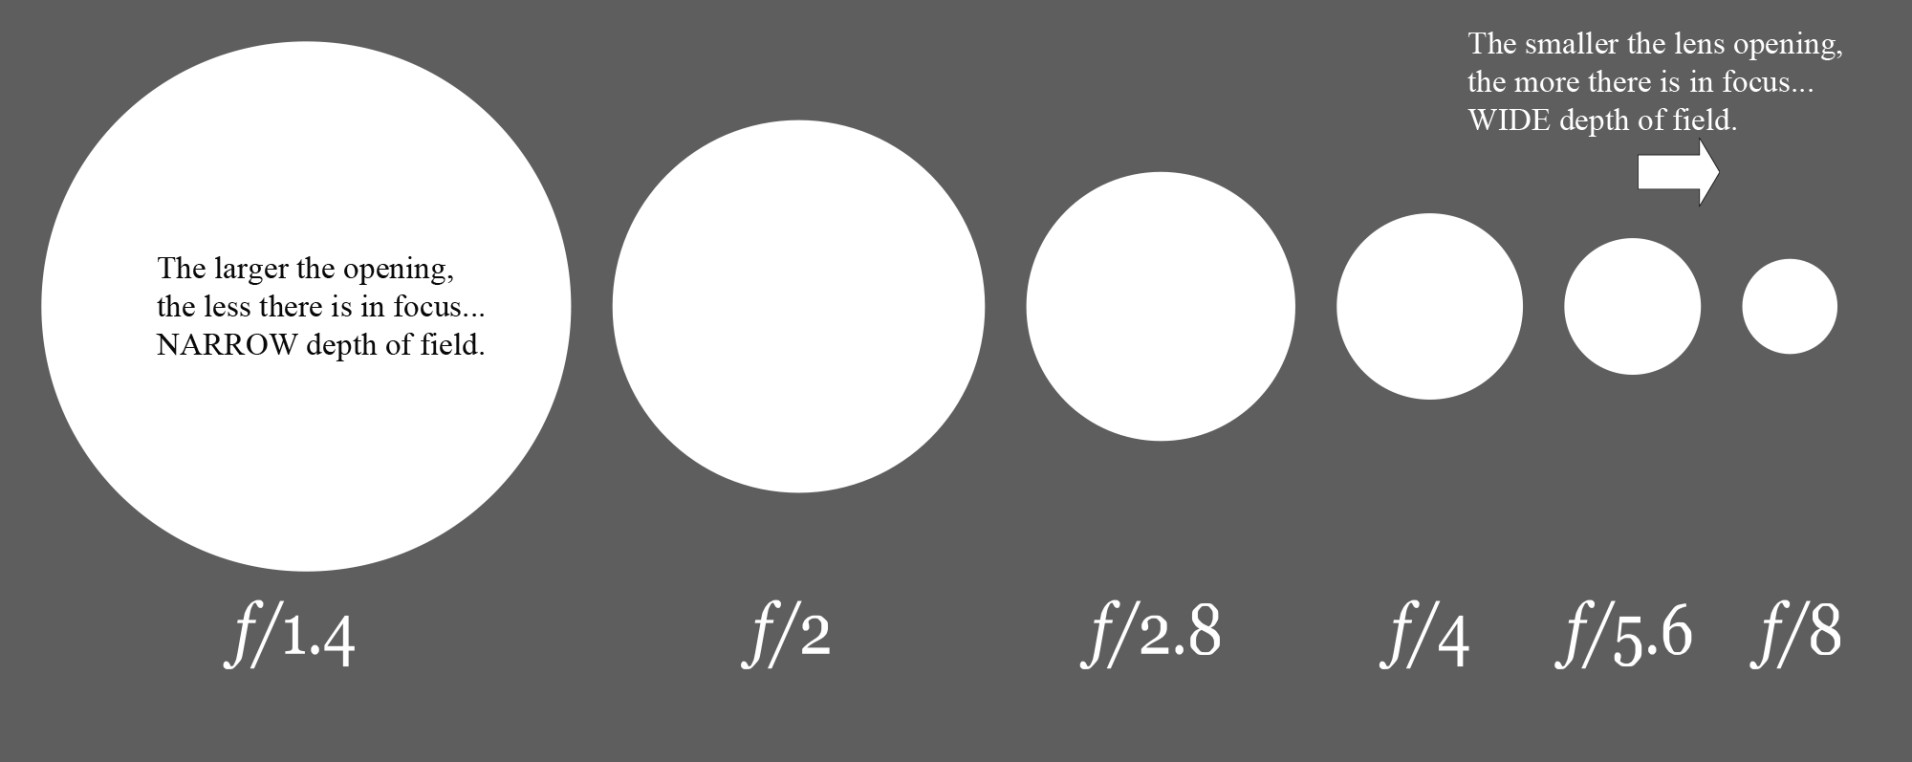
2-7
ABOUT THIS FIGURE If you can picture in your mind the lens opening at larger apertures versus the lens opening at smaller apertures as in this figure, it will be easier for you to understand how to set your camera.
Here are few more important items to know regarding depth of field:
• Wide depth of field. Apertures of f/8 and smaller (f/11, f/16, f/22) all produce a photo with a reasonably wide depth of field. These settings are perfect for shots where you want to include the environment as part of the image, such as when photographing a child in his room and including the detail of all the toys.
A wider depth of field is also good when shooting groups of people, such as a family, so that everyone in the photograph is in focus from the front row to the back. When you see images of children at a distance or portraits in which all things in the image are in focus, the photographer is often using smaller apertures of f/11 to f/16 or smaller, which results in a wide depth of field. This technique is often referred to as shooting stopped down, meaning the aperture of the lens is smaller and more closed down.
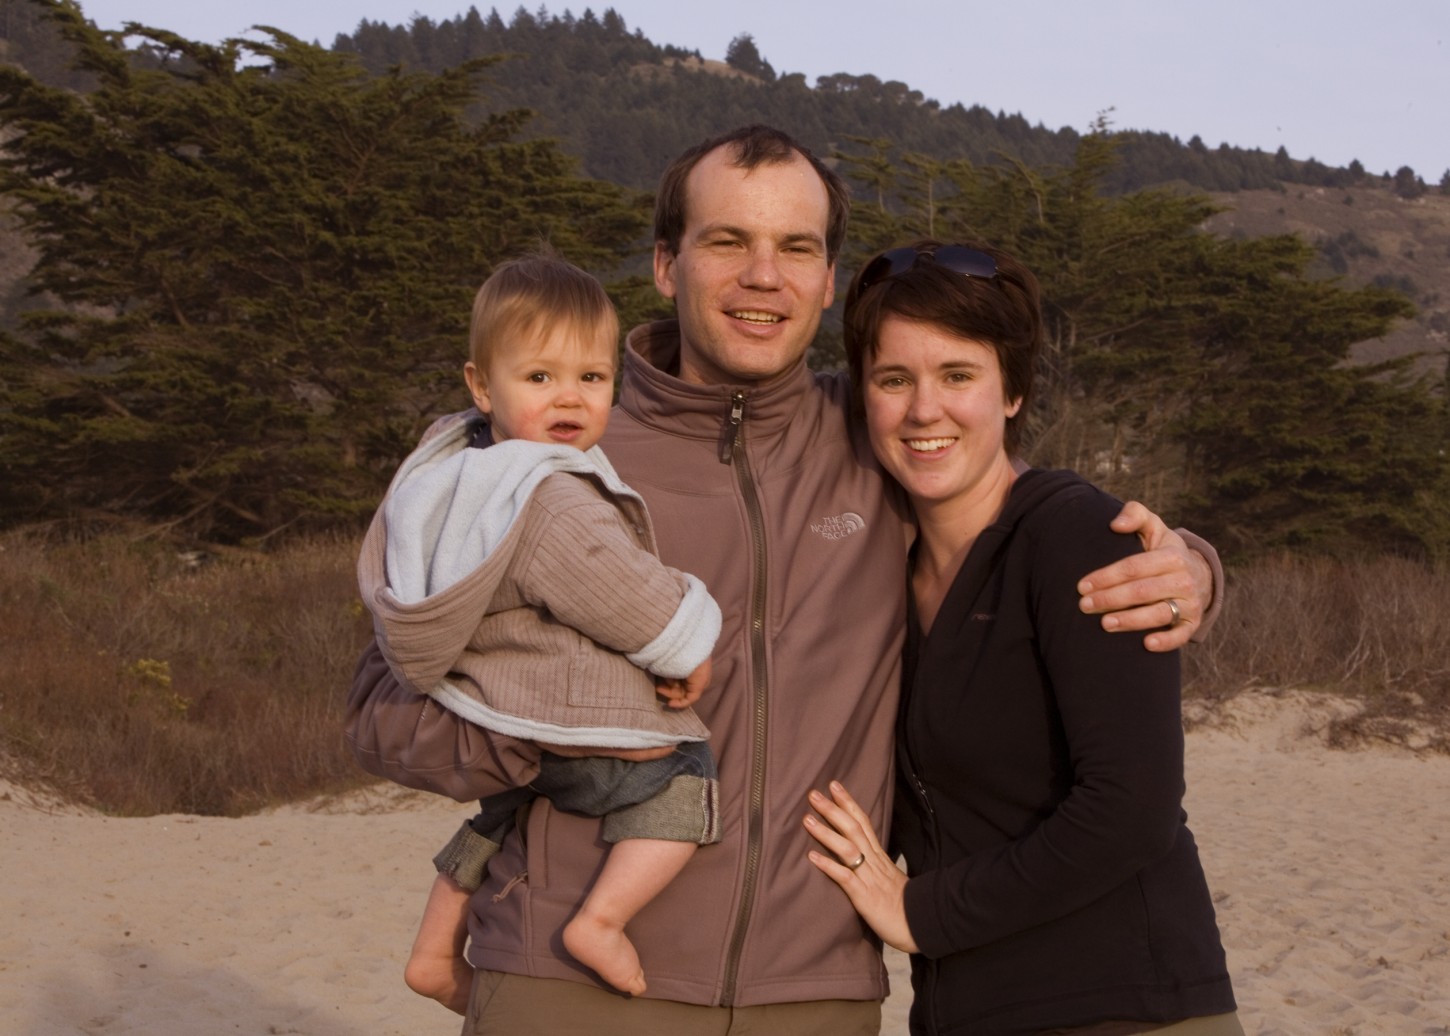
2-8
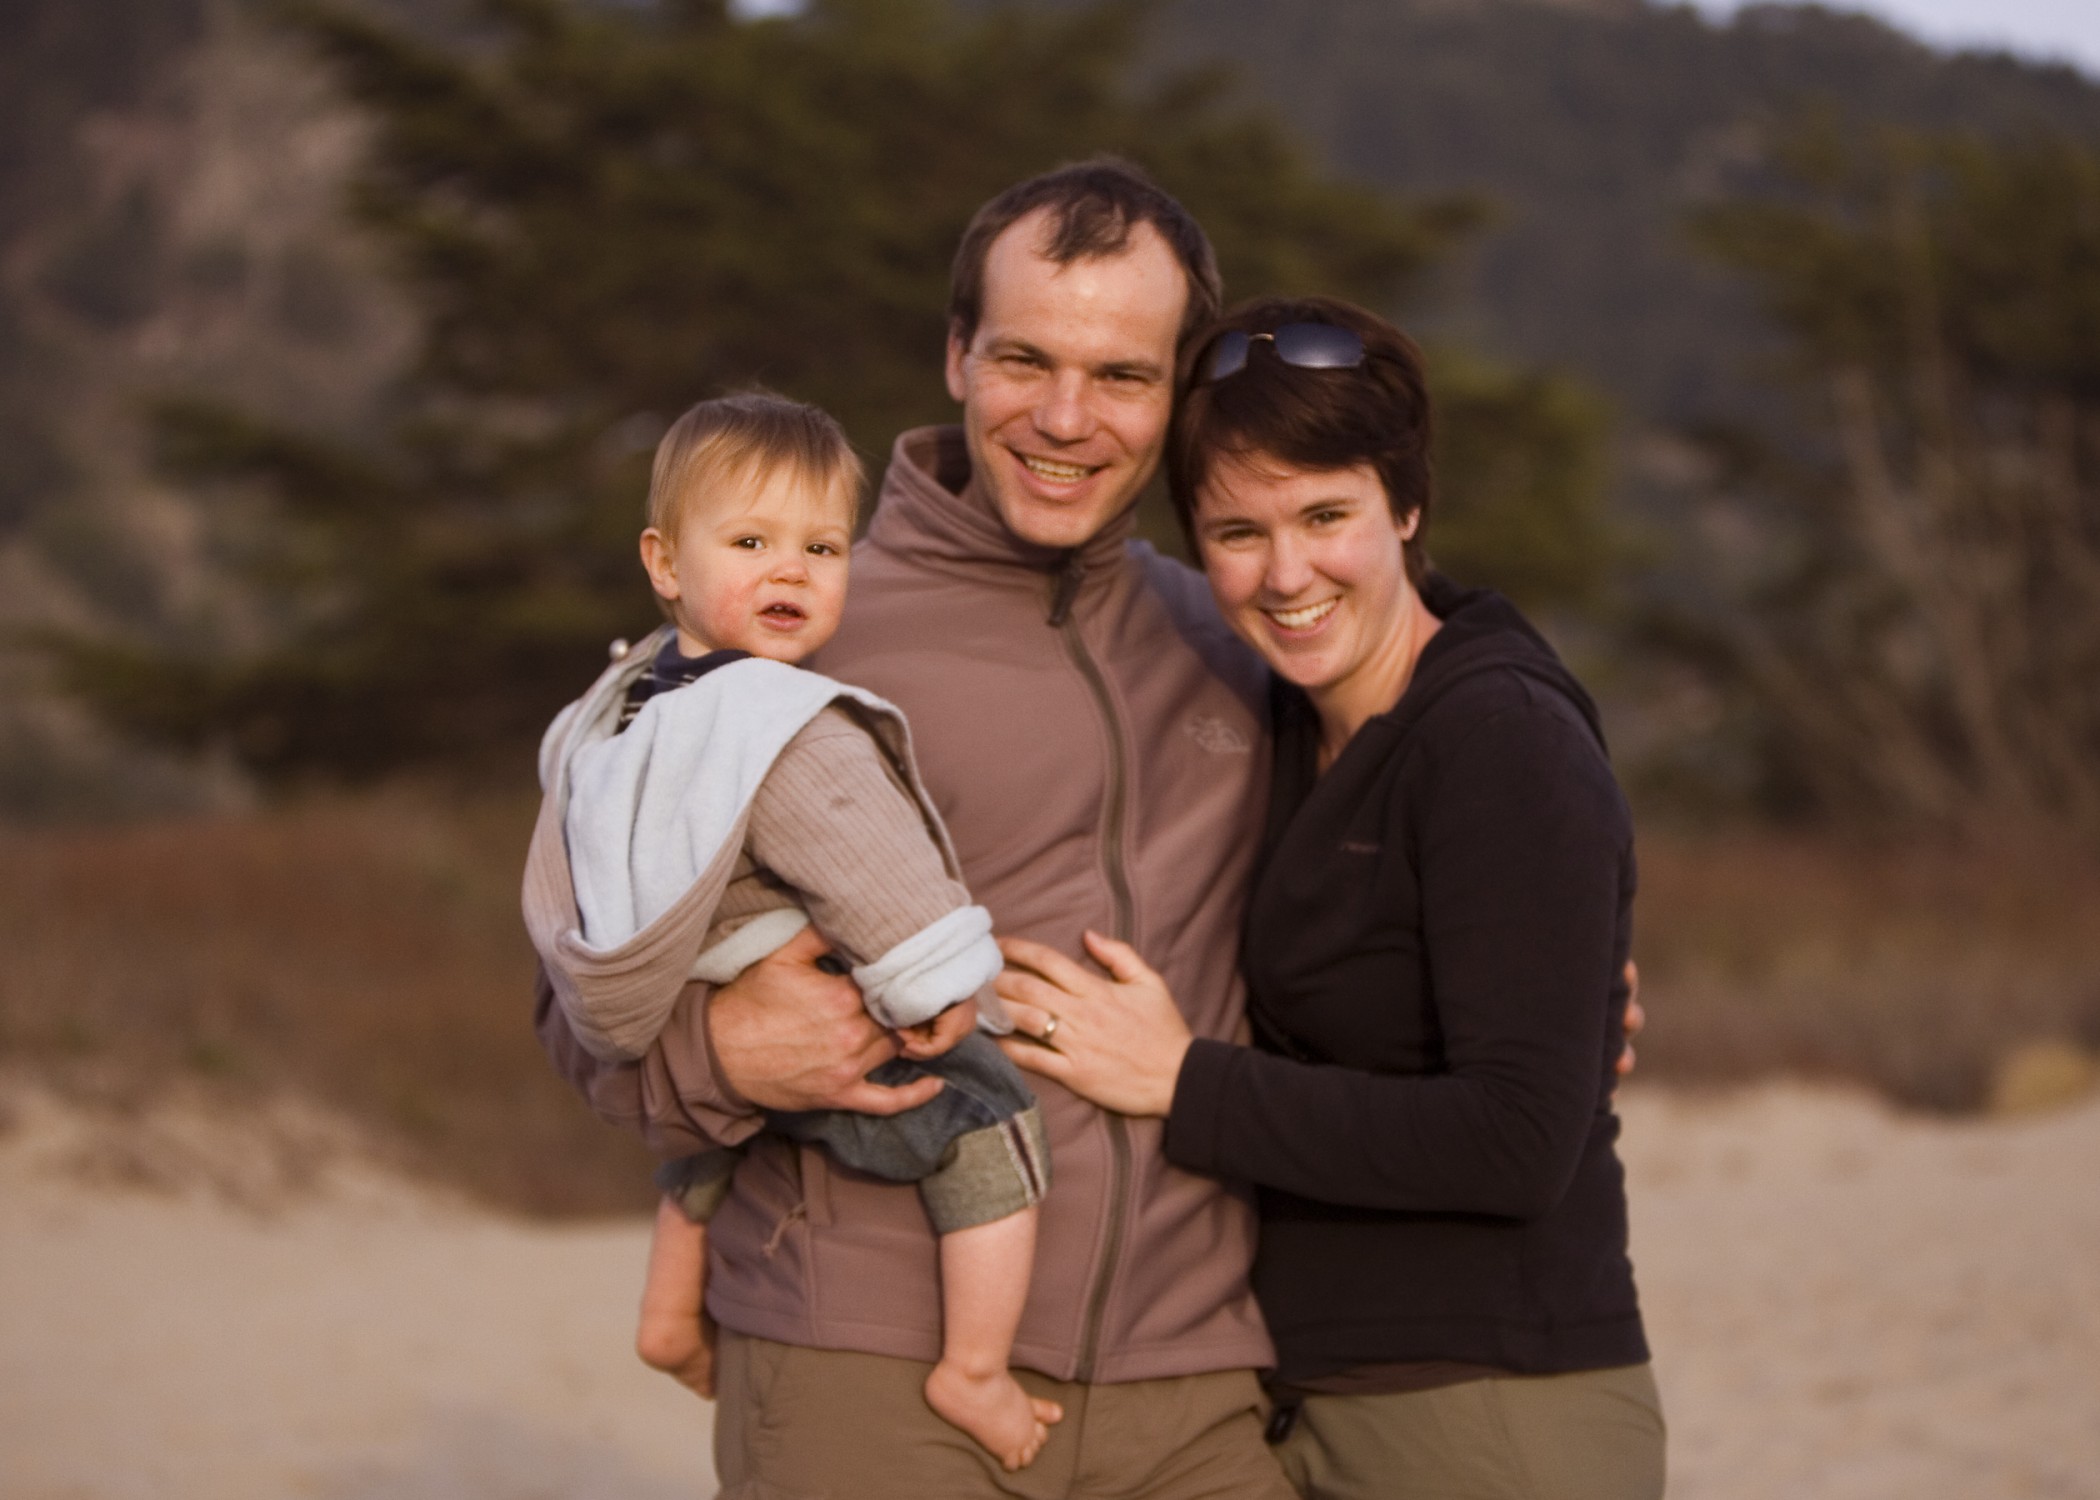
2-9
ABOUT THESE PHOTOS In 2-8 you can see a photo of a young family I photographed at the beach using an aperture of f/22 at 1/50 second, giving focus throughout. In 2-9, I photographed the same family using an aperture f/2.8 at 1/320 second, causing the subjects to be in focus and all else blurred. Taken at ISO 400, f/4.5, and 1/320 second. ©Ginny Felch / www.photographingchildren.com
• Narrow depth of field. Apertures of f/2.8, f/2.0, and even f/1.4 or f/1.2 are not uncommon in narrow depth of field photos. These settings work well for isolating your subject from the background, as in 2-10. The f-stops used on most of the photographs in this book were anywhere from f/1.4 to f/5.6. That isn’t much of a range considering that there are so many other possibilities (f/8, f/11, f/16, f/22, f/32, and some stops in between).
Throughout the book, you see many portraits of children where you can clearly see their faces, yet the background is blurred. In these instances, the photographer was using larger apertures, such as f/3.5 to f/2.8, or larger. The larger apertures create a narrow depth of field. This technique is often called shooting wide open, meaning the aperture is as wide open as it can be. The photo in 2-10 was shot wide open with an aperture of f/3.5. The newborn is in focus and her proud big sister watches with amusement in the background. Similarly, in 2-11, the photographer used f/2 to blur background and sharpen the very handsome little cycler.
Choose which aperture/f-stop you want to use. You can see that the larger f-stops (smaller numbers) — that is, f/4 and f/5.6 — give you a pleasing depth of field for portraits. Your best way of deciding which one to use is through experimentation.
Manipulate your depth of field by playing with your aperture settings. Shoot the same subject in the same setting and only change your aperture for each shot. This gives you an instant library of how the aperture of your lens affects your images.
ISO
On most digital cameras there is a button or menu setting that enables you to choose the ISO setting. ISO, which stands for International Organization for Standardization, refers to the light sensitivity of your camera. ISO ratings originally applied to film speeds, such as 200, 400, and so on. Just like film, the higher the number rating, the more sensitive the sensor on your digital camera is to light. For example, if you need your camera to be very sensitive to light, such as when you are shooting in low light, then you’d want to choose an ISO of 800 or higher. The ISO setting is often the easiest variable to manipulate when you need a specific aperture and shutter speed combination.
Generally speaking, in order to keep your photographs crisp and free of noise, you should use the lowest ISO you can while still keeping your preferred shutter speed and aperture. On most cameras, ISO 100 is the lowest setting. When you use higher ISO settings — generally 800 and higher — you begin to see noise in your images, which gives a grainy appearance.
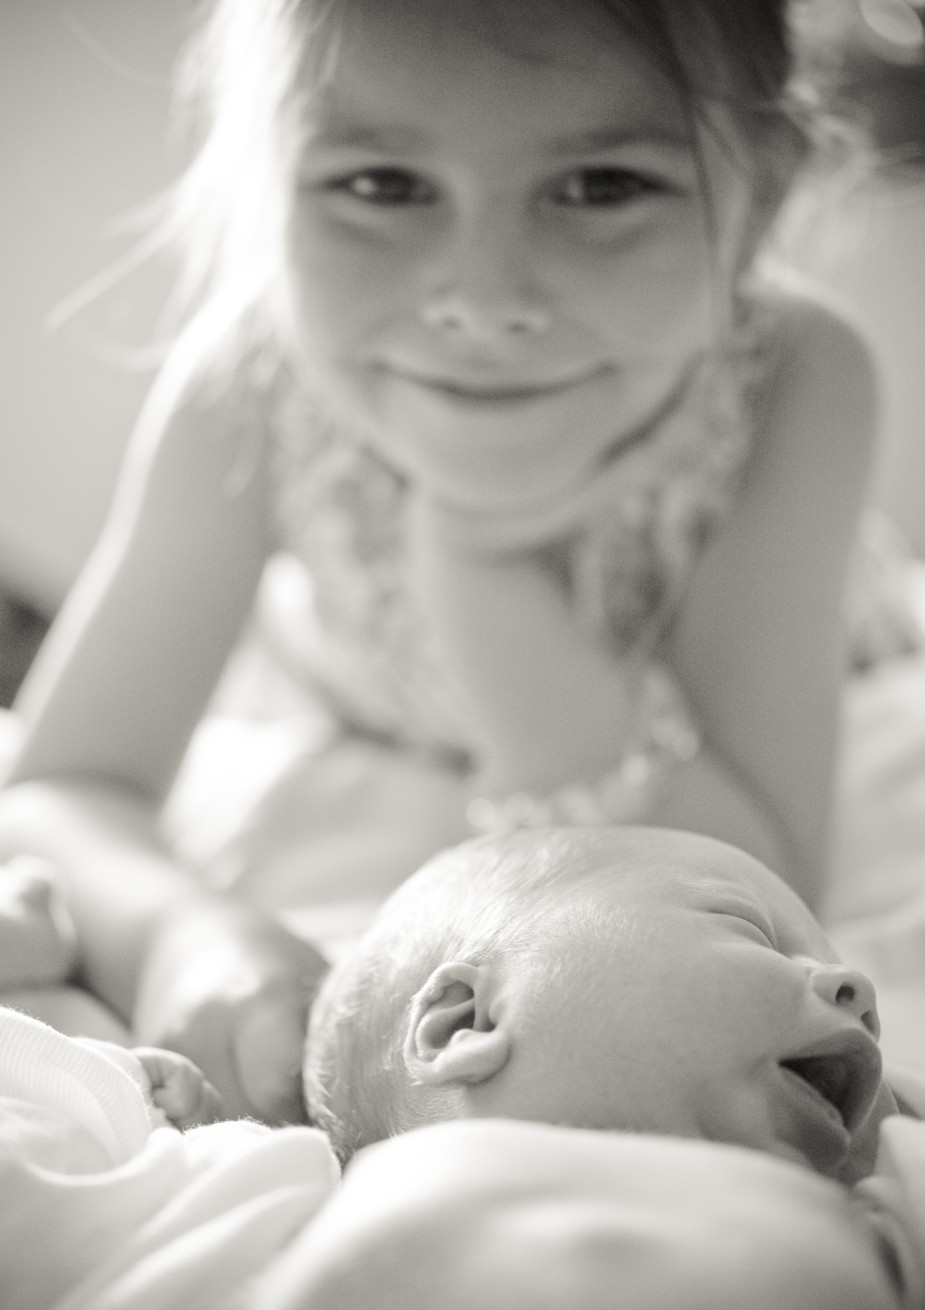
2-10
ABOUT THIS PHOTO A large aperture was chosen by the photographer to isolate the newborn, yet reveal the delighted sister in the background. Taken at ISO 800, f/1.8, and 1/60 second. ©Zofia Waig / www.zofiafoto.com
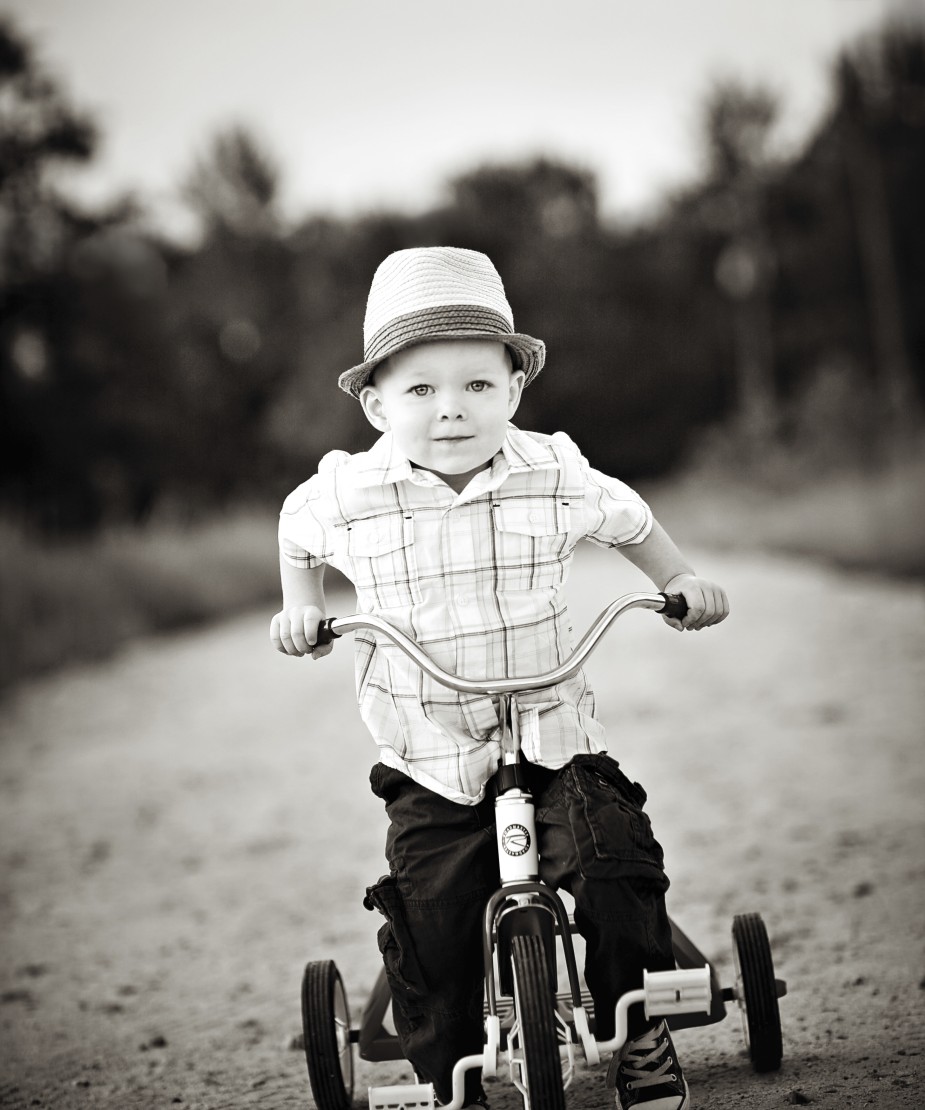
2-11
ABOUT THIS PHOTO The blurred or out-of-focus background created by a wide aperture separates the uptown tricyclist from the woods in the background. Taken at ISO 100, f/2, and 1/640 second. ©Cama Cathrae / www.camacathraephotography.com
Refer to Table 2-2 as a starting point for choosing ISO settings in different situations. Most cameras can deliver excellent, noise-free results when you use ISO settings of 100, 200, and 400. The settings in the table are only a starting point for various situations that you may find yourself in and are designed to allow for high enough shutter speeds to enable you to hand-hold your camera.
Table 2-2
Common ISO Settings
|
Situation |
ISO Setting |
|
Sunny day |
100 |
|
Porch light |
200 |
|
Overcast day |
200 to 400 |
|
Window light |
400 |
|
Indoor w/o flash |
800 and up |
|
Stage performances w/o flash |
1600 |
|
Indoor sporting events w/o flash |
1600 |
Using Program Modes
The previous discussions of shutter speed, aperture, and ISO are to give you an idea of how your camera works so you can manipulate it as you desire. Many cameras have program modes that move beyond the general Auto mode and give you more control over your final image. These program modes allow you to choose the type of subject matter you want to photograph; you can match your camera’s program mode to the subject you are photographing. Table 2-3 is a list of some common program modes your camera might offer.
Table 2-3
Common Camera Program Modes
|
Mode |
Indicated by |
Results |
|
Auto mode |
A |
Your camera makes all the decisions. |
|
Program mode |
P |
Camera chooses shutter and aperture; you choose metering mode, ISO setting, focusing mode, and so on. |
|
Portrait mode |
Icon |
Camera favors a narrow depth of field to blur background. |
|
Sports mode |
Icon |
Camera favors a fast shutter speed to freeze action. |
|
Landscape mode |
Icon |
Camera favors a wide depth of field (everything in focus). |
|
Macro mode |
Icon |
Camera favors a narrow depth of field and macro lens settings for very close-up shots. |
|
Shutter Priority mode |
S or Tv |
You choose the shutter speed; the camera sets the aperture. |
|
Aperture Priority mode |
A or Av |
You choose the aperture; the camera sets the shutter speed. |
|
Manual mode |
M |
Total control. You set everything: shutter speed, aperture, and ISO. |
Your camera is a precision instrument that has been designed to successfully capture your image. Let the camera do some of the work for you when you are learning. The program modes go beyond the more generic Auto mode and can increase your chance of success in specific shooting situations.
If you find that your creativity is limited by the choices on your camera (if it is a point-and-shoot with Auto mode only), it might be time for you to consider a more advanced camera. Check out Chapter 9 for recommendations on cameras and lenses.
Portrait mode
Choosing Portrait mode tells your camera that you want your subject in focus but everything else can be out of focus. Portrait mode favors a narrow depth of field where possible. If you make the same image twice, using Auto and then using Portrait mode, you should see a difference in what is in focus. Portrait mode is a precursor to using Aperture Priority, which gives you more control, allowing you to choose the exact aperture you require and letting the camera set the shutter speed.
Sports mode
Sports mode defaults to a fast shutter speed, allowing you to capture fast-moving children or the action in sporting events. This program mode is a precursor to using Shutter Priority, which allows you to set the exact shutter speed required and lets the camera take care of the aperture.
Landscape mode
Landscape mode favors a wide depth of field setting to allow everything — foreground and background — to be in focus. This mode is not used a great deal in child photography but might come in handy when photographing children in an outdoor setting where you want to include the detail in the background. You might also use Landscape mode to photograph a large group to ensure that everyone is in focus.
Close-up or Macro mode
Macro mode is great for isolating the bee that just landed on a flower but more applicable to the children’s photographer is using this setting to get in close on baby toes, eyelashes, ears, and fingers.
Aperture Priority mode
Many digital cameras have a mode called Aperture Priority, often abbreviated as A or Av. This mode enables the photographer to choose the aperture or f-stop, and the camera correspondingly selects the correct shutter speed to give you a proper exposure. Aperture Priority is a better choice than Portrait mode once you understand the concept of depth of field, because it gives you more control over your image. You are able to set the exact aperture you need and let the camera do the rest. Aperture Priority is the mode favored by many professional portrait and wedding photographers.
This mode is a great choice for general use but particularly for children’s portraits. It simplifies the process, allowing you to be spontaneous while ensuring an accurate exposure. You already have enough on your mind when working with children without having to concentrate on camera function. All you need to decide is what should be in focus (narrow versus wide depth of field).
Many photographers are now stylizing their portraits using an even larger f-stop, such as f/1.5 or even f/1.2. This creates a more selective focus and really throws all else out of focus except for what you choose as your main subject. It can be the face; it can be the foot. Ah, creative liberty! Just remember that when you are shooting this wide open, as in 2-12, your margin for error is very slim. It’s easy to get everything out of focus, so practice, practice, practice.
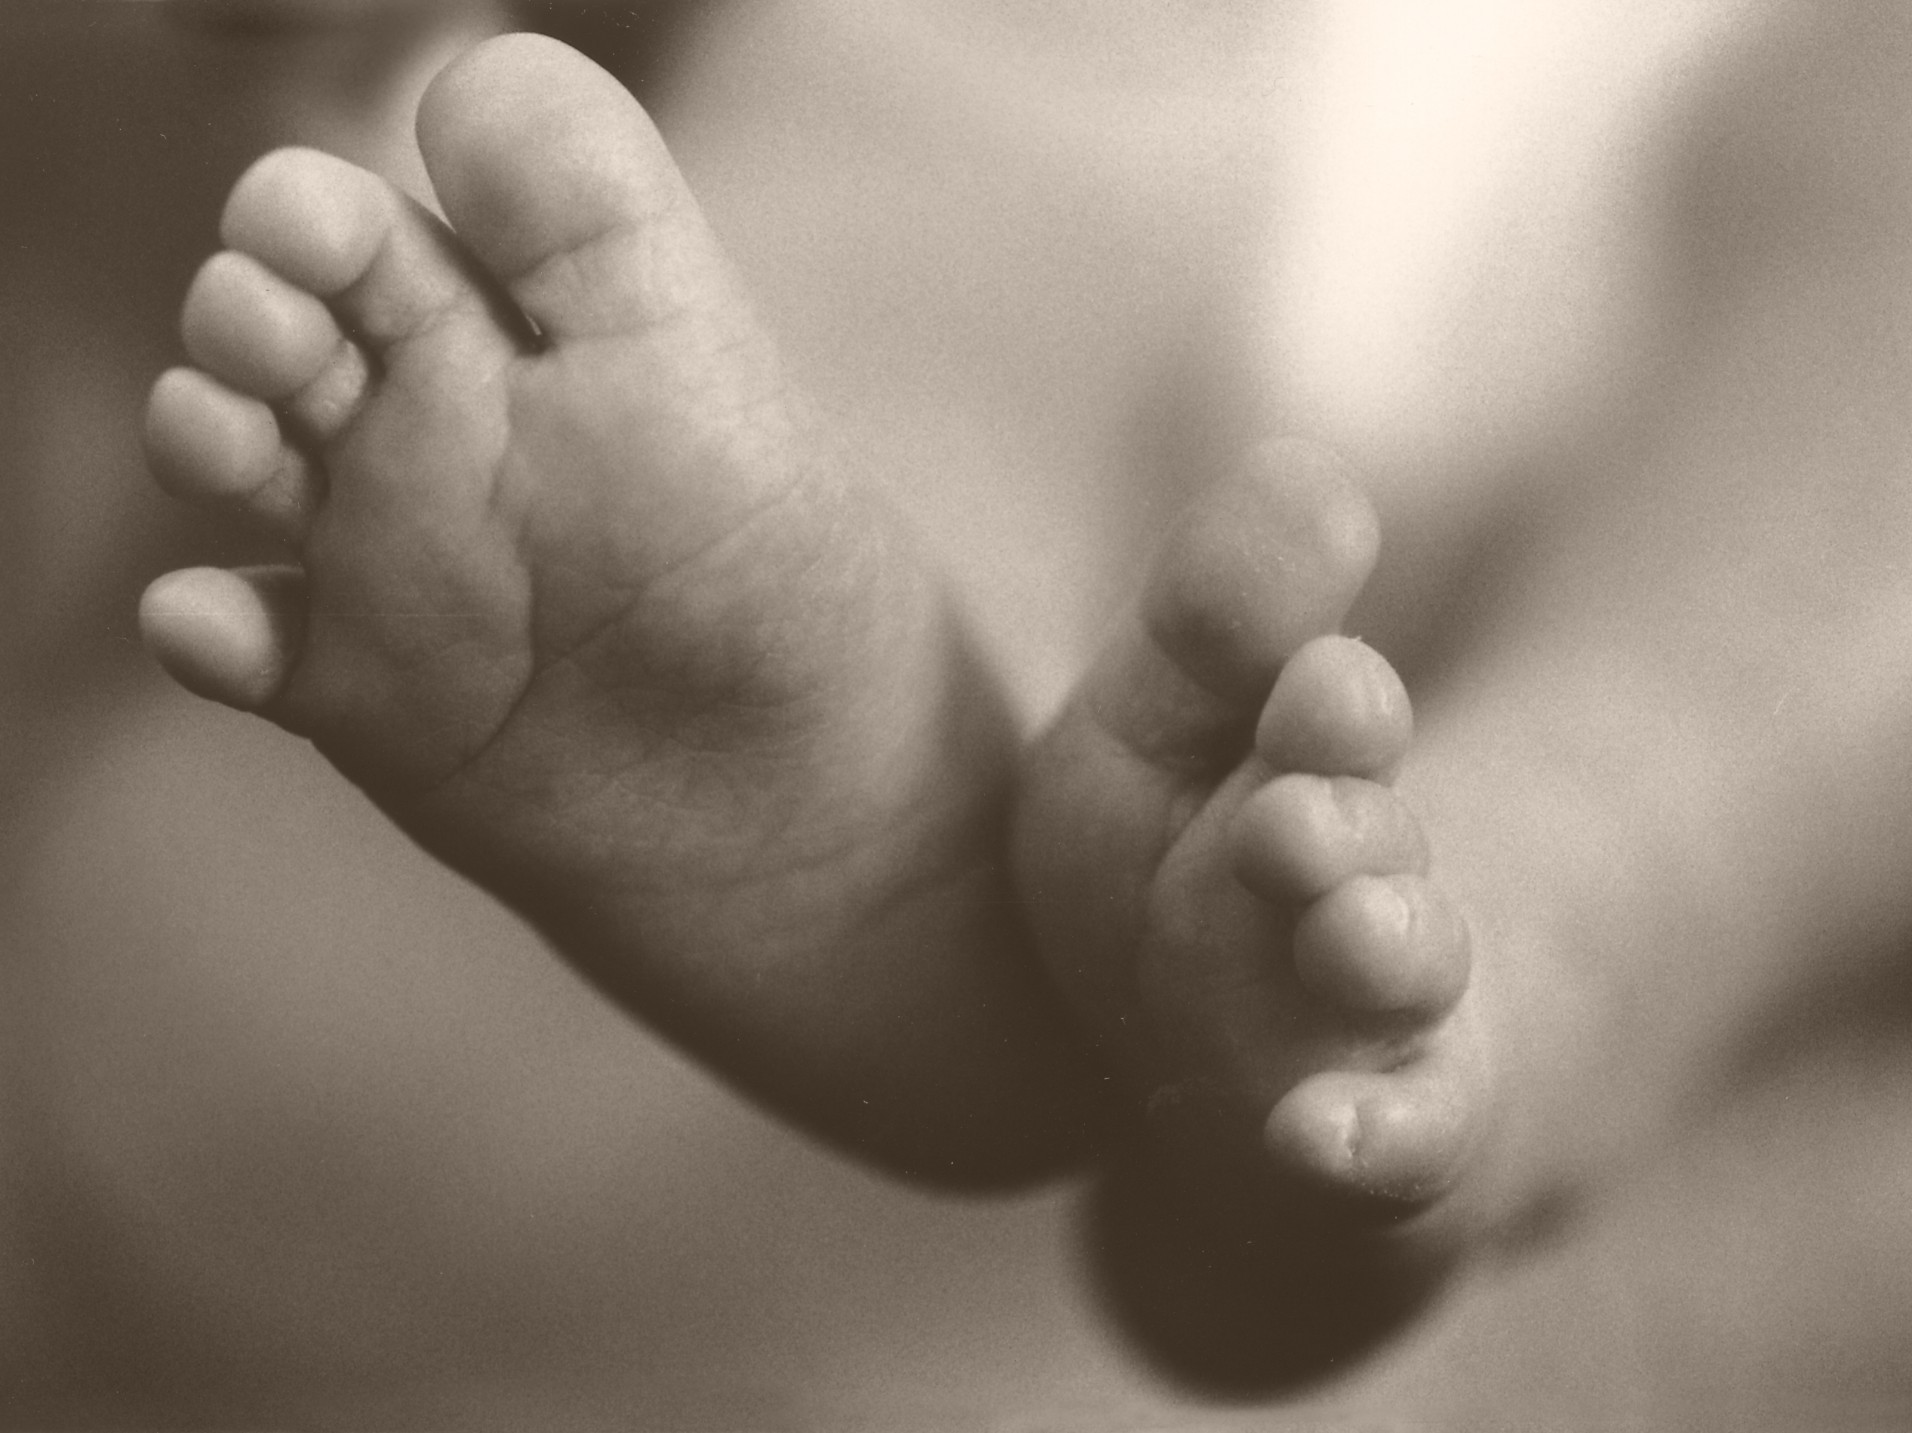
2-12
ABOUT THIS PHOTO I chose a large aperture to hone in on the brand new little feet of a newborn. Taken at ISO 100, f/1.5, and 1/250 second. ©Ginny Felch / www.photographingchildren.com
Shutter Priority mode
Shutter Priority mode allows you to determine the best shutter speed for your subject, and the camera does the rest. So, if you are shooting your daughter’s softball game and you want to freeze the big run for home, as in 2-13, set your camera on Shutter Priority mode, dial in a fast shutter speed, and let the camera take care of the rest.
When you are using Aperture Priority mode, and the aperture you choose causes the camera to select a shutter speed that is too slow to handhold your camera (1/60 second and slower), you can increase your ISO until an appropriate shutter speed is selected.

2-13
ABOUT THIS PHOTO The split second of sliding for home is captured by a fast shutter speed. Taken at ISO 100, f/5.0, and 1/800 second. ©Allison Tyler Jones / www.atjphoto.com
Manual mode
Manual mode gives you free reign, allowing you to choose both the shutter speed and the aperture. Some photographers swear by it, but it takes experience and understanding of the built-in metering capabilities of the camera.
What Do You Want?
If you’ve made it this far in the chapter, give yourself a pat on the back. That is a lot of technical information to wade through, but your patience will pay off if you learn to practice even one or two of the techniques discussed. The important thing to remember is that every one of these topics is just a tool in your image-making arsenal. Before you take your next photograph, ask yourself this question, “What do I want?” Do you want a gorgeous close-up of your toddler with the background blurred so you can concentrate on her face? Perhaps you’d like to freeze the motion of your 12-year-old skateboarding off the neighborhood ramp. Rather than just letting your camera do its thing, why not take control and start making some informed decisions about the images you are making? Set your aperture with your subject in mind rather than just to let enough light in to get the shot. When you start to choose your camera settings on purpose and with your subject in mind, you will be amazed at how fast your photography improves.
Assignment
Depth of Field and Selective Focus
This assignment is about learning to make a photograph with a narrow depth of field. For this assignment, try to get a beautiful photo with selective focus, meaning your subject should be sharp and all else falls out of focus. Photograph a child or children setting your camera on either Portrait mode, if you have it, or Aperture Priority. If you use Aperture Priority, select an aperture (f-stop) that is a small number, such as f/4.0 or lower. If you focus on your subject, that f-stop ensures a narrower depth of field. You will see the difference in a portrait taken with these settings compared with auto focus, where everything tends to be sharp.
These cherubic sisters shown here in their morning garb on the window seat were photographed with a narrow depth of field to blur out the potentially distracting details in the window, as well as create a more painterly look. Taken at ISO 500, f/2.8, and 1/60 second.
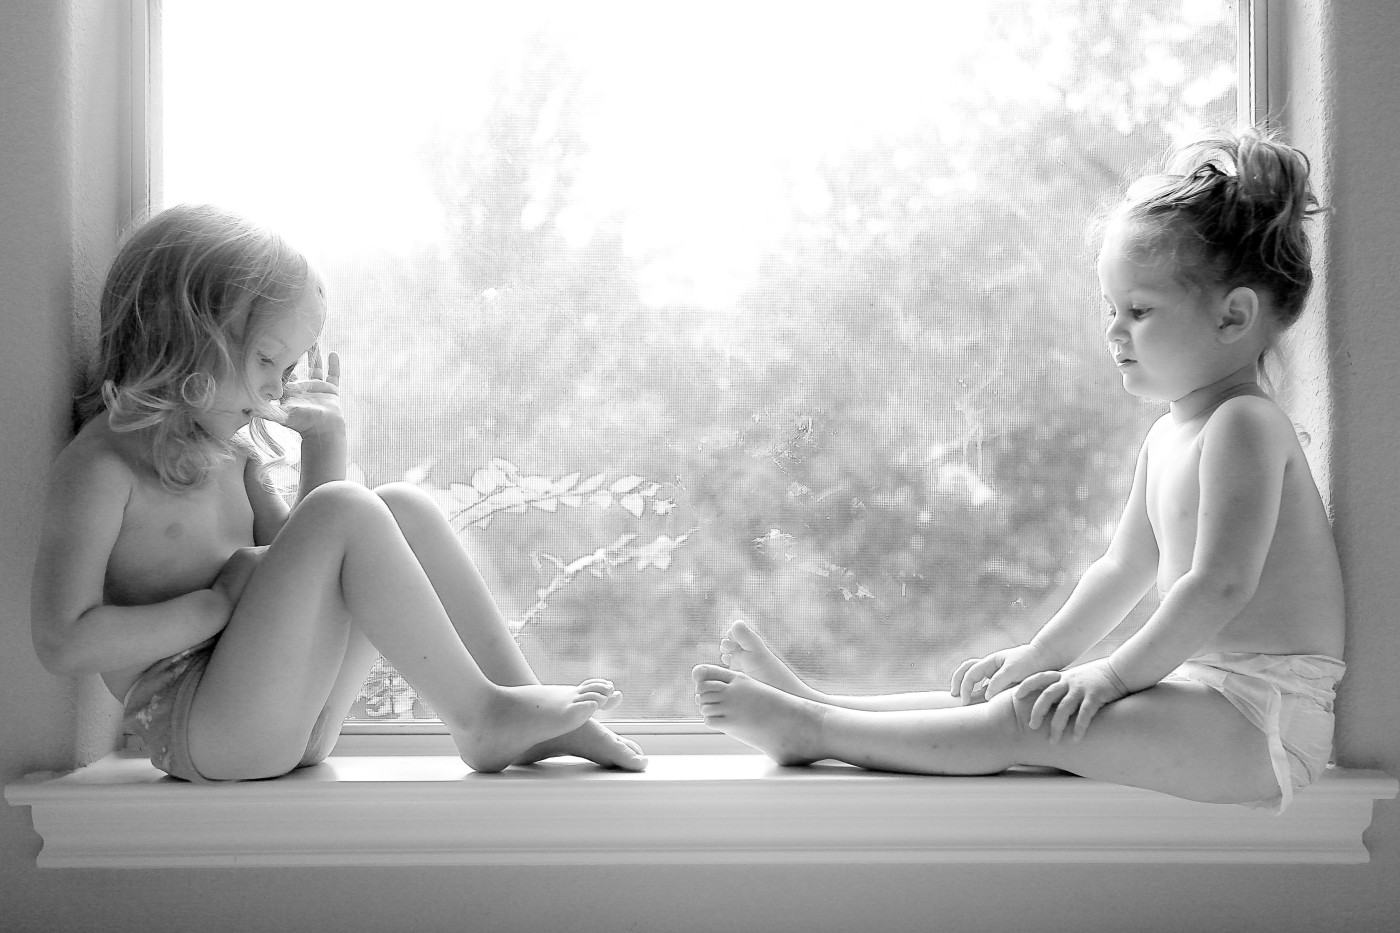
©Natalija Brunner / www.daidalorange.com
Remember to visit www.pwsbooks.com after you complete this assignment and share your favorite photo! It’s a community of enthusiastic photographers and a great place to view what other readers have created. You can also post comments, read encouraging suggestions, and get feedback.