
Chapter 4: Manipulating the Light
Indirect Light
Direct Light
Direct Sun
To Use Flash or Not to Use Flash
Direction of Light
Light Modifiers
Color Temperature or White Balance
Basic Studio Lighting
When it comes to resplendent light, natural light wins, hands down, and, in a perfect world, it would be forever sunny, and all windows would face north to capture that beautiful quality. Unfortunately, we live in a world with all sorts of weather, a sun that sets, and windows that may not face the optimal direction. What’s a children’s photographer to do?
Kids are not going to stand around waiting for you to fiddle with your camera and lighting. You’ve got to work quickly and effectively without too much fuss. Luckily, many intrepid photographers have gone before you and figured out helpful and simple tricks for manipulating whatever lighting situation you may find yourself in.
Indirect Light
Beginning photographers are so often concerned with finding light in enough quantity to make a good exposure that they don’t stop to consider the quality of that light and its effect on the child they are photographing. When you start to see how the quality of light can work for you, you will start to use different types of lighting on purpose to create a certain look or convey an emotion.
Indirect light is the light you have been learning to see and use. The light you find coming through the windows of your home or on your front porch can be soft and beautiful because the light is indirect, meaning it isn’t coming straight from the source.
Indirect light has been bounced off of, blocked by, or diffused through something. The light may be bouncing off the concrete walkway up to the house or the house across the street or, possibly, the light has been diffused by a window. Indirect light creates a soft light with no harsh line between light and shadow. It’s hard to see where the light stops and the shadow starts, and that makes for beautiful photographs.
If you need to find a place to take some photos that has nice, indirect light and you don’t have a porch, try your garage.
Porches or overhangs
In the previous chapter, you learned about window light, but windows aren’t the only places to find gorgeous light. Beautiful, soft light might be as close as your front porch.
Porches block the direct, overhead light, leaving a huge window of light in which to shoot your subject. Porches are particularly great places to photograph children because the lighting usually remains constant across the length of the porch and the overhang prevents shadows under the eyes, as in 4-1.

4-1
ABOUT THIS PHOTO Two brothers leaning against an old Spanish mission are beautifully illuminated by indirect available light. Because of the overhang, notice how there are no shadows under their penetrating eyes. I always take advantage of an overhang to avoid shadows under the eyes. Taken at ISO 400, f/4.5, and 1/60 second. ©Ginny Felch / www.photographingchildren.com
Open shade
Open shade is an ideal place to find indirect light. By definition, open shade means there is nothing blocking the light from overhead, but the direct light is being blocked by either cloud cover or something on either side of your subject.
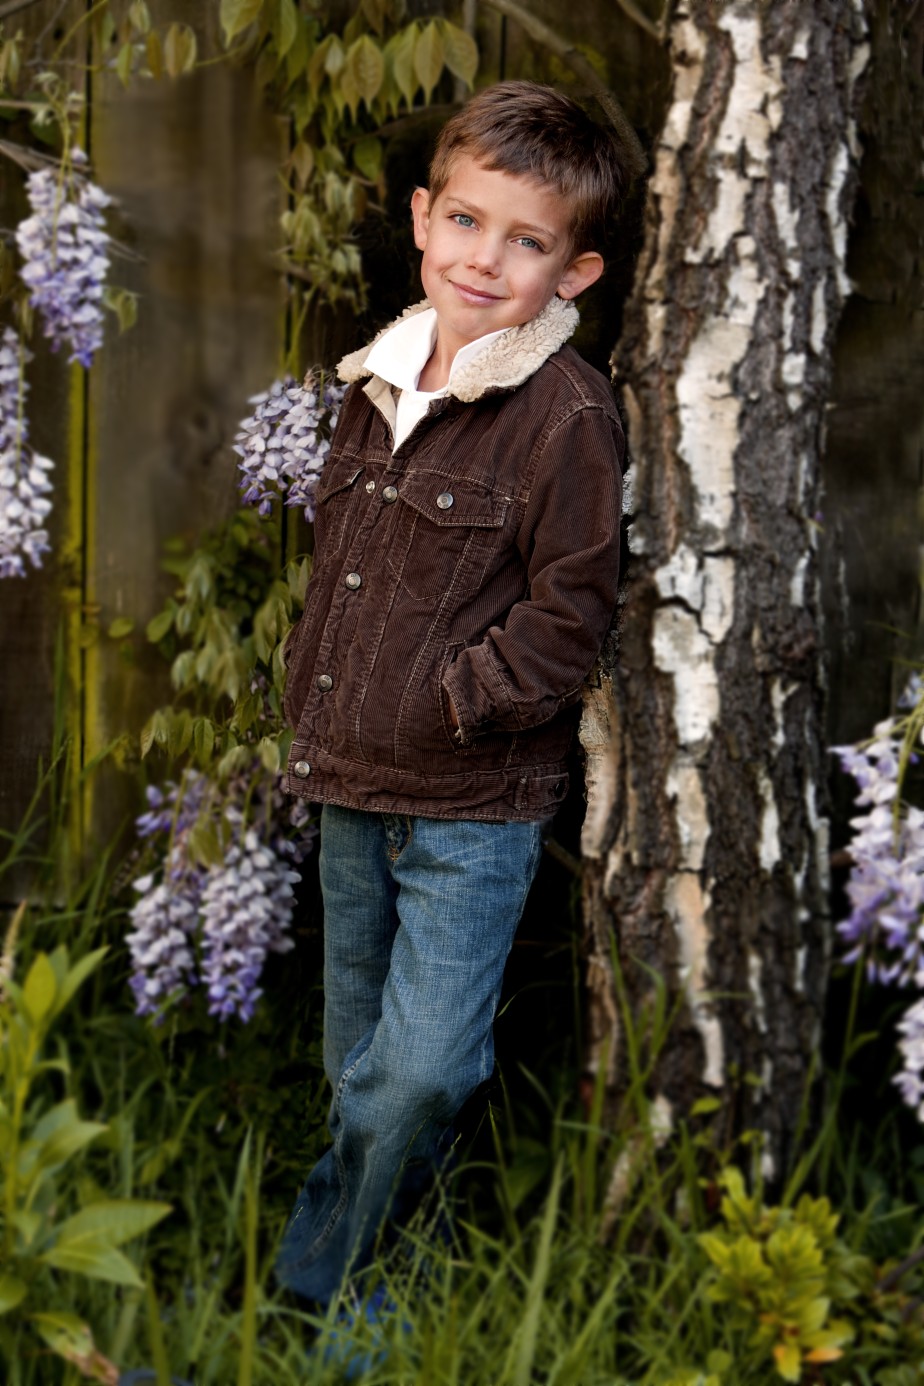
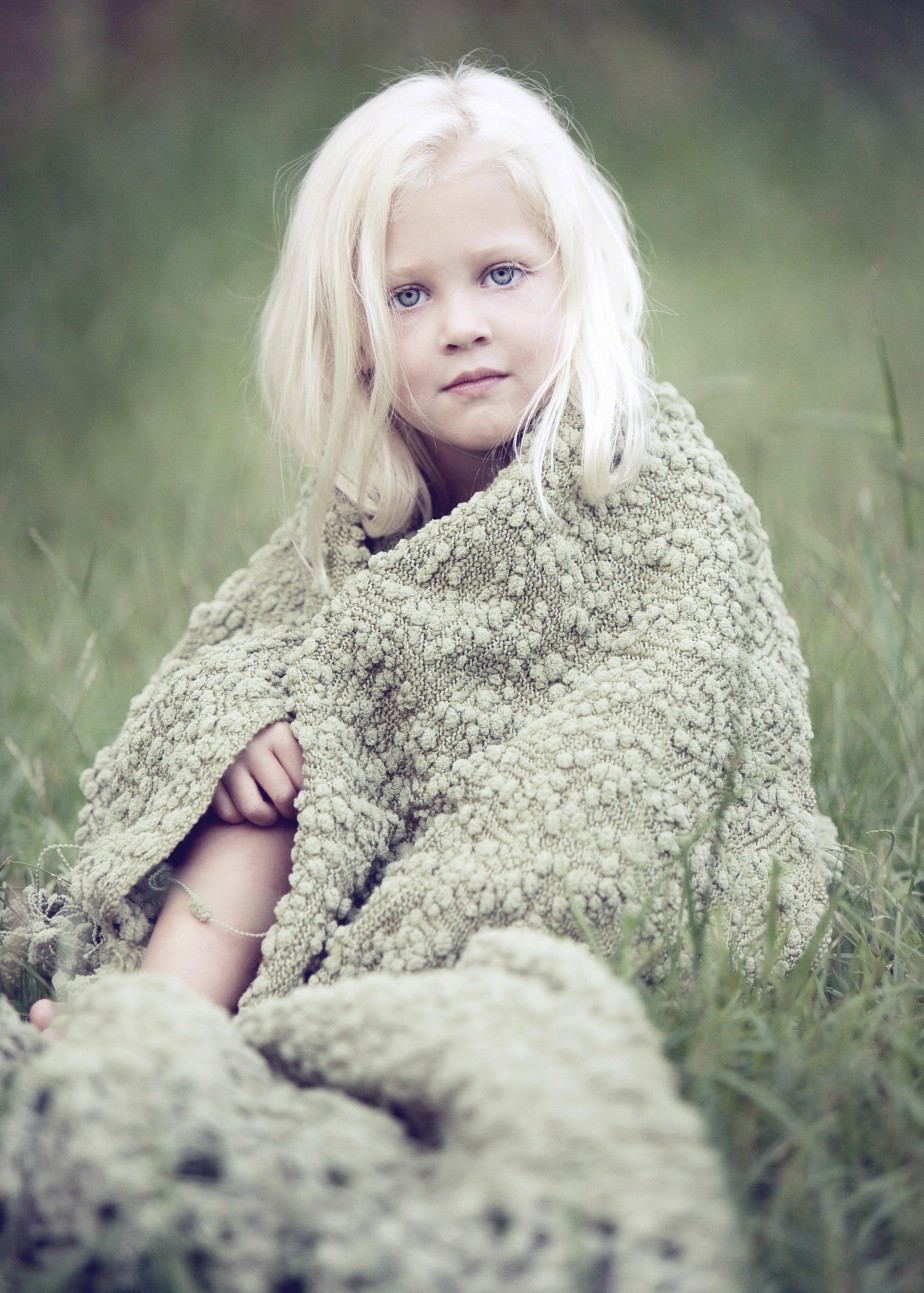
Open shade can be found under a tree (as in 4-2), with a low and broad sky as a light source, as diagrammed in Chapter 3. You can find another exquisite source of open shade in a meadow on an overcast day, as in 4-3.
4-2
ABOUT THIS PHOTO I love the textures of the tree and flora, which make a great, rustic surrounding for this portrait of a young boy. Notice the quality of light because of the tree overhang, and the indirect available light, highlighting his skin and eyes. Taken at ISO 400, f/2.5, and 1/250 second. ©Ginny Felch / www.photographingchildren.com
4-3
ABOUT THIS PHOTO Photographing in a meadow on an overcast day created lovely soft tones. The colors pop because of the contrast with the gray, flat light. All in all, a pastel look is created. Taken at ISO 100, f/2.8, and 1/100 second. ©Wendi Hiller / www.wendihillerphotography.com
Direct Light
Direct light is just what it sounds like: It comes directly from the light source to your subject with nothing in between. It can be very hard, harsh, and potentially unflattering unless used with care. You probably have a lot of pictures that have been ruined by direct light — overflashed, too bright, or glaring sun photos with ghostly or squinting subjects.
If you are a beginner, your best bet is to start out finding and using indirect light first. When you’re comfortable there, stretch your wings and experiment with direct light. You will have more immediate success, giving you the confidence to move on to more challenging lighting situations.
“I have seized the light. I have arrested its flight.” ~Louis Daguerre
Direct Sun
The sun is the most common source for direct light. If you shoot during midday in harsh, direct sun, the shadows are very distinct with a hard line around them, and it’s almost impossible for your subjects not to squint. The photo in 4-4 is a prime example of what not to do. The sun is so bright the little boy can barely open his eyes! The shadows are harsh, and the highlights are too bright, leaving little detail.
4-4
ABOUT THIS PHOTO Shooting in harsh, direct sun can be a challenge. Very often it results in photos of squinting children with little or no highlight detail. Taken at ISO 100, f/2.8, and 1/25 second. ©Allison Tyler Jones / www.atjphoto.com
Negatives aside, direct light can be used to great effect when used correctly. For beginners, it’s important to pay attention to the direction from which the light is shining. Planning to shoot earlier or later in the day allows you to work with the sun at an angle to your subject. This gives you more options for positioning your subject. In 4-5, the photographer waited until the bright sun had set; the light is warmer and softer and extremely flattering.
4-5
ABOUT THIS PHOTO No squinting necessary after the sun sets. I always seek out the sweet light and take advantage of it. Taken at ISO 400, f/4.5, and 1/60 second. ©GinnyFelch / www.photographingchildren.com
Creating a halo: Using rim or back light
Have you ever been looking at someone, and the low sun behind him creates a light on the rim of his hair? This is a simple example of what is called rim light or back light. Studio photographers emulate this exquisite light by actually placing a strobe behind their subjects. This is just another way to give depth, definition, and drama to an image and helps to separate the subject from the background. Rim or back light illuminates and separates the hair and head from the background, as in 4-6. Rim lighting also adds an emotional element to an image.
Working with this type light can be tricky, requiring you to practice everything you learned about exposure in Chapter 2. The best back light occurs either in the morning or late afternoon when the angle of the sun is low, just when sweet light appears. The higher the sun is in the sky, the brighter the light is on the back of the child’s head. If the back light is too bright, you may lose all the detail in your highlights.
To really make this technique work, be sure you have enough ambient light (which is the available light in the scene) coming from behind you, so that the faces of your subjects are illuminated properly. Sometimes photographers bring along a small metallic reflector that they use to catch the light of the sun behind the subjects and reflect it back onto their faces. You can also use back light to create dramatic silhouettes by leaving out the reflector and exposing your image for the background instead of the foreground.
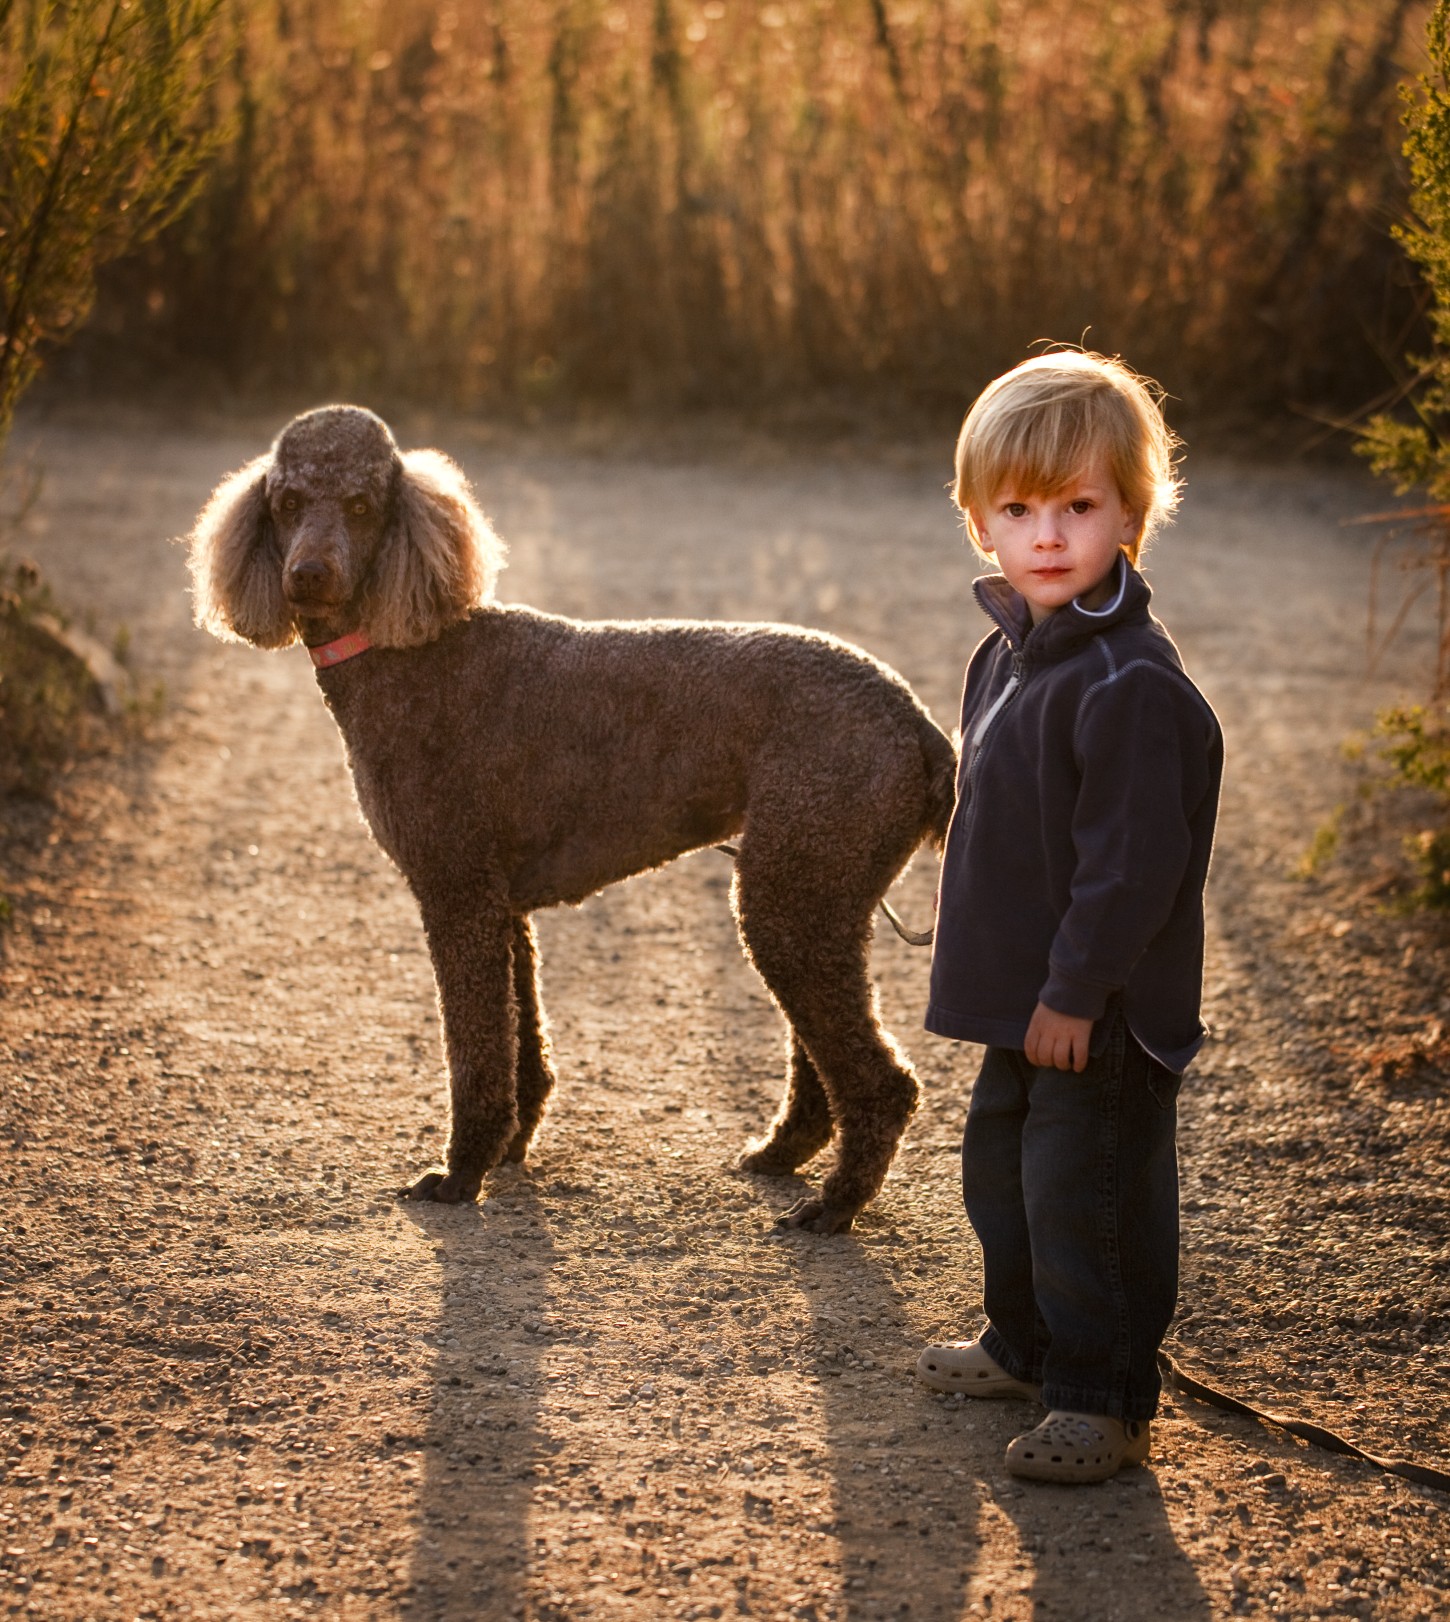
4-6
ABOUT THIS PHOTO Late afternoon sun going down behind the dune grasses illuminates the back of my grandson and his favorite dog (my Gracie) on an evening walk on the coast. The mood that is created is sweet, which adds to the story-telling effect. Taken at ISO 400, f/3.5, and 1/1000 second. ©Ginny Felch / www.photographingchildren.com
Halo or rim lighting requires careful metering to be successful. For more information, see Chapter 3.
To Use Flash or Not to Use Flash
Learning to control the flash output of your camera could be the best thing you ever do for your photos. Consult your manual to see if you can adjust your flash output to half power or even turn it completely off. It is almost always a mistake to use your on-camera flash as the main light. After looking at the not-so-flattering images you have captured using just flash, you may think that you never want to use it again, but there are times when flash has its uses, as in the before and after images in 4-7.
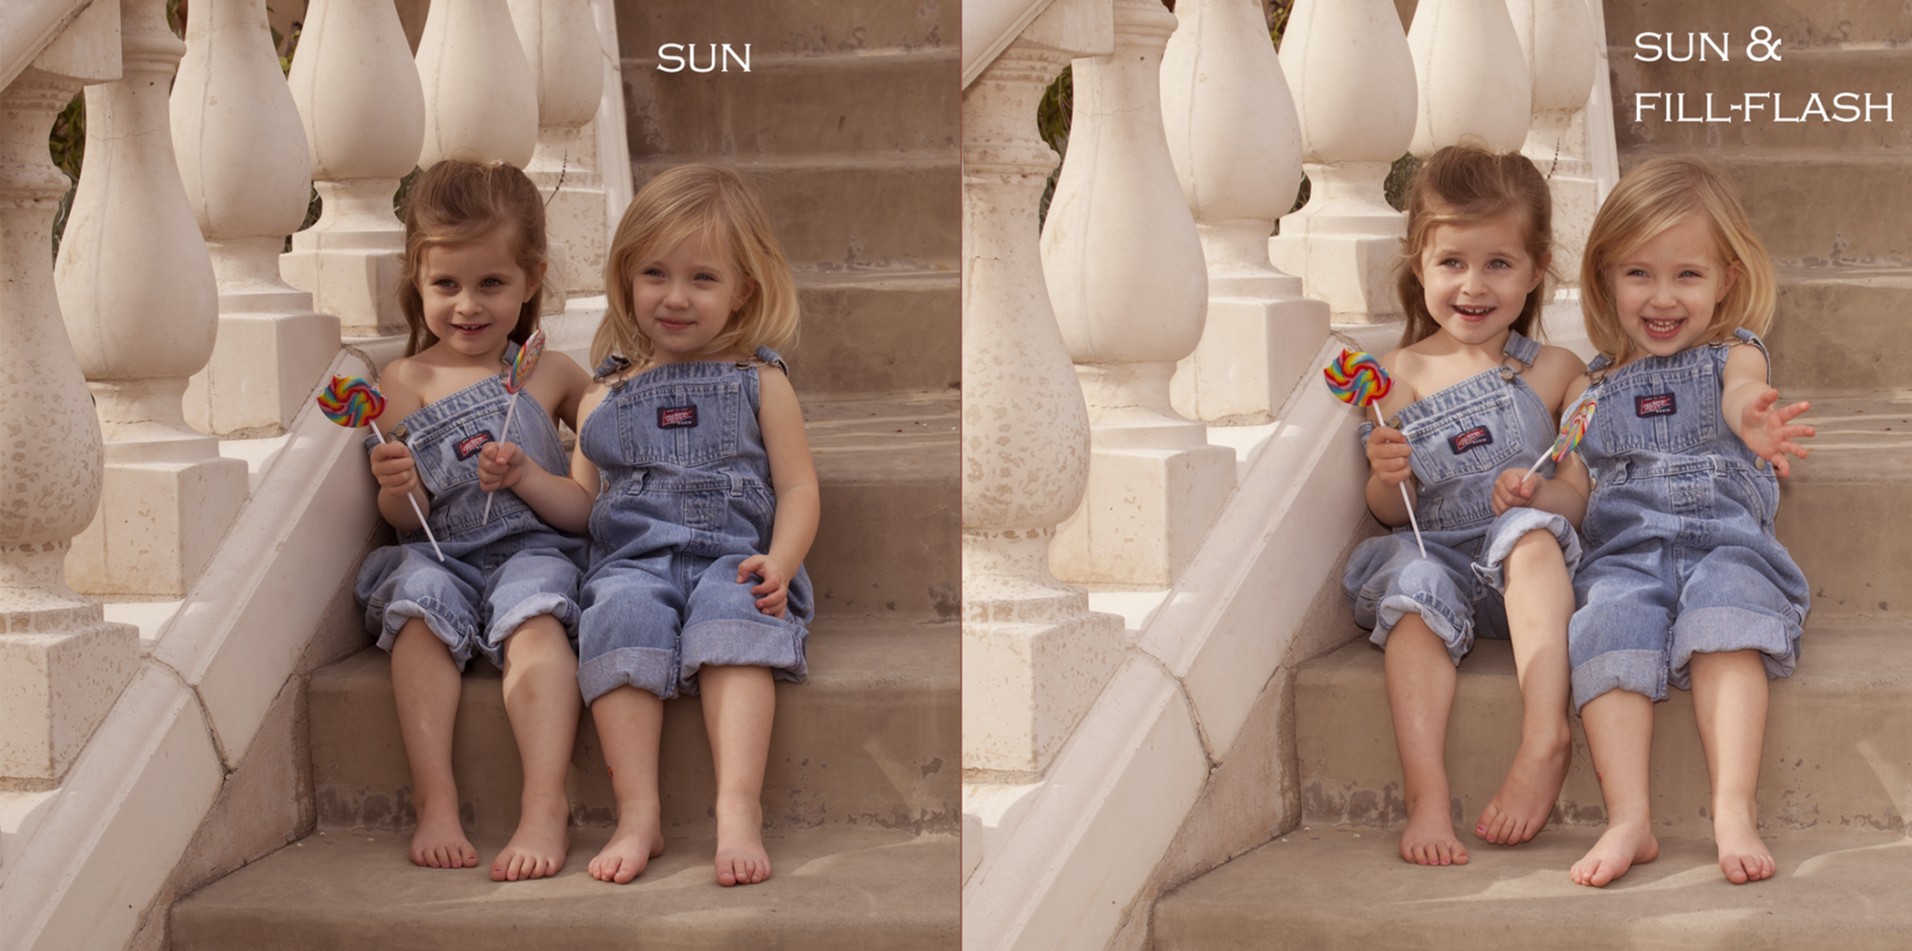
4-7
ABOUT THIS PHOTO This photograph shows a before and after example of how fill flash can be used. The midday sun coming in from the side provided the main light, which produced splotchy skin tones and “raccoon eyes,” or shadows beneath the eyes, and made the little girls squint. This is not an ideal time to photograph, but if you must, fill-flash can help. I usually avoid light like this because I prefer not to use flash. Taken at ISO 200, f/9.0, and 1/320 second in Program mode with auxiliary flash set to TTL (through-the-lens). ©Ginny Felch / www.photographingchildren.com
Concept of main light and fill
A basic tenet of lighting theory is learning which light will be your main light and which light, if any, will be your fill light. The main light is the light that provides the primary illumination of your subject. The fill light does just what its name implies: It fills in the shadow areas to one degree or another. The main light is the most important light because it determines from which direction your subject is lit, which, in turn determines how the shadows fall on the child. You then can add fill light to fill in those shadowy or darker areas. A reflector to one side could act as a fill light, which you learn about later in this chapter, but you can also use a flash as a fill light. Used as a fill light or bounced or diffused in some way, flash can provide a portable source of beautiful light.
Bounce it
If you have an auxiliary flash unit for your camera (often called a speedlight) you may find that bouncing your flash off a nearby wall, a ceiling, or even a piece of white cardboard that you have taped at an angle to your flash unit almost always yields better results than straight-on flash.
Auxiliary flashes typically have heads that swivel and allow you to point the flash unit to a wall or ceiling that allows the light to bounce, softly illuminating the child you are photographing.
Some professionals have come up with great formulae to use a fill-flash, so that they are not fiddling with equipment when they are on the move. You might want to try your own formula, like shooting in Program mode and moving your exposure compensation up or down.
Photographer and entrepreneur Gary Fong has developed some very useful attachments for an auxiliary flash called Lightsphere (www.garyfongstore.com). You can see his tutorials for getting excellent results with fill-flash.
Diffuse it
Diffusing your flash means placing some type of material between your flash unit and the subject so the light is softened, eliminating harsh shadows and washed-out skin tones.
Diffusing your flash is the easiest method for all types of flash units whether they are on-camera or auxiliary units. There are many light modifiers for flash units on the market, but some of the best are also the cheapest. One or two pieces of tracing vellum taped across the front of your flash can soften the light enough to keep your subject from looking like a deer in the headlights.
What about On-Camera Flash?
On-camera flash is another common source of direct light. However, if you think about it, on-camera flash is kind of like turning on the high beams of your car to illuminate your subject. You’ll get the shot, but does the lighting convey the mood you were going for?
As discussed in Chapter 3, using on-camera flash as your only light source flattens your subject and causes harsh shadows to fall behind them. It is also often the cause of red-eye. Unless there is no other option, it is best to avoid using your on-camera flash as your main light.
Direction of Light
Whether you are working with direct or indirect light, the direction from which the light is shining onto your subject greatly affects the look of your photograph. Luckily, kids look good in just about any light so they are the perfect subjects on which to experiment with different lighting directions and patterns.
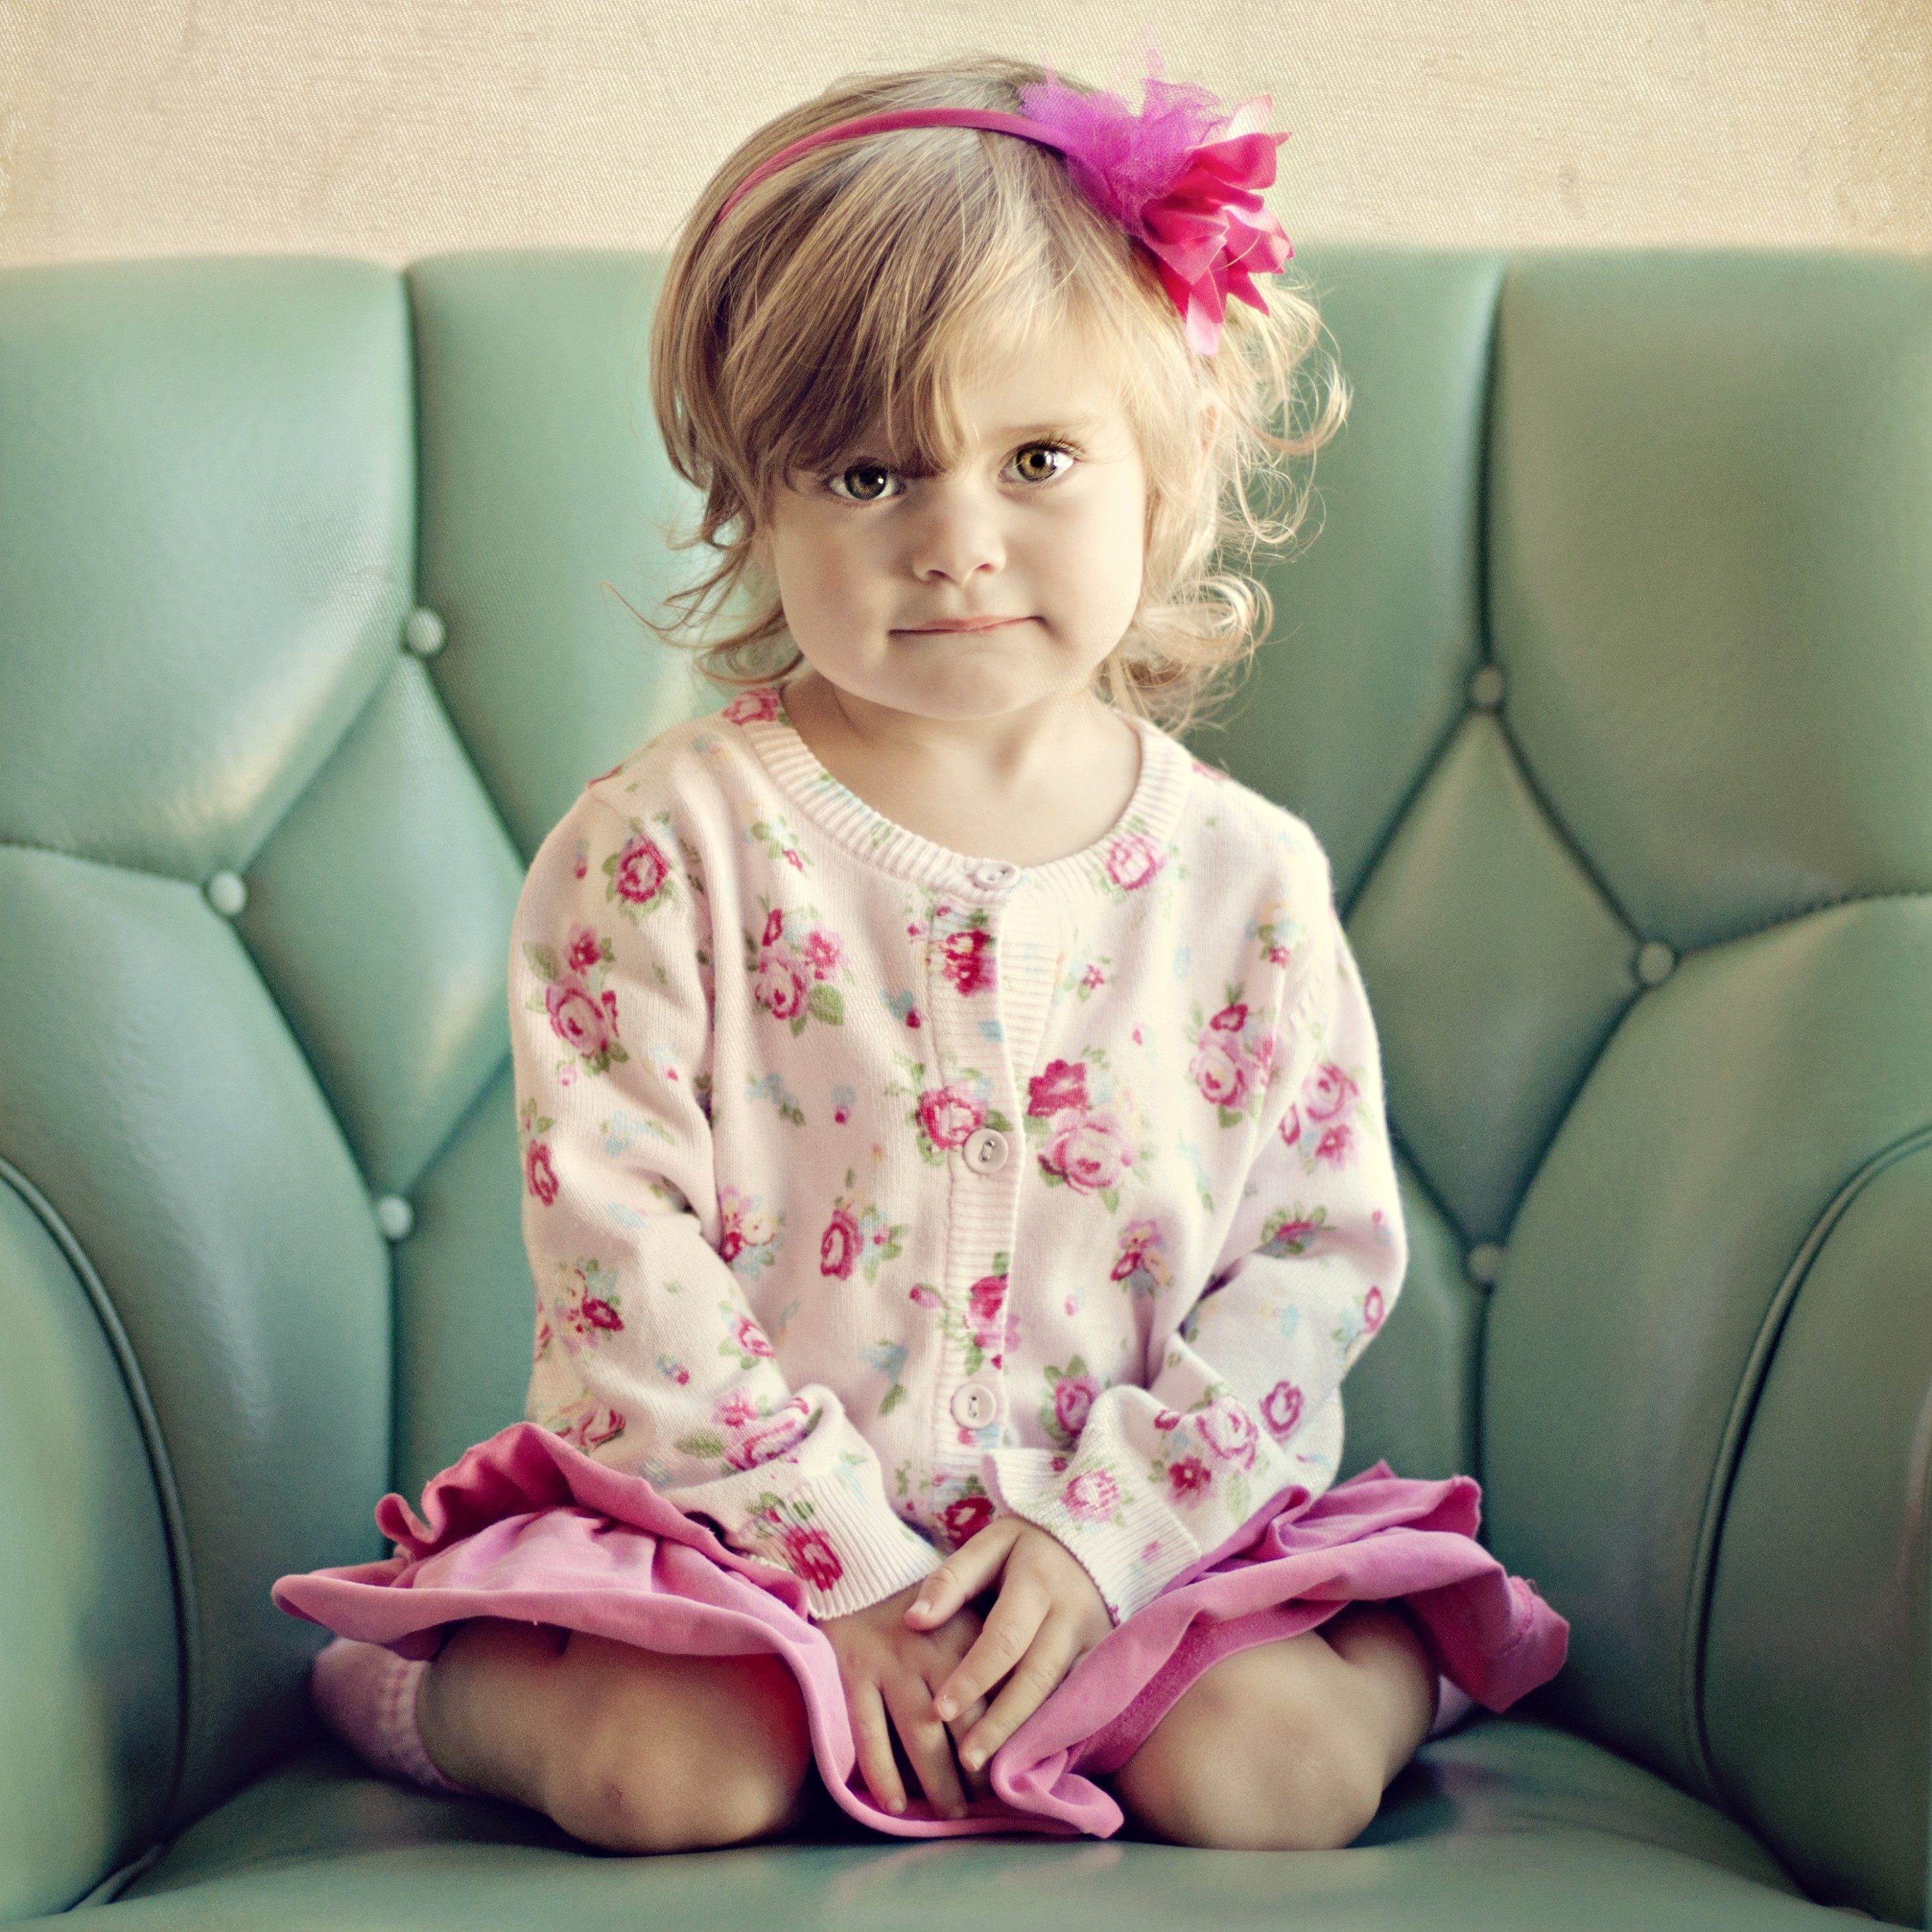
Flatter: Using flat or front lighting
It’s no accident that just about every cosmetic ad you’ve ever seen is lit using front or flat lighting, which is lighting from the direct front of your subject. Placing your subject face-on to the light source is most flattering because this lighting pattern creates a shadowless light that disguises all the texture or imperfections in the skin.
For photographing children, however, there is another benefit to flat lighting. The broad light source needed to create a flat lighting pattern is usually broad enough to allow your little subjects to roam around a bit while still in nice light, like this little girl on her front porch in 4-8.
4-8
ABOUT THIS PHOTO This sweet little girl has a lot of great light to roam in on her front porch. The indirect light is coming from in front of her, providing soft, flat illumination of her face. Taken at ISO 250, f/1.8, and 1/1250 second. ©Melani Sikma / www.melaniesphotos.com
Contour: Using Rembrandt or 3-D lighting
Contouring with light, as shown in Chapter 3, requires that the subject be positioned so that the light is coming in from one side. The light then wraps around the face of the subject giving more dimension to the face, as in 4-9. This type of lighting, commonly referred to as Rembrandt lighting, is named after the master Dutch painter who often painted by window light.
Rembrandt lighting is achieved by placing your subject at a 45-degree angle to your indirect light source, such as a single window in a room. The light then plays over the face of the subject, creating light on one side of the face and shadow on the other, giving it contour. It also highlights the texture of the skin, hair, and clothing of the subject, lending a three-dimensional look — the feeling that you can almost reach out and touch them.
4-9
ABOUT THIS PHOTO This very soft and moody portrait of a child was made in a true Rembrandt style, where the light comes from above and the side. You can see the contouring of light on her face, giving it dimension and texture. Taken at ISO 500, f/3.2, and 1/400 second. ©Ken Sharp / www.kensharp.com
Light Modifiers
There are so many cool gadgets on the market geared toward modifying light in one way or another, but when all is said and done, they can all be put into one of three basic categories: reflectors, diffusers, or gobos.
Reflectors
Reflectors are the most commonly used light modifier in the photographic world. A reflector is any reflective surface used to reflect light onto your subject. You would use a reflector when the light is a bit too dim on one side of your subject or to correct unflattering shadows on the face; or you might use a reflector to throw a bit more light into any image. Reflectors can be found in the environment, such as a white wall reflecting onto your subject, or they can be commercial reflectors manufactured specifically for photography and found in your local camera store.
Reflectors are everywhere, like in the new sibling relationship in 4-10. The photographer used the white sheets and duvet cover on the parents’ bed as well as the white clothing they were wearing as reflectors to help add light into the image. Even a natural surface, such as the pavement beneath the girl in 4-11, can act as a reflector to help gently light your photos.
If you’re not sure you want to spend the money on a commercial reflector, try using a piece of white foam core or poster board from your local art supply store. You could even use someone wearing a white T-shirt as a reflector if you’re really desperate.

4-10
ABOUT THIS PHOTO The white sheets on the bed make for gorgeous, reflective light. Taken at ISO 400, f/3.2, and 1/125 second. ©Allison Tyler Jones / www.atjphoto.com
4-11
ABOUT THIS PHOTO The light bouncing off the pavement in front of this little girl’s home provides a gorgeous, even illumination of her sweet face. Taken at ISO 400, f/2.8, and 1/400 second. ©Allison Tyler Jones / www.atjphoto.com
You can purchase commercial photographic reflectors, which are very handy for reflecting light into too-shadowy areas of your subject’s face. Often reflectors come with other materials, such as gobos (which are explained later). A popular reflector style is a two-sided, collapsible reflector, as demonstrated by the young lady in 4-12, 4-13, and 4-14. You can find them with different options, such as white on one side and gold on the other, or silver on one side and gold on the other.
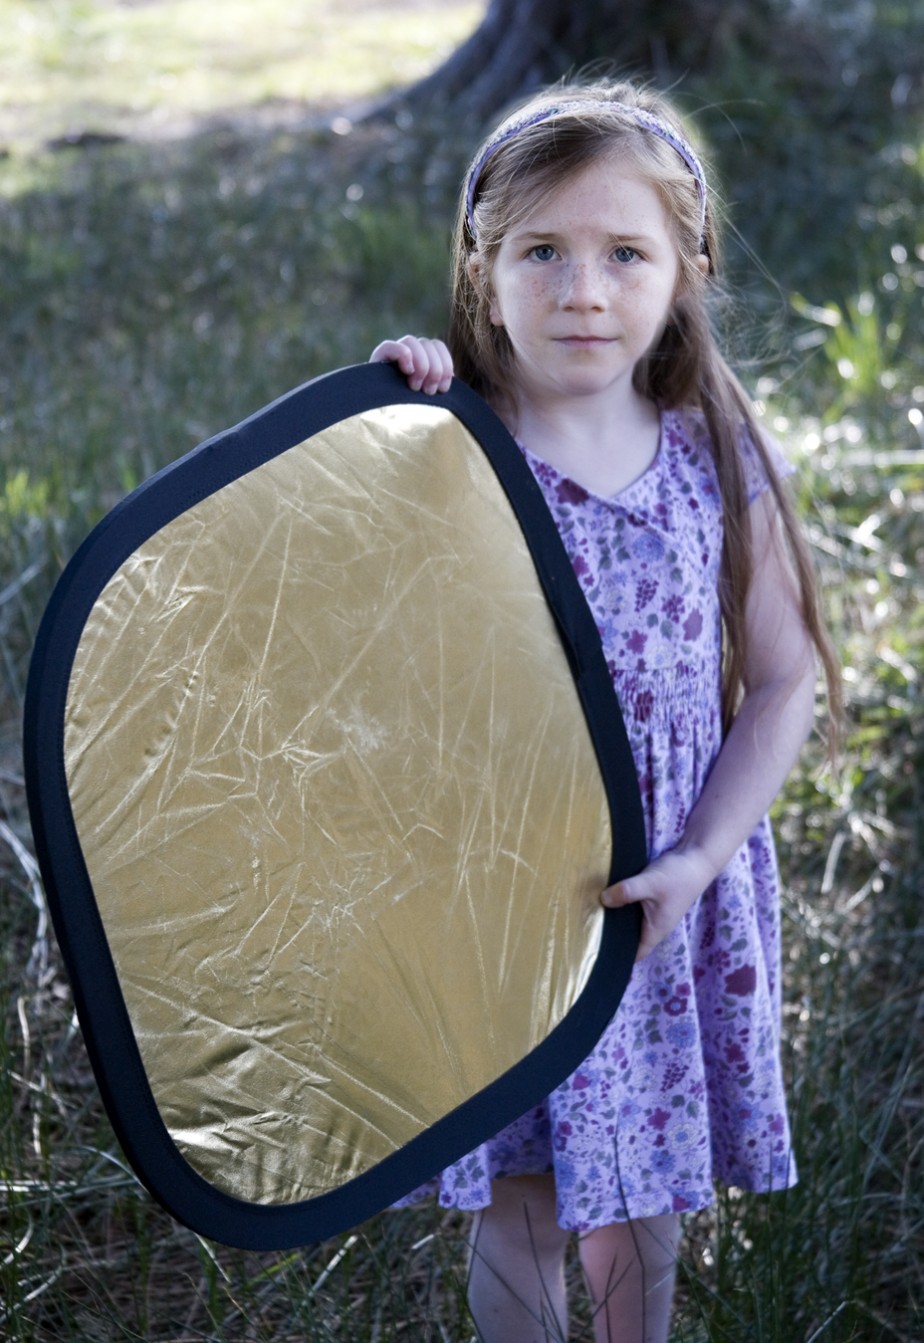
4-12
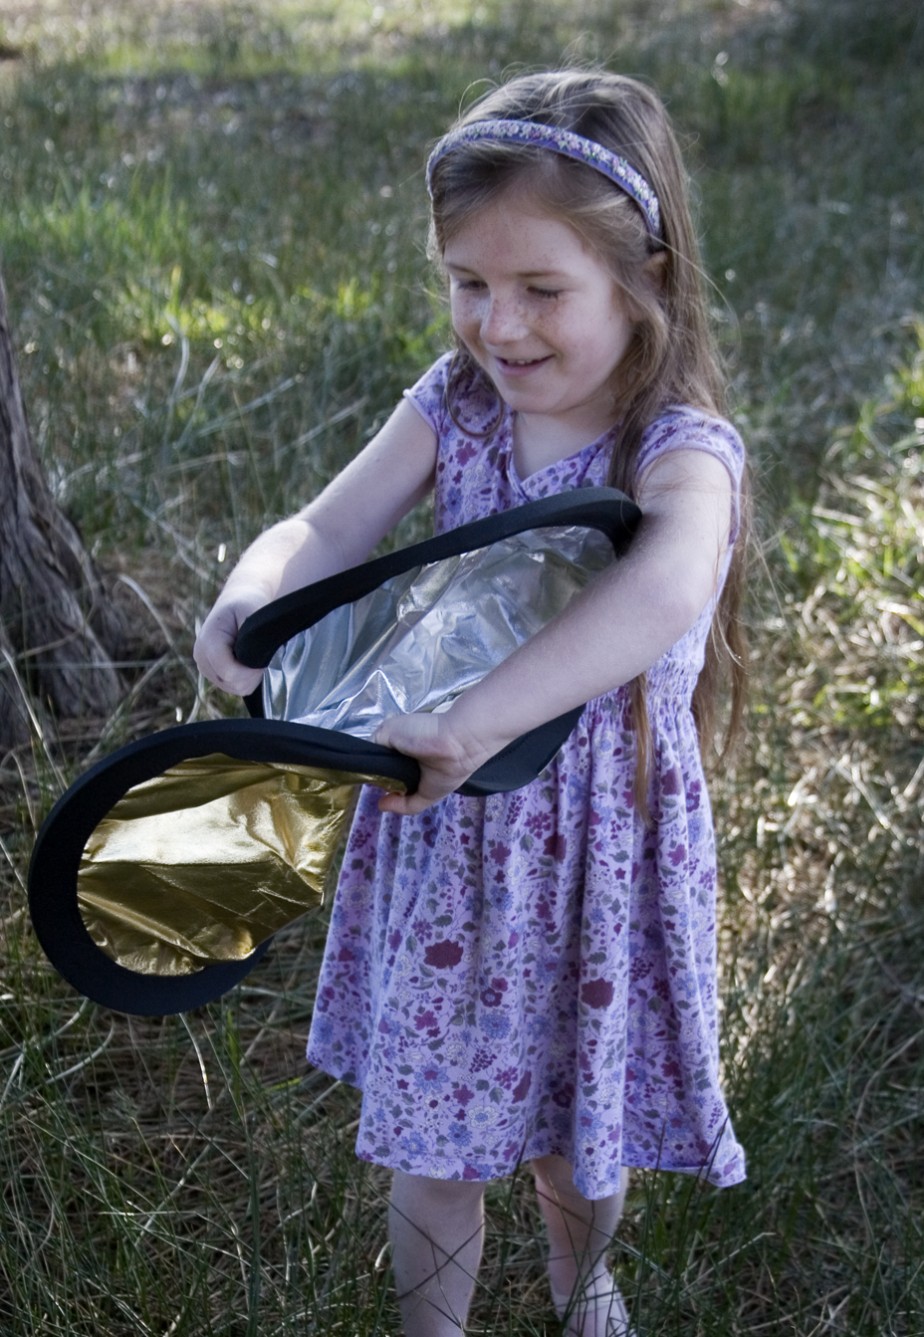
4-13
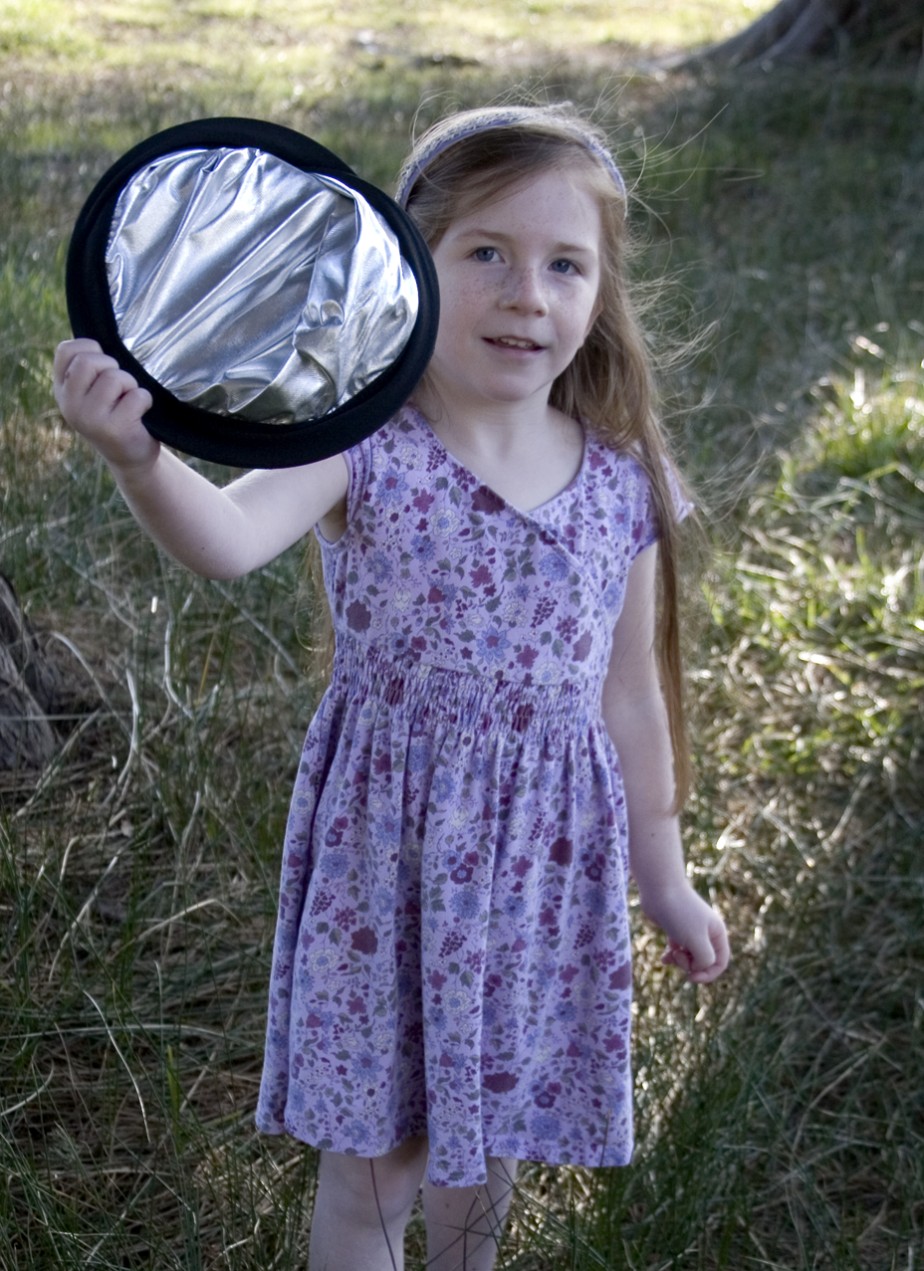
4-14
ABOUT THESE PHOTOS Commercial photographic reflectors come in different shapes and sizes. They are great when lighting is less than ideal and fold up easily to stow with your camera gear. My pal Daisy is seen here demonstrating how easy it is to open and close. ©Ginny Felch / www.photographingchildren.com
A white reflector doesn’t add any colorcast into the image and provides a soft fill light into the shadow side of your subject. A silver side is more specular and can give a bit more punch to an image, which is essential when you are working in low light or shooting at sunset and losing light fast. The gold side is great for warming up skin tones in photos taken in shade (which can tend to be bluish in color) or during overcast days. A little experimentation will determine your favorite.
Diffusers
Diffusers are made to diffuse, or spread out, the light that is shining onto your subject, making the light less harsh and more flattering. When all you have is harsh, direct light, a diffuser can be your best friend. Pop it into a window or have someone hold it between the harsh light and your subject and you’ll be amazed at the difference, as demonstrated in 4-15, 4-16, and 4-17. A diffuser can be a commercial product (similar to the reflector shown in the previous series of images), or you can use a panel of translucent drapes or a white sheet to diffuse the light between its source and your subject.
4-15
4-16
4-17
ABOUT THESE PHOTOS Splotchy and harsh sun was coming in from the right side in the afternoon when this image was made, creating shadows and very unflattering light. The diffuser or gobo (“go between”) was used to diffuse the sun and help to soften the light. Taken at ISO 200, f/4, and 1/800 second. ©Ginny Felch / www.photographingchildren.com
Gobos or subtractive lighting
Sometimes you don’t want to reflect or diffuse the light, you just want to block it altogether and that’s where gobos come in. Gobos are light-blocking devices; the name comes from “go-between.” You place a gobo between the light source and the camera or the light source and the subject. Many of the reflector kits mentioned previously have a black side that works really well for blocking stray light.
Why would you want to block the light when you’ve spent so much time trying to find it in the first place? Maybe you are trying for the halo light mentioned earlier, but the sun is causing flare spots on your lens; in this instance, you can have someone stand holding the gobo to block the light from hitting your lens. Or maybe there is just too much light all around, and you have envisioned a more subdued, moody look to your image. Blocking the light from one side of your subject will give you more of a Rembrandt-like look.
Color Temperature or White Balance
Color temperature refers to the color of light in an image. For example, you have likely noticed that when you photograph indoors and your flash does not fire, the image has an almost orange cast to it. Perhaps you have photographed a subject on an overcast day or on the shady side of a building and found the image to have a bluish tinge to it. Both of these scenarios highlight the importance of understanding how color temperature can affect your images.
Film photographers have long struggled with color temperature in their images, requiring special films or filters to correct the colorcasts created by different types of indoor and natural lighting situations. Digital has eased this dilemma by giving us the gift of white balance, but you have to know how to use it in order to take advantage of it.
If you’ve experimented at all with your digital camera, you might find that Auto white balance doesn’t take care of everything. Photos with weird colorcasts to them (too yellow, too blue, greenish, and so on) mean that your white balance settings aren’t working the way you’d like them to. Check your manual or the menus on your camera to see if you can manually set the white balance to accommodate the type of light you are shooting in.
For more about hard and soft light, or light in general, see Chapter 3.
Following are a few examples of lighting situations that might play tricks on your Auto white balance, requiring you to choose a specific white balance setting on your camera.
• Daylight. By default, digital camera settings are geared to daylight photography. Daylight is considered neutral as far as color temperature is concerned — not too cool or too warm. Real life is different, however. Place a child on the shady side of the house and you might have an image with a decidedly blue cast. Shooting during the sweet light of early evening often casts a very yellow tone onto your subject. Check your white balance settings for Shade or Full Sun options and experiment with them until you come up with a result you like.
• Flash. The flash on your camera is balanced to daylight color temperature. This allows you to use your flash as a remedy for lighting situations with extreme colorcasts. Using your flash might be your best option if you are having colorcast problems with your images and don’t have custom white balance settings for your camera. For example, when you are stuck in a school gym with horrible fluorescent lighting, your flash is probably your best bet.
If purchasing a studio strobe setup is not in your budget, you may want to experiment with halogen or tungsten garage lights from your local hardware store. Use caution, particularly with children, because these lights are very hot. For additional information on setting up your own economical home studio go to www.diyphotography.net.
• Fluorescent. Shooting under fluorescent light makes for sickly, greenish skin tones. If your Auto white balance setting isn’t handling it well, switch to the Fluorescent setting in the White Balance menu on your camera, usually denoted by a mini fluorescent tube icon.
• Tungsten. Tungsten lighting is just a fancy name for the regular bulbs in your lamps at home. Tungsten or incandescent lights give off an almost orange light that you can use to great effect when photographing your Christmas tree lights or if you are looking for that warm look, as in 4-18. If not, adjust your white balance to the Tungsten setting, usually denoted by a small light bulb icon.
What about red eye?
Red eye happens because the photographer is using on-camera flash in a darkened setting. The subject’s pupils are more dilated so when the flash fires, the light reflects off the retina of your subject and shows up in your photo as red eye. Because most on-camera flashes are very close to the camera lens, the angle of the flash is too close to the angle of the lens, allowing the light to more readily reflect off the retina.
How to avoid it? Try the red-eye reduction setting on your camera if you have one. If not, you might try raising the ambient light in the room by turning on more lights, which will close down the pupils of your subject, reducing the chance for red eye. If neither of these tips works and you do a lot of shooting in dark environments, you may want to consider a dedicated flash unit for your camera. Flash units typically sit higher on the camera, increasing the angle between flash and lens, thereby eliminating the red-eye problem.
4-18
ABOUT THIS PHOTO Using regular tungsten or incandescent lighting casts a very warm glow on your subject that can be used for effect, as in this photo of a young boy in his home. Taken at ISO 1250, f/2.8, and 1/125 second. ©Allison Tyler Jones / www.atjphoto.com
• Shade. Shooting on the shady side of a building or under a tree during daylight hours can cause your images to be very bluish in color, as in 4-19. Select the Shade setting in your White Balance menu, usually denoted by a little house icon showing shade to one side. The Shade setting offsets the color cast and results in a more pleasing image, as in 4-20.

4-19

4-20
ABOUT THESE PHOTOS In 4-19, the little girl was photographed on the shady side of a building. The shade plus the blue color of the surrounding walls made for a bluish cast to the image. Taken at ISO 400, f/2.0, and 1/250 second on Auto white balance. In 4-20, you see the same image with the colorcast corrected with the white balance set to Shade mode. ©Allison Tyler Jones / www.atjphoto.com
• Custom White Balance. Check your camera manual to see if your camera has a setting for Custom White Balance. This is the manual version of setting your preset white balance options. Most cameras require a white card or some kind of white balance tool (such as Expo Imaging’s Expo Disc) to aid in setting a custom white balance. Setting a custom white balance might be a bit advanced if you are just starting out, but it is good to know it is available.
Although it seems counterintuitive, the closer the light source is to your subject, the softer the light appears. The farther you move the light away, the harsher it becomes.
Basic Studio Lighting
Studio lighting may seem mysterious and complicated but if you think about the big studio lights as oversized flash units or big windows, you might feel a bit less intimidated. Studio flash was created so that photographers could shoot at any time of day, in any weather, and still get natural-looking results. Studio lighting also gives the photographer much more control over the lighting. Photographing children in a studio has its distinct advantages. Some photographers find it a bit easier to corral kids in the enclosed space of a studio. The quality of light produced by studio strobes tends to be a bit more sparkly than natural light, and because these lights are essentially big flash units, they can freeze action very well.
Everything you have learned up to this point is applicable in studio. Do you want the light to be hard or soft? Which direction do you want the light to come from? Are you looking for a flat lighting pattern or a more dimensional, contoured look?
One-light setup
Within a studio shoot, you can achieve a lot with just the basics: a single light and a reflector. The single light provides the main light, and the reflector fills in the shadows, keeping them from becoming too harsh and dark. This is the easiest and one of the most economical lighting setups if you are just starting out.
In 4-21, you can see that the flash head, in this case a monolight, has a large soft box attached to the front. A monolight is a flash head that has all the controls and power source built in to the head of the flash unit. Monolights are often less expensive than flash heads that require a power pack to run them. A soft box is a big black fabric box with a translucent front that acts as a diffuser, keeping the light from becoming too direct and harsh. The translucent material on the front of the box spreads out the harsh light from the monolight creating a large, diffused light source. Also, note how close the light setup is to the subject. Keeping the light close keeps the light soft. On the other side of the subject is a big silver reflector that throws light back into the face of the child being photographed keeping the shadows from becoming too dark on the right side of his face.
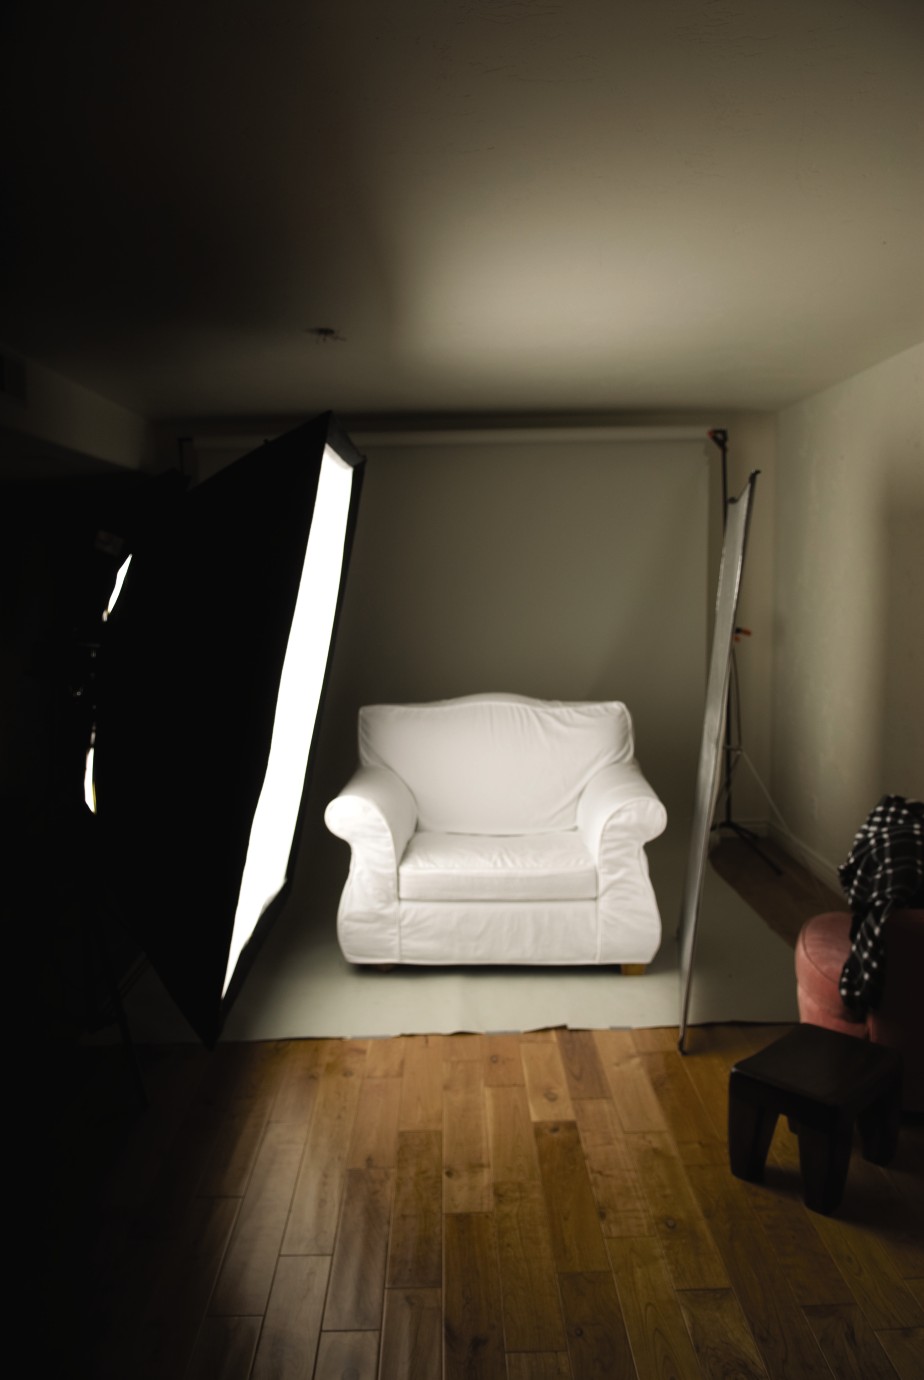
4-21
ABOUT THIS PHOTO The main light is fitted with a 4 × 6-inch soft box that creates a large area of soft, even light. On the right side is a reflector to keep the right side of the child’s face from becoming too dark. ©Allison Tyler Jones / www.atjphoto.com
Metering
Monolights are fitted with modeling lights, which gives you an idea of how the light will fall on the subject. The actual illumination of the child, however, is done by the powerful flash inside the monolight unit. Because you can’t see how the flash turns out until the photo is taken, it’s a good idea to have a flash meter (4-22) that allows you to measure the light and get a starting point for properly exposing your image. Using a flash meter that is tied into your monolight either by a cord or a wireless device, measure the light and set your camera manually to the settings recorded by the flash meter.
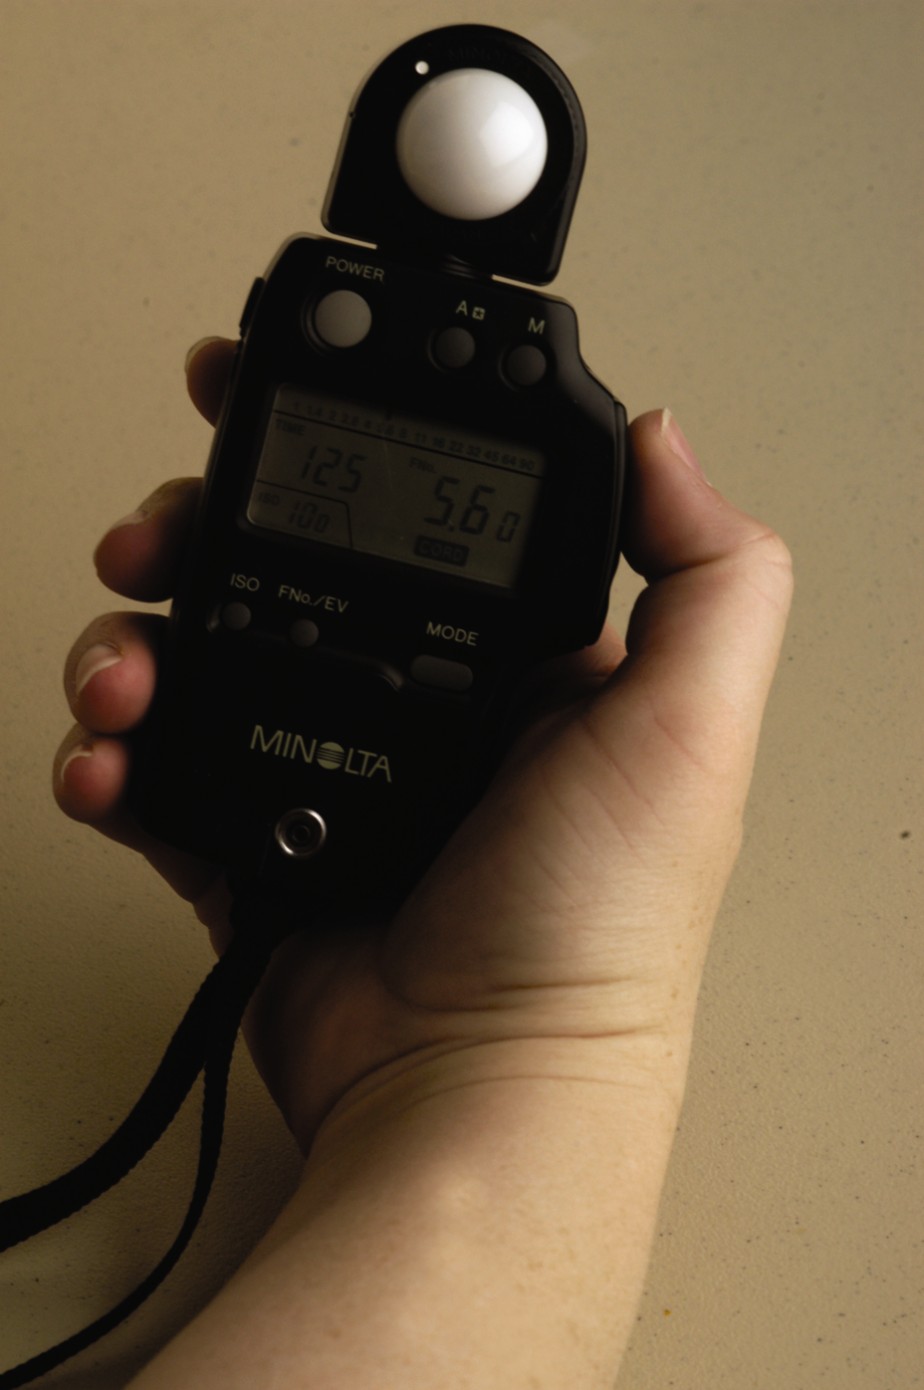
4-22
ABOUT THIS PHOTO A flash meter is a vital tool to ensure proper exposure of your studio flash images. ©Allison Tyler Jones / www.atjphoto.com
The final result
The final result of a setup similar to what is illustrated in 4-21 shows just how simple it is to create a pocket of gorgeous light to photograph children in, as shown in 4-23. You might also notice that the big chairs are white, which catches the light and bounces it back into the child’s face. Big chairs are also a good place to corral wild and wiggly kids for a quick photograph!

4-23
ABOUT THIS PHOTO The final result of this lighting setup, using two chairs for this sibling portrait. Taken at ISO 250, f/10.0, and 1/200 second. ©Allison Tyler Jones / www.atjphoto.com
Studio photography doesn’t have to produce the overposed, boring pictures of years gone by. The studio is a perfect place to, literally, do a study of and explore the personalities of your subjects. With no distractions in the environment, expressions and relationships are all you have to concentrate on, as demonstrated in 4-24.
Learning to manipulate the light no matter where you are shooting will build your confidence as a photographer. Every professional photographer knows that you rarely happen upon the ideal lighting situation; instead, you have to work with what you’re given, and sometimes it’s that problem-solving that results in some of the best images you ever take.
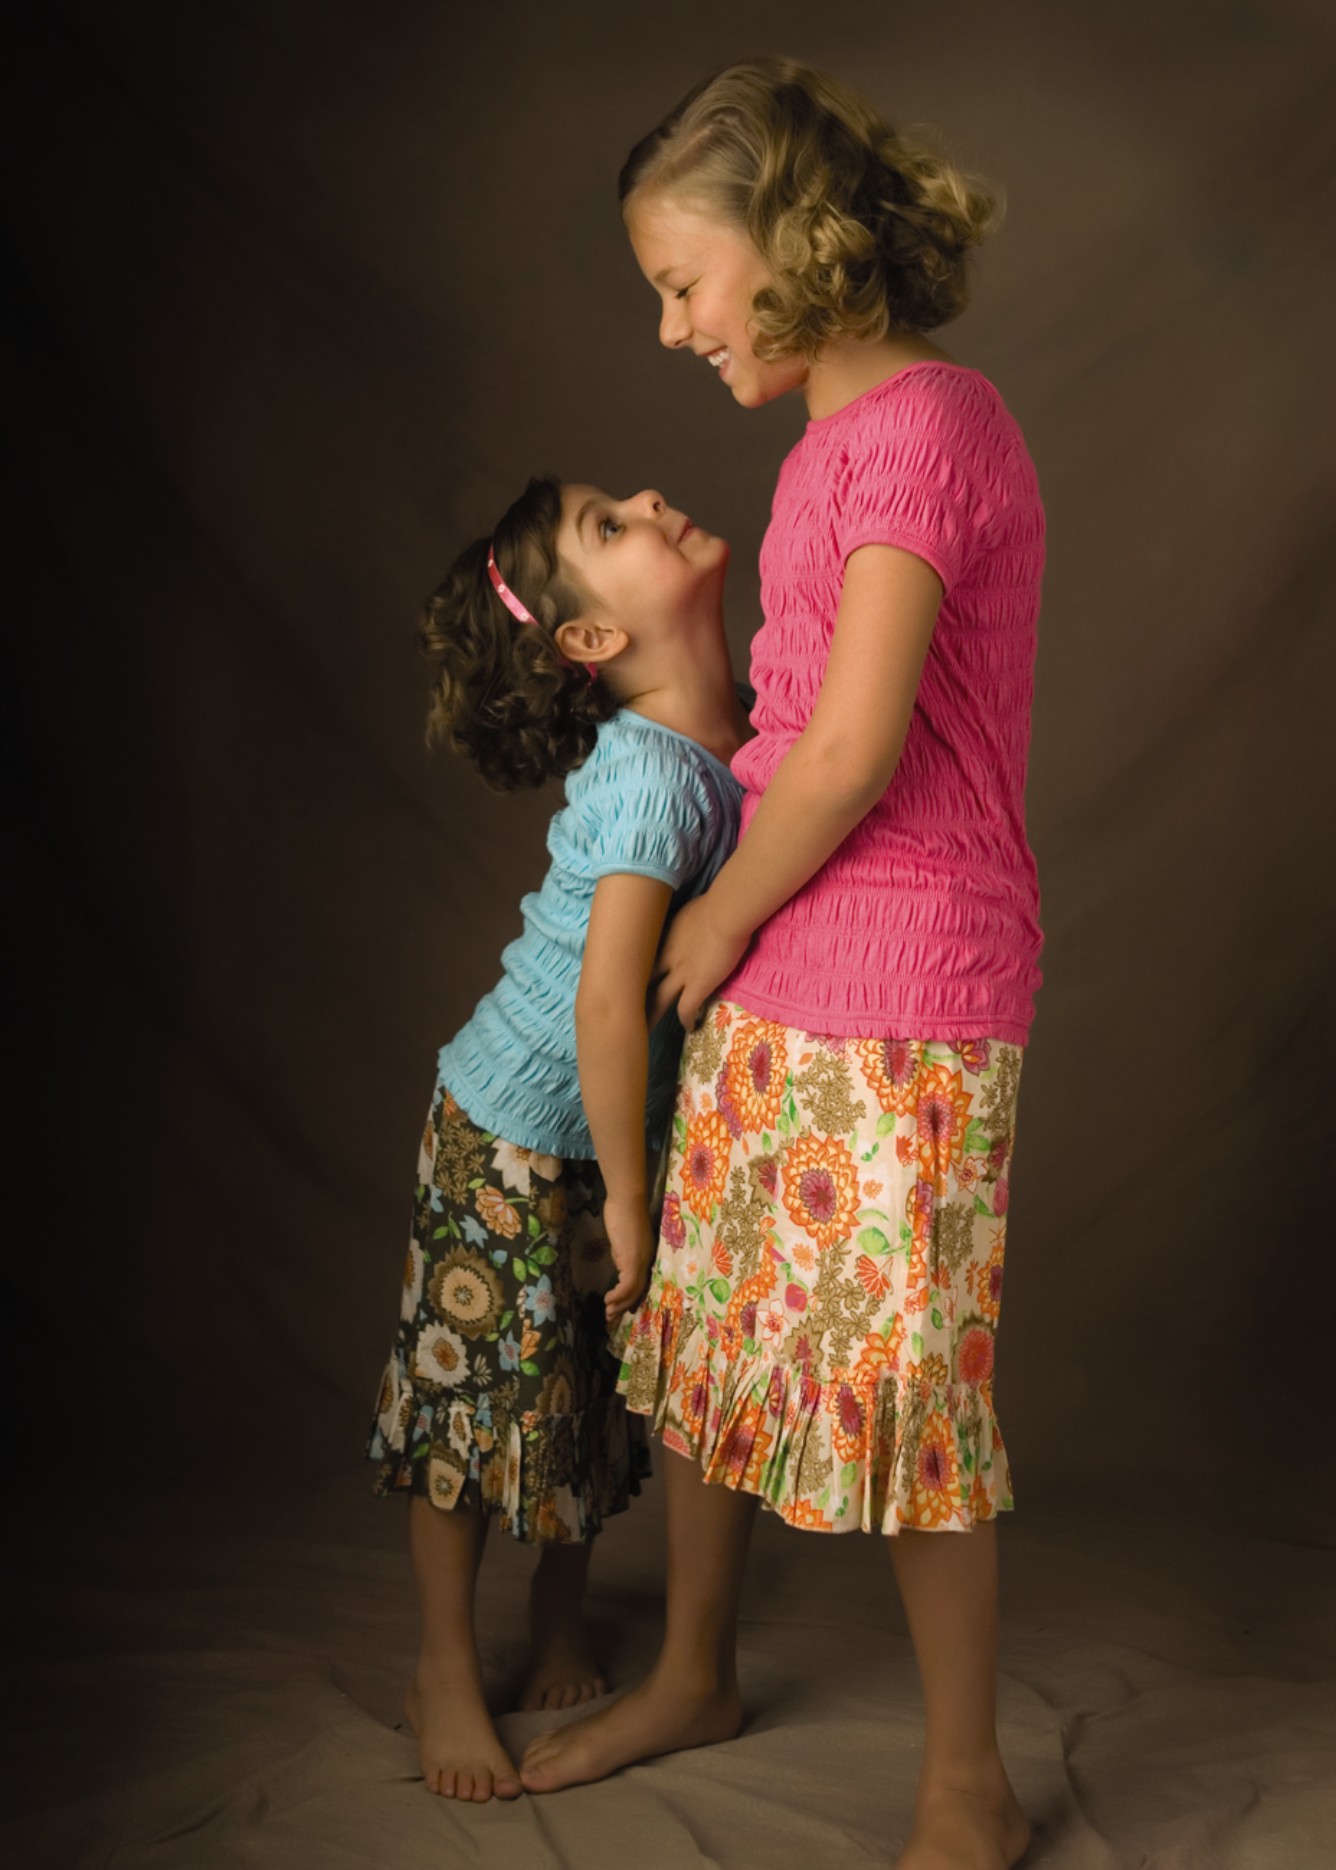
4-24
ABOUT THIS PHOTO This photo perfectly illustrates the personality and relationship between these two sisters. This was shot with the lighting setup outlined earlier in the chapter. Taken at ISO 100, f/2.8, and 1/250 second. ©Allison Tyler Jones / www.atjphoto.com
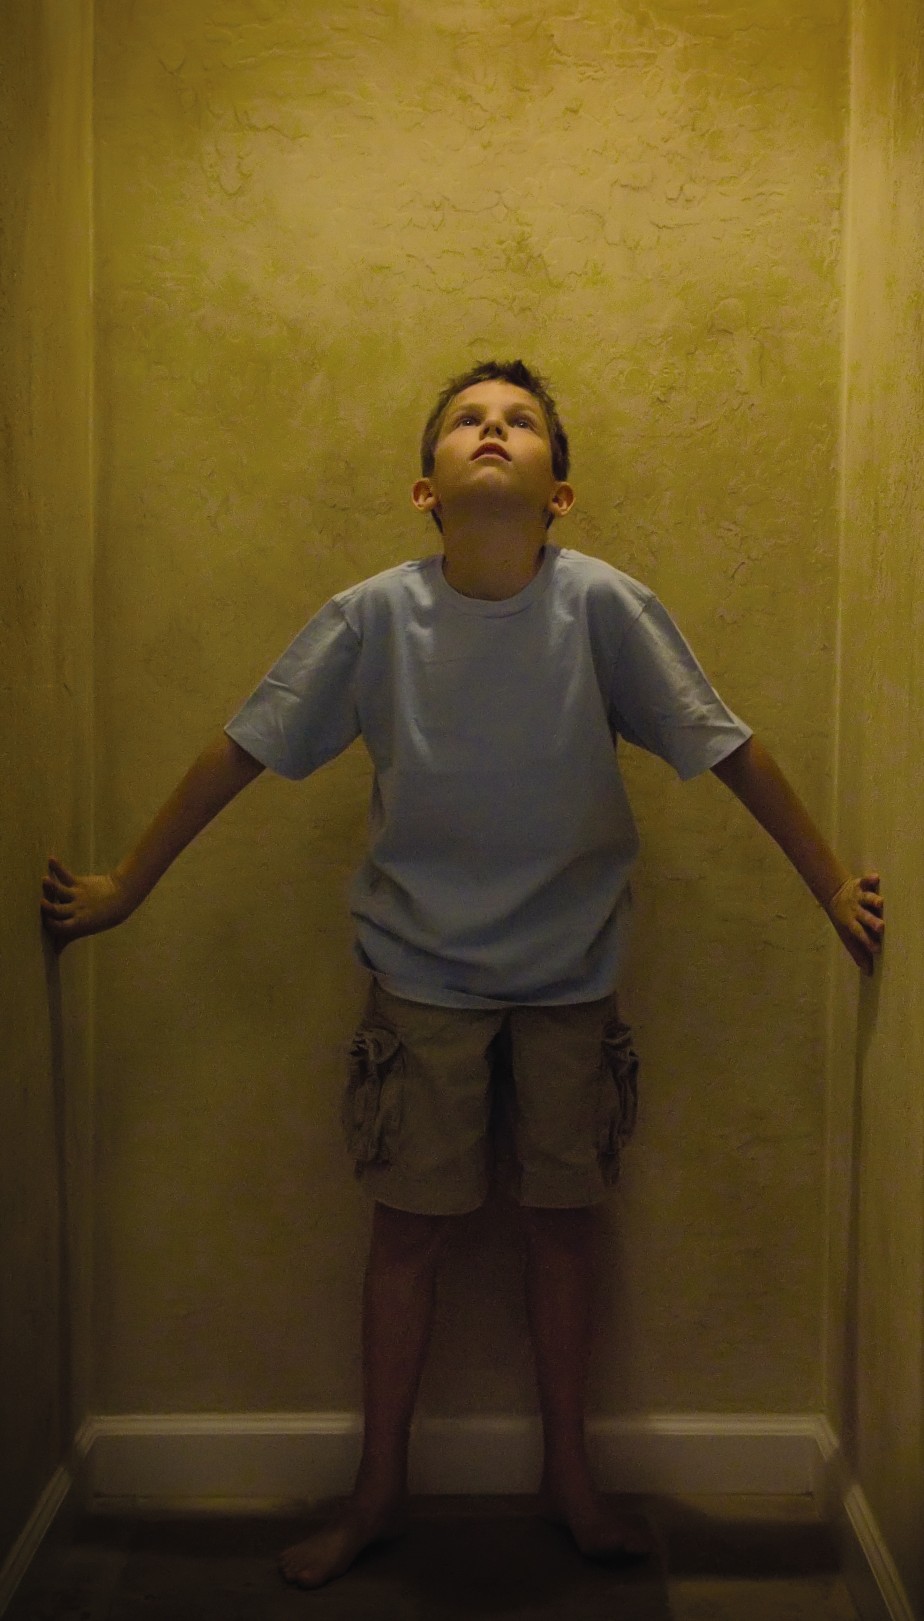
Assignment
Manipulating the Light
Choose one of the lighting situations described in the chapter and try to work out the lighting to best flatter your subject. You may want to experiment using a single window to light your subject or try using rim lighting to separate your subject from the background. Just try one of them and focus all your attention on the lighting and how it is falling on your subject. Walk all the way around the child you are photographing, taking photographs from different directions and documenting how the light falls from different angles. Examine the results once you are finished and determine which lighting patterns most reflect your individual style.
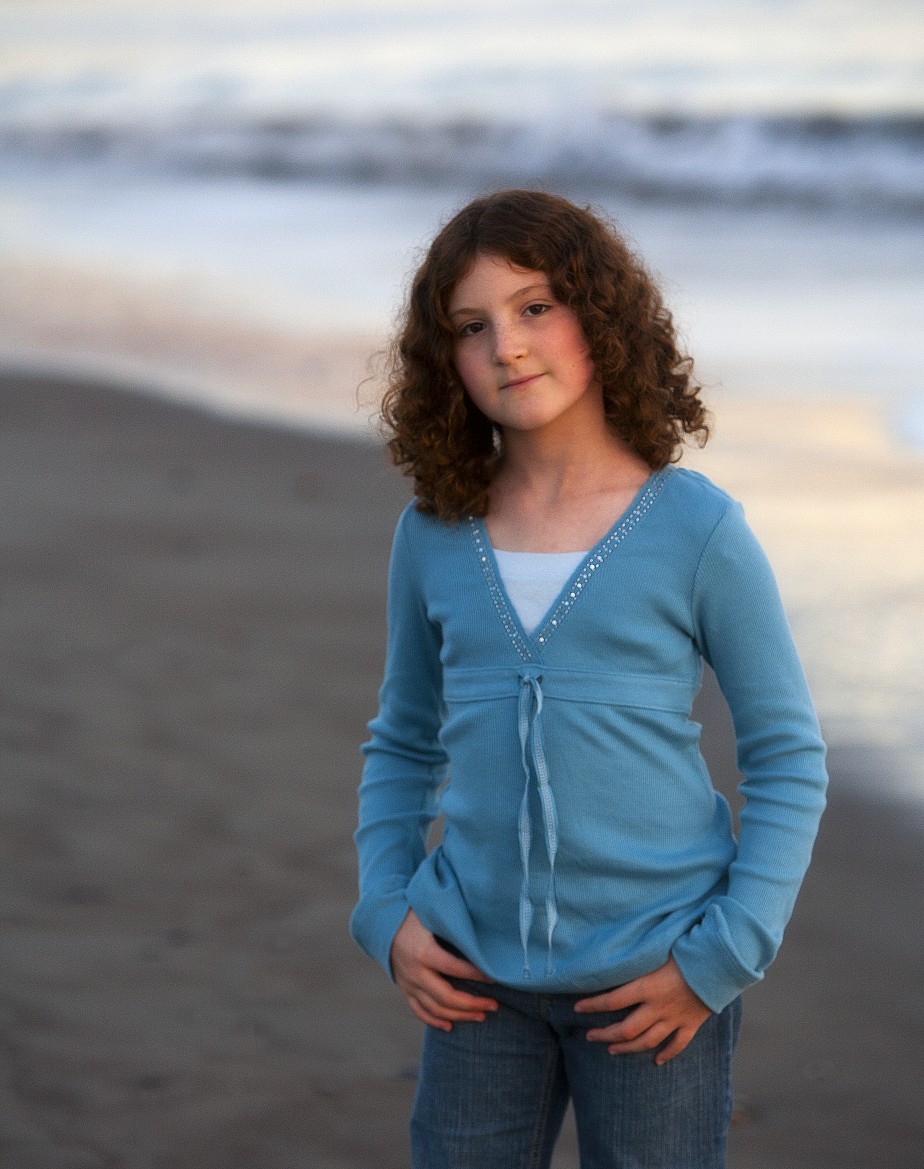
In this image, I chose to use late afternoon sun at an angle, creating a halo effect on my grandson’s hair. This light really adds to the mood of the photograph. Taken at ISO 400, f/5.6, and 1/320 second.
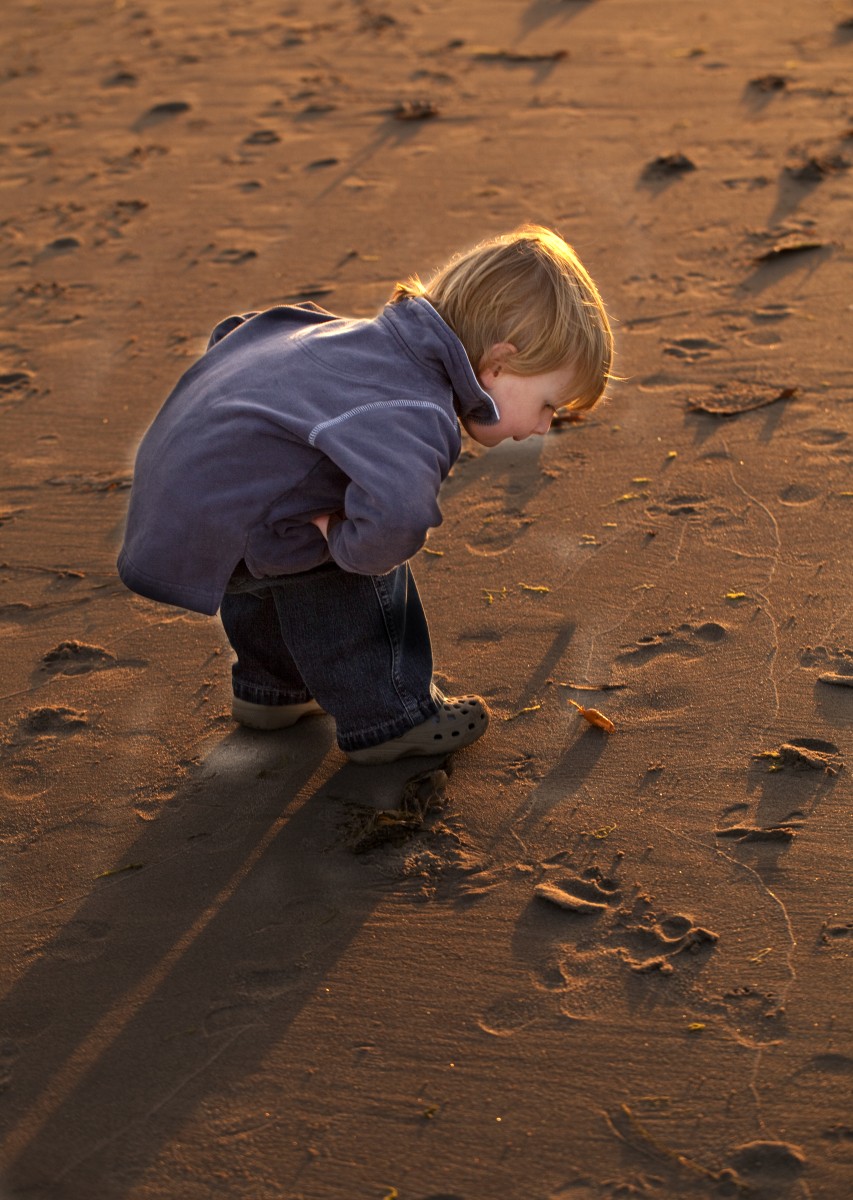
©Ginny Felch / www.photographingchildren.com
Remember to visit www.pwsbooks.com after you complete this assignment and share your favorite photo! It’s a community of enthusiastic photographers and a great place to view what other readers have created. You can also post comments, read encouraging suggestions, and get feedback.