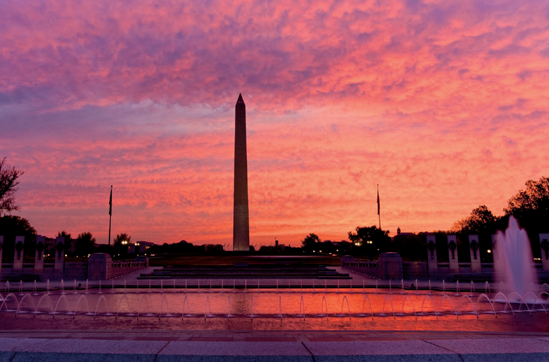
The National World War II Memorial and the Washington Monument on an early fall morning from its west side. Taken at ISO 200, f/22, 1.3 seconds with a 35mm lens.
The National World War II Memorial is dedicated to Americans, both civilian and military, who served during World War II. The ceremonial entrance to the memorial is from 17th St. SW. Here, the bases of granite feature the military service seals of the Army, Navy, Marine Corps, Army Air Forces, Coast Guard, and Merchant Marine.
At either end of the memorial are pavilions representing the victory in the Atlantic and Pacific theaters. Granite pillars surround the memorial, representing the American states and territories, arranged by their order of entry into the Union. On the western side of the memorial is the Freedom Wall, adorned by sculpted gold stars representing Americans who gave their lives during the war.
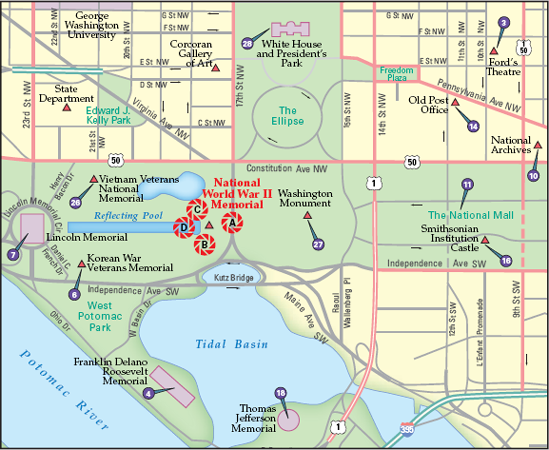
Figure 12.1. The best locations from which to photograph the National World War II Memorial: (A) 17th St. SW entrance, (B) between Delaware and New Jersey pillars, (C) next to Atlantic and Pacific Pavilions, and (D) across the Rainbow Pool. Nearby photo ops: (3) Ford's Theatre, (4) Franklin Delano Roosevelt Memorial, (6) Korean War Veterans Memorial, (7) Lincoln Memorial, (10) National Archives, (11) National Mall, (14) Old Post Office, (16) Smithsonian Institution Castle, (18) Thomas Jefferson Memorial, (26) Vietnam Veterans National Memorial, (27) Washington Monument, and (28) White House and President's Park.
The National World War II Memorial's spare, open design is somewhat challenging to photograph. In the next sections, I go over some good vantage points to get you started.
The ceremonial entrance to the memorial off of 17th St. SW provides a higher vantage point to see the memorial, and it's also just far enough away to capture the entire memorial. Because the memorial's design is horizontal, cropping the photo at the bottom to eliminate some of the grass area helps the composition.
This location is also a good opportunity to take a panoramic photo like Figure 12.1. To do this, use a tripod and shoot several images in sequence by rotating your tripod's head from one side of the memorial to the other. You can stitch the photographs together manually or use software to create one large image.
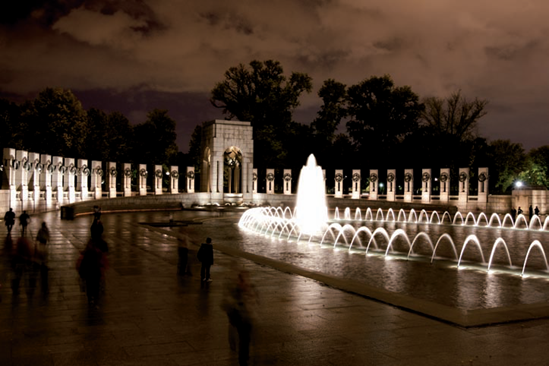
You can position yourself between these two pillars and get an elevated view of the other side of the memorial. (Of course, the same location on the other side should work as well.) This vantage point works well not only for the composition (shown in Figure 12.2) but also because you are high enough to capture the image over other visitors below.

Viewing the pavilions from their north or south sides is another good vantage point. On the inside, you can get the fountains that are next to each one, while on the outside you can see the rest of the memorial through the pavilion and pillars (see Figure 12.3).
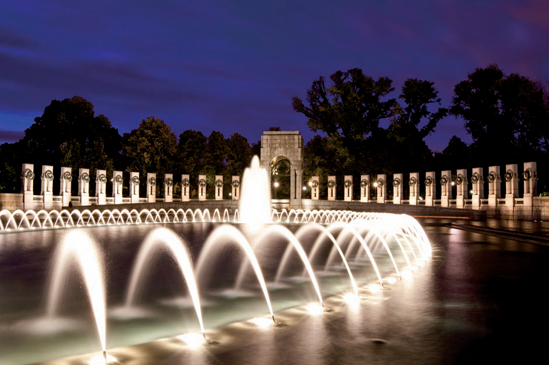
Another idea is to look across the Rainbow Pool to the pillars on the opposite site (see Figure 12.4). This can be photographed from either next to the pool or from within the pavilion. An alternative is to go to either side of the pool and compose the shot with the pavilion in the back.
The World War II Memorial definitely requires a thorough exploration before you begin photographing. You have plenty to see, and there are also usually many veterans of the war here, especially on the weekends.
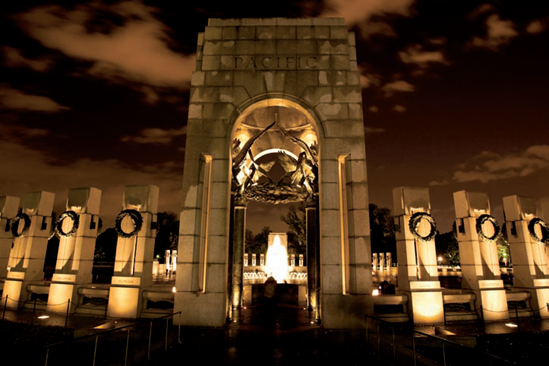
Figure 12.4. The Pacific Pavilion at the World War II Memorial (see C on the map). Taken at ISO 800, f/8, 6 seconds with a 20mm lens and a tripod.
Figure 12.5. The view from across the Rainbow Pool at the World War II Memorial (see D on the map). Taken at ISO 200, f/18, 30 seconds with a 35mm lens and a tripod.
Spectacular images here require good composition but generally basic equipment.
Most of the images in this chapter were shot using a 35–50mm lens, the standard lenses on most any camera with a zoom lens. The exception is the image of the Pacific Pavilion, but you can get a similar shot perhaps by being farther from it and using a longer lens. Also, an image from the 17th St. SW entrance requires a wide lens of between 16 and 20mm. It is possible, however, to capture a similar image from the east side of 17th St. SW with a longer lens.
Because the sky can often play a big role in images from here, having a polarizing filter is a good idea to help enhance the sky during the day, as well as a graduated neutral density filter to even out the exposure between the sky and the memorial.
Tripods are allowed inside the memorial here, although they are restricted near the Freedom Wall (which contains the Field of Stars) because of the large number of visitors in this area. Also, be respectful to other visitors anywhere you have a tripod setup. This memorial can become very crowded, and each individual photographer who visits acts as an emissary for all photographers.
When photographing here during the day in direct sunlight, you will likely need to help your camera determine the proper exposure by dialing in some additional exposure compensation or by using an automatic setting for snow or the beach. It definitely depends on your camera, but the granite in the memorial can become very bright in direct sun and if your camera sees an abundant amount of it, it may underexpose the scene simply because it is so bright.
Photographing at night before digital cameras were the norm was not terribly simple, but now that LCD screens are standard on cameras, it's much easier to both see the composition and judge exposure. Many cameras have an automatic Night setting that is usually geared towards handholding your camera. If you're not using a tripod, give this mode a try.
If you are comfortable using your camera's Aperture Priority or Shutter Priority settings, you can simply set an aperture of f/11, for example, to see how its computer is deciding to expose the scene. Most cameras when set to these priority settings allow you to use exposure compensation, so you can adjust the exposure up or down depending on what your preview shows. One thing to keep in mind is that digital cameras have maximum shutter speeds that vary by camera.
Finally, white balance can dramatically change the look of the images. Most camera's Auto white balance modes should do a good job, but sometimes they may try to make the scene overly warm (yellow) looking, which can make the image appear muddy and lacking contrast. Try out the different settings while shooting to see which one looks the best (or if you are shooting in RAW mode, you can change the white balance later).
There are two ways to think about photography here: If you can determine when you get there, try for dusk to night. If you can't (for example, if you are going to be part of an organized tour), concentrate on using the existing light to your advantage.
The difference between night and day at the World War II Memorial is significant, to the point that it almost appears as two different places. At night, the memorial comes alive — the pillars light up, the fountains sparkle, and the difference is remarkable. All the previous images can be photographed at any time during the day, however.
Because the memorial's design is airy and open, the sky above you determines a lot about how your pictures look — so capturing it when the sky is clear is definitely advantageous. It's also a nice scene when the memorial is still wet from a rain, because much of the surface becomes reflective.
It's a good idea to factor in the weather when you are thinking about how to photograph here: Sunny, contrasty days could work well with using repetition in your photo with lots of highlights and shadow, such as with all the pillars in a line. On the other hand, a cloudy, foggy day could mean evenly lit, ethereal images of the memorial.
The transition between evening and night is a nice time to visit here (see Figure 12.5), but later at night works out well, too. At night, any low clouds usually reflect all the yellowish lights from the city, which gives an interesting but sometimes artificial look. Note that the fountain lights are often turned off late at night through the morning, so unfortunately, morning shots with the fountains illuminated are rare.
As always, these shots are great starting points for your exploration of the memorial. There are certainly many more to be done.
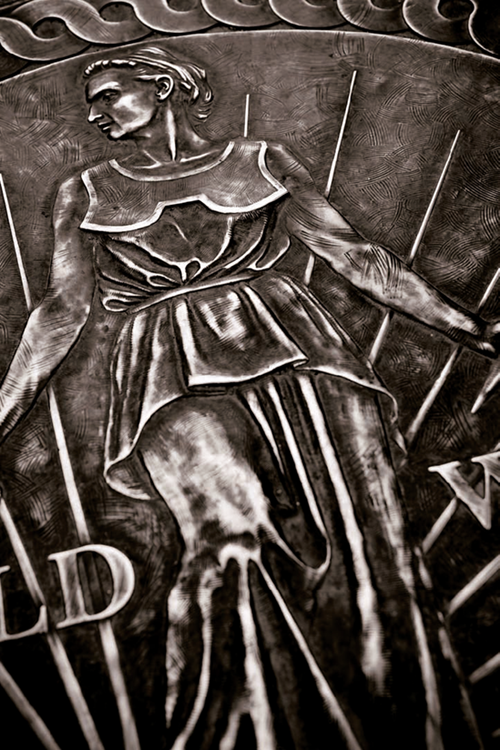
The World War II Memorial is especially good for exploring low angles, because the space is so open. You can use your camera as an excuse to explore the fine details of the memorial, as in Figure 12.6.