Chapter 1. Capture Photos
We can’t start a book about photography without capturing some photos, right? Lucky for us, it turns out that Apple currently offers some of the best cameras on the market.
Not long ago that would have been a controversial statement. Apple doesn’t make any “cameras”—at least, not in the traditional sense. But I’m guessing you probably own an iPhone (or iPad or iPod touch), which might capture more photos than an old point-and-shoot or DSLR in your closet somewhere. I shoot with a variety of cameras, including DSLR and mirrorless models, but the convenience of snapping photos with my iPhone is unbeatable.
And it’s not as if shooting with an iPhone means you’re giving up a lot of image quality. Sure, it’s limited in some ways compared to a DSLR—no optical zoom or interchangeable lenses, for example—but the results can be stunning. Apple dedicated an entire “Shot on iPhone 6” marketing campaign to prove it (www.apple.com/iphone/world-gallery/).
In this chapter, I cover how to make photos and videos using the cameras in the iPhone, iPad, and iPod touch. Later on, I’ll go into detail about what happens to them further along in Apple’s photo ecosystem.
Capture Photos Using the Camera App
It’s time for me to make a confession: Even though dozens of photography apps exist, and even though I’m a photographer who regularly shoots in manual mode on my DSLR, I almost always use the built-in Camera app when I take photos using my iPhone. Here’s why:
1. On your iPhone or iPad, press the Sleep/Wake button or the Home button to activate the lock screen.
2. See that little camera icon in the lower-right corner? It’s a shortcut. Drag it up to open the Camera app directly (1.1).

When I see a photo opportunity and I have just my iPhone, it’s usually something spontaneous. Being able to launch the Camera app and snap a photo within seconds makes all the difference.
Of course, you can also open the Camera app the traditional way, by tapping its icon on the Home screen.
Take a photo
The Camera app embodies the phrase “point and shoot.” Position your subject on the screen and do the following:
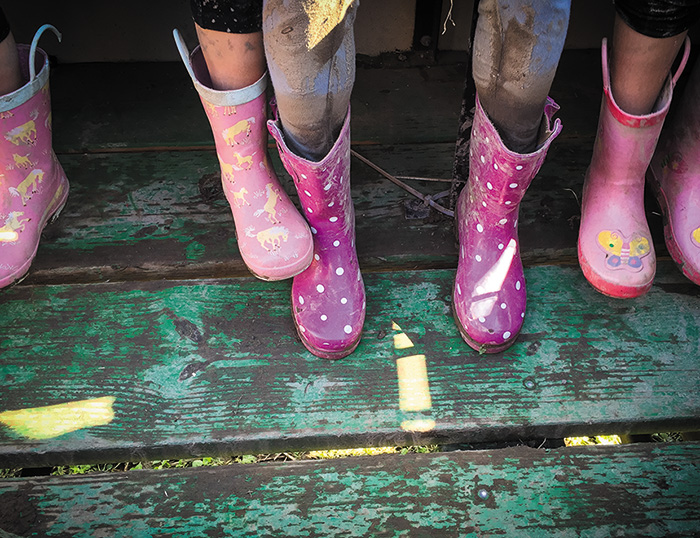
1. Make sure the mode is set to Photo (which is the default) (1.2).
2. Tap the white shutter button to take a photo.
Or,
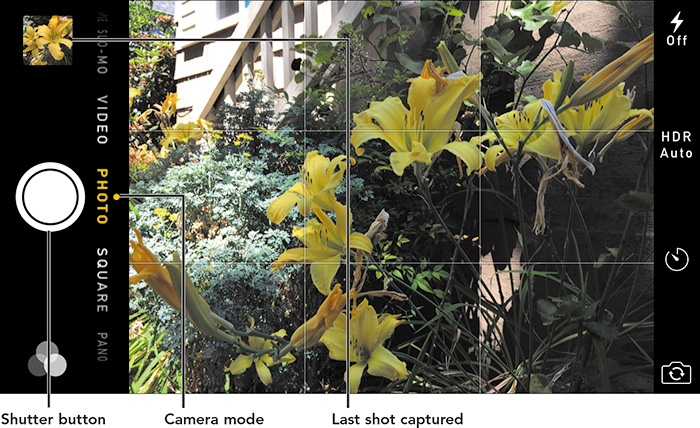
Press a volume button (either one) on the iPhone or iPad’s case to trigger the shutter. This option is often easier than trying to “stab” the shutter button on the screen (1.3).
A thumbnail of the image you shot appears near the button. The photo is stored in your Camera Roll, a special album in the Photos app.
Adjust focus and exposure
The camera does a pretty good job choosing which items should be in focus and how bright or dark the scene should be. If people’s faces are in view, the app will highlight those and focus on them. Sometimes, though, the app needs a little nudge:
• To choose a focus point, tap once on that spot on the screen. The app also uses that point as the basis for calculating exposure.
• To lock exposure and focus so they don’t change even if you move the device, touch and hold until you see AE/AF LOCK appear at the top of the screen. It will remain locked until you take a photo or tap elsewhere on the screen.
• To adjust the exposure of the scene manually, touch to set a focus point and then drag the Exposure slider that appears to the right of the focus reticle up or down (1.4).

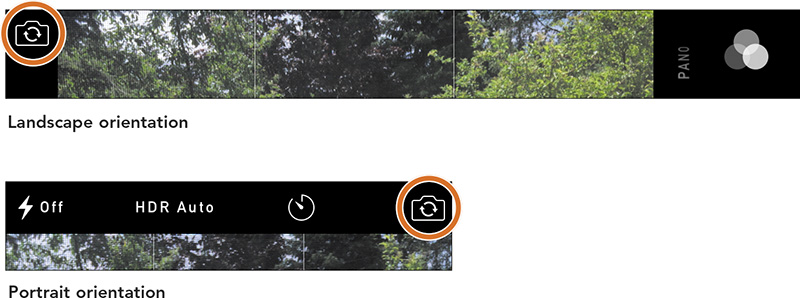
Switch cameras
Remember during the dark ages, when we had to turn the camera around to take a selfie, not knowing if we’d actually framed ourselves in the image until after the shot? The front-facing camera on the iPhone and iPad saves us from that nightmare (even if the image quality isn’t as good as the back-facing camera; it’s designed primarily for participating in FaceTime video calls). Tap the Switch Camera button to alternate between the two cameras (1.5).

![]() Tip
Tip
When you orient the iPhone or iPad to take either a portrait (tall) or landscape (wide) photo, make sure the app is also oriented properly. Sometimes if I’m holding the device at an odd angle, or shooting top-down, the device doesn’t click into the correct orientation, leading to photos that need to be rotated in the Photos app (which is easy, but an additional step). The entire interface doesn’t shift when you turn the device, but some of the icons do. Look at the Switch Camera button to see how it’s oriented, and turn the device to change it if needed (1.6).
Capture photos in Square mode
The Camera app’s shooting modes, such as Photo and Video, all capture different types of images—except the Square mode. Square is just like Photo, but it automatically records in a square aspect ratio. Swipe the mode names or tap one to jump to it.
Capture photos using the Apple Watch
If you own an Apple Watch, you can use it as a remote trigger to capture photos on the iPhone. It’s great for snapping photos of yourself or a group when you’re in the picture. Stabilize the iPhone on a tripod or some other method of keeping it steady, and then do the following:
1. On the Apple Watch, open the Remote Camera app. If the Camera app on the iPhone isn’t already open, it automatically launches. You’ll see a preview on the watch of what the iPhone’s camera sees.
2. Tap an area of the image to set focus and exposure (1.7).

3. Tap the white shutter button to snap a photo. Or, tap the Timer button to start a 3-second countdown before the shot (and to prevent seeing your arm raised in every shot of yourself). (See “Timer mode,” later in this chapter, for more information.)
4. Tap the Review button to see the photos on the watch.
Images you capture on the watch are automatically saved to the Photos app on the iPhone.
Photography Fundamentals: Composition
• The Rule of Thirds: Split the frame into thirds both vertically and horizontally, and align prominent objects along those thirds. For example, instead of putting a person directly in the middle of the shot, position them one-third the distance from either edge. The Camera app makes this easier by overlaying a grid on the screen; go to Settings > Photos & Camera > Grid to enable or disable it.
• Leading lines: Take advantage of lines or items in the scene that direct the viewer’s eyes to the main subject (1.8).

1.8 This photo demonstrates the rule of thirds (the girl aligned where a rightthird line would be) as well as using leading lines (the blinds) to direct the viewer’s attention.
• Framing: Look for natural or manmade objects that frame the scene—tree branches that bend over a path, a barn window that looks out over farmland.
• Background items: Be conscious not only of your subject, but also of what’s going on elsewhere in the frame. A famous example is taking a photo of someone in front of trees such that it looks like a branch is growing out of her head.
The iPhone’s flash
When you’re shooting in dark or challenging lighting conditions, the camera needs more light to avoid overly dark photos. One method is to add new light using the LED flash on the back of the iPhone. The iPhone 5s and later incorporate a novel dual-LED flash: one warm, one cool. After the camera evaluates the scene, it fires the two LEDs in combinations that balance the color and do a much better job than earlier single-LED flashes of not blowing out the image with too much light.
To activate the flash in the Camera app, tap the Flash button to choose Auto (the camera decides), On (it fires every shot), or Off (no flash fires, even in dark situations) (1.9).

![]() Tip
Tip
The flash can also be used as a flashlight. Swipe up in any app (even the lock screen) to reveal Control Center, and tap the Flashlight button (far left) to turn it on or off.
HDR
Another method the iPhone can use to add light to a scene is HDR (high dynamic range). In HDR mode, the Camera app captures multiple photos at different exposures—from very light to very dark—and combines them into one image that balances them. HDR is great for scenes where the subject is in shadow in the foreground and the background is bright (1.10), or when the overall lighting is dark.

1.10 The HDR version greatly improves the sky in this example, while still keeping detail in the shadowed foreground.
To enable HDR, tap the HDR button and choose Auto, On, or Off.
In Auto mode, the Camera app displays a yellow HDR badge at the bottom of the screen when it detects that HDR will work better than a normal exposure.
![]() Tip
Tip
When the Camera app captures an HDR image, it also records a regular version and saves that to the Camera Roll. If you prefer to keep only the HDR, go to Settings > Photos & Camera and turn off Keep Normal Photo under the HDR (High Dynamic Range) section.
Burst mode
Ever try to take a picture of a moving toddler? How many of those turned into artful blurs? The burst shooting mode on the iPhone 5s and later (and the iPad Air 2) captures up to 10 images per second. All you need to do is hold the shutter button—a running total of shots recorded appears near the shutter button (1.11).

To avoid overwhelming you with potentially dozens of pictures, the Photos app picks what it thinks is the best one and presents that as the shot you see. You can also pick out other stills by doing the following:
1. In the Photos app, tap the burst you shot to view it.
2. Tap the Select button.
3. Scroll through the images and tap the ones you want to keep (1.12).

4. Tap Done.
5. In the dialog that appears, choose Keep Everything to continue to store the full burst, or choose Keep Only Favorites to save the ones you marked and delete the rest.
Timer mode
Tap the Timer button to choose a 3-second or 1-second delay before the shutter fires. In the Camera app, the timer has a bonus feature: it captures a burst of 10 photos when the time is up, which helps avoid the inevitable shot where someone in the picture has their eyes closed.
![]() Note
Note
When the front-facing camera is being used, the timer is still available, but HDR and the flash are not options.
Zoom
Pinch outward with two fingers to zoom in, but keep this in mind: the camera lens doesn’t actually zoom, so what you’re doing is enlarging pixels in software. The result will be images that are softer than you may like.
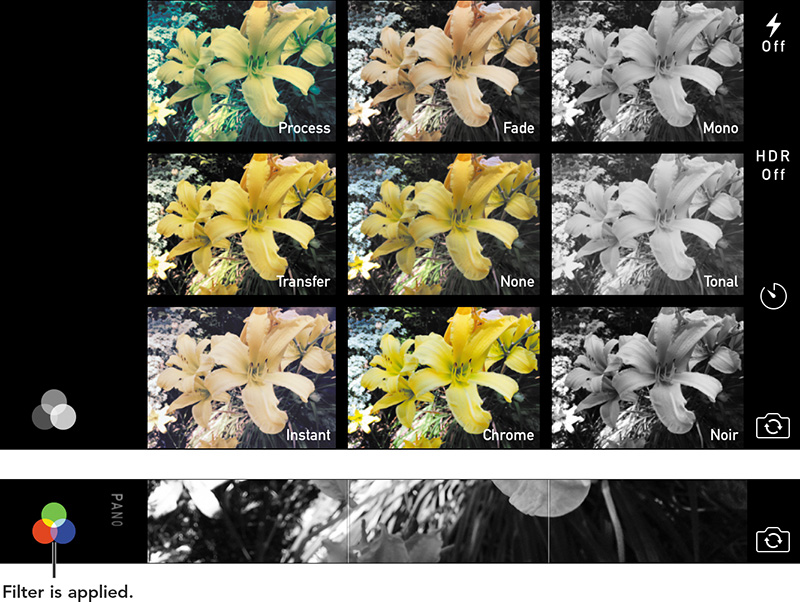
Shoot using a filter
The Photos app, as you’ll see in the upcoming chapters, includes preset filters that apply stylized looks to your photos, such as black and white or a simulated instant-film appearance. You can also shoot photos with a filter active, allowing you to see just how that look will apply to the scene in front of you.
What I like about the filters is that they aren’t permanently applied to the image you capture. The Camera app saves the original pixels that were recorded, so later you can change the filter or remove it entirely.
To shoot with a filter, tap the Filters button and choose one of the filters (1.13). The Filters button then appears in color to remind you that a filter is active.
![]() Tip
Tip
When you shoot with filters, they remain “sticky” to the shooting mode you’re in. For example, if you switch to Square mode and choose the Chrome filter, every shot you take in that mode will be made with Chrome. If you switch to another mode, the next time you return to Square mode the Chrome filter will be applied until you change it.
To remove a filter, tap the Filters button and choose the None option in the center of the screen.
Shoot a Panorama
Traditionally, the way to make a panorama—an extra-wide photo of a scene—was to take a bunch of pictures side by side, and then use external software to stitch them together into one image. Apple’s approach is different, and much easier to accomplish.
1. In the Camera app, switch to the Pano mode.
2. Hold the iPhone or iPad in its vertical orientation and tap the shutter button once.
3. Move the device in the direction indicated by the arrow, keeping the arrow’s tip on the yellow line (1.14). The app will remind you if you move too far off the line or if you need to speed up or slow down.


4. When you want to end the panorama, tap the shutter button again to stop. Or, the capture ends when you reach the other side of the screen.
The Camera app records your action and stitches together the panorama as you shoot it, making tonal adjustments during the capture to avoid any jagged divisions.
![]() Tip
Tip
You can shoot a vertical panorama, too. Start low with the device in landscape orientation and pan up.
![]() Tip
Tip
Have you heard of the “panoselfie?” I thought it sounded like a joke, too, but it’s actually pretty cool. Instead of turning your body around to take a panorama, stay in one position and turn the iPhone 360-degrees in your hands to get a panorama where you’re in the shot (1.15).

Shoot a Video
I’ve written extensively about iMovie over the years, and let me tell you, the video-recording capabilities of the iPhone still make me shake my head in wonder. High-definition video in my pocket? From a device that also happens to be a small supercomputer and communicator? Amazing. Here’s how to capture some of that amazement yourself:
1. In the Camera app, switch to the Video mode.
2. As with photos, tap to set a focus and exposure point, adjusting exposure by dragging up or down if needed. To lock focus and exposure, touch and hold a spot until you see AE/AF LOCK appear.
3. If you’re shooting in a dark environment, tap the Flash button to turn the flash on (or set it to Auto and let the camera decide).
4. Tap the red Record button (formerly the white shutter button) to begin recording. The counter at the top of the screen indicates elapsed time.
While you’re recording, you can tap elsewhere on the screen to change the focus and exposure.
5. Tap the button again to stop recording.
You can also snag snapshots as you record by tapping the smaller shutter button that appears. Be forewarned that they’re less than normal photo resolution (2720 by 1532 pixels on the iPhone 6) and at the 16:9 video aspect ratio, but that’s better than trying to pull out a frame of video later.
![]() Tip
Tip
By default, the Camera app records at 30 frames per second (30 fps), which is standard for video playback (movies you watch in the theater are recorded at 24 fps). The iPhone 6 and later can also record at 60 fps, which allows for smoother video—but also an increase in the storage required to save the movie. Go to Settings > Photos & Camera, and under Camera, enabled the Record Video at 60 FPS option.
![]() Tip
Tip
Shooting and editing video is a much deeper topic than I need to go into here—in fact, I wrote an entire book about it! Learn all about video on iOS devices in iPad and iPhone Video: Film, Edit, and Share the Apple Way.
![]() Note
Note
Allow me to make a personal appeal? When shooting video, try to remember to hold the iPhone or iPad in its horizontal orientation. Video and film are horizontal, and even though you can record video vertically, it makes things difficult if you want to share or edit it later on—in most cases, you’ll need to crop the image, potentially cutting out the very thing you were focused on.
Shoot a Slo-Mo Video
HD video on a phone is quite the achievement, but the iPhone 5s and later can do one better: slow-motion HD video. The iPhone 6 and iPhone 6 Plus in Slo-Mo mode shoot 240 fps, slowing the action to 12.5 percent of normal speed (the iPhone 5s and iPad Air 2 manage 120 fps). Slo-Mo makes everyday things like butterfly wing flaps and hair flips even more compelling.
In the Camera app, switch to the Slo-Mo mode; recording the video is the same as recording a regular video. On the iPhone 6 and iPhone 6 Plus, you can choose to record in 240 fps or 120 fps by tapping the number on the screen (1.16).

![]() Tip
Tip
Slo-Mo videos shoot at a lower resolution than regular videos, 720p (1280 by 720 pixels), to record so many frames. The tradeoff is worth it.
When you play the Slo-Mo video, the Photos app automatically runs it in normal time at first, then transitions to slow-motion, and finally wraps up in normal time again. You can choose where the transitions occur by doing the following:
1. After recording the Slo-Mo video, tap the thumbnail in the Camera app to review it, or open the Photos app and tap the clip.
2. At the top of the screen, below the frame viewer, is a control that represents the speed. Drag the black vertical bars to frame the slow-motion portion of the video (represented by tickmarks spaced farther apart) (1.17).

3. Tap the Play button to review the changes.
A Slo-Mo video can have only one slow section; if you want to adjust the speed of multiple sections, you’ll need to do that in a tool such as iMovie.
Shoot a Time-Lapse Video
Another method of shifting time for your own ends is to shoot a time-lapse video. Instead of recording hundreds of frames per second, the Time-Lapse mode takes a still photo every few seconds over a long period of time, resulting in a sped-up video that compresses time.
Set the iPhone or iPad on a tripod or some other sturdy location, switch to the Time-Lapse mode, and tap the Record button (1.18).

![]() Tip
Tip
Just how often does the Camera app record frames for time-lapse movies? It turns out Apple is being clever. The app “snap(s) photos at dynamically selected intervals,” which turns out to vary based on how long you record. As explained by Dan Provost of Studio Neat, a company that makes an app called Frameographer, the longer the recording time for the video, the fewer number of frames Apple records. For example, recording for less than 10 minutes yields 2 frames saved every second, while recording for up to 80 minutes yields 1 frame every 4 seconds. The result: a movie that runs between 20 and 40 seconds, with action happening faster the longer the recording duration, and played back at a smooth 30 fps. (See Provost’s write up here: http://www.studioneat.com/blogs/main/15467765-how-does-the-ios-8-time-lapse-feature-work.)
Shoot Using Other Apps
Apple’s approach has always been simplicity and an appeal to the most people it can reach. That leaves plenty of room for other developers to create photo apps with particular strengths. And believe me, there are a lot to choose from at the App Store. Here are a few that are worth checking out:
• Camera+: This app was one of the early apps to extend the photo-capture capabilities of the iPhone. It includes a host of features, like a horizontal level and white balance presets, but the one that grabbed my interest initially was the ability to set separate focus and exposure spots (1.19). (http://campl.us)

• Manual: So you’d prefer not to let the computer do the thinking for you? Manual exposes the photo settings that give you control over your shots. Set shutter speed, ISO, focus, and white balance yourself (1.20, next page). The one control you can’t access is aperture, because the iPhone’s fixed lens is set at a maximum f/2.2 (or f/2.4 on the iPad Air 2). (http://shootmanual.co)

• 645 Pro Mk III: I’m sorry, did I imply that Manual gave you all the control you wanted? 645 Pro Mk III is the app version of the photographer who can name every item in your local photography store (1.21). It has manual controls, simulated film stocks and filters (not the Instagram-style filters, but the glass ones you affix to the lens of a DSLR), and more. (http://jag.gr/645pro/)

• Hydra: Creaceed, the creators of this app, decided to focus on a few specialized features for capturing photos instead of trying to reinvent an overall camera. Hydra blends multiple exposures to build HDR photos and videos, ensure better low-light photos and zoomed-in shots, and even create high-resolution 32 megapixel images (1.22). (http://www.creaceed.com/ihydra)
