Chapter 2. Convert iPhoto and Aperture Libraries

Photos for OS X replaces both iPhoto and Aperture. Although each application will continue to work for a while, Apple won’t release any more updates other than to fix egregious bugs. I suspect that within a year or two the applications will no longer work at all. So what happens to the thousands of photos currently stored in their libraries?
The good news is that the Photos application offers a direct path for each application. It will open the libraries directly, with very little trouble involved. In fact, you’ll still be able to open the libraries in iPhoto or Aperture even after you’ve switched to Photos, (although you won’t want to, as I describe shortly). However, doing so involves a number of tradeoffs, particularly if you use Aperture.
Before you convert your current libraries to Photos, take a spin through this chapter for important tips on how to prepare and ease the transition. If you’re starting fresh, skip ahead to Chapter 3.
Back Up Photo Libraries
This is where I get to play professional nag (in a friendly way) and ask, “You do have a current backup strategy, right?” Backups are important for keeping your computer’s data safe, and for recovering quickly after a setback like a failed hard disk, but they’re essential when it comes to digital photos. If the image files on your computer don’t exist anywhere else, you could lose them all, forever, in a few seconds. Trust me, I’ve sat helpless as hard disks self-destructed next to me—even once when I did not have a good backup. It’s terrifying.
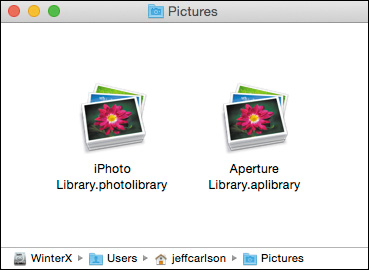
I’ll assume you’re nodding along, so here’s the first step in the conversion process: Make sure your iPhoto and Aperture library backups are up to date. Both applications store the libraries in the Pictures folder located in your Home folder (in the Finder, choose Go > Home, and then open the Pictures folder). There, you’ll find one or both of the following files, depending on the application you own (2.1):
• iPhoto: iPhoto Library.photolibrary
• Aperture: Aperture Library.aplibrary
Drag that library file to an external hard drive to make a copy; or, hold Option and drag it to another location on your hard disk to make a copy.
![]() Note
Note
Each one is actually a special type of file called a package, which is essentially a folder that looks like a file. Inside the package are the database that keeps track of everything, the photos themselves, and related files such as thumbnail images.
Although OS X’s Time Machine feature does back up your data, I recommend also making standalone copies of your libraries. In the unlikely event that something goes wrong during conversion, it’s easier to replace a photo library from a spare copy than from Time Machine.
Verify and Troubleshoot Libraries
When it comes to photo libraries, I tend to take an abundance of caution (as you can tell). With so many hundreds or thousands of photos, it’s almost impossible to see if something got missed or, worse, if something is corrupted. At their cores, iPhoto, Aperture, and Photos are databases that keep track of your photos. Apple built diagnostic tools that you can use to check things out if you notice something isn’t working correctly (such as mangled photo previews).
Before converting a library to Photos, even if iPhoto or Aperture are running fine, I recommend running two diagnostic steps to help ensure that Photos starts on solid footing. The first is to make sure the library has the correct system-level permissions set—permissions are what dictate which actions the operating system can take. Second, validate and repair the integrity of the database. Both steps are easy to do, even if the mechanisms are a bit hidden.
1. In iPhoto or Aperture, open the application and immediately hold the Command and Option keys to bring up the Photo Library First Aid dialog (2.2).
2. Select the first item, Repair Permissions, and click the Repair button. After a short while, depending on the size of your library, the repair process ends and you can view your library.
3. Quit the application.
4. Open the app again, holding Command-Option to access the Photo Library First Aid dialog.
5. Select Repair Database and click the Repair button.
iPhoto includes an extra item, Rebuild Thumbnails, which is useful if iPhoto isn’t displaying all the image previews. However, you can ignore it in this case because Photos for OS X builds its own thumbnails (and does it better and faster than iPhoto).
The final option in both applications, Rebuild Database, is overkill in preparation for moving to Photos unless you’re having serious stability problems. Depending on the size of your library, rebuilding can take a long time.
Merge Libraries
Is your “photo library” actually a scattered armada of smaller libraries you’ve created over the years? Perhaps you ran out of storage space on a hard disk, or you created new iPhoto libraries for special events. iPhoto and Photos for OS X offer no way to merge libraries into one master library, but you can do it in Aperture or using an application called iPhoto Library Manager. Combining libraries is best done before opening them in Photos for OS X; the developer of iPhoto Library Manager has released a new application for Photos, called PowerPhotos, but it doesn’t yet offer a merge feature.
If you choose not to merge libraries at this point, that’s fine—you may just want to get to Photos already without these interruptions. There is a way to do it later in Photos using iCloud Photo Library, but it’s not as elegant (see Chapter 3).
Merge libraries using iPhoto Library Manager
Fat Cat Software’s iPhoto Library Manager ($30) is like a wishlist of basic features Apple never implemented in iPhoto. It makes it easier to work with multiple libraries (by not having to hold Option at startup), finds and removes duplicate photos, and merges libraries. Here’s how to do the latter.
1. In iPhoto Library Manager, click the Merge Libraries button in the toolbar.
2. Choose a source library—the photos you want to add to your master library—and drag it to the Choose Source Libraries pane (2.3). Repeat if you want to incorporate other libraries.

3. Drag your main library—the one that will receive the merged photos—to the Choose Destination Library pane.
4. Under Duplicate Handling, choose whether the program should find and eliminate duplicates.
5. In the Options section, click the Show Preview Before Merging checkbox to see what will happen during the merge. That also allows you to act on any duplicates that crop up (2.4, on the next page).

6. Click the Preview button to review the new library.
7. If everything looks good, click Merge to combine the libraries.
Merge libraries using Aperture
Although iPhoto and Aperture share the same file format, only Aperture includes a method of importing the contents of other libraries from either application. It doesn’t search for duplicates the way iPhoto Library Manager does, though.
1. In Aperture, open the library you wish to use as your master. Choose File > Switch to Library if necessary to load the correct one.
2. Choose File > Import > Library (2.5).

3. In the dialog that appears, locate the library file that contains the photos you want to add, and click Import. The photos are copied (not moved, so make sure you have enough free storage to accommodate) to your open library.
What Changes in Photos for OS X
There’s one last topic to cover before opening an iPhoto or Aperture library in Photos for OS X. The new application looks and acts a bit different in practice, which I’ll detail in the next chapter, but it also does a few notable things during the conversion process. Before you open an existing library in Photos, skim the following items for an important heads-up.
Star ratings are gone
I use star ratings all the time to note which of my photos are better than others, which ones I want to edit further, and which ones should just fade into obscurity. In Photos for OS X, you can mark an image only as a favorite or not.
That doesn’t mean ratings completely disappear, however. Photos for OS X converts them to keywords instead. So, for example, a photo marked with three stars in iPhoto is tagged with the “3 star” keyword in Photos (2.6). Any smart albums that filter for star ratings pick up the new keyword instead. (In Chapter 3, I share a way to continue using star ratings, in case you’re not ready to dispense with them. Personally, I find ratings to be quite valuable when evaluating and editing hundreds or thousands of photos at a time.)

Events and Projects become albums
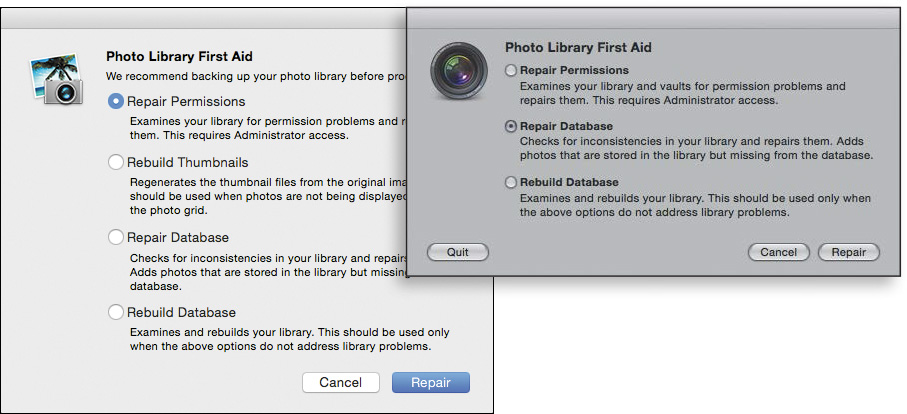
Apple introduced Events in iPhoto to break up the tyranny of the seemingly endless scroll through all your photos. Photos for OS X continues that tradition by splitting photos into Collections and Moments, but what about Events? You’ll find them converted to albums. And just to make things confusing, the albums are nested within a folder (that looks like an album) called iPhoto Events (2.7). Double-click that item to reveal your Events. Alas, the convenient trick of moving the mouse pointer over the album name does not reveal thumbnails of the album’s contents, as in iPhoto.
When migrating from Aperture, Projects are brought over, but they also appear in the folder called iPhoto Events.
Faces are now found in albums
The Faces feature, which identifies people in your photos, is still present in Photos for OS X, though it’s not as prominent. Instead of being a top-level feature, Faces now appears as an album (2.8).
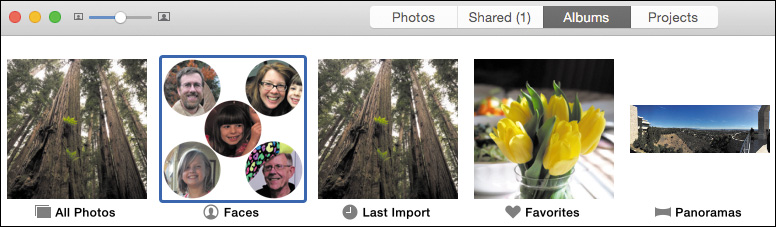
2.8 Faces is now located under the Albums tab, even though it’s not really an “album” like the others.
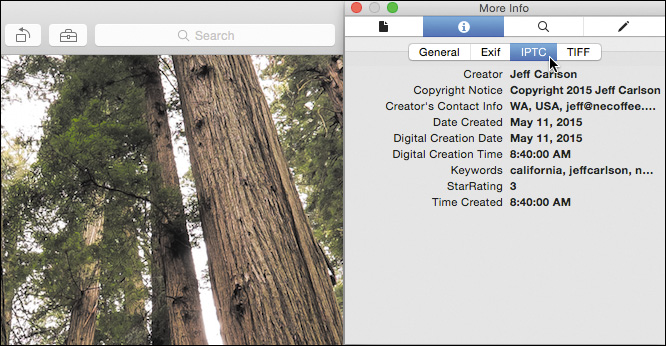
Some metadata is not visible
This limitation is likely to hit Aperture users harder than iPhoto users, and I’m hoping a fix will be added in an upcoming revision of Photos. In addition to the metadata that each camera adds to a photo—such as shutter speed, aperture, and focal length—an image can contain plenty of other information. Aperture provides a way to also include IPTC (International Press Telecommunications Council) data like your name, contact information, and copyright notice on each photo.
In Photos for OS X, that information still resides with the photo, but it’s not exposed in the application’s interface. You can still see the basic image data in the Information window, but not IPTC data.
![]() Tip
Tip
If you ever need to check the IPTC information for a photo, open it in the Preview app, choose Tools > Show Inspector, click the More Info tab (![]() ), and then click the IPTC tab below it (2.9).
), and then click the IPTC tab below it (2.9).
Aperture custom fields are discarded
In Aperture, you can create custom metadata fields; for example, a company may use an internal tracking scheme for identifying photos. (In the Info inspector, click the settings button—with the gear icon—and choose Manage Custom Fields.) When converted to Photos for OS X, that information is ignored and does not transfer.
iPhoto referenced files actually work
You may never have run into this issue, but it was a long-running frustration of mine. iPhoto and Aperture (and Photos) prefer to keep all your photos within the library package file, the better to keep track of everything. But as your library grows, it can be difficult to fit everything onto a single hard disk. iPhoto and Aperture both offer the ability to reference photos from anywhere, such as on an external drive (in iPhoto’s Advanced preferences, turn off the option to copy items to the iPhoto library; Aperture lets you specify a destination during import).
In iPhoto, however, if that external drive wasn’t attached to the computer, you’d see a giant warning sign instead of the referenced photo. Photos for OS X correctly handles referenced files by showing a preview of the image, even if it’s not currently online, with an icon in the lower-left corner to indicate its status (2.10).

2.10 Referenced photo online (left) and the same photo when the drive on which it’s located is unavailable (right)
(It’s possible to consolidate a referenced library so all of its photos are in the package file; I explain how in Chapter 3.)
Migrate a Library to Photos for OS X
Now that you have a grasp of what will change afterwards, actually opening an iPhoto or Aperture library in Photos for OS X may be anticlimactic. The application handles all the conversion. The most taxing part of the process for you will likely be the amount of time you wait while the library is being prepared, depending on its size (let large libraries run overnight).
• If this is the first time you’ve launched Photos for OS X and it asks if you want to use iCloud Photo Library, I recommend clicking Not Now for the time being. I cover that feature in more detail in Chapter 3; it’s easy to enable it later.
Photos looks for a default library in your Pictures folder and opens it. If multiple libraries are found on the Mac, it asks you to choose one (2.11). Select it and click Choose Library, or click Other Library if the one you want isn’t listed.

• If you have opened Photos previously but want to convert a different library, launch the application with the Option key held to bring up the Choose Library dialog, select the one you want, and click the Choose Library button (2.12).

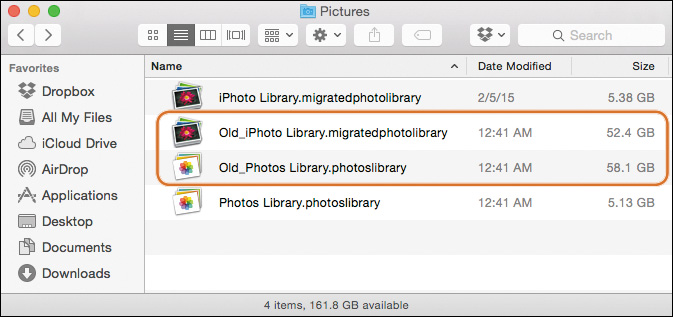
After the library is opened in Photos, you’ll find two files: the original, which now has the extension “.migratedphotolibrary,” and the new Photos library, with the extension “.photoslibrary” (2.13). (If you don’t see the filename extension, go to the Finder menu, choose Preferences, click the Advanced button, and enable the Show All Filename Extensions checkbox.)
![]() Note
Note
At first glance, it looks as if Photos has duplicated all your photographs and gobbled valuable storage space. Don’t worry, there’s just one copy of your library! Due to the way Photos links to the images (called hard links) in the old library, the Finder incorrectly reports excessive storage being used. For a more technical explanation, see Jason Snell’s article “The (hard) link between Photos and iPhoto” (http://sixcolors.com/post/2015/02/the-hard-link-between-photos-and-iphoto/).
