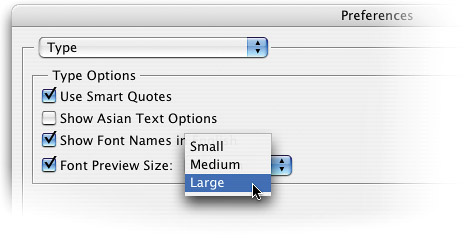
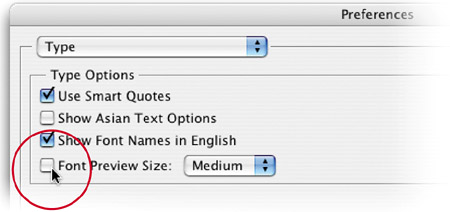
In Photoshop CS2, Adobe added font previews (where you can see a preview of how each font looks, right in the Font menu itself), but the previews are so small, it's still hard to tell the difference among fonts. Luckily, there is a way to make those previews large enough so they actually are usable—just press Command-K (PC: Control-K) to bring up Photoshop's Preferences, then press Command-9 (PC: Control-9) to jump to the Type preferences. In the Font Preview Size pop-up menu, choose Large, and now your font previews will be significantly larger.
I know everybody and their uncle has been waiting patiently for years to get font previews in the Font menu, but personally, they drive me nuts. Maybe it's the type freak in me that has led me to memorize what my favorite installed fonts are, but whatever it is, I hate seeing those previews (plus, it does slow the Font menu down a bit), so I turn it off. If you have the same level of disdain that I do for font previews, here's how to turn them off: Press Command-K (PC: Control-K) to bring up Photoshop's Preferences, then press Command-9 (PC: Control-9) to jump to the Type preferences. Now turn off the checkbox next to the Font Preview Size pop-up menu, and they're wiped from your Font menu.
Here's one I learned from my buddy Matt Kloskowski, and it's something that has been driving me crazy for years, and I had no idea there was a way around it. It happens when you've already got some Type layers in your document, and you want to create some new type. When you click the Type tool (T) within your document, if you're anywhere in the vicinity of any other type, Photoshop thinks you want to add to that type (rather than creating some new type), so it puts your cursor in with your existing Type layer. Arrrrrggghh! Here's how to get around it—just hold the Shift key before you click the Type tool, and it ignores any nearby Type layers, letting you create a brand new string of type. Thanks to Matt for keeping me (us) from standing out on a ledge somewhere.
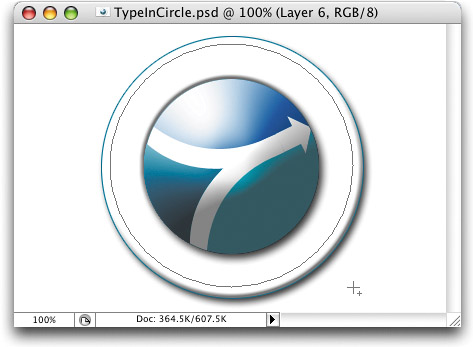
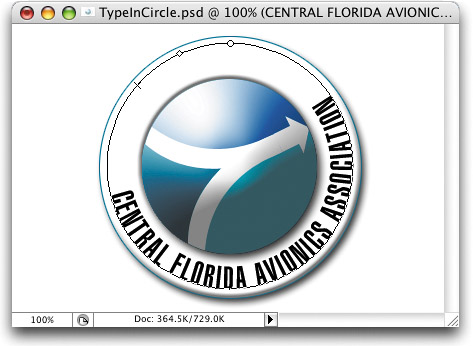
Now that Photoshop can really give you type in a circle, getting a perfect circle that you can add type to is not as obvious as you'd think. To get this perfect circle, click on the Shape tools in the Toolbox and choose the Ellipse tool from the flyout menu (or press Shift-U). Then go up to the Options Bar, and in the group of three icons from the left, click on the middle icon, which creates a regular path, rather than a Shape layer or a pixel-based shape. Then, press-and-hold the Shift key, and drag out your circle (the Shift key constrains the shape to a perfect circle). Now you can press T to switch to the Type tool and move your cursor over the circle. When it changes into a Type on a Path cursor, click on the circle and get to typin'.
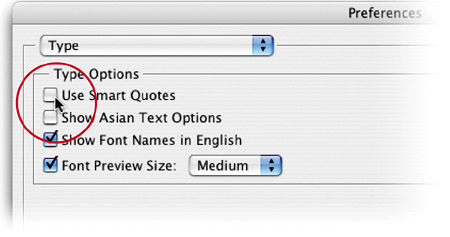
In all previous versions of Photoshop, when you typed in a quote mark (“) or apostrophe ('), what Photoshop gave you was the typographically incorrect inch mark (") or foot mark (') instead. They're called “dumb quotes.” Luckily, back in Photoshop 7.0, Adobe brought these typographically challenged dummies into line, and now they're properly applied as “curly quotes” by default, which is great. That is unless you have to actually type an inch mark or a foot mark. Here's the workaround—when it comes time to type an inch or foot mark, go under the Photoshop menu, under Preferences, and choose Type (in Windows, Preferences can be found under the Edit menu). In the resulting dialog, turn off Use Smart Quotes, and then type your characters. When you're done, return to the Type Preferences and turn them back on to bring typographic order to your world.
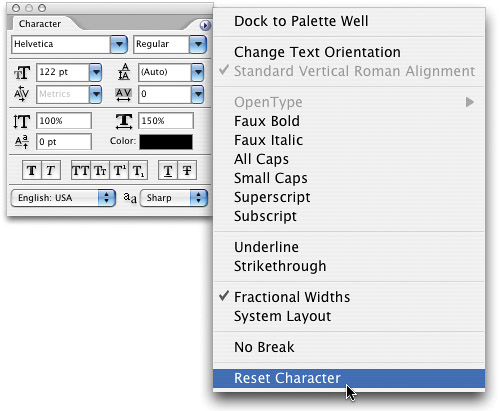
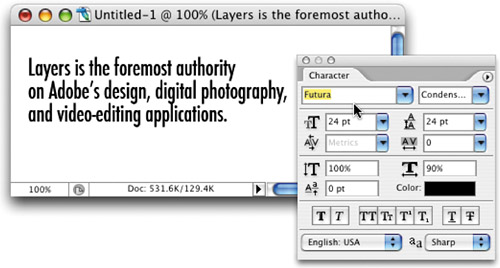
If you're into typography, Photoshop gives you loads of typographical control. You can adjust everything from tracking, kerning, and dozens of other characteristics. The downside is—the Character palette (where we make most of these tweaks) keeps your last-used settings as a default. If you did some major type tweaking to your last line of type, it might need some major “undoing” in the Character palette to get you back to normal type settings. Rather than manually resetting every field, you can quickly reset Photoshop's type to its “default” standard settings by going to the Character palette and choosing Reset Character from the palette's flyout menu.
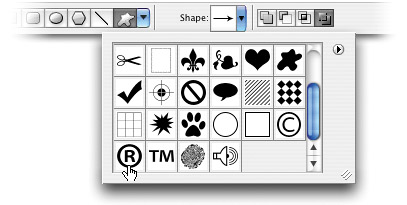
Looking for some special type characters, like ©, ™, or ®? If you're not fussy about these characters not actually being a font, you can find them in the default set of Custom Shapes. Just get the Custom Shape tool (press Shift-U until you have it), click on the Shape thumbnail in the Options Bar, which opens the Custom Shape Picker, and you'll find all three special characters there, in the default set of shapes.
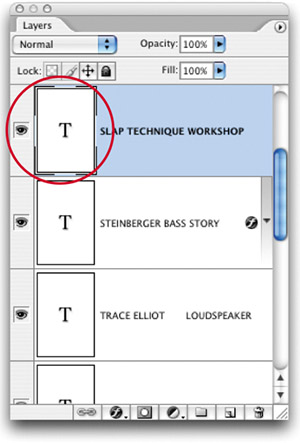
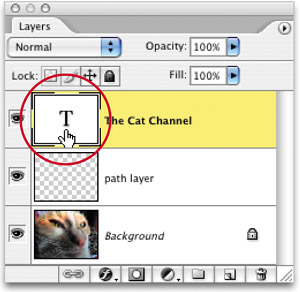
When you want to automatically highlight the type in a Type layer and switch to the Type tool at the same time to make some copy changes, just double-click directly on the “T” thumbnail on the Type layer you want to edit in the Layers palette, and blam! You're ready to go.
©ISTOCKPHOTO/ALISON HAUSMAN
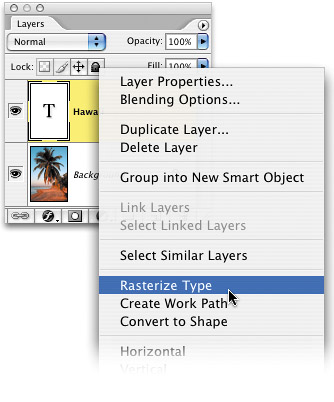
If you need to convert your Type layer into an image layer, you can save some time by simply Control-clicking (PC: Right-clicking) directly on the Type layer name that appears in the Layers palette. A contextual menu will appear where you can choose Rasterize Type to instantly render your type.
©ISTOCKPHOTO/ANGELA AGNEW
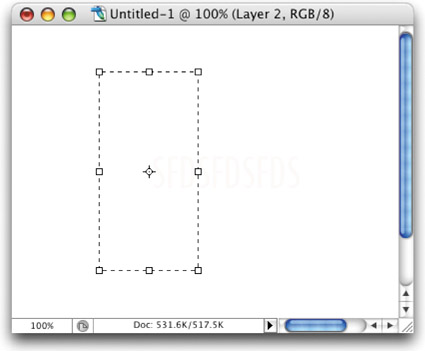
To create a text box for your type to fit within, press T to select the Type tool, then click-and-drag out the area you want for your text box. Your type will now fit within that box. When you're finished entering your text, just press Enter on your numeric keypad (or Command-Return [PC: Control-Enter] on your laptop) to get out of the text bounding box.

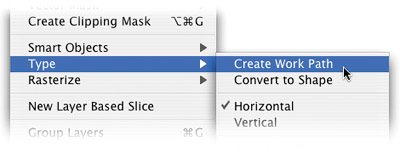
If you want to convert your Type layer into paths (as if you meticulously drew the type with the Pen tool—your clients won't have to know), simply go under the Layer menu, under Type, and choose Create Work Path.
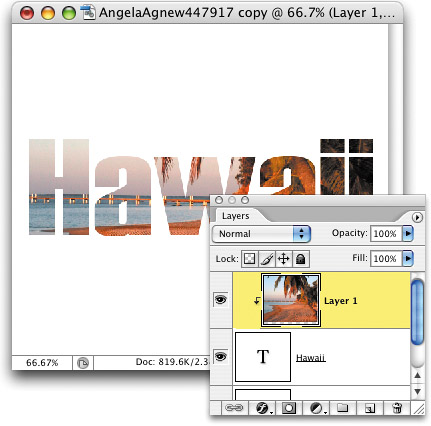
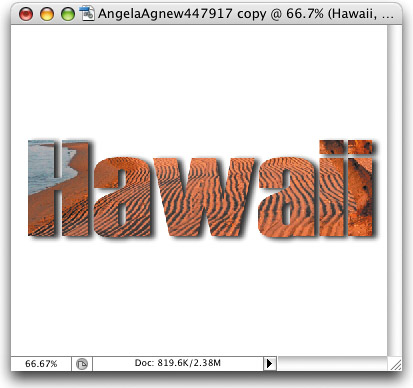
First, set your Foreground color to black by pressing D. Press T to choose the Type tool and create your text (you don't have to rasterize the type). Then, open the image you want to appear inside your type and use the Move tool (V) to drag-and-drop it into your type document (it should appear on the layer above your Type layer. If it doesn't, just go to the Layers palette and move it on top of your Type layer). To put your image inside the type, press Command-Option-G (PC: Control-Alt-G) to create a clipping mask and whammo—your image is masked into your type. You can reposition the image by using the Move tool. And since you didn't rasterize your Type layer, your text remains totally editable—just click on the Type layer and start editing. You can add layer styles to your Type layer to further enhance the effect. If you're not crazy about the image you picked, click on the image layer and press the keyboard shortcut again to release the mask. Now remove the image.
Here's a tip to quickly change type-faces and see the change while you make it. First, highlight the type you want to change, and then press Command-H (PC: Control-H) to hide the highlighting (the type is still highlighted; the highlight is just hidden from view). Then, up in the Options Bar, click once in the Font field, then use the Up/Down Arrow keys on your keyboard to scroll through your installed typefaces. Man, do I love this one.
©ISTOCKPHOTO/SAULO DOURADO

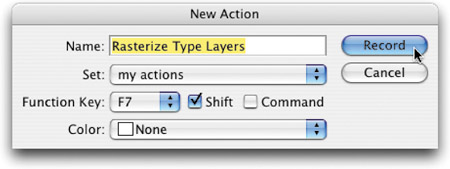
Earlier, I gave you the quick tip for rasterizing your type by Control-clicking (PC: Right-clicking) on your Type layer in the Layers palette, then choosing Rasterize Type from the contextual menu that appears. Believe it or not, there's an even faster way, if you don't mind spending a minute or two setting it up. You can create an action that rasterizes the type for you with just one key. Here's how: Use the Type tool (T) to create a Type layer, then make the Actions palette visible (from the Window menu). Choose New Action from the Actions palette's flyout menu. Name your new action “Rasterize Type Layers,” assign it an action set from the Set pop-up menu, then from the Function Key pop-up menu, assign an F-key to this action. Click the Record button, then go under the Layer menu, under Rasterize, and choose Type. Now go back to the Actions palette and click on the Stop icon at the bottom of the palette (it's the first icon from the left). That's it—your action is written. Test it by creating a Type layer, then pressing the F-key you assigned to your action. It should instantly rasterize (you'll know if it worked, because the “T” icon on the Type layer will no longer be visible).
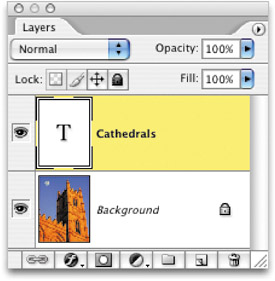
Before
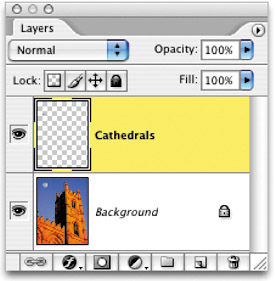
After rasterizing type
©ISTOCKPHOTO/GALINA BARSKAYA
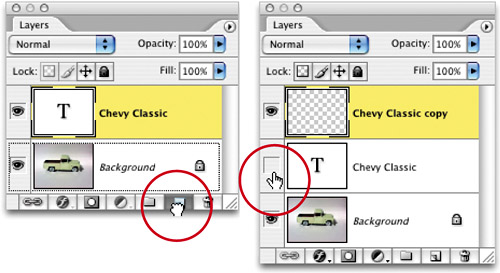
We've already talked about rasterizing text, but once you've rasterized your Type layer into a regular image layer, your type is no longer editable (meaning you can't go back and change typefaces, type in a different word, adjust leading or kerning, etc.). Here's a quick way around that limitation. Before rasterizing (rendering) your type, duplicate the Type layer by dragging it to the Create a New Layer icon at the bottom of the Layers palette. Then, hide the original Type layer from view (by clicking on the Eye icon next to the original Type layer) and rasterize the duplicate Type layer (see previous tip). That way, if you ever need to go back and change the word (or font, leading, etc.), you have the original editable Type layer still available. Just simply make it visible by clicking in the empty box where the Eye icon used to be.
©ISTOCKPHOTO
Here's a tip that can save you a lot of tool switching when formatting your type. Once you create your type with the Type tool (T), and while your cursor is still blinking somewhere in the text, if you need to move the type, you don't have to switch to the Move tool—just move your Type cursor away from your type (either above, below, or an inch or so to the right or left), and your cursor will temporarily change to the Move tool. You can now simply click-and-drag your type. If you want to edit your type some more, just move your cursor back to the type and click where you need to make edits.
In Photoshop, you can change the color of your type without even selecting it first. “Why is that important?” you may ask. If you highlight your type to change its color using the Foreground color swatch in the Toolbox, the highlighting hides the color of your type so you can't see any of your color changes while you're in the Color Picker. So instead, after you commit your type by pressing the Enter key, click on the Color swatch in the Options Bar (without highlighting your type first) when you have the Type tool (T) active. As you change colors in the resulting Color Picker, you'll see your type update on the fly.
©ISTOCKPHOTO/PHAEDRA WILKINSON
Here's a cool little tip for changing your text without having the Type tool active. Just click on your Type layer (in the Layers palette), then go under the Window menu and choose Character. When the Character palette appears, you can make changes to your type size, color, font, tracking, etc. It freaks you out, doesn't it?
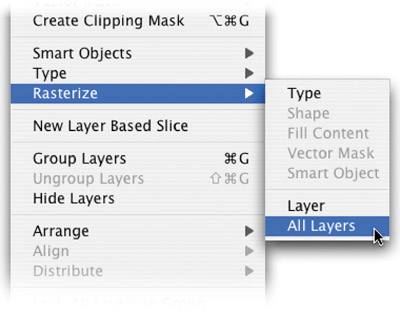
If you have multiple Type layers and you want to convert them all to image layers, there's a way to do it without individually rasterizing each. Simply go under the Layer menu, under Rasterize, and choose All Layers. This will rasterize all the Type layers at once.
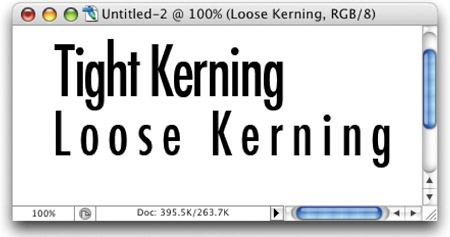
You can visually control the spacing between your type (which is much better than numerically trying to figure it out) by using the same keyboard shortcuts for adjusting type that Adobe Illustrator uses. Here's how: To set the tracking tighter (tightening the space between each letter or word in a group), highlight the type with the Type tool (T), then press Option-Left Arrow (PC: Alt-Left Arrow) to tighten. Press Option-Right Arrow (PC: Alt-Right Arrow) to add more space between a selected group of letters or words. To adjust the space between two individual letters (called kerning), click your cursor between the two letters and use the same keyboard shortcuts mentioned above.
As you probably know, you can jump to most any tool in the Toolbox by pressing a single-key keyboard shortcut. (If you didn't know that, sell your copy of Photoshop. Kidding. Just turn to Chapter 2 for some essential tips.) Here's the problem: While creating type with the Type tool (T), if you press one of those one-key shortcuts (let's say the letter P for the Pen tool), instead of jumping to the Pen tool, Photoshop types the letter “p”. It'll drive you nuts. Okay, you won't go nuts, but at the very least you'll have a lot of typos. The reason is this: You have to tell Photoshop that you're done editing your type. You do this in one of three ways: (1) Click on the checkmark icon at the far right of the Options Bar, (2) press the Enter key on your numeric keypad (or Command-Return [PC: Control-Enter] on your laptop), or (3) switch to another tool manually by clicking on it in the Toolbox. Any of these three tells Photoshop that you're done and lets you use the single-key shortcuts to switch tools.

How do you merge two Type layers together? Unfortunately, while they're still editable Type layers, you can't—you have to rasterize the layers first. Technically, you rasterize just one (the bottom of the two Type layers), and then make the top Type layer active and press Command-E (PC: Control-E) to merge these two layers together. However, when you do that, the top Type layer will automatically rasterize as the two layers are combined into one, so there's really no way around it—with the exception of this little tip: Highlight the editable type on the top layer and choose Cut from the Edit menu. Switch to the lower Type layer, click your Type cursor once at the end of the type, press Return (PC: Enter) to start a new line, then choose Paste from the Edit menu to paste the contents of the top Type layer into the bottom Type layer. Then drag the old top Type layer into the Trash icon at the bottom of the Layers palette. Although it takes a little effort, now you have both layers combined into one layer (your goal), but the type remains totally editable (the bonus).
Although the Character palette has numeric controls for making your type fatter (horizontal scaling) or taller (vertical scaling), it's usually easier to do these two functions visually (rather than numerically). Here's how: First set your type, then with the Type cursor still blinking somewhere in the text, press-and-hold the Command key (PC: Control key) to bring up the Free Transform bounding box. To make your type fatter, click on the center (or corner) handle on either side, release the Command/Control key and drag outward. To make your type taller, grab the center (or corner) handle on the top or bottom, release the Command/Control key, and drag upward or downward.
©ISTOCKPHOTO/ERIC COIA
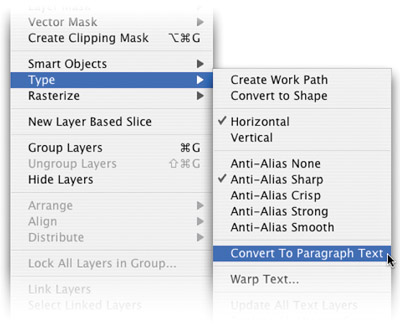
This tip relates to a previous tip, where you created what's called a “text box” so that your type wraps within a text block, rather than running in one straight line. The tip is this: If you've created some standard type by just clicking and typing rather than creating a paragraph text box, you're not out of luck. While the Type layer is active, just go under the Layer menu, under Type, and choose Convert to Paragraph Text. Now your type will wrap within the text box boundaries, and you can edit the boundaries by adjusting the corner and center points.
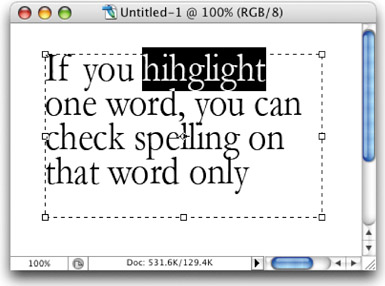
Photoshop's spell checker isn't just window dressing; it has a very robust spell-checking function, akin to Adobe InDesign's own spell checker, but if you understand how it works, you can save yourself some time and frustration. Basically, if you highlight some text on a layer, it checks just the highlighted text, so if you highlight one word, it just checks that one word (even if there are dozens of words in your paragraph). If you choose to spell check but don't have anything highlighted, it checks your entire document, regardless of how many Type layers you have. It's also helpful to know that it only checks real Type layers (layers that have a capital “T” as their thumbnail image in the Layers palette), and it cannot spell-check any layers with text that have been rasterized (converted from a Type layer into a regular image layer).
If you've created some type on a path, highlighting that type to edit it (to change the font, color, spelling, etc.) can be kind of tricky. That's why it's quicker to go to the Layers palette and double-click directly on the “T” thumbnail icon. This will highlight all the type on this layer, making it easy to type in some new text, or change some of the attributes.
©ISTOCKPHOTO/ASHLEY FARLAND
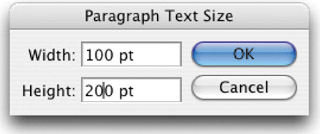
We already showed you how to create a column of type by clicking-and-dragging the Type tool to create your text box so your text will wrap within that column. But here's a quick little tip that lets you tell Photoshop exactly the width and height you'd like your type column to be (rather than just clicking-and-dragging it out visually). With the Type tool, just hold the Option key (PC: Alt key) and click in your document and the Paragraph Text Size dialog will appear where you can enter the exact size you'd like for your column.
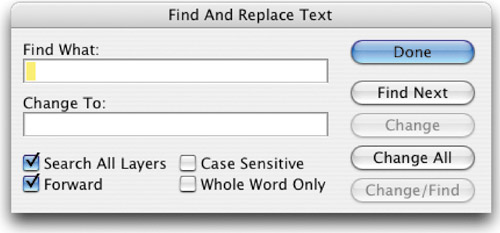
If you're trying to set type that looks typographically correct in Photoshop, there's an old habit you'll have to break, and that's the curse of putting two spaces at the end of every sentence. This is a holdover from people who at one time used traditional typewriters, where adding two spaces was necessary, but in typesetting that's a huge no-no. About 70% of the text I copy-and-paste from text files that people give me has two spaces, but I use this Photoshop tip to fix the problem in just seconds. First, go under the Edit menu and choose Find and Replace Text. In the Find field, press the Spacebar twice (entering two spaces), then in Change To, press the Spacebar just once. Click Change All, and every time Photoshop finds two spaces at the end of a sentence, it will replace it with just one, making you typographically correct.
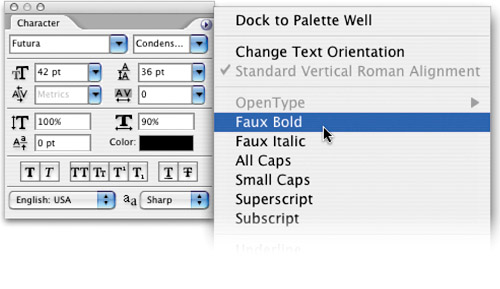
If you have a typeface that doesn't have a bold or italic version available, don't sweat it—Photoshop can make a fake bold or italic version for you. They're called faux bold and faux italic (don't pronounce them “fox bold” or the French will get really cranky about it. It's pronounced “fo,” as in “Fe, Fi, Fo, Fum”). To apply a faux style to the type, highlight your type and choose Faux Bold or Faux Italic from the Character palette's flyout menu. Here's another tip: Don't forget to turn off these faux styles when you're done, because they don't automatically turn themselves off. Vive le Français!
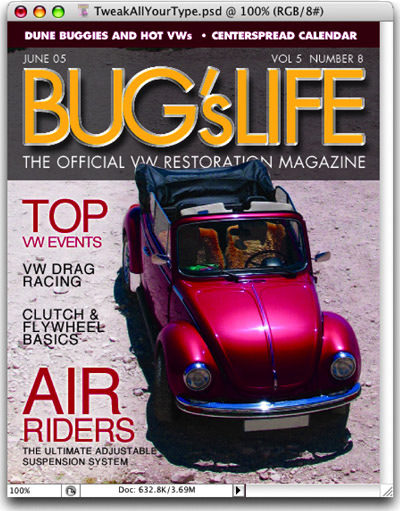
This is a pretty darn slick tip for changing the font, size, or color of a number of different Type layers all at once. Here's how it's done: First, link all the layers that you want to adjust by Command-clicking (PC: Control-clicking) on each Type layer, then clicking on the Link icon in the bottom left corner of the palette. Linking the layers helps you keep track of your text. Now, just choose the Type tool (T) and go straight to the Options Bar or the Character palette. The change you make to one Type layer will also affect all the selected Type layers. The key is not to highlight your type. Schweeeet!

©ISTOCKPHOTO/KNUD NIELSEN