This one gets more people because it's a feature that acts like a bug. Has this ever happened to you? You're working in Photoshop, you're using the Brush tool (B), and everything seems fine. But a little later in your session, you get the Brush tool again, and it no longer displays the size of the currently selected brush tip. Instead, it displays a little crosshair cursor. So you go to the Preferences dialog and choose Display & Cursors, and sure enough, you've got Normal Brush Tip chosen as your preference, but for some strange reason, it's not showing your brush size; it's showing that stupid crosshair. Here's the problem: Check your Caps Lock key. It's turned on, and turning it on changes your Brush cursor from displaying brush size to displaying the crosshair. This is actually a feature to be used when you need to see the precise center of your brush. The problem is it's assigned to the Caps Lock key, so every time you turn on Caps Lock when you're working with type, you just temporarily switched your Brush cursor (or any cursor for that matter). Does Adobe need to find a better key for this feature/bug? You betcha! Will it happen? Not as far as I know.
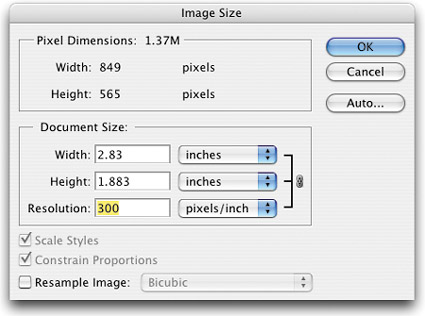
Problem: You imported an image from your digital camera and although the physical dimensions of the image are rather large, the resolution shows up as only 72 ppi. How can you get enough resolution to print this image? Solution: Go under the Image menu and choose Image Size. Turn off Resample Image, then in the Resolution field, type the resolution you need for the specific device you'll be printing to. When you do this, Photoshop will automatically input the Height and Width that would result from using that resolution (the image size will definitely be smaller—the higher the resolution needed, the smaller the physical dimensions of your image). All you have to do is click OK and Photoshop will do the math, creating an image in the new smaller size, with the new higher resolution. The good news is that by doing it this way, there's absolutely no loss of quality to the file whatsoever.
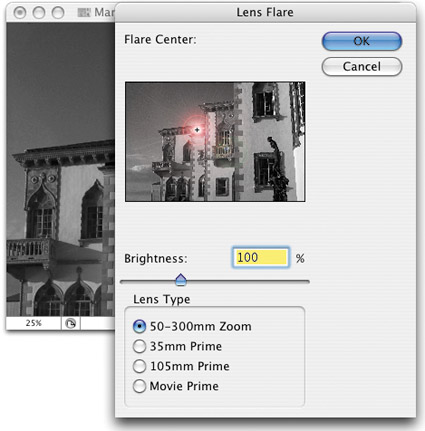
If you're working on grayscale images, you'll find there are some Photoshop filters that won't work (they're grayed out, so you can't access them). Of course, it's always the really cool filters, such as Lens Flare and Lighting Effects, that are grayed out. But don't be dismayed (in fact, be “mayed”) because you can still use those filters—just switch to RGB mode (it's found under the Image menu, under Mode), apply the filters, then switch back to Grayscale mode. It won't affect the color of your image because, well, there is no color—you're working on a grayscale image. Switching to RGB doesn't suddenly pour color onto your image; your grayscale image will still look grayscale in RGB. When you switch back to Grayscale mode (after applying the filters), you'll get a warning asking, “Discard color information?” You can safely click OK, because after all, there was no color to begin with.
©ISTOCKPHOTO/MARJE CANNON
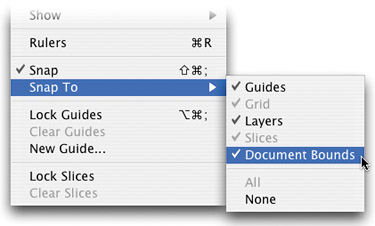
Problem: When you're trying to crop an image using the Crop tool (C), your cropping border tries to snap to the edges of your document window. This might be happening when drawing large Marquee selections as well. Solution: Press Command-Shift-; (PC: Control-Shift-;), which is the shortcut for turning off this snapping. The only downside is it turns off all snapping (like Snap To Guides, Snap To Grid, etc.). If you just want the Crop snapping (or Marquee snapping) off, go under the View menu, under Snap To, and choose Document Bounds, and your tools will no longer try to snap to your, well, document bounds.
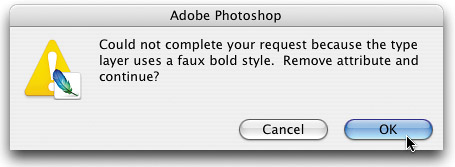
I get more people than you can “stick a shake at” asking me about this problem. If you go to use Photoshop's Warped Text function, you might get a warning that states, “Could not complete your request because the type layer uses a faux bold style.” A faux bold style? What in the wide world of sports is that? Actually, it's a feature of Photoshop (that was introduced back in version 5.0) that lets you create a fake (faux) bold or italic type style for fonts that don't really have a bold or italic type style. It's toggled on/off in the Character palette's flyout menu. In Photoshop 7.0, Adobe added the option in the warning dialog to “Remove attribute and continue.” All you have to do is click OK to remove the faux bold and now you can warp your text. Life is good.
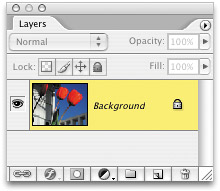
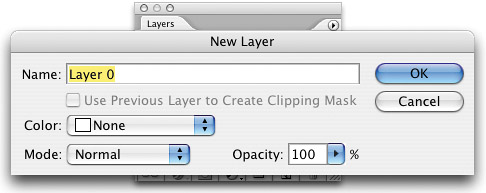
Can't move the Background layer? That's because back in Photoshop 6.0, Adobe locked the Background layer from movement. That wouldn't be so bad, except that if you look at the top of the Layers palette, you can see that “Yup, the checkbox to lock movement is turned on,” but the frustrating part is that it's also grayed out, so you can't simply uncheck it to unlock it. The only way around this is to double-click on the Background, which brings up the New Layer dialog. Click OK, and your Background layer becomes Layer 0 and is unlocked. Now you can move it.
©ISTOCKPHOTO
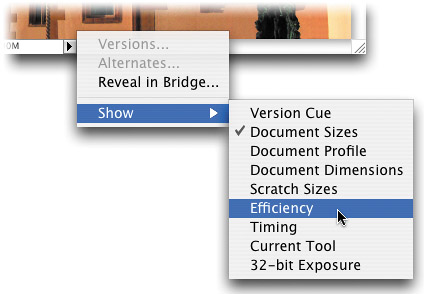
Not sure if you have enough RAM? Just ask Photoshop. Believe it or not, it can tell you. Here's how: Open a document that's indicative of the type of image you normally work on. Work on the image, doing typical stuff, for about 10 minutes. Along the bottom left-hand corner of your document window, just to the right of the current document magnification readout, is the status bar. By default, it's set to display your document's file size, but if you click-and-hold on the right-facing triangle to the right of it, a pop-up menu of options will appear. Choose Show, then Efficiency. If the percentage shown is 100%, you're gold, baby! That means that Photoshop is running at peak efficiency, because 100% of the time your image manipulations are being handled in RAM. If the efficiency number shown is, say, 75%, this means that 25% of the time, Photoshop ran out of RAM and had to use free hard drive space to make up for it, which means Photoshop ran much slower 25% of the time. An efficiency of 75% is pretty much as low as you want it to go. If it shows anything less than 75%, it's time to buy more RAM. Pronto!
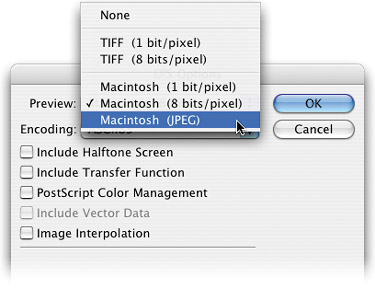
Problem: The image looked great in Photoshop, but now that you've converted it to CMYK, saved the file as a TIFF, and placed it into QuarkXPress, InDesign, PageMaker, etc., the image looks awful—way oversaturated and totally whacked. Reason: The preview of CMYK TIFFs just looks like that, so don't freak out—if it looked right in Photoshop, it should print fine. Okay, what if you saved the file as an EPS, and when you place the image into your page-layout app, the color of the image looks okay, but it's not crisp and clear, but pixelated. Reason: By default, the preview embedded within EPS images is a lame 256-color preview. Solution: When you choose Save As (from the File menu), choose Photoshop EPS in the Format pop-up menu, click Save, and the EPS Options dialog will appear. In the Preview pop-up menu, choose JPEG. That way, it sends a 24-bit, full-color preview, rather than the lame 256-color preview.
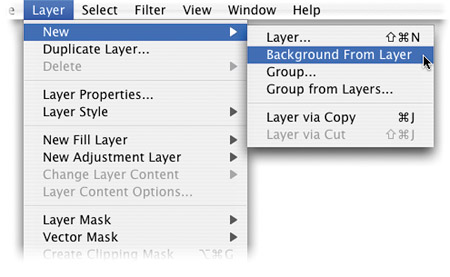
Lost your Background layer? It happens. It's heartbreaking, but it happens. If you suddenly find yourself staring at a Layers palette and there's no Background layer (chances are you accidentally converted your Background layer into a regular layer), here's how to get a Background layer again: Click on the Create a New Layer icon, then go under the Layer menu, under New, and choose Background From Layer, and Photoshop will take your new blank layer and create a solid white Background layer at the bottom of your layer stack.
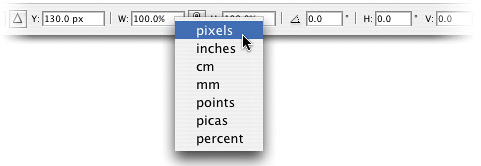
If you've ever tried to expand a rectangular selection by more than five or six pixels, you know what happens. The crisp, sharp-edged corners that you start off with become rounded. Here's the fix: Don't use the Expand command (found under the Select menu, under Modify). First, make your selection and press Command-T (PC: Control-T) to bring up the Free Transform bounding box. Go to the Options Bar and Control-click (PC: Right-click) in the Width and Height fields to change the measurements from Percent to Pixels. Now, simply add the amount of pixels you want to expand to the existing number. For example: If the field reads 110 pixels, and you want to expand it by 10 pixels, enter 120 pixels in the field and press Enter to apply the transformation. Don't forget to change both the Width and Height fields. That's it—perfectly expanded corners.
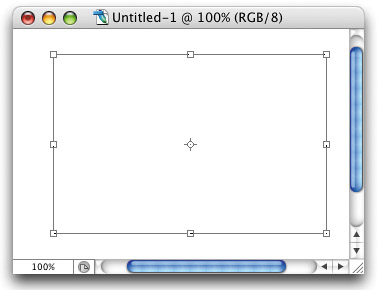
Ever have this happen? You draw a selection with the Rectangular Marquee tool (M) and the corners of your selection are rounded, rather than nice and straight? This happens to a lot of people, especially if they've been drinking. If you haven't been drinking but you're suffering from rounded-corner selections, look up in the Options Bar, and you'll see a field for Feather. Chances are there's some number other than zero in this field, and what's happening is every time you draw a selection with that tool, it's automatically feathering (softening) the edge. What probably happened is you intentionally (or accidentally) added a feather amount at some time, then later forgot to set it back to its default of zero. So to fix it, just highlight the field and type 0 (zero). Incidentally, this is a great Photoshop prank to play on co-workers, friends, soon-to-be-enemies, etc., because the Feather field is usually the last place they'll look.
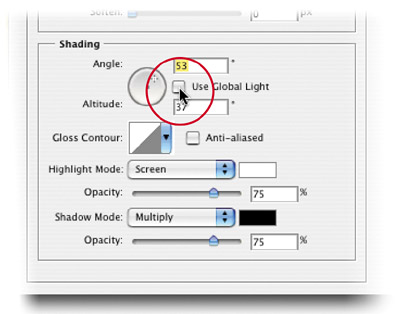
Problem: You applied a drop shadow to an object on one layer, then later you applied a bevel on another layer, but in the Bevel and Emboss options in the Layer Style dialog, you notice that the position of your drop shadow just moved when you changed the angle of your bevel. Reason: Adobe uses a feature (that acts like a bug) called Global Light. The idea behind it makes sense, yet we've never run into the scenario it was created for. The idea is this: You've created an image with lots of drop shadows, all casting in a particular direction. If the client saw your work and said, “Hey, instead of having the shadows go down and to the right, can we make all the shadows go up and to the left?” If that unlikely event ever occurred, you'd be set, because all you'd have to do is move one shadow and all the other shadows on other layers would move to the exact same angle. It's a great idea; it just never happens (okay, it's probably happened somewhere, once). Solution: In the Layer Style dialog, deselect the Use Global Light checkbox. Now you can move the angle of your current layer style separately from the rest of your image. Life is good once more.
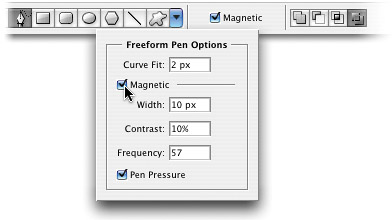
I know what you're thinking—finding the Magnetic Pen tool options? I didn't even know there was a Magnetic Pen tool in the first place. Adobe has done a great job of hiding it. For some reason they must hate this tool. Anyway, to get to the Magnetic Pen tool (the magnetic part means it snaps to well-defined edges to help you draw accurate paths around objects), you have to start by choosing the Freeform Pen tool from the Toolbox (it's nested with the Pen tool). Only then will the subterranean Magnetic checkbox surface in the Options Bar. However, to access the all-important Magnetic options so you have a chance in hell of actually controlling this tool, you have to dig deeper into the underground world of CS2 to make these options bubble to the top. Click on the down-facing black triangle to the right of the Custom Shape tool icon in the Options Bar to reveal a pop-down menu few will ever see—the Freeform Pen Options. In this rarely viewed menu, you'll find a checkbox for Magnetic, and clicking on it will bring the grayed-out Magnetic options to life, and open a treasure chest of newfound riches (also known as more boring options).
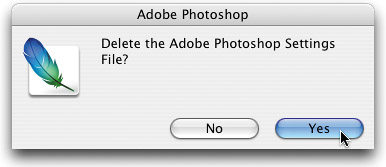
If you need to delete Photoshop's current preferences file (which is a common “first-line-of-defense” troubleshooting move), you don't have to go digging around your drive. All you have to do is hold the Command, Option, and Shift keys (PC: Control-Alt-Shift) when you first launch Photoshop, and you'll be greeted with a dialog asking you if you want to delete the Photoshop Settings File. If you do, click Yes, and Photoshop will build a new, factory-fresh set of preferences for you.
Problem: All of a sudden, every time you click on a layer with the Move tool, it jumps to that layer. Solution: Somehow you turned on a feature called Auto Select Layer, which lets you make a layer active by just clicking on it with the Move tool. To turn this feature off, press V to get the Move tool, and up in the Options Bar, turn off the checkbox for Auto Select Layer. Besides, you never really need to turn this feature on, because you can just hold the Command key (PC: Control key) and click on any layer in your image window.

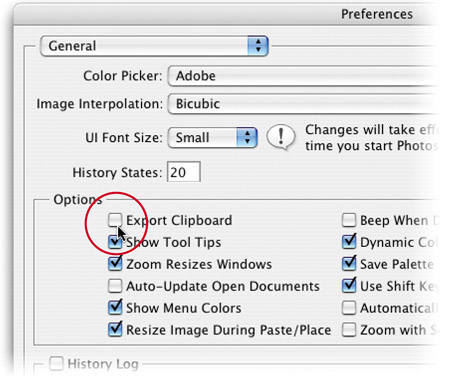
Do you often copy-and-paste images from Photoshop into other applications (such as FileMaker Pro, Word, etc.)? I'm not talking about importing a TIFF or EPS, I'm talking about copying the object, switching to another application, and pasting your copied image from the Clipboard. You don't? Great, then we have a tip for you that will speed up your application-switching pretty dramatically. Go under the Photoshop menu, under Preferences, under General, and turn off the checkbox for Export Clipboard (in Windows, Preferences can be found under the Edit menu). Here's what's happening when it's turned on: Whatever you last copied in Photoshop gets transferred to your system's Clipboard memory when you switch to another application, just in case you want to paste it. If you have a large image in Clipboard, it'll take some time to export the image to the other application (or it'll be so large it won't export at all—you'll get a warning dialog instead). So, turn off that preference, and wait no more.
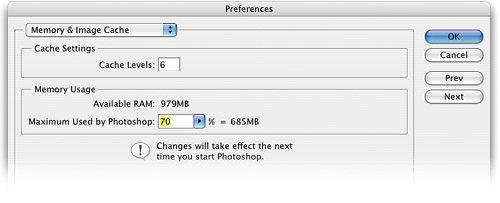
Problem: You added more RAM to your system and assigned more RAM to Photo-shop, but it doesn't seem to run any faster. Reason: Adding RAM doesn't always make Photoshop run faster. It only works if you didn't have enough RAM to begin with. Adding RAM will only help to make your computer run as fast as it can, but it won't make your 800-MHz computer run at 801 MHz. For example, if you work on Web images and the average image you work on is 3 MB, you only need about 15 or 20 MB assigned to Photoshop to have it run at full speed. If you've got that, and add another 256 MB of RAM, Photoshop won't run any faster, because Photoshop only needs that 15 or 20 MB that you already had. Freaky. To check your RAM usage, go under the Photoshop menu, under Preferences, and choose Memory & Image Cache (on a Windows PC, Preferences are under the Edit menu).
Problem: You're trying to fix barrel distortion that appears on a photo you're editing, but using the Crop tool's Perspective feature is a guessing game. You try the crop and it doesn't look right; you have to undo it, and guess again. Solution: Don't use the Crop tool's Perspective feature (found in the Options Bar), even though it was specifically designed to address barrel distortion. Use the standard Free Transform command instead by pressing Command-T (PC: Control-T) and then pressing-and-holding the Command (PC: Control) key while you drag the corner handles to create your perspective. Doing this gives you a live onscreen preview as you work, so fixing the distortion takes just a few seconds—unlike Crop's Perspective.
©ISTOCKPHOTO/BRUCE LIVINGSTONE
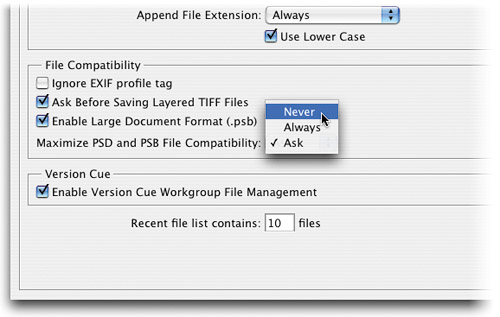
Do your Photoshop PSD file sizes seem a little large? It may be because of a Preferences setting that makes Photoshop save a flattened version of your Photoshop image, along with your layered Photoshop file. Why does Photoshop do this? Because there's a slight possibility you might share this file with someone using Photoshop 2.5 (just like there's a slight possibility that Congress will vote to cut their own salaries), and Photoshop 2.5 didn't support layers, so it can't read your layered document. But because, by default, that flattened version is included in your layered file, guess what—2.5 can open the flattened image. What luck! Who cares? I'd rather have smaller file sizes all year long, and if you would too, go under the Photoshop menu (the Edit menu in Windows), under Preferences, under File Handling, then in the File Compatibility section, for Maximize PSD and PSB File Compatibility, change Ask to Never. Think about this one for a minute and you'll wonder why this is turned on by default. Think about it for two minutes and you'll wonder why it's in Photoshop at all. Don't spend too much time on it, or you'll start to wonder who's the poor soul that's stuck on version 2.5.