

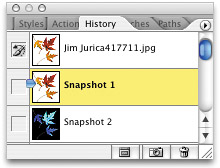
Have you ever written an action, and after it's done, you wish you hadn't run it in the first place? Maybe the effect just doesn't look right on the image, or there's a mistake or missing step in your action? Well, here's a tip that will help you, not just when you're testing your action, but even after you've perfected it. Bring up the Actions palette (found under the Window menu), click on the Create New Action icon, and once you're recording, make the first step of your action creating a snapshot. To do this, just open the History palette (under the Window menu) and click on the Create New Snapshot icon at the bottom of the palette. That way, if after the action runs, you don't like the results, you can just click on the saved snapshot in the History palette, and the image will instantly return to how it looked when you opened it.
©ISTOCKPHOTO/JIM JURICA
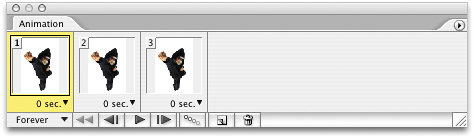
In previous versions of Photoshop, if you wanted to create an animation, you'd have to jump to Image-Ready (Photoshop's Web graphics sibling that comes preinstalled with Photo-shop). Although ImageReady still comes with Photoshop CS2, you don't need to jump over there to do your animations; now you can do them right within Photoshop. Just go to the Window menu and choose Animation, and ImageReady's familiar-looking Animation palette will appear across the bottom of your Photoshop screen, and a row of buttons for animation options will appear near the top of your Layers palette.
©ISTOCKPHOTO
If you're used to the old Command-G (PC: Control-G) shortcut to clip the layer you're on into the layer beneath, then you're going to have some frustrating times in CS2. That's because Command-G (PC: Control-G) now creates a Layer Group, not a clipping group (or clipping mask as Adobe renamed it in CS). To create a clipping mask, you have to use the old shortcut from pre-CS versions of Photoshop, which is to hold the Option key (PC: Alt key) and in the Layers palette click once right between the two layers (your cursor will change to two overlapping circles—that's your cue to click). You unclip them the same way.
©ISTOCKPHOTO/RAFAL ZDEB
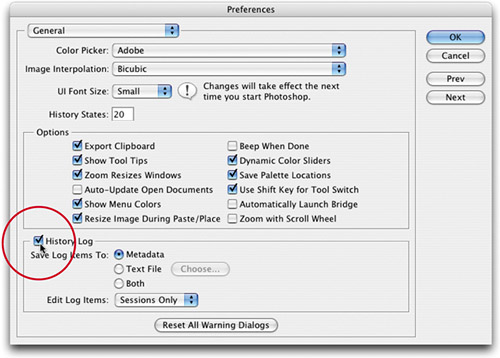
If you'd like to keep a running record of every step, every tweak, every movement—virtually every little thing you've done to your image in Photoshop CS2—you can do just that. It's called History Logging. Basically, it keeps a running log (in the background) of all your History States, and it can save it to a text file that you can open and view later. To turn on this History Log, go under the Photoshop menu (PC: Edit menu), under Preferences, and choose General. At the bottom of the Preferences dialog, turn on the checkbox for History Log, then choose if you want the log items embedded into the file (metadata), written to a text file, or both.
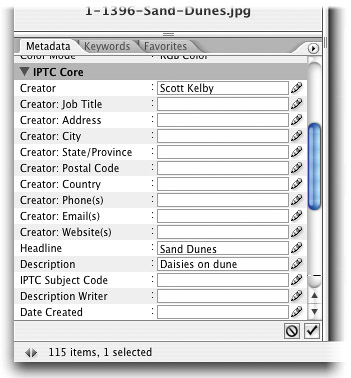
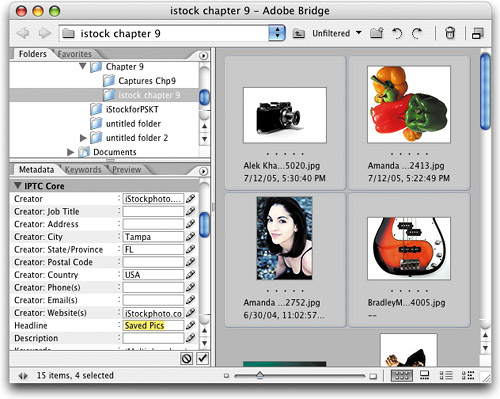
As you know, your digital camera embeds background info into your photos (called EXIF data), and Photoshop embeds its own info when you edit the image (called File Properties). However, in Photoshop CS2 you can add your own info (called IPTC data) in the IPTC Core area within the Metadata palette in Adobe Bridge. This is where you might embed your copyright info, website, or other comments that people viewing your file might find important. To add your info, just click next to any IPTC item that has a Pencil icon to the right of it, and a field will appear where you can enter your own custom info.
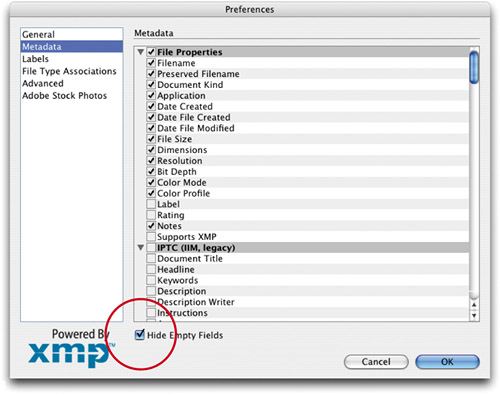
The Metadata palette in Bridge provides much more information than the average person will ever need. If you don't need all this “metadata overload,” you can set it up so it only displays the data you care about, giving you a more orderly, easier-to-read Metadata palette. To do this, go to Bridge's Metadata palette, click on the flyout menu, and choose Preferences. In the dialog that appears, uncheck any fields you don't need displayed, turn on the checkbox at the bottom for Hide Empty Fields, and click OK.
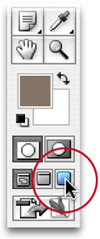
If you don't want to create a full PDF Presentation, you can create a mini slide show right within Photoshop. Just open all the images you want in your slide show, then Shift-click on the Full Screen Mode icon near the bottom of the Toolbox (it's the third icon from the left), and press the Tab key on your keyboard. To step through your slide show, press Control-Tab.
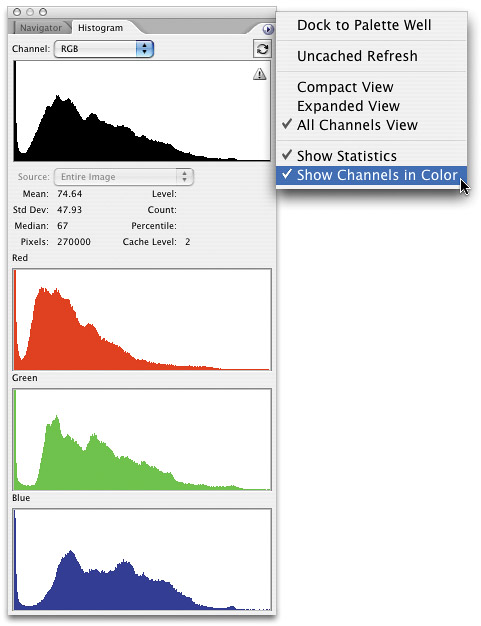
When you're using Photoshop's Histogram palette (under the Window menu), not only can you see a histogram of each individual channel (select the All Channels View option from the Histogram palette's flyout menu), but you can use color as your visual cue to quickly see which channel is which. Just choose Show Channels in Color from the palette's flyout menu, and then the Red channel histogram will appear in red, the Green in green, etc.
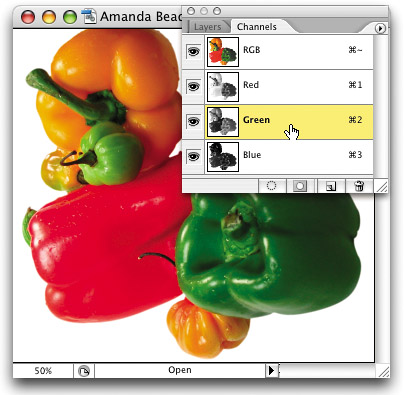
When you're working on an individual channel in the Channels palette (under the Window menu), by default Photoshop displays your current channel onscreen in grayscale. If you make changes to that channel, you only see how the change affects that channel. However, there is a little-known trick that lets you see the full-color image, while editing the currently selected channel. While you're editing the channel, just press the Tilde key (~), which is right above the Tab key on your keyboard, and you'll see the full RGB preview as you edit.
©ISTOCKPHOTO/AMANDA BEADLES
If you're using the Pen tool (P), and you've created multiple paths within your document, these paths are totally separate, and are moved independently of one another. However, if you want these paths to move as one unit—combine them. Just switch to the Path Selection tool (Shift-A until it comes up), then go up to the Options Bar and click on the Combine button. Now when you move one path, all the combined paths move right along with it.
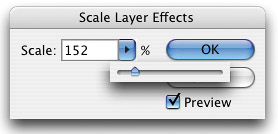
Here's a little-known tip for controlling the intensity of your layer styles. This is particularly helpful if you've applied a number of different layer styles to a layer, and want to affect them all at the same time, rather than tweaking each one individually. It's called Scale Effects, and it's buried in the Layer menu, at the bottom of the Layer Style submenu. Choose it, and a dialog appears with a slider set to 100% by default. As you increase the amount (up to 1000% maximum), it increases the “scale” of all your effects. For example, if you increased the scale of a Drop Shadow layer style, the shadow would become blurrier and its distance from the object would become greater. If you adjusted a Stroke layer style, the stroke would become thicker, etc. Pretty powerful stuff.
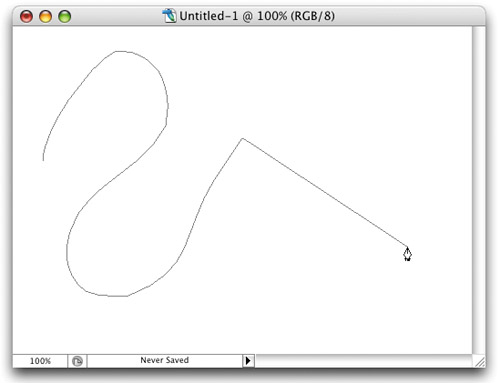
If you're using the Freeform Pen tool (Shift-P until it comes up), there are times when you may want to temporarily switch to the regular Pen tool so you can draw a straight-line segment. You can actually do this by holding the Option key (PC: Alt key) and then releasing the mouse button. This temporarily switches you to the regular Pen tool so you can draw your straight-line segment by moving the mouse. When you're done, click-and-hold, release Option/Alt, and you're back to the Freeform Pen tool.
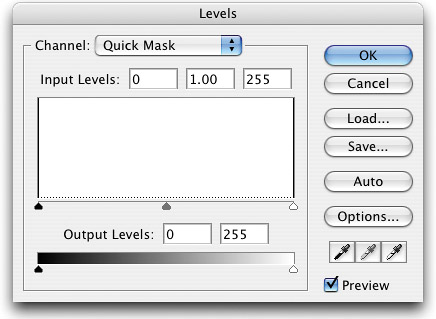
Did you know that you can use Quick Mask mode to expand or contract your selections visually? Here's how: Create a selection (using any of Photoshop's selection tools), and then switch to Quick Mask mode (press the letter Q). Now you can go to the Levels dialog (under the Image menu, under Adjustments) and tweak the size of your selection. Moving the midtones Input Levels slider to the far left makes the selected area smaller (contracting the selection). Moving the midtones Input Levels slider to the far right makes the selected area larger (expanding the selection). The changes here usually aren't drastic, so you'd use this technique when a small adjustment to your selection is necessary, but seeing it like this beats the heck out of guessing.

©ISTOCKPHOTO/FRANK SCHOETTKE

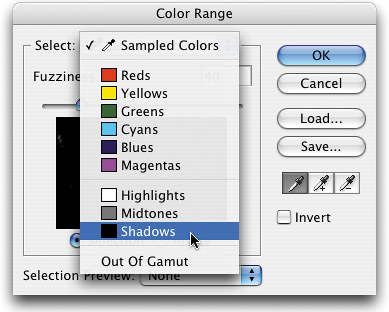
This is a trick we use for prepress and for photo retouching because it instantly lets you select all the shadow areas (or highlight areas if you wish) for a particular image, and it's so easy because Photoshop does all the work. To have Photoshop select just the shadow areas in your image, go under the Select menu and choose Color Range. When the dialog appears, in the Select pop-up menu, choose Shadows (or Highlights), and click OK. The shadow areas are instantly selected. This is ideal for situations where your scanner has plugged up the detail in the shadow areas (pretty common in most sub-$1,000 desktop scanners). Once the shadows are selected, you can “open them up” by going to the Levels dialog (under the Image menu, under Adjustments) and moving the midtones Input Levels slider to the left to bring back some of the shadow detail lost in the scan.
If you're an advanced user, chances are you're no stranger to using actions, and in fact, you probably create your own (rather than using the default actions that ship with Photoshop, many of which redefine the term “useless”). If you do create your own actions, you've already found that you spend more time troubleshooting your actions than you do creating them in the first place. Well, this little tip makes the troubleshooting process a lot easier, and saves you both time and frustration. The problem is (and this won't sound like a problem) Photoshop runs actions so quickly that you don't see each step, or each dialog, so tracking down a missing or wrong step is just about impossible. Luckily, you can actually slow down your action, or even put a pause between each step, by using Photoshop's Playback Options dialog found in the Actions palette's flyout menu. When it appears, you can choose to play your action Step by Step, seeing everything as it happens, or you can choose to enter the number of seconds you'd like it to pause. Then, when you replay the action, you can see everything step by step and track down the culprit.

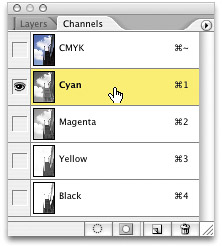
One of the bad things about converting from RGB mode to CMYK mode (under the Image menu) is that many of Photoshop's coolest filters can only be applied in RGB mode, and once you're in CMYK mode, many of them are grayed out in the Filter menu, so they can't be accessed. So what do you do if you really want to use one of those filters? (Whatever you do, don't convert back to RGB mode, then back to CMYK. That's image suicide.) Instead, try this tip: In the Channels palette, click on the Cyan channel. Go to the Filters menu and you'll notice that all those grayed-out filters are now suddenly available. All you have to do now is apply the filter you want to each channel individually (once each on Cyan, Magenta, Yellow, and finally the Black channel), and the filter will appear as though you applied it to the entire image (in reality, you did—you just did it the more laborious way). One way to speed up this process is to create an action that will do it all for you with one click of the mouse.
©ISTOCKPHOTO/SIMON MORAN
Want to assign metadata to more than one photo at a time in Bridge? (Perhaps you want to embed your copyright info into 30 or more photos at once.) Just Command-click (PC: Control-click) on all the photos you want to affect, then enter the custom info you want (in one of the IPTC fields in the Metadata palette) and that info will be added to every selected photo at once.
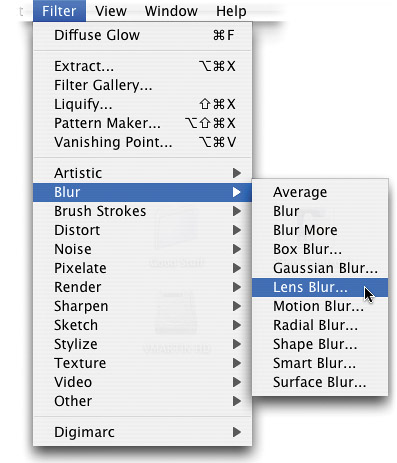
We love Photoshop's Fade command (which acts like an “undo on a slider”), and when it comes to applying filters, we use it all the time to gain more control (including blending mode control) over filters we apply. The only downside to the Fade command (which is found under the Edit menu) is you can only use it one time—you get one opportunity to Fade, or choose a Blend Mode, then you're stuck. Here's a tip to keep the control of your filters for as long as you'd like: When you're about to apply a filter, make a duplicate of the layer before you apply the filter by pressing Command-J (PC: Control-J) and then apply the filter. This keeps the application of your filter fully editable—you can change blend modes as often as you like, change opacity, add a layer mask to determine where the filter shows and where it doesn't, or even toss the layer in the Trash and start over.
©ISTOCKPHOTO/AMANDA ROHDE
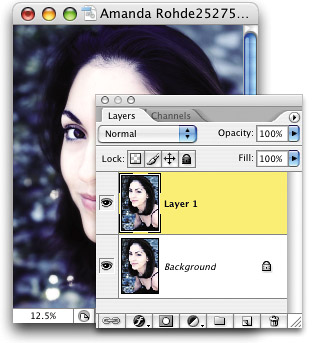
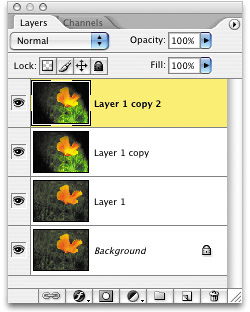
Thinking of applying a number of different filters to a particular layer? Don't do it. Instead, make a copy of your layer by pressing Command-J (PC: Control-J), then apply the first filter. Make another copy of the layer and apply the second filter; make another copy, apply the third filter, and so on. You can use Photoshop's layer blend modes in the Layers palette to get the effect that one filter is applied on top of the others, and now you've got full control over each individual filter applied. If you don't like one of the filters, just drag that layer into the Trash. Better yet, you've got blend and opacity control you wouldn't have by simply applying filter over filter.
©ISTOCKPHOTO/MIKE MANZANO
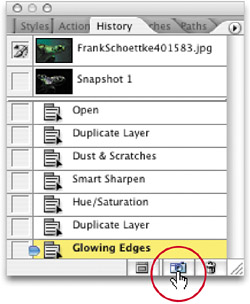
The great thing about Photoshop's History feature is that you can (by default) undo your last 20 steps. Perhaps even more important is that you can always return to how the image looked when you opened it, so you never really do any permanent damage (as long as the file is open). However, what if you opened an image, worked on it for a while, and it was really looking great, but about 10 minutes later, it took a turn for the worse (this happens to us more often than we'd care to admit). If you undo the last 20 steps, it may not take you back far enough to the point that you want to return to, and the only other choice is to go all the way back to where you started. Here's a tip to keep you from pulling your hair out: Any time your image is at a stage where you think it looks pretty good, go to the History palette, and at the bottom of the palette, click on the Create New Snapshot icon. Think of it as an insurance policy, so that if things go bad, you can at least return to that spot and try again. It's not a bad idea to create a new snapshot about every five minutes when you're working on a big project. To keep from loading up on snapshots, when you create a new one, delete one or two snapshots before it.
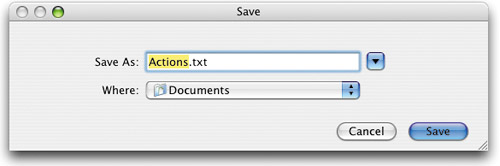
This is a totally undocumented actions tip, and if you need it, it's a real lifesaver. Once you've created an action, you can actually save a text document with all the action steps so you can have a printed hard copy of your action. Here's how: In the Actions palette, click on the action set containing the action that you want to save as a text document. Hold Command-Option (PC: Control-Alt) and from the Actions palette's flyout menu, choose Save Actions. When the Save dialog appears, you'll notice that the three-letter file extension is TXT (indicating it's a text file) rather than ATN (which is the Photoshop action format). Click OK and you've got a text file you can open in any word processor to print out your steps.
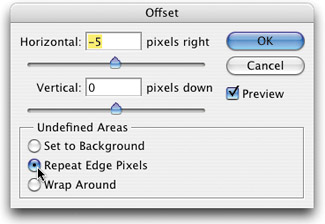
For a brief time back in the 1950s, 3D movies were all the rage, but it was short-lived, probably because you had to wear those cheesy-looking 3D glasses to experience the effect. Although 3D has come a long way since then, unfortunately you still have to wear the cheesy glasses. Be that as it may, the 3D effect is starting to appear again in print ads in trendy magazines, which generally include the paper 3D glasses in the magazine. This effect can be created in Photoshop, no problem. The hardest part is finding a supplier for 3D glasses (okay, we'll help on that part too. Try 3D Glasses Direct at www.3dglasses.net). Here's a tip on how to create the 3D effect in Photoshop: Open an RGB image, then go to the Channels palette and click on the Red channel. Go under the Filter menu, under Other, and choose Offset. For Horizontal enter –5 and set Vertical to zero. For Undefined Areas, choose Repeat Edge Pixels, then click OK. In the Channels palette, click on the RGB channel to reveal the effect. Then, lastly, you have to determine which part you want to appear as “coming out of the image” toward the person viewing it. Switch to the History Brush (Y), and using a soft-edged brush, paint over the area you want to “jump out” from the image. As you paint with the History Brush, you'll see your original untouched image paint back in (don't sweat it, that's what it's supposed to do). Now all you have to do is order the glasses.
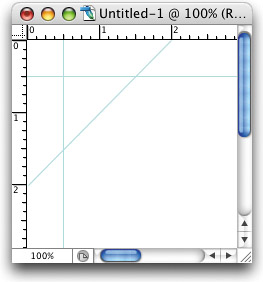
If you've used Photoshop's rulers at all, you know that you have your choice of either a vertical or horizontal guide. That's not a bad thing, but there's one thing missing—a diagonal guide. Since Photoshop doesn't have one, here's a tip for making your own: Start by clicking the Create a New Layer icon in the Layers palette, then double-click on your Foreground color swatch and in the resulting Color Picker, set it to R: 161, G: 253, B: 253 (the color Photoshop uses for its built-in guides). Switch to the Line tool found in the Shapes tools (Shift-U until it comes up), and on this new layer draw a diagonal line where you want your guide to appear (make sure you have the Fill Pixels icon selected in the Options Bar). It's not a bad idea to copy that layer into a separate document and save it on your drive—so anytime you need a diagonal line, you can just open that document and drag it right in.
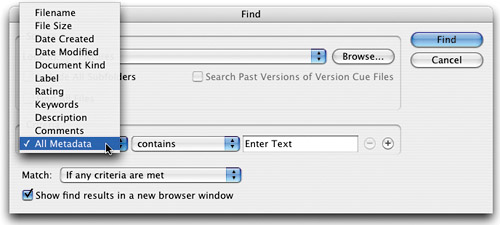
Don't get caught in the trap of thinking that you have to assign keywords to your photos before you can start using Bridge's Find function (although keywords certainly make it easier). But to find out just how much power the Find function really has, just press Command-F (PC: Control-F), then choose your options from the pop-up menus in the Criteria section. If you remember you shot the photo you're looking for with a certain camera, you can search All Metadata for that make and model. You can also search by Rating, Date Created, and a host of other criteria.
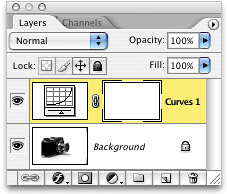
If you're color-correcting a number of images that are basically the same (for example, catalog shots or high school yearbook shots, where the lighting and composition are pretty much the same), you may want to apply the same Curve setting to a number of images. Rather than saving the Curve setting and loading it each time, try this tip: Use the Create New Adjustment Layer pop-up menu at the bottom of the Layers palette to create a Curves adjustment layer, and then just drag-and-drop that adjustment layer from your current image to your target image.
©ISTOCKPHOTO/ALEK KHAZANOV
Here's an actions power tip: Did you know that you can build an action that will include an existing action? Here's how it's done: As you're recording your action, just go to the Actions palette, click on the existing action you want to include in your current action, and click the Play button at the bottom of the Actions palette. The existing action will now be added as a step in your current action (pretty scary stuff).
This is a great tip if you're zoomed in close to an image for retouching, or checking it in prepress for spots or specs, because it lets you check the entire image in a very methodical way—using your keyboard to navigate zone by zone. Here's how:
Press the Home key to jump to the upper-left corner of your image window.
Press the End key to jump to the lower-right corner of your image window.
Press the Page Up key to scroll upward one full screen.
Press the Page Down key to scroll downward one full screen.
Press Command-Page Up (PC: Control-Page Up) to scroll one full screen to the left.
Press Command-Page Down (PC: Control-Page Down) to scroll one full screen to the right.
Once you've learned these shortcuts, you can start by pressing the Home key (jumping you to the upper left-hand corner of your image). Clean that area then press the Page Down key to move methodically down the left side of your image until you reach the bottom of your window. Then press Command-Page Up (PC: Control-Page Down) to move one screen to the right, clean that area, then press the Page Up key to move methodically up the image until you reach the top. Repeat these steps until you're finished. The advantage of doing it this way, besides the sheer speed of using keyboard shortcuts, is that you'll see every area of the image without missing a spot.
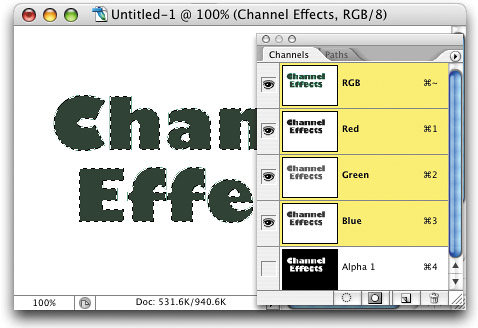
If you've ever tried to create and format type in a channel, you know what a pain it can be. Especially because, when you're working in a channel, it doesn't create an editable Type layer, so you're really limited to how you can format and, of course, edit your type. So instead of creating type in a channel (which many special channel-type effects call for), just create your type on a layer as usual. In fact, don't go to the Channels palette at all—just pretend you're not using channels. Once you've got your type formatted and adjusted just the way you want it on your regular Type layer, Command-click (PC: Control-click) on your Type layer's thumbnail in the Layers palette. This puts a selection around your type. Now you can go under the Select menu and choose Save Selection. When the dialog appears, click OK, and it saves your perfectly formatted type as (you guessed it) a channel. Now you can delete your Type layer, and you're left with an Alpha channel with perfectly formatted type.
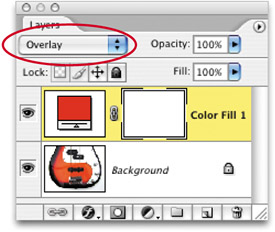
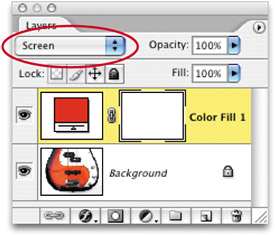
Once you understand layer blend modes, you wind up using them all the time. Chances are by now you know which individual modes you want to use (such as Overlay, Multiply, Soft Light, Hard Light, Screen) and which ones you'll probably never use (such as Dissolve). If you know which ones you want to apply, you can use a keyboard shortcut to jump right to the blend mode you want. For example, to jump to the Overlay mode for a layer, press Option-Shift (PC: Alt-Shift) and the first letter of the mode you want, in this case, the letter O (making the shortcut Option-Shift-O [PC: Alt-Shift-O]). For Screen mode, you'd press Option-Shift-S (PC: Alt-Shift-S), and so on. (Note: If you have a tool selected that has a blend mode in its Options Bar, such as the Brush tool [B], the keyboard shortcut will change that tool's blend mode instead of the layer blend mode.)
©ISTOCKPHOTO/BRADLEY MASON
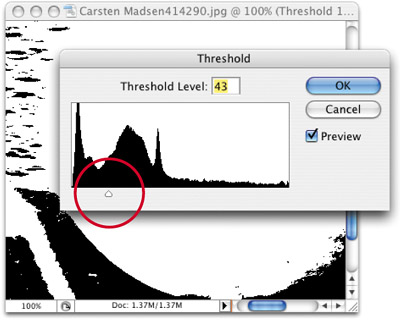
We use this tip to have Photoshop help us determine which are the darkest (shadow) points and which are the lightest (highlight) points in an image when we're color-correcting. We start by choosing a Threshold adjustment layer from the Create New Adjustment Layer pop-up menu at the bottom of the Layers palette. When the Threshold dialog appears, we drag the slider all the way to the left and the image turns completely white. We then slowly drag the slider back to the right, and the first black pixels that appear onscreen are the shadow areas. We make a mental note of that area as our shadow point. Then we drag the slider all the way to the far right (the image turns black). As we drag slowly back toward the left, the first white pixels that appear are the highlight points in the image. We note them as well. We now know where the shadow and highlight points are in the image, and we can use them, along with the Eyedropper tools in the Curves dialog (Command-M [PC: Control M]), to set the proper shadow and highlight areas to remove any color casts. Note: When you've determined where the shadow and highlight areas are, you can then delete the Threshold adjustment layer by dragging it into the Trash icon at the bottom of the Layers palette.
If you're using the Lasso tool (L), you have a surprising amount of navigation control, even while you're dragging out your selection. For example, if you're drawing a selection and you need to scroll over a bit, just press-and-hold the Spacebar, and right where your cursor is, the Hand tool will appear. Then you can move the image while you're still selecting (try it once and you'll see what we mean). When you let go of the Spacebar, you're right where you left off, and you can continue your selection. Here's another Lasso tip: If you're drawing a selection and reach the edge of your document window and need to scroll over, hold the Option key (PC: Alt key), let go of the mouse button, move your mouse to the edge of your image window, and you can nudge the screen over (again, this is one you have to try once to understand it). It's like you're using the Lasso tool to slide the image over. When you're done sliding, press the mouse button and release Option/Alt to continue selecting. Incidentally, while selecting, you can also use the zoom in/out tricks: Command–+ (Plus Sign) (PC: Control–+) and Command–- (Minus Sign) (PC: Control–-).

©ISTOCKPHOTO
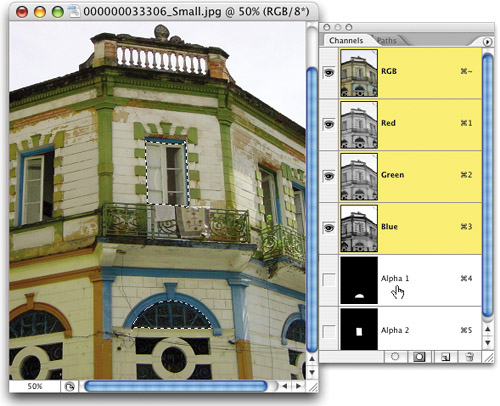
If you're working on an RGB image and you've saved a selection (by drawing a selection and choosing Save Selection from the Select menu), you can instantly reload that selection at any time, without going to the Channels palette. If you have only one saved selection, just press Command-Option-4 (PC: Control-Alt-4), and the selection will instantly appear onscreen. If you have a second saved selection, press Command-Option-5 (PC: Control-Alt-5), and so on. The key to remember is that the RGB channels take up the 1, 2, and 3 spots, so always start with 4 to load your first Alpha channel. Note: If you're working with CMYK images, remember to always start with 5, because the CMYK channels take up the first four spots.
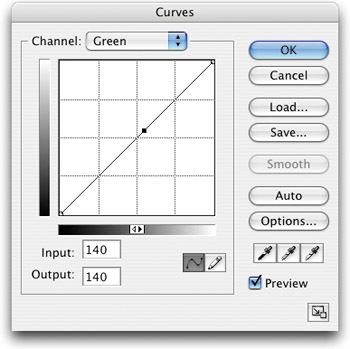
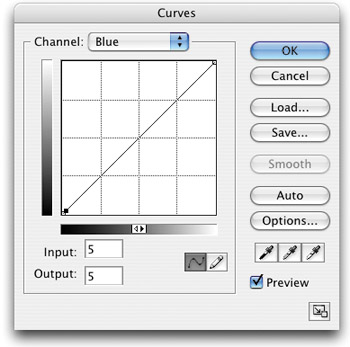
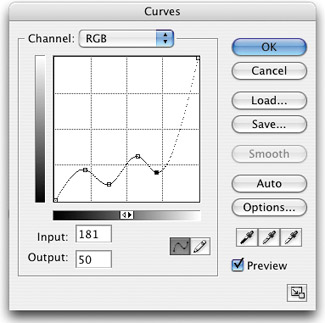
Earlier in the book, we showed you how Photoshop will plot a point on the curve for you if you Command-click (PC: Control-click) on a color in your image that you want plotted. However, there's a power tip that we waited until now to share—if you add the Shift key, making it Command-Shift-click (PC: Control-Shift-click), Photoshop will add a point for that spot on all the color channels for you. This works in both RGB and CMYK modes.

If you're struggling to make a selection of an image that's against either a background of a similar color or a very busy background, here's a masking tip to make the process easier: Add a Levels or Curves adjustment layer above your image layer using the Create New Adjustment Layer pop-up menu, and use it to dramatically increase the contrast in the image to help make the edges stand out. This will often help make the difference between the object's edge and the background more obvious. The great part is, you can totally damage the look of the image because you're using an adjustment layer. When your selection is in place, just drag the adjustment layer onto the Trash to delete it, and your image is back to normal, but you've got that “impossible” selection still in place.
©ISTOCKPHOTO/JUSTIN HORROCKS
If you're working in CMYK mode and you go to the Color Picker, it still displays RGB colors. This is a bit of a problem, because you think you're picking one color, but when you start to paint or fill with that color, you get the CMYK desaturated version. Here's a tip to get around that. When you're in CMYK mode and you go to the Color Picker, press Command-Y (PC: Control-Y), which is the shortcut for Proof Colors (found under the View menu). When you do this with the Color Picker open, it changes all the colors in the Color Picker to CMYK colors. That way, when you pick a color in the Color Picker, it looks the same when you paint or fill with it in your CMYK image.
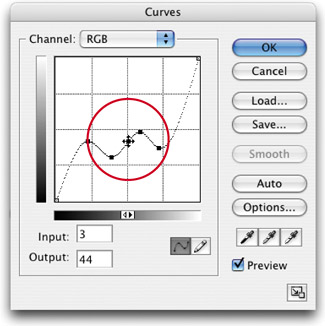
If you're working in the Curves dialog (Command-M [PC: Control-M]) and you want to make more than one point active at the same time, click on one point (to make it active) then hold the Shift key and click on another. As long as the Shift key is held down, you can click on as many points as you'd like to make them active at the same time.
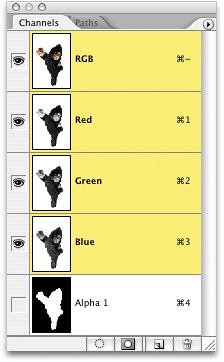
If you've got the Channels palette open and you have multiple saved Alpha channels, you can load any Alpha channel as a selection by holding the Command key (PC: Control key) and clicking directly on the channel's name. This instantly loads the selection. An even better tip: If you hold the Command key (PC: Control key) then add the Shift key (making it Command-Shift/Control-Shift) and click on another Alpha channel, it adds that to your current selection. You can keep adding more selections to your original selection until, well… until you run out of Alpha channels.
©ISTOCKPHOTO/RAFAEL OLIVEIRA
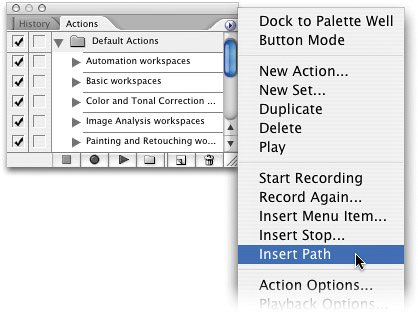
If you're creating actions and you want your action to include a path that you've created, you can do that, but you have to draw your path first, before you record your action. Once you've drawn your path, and it comes to the part of your action that requires the path, go to the Action palette's flyout menu, choose Insert Path, and that path will be stored along with the action.
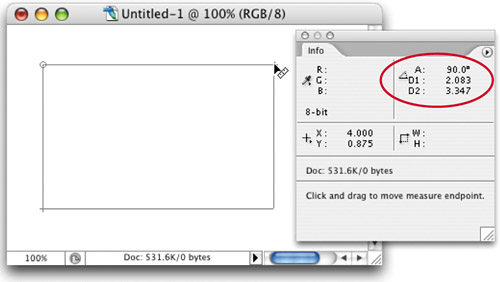
If you need to measure more than one side of an object (for example, if you're measuring a box, and you need the height and width), you can measure both at the same time. First, open the Info palette under the Window menu (so you can see the measurements that the Measure tool generates), then get the Measure tool (Shift-I until it comes up) and click-and-drag it along the first edge. Release the mouse when you reach the end of the edge. Then hold the Option key (PC: Alt key), click on the end of the first line, and continue on in a different direction. You'll notice that another measurement line appears. Now, look in the Info palette and you'll see your two measurements listed under D1 and D2.
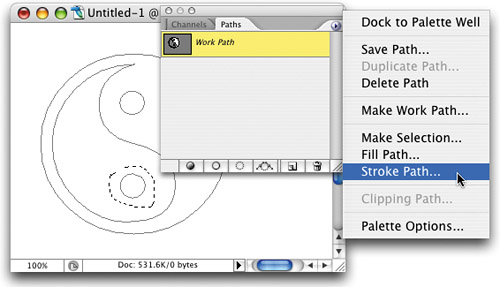
This is a mind-blowing advanced tip (not because it's hard—it's simple—but if you use the Pen tool [P], warning—your mind is about to spontaneously combust). Here's the scoop: If you're an advanced user, you already know that you can draw a path and then apply a stroke along that path (using the paint tool of your choice) by choosing Stroke Path from the Paths palette's flyout menu. But dig this: If you draw your path, but only want to stroke a portion of that path, all you have to do is make a selection (using any selection tool) of the part of the path you want stroked. Then when you choose Stroke Path, it will only stroke the area of your path that is contained within your selection. Boom! That was the sound of our heads exploding.
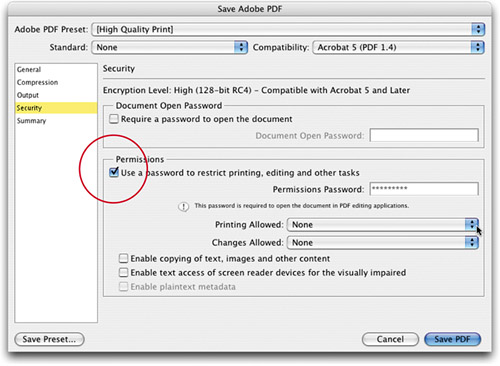
If you're using Photoshop to create a PDF Presentation slide show (under the Automate submenu in the File menu) so you can email it to your clients for proofing, one of your concerns may be that your client will just print your photos out to a photo-quality printer, leaving you out in the cold (so to speak). But you can pull the plug on their printing aspirations. When saving your PDF Presentation, under Output Options, choose Presentation, then hit Save. It'll ask you to name your PDF presentation (you're not done yet), so name it and click Save. Then, a PDF options dialog will appear. Under Security (in the options along the left side), turn on the checkbox for Use a Password to Restrict Printing, Editing and Other Tasks under Permissions. Enter (and memorize) a password. Then, make sure Printing Allowed and Changes Allowed are set to None. Click Save PDF and it'll ask for your password one more time. Now, when you email the PDF Presentation, printing will be grayed out, and even if they have the full version of Acrobat, they won't be able to copy-and-paste your photos into something else for printing.
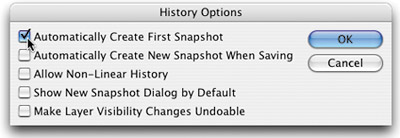
If you're running a Batch action on a folder full of images, one of the things that can really slow the process down is the fact that the History palette keeps creating History States (undos) for each image. To keep your Batch actions running at full speed, there are two things you can do: In the History palette's flyout menu, under History Options, turn off the checkbox for Automatically Create First Snapshot. Secondly, go under the Photoshop menu, under Preferences, and choose General (in Windows, Preferences can be found under the Edit menu). In the History States field, lower the number from 20 (the default) to 2 and click OK, then your Batch will run like a greased pig. Don't forget to increase your History States or change your History Options back after you're done batching or you'll be down to two undos.
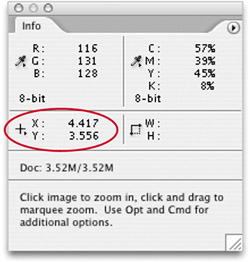
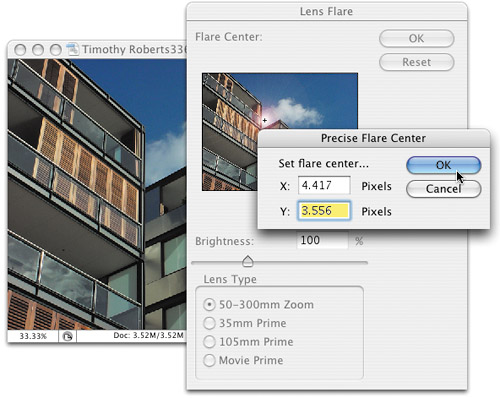
This tip lets you precisely position the center of the Lens Flare filter by using the Info palette and a little-known feature of the Lens Flare dialog. First, open the Info palette (found under the Window menu), then put your cursor over the precise spot in your image where you'd like the center of your lens flare to appear. Look in the Info palette, under the X and Y coordinates, and write down those two coordinates (I knew one day I'd find a use for the X and Y coordinate readings). Then go under the Filter menu, under Render, and choose Lens Flare. There's a fairly large preview window in the center of the dialog. Hold the Option key (PC: Alt key), click once on the preview window, and it brings up the Precise Flare Center dialog. Enter those X and Y coordinates you wrote down earlier (you did write them down, right?), click OK, and your lens flare is precisely positioned.
©ISTOCKPHOTO/TIMOTHY ROBERTS