Defining an Adjustment’s Scope
Each of our applications has a mechanism for applying adjustments that affect only parts of an image, or are stronger in one area than in another. We will proceed from the least precise of these (graduated and radial) to the most, those using Photoshop’s array of selection tools.
Adjustments in Lightroom and Adobe Camera Raw are additive. By this I mean two things. First, if you apply a local adjustment, it is intuitively applied where you add it. Simple. Second, where you apply possibly conflicting adjustments, the total effect is added up for each pixel. So if you globally darken an image, then lighten a part of it, that area will experience no net adjustment, rather than showing the wear of two adjustments.
This is somewhat different in Photoshop. In Photoshop we add adjustment layers which would normally affect an entire image. By utilizing those layers’ masks, we prevent or remove the adjustment from targeted areas. So I think of the process of creating area or local adjustments as subtractive. Also, if we apply too many conflicting adjustments on one area of an image, it will likely look posterized or otherwise degraded.
To do this, especially in Photoshop, we’ll have to master the concept of Masks. Review “Masks” (page 188).
Graduated & Radial Adjustments
The first method I’ll examine is producing a graduated or radial filter. These adjustments are intended to remind photographers of the filters with variably tinted glass that we’d put on the front of our lenses. These are used to make part of our image darker or more pink, for example, than the rest.


Let’s first create a radial adjustment. ACR’s toolbar is illustrated above, Lightroom’s below it. Since the two are similar, so I’ll focus on Lightroom.
The options are not as plentiful as those for a global correction, but they are more powerful than any piece of glass we put in front of our lenses. The adjustment is created as follows:
- Click on Radial Filter (or press Shift + M in Lightroom, J in ACR). The settings drawer appears with New highlighted.
- Configure settings. Just guess. If you want to lighten, pull Exposure rightward. Soft focus? Down with Clarity and Sharpness. You can change the settings later.
- Drag from where you want no effect to where you want full effect—just the opposite with the Graduated Filter. Click “Invert Mask” to reverse.
- Adjust to taste:
- Move filter by dragging the Pin.
- Compress or expand the ellipse by its control handles.
- Rotate filter by dragging outside the ellipse.
- Adjust settings. Note that Edit is now highlighted to enable this.
- Click New to create another filter.

In this example, I am creating a “warming density” Graduated Filter to compensate for the bright, hazy distance. I’ll need contrast, diminished exposure, and a warmer white balance. After choosing the tool, I guessed a few settings. Then, I dragged from where I wanted the full effect to where I wanted none. If I wanted a color effect, I could have clicked on the color box and chosen a Hue and Saturation from the Color Picker.
Then I adjusted my adjustment. First, in Edit mode, I used the sliders and adjusted the filter’s position. As of this writing, only ACR has an extra refinement to Graduated and Radial filters: a Brush. Therefore, in ACR’s Brush mode, I removed the darkening from the hilltops (below).

Photoshop

In Photoshop, we can make any adjustment a graduated one. There isn’t one specific tool for the task, but instead, we use both adjustment layers and the Gradient Tool, which can make many different types of gradients. I usually set my Gradient Tool to create a Linear, Foreground Color-to-Transparent gradient, with my Foreground color set to black.
Create an adjustment that corrects the part of the image that needs adjusting. Note that this adjustment layer has a white-filled mask. It’s on this mask that we’re going to put the gradient.

Choose the Gradient Tool. The Options Bar will show a preview of the gradient that you’ll be drawing. The small button to the right of the preview accesses a menu of gradient presets from which we should choose “Foreground to Transparent.” Just to be sure nothing is amiss, access the Properties panel: be sure you see “Layer Mask” at the top. If not, click the mask button at the top to bring it to the fore. You still have the Gradient Tool, right?
Since the gradient begins with black, we will be dragging from where we want no adjustment (as black will hide it) to where we want full, unmasked adjustment. If you need the gradient to be perfectly horizontal or vertical, hold the Shift key down as you complete it. Use the Reverse checkbox in the Options Bar if you prefer to drag the opposite way (full effect to none).

Have a look at your workspace: the mask on the adjustment layer will gradually go from black to white. You should see this in both the Layers panel and the Properties panel. If it’s backwards (the area that should be adjusted isn’t), click Invert in the Properties panel.
Painting Adjustments
Key Concepts

Graduated adjustments are fine for when a correction needs to gradually diminish across an image. When you need to apply a correction to more arbitrary areas of an image, Painting becomes a much more powerful method.
The brushes with which we paint have size, opacity, and hardness. In Photoshop, one can control many other attributes, too. But these three can be very effective in controlling where we apply corrections. A large, soft brush can be used to apply a correction in a way that is similar to a gradient in its looseness. But by making the brush smaller and smaller, we can more precisely control the adjustment’s application—from lightening a face to increasing the contrast of the eyes to desaturating just the whites of the eyes, for example.
To have an adjustment end abruptly, we’d use a harder brush. To gently fade the adjustment, we’d use a softer one. For increased precision, ACR and Lightroom offer Auto Mask, which attempts to keep your “paint” from slopping into areas of the image that are different from the areas where you started to paint. Photoshop, as we’ll see in the next section of this chapter, offers unparalleled precision with its many selection tools.
Procedures

The adjustments that are available for the adjustment Brush are the same as those for Graduated Filters. There are additional controls for affecting the qualities of the brush one is using to apply those adjustments, such as size and hardness. One additional control that is worthy of exploration and experimentation is Auto Mask. When active, this feature samples color/tones from the center of the brush, then applies that adjustment only to similar pixels.

Choose the adjustment Brush from the tools (top of ACR’s window; just under the histogram in Lightroom).
- In this example, to reveal detail in the sky in the windows, I configured the brush to darken and increase contrast. With the new (2012) Process Version, there are many more attributes we can “paint.”
- To make the brush soft, use the Feather Slider. If you’re worried about “spilling” adjustment onto surrounding areas, use…
- Auto Mask. Once checked, you paint the area that should be adjusted, preventing the central crosshair of the cursor from touching tones/colors that should remain unchanged. Note the brush at work in the image above.
- Hover over a pin to see its mask Overlay and know where the adjustment is being applied. Or tap O in Lightroom (Shift+O to cycle through overlay colors); Y or the checkbox (lower right) in ACR.
Tip: In Lightroom, with the cursor over the pin, press and drag left or right. Dragging left diminishes the effect of the adjustment, while dragging right increases it. If any of the sliders that control the adjustment are at maximum or minimum, however, you may not be allowed to exceed those values.
You may apply more than one adjustment Brush, too. Just click on New, change the settings, then begin painting. You may also readjust the effect of any brush by clicking on its Pin, then moving the sliders. If you select a brush’s Pin, then click Erase, you may paint away the effect. Using Backspace or Delete removes the pin and its adjustment.
Photoshop
Painting Tools & Brush Presets

There are many tools in Photoshop that use a painting metaphor (above); that is, as you press or drag your cursor across your image, either color or an effect builds up. Although there are many possible configurations of brush settings, we will focus on the three primary brush qualities that all the major painting tools share: Size, Hardness, and Opacity.
Usually, a brush appears as a circle as you move the cursor over the image. The ability to edit the brush quickly and easily makes overall editing much easier. The basic techniques for manipulating brushes are so important that I have listed the steps here. Refer to these shortcuts whenever I introduce a new tool that uses brushes.
Choosing & Building Brushes
Size
When you move a brush over your image, Photoshop usually displays a circle that represents the size of the brush. If very small, Photoshop displays a small crosshair.
You can change the brush size easily in one of three ways:

- Right-click somewhere in the Image Window, then choose a size in the box that appears (above). Drag you cursor when it’s over “Size” to “scrub” the size quickly.
- Use the square bracket keys, [ ( for smaller) or ] (for larger).

- option+control-drag/Alt+Right-drag horizontally while watching the orange mask (HUD or Heads Up Display) grow or shrink (left).
Once you become accustomed to the keys, it is much easier to select an appropriate brush size.
Brush Hardness
Sometimes you’ll want to control how the “paint” blends into what’s already there. So we set an appropriate Hardness for the brush, from 0% for very soft, to 100% for a sharp edge.
- In the Image Window, Right-click, then use the slider to choose a hardness value in the box that appears.
- Press Shift+ [ or ]
- option+control-drag/Alt+Right-drag vertically while watching the orange mask get fuzzier or sharper-edged (left).

There are two General Preferences with choices related to the Heads-Up Display (HUD): 1) HUD Color Picker appearance and 2) whether brush hardness or opacity is controlled with mouse movement (above).
Brush Opacity
There are times when you’ll want to apply a brush stroke lightly or heavily. In general, do not change brush color to change density—rather, change brush opacity. When using the Brush Tool, opacity represents the amount of color a brush puts down as you drag the cursor across your image. By changing opacity, you change how thickly you apply the color with the brush: 10% opacity for very thin coverage, 50% for heavier coverage, etc.
You can change the opacity level via the Opacity slider in the Options Bar or by pressing the number keys: 1 for 10% opacity, 2 for 20%…up to 9 for 90% and 0 for 100%. When you press these keys, note how the brush opacity changes in the Options Bar. Press two numbers rapidly for more precision. For the Brush Tool, this is literally the opacity of the stroke, but for tools like the Blur Tool, Opacity is called “Strength” and is a measure of the intensity of effect.
To build up density when painting with less than 100% Opacity, make several brush strokes in the same area. If you wish to build up density by going over the same area repeatedly with one brush stroke, adjust the Flow, instead. Use Shift+ a number to change Flow. I believe the affect of Flow is more intuitive and natural.
Choosing a Color


The Brush Tool uses the Foreground color as its paint color; interestingly, the Eraser Tool uses the background color as its color, but only on the background. For Layer and Filter Masks, the best colors for painting are often the default colors of humble black and white. Use the D key to set the default colors. If you need to swap the Foreground and background colors, use the X key or click on the small, two-headed arrow near the foreground and background colors in the Tool panel.
If you click on the foreground or background color squares, Photoshop will display the Color Picker. Use this or the HUD (Heads-up Display) to select colors. When the Color Picker is open, click on a Hue from the bar of color near the center, then choose from the large square on the left to specify how light (top to bottom) and how saturated (left to right) a color you want.
Remember: the Color Picker almost always requires at least two clicks. On the right are fields where you might enter numerical values for colors. To summon the HUD instead, option+⌘+control-click/
Alt+Shift+right-click and hold the mouse button down while choosing a color. This takes a little practice, but becomes much faster than the Picker.
A Simple Exercise with the Paint Brush
- Select the Brush Tool or simply press B.
- Create a new layer: Give it a name like “painting exercise.”
- Move the cursor over your image and you’ll see a circle, i.e., the brush. Resize the brush via the methods listed above.
- Use the HUD or click on the foreground color and choose a color from the Color Picker. Paint with the brush on your image. Change the hardness of the brush.
- Change the Opacity using the number keys. Recall that 0 (zero) is 100% opacity. Paint more. Click on the background color square and choose a color. Click OK. Switch between the foreground and background colors by using the X key. Note how easy it is to paint first with one color, switch them, then to paint with the other color.

- Next, create a new adjustment layer. Brightness/Contrast is good for an experiment. Use the adjustment’s Properties panel to make a strong adjustment.
- Click the Masks button at the top of the Properties panel to target the mask. Reset your colors back to the defaults by clicking the D key. Reset the opacity to full.
- Remember, pressing X switches the foreground and background colors. With black as the foreground color, you should be able to mask the adjustment.
- Experiment with changing the brush size, edge hardness, and opacity. Notice how using a soft-edged brush and a moderate opacity can make the painted edges appear softer.
Painting Adjustments Example: Dodging & Burning

In traditional darkroom photography, dodging results in lightening parts of the image while burning darkens parts of the image. This technique is a way to salvage just those highlights and shadows we care to. In the darkroom, it was difficult to dodge or burn areas of small or irregular sizes. And we certainly did not have undo. In Photoshop, we will use two adjustment layers, one that lightens and one that darkens. We’ll use masks to hide those layers everywhere but where we paint with white. We will be able to paint darkness in or out as we need.
Let’s see how we can use this technique to help this image.

Dodging
- Create a lightening Curves adjustment with the Adjustments panel.

- At the top of the Properties panel, click the Masks button. Use the Invert button to hide the lightening effect—the mask is now filled with black.
- Choose the Brush Tool and reset colors to their default. Adjust the size of the brush and choose low hardness. To dodge with subtlety, set the Opacity low. We’ll be more bold here and leave the Opacity at full.
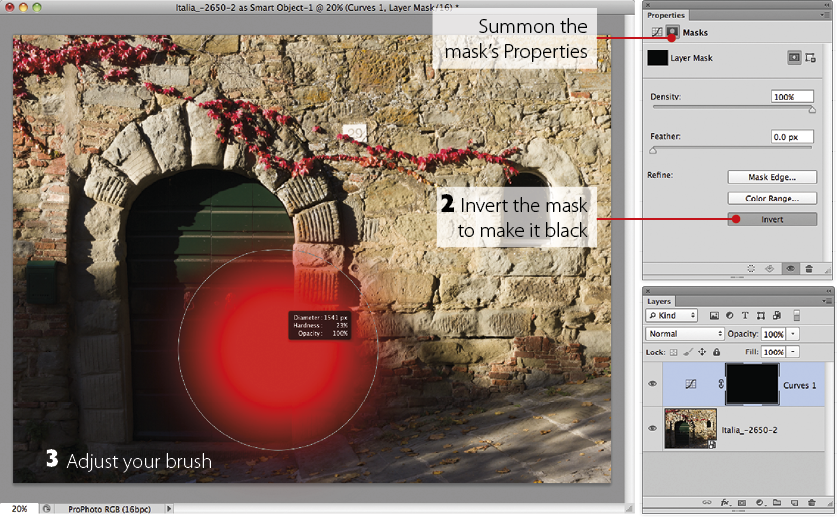
- Paint with white on the dodge layer’s mask. With a soft-edged brush, the effect is subtle at the edges.

Burning
- Create a darkening Curves adjustment with the Adjustments panel.
- Target the mask and use the Invert button in the Properties panel to hide the darkening effect.
- Adjust the size of the brush and choose a low hardness. Also, to burn with subtlety, you can use low Opacity.
- Paint with white on the burning layer’s mask. If the brush opacity is low, you can build up effect by repeatedly painting over an area.

Precise Area Adjustments
Photoshop
Key Concepts
So far, the local adjustments we’ve done have been rather loose. True, you might use very small brushes to slowly apply subtle adjustments, but sometimes you need to be precise and efficient. For that combination, creating good selections and generating masked adjustments from them is the ideal course.
Selections are like stencils or masking tape, which prevent the next things you do in Photoshop from going beyond edges you designate. Unlike a stencil, however, selections can have edges that are crisp or fuzzy, or both, like the masks we have been painting. Indeed, you can think of selections as ad hoc, temporary masks. The selections we’re going to make in this section will become “real” masks on adjustment layers.
Procedures
To-Do: Select, Create an Adjustment, Refine the Mask
I have to say it: it’s as easy as 1-2-3. However, each of these three steps can be involved. I’ll summarize them below, then I’ll go into the details involved in each step, explaining their vocabulary and concepts.
- Make a selection. Once you’ve identified the image area to adjust, make a selection of this area. There are several good selection tools to use: the Quick Selection Tool, Color Range, the Marquee tools, and the Lassos. Try to use the most appropriate tool to make an initial selection, but this selection doesn’t have to be perfect. You can add to the selection with any selection tool using the Shift key, subtract from it with the option/Alt key, or invert it using the command.
You may also combine selection tools with painting tools using a Quick Mask. You might need to delicately refine that selection, especially around difficult areas like grass, hair, and other wispy things using the command.
- Make the adjustment. Create a new adjustment layer from the Adjustments panel. Photoshop automatically creates a mask based on the selection you created. Any pixels that were partially selected will be partially adjusted. The mask makes the adjustment apply only in the area of the selection you made.
Work with the adjustment until it provides the correct result. Don’t worry if the area of the adjustment is imperfect at this point. It’ll be good enough to visualize the adjustment.
- Refine the mask, if necessary. Despite our best efforts while making selections, we sometimes don’t see small errors until we have created the adjustment. So a final mask refinement is sometimes necessary.
There are several tools for editing a mask. With adjustment layers, the mask is automatically selected for any edits. The most common options for editing a mask can be found in the Properties panel (Feather, Invert, and Refine Edge). It is also common to paint on a mask using the Brush Tool. The Refine Edge option is the same powerful tool we use for making selections, but it can be used on masks, too.
Note: One adjustment you might want to make is Shadows/Highlights, but it is not available as an adjustment layer. To perform this adjustment nondestructively, you must apply it to a Smart Object. Once you have a Smart Object, select Shadows/Highlights from the menu. You’ll notice it’s applied as a “Smart Filter.” Indeed, you can apply many filters to a Smart Object, and they will be masked to your initial selection.
Select
Selection Tools & Methods
Given the task list for localized adjustments, you need to familiarize yourself with selection techniques. Selections can be quick and easy; most take less than 60 seconds. Some are more difficult. Users often try way too hard to create a very precise selection. There are definitely times when a very precise selection is needed, and often, a fairly simple selection is a great start. Delicate alterations can be made with other tools.
Here are some of my favorite selection techniques that I use most often. They’re not listed in any particular order of preference. Try them all. The best way to learn them is to experiment with them. Don’t get caught using one tool all the time; it might be great for some selections, but very difficult for others.


You may also use the tools in combination. You can start with one tool, add to your selection with another, and remove areas from the selection with a third. The Options bar will display four buttons to help you do this. You may also use the Shift key to add or the option/Alt key to subtract—or both keys to intersect.
Marquee Tools

The Rectangular and Elliptical Marquee Tools are often maligned because of their simplicity. But with a few clicks of these tools, sometimes with a feathering of their edge, you can have a good selection quickly. Pick the Elliptical Marquee Tool from the Tools panel. If the Rectangular Marquee is displayed, click and hold it to display the Elliptical Marquee Tool underneath it. (You can also select the current Marquee Tool by pressing the M key, and switch between the Rectangular and Elliptical Marquee Tools by pressing Shift+M).
Drag diagonally with a Marquee Tool over the image part you want to select. You will find that the Shift key can do two things to aid you. First, it can constrain the selection to a perfect square or circle if you finish dragging with the Shift held down. Second, if you start a second or subsequent marquee with the Shift held down, as mentioned above, you’ll add these new shapes to your existing selection. To both add to a selection and constrain the shape, begin your marquee with Shift, then while dragging momentarily release it, and then finish your marquee with it held down. Tricky!

If you select too much of the image, you can undo the most recent addition easily by hitting ⌘+Z/Ctrl+Z, or you can subtract a piece from the current selection by holding down the option/Alt key while making a marquee over the part you want to remove. This is an easy way to take a quick bite out of an existing selection.
The Lasso & Polygonal Lasso Tools

The Lasso Tools are easy tools for making quick, loose selections of irregular-shaped objects. You can then feather these selections to soften the roughness. I prefer the Polygonal Lasso Tool over the traditional Lasso Tool as it feels a bit easier on my overused wrist (a lot of years on computers). The Lasso Tool simply requires you to draw a selection on the screen in a freehand manner. You hold down the mouse button, drag a loose shape, and release when you’re close to where you started. The Polygonal Lasso requires a series of clicks—more for greater precision, and fewer for a less precise, more faceted selection. It’s also great for any selection involving straight lines, like building façades. Choose the Polygonal Lasso Tool from the Tools panel. If the Lasso Tool is displayed, click and hold it to display the Polygonal Lasso Tool underneath. (You can also select the current Lasso Tool by pressing the L key, and switch between the Lasso Tools by hitting Shift+L.)

Use the Polygonal Lasso by clicking along the edge of the area you want to select. I like working with the image window a bit bigger than the image or in one of the Full Screen modes (accessed by tapping the F key). If you come to the edge of the image, click outside of the image (in the gray or black around it) to select the pixels right along the edge. Click on the first point to complete the selection.
Quick Selection Tool

Choose this tool in the Tools panel or tap the W key. This tool selects pixels intelligently, and it gets more intelligent as you build a selection. If you are trying to select an object in a photo, like the door in the example below, simply drag the cursor much like you would paint. Photoshop reads the colors and tones within the brush’s radius, then automatically expands to include similar colors and tones near to where you dragged, stopping at edges it detects.

Since it’s learning from you, take care to avoid brushing over areas you don’t want selected. Note that in the Options bar you set the size of the brush and whether that brush is adding to the selection or removing unwanted areas from it. In the subtraction mode, avoid areas you want selected. With this tool, you can build a complex selection very quickly. As with painting tools, you can change the size (and less usefully, the hardness) of the brush you use to make selections.
Visualizing Selections: Quick Mask

Quick Mask is a fast and easy way to visualize which areas of an image are selected by placing a translucent orange overlay over the unselected areas. The marquee (also known as “marching ants”) disappears and you see this overlay instead.
Engage Quick Mask Mode by pressing the Q key. Turn it off by pressing Q again. You can also enter this mode from the bottom of the Tools panel, or use . Photoshop reminds you’ve done so by displaying “Quick Mask” in the image title bar. In a very real sense, you are viewing and potentially editing this orange-and-clear image and not your photograph anymore.
Warning: Be careful in Quick Mask Mode. It temporarily changes your selection into an image that overlays the main image. Most of the standard Photoshop tools still work in this environment, including the selection tools, so that you can edit this image and therefore the selection it represents. It’s usually best to have a selection, switch to Quick Mask Mode, view and/or edit the selection, and then switch right out of it again.
Quick Mask Mode is an easy way to edit a selection by simply painting using the Brush Tool. It’s possible to edit a selection this way because it is, for the moment, an image. Strangely, white paints clear (selected) in Quick Mask, and black paints orange (unselected). In the example above, I began with a selection of Mr. Franklin (right), entered Quick Mask Mode, then used the Brush Tool to paint with white to include Mr. Adams, Mr. Revere, and General Washington. (It is interesting whom you encounter in Boston.)
Double clicking on the Quick Mask Mode button in the Tools panel accesses the Options dialog in which you may set the color for the Quick Mask. The bright red-orange color works for most images. If you want to change the color to something that will contrast with a particular image, click on the color square to bring up the Color Picker. Pick a different color, change its visual opacity, and click OK to close the Quick Mask Options dialog.
To ensure you’re painting with the default colors of black and white simply press D, then paint knowing you’re getting full selection or deselection. Press the X key to swap the colors. Press the Q key to switch out of Quick Mask Mode and display your selection as marching ants again.
Inverting the Selection
It’s often easier to select an area that you don’t want and then invert the selection than to directly select the area you do want. Just make a selection of everything you don’t want, and then invert the selection by using the command. In this example, it’s easy to select the door with the Quick Selection Tool and then invert the selection to make a selection of the walls, window, and pavement.

Focus Area
Focus Area isolates the sharply focused areas of a photo. Choose the command to open the dialog. Wait while it makes a first attempt, then use the controls to fine-tune the result. Note that there are brushes that act like the Quick Selection’s add and subtract functions, and sliders to enhance the edge. The Refine Edge option is explained later in this chapter.

Color Range: Highlights, Midtones, Shadows

Color Range lets you select a range of tones or colors in your image. Choose the command to open the dialog. Use the Select menu at the top of that dialog box to access the options for Highlights, Midtones, or Shadows, as well as preset colors, Skin Tones (with facial recognition), or Sampled Colors. In this first example, we’ll make a selection based on tone. We’ll select everything except the brightest areas of the image in preparation for an adjustment to lighten.
When you choose Highlights from the Select menu, the dialog displays a small map with the areas that will be selected (in this case, highlights) shown as white, and the unselected areas as black. Any grays you see represent partially selected areas. Choosing a Selection Preview uses the main image window to show a larger map.
- Grayscale—a large version of the small preview, with white representing the selected areas, black the unselected areas
- Black Matte—white is removed from the preview, showing the selected part of the image instead, and black remains
- White Matte—white is removed from the preview, showing the selected part of the image instead, and black is replaced with white
- Quick Mask—white is removed from the preview, showing the selected part of the image instead, and black is replaced with translucent red/orange

In our example, I’m trying to select all but the highlights. So I’ll check the Invert box. Now the areas that need to be adjusted are selected, so we click OK, then create the necessary adjustment.
Color Range: Sampled Colors

Most often, Color Range is used to select a range of colors based on those you click on with one of the eyedroppers. Open the Color Range dialog by using the menu command. Choose Sampled Colors from the Select menu, then click on a color in the Image Window. You may use the Options Bar or Right-click to set the size of the sample. The window in the Color Range dialog displays a black-and-white version of the selection it creates.
If you would like it to use proximity to where you click as well as color similarity, check the box for Localized Color Clusters. This engages a feature much like the Quick Selection Tool’s. The Range slider affects the size of the area within which you make the selection.
Color Range has one significant advantage over other tools. Like them, it completely selects colors that are very similar to the colors on which you click. But it also partially selects areas that are only somewhat similar to those clicked, thus providing built-in feathering based on the sampled colors. The Fuzziness slider lets you adjust how broad of a range of colors will be selected or partially selected; increasing the fuzziness results in a larger selection.
You will also use the “Add to Sample” and “Subtract from Sample” eyedroppers to increase or decrease the range being selected. Combined with Fuzziness, these allow you to define a very specific range of colors to be selected.
If Color Range selects too many pixels, try reducing Fuzziness to limit the number of selected pixels. If Color Range selects too small an area (very common), don’t immediately increase Fuzziness. Rather, sample additional colors by using the Add to Sample dropper or by holding the Shift key and clicking more areas.

You can restrict the area Color Range sees by making a marquee before you choose Color Range. For example, if you want to select just one of several green objects in an image, you can make a loose selection using a simple tool like the Lasso. When you open Color Range, the selection it makes is restricted to the area inside the Lasso selection.
Refining Selections
Selections can be built by combining multiple selection tools: in fact, it’s often easiest to do so. With any of the Tools panel selection tools, hold down the Shift key while starting a new marquee to add the new area to the existing selection. Remember to build a selection rather than expect one tool to make a great selection in one quick step.
Take a chunk out of a selection by holding down the option/Alt key while starting a new marquee to subtract it from the existing selection.
Feathering
When making a selection using a Marquee or Lasso Tool, you often will want to feather it to soften its edge. This is especially true in nature photography where perfect rectangles, ellipses, and polygons are rare. If you make the edges soft enough, the irregular edges of the selection won’t be noticeable in the final image.

After a hard-edged selection is made, choose . This selection was made with the Lasso. I wanted it to be like areas of sunlight streaming between branches and hitting the wall.

Choose a Preview that allows you to judge the quality of the edge of the selection. See Refine Edge on the next page below for more on these choices.

In this example, I followed the feathered selection with an adjustment that looks like sunlight on the wall…dappled sunlight.
Refine Edge
Photoshop offers an elegant interface to refine your selection before you add an adjustment layer or Smart Filter. It can also be applied later to a mask via that mask’s Properties panel. As you saw in the above example, Refine Edge is my favorite way to feather a selection so it has a softer edge. This interface allows you to clearly visualize your selection and to refine its edge precisely at the same time.
Choose or use the button in the Options Bar (present when any selection tool is active).
When you open the dialog, you’ll see five sliders, a couple of menus and checkboxes, and a few tools. The view Mode menu lets you visualize the selection and its refinement in seven ways. I usually press the F key to cycle through them and the X key to toggle them on and off. Hover your cursor over each choice for an explanatory note.

I most often use Overlay, Black & White, and either On Black or On White to contrast with a subject’s background. In the example above, Overlay allows me to see the unselected as well as the selected areas.

Radius sets the width around the original selection edge within which Photoshop will look for edges in the image. The selection will try to follow those edges. Smart Radius will try to tighten the radius around edges automatically within your slider-specified radius.

Contrast makes fuzzy selection edges look sharper. Use the Black & White View mode (tap the K key) to see what I mean. If there are fuzzy edges to the selection, then increase the Contrast to see how contrast diminishes feathering.
Smooth smooths rough, “crinkly” edge selections like sanding does on wood. Use Feather and Contrast if you need a larger effect than Smooth produces.
Feather gives a blurry edge to the selection so it blends into its surroundings.
Feathering a selection makes some of the pixels along the edge of the selection “partially” selected. Partially selected pixels result in a mask with some intermediate (gray) value, neither completely masked (black) nor completely visible (white). Pixels that have a gray mask have only a portion of an adjustment applied. This provides for a range of pixels along the edge of the selection to display a smooth transition from the complete adjustment to no adjustment. In this example, I wanted a sharper result. In other cases a very feathered result is desirable.
Shift Edge is especially good with fuzzy selections when they’re a little too big or small. Beware: the higher your Feather or Radius, the more this slider will affect your selection.
The Refine Radius Tool allows you to paint more (or less) radius where you feel it’s needed (on hair or splashing water, perhaps).

Let experimentation guide you. You’ll soon find that selections of objects that are translucent will benefit from liberal painting with the Refine Radius Tool. Those involving hair seem to benefit from either large radii or generous painting with the Refine Radius Tool. Larger file sizes, i.e., pixel-rich images, will need higher values in all sliders than smaller images.

Saving Selections
There are times when you want to save a complex selection, perhaps to continue its refinement, or in case clients change their minds. When you use the command, you create an extra channel in the Channels panel. These extra channels, called alpha channels, are rarely seen by anyone but you, the imagemaker. The first few channels (Red, Green, and Blue) are the foundation of your image. I liken the extra ones to stuff I store in my basement, amidst my house’s foundation.

You’re storing these channels in order to reload them later. Also, there are some Photoshop functions that can use alpha channels to limit their scope (like Content Aware Scaling) or to indicate depth (like the Lens Blur Filter). For now, let’s focus on the simple use of saving a selection.
Alpha channels are grayscale images that can be edited. This is yet another way to refine a selection. You may paint on an alpha channel, or use filters on it, or even do tonal adjustments to affect the balance of light to dark pixels. Why would you? Because when you reload an alpha channel as a selection (), the light areas are selected and the dark pixels are unselected. After using Color Range and Refine Edge, this should sound familiar.
To have the power of image editing tools while working with selections, without the overhead of extra channels, consider Quick Mask Mode. This creates a temporary channel on which you do image edits. Leaving Quick Mask Mode returns a Marquee.
Create an Adjustment
Once you have made your selection and refined it, immediately create the adjustment layer or Smart Filter for your target adjustment. Photoshop automatically converts the selection into a mask for this adjustment layer.
If you need to convert a layer into a Smart Object (because the adjustment, such as Shadows/Highlights or Lens Correction, is not available as an adjustment layer), Right-click on the layer’s name in the Layers panel and choose .
Now you can apply the Filter or adjustment. The result should be an adjustment layer or Smart Object Layer that contains the appropriate adjustment or Smart Filter, and a mask that localizes the result.
Refine the Mask
Often the mask is just fine for the adjustment you want, in which case you can skip this step. But the mask might be further improved by some basic edits.
I use two main methods to fine-tune a mask: painting and refining.
Paint on the Mask
Make some simple changes to a mask by painting on it. Be sure to target the mask for editing—otherwise you might paint on your image. See Painting adjustments above (see page 220) for more details.
Refine the Mask Edge
This is identical to refining the edge of a selection. This means you might make your rough selection, create the adjustment, then you can refine the mask while watching the final result.
To permanently and irreversibly blur a mask, simply select and adjust the radius of the blur. The filter previews the result of this edit. You can use any filter on a mask, provided it can be used on a grayscale image. This opens up many possibilities. But to do a simple blur, you may also use the mask Properties panel’s Feather slider. This provides a reversible way to blur a mask.
Example: Reducing Local Color Casts
Teeth Whitening, Marble Cleaning, etc.
A photograph can exhibit skin tones with too much red or magenta. Daylight shadows exhibit too much blue. And those of us who photograph people often find ourselves needing to whiten and polish teeth in Photoshop, too.
Each of these issues can be dealt with fairly easily with a fast selection and an easy adjustment.
- Make a rough selection of the area that has the color cast (select the too-red face, the yellowish teeth, or the bluish shadows, excluding things of the same hue that shouldn’t be adjusted).
- Create an adjustment layer via the Adjustments panel. Photo Filter can be handy for color casts, but since I wish to de-yellow the marble in the photo below, I’ll need Hue/Saturation.


- In the menu at the top of the panel, pick the hue that needs help. If, for example, you are trying to make a magenta cast in skin merely reddish, choose Magentas. In the example above, I selected Yellows. You may also click on the problematic color in the Image Window with the Targeted Adjustment Tool (TAT).
- Refine the range of color affected by moving/narrowing the adjustment slider (between the spectra at the bottom of the panel).
- For this example and the others mentioned, lowering the saturation is one adjustment that helps reduce a cast. I also lightened this example a bit.
- If necessary, paint white or black on the adjustment layer’s mask to spread or limit, respectively, the effect of your adjustment.