
![]()
Spring MVC
This chapter was written with the intention of teaching a developer how to create a simple Spring web application and understand how the background plumbing can be modified according to the desired approach. Think of Spring infrastructure components as LEGO pieces. You can connect them in different ways to get the final result: a working web application. After going through this chapter, you should be able identify and use the main components of Spring MVC to create a web application in a few easy steps.
Aside from describing and giving examples on how Spring Web MVC works, this chapter also teaches you how to integrate it with different view technologies, like JSP, Apache Tiles, and Thymeleaf.1
MVC Basics
Spring Web MVC is a popular request-driven framework based on the model-view-controller software architectural pattern, which was designed to decouple components that by working together make a fully functional user interface.
The typical model-view-controller behavior is displayed in Figure 3-1.

Figure 3-1. Typical MVC behavior
The Spring Web MVC provides preconfigured beans for the implementation of this behavior. These beans are contained in two main libraries:
- spring-web.jar
- spring-webmvc.jar
These libraries are the core of all Spring-related modules. At the center of the Spring Web MVC framework sits the DispatcherServlet class, which is the entry point for any Spring web application. Before any HTTP request reaches the specific controller, it has to go through DispatcherServlet for that controller to be identified.2 In a nutshell, the DispatcherServlet coordinates all request-handling operations using other infrastructure components defined in Spring and user-defined components. And it acts as a front controller, an entry point for the web application. The Spring components mentioned earlier can be categorized as follows:
- Spring MVC infrastructure components
- handler mappings
- handler adapters
- view resolvers
- personalization beans
- exception resolvers
- User-provided web components
- handler interceptors
- controllers
Thus, the Spring MVC functional flow can be sketched somewhat like in Figure 3-2.

Figure 3-2. Spring MVC functional flow
Briefly put, to configure a Spring web application, you need to do the following:
- Define the DispatcherServlet as the main servlet handling all requests to the application in web.xml and link it to the Spring configuration, or configure this servlet programmatically by using a class implementing WebApplicationInitializer (only possible in a Servlet 3.0+ environment)
- Define the application configuration (usually in a Spring configuration file named mvc-config.xml or a Java configuration class), which should do the following:
- Define the MVC context used (handler adapter, handler mapping, and other infrastructure beans)
- Define a view resolver (or more)
Configuring MVC
Spring Web MVC can be configured just like any other Spring application, via XML (using mostly the <mvc/> namespace), Java configuration annotations, or by mixing these. A Spring web application can be configured in two ways:
- All-in-one configuration: web.xml (part of JEE specification) or a WebApplicationInitializer implementation and Spring application configuration files. Back-end and front-end configurations are coupled and the DispatcherServlet is the only entry point to the application.
- Separate configuration: Used for more complex applications when the DispatcherServlet is not the only entry point (usually applications that require the back end to be accessed via REST or SOAP requests/web services, and in this case, the back end needs a separate listener).
Typical Java web applications that can be built with Gradle have the internal structure consecrated by Maven. The folder containing web-specific files, configuration files, and static resources is named webapp. The projects used in this chapter all have this structure (in Intellij IDEA), as shown in Figure 3-3.

Figure 3-3. Typical Java web application structure with web.xml configuration file
Spring XML configuration for core applications was covered in the previous chapter. But XML namespaces can be used for declaring web-specific infrastructure beans too. There are multiple ways to configure a web application; multiple files can be used for web-specific beans to be grouped together based on their purpose. In this chapter, multiple ways to create a configuration are presented, and after getting familiar with all of them, you will be able to “mix and match” to create configurations for the types of applications that you will develop.
This is the simplest way to configure a web application. The Spring configuration files are all referred to in the web.xml file as a value for the contextConfigLocation parameter.
<servlet>
    <servlet-name>admin</servlet-name>
    <servlet-class>
    org.springframework.web.servlet.DispatcherServlet
    </servlet-class>
    <init-param>
        <param-name>contextConfigLocation</param-name>
        <param-value>
        /WEB-INF/spring/mvc-config.xml
        /WEB-INF/spring/app-config.xml
        </param-value>
    </init-param>

</servlet>

<servlet-mapping>
    <servlet-name>admin</servlet-name>
    <url-pattern>/</url-pattern>
</servlet-mapping>
In the preceding case, the mvc-config.xml contains the Spring configuration for the front-end (controllers and MVC infrastructure beans) of the application, and the app-config.xml contains the back-end configuration (service beans). In this case, all Spring configuration files are loaded by the DispatcherServlet and a web context is created.
The proper way to configure a more complex web application to make it more extensible and flexible is to decouple the front-end configuration the back-end configuration. Such an implementation provides web services access to the back end. This can be done by having a separate listener for the back-end configuration. This complicates the content of web.xml a bit, and the configuration looks similar to the next one:
<context-param>
    <param-name>contextConfigLocation</param-name>
    <param-value>/WEB-INF/spring/app-config.xml</param-value>
</context-param>

<listener>
    <listener-class>
        org.springframework.web.context.ContextLoaderListener
    </listener-class>
</listener>

<servlet>
    <servlet-name>admin</servlet-name>
    <servlet-class>
        org.springframework.web.servlet.DispatcherServlet
   </servlet-class>
    <init-param>
        <param-name>contextConfigLocation</param-name>
        <param-value>/WEB-INF/spring/mvc-config.xml</param-value>
    </init-param>
</servlet>
<servlet-mapping>...</servlet-mapping>
![]() CC When the back-end Spring configuration file is named applicationContext.xml, there is no need to specify the <context-param> element in your configuration. The Spring IoC container accepts the previously mentioned file name as a default name for the backed configuration file and it will load it automatically.
CC When the back-end Spring configuration file is named applicationContext.xml, there is no need to specify the <context-param> element in your configuration. The Spring IoC container accepts the previously mentioned file name as a default name for the backed configuration file and it will load it automatically.
The web.xml file is transformed to this:
    <listener>
        <listener-class>
            org.springframework.web.context.ContextLoaderListener
        </listener-class>
    </listener>
 <!-- The backend configuration file is named applicationContext.xml -->
 <!-- The <context-param> is no longer needed.-->

<listener>
    <listener-class>
        org.springframework.web.context.ContextLoaderListener
    </listener-class>
</listener>

<servlet>
    <servlet-name>mvc-dispatcher</servlet-name>
    <servlet-class>
         o.s.web.servlet.DispatcherServlet
   </servlet-class>
    <init-param>
        <param-name>contextConfigLocation</param-name>
        <param-value>/WEB-INF/spring/mvc-config.xml</param-value>
    </init-param>
</servlet>
<servlet-mapping>...</servlet-mapping>
![]() ! Throughout this book, package names may not be presented fully: or.springframework. usually becomes o.s. The reason for this is to fit the configuration and code samples better in the page to make them more readable.
! Throughout this book, package names may not be presented fully: or.springframework. usually becomes o.s. The reason for this is to fit the configuration and code samples better in the page to make them more readable.
![]() CC If the Spring MVC configuration file is named [servletName]-servlet.xml, there is no need to specify the <init-param> element either. The Spring IoC container accepts the previously mentioned file name template (replace servletName with the name given to the servlet) as a default name for the front-end configuration file and it will load it automatically.
CC If the Spring MVC configuration file is named [servletName]-servlet.xml, there is no need to specify the <init-param> element either. The Spring IoC container accepts the previously mentioned file name template (replace servletName with the name given to the servlet) as a default name for the front-end configuration file and it will load it automatically.
The separate configuration can be simplified like this:
    <context-param>
        <param-name>contextConfigLocation</param-name>
        <param-value>/WEB-INF/app-config.xml</param-value>
    </context-param>
    <listener>
        <listener-class>
            org.springframework.web.context.ContextLoaderListener
        </listener-class>
    </listener>

    <servlet>
        <servlet-name>mvc-dispatcher</servlet-name>
<!-- The frontend configuration file is named mvc-dispatcher-servlet.xml -->
 <!-- The <init-param> is no longer needed.-->
       <servlet-class>
           o.s.web.servlet.DispatcherServlet
       </servlet-class>
       <load-on-startup>1</load-on-startup>
   </servlet>
   <servlet-mapping>
       <servlet-name>mvc-dispatcher</servlet-name>
       <url-pattern>/</url-pattern>
   </servlet-mapping>
Customizing the configuration is easy. All rules from Spring core configuration apply. Wildcards are supported. Different resource prefixes can be used. The DispatcherServlet can even be configured to a different url-pattern. In this case, the requests to the application must contain the value of the url-pattern value, otherwise they won’t be handled by the DispatcherServlet. This approach is suited when the application uses multiple DispatcherServlet instances.
<init-param>
        <param-name>contextConfigLocation</param-name>
        <param-value>
             /WEB-INF/spring/*-beans.xml
            classpath:com/book/app-config.xml
        </param-value>
    </init-param>
...
<servlet-mapping>
    <servlet-name>admin</servlet-name>
    <url-pattern>/admin/*</url-pattern>
</servlet-mapping>
In the previous example, the DispatcherServlet handles the request with the URL matching [server:port][application-name]admin*.
![]() ! Throughout this book and in all code examples, the Spring MVC configuration file is named mvc-config.xml to emphasize that only Spring MVC components are defined in it; otherwise, this configuration file can be named in any other way. The contents of this file are used for view, locale, and time zone resolution and for customizing handler mappings and other Spring MVC infrastructure beans.
! Throughout this book and in all code examples, the Spring MVC configuration file is named mvc-config.xml to emphasize that only Spring MVC components are defined in it; otherwise, this configuration file can be named in any other way. The contents of this file are used for view, locale, and time zone resolution and for customizing handler mappings and other Spring MVC infrastructure beans.
The controllers can be defined in the mvc-config.xml configuration file using the bean tag element, just like any other bean, but starting with Spring 3.0, the preferred way to define controllers is using the @Controller annotation, which is why the Spring MVC is often referred to as @MVC.
The main component of an MVC XML configuration is the <mvc:annotation-driven/> element that registers all necessary default infrastructure beans for a web application to work: handler mapping, validation conversion beans, and many others.
Another component that is important is the <mvc:default-servlet-handler/>. Usually in Spring web applications the default servlet mapping “/” is mapped to the DispatcherServlet. This means that static resources have to be served by it too, which might introduce a certain lag in providing a response as the DispatcherServlet has to find the resources that the request URL is mapped to. The <mvc:default-servlet-handler/> configures a DefaultServletHttpRequestHandler with a URL mapping of “/*” and the lowest priority relative to other URL mappings. Its sole responsibility is to serve static resources.
You can see some user-defined beans needed for configuring a Spring MVC application in the following example. Configurations might differ, depending on the types of resources used.
<!-- Defines basic MVC defaults (handler mapping, date formatting, etc) -->
<mvc:annotation-driven/>

<!-- Configures a handler for serving static resources by forwarding to the
   Servlet container’s default Servlet.-->
<mvc:default-servlet-handler/>

<!-- ResourceBundle bean used for internationalization -->
<bean name="messageSource"
      class="o.s.context.support.ReloadableResourceBundleMessageSource"
      p:basename="classpath:messages/global"/>

<!-- View resolver bean used to render a *.jsp page -->
<bean id="jspViewResolver"
   class="o.s.web.servlet.view.InternalResourceViewResolver">
   <property name="prefix" value="/WEB-INF/"/>
   <property name="suffix" value=".jsp"/>
</bean>
![]() ! Before continuing to the next section, take a look at the module project 03-chapter-01-practice under the book-code project. This is a simple project focusing on the XML-based configuration; it can be used to test your understanding of this section. It uses the minimum number of Spring infrastructure beans required to start a web application and display a simple JSP page.
! Before continuing to the next section, take a look at the module project 03-chapter-01-practice under the book-code project. This is a simple project focusing on the XML-based configuration; it can be used to test your understanding of this section. It uses the minimum number of Spring infrastructure beans required to start a web application and display a simple JSP page.
To run a project that is a web application from the command line, execute the gradle appRun task.
To run a project in Intellij IDEA, use the appStart task to start the application and appStop to stop the application.
Make sure to execute the tasks from under the specific module in the Gradle task tree. Figure 3-4 can help you identify the task you need to run the application within Intellij IDEA.

Figure 3-4. Gretty plugin special tasks to start and stop web applications
2015-03-01 15:48:36.834 WARN - 03-chapter-01-practice runs at:
2015-03-01 15:48:36.834 WARN - http://localhost:8080/03-chapter-01-practice
Open that location in your browser. If you see the page shown in Figure 3-5, the project is working properly. Run gradle appStop to stop the server.

Figure 3-5. Practice Spring MVC application welcome page
Configuration Using Annotations
An equivalent configuration using Java configuration can be created, but there are a few additional details needed for the configuration class to work properly. The configuration class has to also be annotated with the @EnableWebMvc annotation and has to either implement WebMvcConfigurer or extend an implementation of this interface, for example: WebMvcConfigurerAdapter, which gives the developer the option to override only the methods he or she is interested in.
Annotating a configuration class with @EnableWebMvc has the result of importing the Spring MVC configuration implemented in the WebMvcConfigurationSupport class; it is equivalent to <mvc:annotation-driven/>. This class registers a lot of Spring infrastructure components that are necessary for a web application (covered later in this chapter).3
To tell the DispatcherServlet that the configuration will be provided by a configuration class instead of a file, the following changes have to be made in web.xml:
- Define an initialization parameter named contextClass with the full name of the Spring class used to create an annotation-based context as the value.
- The initialization parameter named contextConfigLocation should have the full name of the configuration class written by the developer as the value.
<servlet>
        <servlet-name>admin</servlet-name>
        <servlet-class>
                        org.springframework.web.servlet.DispatcherServlet
        </servlet-class>
        <init-param>
            <param-name>contextClass</param-name>
            <param-value>
            o.s.web.context.support.AnnotationConfigWebApplicationContext
            </param-value>
        </init-param>
        <init-param>
            <param-name>contextConfigLocation</param-name>
            <param-value>
                com.book.config.WebConfig
        </param-value>
        </init-param>
</servlet>
The configuration class for what was configured with XML in the previous chapter looks like this:
@Configuration
@EnableWebMvc   // equivalent with <mvc:annotation-driven/>
@ComponentScan(basePackages = {"com.book.controllers"})
// equivalent with <context:component-scan base-package="com.book.controllers"/>
//used to scan only web components
public class WebConfig extends WebMvcConfigurerAdapter {
    ...

    @Bean(name = "messageSource")
    MessageSource getMessageSource() {
        ReloadableResourceBundleMessageSource
                      messageSource = new ReloadableResourceBundleMessageSource();
        ...
        return messageSource;
    }
     // <=> <mvc:default-servlet-handler/>
    @Override
    public void configureDefaultServletHandling(
           DefaultServletHandlerConfigurer configurer) {
        configurer.enable();
    }

    @Bean
     InternalResourceViewResolver getViewResolver(){
        InternalResourceViewResolver resolver = new InternalResourceViewResolver();
        resolver.setPrefix("/WEB-INF/");
        resolver.setSuffix(".jsp" );
        return resolver;
    }
}
The @ComponentScan annotation is the equivalent of <context:component-scan />. It is used to find all the classes annotated with @Controller in the package com.book.controllers.
![]() ! Before continuing to the next section, take a look at the module project 03-chapter-02-practice under book-code. This is a simple project focusing on the Java configuration–based configuration and can be used to test your understanding of this section. It uses the minimum number of Spring infrastructure beans required to start a web application and display a simple JSP page.
! Before continuing to the next section, take a look at the module project 03-chapter-02-practice under book-code. This is a simple project focusing on the Java configuration–based configuration and can be used to test your understanding of this section. It uses the minimum number of Spring infrastructure beans required to start a web application and display a simple JSP page.
The Gradle running instructions are the same as the instructions for the previous section.
Mixed Configuration
![]() ! There are Spring-specific annotations like @Controller, @Service, @Component, and @Repository, which can be used to configure a Spring application without the need to use a Java configuration class; instead, an XML file is used, containing context or MVC namespace element definitions. This is called a mixed configuration, because it uses annotations to define the beans, and XML to define the context.
! There are Spring-specific annotations like @Controller, @Service, @Component, and @Repository, which can be used to configure a Spring application without the need to use a Java configuration class; instead, an XML file is used, containing context or MVC namespace element definitions. This is called a mixed configuration, because it uses annotations to define the beans, and XML to define the context.
In practice, most common and frequently used Spring configurations imply a combination of XML and annotations. The primary reason for this is legacy code, as XML configuration was the first and only way to configure a Spring application prior to Spring 2.5. Migration to a more recent version of Spring is usually a slow process, and projects remain stuck between worlds for some periods of time. And there are also developers that still prefer XML because it seems easier to separate configurations for the back end, front end, security, web services, and so on, in separate files (although this can just as easily be done with Java configuration classes). It is also intuitive and very readable when it comes to dependency injection. It is more practical to have the definition of the relationship between the beans decoupled from the bean implementation. Because it is more practical to implement transaction management using annotations, it is very visible which method is executed in a transaction.
Annotations should be applied when they provide functionality and/or visibly mark the annotated classes or methods for a specific purpose. Annotations should not tie the code down to some specific process, so the code should function normally without them. The most obvious case here is the @Controller annotated classes for the web side of an application. In the back end, @Repository and @Service annotations are used for the same purpose. When looking at the code of a controller class, you see the annotation and you can easily infer what the purpose of that class is. All annotation mentioned earlier are Spring stereotype annotations, which are used to denote the roles of types in the overall architecture.
A typical Spring web application configuration uses an mvc-config.xml file to declare the infrastructure beans and @Controller annotated classes.
Configuration Without Using web.xml
Starting with Servlet 3.0+, the web.xml file is no longer needed to configure a web application. It can be replaced with a class implementing the WebApplicationInitializer (or a class extending any of the Spring classes that extend this interface). This class is detected automatically by SpringServletContainerInitializer (an internal Spring supported class, which is not meant to be used directly or extended). The SpringServletContainerInitializer class is bootstrapped automatically by any Servlet 3.0+ container.
The SpringServletContainerInitializer4 extends javax.servlet.ServletContainerInitializer and provides a Spring-specific implementation for the onStartup method. This class is loaded and instantiated, and the onStartup is invoked by any Servlet 3.0–compliant container during container startup, assuming that the Spring-web module JAR is present on the classpath.
Considering you have a web.xml file that looks like this:
<servlet>
     <servlet-name>admin</servlet-name>
     <servlet-class>o.s.w.s.DispatcherServlet</servlet-class>
     <init-param>
         <param-name>contextConfigLocation</param-name>
         <param-value>
             /WEB-INF/spring/mvc-config.xml
         </param-value>
     </init-param>
     <load-on-startup>1</load-on-startup>
</servlet>
<servlet-mapping>
     <servlet-name>admin</servlet-name>
     <url-pattern>/</url-pattern>
</servlet-mapping>
The most obvious way to implement WebApplicationInitializer is this:
public class WebInitializer implements WebApplicationInitializer {
    @Override
    public void onStartup(ServletContext servletContext) throws ServletException {
        ServletRegistration.Dynamic registration =
                  servletContext.addServlet("dispatcher", new DispatcherServlet());
        registration.setLoadOnStartup(1);
        registration.addMapping("/");
        registration.setInitParameter("contextConfigLocation",
                       "/WEB-INF/spring/mvc-config.xml");
        }
}
The class does not need to be annotated or linked to any other configuration file existing in the application. You can easily notice which lines from XML turned into which lines in the code, right?
But there is another way, which involves constructing the application context first and then injecting it into the DispatcherServlet:
XmlWebApplicationContext appContext = new XmlWebApplicationContext();
appContext.setConfigLocation("/WEB-INF/spring/mvc-config.xml");
ServletRegistration.Dynamic registration =
   servletContext.addServlet("dispatcher", new DispatcherServlet(appContext));
registration.setLoadOnStartup(1);
registration.addMapping("/");
And there is an even simpler way—by extending AbstractDispatcherServletInitializer, an abstract implementation of the WebApplicationInitializer:
public class WebInitializer extends AbstractDispatcherServletInitializer {

    @Override
    protected WebApplicationContext createRootApplicationContext() {
//there is no root application context for the web application context to inherit
    return null;
}

    @Override
    protected WebApplicationContext createServletApplicationContext() {
        XmlWebApplicationContext cxt = new XmlWebApplicationContext();
        cxt.setConfigLocation("/WEB-INF/spring/mvc-config.xml");
        return cxt;
    }

    @Override
    protected String getServletMappings() {
        return new String { "/" };
    }
}
Java-based annotation configurations are supported too—in multiple ways. Consider that you have a WebConfig class and a web.xml that looks like this:
<servlet>
    <servlet-name>admin</servlet-name>
    <servlet-class>
       o.s.web.servlet.DispatcherServlet
       </servlet-class>
    <init-param>
       <param-name>contextClass</param-name>
       <param-value>
           o.s.web.context.AnnotationConfigWebApplicationContext
       </param-value>
    </init-param>
    <init-param>
       <param-name>contextConfigLocation</param-name>
       <param-value>
           com.book.config.WebConfig
       </param-value>
    </init-param>
    <load-on-startup>1</load-on-startup>
</servlet>


<servlet-mapping>
    <servlet-name>admin</servlet-name>
    <url-pattern>/</url-pattern>
</servlet-mapping>
This is the most obvious way to implement WebApplicationInitializer’s onStartup() method:
ServletRegistration.Dynamic registration =
    servletContext.addServlet("dispatcher", new DispatcherServlet());
registration.setLoadOnStartup(1);
registration.addMapping("/");
registration.setInitParameter("contextConfigLocation", "com.book.config.WebConfig");
registration.setInitParameter("contextClass",
    "o.s.w.c.s.AnnotationConfigWebApplicationContext");
But wait, there’s more! You can create the application context and inject it into the DispatcherServlet as you did before:
AnnotationConfigWebApplicationContext context =
    new AnnotationConfigWebApplicationContext();
context.register(WebConfig.class);

ServletRegistration.Dynamic registration =
    servletContext.addServlet("dispatcher", new DispatcherServlet(context));
registration.setLoadOnStartup(1);
registration.addMapping("/");
And the easiest way to do it is with AbstractAnnotationConfigDispatcherServletInitializer, which extends AbstractDispatcherServletInitializer, an abstract implementation of the WebApplicationInitializer. Spring provides them to help you eliminate some of the code writing. By extending the AbstractAnnotationConfigDispatcherServletInitializer template and using customization methods offered by the AbstractDispatcherServletInitializer, the developer is only required to provide concrete implementations for three methods: getRootConfigClasses, getServletConfigClasses, and getServletMappings.
public class WebInitializer extends
          AbstractAnnotationConfigDispatcherServletInitializer {
    @Override
    protected Class<?> getRootConfigClasses() {
    //there is no root application context for the web application context to inherit
         return null;
     }

     @Override
     protected Class<?> getServletConfigClasses() {
         return new Class { WebConfig.class };
     }

     @Override
     protected String getServletMappings() {
         return new String { "/" };
     }
}
![]() ! Before continuing with this chapter, take a look at the 03-chapter-03-practice and 03-chapter-04-practice and try to make the projects run. The first requires you to configure a Spring web application using a Spring XML–based configuration and without a web.xml file. The second requires you to configure a Spring web application using a Java-based configuration and without a web.xml file. Be creative, read the Spring API if necessary, and then you can even compare your solution to the ones provided in the solution projects.
! Before continuing with this chapter, take a look at the 03-chapter-03-practice and 03-chapter-04-practice and try to make the projects run. The first requires you to configure a Spring web application using a Spring XML–based configuration and without a web.xml file. The second requires you to configure a Spring web application using a Java-based configuration and without a web.xml file. Be creative, read the Spring API if necessary, and then you can even compare your solution to the ones provided in the solution projects.
The Gradle running instructions are the same as in the previous section.
MVC Components
The configuration of a Spring web application integrates quite a few infrastructure beans.
The DispatcherServlet looks for implementations of type: HandlerMapping, HandlerAdapter, ViewResolver, and HandlerExceptionResolver. Out-of-the-box implementations for the previously mentioned interfaces are provided by Spring. The default configuration can be found in the DispatcherServlet.properties, which is in the spring-webmvc.jar in package org.springframework.web.servlet.5
![]() ! You can find the jar in your local maven repository. It is recommended to open the file and study it, because in the exam you might be asked about the default components configured in Spring for some MVC bean types. Some of them are deprecated in the current API—DefaultAnnotationHandlerMapping, for example—and the file will suffer some changes in future versions.
! You can find the jar in your local maven repository. It is recommended to open the file and study it, because in the exam you might be asked about the default components configured in Spring for some MVC bean types. Some of them are deprecated in the current API—DefaultAnnotationHandlerMapping, for example—and the file will suffer some changes in future versions.
The infrastructure beans mentioned earlier can be configured manually, but this is rarely done and is recommended to be avoided, as the explicit configuration cancels the default configuration for that bean type. In Spring 4.0, <mvc:annotation-driven/> and the equivalent @EnableWebMvc do just that—override the default configuration to provide the new features, so you don’t have to struggle with the configuration yourself.
A Spring web application can use more than one infrastructure bean of a specific type. In this case, the beans can be chained and have an associated priority value specified using the order property. For example, you can have multiple HandlerMapping implementations:
<bean
    class="o.s.web.servlet.handler.SimpleUrlHandlerMapping">
    <property name="order" value="0"/>
</bean>

<bean
    class= "o.s.web.servlet.mvc.support.ControllerClassNameHandlerMapping">
    <property name="order" value="1"/>
</bean>
When <mvc:annotation-driven/> or @EnableWebMVC is used in the application configuration, the RequestMappingHandlerMapping implementation is registered internally with Spring MVC. This class was added in Spring 3.1; it allows RequestMappings for the same URL to be in different controller classes. It is meant to replace the DefaultAnnotationHandlerMapping implementation. It was introduced to make the annotation controller support class more customizable and open for extension. When using the RequestMappingHandlerMapping, the actual handler is an instance of HandlerMethod, which identifies the specific controller method that will be invoked. Starting with Spring version 4.0, the DefaultAnnotationHandlerMapping was marked as deprecated.
The following sections cover each of the infrastructure bean types in detail.
Infrastructure Beans
Spring MVC offers developers a lot of support when it comes to building the plumbing of a web application, so developers can focus on implementing the actual service a web application is expected to provide. The beans provided by Spring MVC are often called infrastructure beans, which have default configurations that work out of the box. Each of these infrastructure beans are presented in detail in the following sections.
HandlerMapping
This HandlerMapping Spring interface is implemented by classes that map parts of URL for the incoming requests to the appropriate handlers and a list of pre- and post-processor interceptors (AOP is used for this). Prior to Spring 3.1, it was necessary to specify one or more HandlerMapping beans in the application context, but after the introduction of annotated controllers, there is no need to do so. All HandlerMapping implementations are used by the DispatcherServlet to identify the handler (controller class) of a request.
In the DispatcherServlet.properties, you find the following default HandlerMapping implementations configured:
org.springframework.web.servlet.HandlerMapping=
org.springframework.web.servlet.handler.BeanNameUrlHandlerMapping,
org.springframework.web.servlet.mvc.annotation.DefaultAnnotationHandlerMapping
The BeanNameUrlHandlerMapping class maps URLs to beans with names that start with “/”. So a request incoming with URL http://localhost:8080/persons maps to bean:
@Controller("/persons")
public class PersonsController {
    ...
}
![]() ! The DefaultAnnotationHandlerMapping is deprecated in Spring 4.0 as it was replaced by RequestMappingHandlerMapping.
! The DefaultAnnotationHandlerMapping is deprecated in Spring 4.0 as it was replaced by RequestMappingHandlerMapping.
The RequestMappingHandlerMapping class maps URLs to classes annotated with @RequestMapping. So a request coming from URL http://localhost:8080/persons/list is handled by the following controller:
@RequestMapping("/persons")
@Controller
public class PersonsController {

    @RequestMapping(value="/list")
    public void list(Model model){
       ...
    }
}
In the preceding example, the @RequestMapping at method level is used to narrow the mapping expressed at class level, if one is present. The annotation is not really necessary at method level when it is present at class level, because narrowing can be done using other criteria too; for example, the request method type.
@RequestMapping("/persons")
@Controller
public class PersonsController {
    //End user requests to see data for a certain person.
    @RequestMapping(method = RequestMethod.GET)
    public void getPerson(Model model){
       ...
    }

    //End user sends data to save for a certain person.
    @RequestMapping(method = RequestMethod.POST)
    public void savePerson(Person person, Model model){
        ...
    }
}
It is mandatory for any HTTP request path to be uniquely mapped onto a specific handler. It is recommended to keep all related handler methods in the same bean, and not span them across multiple handler beans in order to improve code readability.
Another implementation worth mentioning is ControllerClassNameHandlerMapping, which was introduced in the spirit of convention over configuration. This implementation offers the possibility to generate URL path mappings from the class names and method names of registered or annotated controller beans. The convention is to take the short name of the class, remove the Controller suffix, lower case the first letter of the remaining text, prefix it with “/”, and then add the method name used to handle the request. Using this implementation, the PersonsController mentioned earlier is mapped to "/persons*" and the @RequestMapping("/persons") annotation is no longer needed.
In the book-code project, there is a sample module named 03-chapter-05-solution, which contains a simple controller with the following implementation.
@Controller
public class WelcomeController {

    @RequestMapping
    //maps to /welcome/sayhi
    public String sayhi(Model model){
        model.addAttribute("salute", "Hi!");
        return "welcome";
    }

    @RequestMapping
    //maps to /welcome/sayhello
    public String sayhello(Model model){
        model.addAttribute("salute", "Hello!");
        return "welcome";
    }
}
In order for a request to be solved correctly using the ControllerClassNameHandlerMapping, a HandlerAdapter implementation needs to be configured. AnnotationMethodHandlerAdapter will do, even if it is deprecated in Spring 4.0.
...
    <context:component-scan base-package="com.book"/>
    <bean
        class="o.s.web.servlet.mvc.support.ControllerClassNameHandlerMapping"
        p:caseSensitive="true"/>

    <bean id="annotationMethodHandlerAdapter"
        class="o.s.web.servlet.mvc.annotation.AnnotationMethodHandlerAdapter" />
...
![]() ! An example of how to configure the ControllerClassNameHandlerMapping bean and how it works is implemented in the 03-chapter-05-solution module in the book-code project. This project does not have a practice project associated with it because there is no need for one.
! An example of how to configure the ControllerClassNameHandlerMapping bean and how it works is implemented in the 03-chapter-05-solution module in the book-code project. This project does not have a practice project associated with it because there is no need for one.
The Gretty plugin is quite flexible and can be configured to start a web application on a different context or port. When working locally, the URL of the application looks like this: http://localhost:8080/03-chapter-05-solution. The context is the string after the port, and Gretty automatically takes the name of the project and uses it as context for the web application, if not configured to do otherwise. Also, the default port is 8080, which is the default port used by most of application servers for web applications.6
As the name of the modules in book-code are quite long, Gretty was configured to use a different context, which can also emphasize the purpose of the application.
gretty {
    port = 8080
    contextPath = '/mvc-handling'
}
HandlerAdapter
The HandlerAdapter interface is internal and is not intended for application developers. It must be implemented by each handler to be able to handle a request. The DispatcherServlet uses this interface to invoke handler methods because the interface is taking care of solving various annotations inside a controller class and identifies which method should be called.
In the DispatcherServlet.properties you find the following default HandlerAdapter implementations:
org.springframework.web.servlet.HandlerAdapter=
org.springframework.web.servlet.mvc.HttpRequestHandlerAdapter,
org.springframework.web.servlet.mvc.SimpleControllerHandlerAdapter,
org.springframework.web.servlet.mvc.annotation.AnnotationMethodHandlerAdapter
These are the out-of-the-box defaults if <mvc:annotation-driven/> is not specified.
When <mvc:annotation-driven/> or @EnableWebMVC is used in the application configuration, RequestMappingHandlerAdapter is used. Introduced in Spring 3.1, the scope of this class is to work with RequestMappingHandlerMapping to make this class the only place where a decision is made about which method should handle a request. This actually means that every handler method is a unique endpoint that can be identified from class and method-level RequestMapping information. Prior to Spring 3.1, identifying and calling a handler method involved two steps: identifying a controller (handler) using a HandlerMapping implementation and identifying the method (handler method) using a HandlerAdapter implementation. Starting with Spring 3.1, everything is done in one step, with the two classes working together.
So Figure 3-2 is not an accurate representation for Spring >=3.1; when using <mvc:annotation-driven/> or @EnableWebMVC, Figure 3-6 is more accurate.

Figure 3-6. @MVC Spring >= 3.1
The old implementations were kept in the Spring MVC library, but it is recommended to use the ones introduced in Spring 3.1 and enabled by the MVC namespace or @EnableWebMVC because these ensure a simpler configuration and faster identification of a handler method, and take advantage of other new features introduced in Spring 3.1. Here is a list of some of the changes introduced by this approach:
- It is no longer possible to use SimpleUrlHandlerMapping or BeanNameUrlHandlerMapping to identify a controller and then identify the handler method by narrowing the method choice with @RequestMapping.
- It is no longer possible to have a single method without explicit mapping to solve all requests mapped to a controller. The new support classes will throw a Not Found 404 error.
- HandlerInterceptor and HandlerExceptionResolver (covered later in the chapter) can now expect the object-based handler to be a HandlerMethod. They can examine its parameters and annotations.
- Custom argument and return types are supported for handler methods.
- @PathVariable annotated parameters (covered later in the chapter) are automatically added to the model, so it’s not necessary to manually add them if you are providing them as part of forwarding or redirecting.
- Supports parameterized URI template on redirect strings.
- RequestMappings now support consumes/produces, so it’s not necessary to specify headers="ContentType=application/json". This is a little closer to the JAX-RS style of specifying @Consumes/@Produces annotations. This helps in producing the correct error code if unsupported media types are referenced on REST requests.
The preceding list is not complete. If you want a full read of all the advantages of using the new handler support classes, you can find it in the official documentation.7 Some are also mentioned in the following sections; those are the ones you should focus on for the exam.
When the web application starts, if the logger of the application is configured properly, you should be able to see all the beans used in the application, including the infrastructure beans. The following is a snippet from a debug log printed when 02-pr-mvc-basic-solution starts. Run the project yourself to analyze the console output in more detail.
INFO Initializing Spring FrameworkServlet 'mvc-dispatcher'
...
DEBUG o.s.b.f.s.DefaultListableBeanFactory - Pre-instantiating singletons ...,
accountRepo,hospitalRepo,personManager,identityCardRepo,transactionManager,
entityManagerFactory, ..., o.s.w.s.m.m.a.RequestMappingHandlerMapping#0,
... ,o.s.w.s.m.m.a.RequestMappingHandlerAdapter#0,
o.s.w.s.m.m.a.ExceptionHandlerExceptionResolver#0,...,
org.springframework.web.servlet.view.InternalResourceViewResolver,
,messageSource,localeResolver,themeResolver,
...
ViewResolver
The HTTP response returned to the client after the execution of a handler method is constructed using a model and a view. The model contains the data that is used to populate a view. Spring provides view resolvers to avoid ties to a specific view technology. Out of the box, Spring supports JSP, Velocity templates, and XSLT views. The interfaces needed to make this possible are ViewResolver and View. The first provides a mapping between view names and actual views. The second takes care of preparing the request and forwards it to a view technology.8
All handler methods must resolve to a logical view name that corresponds to a file, either explicitly by returning a String, View, or ModelAndView instance or implicitly based on internal conventions. The core view resolver provided by Spring is the InternalResourceViewResolver, which is the default view resolver, as you can see in the DispatcherServlet.properties file:
org.springframework.web.servlet.ViewResolver=
         org.springframework.web.servlet.view.InternalResourceViewResolver
View Resolver Chaining
A web application can have more than one ViewResolver configured and the DispatcherServlet discovers them by type. In this case, the default view resolver configuration is overridden, meaning the InternalResourceViewResolver is not the default resolver anymore, so if this bean is needed, it has to be configured explicitly. In this case, the available view resolvers can and should be chained to have a fixed sequence of resolvers trying to obtain a view. The next example shows how two view resolvers can be chained together to resolve JSP and Excel views:
<!-- in mvc-config.xml -->

<bean name="persons/list.xls" class="com.book.persons.PersonsExcelView"/>

<bean
  id="xlsViewResolver"
 class="...web.servlet.view.BeanNameViewResolver"
    p:order="0"/>

<bean
    class="org.springframework.web.servlet.view.InternalResourceViewResolver"
    p:order="1" />
![]() ! Defining bean properties using the p: ... syntax is possible by using the p namespace that offers a way to contract bean definitions in XML configuration files to reduce their size and make them more readable.9
! Defining bean properties using the p: ... syntax is possible by using the p namespace that offers a way to contract bean definitions in XML configuration files to reduce their size and make them more readable.9
Chaining view resolvers is also possible using a Java configuration class:
\ in @Configuration annotated class
@Bean(name="persons/list.xls")
public View excelView(){
        return new PersonsExcelView();
}

@Bean(name="xlsViewResolver")
public ViewResolver xlsViewResolver(){
     BeanNameViewResolver resolver = new BeanNameViewResolver();
    resolver.setOrder(0);
    return resolver;
}

@Bean
  public ViewResolver jspViewResolver() {
    InternalResourceViewResolver resolver = new InternalResourceViewResolver();
...
    resolver.setOrder(1);
    return resolver;
}
When a view resolver does not result in a view (usually null is returned, but there are view resolvers that throw exceptions), Spring examines the application context for other view resolver beans and inspects each of them until a view is obtained. If this is not possible, a ServletException is returned. When resolver beans are chained, the inspection is done based on the value of their order property; the lower the value of the property, the higher the priority when resolving view names.
![]() ! The InternalResourceViewResolver resolves the view no matter what view name is returned. It throws an exception if it cannot resolve a view name, so this bean always has to be placed last in the chain; otherwise, Spring skips looking for other view resolver beans in the context. XSLT and JSON are also resolvers that must be last in the chain. Tiles, Velocity, and FreeMarker can appear anywhere in the chain.
! The InternalResourceViewResolver resolves the view no matter what view name is returned. It throws an exception if it cannot resolve a view name, so this bean always has to be placed last in the chain; otherwise, Spring skips looking for other view resolver beans in the context. XSLT and JSON are also resolvers that must be last in the chain. Tiles, Velocity, and FreeMarker can appear anywhere in the chain.
In the case just presented, if the BeanNameViewResolver does not return a view (a request method has returned a logical view name different than "persons/list.xls"), the next resolver is called to do that.
The InternalResourceViewResolver is the most important implementation provided by Spring. It is a specialization of UrlBasedViewResolver (so they cannot be used together in a configuration, chained or not) and inherits the behavior of interpreting view names as a URL, supports the "redirect:" prefix and the "forward:" prefix. And supports InternalResourceView(Servlets and JSPs) and JstlView.
![]() ! The "redirect:" and "forward:" prefixes are appended to the logical view name to tell the servlet container what to do.
! The "redirect:" and "forward:" prefixes are appended to the logical view name to tell the servlet container what to do.
With "forward:", the servlet container just forwards the same request to the target URL, and the browser is not involved and does not know the URL has changed. A forward should be used for safe operations when reloading the page won’t result in corrupt data (usually for requesting data to display in the page).
With "redirect:", the response status is set to 302 and the URL to redirect to is set in a Location header, then the response is sent to the browser. The browser then makes another request to the new URL. Redirect is a two-step operation; it is recommended to be used when the first request is a data manipulation request, and the browser must then be redirected to a confirmation page to prevent data duplication.
The “redirect:” prefix can be returned together with a view name to delegate the creation of the response to another handler. The most suitable for such behavior is when a POST request was received and the possibility to resubmit the same form data has to be eliminated. The browser sends an initial POST, receives a response to redirect to a different URL, and then performs a GET request for the URL received as a response. This sequence of actions matches a web development design pattern named Post-Redirect-Get that prevents duplicate form submissions. In Figure 3-7, the Post- Redirect-Get process is displayed using the PersonsController.
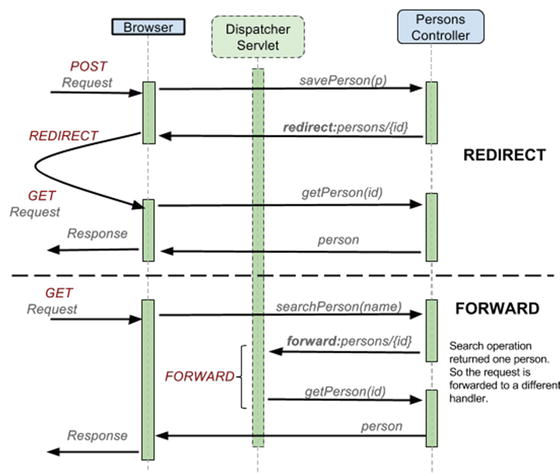
Figure 3-7. Post-Redirect-Get in Spring using the "redirect:" prefix compared to "forward:"
"redirect:" and "forward:" are recognized by the UrlBasedViewResolver and all its subclasses. They treat them accordingly and consider the view name after the prefix as the redirect/forward URL.
![]() ! You will have the occasion to work with "redirect:" and "forward:" in the 05-pr-mvc-form-practice project.
! You will have the occasion to work with "redirect:" and "forward:" in the 05-pr-mvc-form-practice project.
All view file templates are stored under /WEB-INF for security reasons. They cannot be accessed directly via a manually introduced URL and they require a model in order to be rendered. The previously mentioned view implementations supported by InternalResourceViewResolver have the following characteristics:
- InternalResourceView exposes the model attributes as request attributes and forwards the request to the specified resource URL using a RequestDispatcher.
- JstlView is a specialization of InternalResourceView that exposes request attributes specifying the locale and the resource bundle for JSTL’s formatting and message tags, using Spring’s locale and MessageSource ( the JSTL library is required in the classpath for this View technology to be available).
More about this topic is covered later in this chapter.
This is an example of how a view is resolved using the chained resolvers configured earlier:
/* 1 */
@RequestMapping("/persons.htm")
public String listHtml(HttpServletRequest rq, Model model) {
   model.addAttribute(personManager.getAllPersons());
   return "accounts/list";
}

/* 2. */
@RequestMapping("/persons.xls")
public String listExcel(HttpServletRequest rq, Model model) {
   model.addAttribute(personManager.getAllPersons());
   return "persons/list.xls";
}
The first method has InternalResourceViewResolver resolve the view, and the second is taken care of by BeanNameViewResolver and a PersonsExcelView is rendered.
As you can see, the implementation for the two methods is almost identical. The URL and the logical view name returned are different, however. And there’s a programming principle called Don’t Repeat Yourself! that those two methods do not respect. Let’s try and respect that principle by merging the two methods into one:
/* 1 */
@RequestMapping("/persons")
public String list(HttpServletRequest rq, Model model) {
   model.addAttribute(personManager.getAllPersons());
   if (rq.getRequestURL().toString().endsWith("xls")) {
       return "persons/list.xls";
   } else {
       return "persons/list";
   }
}
But this is not an acceptable solution either. What if the application is requested to support PDF views too? That means more if-else instructions have to be added. Right now you are probably telling yourself: “There’s gotta be a better way of doing this!” And there is. Worry not, this shall be covered in the next section.
![]() ! Take a look at the 03-chapter-06-solution project. It has been set up to work with the chained resolver configuration mentioned in this chapter. The data can be viewed in a web page, an Excel document or a PDF. Run it and take a look at the implementation before moving on to the next section.
! Take a look at the 03-chapter-06-solution project. It has been set up to work with the chained resolver configuration mentioned in this chapter. The data can be viewed in a web page, an Excel document or a PDF. Run it and take a look at the implementation before moving on to the next section.
Content Type Negotiation
Another way of organizing the view resolver beans and making sure that the view name is always resolved correctly is to use content-type negotiation. The previous approach, resolver chaining, works only when each resource is associated with one view type. But clients might request different content-types for the same resource via extension, request header, request parameter, and so forth. In this case, chaining won’t work, as the type of view returned depends on some parameters that have to be taken into consideration and then a matching view resolver must be selected to do the job. The bean that does that is the ContentNegotiatingViewResolver, which was introduced in Spring 3.0. This bean does not resolve views but delegates the job to the view resolver implementations defined in the application configuration, selecting the view matching the content-type in the client request.
There are two strategies for a client to request a view from the server:
- Use a distinct URL for each resource by using a different extension in the URL (example: http://localhost:8080/persons/list.xls requests an Excel view containing a list of persons, while http://localhost:8080/persons/list.pdf requests a PDF view containing a list of persons)
- Use the same URL but set the Accept HTTP request header to the desired resource type (example: a request coming from http://localhost:8080/persons/list having the Accept header set to application/pdf requests a PDF view containing a list of persons)
![]() ! The problem with the Accept header is that it cannot be used when the client is a browser, as most browsers force its value to text/html. Because of this, web applications are always built to use the first approach and each view type is mapped to its own URL (taking the extension into consideration; for example: /persons/list.html, /persons/list.xls). The Accept header approach is most useful for REST web services and similar automation scenarios.
! The problem with the Accept header is that it cannot be used when the client is a browser, as most browsers force its value to text/html. Because of this, web applications are always built to use the first approach and each view type is mapped to its own URL (taking the extension into consideration; for example: /persons/list.html, /persons/list.xls). The Accept header approach is most useful for REST web services and similar automation scenarios.
The ContentNegotiatingViewResolver implements the Ordered interface, so it can be used alongside other resolvers, it can be part of a view resolver chain, and it has to have the highest priority in the chain. This is due to its behavior; if theContentNegotiatingViewResolver cannot select a View, it returns null, and Spring examines the application context for other view resolver beans and inspects each of them until a view is obtained. Usually the ContentNegotiatingViewResolver is configured to pick up view resolvers automatically from the application context, so it should always resolve to a View. The next resolvers in the chain can be considered a fallback solution, to make sure that a View is provided.
The ContentNegotiatingViewResolver can be configured in a similar way, as shown in the following example:
<bean class="o.s.web.servlet.view.ContentNegotiatingViewResolver"
  p:order="-1">
     <property name="mediaTypes">
         <map>
             <entry key="html" value="text/html"/>
             <entry key="xls" value="application/vnd.ms-excel"/>
             <entry key="pdf" value="application/pdf"/>
             <entry key="json" value="application/json"/>
         </map>
     </property>
    <property name="viewResolvers">
        <list>
            <bean class="o.s.web.servlet.view.BeanNameViewResolver"/>
            <bean class="o.sweb.servlet.view.tiles3.TilesViewResolver" />
            <bean class="com.book.resolver.JsonViewResolver"/>
        </list>
    </property>
    <property name="defaultViews">
        <list>
            <bean class="o.s.web.servlet.view.json.MappingJackson2JsonView" />
        </list>
    </property>
    <property name="defaultContentType" value="text/html"/>
     <property name="ignoreAcceptHeader" value="true"/>
      <property name="favorParameter" value="false"/>
    <property name="favorPathExtension" value="true"/>
</bean>

<!-- Fallback Resolver: If no extension matched, use JSP view -->
<!-- Resolves view names to protected .jsp resources within the
        /WEB-INF directory -->
<bean class="o.s.web.servlet.view.InternalResourceViewResolver"
      p:prefix="/WEB-INF/"
      p:suffix=".jsp"
      p:order="0"/>
Here is the meaning of each property used in the previous configuration:
- mediaTypes: Map containing extension to content-type correspondences. This property is not mandatory and it does not have to be set in the application when the JavaBeans Activation Framework is used, in which case the types are determined automatically.10
- viewResolvers: The list of view resolvers to delegate to. This property is not mandatory and when it is not set, all view resolver beans in the context are detected and used, but they have to be ordered.
- defaultViews: The default view to use when a more specific view could not be obtained.
The property is not mandatory.
- defaultContentType: The type to render in case a match was not found. The property is not mandatory.
- ignoreAcceptHeader: Indicates that the HTTP Accept header should be ignored if true, and taken into consideration if false. The property is not mandatory, and if not set, it defaults to false.
- favorParameter: Indicates if a request parameter named format should be used to determine the requested content-type. The property is not mandatory, and if not set, it defaults to false.
- favorPathExtension: Indicates if the extension of the request URL should be used to determine the requested content-type. The property is not mandatory, and if not set, it defaults to true.
Starting with Spring 3.2, ContentNegotiationManagerFactoryBean and ContentNegotiationManager were introduced in order to encapsulate all content-type related configurations for the ContentNegotiatingViewResolver.
ContentNegotiationManagerFactoryBean provides access to a ContentNegotiationManager configured with one or more ContentNegotiationStrategy. An equivalent configuration to the preceding, after Spring 3.2, looks like this:
<bean class="o.s.web.servlet.view.ContentNegotiatingViewResolver">
      <property name="viewResolvers">
            <list>
                <bean class="o.s.web.servlet.view.BeanNameViewResolver"/>
                <bean class="o.sweb.servlet.view.tiles3.TilesViewResolver"/>
                <bean class="com.book.resolver.JsonViewResolver"/>
            </list>
        </property>
        <property name="defaultViews">
            <list>
                <bean class="o.s.web.servlet.view.json.MappingJackson2JsonView" />
            </list>
        </property>
<!-- All content-type related configuration is now done by this bean
         since Spring 3.2 -->
        <property name="contentNegotiationManager">
            <bean class="o.s.web.accept.ContentNegotiationManagerFactoryBean>
                <property name="mediaTypes">
                    <map>
                        <entry key="html" value="text/html"/>
                        <entry key="json" value="application/json"/>
                         <entry key="pdf" value="application/pdf"/>
                        <entry key="xls" value="application/vnd.ms-excel"/>
                    </map>
                </property>
                <property name="defaultContentType" value="text/html"/>
                <property name="ignoreAcceptHeader" value="true"/>
                <property name="favorParameter" value="false"/>
                <property name="favorPathExtension" value="true"/>
            </bean>
</property>
![]() ! The problem with using JavaBeans Activation Framework is that if the extension is not recognized, it sets the content-type to application/octet-stream by default. This means that the Views configured with the defaultViews property are not taken into consideration and the ContentNegotiatingViewResolver will return null. That’s why in Spring 3.2, the useJaf property was introduced; it can be set to false to disable the JavaBeans Activation Framework. This property has been added to ContentNegotiationManagerFactoryBean too.
! The problem with using JavaBeans Activation Framework is that if the extension is not recognized, it sets the content-type to application/octet-stream by default. This means that the Views configured with the defaultViews property are not taken into consideration and the ContentNegotiatingViewResolver will return null. That’s why in Spring 3.2, the useJaf property was introduced; it can be set to false to disable the JavaBeans Activation Framework. This property has been added to ContentNegotiationManagerFactoryBean too.
Considering the previous configuration, the following code displays how a view is resolved using content negotiation type:
// In PersonsController.java
@RequestMapping("/persons")
public String list(Model model) {
       model.addAttribute(personManager.getAllPersons());
       return "persons/list";
}
<!-- In mvc-config-->
<bean class="com.book.persons.PersonsExcelView"/>
As you can see, there is no need for the bean name to be persons/list.xls, because the ContentNegotiatingViewResolver does the match without it.
![]() ! In the following XML configuration, the util namespace is introduced to simplify the configuration. The util namespaces allows you to define and use collections in the same way that beans are defined and used in a configuration file.
! In the following XML configuration, the util namespace is introduced to simplify the configuration. The util namespaces allows you to define and use collections in the same way that beans are defined and used in a configuration file.
This configuration can be simplified by using the p and util namespaces, which allow the ContentNegotiatingViewResolver XML bean definition to be simplified, as follows:
<beans xmlns="http://www.springframework.org/schema/beans"
       xmlns:xsi="http://www.w3.org/2001/XMLSchema-instance"
       xmlns:context="http://www.springframework.org/schema/context"
       xmlns:mvc="http://www.springframework.org/schema/mvc"
       xmlns:p="http://www.springframework.org/schema/p"
       xmlns:util="http://www.springframework.org/schema/util"
       xsi:schemaLocation="http://www.springframework.org/schema/mvc
         http://www.springframework.org/schema/mvc/spring-mvc.xsd
         http://www.springframework.org/schema/beans
         http://www.springframework.org/schema/beans/spring-beans.xsd
         http://www.springframework.org/schema/context
         http://www.springframework.org/schema/context/spring-context.xsd
         http://www.springframework.org/schema/util
         http://www.springframework.org/schema/util/spring-util.xsd">
...
<!-- sample usage of the util namespace to declare a map -->
    <util:map id="mediaTypesMap">
        <entry key="html" value="text/html"/>
        <entry key="xls" value="application/vnd.ms-excel"/>
        <entry key="pdf" value="application/pdf"/>
        <entry key="json" value="application/json"/>
    </util:map>

 <!-- sample usage of the util namespace to declare a list -->
    <util:list id="defaultViewsList">
        <!-- Excel view-->
        <bean class="com.pr.views.PersonsExcelView"/>
        <!-- JSON View -->
        <bean class="o.s.web.servlet.view.json.MappingJackson2JsonView"/>
    </util:list>

    <util:list id="resolverList">
         <bean class="com.pr.resolver.JsonViewResolver"/>
         <bean class="o.s.web.servlet.view.BeanNameViewResolver"/>
         <!-- Resolves logical view names to Tiles 3 definitions -->
         <bean id="tilesViewResolver"
               class="o.s.web.servlet.view.tiles3.TilesViewResolver"
               p:requestContextAttribute="requestContext"/>
    </util:list>
    <bean class="o.s.web.servlet.view.ContentNegotiatingViewResolver"
          p:order="-1"
          p:defaultViews-ref="defaultViewsList"
          p:viewResolvers-ref="resolverList">

        <property name="contentNegotiationManager">
            <bean class="o.s.web.accept.ContentNegotiationManagerFactoryBean"
                  p:defaultContentType="text/html"
                  p:ignoreAcceptHeader="true"
                  p:favorParameter="false"
                  p:favorPathExtension="true"
                  p:mediaTypes-ref="mediaTypesMap"/>
        </property>
    </bean>

<beans>
Of course, this means taking out the defaultViewsList and the mediaTypesMap outside the declaration of the ContentNegotiatingViewResolver, which is the only place that they are needed. In this configuration, they can be used by other beans, although this is rarely needed. The choice belongs to the developer, depending on what configuration approach he is most comfortable with.
![]() ! When the p namespace is used, the p:[property-name]-ref means this property is a reference to an existing bean in the context, with the id specified as the value.
! When the p namespace is used, the p:[property-name]-ref means this property is a reference to an existing bean in the context, with the id specified as the value.
That’s mostly it when it comes to content-type negotiation. What is left to add is some sample code for the Java configuration:
@Configuration
@EnableWebMvc
public class WebConfig extends WebMvcConfigurerAdapter {
// Configures the contentNegotiationManager bean
@Override
public void configureContentNegotiation(ContentNegotiationConfigurer configurer) {
            configurer
                .ignoreAcceptHeader(true)
                .defaultContentType(MediaType.TEXT_HTML)
                .favorParameter(false)
                .favorPathExtension(true);
}

//Configure ContentNegotiatingViewResolver
@Bean
public ViewResolver contentNegotiatingViewResolver
                (ContentNegotiationManager manager) {
  ContentNegotiatingViewResolver resolver = new ContentNegotiatingViewResolver();
  resolver.setContentNegotiationManager(manager);

  // Define all possible view resolvers
  List<ViewResolver> resolvers = new ArrayList<>();
        resolvers.add(beanNameViewResolver());
        resolvers.add(tilesViewResolver());
        resolvers.add(jsonViewResolver());
        resolver.setViewResolvers(resolvers);

        List<View> defaultViewList = new ArrayList<>();
        defaultViewList.add(jsonView);
        resolver.setDefaultViews(defaultViewList);

        resolver.setOrder(0);
        return resolver;
}
@Bean
public ViewResolver jsonViewResolver() {
     return new JsonViewResolver();
}

@Bean
public MappingJackson2JsonView jsonView(){
    return new MappingJackson2JsonView();
}

@Bean
InternalResourceViewResolver getViewResolver(){
    InternalResourceViewResolver resolver = new InternalResourceViewResolver();
    resolver.setPrefix("/WEB-INF/");
    resolver.setSuffix(".jsp" );
    resolver.setOrder(1);
    return resolver;
}

 // other bean definitions ...
}
In the Java-annotated configuration there is no need to create a ContentNegotiationManager using the ContentNegotiationManagerFactoryBean. Spring does it automatically if you provide a configuration for it by overriding the implementation for the configureContentNegotiation method.
JSON View Resolver
In this section, in the code samples, the MappingJackson2JsonView is an example of a default View. This is a Spring MVC View implementation that renders JSON content by serializing the model for the current request using the Jackson 2.x ObjectMapper. By default, everything serializable (classes that implement the Serializable interface) in a model map is being serialized, except for framework-specific classes and classes or fields annotated with @JsonIgnore. The configuration for the view is provided by Jackson2ObjectMapperBuilder.
The only tiny issue is that there is no view resolver provided by Spring, which could resolve this type of view. So a developer has to create one; but worry not— it’s quite easy:
@Component
public class JsonViewResolver implements ViewResolver {

    @Override
    public View resolveViewName(String viewName, Locale locale) throws Exception {
        MappingJackson2JsonView view = new MappingJackson2JsonView();
        //make JSON output readable using proper indentation
        view.setPrettyPrint(true);
        return view;
    }
}
When using Java configuration classes, all that is needed is a @Bean annotated method:
@Bean
public ViewResolver jsonViewResolver() {
        MappingJackson2JsonView view = new MappingJackson2JsonView();
        view.setPrettyPrint(true);
        return view;
}
The Jackson library provides a set of annotations designed to be used when implementing classes subjected to JSON serialization to customize what is serialized and in which format. This way of working is similar to JPA and JAXB.
![]() ! The project 03-chapter-07-solution has a view resolver configuration that uses a ContentNegotiatingViewResolver. The data can be viewed in a web page, Excel document, PDF document, or JSON. Run it and take a look at the implementation before moving on to the next section.
! The project 03-chapter-07-solution has a view resolver configuration that uses a ContentNegotiatingViewResolver. The data can be viewed in a web page, Excel document, PDF document, or JSON. Run it and take a look at the implementation before moving on to the next section.
Personalization Beans
Most web applications are created to provide a certain service to users from different places in the world, so the application needs to adapt to the language used by those customers (a process called internationalization). Some web applications offer their users the ability to customize the application’s interface based on a number of available themes. Spring offers the ability to easily customize the locale and look-and-feel of a web application via a couple of infrastructure beans.
MessageSource
To support internationalization, a Spring application must have in its context a bean named messageSource. The class of this bean must implement the MessageSource interface and provides access to localized messages. This class provides concrete implementations for localization methods named getMessage(...). When an ApplicationContext is loaded, it automatically searches for this bean in the context and all calls to getMessage(...) methods are delegated to this bean.
Spring provides two out-of-the-box implementations for the MessageSource interface: ResourceBundleMessageSource and StaticMessageSource. The second one allows messages to be registered programmatically and it is intended to be used in testing. The first implementation relies on JDK’s ResourceBundle implementation. Reloading a resource bundle during execution is not possible, as ResourceBundle caches loaded bundles files forever, so the implementation usually used in a web application is ReloadableResourceBundleMessageSource, which is a Spring-specific implementation that accesses bundles using specified base names, participating in the Spring ApplicationContext’s resource loading. This class supports reloading properties files containing the internationalization information; it is usually slightly faster than ResourceBundleMessageSource. Another advantage is that it can read properties files with a specific character encoding.
In the following, you can see a simple XML configuration of this bean:
<bean id="messageSource"
    class="o.s.context.support.ReloadableResourceBundleMessageSource">
    <property name="basenames">
        <list>
          <value>/WEB-INF/messages/global<value/>
        </list>
    </property>
    <property name="cacheSeconds">1</property>
</bean>
When only one resource bundle and the p-namespace are used, the previous definition becomes this:
<bean id="messageSource"
    class="o.s.context.support.ReloadableResourceBundleMessageSource"
    p:basename="/WEB-INF/messages/global"
    p:cacheSeconds="1"/>
When Java-based configuration is used, the bean definition looks like this:
@Bean
public MessageSource getMessageSource(){
     ReloadableResourceBundleMessageSource messageSource =
          new ReloadableResourceBundleMessageSource();
     messageSource.setBasename("/WEB-INF/messages/global");
     messageSource.setCacheSeconds(1);
     return messageSource;
}
The cacheSeconds property is used to set the number of seconds to cache the loaded property files. Internationalization messages are loaded from properties files under /WEB-INF/messages/; they are named global_[locale].properties.
To use the messageSource bean to retrieve internationalized resources inside handler methods, simply inject the bean in the controller and call the desired getMessage(...) method. The Spring type library is used for this purpose too. The fmt tag library, which is a component of JSTL, can be used too. The syntax is a little different, as you can see in the following example:
<!-- JSTL fmt way -->
<fmt:message key="menu.home"/>
 <!-- Spring way -->
<spring:message code="menu.home"/>
When using the spring:message tag, the MessageSource classes can be integrated with the Spring context. The spring:message- tag works with the locale support that comes with Spring. If the “code” attribute isn’t set or cannot be resolved, the “text” attribute is used as the default message. And spring:message supports dynamic names for internationalization codes, so a message code can be an expression:
<spring:message code="myPrefix.${account.state}"/>
ReloadableResourceBundleMessageSource is able to load messages from properties files with a specific encoding. In order for those messages to be successfully incorporated in a view, Spring provides a class called CharacterEncodingFilter, which is used to apply character encoding to requests. It can work in two modes to do the following:
- Enforce the encoding
- Apply the encoding if one is not already defined
This bean is added to the web.xml file like this:
<filter>
      <filter-name>characterEncodingFilter</filter-name>
      <filter-class>o.s.web.filter.CharacterEncodingFilter</filter-class>
      <init-param>
           <param-name>encoding</param-name>
           <param-value>UTF-8</param-value>
      </init-param>
      <init-param>
           <param-name>forceEncoding</param-name>
           <param-value>true</param-value>
      </init-param>
 </filter>
<filter-mapping>
     <filter-name>characterEncodingFilter</filter-name>
     <url-pattern>/*</url-pattern>
</filter-mapping>
Equivalent Java-based configuration looks like in the following code snippet:
\in class implementing WebApplicationInitializer
 @Override
protected Filter getServletFilters() {
     CharacterEncodingFilter characterEncodingFilter = new CharacterEncodingFilter();
     characterEncodingFilter.setEncoding("UTF-8");
     characterEncodingFilter.setForceEncoding(true);
     return new Filter { characterEncodingFilter};
}
LocaleResolver
In order for the messageBean to solve the messages, a locale must be defined for a web application. The value for the locale is taken from the browser. The bean resolving the locale must be named localeResolver and it must implement the LocaleResolver interface, because the DispatcherServlet looks for such a bean to use. A LocaleResolver can also store a different locale defined by the user. In Spring, there are three types of locale resolvers defined:
- AcceptHeaderLocaleResolver: Reads the locale from the request
- CookieLocaleResolver: Reads/writes the locale from/to a cookie named org.springframework.web.servlet.i18n.CookieLocaleResolver.LOCALE (unless named otherwise in the bean definition using property cookieName)
- SessionLocaleResolver: Reads/writes the locale from/to an HTTP session
![]() ! The default name of the cookie can be confusing because it looks like a full name for a static variable, but no such variable exists. The same applies to the theme cookie mentioned in the next section.
! The default name of the cookie can be confusing because it looks like a full name for a static variable, but no such variable exists. The same applies to the theme cookie mentioned in the next section.
When a specific LocaleResolver is not defined, AcceptHeaderLocaleResolver is used as default. When users select language, CookieLocaleResolver or SessionLocaleResolver can be used. CookieLocaleResolver is most often used in stateless applications without user sessions; this bean is defined in the mvc-config.xml file. The following definition is quite common:
<bean id="localeResolver" class="o.s.w.s.i18n.CookieLocaleResolver"
          p:defaultLocale="en"
          p:cookieMaxAge="3600"/>
The cookieMaxAge sets the maximum age in seconds for the cookie. If set to –1, the cookie is deleted only when the client shuts down.
In order for Spring to be notified of the changes in the locale, a bean of type LocaleChangeInterceptor needs to be configured. This ensures that the locale interceptor will be applied to all handler mappings.
<mvc:interceptors>
    <bean class="org.springframework.web.servlet.i18n.LocaleChangeInterceptor" />
    </mvc:interceptors>
An equivalent Java configuration for this bean can be used by providing an implementation for the addInterceptors method when implementing WebMvcConfigurer or overriding the same method when extending WebMvcConfigurerAdapter:
\in the @Configuration and @EnableWebMvc annotated class
    @Override
    public void addInterceptors(InterceptorRegistry registry) {
        registry.addInterceptor(localeChangeInterceptor());
        \other interceptors can be added here
    }

  @Bean
public LocaleChangeInterceptor localeChangeInterceptor(){
    return new LocaleChangeInterceptor();
}
This interceptor detects requests to change the locale by looking for a request parameter named locale by default. The LocaleResolver bean is used to store the value of this parameter. A different name can be set by using a different value for the parameterName property. Request URLs to change the locale are expected to contain the parameter name and a value in the URL: http://myapp.com/?[parameterName]=[locale_name] (under /WEB-INF/messages/ a [filename]_[locale_name].properties files is defined).
ThemeResolver
If the web application has a customizable look and feel, the different themes can be managed using a bean named themeResolver. The bean resolving the theme has to implement the ThemeResolver interface, because the DispatcherServlet looks for such a bean to identify the resources needed for creating a response.
To use a ThemeResolver, you have to do the following:
- Create a [theme].properties file on the classpath (under /WEB-INF/classes/). The “theme” term can be replaced with any word describing that theme. In it, add the properties specific to that theme. In the code samples attached to this chapter, you have a file named blue.properties that contains the following theme properties:
style.css=/styles/decorator-blue.css
banner.image=/images/banner-blue.png - Use the Spring theme tag to resolve theme properties.
<%@ taglib prefix="spring" uri="http://www.springframework.org/tags" %>
...
<spring:theme var="styleCss" code="style.css"/>
<c:url var="styleCssUrl" value="${styleCss}"/>
<link type="text/css" type="stylesheet" href="${styleCssUrl}" />
To access the current theme in a view, you can use the RequestContext; but first you need to expose a requestContext attribute:
<bean class="org.s.web.servlet.view.InternalResourceViewResolver">
    <property name="requestContextAttribute" value="requestContext"/>
</bean>

 <c:if test="${requestContext.theme.name eq 'blue'}">
...
In Spring there are three types of theme resolvers defined:
- FixedThemeResolver: The default implementation uses a configured default theme
- CookieThemeResolver: Reads/writes the theme attribute from/to a cookie named org.springframework.web.servlet.theme.cookieThemeResolver.THEME (unless named otherwise in the bean definition using property cookieName)
- SessionThemeResolver: Reads/writes the theme attribute from/to a HTTP session

Figure 3-8. List of cookies for the Personal Records Manager application
You can view the two cookies using the Firebug extension for Firefox by opening the console and looking in the Cookies tab. You should see a cookie listing similar to the one shown in Figure 3-8.
For Spring to be notified of the changes in the theme, a bean of type ThemeChangeInterceptor needs to be configured. This ensures that the theme interceptor is applied to all handler mappings:
<mvc:interceptors>
    <bean class="org.springframework.web.servlet.theme.ThemeChangeInterceptor" />
</mvc:interceptors>
An equivalent Java configuration for this bean can be used by providing an implementation for the addInterceptors method when implementing WebMvcConfigurer or overriding the same method when extending WebMvcConfigurerAdapter:
\in the @Configuration and @EnableWebMvc annotated class
    @Override
    public void addInterceptors(InterceptorRegistry registry) {
        registry.addInterceptor(themeChangeInterceptor());
        \other interceptors can be added here
    }

    @Bean
public ThemeChangeInterceptor themeChangeInterceptor(){
    return new ThemeChangeInterceptor();
}
This interceptor detects requests to change the theme by looking for a request parameter named theme by default. The ThemeResolver bean is used to store the value of this parameter. A different name for it can be set by using a different value for the parameterName property. Request URLs to change the theme are expected to contain the parameter name and a value defined in the application: http://[parameterName]?theme=[theme_name] (under /WEB-INF/classes/ a [theme_name].properties files is defined).
HandlerExceptionResolver
Exceptions can be thrown during handler mapping or execution. Spring MVC catches and handles the exceptions using implementations of HandlerExceptionResolver. The developer writing the application can customize the beans provided by Spring or provide his own implementation. The typical way to treat an MVC exception is to prepare a model and select an error view. Multiple exception resolvers can be used to treat different types of exceptions in different ways. They can also be chained using the order property like any other infrastructure bean. Spring MVC supports the following default resolvers:
org.springframework.web.servlet.HandlerExceptionResolver=
o.s.w.s.m.a.AnnotationMethodHandlerExceptionResolver,
o.s.w.s.m.a.ResponseStatusExceptionResolver,
o.s.w.s.m.s.DefaultHandlerExceptionResolver
An exception resolver provides information related to the context in which the exception was thrown, which handler method was executing, and which arguments it was called with.
Spring MVC also provides some implementation of its own, which you can configure and use instead of writing a full implementation. The preferred ways to handle exceptions are by using the SimpleMappingExceptionResolver bean and annotating methods with @ExceptionHandler. SimpleMappingExceptionResolver can be used to map exception classes to different views. The SimpleMappingExceptionResolver provides the following options:
- Maps exception classes to view names
- Specifies a default error page for any exception that is not handled
- Logs a message if configured to do so by setting a logger name for the warnLogCategory property
- Sets the name of the exception attribute to add to the model so it can be used inside a view
The following is an example on how to configure a SimpleMappingExceptionResolver bean to map exception types to error views, depending on the class name:
<bean class="o.s.web.servlet.handler.SimpleMappingExceptionResolver">
   <property name="exceptionMappings">
      <map>
         <!-- No need for package name, any package name will match. If you have
         two exceptions with the same name in different packages, you need to use
         the full class name to implement the proper behaviour -->
         <entry key="DataAccessException" value="databaseError"/>
         <entry key="InvalidPncException" value="pncError"/>
         <!-- The databaseError and pncError are logical view names -->
      </map>
   </property>
   <property name="defaultStatusCode" value="500"/>
   <property name="defaultErrorView" value="error"/>
</bean>
An equivalent Java configuration can be obtained by defining the bean programmatically:
\in the @Configuration and @EnableWebMvc annotated class
@Bean(name="simpleMappingExceptionResolver")
    public SimpleMappingExceptionResolver createSimpleMappingExceptionResolver() {
        SimpleMappingExceptionResolver resolver =
                new SimpleMappingExceptionResolver();

        Properties mappings = new Properties();
        mappings.setProperty("DatabaseException", "databaseError");
        mappings.setProperty("InvalidPncException", "pncError");

        resolver.setExceptionMappings(mappings); // None by default
        resolver.setDefaultStatusCode(HttpStatus.INTERNAL_SERVER_ERROR.value());
        resolver.setDefaultErrorView("error");
        return resolver;
    }
![]() ! Views returned from @ExceptionHandler methods do not have access to the exception, but views defined to SimpleMappingExceptionResolver do. This means that when using SimpleMappingExceptionResolver, the @ExceptionHandler methods must construct and return a ModelAndView instance. (See example in the 02-pr-mvc-basic-solution module.) In order to return a logical view name from a method annotated with @ExceptionHandler, ExceptionHandlerExceptionResolver must be extended.
! Views returned from @ExceptionHandler methods do not have access to the exception, but views defined to SimpleMappingExceptionResolver do. This means that when using SimpleMappingExceptionResolver, the @ExceptionHandler methods must construct and return a ModelAndView instance. (See example in the 02-pr-mvc-basic-solution module.) In order to return a logical view name from a method annotated with @ExceptionHandler, ExceptionHandlerExceptionResolver must be extended.
To provide a custom implementation, the SimpleMappingExceptionResolver can be extended; its methods can be overridden to provide the desired functionality.
Methods annotated with @ExceptionHandler can be used to handle exceptions inside a single controller or they may apply to many when defined inside a class annotated with @ControllerAdvice.
Annotated exception handler methods are automatically called when controller methods throw an exception, and the method does not treat it itself. Method signatures are as flexible for an exception handler method as the controller handler methods (this is discussed in the “Controllers” section). Next you see an exception handler method used to handle database exceptions for the PersonsController class:
@Controller
public class PersonsController {
...
    @ExceptionHandler
    public String handleException(DataAccessException ex) {
        return "databaseError";
    }
}
The @ExceptionHandler can be set to treat a specific type of exception, using the annotation parameter, thus rendering the exception argument of the method unnecessary.
@Controller
public class PersonsController {
...
    @ExceptionHandler(DataAccessException.class)
    public String handleException() {
        return "databaseError";
    }
}
But using a parameter gives access to the exception, which can be treated or logged. Of course, the two approaches can be mixed.
The @ExceptionHandler can be set to treat an array of exceptions. If an exception is thrown that matches one of the types in the list, then the method annotated with the matching @ExceptionHandler is invoked. The same can be done by setting the array as an argument for the annotated method. By using different @ExceptionHandler annotated methods for each type of exception, the code can become crowded. So exceptions can be grouped by different criteria; for example, an @ExceptionHandler method can handle a group of database access exceptions, another can treat security exceptions, and so on. The chosen approach depends on the exception handling specifications of a project and developer preference.
Spring MVC internal exceptions raised while processing a request are translated by a class named DefaultHandlerExceptionResolver to specific error codes: a client error (4xx) or a server error (5xx), which is set on the response. This class is registered by default with the MVC namespace and @EnableWebMVC.
But when writing your own exceptions, you can set the status code on the exception class, like this:
@ResponseStatus(value= HttpStatus.NOT_FOUND, reason="Requested item not found")
public class NotFoundException extends Exception {
...
}
A class annotated with @ControllerAdvice allows you to use the same exception handling techniques across the whole application, not just a single controller. Three types of methods are supported inside a class annotated with @ControllerAdvice:
- Methods annotated with @ExceptionHandler that are used to handle exceptions
- Methods annotated with @ModelAttribute that are used to add data to the model
- Methods annotated with @InitBinder that are used for configuring form-handling
A controller advice class used only for exception handling could look like in the following example, which depicts a global default exception handler:
@ControllerAdvice
public class GlobalExceptionHandler {

    @ExceptionHandler(value = Exception.class)
    public ModelAndView defaultErrorHandler(HttpServletRequest req, Exception e)
                                       throws Exception {
        if (AnnotationUtils.findAnnotation(e.getClass(),
                                        ResponseStatus.class) != null){
            // we test to see if the exception is annotated with @ResponseStatus
            // if it is, we will re-throw it and let Spring handle it.
            throw e;
        }

        ModelAndView mav = new ModelAndView();
        //set exception details to be displayed in the page
        mav.addObject("exception", e);
        //set request URL to be displayed in the page, so the request causing
        //the problem can be identified
        mav.addObject("url", req.getRequestURL());
        mav.setViewName("error");
        return mav;
    }
}
![]() ! Notice in the previous example that the exception handler method returns a ModelAndView instance that is created inside the method body. The reason for this is that the methods in classes annotated with @ControllerAdvice are methods that apply to a group of controllers in the application. This can be customized via annotations(), basePackageClasses(), and basePackages() methods. But the methods are not part of the controller, so a model cannot be automatically injected by Spring. Also, a global exception handler like this one uses the same view to display all exception-specific messages in the application, so the view must be linked to the model, which in this case can only be done by creating a ModelAndView instance that is handled appropriately by the DispatcherServlet.
! Notice in the previous example that the exception handler method returns a ModelAndView instance that is created inside the method body. The reason for this is that the methods in classes annotated with @ControllerAdvice are methods that apply to a group of controllers in the application. This can be customized via annotations(), basePackageClasses(), and basePackages() methods. But the methods are not part of the controller, so a model cannot be automatically injected by Spring. Also, a global exception handler like this one uses the same view to display all exception-specific messages in the application, so the view must be linked to the model, which in this case can only be done by creating a ModelAndView instance that is handled appropriately by the DispatcherServlet.
If you want to analyze the full capabilities of treating exceptions with Spring MVC, you can take a look at tutorials posted on their official site.11 For passing the certification exam, all that was presented here should suffice.
User-Provided Components
Although Spring MVC offers a lot of ready-to-use components for creating web applications (all that is required are small customizations), there are components that need to be implemented by the developer. Such components are controllers and interceptors. Controllers include and are the focus object of everything that has been presented so far. Controllers are the handlers identified by handler mappings; their methods handle application requests and return views. They can use message source to populate models with internationalized data and can contain methods for exception handling. If until now it was hard to connect all the infrastructure beans and picture what exactly they did, this mystery will be solved in the “Controllers” section, which puts every LEGO piece in its proper place. The handler interceptors are not really a big thing compared to it, but they are useful too.
Controllers
Controllers are POJOs—simple beans annotated with the @Controller annotation—that are used to handle requests. Each controller class contains methods that are mapped to a request URL via the @RequestMapping annotation. These methods are used to handle different requests. Each method executes three steps:
- Invoke services.
- Populate a model.
- Select a view.
Here is a simple controller example. Notice the syntax for @RequestMapping annotation.
@Controller
@RequestMapping("/persons")
public class PersonsController {

    private PersonManager personManager;

    @Autowired
    public PersonsController(PersonManager personManager) {
        this.personManager = personManager;
    }

    // Handles requests to list all persons.
    @RequestMapping(value="/", method = RequestMethod.GET)
    public String list(Model model) {
        model.addAttribute("persons", personManager.findAll());
        return "persons/list";
    }

     //Handles requests to shows detail about one person.
    @RequestMapping(value="/{id}", method = RequestMethod.GET)
    public String show(@PathVariable Long id, Model model) {
        model.addAttribute("person", personManager.findOne(id));
        return "persons/show";
    }
}
When @RequestMapping is used to annotate a controller class, the path that the controller is mapped to is a part of the request’s URL. The previous methods handle requests looking like this:
# handled by the list menthod
http://localhost:8080/persons/

# handled by the show menthod
http://localhost:8080/persons/144
All handling methods are relative to the path set by the @RequestMapping at class level. This means that the class mapping is solved first, and then the request mapping.
![]() ! A controller can have methods that are not annotated with @RequestMapping. These methods are not used to solve requests. They are practically ignored, processing a user request.
! A controller can have methods that are not annotated with @RequestMapping. These methods are not used to solve requests. They are practically ignored, processing a user request.
The methods of a controller can be mapped using @RequestMapping with the following URI templates:
- By URL only:
@RequestMapping("persons/list")
public String list(Model model) {
...
} - By URL and request method:
@RequestMapping("persons/list", method = RequestMethod.GET)
public String list(Model model) {
...
} - By URL with request parameters:
@RequestMapping(value="/persons/show", params={"id"})
public String show(@RequestParam("id") Long id, Model model) {
...
} - By URL with a parameter and a specific value for it:
@RequestMapping(value="/persons/show", params={"id=1123"})
public String show(@RequestParam("id") Long id, Model model) {
...
} - By URL with a path variable:
@RequestMapping(value="/persons/{id}")
public String show(@PathVariable("id") Long id, Model model) {
...
} - By URL with a path variable and a regular expression that the value must match:
@RequestMapping(value = "/{id:[\d]*}")
//the regular expression [\d]* insures the id to be numeric,
//made of one or more digits.
public String show(@PathVariable("id") Long id, Model model) {
...
}
The preceding are simple examples of URIs onto which controllers methods are mapped. The options do not stop here and any of these can be mixed, depending on the developer’s needs. For example, you can do something like this in web applications:
@RequestMapping(value="/persons/{id}/?dateOfBirth=1983-08-18")
public String show(@RequestParam("dateOfBirth") Date date,
     @PathVariable Long id, Model model) {
...
}
The controller methods can have very flexible signatures. The following can be used as arguments in any combination or order:
- Model
- HttpServletRequest
- HttpServletResponse
- HttpSession
- Locale
- Principal
In the body of a controller method, path variables and request parameters must be accessed to process the request. If the URI template is a RESTful URI,12 then the variable is part of the URI, called a path variable, and can be accessed using @PathVariable:
@RequestMapping(value="/persons/{id}")
public String show(@PathVariable("id") Long identifier, Model model) {
...
}
![]() CC When the method argument has the same name with the path variable, the value for the @PathVariable annotation is no longer required.
CC When the method argument has the same name with the path variable, the value for the @PathVariable annotation is no longer required.
So the preceding method becomes:
@RequestMapping(value="/persons/{id}")
public String show(@PathVariable Long id, Model model) {
...
}
And handles requests similar to: http://localhost:8080/persons/144.
There is a special case when the @PathVariable is not even needed and the default is the argument name; this happens when the application is compiled with debug symbols enabled. It is rarely used because the result is an unoptimized/debuggable byte code. This is mentioned here because the official course mentions it too, and it might be useful to know that this possibility exists in case you ever need it.
When the URI is non-RESTful, the variable is provided as a parameter in the request URL. The request parameter can be accessed using the @RequestParam annotation.
@RequestMapping(value="/persons/show", params={"id"})
public String show(@RequestParam("id") Long identifier, Model model) {
...
}
Type conversion is applied, and if the parameter value is missing or has the wrong type, an exception is thrown.
![]() CC When the method argument has the same name with the request parameter, the value for the @RequestParam annotation is no longer required. The params property is no longer needed for the @RequestMapping either.
CC When the method argument has the same name with the request parameter, the value for the @RequestParam annotation is no longer required. The params property is no longer needed for the @RequestMapping either.
So the preceding method becomes this:
@RequestMapping(value="/persons/show")
public String show(@RequestParam Long id, Model model) {
...
}
The request parameter can be set as optional if it is not a primitive type; in this case, it defaults to null and must be handled in the method body.
@RequestMapping(value="/persons/show", params={"id"})
public String show(@RequestParam(value="id", required=false) Long identifier,
Model model) {
if(identifier == null) {
//return a specific view
}
...
}
The request parameter can also be set as optional when the request parameter is a primitive type and a fallback default value is provided.
@RequestMapping(value="/persons/show", params={"id"})
public String show(@RequestParam(value="id", required=false,
                  defaultValue = "2") long identifier, Model model) {
    if(identifier == null) {
        //return a specific view
    }

    ...
}
Request parameters can have any type, including Date and Number, and these types can be formatted by using the following annotations:
//matches http://localhost:8080/persons/1983-08-18
@RequestMapping(value="/persons/{birthDate}")
public String list(@PathVariable
        @DateTimeFormat(pattern = "yyyy-MM-dd") Date birthDate,
           Model model) {

...
}

//matches http://localhost:8080/accounts/?minAmount=$5000.50
@RequestMapping(value="/accounts" params={"minAmount"})
public String list(@RequestParam
         @NumberFormat(style = NumberFormat.Style.CURRENCY) Double minAmount,
           Model model) {

...
}
To generate a Spring-parametrized URI in a JSP file, a combination of <spring:url> tag and <spring:param/> is used:
<%@ taglib prefix="spring" uri="http://www.springframework.org/tags" %>
...
 <spring:url var="showUrl" value="{id}">
      <spring:param name="id" value="${person.id}"/>
</spring:url>
 <a href="${showUrl}">${person.id}</a>
The first three lines of the preceding example generate a URI similar to http://localhost:8080/person/123 by using the current context of the application and the person attribute in the model. The generated URI is stored as a value for the showUrl attribute in the model. In the next line, that attribute is used to populate the HTML link element.
After the execution of the code in a mapping method, the controller selects a view for the resulting data to be rendered in. The controller’s responsibility includes populating a model map with the data to display in the view. There are multiple ways of specifying the resulting view too, but the default is for the mapping method to return a string, which is the logical view name. (By default, a path to a JSP file is expected, unless some view resolver is used, such as TilesResolver, for example). Also, the controller can directly write to the response stream and complete the request (when handling AJAX calls or REST services, cases that are presented in detail in the following chapters). The process to identify which view is being used is called view resolution, which is performed by one view resolver class or a chain of view resolver classes.
Accessing Model Data
Accessing Model data instances is simple, especially when the model is used as an argument of the request method, and Spring takes care of injecting it:
@RequestMapping("/persons")
public String list(Model model) {
    model.addAttribute("persons", personManager.findAll());
     return "persons/list";
}
All model attributes are available in the JSP for rendering.
Attributes can be added to the model without specifying a name. There are convention-over-configuration rules applied by Spring to infer the name of an attribute based on the type of the attribute value set. For example:
Person person = personManager.getById(id);

model.addAttribute(person);
//added as "person" as the reference type is Person
List<Person> persons = personManager.findAll();
model.addAttribute(persons);
// added as "personList" as reference type is List<Person>
![]() CC When objects are added to a model without specifying an attribute name, this is inferred by lowercasing the first letter of the reference type. If the attribute is a collection of objects, the attribute name is composed from the reference type with first letter lowercased and suffixed with the specific collection suffix (a simple name of the Collection interface implemented): “Set” for Set<?>, “List” for List<?>, etc.
CC When objects are added to a model without specifying an attribute name, this is inferred by lowercasing the first letter of the reference type. If the attribute is a collection of objects, the attribute name is composed from the reference type with first letter lowercased and suffixed with the specific collection suffix (a simple name of the Collection interface implemented): “Set” for Set<?>, “List” for List<?>, etc.
When only one object needs to be added to the model, the object can simply be returned by the method and it is automatically added to the model. This obviously does not work with objects of type String, because Spring assumes the returned String value is a logical view name. When the following approach is used, the returned object is added to the model as an attribute and the name is inferred based on the conventions mentioned earlier.
@RequestMapping("/persons/list")
public List<Person> list() {
      return personManager.findAll();
      //model name attribute convention will be used
}
But the attribute name can be specified by annotating the method with @ModelAttribute and specifying a different attribute name.
@RequestMapping("/persons/list")
@ModelAttribute("persons")
public List<Person> list() {
    return personManager.findAll();
}
![]() CC When the handler method returns an object, the DispatcherServlet has to infer the view to render the model. The logical view name is extracted from the mapping URL by stripping the first "/" and the extension if present. In the preceding examples, the logical view name used is "persons/list".
CC When the handler method returns an object, the DispatcherServlet has to infer the view to render the model. The logical view name is extracted from the mapping URL by stripping the first "/" and the extension if present. In the preceding examples, the logical view name used is "persons/list".
Selecting a View
A controller method selects a view by returning its name, and DispatcherServlet takes care of the rest using the ViewResolvers in the context. But there are conventions over configurations in place that allow a controller method to return null and a view is still selected, like the convention mentioned right before this section.
The logical view name can be extracted from the request URI by removing the leading slash and extension. This is done by the RequestToViewNameTranslator.
@RequestMapping("/persons/list.html")
public String list(Model model) {...}
// logical view name is: "persons/list"
![]() CC The same view name “persons/list” is inferred if you have a @RequestMapping ("/persons") on the controller class and @RequestMapping ("/list.html") on the method.
CC The same view name “persons/list” is inferred if you have a @RequestMapping ("/persons") on the controller class and @RequestMapping ("/list.html") on the method.
When <mvc:annotation-driven/> or @EnableWebMVC is used in the application configuration for simple views that do not require a model being populated with data can be defined without controllers. The following sample code shows how to configure such views using XML and Java configuration.
<!-- in mvc-config.xml -->
<mvc:view-controller path="/" view-name="welcome"/>

//in class annotated with @Configuration and @EnableWebMvc
// and implementing WebMvcConfigurer
@Override
public void addViewControllers(ViewControllerRegistry registry) {
     registry.addViewController("/").setViewName("welcome");
}
Redirecting
Controller methods can also make redirect requests instead of selecting a view. This is done by returning a string representing a view name prefixed with "redirect:". Redirecting implies a new HTTP request being created and usually some request attributes need to be passed from one request to the other. Until Spring 3.1, this was done using @ModelAttribute on a controller method, or @SessionAtributes on the controller class.
The @ModelAttribute makes sure that the annotated method is always invoked before a request handling method, thus adding the person instance to the model as an attribute with the name "person":
@ModelAttribute
public Person getPerson(@PathVariable Long id) {
    return personManager.getPerson(id);
}
The object is not added to the HttpServletRequest to fulfill this purpose, but to the model; the reason for this is that Spring MVC wants to keep the view usage as generic as possible, which means not forcing the application to use only view technologies based on HttpServletRequest.
The @SessionAttributes is used on a controller class to designate which model attributes should be stored in the session.
@SessionAttributes("person")
@Controller
@RequestMapping("/persons")
public class PersonsController {

    @RequestMapping("/{id}", method = RequestMethod.GET)
    public Person show(@PathVariable Long id, Model model) {
       model.add("person", personManager.getPerson(id));
       return "persons/show";
    }
}
Starting with Spring 3.1, there is another way: using flash attributes, which are saved in an object model implementing the RedirectAttributes interface. Flash attributes provide a way for one request to store attributes intended for use in another. Flash attributes are supported by default; no extra configuration is needed. They are automatically added to the model after the redirect, but they must be added to the redirectAttributes object before the redirect call.
@Controller
@RequestMapping("/persons")
public class PersonsController {

    @RequestMapping(method = RequestMethod.POST)
     public String edit(@Valid Person person,
     final RedirectAttributes redirectAttributes,
     BindingResult result, Model model) {
         if (result.hasErrors()) {
              return "persons/edit";
          }
          personManager.update(person);
          redirectAttributes.addFlashAttribute("person", person);
          return "redirect:/persons/show";
          }
    }

    @RequestMapping("/show", method = RequestMethod.GET)
     public String show(@ModelAttribute("person") Person person) {
        // because the attribute is already in the model,
        //the only thing left to do is return the view name
           return "persons/show";
    }

}
The object added to the redirectAttributes model is added to the model at redirect time with the same attribute name. So if the parameter name is different in the method being called at redirect time, a value representing the attribute name for the @ModelAttribute has to be set. In the previous example, this was done anyway just to make it obvious, but because of the Spring convention over configuration is in place, the value for the verb|@ModelAttribute| can be skipped, as the name of the argument is considered.
![]() ! A sample of what controller methods look like and a sample of “redirect:” usage are found in the 03-pr-mvc-layout-solution module. The equivalent practice module is covered at the end of this chapter.
! A sample of what controller methods look like and a sample of “redirect:” usage are found in the 03-pr-mvc-layout-solution module. The equivalent practice module is covered at the end of this chapter.
Testing Controllers
When testing controllers, the focus is to check that handler methods return the expected logical view name and that the expected data has been placed in the model as an attribute. When doing unit testing, the manager does not need to be involved, as saving data to the database defeats the purpose of testing a small unit. So managers used in the controllers can be replaced with skeleton objects with simulated functionality. This can be done by creating skeleton objects, called stubs, or mocking libraries can be used, to pass to them the responsibility of implementing the objects according to the desired functionality. The library used to mock the managers used in the code samples for this book is called Mockito.13 The tests have to be run with MockitoJUnitRunner for the mock objects to be treated accordingly.
Assuming you have a controller that looks like this...
public class PersonsController {

    private PersonManager personManager;

     @Autowired
    public PersonsController(PersonManager personManager) {
        this.personManager = personManager;
    }

     @RequestMapping(value="/list", method = RequestMethod.GET)
    public String list(Model model) {
        model.addAttribute("persons", personManager.findAll());
        return "persons/list";
}
A test method for the list handler method will look like this:
@RunWith(MockitoJUnitRunner.class)
public class PersonsControllerTest {
    private PersonsController personsController;

    @Mock
    private PersonManager managerMock;

    @Before
    public void setUp(){
        personsController = new PersonsController(managerMock);
    }

    @Test
    public void list() {
    // setting up a mock manager that returns an empty list when
    // findAll() is called
        when(managerMock.findAll()).thenReturn(new ArrayList<>());

    //a model object is "manually" constructed to pass as argument
    // to the controller method
        Model model = new BindingAwareModelMap();
        String view = personsController.list(model);
        assertEquals("persons/list", view);

        //this tests if the handler method has added
        //the "persons" attribute to the provided model.
        assertNotNull(model.asMap().get("persons"));
    }
}
The @Mock annotation makes sure that the object is treated as a mock object by the library and a skeleton implementation is provided transparently. Statements beginning with calls to the when method define the behavior of the respective object when its mock methods are called. The syntax is quite intuitive and really easy to use. The statement underlined in the preceding code sample can be translated as: “When the findAll() method is called on the mock object, return an empty list of persons.”
Integration testing of the controllers can be done by creating a test context for their execution, and it has the advantage of testing the integration of application layers with each other. The test class looks like this:
@RunWith(SpringJUnit4ClassRunner.class)
@WebAppConfiguration
@ContextConfiguration({
        "file:src/main/webapp/WEB-INF/spring/mvc-config.xml",
        "classpath:spring/app-dao-config.xml",
        "classpath:spring/test-db-config.xml"
     })
public class AllControllerTest {

     @Autowired
     private PersonsController personsController;

     @Before
     public void setUp(){
         //we are making sure the controller was initialized correctly
         assertNotNull(personsController);
     }

     @Test
     public void list() {
         Model model = new BindingAwareModelMap();
         String view = personsController.list(model);
         assertEquals("persons/list", view);
         assertNotNull(model.asMap().get("persons"));

         // test to see id the manager returned the expected result
         assertTrue(((List<Person>) model.asMap().get("persons")).size() == 16);
    }
}
The WebAppConfiguration annotation makes sure that the context in which the test methods in this class are run is WebApplicationContext. The root path of the web application is set using this annotation, and the default value for it is the one consecrated by Maven "src/main/webapp". There are other ways of initializing a test web context or even for mocking one using MockMvc, which is the main entry point for server-side Spring MVC test support. Other test libraries can be used to fully test a controller and all objects involved in handling a request. For example, Hamcrest, a testing library that offers a lot of useful methods named matchers test the type of expected params, attribute values, results, and so forth.14
@RunWith(SpringJUnit4ClassRunner.class)
@WebAppConfiguration
@ContextConfiguration({"file:src/main/webapp/WEB-INF/spring/mvc-config.xml",
        "classpath:spring/app-dao-config.xml", "classpath:spring/test-db-config.xml"})
public class HospitalsControllerTest {

    @Autowired
    private WebApplicationContext wac;

    private MockMvc mockMvc;

    @Before
    public void setUp() {
        assertNotNull(wac);
        this.mockMvc = MockMvcBuilders.webAppContextSetup(this.wac).build();
    }

    @Test
    // test all aspects handling a request to "/hospitals/
    public void list() throws Exception {
        mockMvc.perform(get("/hospitals/"))
                // test if response status is 200
                .andExpect(status().isOk())

                // test if the attribute "hospital" was added to the model
                .andExpect(model().attributeExists("hospitals"))

                //when using Tiles, we can test the forward of the request to
                //the template for the page
                .andExpect(forwardedUrl("/WEB-INF/templates/layout.jsp"));
   }
    @Test
    //test a method returning "redirect:/persons/list"
    // (all persons born at the hospital with code =134181)
   public void listp() throws Exception {
       mockMvc.perform(get("/hospitals/134181"))
        // test if response status is 302
        .andExpect(status().isFound())

        //test if the "persons" attribute was added to the redirectAttributes model
        .andExpect(flash().attributeExists("persons"))

        // test if the redirect request is sent to the expected URL
        .andExpect(redirectedUrl("/persons/list"));
    }
}
These are the Spring MVC flavors presented in the book; choose whichever you feel most comfortable with.
Handler Interceptors
Handler interceptors are very useful for adding common functionality for all controllers inside an application. For example, a handler interceptor in an application could be used to audit requests, or to monitor the execution time of handler methods, or to generate performance reports. The most obvious examples for the use of an interceptor are internationalization, validation of data in the request, and request data convertors. Security checks could also be executed by a handler interceptor to give or restrict access to a handler method.
When using REST, a special interceptor of type JsonViewResponseBodyAdvice can be used to customize the response before the JSON serialization with MappingJackson2HttpMessageConverter.
The handler interceptors are beans in the application context. A handler interceptor class must implement the HandlerInterceptor interface and provide concrete implementation for any of the methods that the user is interested in:
- preHandle: Called after the HandlerAdapter has identified the handler method and before its invocation. This method controls the execution of other interceptors in the chain and the handler method by returning a Boolean value.
- postHandle: Called after the HandlerAdapter invokes the handler method and before the DispatcherServlet renders the view (can add extra objects to the model).
- afterCompletion: Called after the request has processed and the view has rendered.
This method is called regardless of the outcome of the handler method call; it can be used for resources cleanup (behavior similar to a finalize method).
The interceptors that modify the response before serialization must implement ResponseBodyInterceptor and provide an implementation for the beforeBodyWrite method. (This is covered in more detail in Chapter 5.
When personalizing the application with locale and theme, the LocaleChangeInterceptor and ThemeChangeInterceptor are configured like this:
<!-- XML -->
 <mvc:interceptors>
        <bean class="o.s.web.servlet.i18n.LocaleChangeInterceptor"/>
        <bean class="o.s.web.servlet.theme.ThemeChangeInterceptor"/>
 </mvc:interceptors>

//Java Configuration
//in the @Configuration and @EnableWebMvc annotated class
@Override
public void addInterceptors(InterceptorRegistry registry) {
    registry.addInterceptor(localeChangeInterceptor());
    registry.addInterceptor(themeChangeInterceptor());
}

@Bean
public LocaleChangeInterceptor localeChangeInterceptor(){
    return new LocaleChangeInterceptor();
}

@Bean
public ThemeChangeInterceptor themeChangeInterceptor(){
    return new ThemeChangeInterceptor();
}
Both interceptors use their preHandle method to set locale and theme values on the appropriate resolvers.15
Users can also create their own interceptors; in 02-pr-mvc-basic-solution the AuditInterceptor is given as an example.
@Component
public class AuditInterceptor extends HandlerInterceptorAdapter {
@Override
public boolean preHandle(HttpServletRequest request,
     HttpServletResponse response, Object handler)
throws Exception {
     // custom implementation here
      return true;
}

@Override
public void postHandle(HttpServletRequest request,
     HttpServletResponse response, Object handler, ModelAndView modelAndView)
         throws Exception {
      // custom implementation here
}

@Override
public void afterCompletion(HttpServletRequest request,
      HttpServletResponse response, Object handler, Exception ex)
        throws Exception {
      // custom implementation here
}
}
To enable this interceptor, you have to configure it in the context. The following snippets show how this can be done in XML and using Java configuration:
<!-- XML -->
<mvc:interceptors>
   <bean class="com.pr.interceptor.AuditInterceptor"/>
</mvc:interceptors>

//Java Configuration
//in the @Configuration and @EnableWebMvc annotated class
@Override
public void addInterceptors(InterceptorRegistry registry) {
    registry.addInterceptor(auditInterceptor());
}

@Bean
public AuditInterceptor auditInterceptor(){
    return new AuditInterceptor();
}
The schema in Figure 3-9 displays what happens “behind the scenes” when a handler interceptor is used in a Spring MVC application.
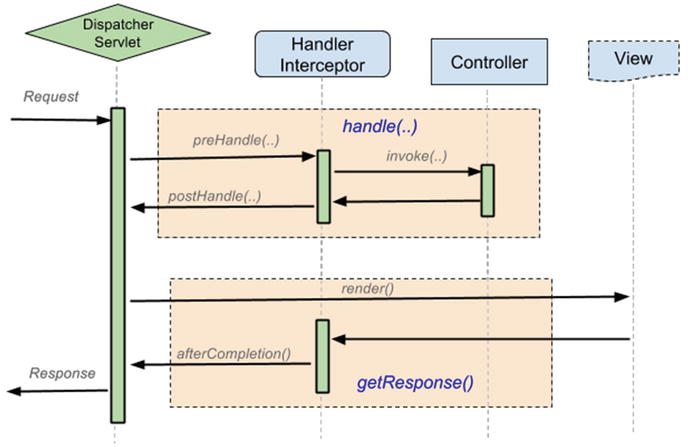
Figure 3-9. Handler Interceptor methods and places where invoked
Again, Spring MVC was designed to be as view agnostic as possible. Most web applications generate HTML content. The “ViewResolver” section mentions how a Spring web application can generate other types of content, such as PDF, Excel, or JSON. The complete list of view technologies that Spring supports is far longer than this. To put it in perspective, anything that provides a ViewResolver and a View implementation is compatible with Spring.
Based on the type of content being generated, the views can be categorized as follows:
- Display views: The response is an HTML page generated using a template: JSP, Tiles, Thymeleaf, FreeMarker, or Velocity.
- File-generating views: The response is an output file when rendered and it is automatically downloaded by the browser: Apache POI, JExcelApi (Excel), IText (PDF), JasperReports, or XSLT transformation.
- Data-delivery views: The response is actually just data and it is meant to be used with AJAX and web services: JSON, Java-XML Marshalling, Atom, and RSS.
This book covers Tiles and Thymeleaf. Tiles is in the official certification course. Thymeleaf is a bonus section that was added because it is the newest template engine in the web development world (its “birth” year was 2014) and it is quite a promising technology. Its goal is to provide templates that are easy to use and extend. It works in web and non-web environments.
![]() ! The book-code module 03-chapter-07-solution covers all three categories of the views mentioned. Take a look at it before advancing to the next section.
! The book-code module 03-chapter-07-solution covers all three categories of the views mentioned. Take a look at it before advancing to the next section.
A web application of composed of more html pages which have a common structure, typically a header/footer, a menu for navigation, and a section with the actual content of the page. The header, footer, and navigation menu are usually the same on every page and they can separate from the contents of a page in their own files to be reused every time a new page is created. If you were working with JSP, the files header.jsp, footer.jsp, and menu.jsp would be included in every page by using <jsp:include page=..."/>. This means three repetitive include statements in every page.
A more practical approach is to create a page template that contains common page elements and placeholders for dynamic content, similar to what is depicted in Figure 3-10. The placeholders are replaced at rendering time with whatever is needed (usually subviews).16

Figure 3-10. Reusable page template
Doing this with only plain JSP is not an option. There are currently multiple ways available to do it. But the one that was interesting for the Spring creators is Apache Tiles.
Apache Tiles is an open source template engine framework that was a part of the currently deceased Apache Struts 1. It is based on the Composite View pattern and was built to simplify the development of user interfaces. To use tiles in a Spring web application, you have to do the following:
- Define template layout for the pages.
- Configure tiles definitions in tiles.xml file(s).
- Configure the tiles resolver bean.
Apache Tiles 3.0.5, which is the version used for the code samples, is the most recent stable release at the time this book was written.
Define Page Templates
A simple template layout, matching the page representation in Figure 3-10, is as simple as this:
...
<%@ taglib prefix="tiles" uri="http://tiles.apache.org/tags-tiles" %>
...
<!-- /WEB-INF/templates/layout.jsp -->
<head>
        <tiles:insertAttribute name="pageTitle"/>
</head>
<body>
        <div class="header">...</div>
        <div class="menu">...</div>
        <div class="content">
              <tiles:insertAttribute name="content"/>
        </div>
        <div class="footer">...</div>
</body>
Configure Tiles Definitions
The tiles.xml files are Tiles configuration files, which define the structure of a page using XML. One or more tiles definitions can be in the same file; it is recommended to store the configuration file and the pages configured in the same directory, as shown in Figure 3-11.

Figure 3-11. Tiles configuration files and templates positioning in the application structure
Tiles definitions are reusable fragments consisting of a template and attributes. Inheritance is possible using the extends attribute. A tile definition element looks like this:
<!DOCTYPE tiles-definitions PUBLIC
        "-//Apache Software Foundation//DTD Tiles Configuration 3.0//EN"
        "http://tiles.apache.org/dtds/tiles-config_3_0.dtd">

<tiles-definitions>
    <definition name="layout" template="/WEB-INF/templates/layout.jsp"/>
</tiles-definitions>
This example is called a base tile because every other definition extends it. Without this tile definition, every other tile definition in your project has to be configured with the template attribute, underlined in the preceding example.
The extended version of the layout.jsp is quite big, and some parts are replaced by “...”. To view its real and full content, please see the 03-pr-mvc-layout-practice project.
...
<%@ taglib prefix="tiles" uri="http://tiles.apache.org/tags-tiles" %>
...
<!-- /WEB-INF/templates/layout.jsp -->
<head>
...
   <title>
        <spring:message>
            <tiles:insertAttribute name="pageTitle"/>
        </spring:message>
   </title>
</head>
...
<div class="page">

    <!-- The header is actually a png image banner,
        that will be loaded depending on the chosen theme-->
    <div class="banner"></div>

    <!-- section to select Locale and Theme -->
    <div class="themeLocal"> ...</div>

    <!-- section with the navigation menu, dynamic data
    The menu item is modified to display the current page
    based on the value for the menuTab attribute -->
    <div class="menu">
     <ul>
            <li><c:if test="${menuTab eq 'home'}">
                <strong>
                  <a href="<c:url value="/"/>"><spring:message code="menu.home"/></a>
                </strong>
             </c:if>
                 <c:if test="${menuTab != 'home'}">
                     <a href="<c:url value="/"/>"><spring:message code="menu.home"/></a>
                 </c:if>
            </li>
            ...
     </ul>
   </div>

    <!-- Dynamic data - body of the page -->
   <div class="content">
       <tiles:insertAttribute name="content"/>
   </div>

   <div class="footer">
       <p><spring:message code="footer.text"/></p>
   </div>
This is what a simple tile definition that extends the base tile looks like:
<definition name="home" extends="layout">
    <put-attribute name="pageTitle" value="home.title"/>
    <put-attribute name="content" value="/WEB-INF/home.jsp"/>
    <put-attribute name="menuTab" value="home" />
</definition>
The tiles attributes are the placeholders for dynamic data; the gaps in the template need to be filled. The following can be an attribute:
- A string that will be rendered or used as it is.
- A template with or without attributes that need to be filled to render the page.
- A tile definition with all (some) attributes filled.
![]() ? In the code sample, can you identify which of these types of tiles attributes were used?
? In the code sample, can you identify which of these types of tiles attributes were used?
Accessing tiles attributes in JSP is done using the tag provided by tiles:
- <tiles:insertAttribute/>: The standard approach to insert the value of an attribute into a page17
- <tiles:importAttribute/>: This is used to add attributes to model (it works only with Spring)18
In the following example, the menuTab attribute is used for navigation in the application. Each tile definition sets a different value for that attribute. The value is tested and the menu navigation option matching the current page is displayed in bold text.
...
<tiles:importAttribute name="menuTab" />
<c:if test="${menuTab eq 'home'}">
   <!-- show the home menu option with bold text -->
</c:if>
Configure the Tiles Resolver Bean
Spring MVC provides out-of-the-box support for Apache Tiles. There is a TilesView to interpret logical view names as tiles definitions. There is a TilesViewResolver bean to resolve views and a class named TilesConfigurer to bootstrap Tiles with a set of configuration files.
<!-- Resolves view names to Tiles 3 definitions -->
<bean id="tilesViewResolver"
      class="org.springframework.web.servlet.view.tiles3.TilesViewResolver"/>

<!-- Configures Tiles 3 -->
<bean id="tilesConfigurer"
     class="org.springframework.web.servlet.view.tiles3.TilesConfigurer">
         <property name="definitions">
             <list>
                  <value>/WEB-INF/tiles.xml</value>
                  <!-- add more tiles definition files if present -->
             </list>
         </property>
</bean>
The equivalent Java configuration looks like this:
// In the @Configuration and @EnableMvc annotated class
@Bean
    TilesViewResolver tilesViewResolver(){
        return new TilesViewResolver();
    }

    @Bean
    TilesConfigurer tilesConfigurer(){
        TilesConfigurer tilesConfigurer = new TilesConfigurer();
        tilesConfigurer.setDefinitions("/WEB-INF/tiles.xml");
        // add more tiles definition files if present
        return tilesConfigurer;
}
This code sample replaces the InternalResourceViewResolver with TilesViewResolver. The InternalResourceViewResolver can be configured for plain *.jsp files too, but do not forget to set the order property and/or configure a content negotiating resolver.
![]() ! The module 03-pr-mvc-layout-practice of the Personal Records Manager project covers Tiles definitions and their usage with Spring MVC. Further details are presented in the practice section of this chapter, but you can take a look at the 03-pr-mvc-layout-solution if you cannot wait to see the Tiles in action.
! The module 03-pr-mvc-layout-practice of the Personal Records Manager project covers Tiles definitions and their usage with Spring MVC. Further details are presented in the practice section of this chapter, but you can take a look at the 03-pr-mvc-layout-solution if you cannot wait to see the Tiles in action.
Thymeleaf
When asked why he decided to create another template engine, because there were already quite a few available, co-creator Daniel Fernandez said this on the Thymeleaf official forum:19
In my humble opinion, Spring MVC 3 is a fantastic web framework tied to a horrible, extremely old and spaghetti-code-loving template engine: JSP. That’s why I wanted the combination of Spring MVC with Thymeleaf to really shine. In some ways I suppose I wanted to give Spring MVC the template engine it deserved. Not from the performance point of view (matching the speed of JSPs, which run in specialized containers, would be very difficult), but more from the points of view of code elegance, readability, and design/coding separation of concerns. Also, I wanted to provide first-class support for the emerging HTML5 standard.
The underlined text in Fernandez’s reply should interest any developer. Thymeleaf is not a certification exam subject, so it can be skipped. But Thymeleaf is nevertheless a practical alternative to JSP, and the SpringSource team fancies it quite a bit, so knowing how to configure it and use it could be useful in the future.
Both Spring and Tiles come with an attribute set that you can use to write your page templates. Thymeleaf is more flexible because it allows you to define a set of template attributes or even tags with the names that you want and with the logic that you want. So it is not just a template engine, it is a framework. Something called standard dialects are offered: Standard and SpringStandard, which contain all you might need to create a page template. You can recognize them in a page because they are prefixed with "th:". The two dialects are almost identical, but the one created for Spring has additional capabilities for integrating into Spring MVC applications (it supports SpEl , the Spring expression language).
Most Thymeleaf attributes allow their values to be set as or containing expressions called Standard Expressions, which can be of the following types:
- Variable expressions
<td th:text="${person.firstName}"></td>
<!-- or -->
<tr th:each="person : ${personList}"> - Selection or asterisk expressions: These are executed on a previously selected object instead of the entire context variables map.
<div th:object="${person}">
                <p th:value="*{firstName} *{lastName}"></p>
</div> - Text externalized expressions (internationalization expressions) used to retrieve locale specific messages from external sources (*.properties files). They even accept parameters.
<tr>
    <td th:text="#{person.label.firstname} & #{person.label.lastname}</td>
    <!-- or -->
    <td th:text="#{person.created(${id})}"</td>
</tr> - URL expressions used to generate session- and context-specific URIs (equivalent to <spring:url/> and <c:url/>).
<img alt="Simple tymeleaf application" title="logo"
                        th:src="@{/images/banner.png}"/>
<form th:action="@{/createPerson}">
<a href="show.html" th:href="@{/persons(id=${person.id})}">
Thymeleaf allows HTML attributes so that templates can link to each other nicely when opened directly in a browser, outside the context of the application, in the same way that Thymeleaf attributes link to each other when executed in the context of a web application. In the previous example, if you want to view your template before deploying the application, you can open the file in a browser and the th:href will be replaced by the values of the static href.
Considering the following Thymeleaf template:
...
<h4>
    Welcome to the sample page with Spring MVC and Thymeleaf!
    <br/>
    Here is a list of random persons:
</h4>

<div class="content" th:if="${not #lists.isEmpty(personList)}">
    <table>
        <thead>
        <tr>
            <td>Cnt.</td>
            <td>First Name</td>
            <td>Last Name</td>
        </tr>
        </thead>
        <tbody>
        <tr th:each="person,iterationStatus : ${personList}">
            <td><a th:text="${iterationStatus.count}" href="show.html"
                      th:href="@{/persons(id=${person.id})}">1</a></td>
            <td th:text="${person.firstName}">John</td>
            <td th:text="${person.lastName}">Smith</td>
        </tr>
        </tbody>
    </table>
</div>
...
In Figure 3-12 you can see what the page looks like when opened in the browser outside the application context.

Figure 3-12. Thymeleaf template page opened in the browser outside the application context
In the application context, all the Thymeleaf expressions are resolved and the resulting page looks like the one shown in Figure 3-13.

Figure 3-13. Thymeleaf template page opened in the browser in the application context
The URL expression th:href="@{/persons(id=${person.id})} turns into a URL with a request parameter; for example, .../persons?id=4. To generate a URI, .../persons/4 the expression has to be modified to this:
th:href="@{/persons/ ${person.id}__}".
The notions presented here are the minimum necessary to create a Thymeleaf simple template. The 03-chapter-08-solution module in the book-code project is a perfect example of how simple it is to create a Thymeleaf template to display a list of persons. All that is left now is to explain how Thymeleaf can be integrated with Spring.
Thymeleaf integrates with both Spring 3.x and Spring 4.x and uses two separate libraries, which are packaged in separate *.jar files: thymeleaf-spring3-{version}.jar and thymeleaf-spring4-{version}.jar. As this book is being written, the most current version of Thymeleaf is 2.1.4.RELEASE. The library corresponding to the Spring version used needs to be added to the classpath together with the thymeleaf.jar. Thymeleaf offers a set of Spring integrations equivalent to the ones in JSP:
- Spring SpEl can be used in Thymeleaf templates
- It creates forms in templates that are completely integrated with form-backing beans and result hidings
- It displays internationalization messages from message files managed by Spring via MessageSource
To integrate Thymeleaf with Spring, you need to define the following:
- The view resolver bean of type ThymeleafViewResolver
- The Thymeleaf engine bean of type SpringTemplateEngine used to handle the Thymeleaf expressions
- The template resolver bean of type ServletContextTemplateResolver used to configure the location and type of templates that the other beans are expected to work with
<bean id="templateResolver"
          class="org.thymeleaf.templateresolver.ServletContextTemplateResolver">
      <property name="prefix" value="/WEB-INF/persons/" />
      <property name="suffix" value=".html" />
      <property name="templateMode" value="HTML5" />
      <!-- Template cache is true by default. Set to false if you want -->
      <!-- templates to be automatically updated when modified. -->
      <property name="cacheable" value="true" />
</bean>
 <bean class="org.thymeleaf.spring4.view.ThymeleafViewResolver">
      <property name="templateEngine" ref="templateEngine" />
      <property name="order" value="1"/>
</bean>

<bean id="templateEngine" class="org.thymeleaf.spring4.SpringTemplateEngine">
      <property name="templateResolver" ref="templateResolver" />
</bean>
And this is all. If you would like to use Thymeleaf in your future projects, you can find all the information you need on their official site at http://www.thymeleaf.org. Also, before continuing to the next section, you might want to run and take a look at the 03-chapter-08-solution module.
Forms
Starting with version 2.0, Spring provides a set of specialized tags for handling form elements when using JSP and the Spring Web MVC. Each tag provides support for a set of attributes matching the ones in the corresponding HTML element, which makes Spring quite easy for the user. The Spring tag library is integrated into Spring MVC, which allows the tags to have access to the command object and model.
The Spring tag library is inside the spring-webmvc.jar. To use the tags in a JSP page, the following directive must be added on top of the JSP page:
<%@ taglib prefix="sf" uri="http://www.springframework.org/tags/form" %>
The "sf" prefix is short for spring form. Any prefix can be used, but in this book, "sf" was chosen because it is short and its meaning is quite obvious. The "spring" prefix will be used for Spring-specific tags that are not related to forms (internationalization and URL generation).
In the examples attached to this chapter, you create forms to edit and to search for a person. A form for editing a person is depicted in Figure 3-14.

Figure 3-14. Form used to edit a Person
The Spring form tag library provides equivalent elements for the HTML elements needed to design a form, annotations for data binding and data validation, and tools for error processing. The code that creates form follows Figure 3-14.