
![]()
Spring Web Flow
As time went by, and more and more services could remotely use web applications, the web applications became more complex—and designing and implementing them became a cumbersome process. Most applications imply creating objects and passing them through several states, or creating objects depending on each other. Spring Web Flow (SWF) is a component of the Spring Framework’s web stack that was created to help develop complex applications by reducing the difficulty in development.
The Spring Web Flow complements the @Controller model and provides the infrastructure needed to build complex web applications that support controlled page navigation and state transition; all of this adds up to a rigorously defined conversation between the end user and the application. It is possible to write such applications with any other web technology, but the definition of a flow is interconnected with the rest of the web components; it is scattered all over the implementation, which makes refactoring and maintenance a real pain. What Spring Web Flow brings to the table is the possibility to define flows as separate components detached from the rest of the implementation—web-specific classes and views. The flow components can be defined and used similar to the way beans are used in Spring. Flow definitions can be inherited, thus implementing flow hierarchies. Flows can be reused and customized as needed.
As this book being is written, the current version of Spring Web Flow is the 2.4.2.RELEASE,1 so this is the version added as a dependency for the Web Flow chapter sources. This version includes the ability to configure flows using Java Configuration and many other features.
The main library is called spring-webflow. When building the project for the first time, the spring-js and spring-binding transitive dependencies should be downloaded too.
What Is a Flow?
A flow models the sequence of steps necessary to perform a task. The most common and simple flow example is ordering items on the Internet. This operation requires the following steps in which the user is guided through: choose item, proceed to checkout, create an account or log in to your account, insert shipping detail, insert payment details, and approve payment to complete the process. Each failure to provide the correct information stops the user from advancing to the next step. If the user wants to go back and review a previous screen, he can do so, unless configured otherwise. But there are web operations that depend on the data received from the user to direct them from one flow to another.
By using the Personal Records Manager at the completion of this chapter, you will be able to create an account and personal data for a person. This operation requires you to design a flow that executes the following steps:
- Insert personal data.
- If the hospital where the user was born is in the system, select it.
- Otherwise, the user is directed to the page where he can create a Hospital instance.
- Return to the previous step and complete creating the Person instance.
- Insert IdentityCard data.
- Review data.
- If the person is an adult (age > 18), add an account.
These steps are depicted in Figure 7-1.

Figure 7-1. Personal Records Manager web flow
In Spring Web Flow, a flow consists of a series of steps called states. A flow will always have only one start point and one or more end points. Leaving one state and passing into another can be restricted by the result of a conditional expression. Entering a new state usually results in a view being displayed to the user. The user works with the view, causing user events to occur. The user events trigger transitions between states, which in turn cause navigation to another view.
Aside from making development easier and clearer, Spring Web Flow was created to solve the following problems related to complex web navigation:
- Duplicate submissions.
- Pop-up window support within a flow.
- State synchronization problems between the server and the client caused by using the browser’s back and refresh buttons.
- State collisions between windows.
- Stale session state. (A session can end up containing inactive data, when a timeout is set. The inactive items must be precisely identified and purged.)
- Short-circuiting navigation rules. (Possibility to jump over steps in the navigation, depending on navigation conditions.)
Web Flow Architecture
In Spring Web Flow, flows are defined using an XML-based flow definition language. The backing classes follow the model already established by Spring MVC. Spring Web Flow provides its own classes to identify handler methods matching flow execution requests and resolving views. The DispatcherServlet is still the front controller when the application is servlet based. For implementation with portlets, there is an analogous implementation provided with DispatcherPortlet(s) as entry points. The similarities with the Spring MVC model can be observed in Figure 7-2.

Figure 7-2. The Spring Web Flow backing classes
The FlowController class is the adapter between the Spring MVC Controller layer and the Spring Web Flow engine. Its responsibility is to provide implementation so that Spring Web Flow can run embedded as a controller within a DispatcherServlet. So basically, the FlowController is itself a front controller for Spring Web Flow.
The FlowHandlerMapping maps all flow requests to the appropriate handlers using FlowDefinitionRegistry. The FlowHandlerAdapter takes care of executing the flow handler methods in a servlet environment using the FlowExecutor implementation.
After they do their jobs, the DispatcherServlet uses the FlowViewResolver interface to resolve a view from the state of an executing flow.
When working with flows, each flow definition is declared in a specific configuration file and is registered in the system by the FlowDefinitionRegistry. For each flow in the system, a configuration file is created and placed in the same directory with all resources implied in the flow execution: views templates, property files, and others. In Figure 7-3, you can see how the files are organized in the practice project for this chapter.

Figure 7-3. Personal Records Manager web flow configuration file and resources
The newPerson-flow.xml configuration file contains the states that the users are directed through to create a new person. For now, the empty file is presented containing only the Spring Web Flow namespace used to define flow elements:
<?xml version="1.0" encoding="UTF-8"?>
<flow xmlns="http://www.springframework.org/schema/webflow"
      xmlns:xsi="http://www.w3.org/2001/XMLSchema-instance"
      xsi:schemaLocation="http://www.springframework.org/schema/webflow
        http://www.springframework.org/schema/webflow/spring-webflow.xsd">

    <!-- states and actions will be placed here later -->
</flow>
The flows are exposed to the client as web resources. The client starts flows by accessing these resources. For example, accessing http://localhost:8080/webflow-basic/persons/newPerson starts the newPerson flow. (The reason the URL has that particular structure is explained later.) Starting a flow actually means starting a new flow execution, meaning an execution context for the task currently in progress is created. The execution context is user session-scoped, meaning all the variables and data needed for the execution of the task is kept in the user session, unless an execution step requires otherwise. (Sometimes data can be saved to the database and removed from the session.)
Web Flow Internal Logic
When the flow starts executing, you can use the URL changing to
http://localhost:8080/webflow-basic/persons/newPerson?execution=e1s1
The parameter execution is the session-scoped execution key. Its value contains the flow execution identifier (e1) and the identifier of the execution step that is currently in progress (s1). Every time the flow progresses a step, the step identifier is incremented. Every time a new flow execution is started, the execution identifier is incremented.
A user resumes flow executions by clicking buttons in the interface—buttons (or links) that have events associated with them using the name property. For example:
<button id="newPersonButton" name=" eventId proceed" type="submit">
     <spring:message code="command.proceed" />
</button>
So when the button with the newPersonButton id is clicked, a request is sent to the URL.
.../persons/newPerson?execution=e1s1&_event_id=proceed
The data provided by the user is bound to the flow context. The flow handles the event, processes the data as defined, and decides what to do next based on the definition of the flow: display a new view to the user, display the same view, and remain in the same step of execution if validation failed or ends the flow. When a flow execution has ended, the execution cannot be resumed; this implies that the transaction cannot be completed multiple times. After a flow execution ends, the flow state is automatically cleaned.
The interaction between a client and a flow always consists of two separate steps: the client will request a resource or activate (trigger) an event and the flow will redirect to the appropriate state. This means that each web flow interaction involves two requests: the client request and the flow redirect request. This has another implication: the data submitted by the initial request will not be available after the redirecting is done and the next view has already been rendered. But there are ways of persisting the data across requests when using web flows; this is covered later in the chapter. In Figure 7-4, the interaction between the client and a flow is displayed.

Figure 7-4. Schema of an interaction between the client and a flow
Configuration and Infrastructure Beans
Spring provides two ways of configuring the environment in which the web flow components can be used: using an the XML namespace and defining the infrastructure beans in an webflow-config.xml file, or using Java Configuration annotations by defining a configuration class that extends a specific Spring class.
![]() ! The configuration file can be named in whatever way the developer desires, as long as it is relevant in the context of the developed application. The beans can be defined in any other Spring configuration file already existing in the application; but the recommended approach and best practice is to keep infrastructure beans definitions grouped by their purpose. In the application used for practice with this book, the beans are grouped as follows:
! The configuration file can be named in whatever way the developer desires, as long as it is relevant in the context of the developed application. The beans can be defined in any other Spring configuration file already existing in the application; but the recommended approach and best practice is to keep infrastructure beans definitions grouped by their purpose. In the application used for practice with this book, the beans are grouped as follows:
- MVC infrastructure beans in mvc-config.xml
- Application custom beans in app-config.xml
- Web Flow infrastructure beans in webflow-config.xml
- Security infrastructure beans in security-config.xml
When configuring an application that uses Web Flow, there are roughly three steps that have to be covered:
- A flow executor and a flow registry bean have to be defined and configured to match the structure of the application so that the flows can be executed correctly by Spring Web Flow.
- A flow adapter and a flow mapping bean have to be defined and added to the list of existing handler mapping and handler adapter beans for the Spring MVC configuration to enable flow handling by Spring MVC.
- An MvcViewFactoryCreator bean has to be created and configured to use the bean view resolvers already defined in the application.
The following two sections cover how this is done when using XML and Java Configuration.
Configuration Using XML
As mentioned in previous chapters, the Spring MVC configuration infrastructure beans are defined in the examples of this book into a file named mvc-config.xml. In this file, FlowHandlerMapping and FlowHandlerAdapter bean definitions have to be added:
<?xml version="1.0" encoding="UTF-8"?>
<beans xmlns="http://www.springframework.org/schema/beans"
       xmlns:xsi="http://www.w3.org/2001/XMLSchema-instance"
       xmlns:mvc="http://www.springframework.org/schema/mvc"
       xmlns:p="http://www.springframework.org/schema/p"
       xsi:schemaLocation="http://www.springframework.org/schema/mvc
       http://www.springframework.org/schema/mvc/spring-mvc.xsd
                http://www.springframework.org/schema/beans
                http://www.springframework.org/schema/beans/spring-beans.xsd">

  <mvc:annotation-driven
   conversion-service="typeConversionService"
   validator="validator"/>

  <bean id="validator"
  class="org.springframework.validation.beanvalidation.LocalValidatorFactoryBean"/>

<!-- Define a custom ConversionService -->
   <bean id="typeConversionService"
     class="o.s.format.support.FormattingConversionServiceFactoryBean">
     ...
     </bean>

<!-- other Spring MVC specific beans, look in Chapter 3 for reference -->
...
 <!-- Maps requests to flows in the flowRegistry; e.g. a path of
    /persons/newPerson looks for a flow with id "persons/newPerson" -->
    <bean id="flowMappings"
      class="org.springframework.webflow.mvc.servlet.FlowHandlerMapping"
           p:order="-1"
           p:flowRegistry-ref="flowRegistry"/>

    <!-- Dispatches requests mapped to flows to FlowHandler implementations -->
    <bean class="org.springframework.webflow.mvc.servlet.FlowHandlerAdapter"
        p:flowExecutor-ref="flowExecutor"/>

</beans>
In the previous example, because <mvc:annotation-driven/> is used, the annotation-driven Spring MVC Controller programming model is automatically enabled, and no other HandlerMapping implementation needs to be defined. However, the FlowHandlerMapping must be the first HandlerMapping implementation used to try to retrieve a mapping to make sure that the flow is identified correctly; that’s why order="-1" is used to set the highest priority in the handler mappings list. This class returns null in the case of no flow id match, allowing the next handler mapping in the chain to execute.
In the webflow-config.xml file, the Spring Web Flow–specific beans are defined and the specific namespace are used:
<?xml version="1.0" encoding="UTF-8"?>
<beans xmlns="http://www.springframework.org/schema/beans"
    xmlns:xsi="http://www.w3.org/2001/XMLSchema-instance"
    xmlns:webflow="http://www.springframework.org/schema/webflow-config"
    xsi:schemaLocation="
      http://www.springframework.org/schema/beans
      http://www.springframework.org/schema/beans/spring-beans.xsd
      http://www.springframework.org/schema/webflow-config
    http://www.springframework.org/schema/webflow-config/spring-webflow-config.xsd">

    <!-- Executes web flows -->
    <webflow:flow-executor id="flowExecutor" flow-registry="flowRegistry" />
    <!-- Contains the flows defined by this application -->
    <webflow:flow-registry id="flowRegistry" base-path="/WEB-INF"
         flow-builder-services="flowBuilderServices">
         <webflow:flow-location-pattern value="**/*-flow.xml" />
    </webflow:flow-registry>

    <!-- Configures services needed to build flow definitions -->
    <webflow:flow-builder-services id="flowBuilderServices"
          view-factory-creator="mvcViewFactoryCreator"
           conversion-service="conversionService"
           development="true" />

    <!-- Configures Web Flow to render Tiles views resolved by Spring MVC -->
    <bean id="mvcViewFactoryCreator"
       class="org.springframework.webflow.mvc.builder.MvcViewFactoryCreator">
        <property name="viewResolvers" ref="tilesViewResolver" />
        <property name="useSpringBeanBinding" value="true"/>
    </bean>

    <!-- Configures Web Flow to automatically convert custom types
         (using the same converter as for Spring MVC) -->
    <bean id="conversionService"
       class="org.springframework.binding.convert.service.DefaultConversionService">
       <constructor-arg ref="typeConversionService" />
    </bean>

</beans>
The Spring webflow-config namespace provides XML elements that make defining Spring Web Flow components more practical and more readable for the user, but a more detailed explanation is needed for the preceding configuration.
- flowExecutor: This bean created is of type FlowExecutorImpl and it uses the flowRegistry bean to identify all flows eligible for execution. This bean is the entry point into the Web Flow system, as it manages starting and resuming flow executions. When an executor bean is created, Spring automatically looks for a flow registry bean named flowRegistry, so the preceding definition can be simplified to
<webflow:flow-executor id="flowExecutor"/>Also, because this is the central bean of the Spring Web Flow engine, listeners can be registered for it to verify rights to perform specific execution steps or audit the execution steps for debugging purposes.
<webflow:flow-executor id="flowExecutor">
    <webflow:flow-execution-listeners>
        <webflow:listener ref="secureFlowExecutionListener" />
        <webflow:listener ref="auditFlowExecutionListener" />
    <webflow:flow-execution-listeners>
</webflow:flow-executor>
    ...
<bean id="secureFlowExecutionListener"
  class="org.springframework.webflow.security.SecurityFlowExecutionListener"/>
<bean id="auditFlowExecutionListener"
     class="com.pr.audit.AuditFlowExecutionListener"/>
![]() ! The flow execution listeners can be configured to be applied only on certain flows; for example:
! The flow execution listeners can be configured to be applied only on certain flows; for example:
<webflow:listener ref="secureFlowExecutionListener"
  criteria="administrativeFlow1, administrativeFlow2"/>
The flowExecutor can be configured to tune flow execution persistence settings by adding a customized definition for flow-execution-repository.
<webflow:flow-executor id="flowExecutor" flow-registry="flowRegistry">
<webflow:flow-execution-repository max-executions="5"
   max-execution-snapshots="30" />
</webflow:flow-executor>
The max-executions property is used to configure the maximum number of persistent flow executions allowed per user session. When the maximum number of executions is exceeded, the oldest execution is removed.
The max-execution-snapshots property is used to configure the maximum number of history snapshots allowed per flow execution. History snapshots enable browser Back button support. When snapshotting is disabled, pressing the browser Back button will not work. It will result in using an execution key that points to a snapshot that has not been recorded.
- flowRegistry: Each flow definition registered in this registry bean is assigned a unique identifier. The base-path property is used specify the root directory, under which all the flow definition files are found; usually this is the WEB-INF directory. The flow-location-pattern further narrows the search for the flow definitions, providing a wildcard template file name for the flow definition files. But flow definitions can be also registered one at a time using flow-location elements. For example:
<webflow:flow-registry id="flowRegistry" base-path="/WEB-INF"
     flow-builder-services="flowBuilderServices">
    <webflow:flow-location path="persons/newPerson/newPerson-flow.xml"/>
</webflow:flow-registry> - flowBuilderServices: This bean registers custom implementations of services needed to build flow definitions: view resolvers, data convertors, formatters, validators, and others. In version 2.4.0.RELEASE, the validation-hints were added, so flow definition can apply partial validation on the model through the validation-hints attribute supported on view state and transition elements. This bean was modified to add a property named validation-hint-resolver that can be used to set a custom validation hints resolver. (An example is presented later in the book.)
![]() ! The development="true" is quite important, because as you will solve the practice exercises, you might not want to restart the application every time you make a change to a flow definition. Setting the development property to "true" ensures that changes to a flow definition is autodetected and results in a flow refresh.
! The development="true" is quite important, because as you will solve the practice exercises, you might not want to restart the application every time you make a change to a flow definition. Setting the development property to "true" ensures that changes to a flow definition is autodetected and results in a flow refresh.
- mvcViewFactoryCreator: This bean is used by a FlowBuilder to configure a flow’s view states with Spring MVC–based view factories. In this case, the tiles view resolver is injected into it, so it can be used to resolve view states using it. The useSpringBeanBinding property is set to “true” to enable the same binding system used by the Spring MVC in a Web Flow environment.
- conversionService: This bean is a wrapper for the conversion service bean used by Spring MVC, which is provided to the flowBuilderServices bean to be used during a flow execution.
Configuration Using Annotations
For the 09-pr-webflow-basic-practice, a full Java Configuration is used; no web.xml. Three classes were defined for such proposes under the com.pr.config package. Figure 7-5 depicts all three classes, their parents, and the relationship between them.

Figure 7-5. Configuration classes for Personal Records Manager project when Spring Web Flow is used
![]() ? Can you tell which class takes care of a certain part of the infrastructure just by looking at the diagram in Figure 7-5?
? Can you tell which class takes care of a certain part of the infrastructure just by looking at the diagram in Figure 7-5?
Each class covers a part of the infrastructure setup needed to run a Spring web application without a web.xml file that uses Spring Web Flow.
- The MvcConfig class encapsulates the Spring MVC infrastructure bean definitions that were covered in Chapter 3. To plug in the Web Flow beans, some modifications were done. The webFlowConfig was injected so the handler mapping and handler adapter specific to flows could be configured.
 ...
import org.springframework.webflow.mvc.servlet.FlowHandlerAdapter;
import org.springframework.webflow.mvc.servlet.FlowHandlerMapping;

@Configuration
@EnableWebMvc
public class MvcConfig extends WebMvcConfigurerAdapter {
     @Autowired
     private WebFlowConfig webFlowConfig;

     //other Spring MVC infrastructure beans: formatters, interceptors,
     // resolvers, etc. Review Chapter 3 for reference.
     ...

     //Web Flow specific infrastructure beans
       @Bean
     public FlowHandlerMapping flowHandlerMapping() {
         FlowHandlerMapping handlerMapping = new FlowHandlerMapping();
         handlerMapping.setOrder(-1);
         handlerMapping.setFlowRegistry(this.webFlowConfig.flowRegistry());
         return handlerMapping;
     }

     @Bean
     public FlowHandlerAdapter flowHandlerAdapter() {
         FlowHandlerAdapter handlerAdapter = new FlowHandlerAdapter();
         handlerAdapter.setFlowExecutor(this.webFlowConfig.flowExecutor());
         handlerAdapter.setSaveOutputToFlashScopeOnRedirect(true);
         return handlerAdapter;
     }
}
The WebFlowConfig class encapsulates the Spring Web Flow infrastructure bean definitions. To align these beans with Spring MVC, the mvcConfig bean was injected, so formatter, validators, and view resolvers could be accessed and set to use during flow executions. This class extends the Spring specialized AbstractFlowConfiguration class, which does not provide any configuration itself but provides access via protected methods to builders for flow executor (getFlowExecutorBuilder()), flow registry (getFlowDefinitionRegistryBuilder()), and flow builder services (getFlowBuilderServicesBuilder()).
 ...
import org.springframework.webflow.config.AbstractFlowConfiguration;
import org.springframework.webflow.definition.registry.FlowDefinitionRegistry;
import org.springframework.webflow.engine.builder.support.FlowBuilderServices;
import org.springframework.webflow.executor.FlowExecutor;
import org.springframework.webflow.mvc.builder.MvcViewFactoryCreator;

@Configuration
public class WebFlowConfig extends AbstractFlowConfiguration {

    @Autowired
    private MvcConfig mvcConfig;

    @Bean
    public FlowExecutor flowExecutor() {
        return getFlowExecutorBuilder(flowRegistry())
        // apply the listener for all flow definitions
         .addFlowExecutionListener(new AuditFlowExecutorListener(), "*")
        .build();
    }

    @Bean
    public FlowDefinitionRegistry flowRegistry() {
        return getFlowDefinitionRegistryBuilder(flowBuilderServices())
                .setBasePath("/WEB-INF")
                .addFlowLocationPattern("/**/*-flow.xml")
                .build();
    }

    @Bean
    public FlowBuilderServices flowBuilderServices() {
        return getFlowBuilderServicesBuilder()
                .setViewFactoryCreator(mvcViewFactoryCreator())
                .setValidator(this.mvcConfig.validator())
                .setConversionService(conversionService())
                .setDevelopmentMode(true)
                .build();
    }

    @Bean
    public MvcViewFactoryCreator mvcViewFactoryCreator() {
        MvcViewFactoryCreator factoryCreator = new MvcViewFactoryCreator();
        factoryCreator.setViewResolvers(Arrays.<ViewResolver>asList(
               this.mvcConfig.tilesViewResolver()));
        factoryCreator.setUseSpringBeanBinding(true);
        return factoryCreator;
    }

    @Bean
    DefaultConversionService conversionService() {
        return new DefaultConversionService(
            conversionServiceFactoryBean().getObject());
    }

    @Bean
    FormattingConversionServiceFactoryBean conversionServiceFactoryBean() {
        FormattingConversionServiceFactoryBean
             fcs = new FormattingConversionServiceFactoryBean();
        Set<Formatter> fmts = new HashSet<>();
        fmts.add(this.mvcConfig.dateFormatter());
        fmts.add(this.mvcConfig.hospitalFormatter());
        fcs.setFormatters(fmts);
        return fcs;
    }
}
![]() ! To tune the flow execution persistence settings in Java, the following configuration has to be present in the WebFlowConfig class:
! To tune the flow execution persistence settings in Java, the following configuration has to be present in the WebFlowConfig class:
@Bean
public FlowExecutor flowExecutor() {
 return getFlowExecutorBuilder(flowRegistry())
 .addFlowExecutionListener(new AuditFlowExecutorListener(), "*")
     .setMaxFlowExecutions(5)
     .setMaxFlowExecutionSnapshots(30)
     .build();
}
- The WebInitializer class provides the Servlet 3.0 configuration that replaces the web.xml file. The configuration classes are added to the array of configuration classes used to create the application context by providing the proper implementation for the getRootConfigClasses.
public class WebInitializer extends
     AbstractAnnotationConfigDispatcherServletInitializer {

   @Override
   protected Class<?> getRootConfigClasses() {
       return null;
   }

   @Override
   protected Class<?> getServletConfigClasses() {
       return new Class<?>{
               MvcConfig.class,
               WebFlowConfig.class
       };
   }

   @Override
   protected String getServletMappings() {
       return new String{"/"};
   }

   @Override
   protected Filter getServletFilters() {
       CharacterEncodingFilter cef = new CharacterEncodingFilter();
       cef.setEncoding("UTF-8");
       cef.setForceEncoding(true);
       return new Filter{new HiddenHttpMethodFilter(), cef};
   }
}
At this time, you might be wondering about the FlowController that you saw in Figure 7-2 and why it wasn’t mentioned anywhere in the configuration section. This class is the bridge between the Spring MVC Controller layer and the Spring Web Flow engine; it allows Spring Web Flow to run embedded as a Controller within a DispatcherServlet and it is used internally. This class uses the handlers and executor defined in the configuration to execute flows; it does this transparently.2
![]() ! Before continuing to the next section, look at the 09-pr-webflow-basic-practice module under the person-manger project. Start the application using the appStart Gretty task for this module. In the browser, you will notice that a new link has appeared, named New Person. The application is depicted in Figure 7-6.
! Before continuing to the next section, look at the 09-pr-webflow-basic-practice module under the person-manger project. Start the application using the appStart Gretty task for this module. In the browser, you will notice that a new link has appeared, named New Person. The application is depicted in Figure 7-6.
If you click the link, you will notice it fails with a 404 error. This is because no handler has been registered for this resource URL. A few configurations have been set up, but some beans and configurations are missing so that this application can use the Spring Web Flow engine. This is left for you to do. The TODO tasks contain comments that direct you where you could implement the required changes. This module will help you test your understanding of the Spring Web Flow Java Configuration. The configuration files have been created, but it is your responsibility to fill them correctly. The flow itself is empty, and no execution step is defined.
After clicking New Person link, you see the form in Figure 7-6. This means your configuration is correct and you can continue with the chapter. If you have difficulties in completing the configuration, you can look at the 09-pr-webflow-basic-solution module, which contains the proposed solution for the given tasks.

Figure 7-6. Link to the New Person flow
Create a Flow
A flow describes a sequence of steps that is executed in the order established by the flow definition. A web flow is made of tree types of elements: states, transitions, and data. In a flow definition, the following types of states can be used:
- View state: In this type of state, the execution of a flow is paused to render a view to the user and wait for input data. It is defined using the <view-state ../> XML element.
- Action state: In this type of state, Java code is executed, and sometimes the next state to transition to depends on the outcome of this code. It is defined using the <action-state ../> XML element.
- Decision state: In this type of state, some branch logic is implemented using the XML flow definition language. It is defined using the <decision-state ../> XML element.
- Subflow state: The execution is transferred to another flow. When the subflow execution is completed, the execution will return to this state. It is defined using the <decision-state ../> XML element.
- End state: The final state of the flow execution. It is not mandatory for this state to render a view, but usually a confirmation view is rendered to the user. It is defined using the <end-state ../> XML element.
The states will be referred to using the XML element names in order to faciltate association between the state type and the element used to configure it.
The switch from one state to the other is called a transition and it is triggered by events. Some data can be shared among states, depending on the scope of that data. The simple schema of a flow definition and composing elements is depicted in Figure 7-7. The data is the information that is carried from one state to the other; it has a life span that depends on the scope on which it was declared.

Figure 7-7. The general schema of a flow definition and composing elements
Flow Definition
A flow is defined in a single XML file, and all the states composing it are defined as child elements of the flow element. The content of the flow element is actually a task algorithm. All resources used by a flow (views, internationalization files) when being executed must be placed in the same directory as the flow definition file. Basically, each flow defined in an application has its own directory that contains all flow definition resources. This was mentioned in the “Spring Web Flow Architecture” section. In this section, all the necessary steps in defining a flow are covered in detail. For example, to develop the /persons/newPerson flow, the following has to be created (use Figure 7-8 or reference ).

Figure 7-8. The components of a flow definition
- A directory with the same name as the flow you are trying to create, so as the path inside the WEB-INF matches the URL path that you want to map the flow to
- message.properties internationalization files
- View files
- A tiles configuration file, if tiles are used
- A *-flow.xml spring configuration flow definition file
When developing a flow, it is recommended to think and design the flow logic first—define the states and transitions, review the flow with business analysts, use mock views (plain HTML files that replace the view in testing scenarios)—to depict the steps and then add the behavior. To define the states of a flow, the *-flow.xml file must be populated. Usually, the first step is a view-state that displays a view to the user to provide data to the flow.
<!-- newPerson-flow.xml -->
<?xml version="1.0" encoding="UTF-8"?>
<flow xmlns="http://www.springframework.org/schema/webflow"
      xmlns:xsi="http://www.w3.org/2001/XMLSchema-instance"
      xsi:schemaLocation="http://www.springframework.org/schema/webflow
        http://www.springframework.org/schema/webflow/spring-webflow.xsd">

        <view-state id="enterPersonInfo"/>
</flow>
The view-state id resolves to a view template; by default, a *.jsp file is searched for in the current directory. View resolution is pluggable, depending on the view technology used. In the examples given in this book, Apache Tiles are used to define and resolve views; so the view to display when entering the enterPersonInfo state is defined in the tiles.xml under the flow directory. The views used for the workflows extend the same tiles template, webapp/WEB-INF/standard/layout.jsp, defined for views in Chapter 3.
<!-- tiles.xml -->
<?xml version="1.0" encoding="UTF-8"?>
<!DOCTYPE tiles-definitions PUBLIC
        "-//Apache Software Foundation//DTD Tiles Configuration 3.0//EN"
        "http://tiles.apache.org/dtds/tiles-config_3_0.dtd">

<tiles-definitions>

    <definition name="enterPersonInfo" extends="layout">
        <put-attribute name="pageTitle" value="persons.new.title" />
        <put-attribute name="content"
               value="/WEB-INF/persons/newPerson/newPersonInfo.jsp" />
        <put-attribute name="menuTab" value="newPerson" />
    </definition>
</tiles-definitions>
In the newPersonInfo.jsp view file template, the user event is linked to a button using the name attribute.
<!-- newPersonInfo.jsp -->
<h2>
   <spring:message code="persons.new.title"/>
</h2>

<div class="person">
    <sf:form id="newPersonForm" method="POST" modelAttribute="person">
        <table>
            <tr>
                <th>
                    <label for="firstName">
                        <span class="man">*</span>
                            <spring:message code="label.Person.firstname"/> :
                    </label>
                </th>
                <td><sf:input path="firstName"/></td>
                <td><sf:errors cssClass="error" path="firstName"/></td>
            </tr>
            <!-- other form elements -->
            ...
            <tr>
                <td colspan="2">
                    <button id="newPersonButton" name="_eventId_proceed"
                         type="submit">
                        <spring:message code="command.proceed" />
                    </button>
                </td>
            </tr>
        </table>
    </sf:form>
</div>
Next, a transition must be defined by adding the <transition> element as a child to the state you are transitioning from when a user event is activated. If no navigation is performed (for example, when validation fails), the initial view is refreshed.
 <!-- newPerson-flow.xml -->
 <flow ...>
<view-state id="enterPersonInfo">
        <transition on="proceed" to="reviewPerson" />
</view-state>

<view-state id="reviewPerson">
        <transition on="confirm" to="enterIdentityCard"/>
</view-state>
...
</flow>
When performing typical web navigations, there is always a Cancel button that allows the user to cancel the whole process. When using Spring Web Flow, this can be done by declaring a <global-transition> element, but using global transition elements sort of breaks the flow. It’s similar to using a goto statement. It also makes the flow definition less readable.3
<flow ...>
    <global-transition on="cancel" to="cancelled" />
    ...
</flow>
A flow can have one or multiple end-states defined (<end-state> elements are used to define them) and a flow execution can end in any of them, based on the events the user triggers. After a flow execution reaches an end state, the flow terminates and the outcome is returned, unless the end state sends a final response or redirects the user to another resource, typically a confirmation page.
<flow ...>
    <end-state id="end" />
</flow>
Redirecting to a confirmation page after a flow has finished the execution is tricky, as the flow data is gone. The solution is to use a redirect to a stateless confirmation page and to use a parameter that has a value that can be used to display confirmation data. The <end-state> element has a view attribute that can be used to specify the URL to redirect to.
<flow ...>
<end-state id="finish"
           view="externalRedirect:contextRelative:/person/1" />
</flow>
![]() ! The value is hard-coded id value (“1”) in the previous example only because the concept that could be used to make that link dynamic— flow variable—has not been covered yet.
! The value is hard-coded id value (“1”) in the previous example only because the concept that could be used to make that link dynamic— flow variable—has not been covered yet.
The contextRelative prefix is one of the explicit redirects supported in the context of a flow execution. Without these prefixes, the returned resource location is relative to the current servlet mapping. The flow redirect prefixes help you have more control over where the user is redirected. The following is the complete list of flow redirection prefixes:
- servletRelative: Redirects to a resource relative to the current server
- contextRelative: Redirects to a resource relative to the current web application context path
- serverRelative: Redirects to a resource relative to the server root
- http:// or https:// Redirects to a fully qualified resource URI
These redirect prefixes are supported in a flow definition together with the externalRedirect: directive in view-state or end-state elements. The view-state element has a view property that can be used to specify a different view than the one with the same state id, and this view can be outside the newPerson flow directory:
<flow ...>
    <view-state id="reviewPerson"
        view="externalRedirect:contextRelative:/verifyPerson">
         <transition on="confirm" to="enterIdentityCard"/>
    </view-state>
</flow>
A flow can also redirect to a different flow by using the flowRedirect: directive in its end state; this basically means the current flow ends and a new one is started.
In conclusion, when creating a web flow, it is recommended that the following steps be followed in this order:
- Define view states and end states.
- Define transition between states.
- Create mock views to test the connection of the states.
- Add the intended behavior.
To create a web flow like the one shown in Figure 7-1, the following must be done:
- When defining view states and end states, the focus is on the steps that the user is guided through. The why (conditions and events) and how (business logic) is left for later.
<flow ...>
 <!-- newPerson-flow.xml -->
 <view-state id="enterPersonInfo" />
 <view-state id="enterHospitalInfo" />
 <view-state id="enterIdentityCard" />
 <view-state id="reviewPersonData" />
 <view-state id="enterAccountInfo" />
 <view-state id="reviewAccountData" />
 <end-state id="end" />
</flow> - Then transitions should be defined as follows:
 <!-- newPerson-flow.xml -->
<flow ...>
 <view-state id="enterPersonInfo" >
         <transition on="addHospital" to="enterHospitalInfo" />
         <transition on="proceed" to="enterIdentityCard" />
 </view-state>

  <view-state id="enterHospitalInfo" >
         <transition on="save" to="enterPersonInfo" />
 </view-state>

 <view-state id="enterIdentityCard" >
         <transition on="review" to="reviewPersonData" />
 </view-state>

 <view-state id="reviewPersonData" >
        <transition on="addAcount" to="enterAccountInfo" />
 </view-state>

 <view-state id="enterAccountInfo" >
         <transition on="review" to="reviewAccountData" />
 </view-state>

 <view-state id="reviewAccountData" >
         <transition on="save" to="end" />
 <view-state>

 <end-state id="end" />
</flow> - To test the connections between the states, mock views should be created. This is an approach that helps users interact with the flow process to test the transitions between the states. Mock views contain static data; no extra data needs to be inserted by the user and no validation is performed. The dynamic behavior is added later, when the back end of the application is developed.
 <!-- newPersonInfo.jsp -->
<h2> Mock New Person </h2>
<div class="person">
    <form id="newPersonForm" method="POST" >
        <table>
            <tr>
                <th>
                    First Name
                </th>
                <td><input path="firstName"/></td>
            </tr>
            <!-- other form elements -->
            ...
           <tr>
                <td colspan="2">
                    <button id="newPersonButton" name="eventId proceed"
                            type="submit">
                        Proceed
                    </button>
                </td>
           </tr>
        </table>
    </form>
</div>

 <!-- enterIdentityCard.jsp -->
 <h2> Mock New Account </h2>
 <div class="identityCard">
    <form id="newIdentityCardForm" method="POST" >
        <table>
            <tr>
                <th>
                    Account Number
                </th>
                <td><input path="accountNumber"/></td>
            </tr>
            <!-- other form elements -->
            ...
           <tr>
                <td colspan="2">
                    <button id="newAccountButton" name="_eventId_review"
                           type="submit">
                        Review
                    </button>
                </td>
           </tr>
        </table>
    </form>
</div>

 <!-- other mock views look similar so their content will not be listed here -->
![]() ! As you probably noticed in the previous example, only view and end states were used. This is because these are the simplest states that can be used to create a flow; also, defining them is very easy and intuitive. The other types of states (action, decision, and subflow) are covered later and added, one by one, to the flow you have become familiar with to allow you to gradually increase your understanding of Spring Web Flow.
! As you probably noticed in the previous example, only view and end states were used. This is because these are the simplest states that can be used to create a flow; also, defining them is very easy and intuitive. The other types of states (action, decision, and subflow) are covered later and added, one by one, to the flow you have become familiar with to allow you to gradually increase your understanding of Spring Web Flow.
Testing Web Flows
Every flow in an application should have a unit test to verify that the flow logic works as expected. The Spring Web Flow provides a test class at org.springframework.webflow.test.execution.AbstractXmlFlowExecutionTests that has to be extended to use unit tests to test flows. This class provides the test infrastructure needed to test that a flow definition executes as expected; no Spring or JUnit annotations are needed. All that is needed is for the getResource(FlowDefinitionResourceFactory resourceFactory) method to be implemented correctly is to provide the test a flow definition file.
import org.springframework.webflow.config.FlowDefinitionResource;
import org.springframework.webflow.config.FlowDefinitionResourceFactory;
import org.springframework.webflow.test.MockExternalContext;
import org.springframework.webflow.test.execution.AbstractXmlFlowExecutionTests;

public class NewPersonFlowTest extends AbstractXmlFlowExecutionTests {
    private static final String ENTER_PERSON_INFO = "enterPersonInfo";
    private static final String ENTER_IDENTITY_CARD = "enterIdentityCard";
    private static final String REVIEW_ACCOUNT_DATA = "reviewAccountData";
    private static final String END = "end";

    @Override
    protected FlowDefinitionResource getResource
             (FlowDefinitionResourceFactory resourceFactory) {
        return resourceFactory.createFileResource(
             "src/main/webapp/WEB-INF/persons/newPerson/newPerson-flow.xml");
    }

    public void testStart() throws Exception {
        startFlow(new MockExternalContext());
        assertCurrentStateEquals(ENTER_PERSON_INFO);
    }

    public void testEnterPersonInfoProceed() throws Exception {
       setCurrentState(ENTER_PERSON_INFO);
        MockExternalContext externalContext = new MockExternalContext();
        externalContext.setEventId("proceed");
        resumeFlow(externalContext);
        assertCurrentStateEquals(ENTER_IDENTITY_CARD);
    }

// other similar transition tests
..

  public void testReviewPersonConfirm() throws Exception {
        setCurrentState(REVIEW_ACCOUNT_DATA);
        MockExternalContext externalContext = new MockExternalContext();
        externalContext.setEventId("save");
        resumeFlow(externalContext);
        assertFlowExecutionEnded();
        assertFlowExecutionOutcomeEquals(END);
        assertTrue(externalContext.getExternalRedirectRequested());
        assertEquals("contextRelative:/persons/1",
                externalContext.getExternalRedirectUrl());
  }
}
The testStart method starts the flow by calling startFlow and tests that the flow has entered the start state by calling assertCurrentStateEquals.
The testEnterPersonInfoProceed tests that starting from an exact state when an event is triggered, the transition is done to the expected state. Triggering the event is done by using a mock context and calling setEventId on it.
![]() ! Before continuing to the next section, take a look at the 10-pr-webflow-fundamentals-practice module under the person-manger project. All the files necessary for creating a very simple flow have been provided for you. Figure 7-9 depicts the simplified version of the newPerson flow that is required to complete the practice example. It uses mock views and only view states; no business logic is required to complete this practice exercise. The purpose of this module is to help you test your understanding of defining states and transitions, and using mock flows and testing the simple flow you have created.
! Before continuing to the next section, take a look at the 10-pr-webflow-fundamentals-practice module under the person-manger project. All the files necessary for creating a very simple flow have been provided for you. Figure 7-9 depicts the simplified version of the newPerson flow that is required to complete the practice example. It uses mock views and only view states; no business logic is required to complete this practice exercise. The purpose of this module is to help you test your understanding of defining states and transitions, and using mock flows and testing the simple flow you have created.

Figure 7-9. Link to the simplified New Person flow
This flow guides the user through the process of creating a person using the minimum amount of information. The first step of this flow should display a form to the user. After submitting the form, the user should be taken to a screen where he can review the information before being confirmed. After confirming, the user should be taken to the screen displaying the details of the completed transaction.
The practice module has ten TODO tasks to be resolved, numbered from 40 to 49. Each task has a short description instructing you on what you have to do. The web application can be started by executing the appStart Gradle task. The newPerson flow definition has been completed and the execution works completely if the user can be guided through all the expected steps. The test has been implemented correctly if all the methods pass.
When executing the flow, and the current state is the reviewPersonData. Try clicking the Back button of the browser to see what happens. You should be able to go back and resubmit. No browser warnings should occur, and the Request URL should depict that you are back to the previous step of the same flow execution.
If the current URL were http://localhost:8080/persons/newPerson?execution=e1s2, clicking the Back button should redirect the user to http://localhost:8080/persons/newPerson?execution=e1s1.
Try the same after the flow has finished its execution and note the parameters in the request URL. The flow execution should be restarted and the execution URL parameter should have the expected value.
![]() ? Can you remember how the execution parameter value should change when a new flow execution is started?
? Can you remember how the execution parameter value should change when a new flow execution is started?
During the execution of a web flow, it is expected for business services to be called for the flow to accomplish its task. Using view states only rendering a view and establishing the next view state in the navigation is possible. Thus, more elements are needed to define which business services are called and what to do with the results in the context of a flow. These elements are called actions; they can be called within a flow on several execution points.
Actions are defined in Spring Web Flow using the Spring Expression Language. Most of the time, their result has to be stored in a flow variable that has a life span defined by the scope that they are declared for. Explaining the type of actions that can be defined for a web flow, and when and how they should be used, cannot be done properly without first mentioning web flow scopes.
In Figure 7-7, in the bottom-left corner of each rectangle grouping state, you see a scope specific to that group of states, written in italics. Within a flow, you can define instance variables. For example, when creating a new person using a flow, the Person instance can be stored in a flow variable and be made available during the flow execution; and so at the end of the flow execution, redirection can be done to a page to render the instance just created:
<flow ...>
    <var name="person" class="com.pr.ents.Person"/>
    ...
    <end-state id="finish"
           view="externalRedirect:contextRelative:/person/#{person.id}" />
</flow>
Flow variables and other data objects exist in a scope, and when using web flows, multiple types of scopes are available to implement the desired functionality. Each flow provides a context where objects are stored. The data scopes are provided by this context and its state is managed by the Spring Web Flow. During flow execution, objects are added to different scopes, depending on the flow definition. They are cleaned when they go out of scope.
The previous example depicted the explicit creation of a flow variable; the <var /> element was used for that. But variables can be assigned dynamically by using actions. The advantage of using actions to assign variables is that the variables can be assigned to any scope possible. Explicit variables, declared with <var/>, can be assigned only a flow scope and a view scope. There are five web flow scopes that are supported by the context of a flow:
- Flow scope: This is the scope that lasts until the flow ends.
- View scope: This is the scope associated with each view-state.
- Request scope: This is the scope matching a single request
- Flash scope: This the scope allocated when a flow starts; it is cleaned automatically after each view is rendered and destroyed when the flow ends.
- Conversation scope: This is a global execution scope; all subflows share this scope. It gets allocated when a top-level flow starts and it is destroyed when the top-level flow ends.
![]() ! The conversation-scoped objects are stored in the HTTP session and should generally be serializable to account for typical session replication.
! The conversation-scoped objects are stored in the HTTP session and should generally be serializable to account for typical session replication.
Flow Variables
The scope of a variable can be determined contextually. For example, when the explicit definition of a variable is directly under the <flow/> element, the scope for that variable is the flow scope. When the explicit definition of a variable is under the <view-state/> element, the scope of that variable is view scope. But when using EL expressions and Java code, the scope needs to be specified explicitly.
When using <var/> to define variables, you have to keep in mind that if the objects are complex and require other properties to be injected, they must either have a constructor, setters annotated with @Autowired, or both depending on the chosen configuration.
 <!-- newPerson-flow.xml -->
<flow ...>
    <var name="identityCardProcessor" class="com.pr.webflow.IdentityCardProcessor"/>
    ...
</flow>

// com.pr.webflow.IdentityCardProcessor.java
public class IdentityCardProcessor implements Serializable {
    private IdentityCardManager identityCardManager;

    @Autowired
     public IdentityCardProcessor(
              IdentityCardManager identityCardManager){...}
}
// or
public class IdentityCardProcessor implements Serializable {
    private IdentityCardManager identityCardManager

    @Autowired
    public void setIdentityCardManager(
               IdentityCardManager identityCardManager){...}
}
Explicit variables are most often used as data models for views. They are used to pass as arguments to business services invoked by the flow; such an implementation is depicted in Figure 7-10.

Figure 7-10. Explicit flow variable usages example
![]() ? From what has been covered so far, can you tell to which scope the person variable in the previous code sample belongs?
? From what has been covered so far, can you tell to which scope the person variable in the previous code sample belongs?
Explicit variables can be defined as view-scoped objects too. In this case, the variable is created when the view-state is entered and is destroyed when the transition to the next view-state occurs. They can be used as data models for a single view. They are often updated using AJAX requests before being used for the expression conditioning the transition to the next state; such an implementation is depicted in Figure 7-11.

Figure 7-11. Explicit flow variable in view scope usages example
In the previous examples, you can see that performing the transition depends on the result of the evaluation of the expression in the <evaluate /> element. The expression in that element is a standard EL expression that can be evaluated directly by the EL; it does not need to be enclosed in delimiters such as #{ }. The delimiters are not needed when the expression is a string that represents a method call or property access, and using them will throw an IllegalArgumentException.
The delimiters are only needed when the argument string is a template EL expression that implies mixing literal text with one or more standard expressions, as in the redirect link for the end state in previous examples.
<flow ...>
    <end-state id="finish"
           view="externalRedirect:contextRelative:/person/#{person.id}" />
</flow>
Conversation Variables
The conversation scope is the widest web flow scope. Variables defined within this scope are available to subflows too. The conversation variables are similar to global variables and have the same disadvantages. Conversation variables introduce a dependency between top-level flows and their subflows; that’s why the recommendation is to not use them if a different option exists. When working with subflows, input/output parameters can be used to avoid conversation variables. A variable can be assigned to the conversation scope using the <evaluate /> element.
In the following example, a Person instance retrieved using a PersonManager service is being assigned to the conversation scope:
<flow ...>
<!-- The result of this expression is stored into the person variable -->
    <evaluate result="conversationScope.person"
           expression="personManager.findById(personId)"/>
</flow>
Request and Flash Scopes
Attributes placed in flash scope exist through the life of the current request and until the next view rendering. After the view renders, the flash scope is cleared. Flash scope is typically used to store messages that should be preserved until after the next view renders. This scope is useful to pass data from one request to another as one flow state involves two requests, as depicted in Figure 7-4.
- The first request lasts between the transition from the current state until entering the next state.
- The second lasts from the moment before the view is rendered to the end of rendering the same state.
You can consider the flash scope as an extension of the request scope in the Web Flow context, because the request scope is not quite useful when using web flow, as is explained later in this section.
Attributes placed in request scope exist for the life of the current request into the flow execution. When the request ends, any attributes in request scope goes out of scope. Variables should be assigned the request scope when their values are refetched every time a state is redisplayed. If the data can be cached, the view scope would be more appropriate for the variable.
![]() ! The request scope can be useful when creating a sports betting site. The application should have a web flow defined, through which the user can place a bet. A request variable should be used to extract the most recent results of games being played, so the user can be informed in real time of his winning chances.
! The request scope can be useful when creating a sports betting site. The application should have a web flow defined, through which the user can place a bet. A request variable should be used to extract the most recent results of games being played, so the user can be informed in real time of his winning chances.
Also, data with request scope can be used in cases where it is needed only to initialize the next view; but it should not be displayed by it.
![]() ! Consider the example of a betting site: only the list of games currently being played should be displayed, so a specific time interval value can be stored in a variable and used as criteria for selection.
! Consider the example of a betting site: only the list of games currently being played should be displayed, so a specific time interval value can be stored in a variable and used as criteria for selection.
To implement the previously mentioned cases, the flow scope can be used, and the games the user can bet on can be retrieved using AJAX calls. Request scope is pretty useless, considering that usually a developer is interested in sharing the data between the two requests implied by a web flow state.
Figure 7-12 is a simple diagram with the duration of the flash scope and the request scope depicted to make their differences in the context of a flow execution more obvious.

Figure 7-12. Comparison between request and flash scope
In Figure 7-12, you can clearly see the two requests implied by a flow state. One of them is the user request to start the flow with URL /person/newPerson. Accessing this URL makes the web flow engine send a request to /persons/newPerson?execution=e1s1. The request to this web flow resource is the second request. The two arrows under the REQUEST bubble show exactly how long the attributes in the request scope is available. And under the FLASH bubble, you can see the longer arrow, which depicts how long the attributes in the flash scope are available. The execution points— :on-entry, on-render, and so forth—are covered in the next section.
Actions
Now that web flow scopes have been covered, it is time to introduce actions. Actions execute behavior at specific points within the flow. There are several points where you can execute actions:
- on flow start: The <evaluate /> element is declared as a child of the <on-start /> element that marks the start of a flow execution. This action is executed only once, when the flow execution starts.
<flow ...>
   <on-start>
      <evaluate expression="..."/>
   </on-start>
</flow> - on state entry: The <evaluate /> element is declared as a child of the <on-entry /> element that marks the entry in a state. (A view state in the following example). This action is executed only once, when entering the state.
<flow ...>
    <view-state ...>
         <on-entry>
             <evaluate expression="..."/>
        </on-entry>
    </view-state>
</flow> - on view render: The <evaluate /> element is declared as a child of the <on-render /> element that marks the moment immediately before a view is rendered. The action is executed on every browser refresh.
<flow ...>
    <view-state ...>
         <on-render>
             <evaluate expression="..."/>
        </on-render>
    </view-state>
</flow> - on transition execution: The <evaluate /> element is declared as a child of the <transition /> element. Actions imply evaluating expressions and the results are assigned to variables that have a specific scope assigned. The <evaluate /> action element used in the following example can be used to evaluate an expression and assign the result a specific scope. It can prevent a transition if an exception is thrown or false is returned as a result when the expression is evaluated. How exceptions are handled in the web flow context is covered later in the chapter. Only one <evaluate /> expression is allowed.
<flow ...>
    <view-state ...>
         <transition on="confirm" to="nextStep">
             <evaluate expression="..."/>
        </transition>
    </view-state>
</flow> - on state exit: The <evaluate /> element is declared as a child of the <on-exit/> element that marks the exit of a state. (A view state in the following example). This action is executed only once, when exiting the state.
<flow ...>
    <view-state ...>
        <on-exit>
          <evaluate expression="..."/>
       </on-exit>
    </view-state>
</flow> - on flow end: The <evaluate /> element is declared as a child of the <on-end /> element that marks the end of a flow execution. This action is executed only once, when the flow execution ends.
<flow ...>
...
    <on-end>
      <evaluate expression="..."/>
   </on-end>
</flow>
The examples presented so far were simplified to set the focus on the syntax when defining your actions. The following example is a concrete one that you will use in the practice exercises:
<flow ...>
<!-- newPerson-flow.xml -->
  <view-state id="enterPersonInfo">
        <on-render>
            <evaluate expression="hospitalManager.findAll()"
               result="flowScope.hospitalList" />
        </on-render>
        <transition on="proceed" to="reviewPerson" />
  </view-state>
</flow>
The <evaluate /> element can also be used to resolve properties on beans and even perform conversions. The actions are usually expressed in Spring EL,4 but Unified EL Standard and OGNL are supported too. Using this type of syntax makes the actions more concise for executing behavior and easier to read from a development point of view.
A Spring EL expression has the following template:
<variable_name>.property_or_method
The variable_name is resolved against the current flow context. Variables referring to data scopes (flowScope, viewScope, requestScope, etc.) should only be used when assigning a new variable to one of the scopes. To resolve a flow variable, reserved variables are searched first, then the variable is searched within each flow scope, starting with request and expanding the scope gradually: flash, view, flow, conversation. If the variable is not found, the flow application context is searched for a bean matching the variable name. Let’s look at a few examples to make usage of Spring EL expressions with web flows easier to understand:
- flowScope.person: The person variable is resolved in flow scope
- person: The person variable is searched in all scopes
- hospitalManager.findAll(): The findAll method is called on the hospitalManager variable (in this book’s examples, hospitalManager is actually a bean).
- hospitalManager.findByCode(hospitalCode): Calling a bean method and using the hospitalCode variable as an argument.
When using Spring EL to write expressions, a few reserved variables can be used without any prior manual initialization (Spring takes care of initializing them).
- scope-specific variables: requestScope, flashScope, viewScope, flowScope, conversationScope
- environment-specific variables: flowExecutionUrl, flowRequestContext, requestParameters, externalContext, messageContext, resourceBundle, currentEvent, currentUser
- externalContext.sessionMap is used to access HTTP session contents. (No sessionScope variable exists in the context of a flow definition.)
Some of these variables can be used in view template files also; in JSP, all scope variables are accessible, flowExecutionUrl is the URL of the current page, flowRequestContext is the RequestContext. Additional variables are available: pageScope, requestParameters, sessionScope, and so forth.
So far, only the <evaluate /> element has been used, but there are alternatives more suitable in particular cases. The <set /> action element is used to set the value of a variable, but it does not prevent a transition and can be used multiple times within a transition element. For example, if you just want to view the details on a person after it was selected from a list; there is nothing to evaluate, you just want view some data. The <set /> element is more suitable for this case:
<flow ...>
<!-- reviewPerson-flow.xml -->
  <view-state id="reviewPersonInfo">
     <on-render>
        <evaluate expression="personManager.getByDateOfBirth(dob)"
              result="viewScope.persons" result-type="dataModel" />
     </on-render>
    <transition on="select" to="viewPerson">
        <set name="flowScope.person" value="persons.selectedRow" />
    </transition>
  </view-state>
</flow>
When using <set />, a scope must be specified when creating a new variable, as there is no default. In the following example, the firstName variable is assigned to the flowScope scope.
<set name="flowScope.firstName"
         value="requestParameters.firstName"/>
When updating an existing variable, or one of its properties, the scope is no longer required and the algorithm presented previously is used to perform scope resolution.
<set name="person.firstName"
         value="requestParameters.firstName"/>
Request Parameters
In the previous code sample, the requestParameters system variable was used. This variable contains all the URL parameters for the current request. These parameters are not in the requestScope, and if they are needed further in the execution flow, they need to be assigned to a proper scope; otherwise, they will be lost when the current request ends.
<view-state id="reviewPersonInfo">
  <transition on="cancel" to="cancelled">
    <evaluate expression=
        "personManager.delete(requestParameters.personId)">
    </transition>
</view-state>
![]() ? To test your understanding, look at the following code snippet:
? To test your understanding, look at the following code snippet:
 <view-state id="practiceInfo">
   <on-entry>
    <set name="flashScope.var1" value="var1" >
    <set name="requestScope.var2" value="var2" >
   <on-entry>
   <on-render>
    <set name="requestScope.var3" value="var3" >
    <set name="flashScope.var4" value="var4" >
    <set name="requestScope.var5" value="var5" >
   </on-render>
 </view-state>
Try to determine which of the following affirmations is true and which is not, and why.5
- var2 is available after the view is rendered.
- var2 can be used to initialize the view, but is lost when the view is rendered.
- var1, var3, var4, and var5 are available after the view is rendered.
- var1 is lost if the view is refreshed.
Actions are really useful components of a flow, but a flow definition must stay clear and readable. The recommended practice is to keep your flow definition as simple as possible, use actions only to prevent transactions or to decide to which state to transition next. The heavy-lifting actions should be performed in Java.
As you probably figured out by now, a web flow definition is a bridge between the service and the web layer that can be used to control the navigation.
Model Objects
In Chapter 3, you learned about controllers, models, and views. A model object handles data used in a view. The views used in web flows view states also need model objects to render data. In web flow definitions, model objects can be assigned different scopes and are associated to a view state using the model attribute.
<flow ...>
   <view-state id="enterPersonInfo" model="person">
       ...
   </view-state>
</flow>
The model object is accessible from the view template files and can be set as a model attribute for forms. The Spring forms used in web flow views are identical to the ones used when working with Spring MVC; the only difference is represented by the Submit button, which is used to trigger a user event when using web flows. This is what a Spring MVC view used to save a Person instance looks like:
<!-- addPerson.jsp -->
<%@ taglib prefix="spring" uri="http://www.springframework.org/tags" %>
<%@ taglib prefix="sf" uri="http://www.springframework.org/tags/form" %>
   <spring:url value="/persons/{id}" var="editUrl">
        <spring:param name="id" value="${person.id}"/>
   </spring:url>
    <sf:form modelAttribute="person" action="${editUrl}" method="POST">
        <table>
            <tr>
                <th>
                    <label for="firstName">
                        <span class="man">*</span>
                        <spring:message code="label.Person.firstname"/> :
                    </label>
                </th>
                <td><sf:input path="firstName"/></td>
                <td><sf:errors cssClass="error" path="firstName"/></td>
            </tr>
            <!-- other form fields-->
            ...
            <tr>
                <td>
                    <button id="saveButton" type="submit">
                        <spring:message code="command.save"/>
                    </button>
                </td>
                <td>
                    <a href="${editUrl}">
                        <spring:message code="command.cancel"/>
                    </a>
                </td>
            </tr>
        </table>
</sf:form>
This is what a Spring Web Flow view used to save a Person instance looks like:
 <!-- newPersonInfo.jsp -->
 <%@ taglib prefix="spring" uri="http://www.springframework.org/tags" %>
<%@ taglib prefix="sf" uri="http://www.springframework.org/tags/form" %>
<sf:form modelAttribute="person" method="POST" id="newPersonForm">
 <table>
            <tr>
                <th>
                    <label for="firstName">
                        <span class="man">*</span>
                        <spring:message code="label.Person.firstname"/> :
                    </label>
                </th>
                <td><sf:input path="firstName"/></td>
                <td><sf:errors cssClass="error" path="firstName"/></td>
            </tr>
            <!-- other form fields-->
            ...
            <tr>
                <td>
                    <button id="newPersonButton" name="_eventId_proceed"
                           type="submit">
                        <spring:message code="command.proceed" />
                    </button>
                </td>
                <td>
                    <button id="cancelOpButton" name="_eventId_cancel"
                        type="submit">
                        <spring:message code="command.cancel" />
                    </button>
                </td>
            </tr>
        </table>
</sf:form>
The cancel user event is handled by a global transition, a concept that is covered later.
The model is populated with the request parameter process, also known as data binding. Validation and conversion are supported for all properties, but can be suppressed if needed (usually during development) using the bind and validation attributes on the <transition /> element, by setting them to "false".
<view-state id="enterPersonInfo"
           model="person">
   <transition on="submit" to="reviewPersonInfo" />
   <transition on="cancel" to="end"
                   bind="false" validate="false"/>
</view-state>
When using Spring MVC, the @InitBinder annotation was used to customize the properties of a model object that should be binded to a view. Spring Web Flow has an equivalent for this too, because there is no point in binding properties that the user does not modify or is not meant to use for security reasons. For example, after personal data is introduced and the validation has passed, the enterIdentityCardInfo data used to generate the unique personal numerical code should no longer be editable by the user; otherwise, the personal numerical code is no longer valid. The <binder /> element can be used to white-list elements eligible for binding, like in the following example:
    <!-- enterIdentityCardInfo-floq.xml -->
   <view-state id="enterIdentityCardInfo"
             model="identityCard">
      <binder>
             <binding property="series" required="true"/>
             <binding property="number" required="true"/>
             <!--current date will be used-->
             <binding property="emittedAt" required="false"/>
             <!-- current date 10 years will be used-->
             <binding property="expiresAt" required="false"/>
             <binding property="address" required="true"/>
      </binder>
</view-state>
When the form is really big, the model object has a lot of fields and the web flow definition might become too verbose. A more appropriate solution in cases like this is to create a validator bean or method for the model objects, as covered in Chapter 3.
Validation, Formatting, and Conversion
Formatters and converters used with web flows are the same as in Spring MVC: default ones are present out of the box, and custom formatters and converters have to be declared and associated with the web flow engine using the flow builder services, as shown in the “Configuration and Infrastructure Beans” section. The same goes for validators: they have to be set on the flow builder services to be used.
![]() ! A Spring convertor is a general-purpose class used for conversion between two types that implement org.springframework.core.convert.converter.GenericConverter or one of its subinterfaces, or implement org.springframework.core.convert.converter.Converter<S,T> or subinterfaces.
! A Spring convertor is a general-purpose class used for conversion between two types that implement org.springframework.core.convert.converter.GenericConverter or one of its subinterfaces, or implement org.springframework.core.convert.converter.Converter<S,T> or subinterfaces.
A Spring formatter is a class specializing in transforming objects into strings or vice-versa, because when Spring MVC or Spring Web Flow is used, this is the focus of model objects. The classes must implement the org.springframework.format.Formatter<T> interface or one of its subinterfaces. The Formatter<T> interface is favored by developers because it is more suitable for web applications.
Although the registered converters are applied to any model objects, if needed, a different converter can be set for a property using the converter attribute of the <binding /> element. A converter cannot be specified in the web flow definition on a property that is not required; otherwise, when no value is provided, validation errors are generated and rendered in the view.
<!-- enterIdentityCardInfo-floq.xml -->
<view-state id="enterIdentityCardInfo"
         model="identityCard">
  <binder>
         <binding property="series" required="true"/>
         <binding property="number" required="true"/>
         <binding property="emittedAt" required="true" converter="simpleDate"/>
         <binding property="expiresAt" required="true" converter="simpleDate"/>
         <binding property="address" required="true"/>
  </binder>
</view-state>
JSR 349 bean validation is supported and annotations on the form object properties are used to set up the validation; but to enable it, a bean of type LocalValidatorFactoryBean has to be defined and set on the on the flowBuilderServices bean. A validator set on the FlowBuilderServices bean is applied to all model objects in the application. For customizations, custom validators can also be used, just like in Spring MVC.
![]() ! Remember the annotation validations?
! Remember the annotation validations?
 @Entity
 @SequenceGenerator(name = "seqGen", allocationSize = 1)
 public class Person implements Serializable {
  @Column(nullable = false)
  @Size(min=2, max=50)
  @NotEmpty
  public String firstName;
  @Enumerated(EnumType.STRING)
  @NotNull
  private Gender gender;
  ...
 }
When it comes to validation, there is one major difference between Spring MVC and Spring Web Flow—the template of the internationalized validation message keys. In Spring Web Flow, the message key must match the following template to be picked up automatically. In Spring MVC, the message name is placed at the beginning; in Spring Web Flow is placed at the end.
 #MVC
messageName.modelObject.property
 #Web Flow
modelObject.property.messageName
But this difference can be eliminated by using a bean of type DefaultMessageCodesResolver that is set on the MvcViewFactoryCreator. Here is the XML configuration needed to make this happen:
<!-- webflow-config.xml -->
  <!-- Configures Web Flow to render Tiles views resolved by Spring MVC -->
  <bean id="mvcViewFactoryCreator"
      class="org.springframework.webflow.mvc.builder.MvcViewFactoryCreator">
      <property name="viewResolvers" ref="tilesViewResolver" />
      <property name="useSpringBeanBinding" value="true"/>
      <property name="messageCodesResolver" ref="mcr" />
  </bean>

       <bean id="mcr"
          class="org.springframework.validation.DefaultMessageCodesResolver"/>
And here is the Java Configuration:
  \ WebFlowConfig.java
  @Bean
    public MvcViewFactoryCreator mvcViewFactoryCreator() {
        MvcViewFactoryCreator factoryCreator = new MvcViewFactoryCreator();
        factoryCreator.setViewResolvers(Arrays.<ViewResolver>asList(
            this.mvcConfig.tilesViewResolver()));
        factoryCreator.setUseSpringBeanBinding(true);
        factoryCreator
             .setMessageCodesResolver(messageCodesResolver());
        return factoryCreator;
  }

  @Bean
  public DefaultMessageCodesResolver messageCodesResolver(){
      return new DefaultMessageCodesResolver();
  }
Another way to validate a model object is to use programmatic validation. You can define a validation method in the model object class specific to the view state. The method must have a specific name to be discovered and the convention naming is
"validate" + {view-state-id(first letter is up-cased)}
So if instead of using a Person instance as model object, a specific form object implementation would be used. That implementation can also be defined with a view-state specific validation method:
<!-- Flow definition file-->
<view-state id="enterPersonInfo" model="personModelObject" >
    ...
</view-state>

<!-- PersonModelObject.java -->
public class PersonModelObject implements Serializable {
        public void validateEnterPersonInfo(
                ValidationContext validationContext) {
                ...
        }
}
Keep in mind that model objects are being serialized and deserialized by Spring to populate the form with values, or retrieve field values from the form, so the model object class must implement the java.io.Serializable interface.
If the model object cannot be modified, a validator bean can be used. The bean name must match a specific convention:
{model object name} + "Validator"
To be automatically detected, the validation method must match the preceding conventions, but the signature has an extra parameter—the model object that is automatically passed as an argument.
<!-- Flow definition file-->
<view-state id="enterPersonInfo" model="person" > ...</view-state>

<!-- PersonValidator.java -->
@Component
public class PersonValidator {
        public void validateEnterPersonInfo(
               Person person,
               ValidationContext validationContext) {
               ...
        }
}
![]() ! When writing a validator class and using annotations to define the bean, make sure to specify a name corresponding to the convention mentioned earlier, or make sure that you name the class appropriately.
! When writing a validator class and using annotations to define the bean, make sure to specify a name corresponding to the convention mentioned earlier, or make sure that you name the class appropriately.
Another way of defining validation with web flows is using the <evaluate /> element to call validation methods and prevent transitions if the validation fails. But doing this is not recommended because it will overcrowd the flow definition. Still, in some cases, this kind of approach could be necessary, so that’s why it is covered.
<!-- Flow definition file-->
<view-state id="enterPersonInfo" model="person" >

   <transition on="submit" to="enterIdentityCardInfo">
     <evaluate expression="personValidator.check(person, messageContext)"/>
   </transition>
</view-state>

<!-- PersonValidator.java -->
@Component("personValidator")
public class PersonValidator{
        public boolean check(
                Person person,
                MessageContext messageContext) {
                ...
        }
}
The method returns a Boolean value that can be used to prevent a transition when the result of its evaluation is false.
Validation methods have flexible signatures and can use different types of objects to register errors. They can use a ValidationContext object to register errors:
import org.springframework.binding.message.MessageBuilder;
import org.springframework.binding.validation.ValidationContext;
...
public void validateEnterPersonInfo(ValidationContext validationContext) {
  validationContext.getMessageContext().
     addMessage(new MessageBuilder().error()
     .source("person")
     .code("Size.person.firstName")
     .defaultText ("Length must be between 2 and 50").build());
}
Or a MessageContext object:
import org.springframework.binding.message.MessageBuilder;
import org.springframework.binding.message.MessageContext;
...
public boolean check(Person person, MessageContext messageContext) {
    messageContext.addMessage
        (new MessageBuilder().error().source("firstName")
             .code("Size.person.firstName").build());
        return true;
}
Or an Errors object:
import org.springframework.validation.Errors;
...
public boolean check(Person person, Errors errors) {
       errors.rejectValue("person",
               "Size.person.firstName",
               "Length must be between 2 and 50");
       return true;
   }
JSR-349 bean validation supports partial validation through validation groups.6 A group defines a subset of constraints. Instead of validating all constraints for a given object graph, only a subset is validated. This subset is defined by the group or groups targeted.
@NotEmpty
@Size(min=2, max=50, groups=NameRule.class)
public String firstName;

@NotEmpty
@Size(min=2, max=50, groups=NameRule.class)
public String lastName;
Groups are represented by interfaces that are defined inside the model class or its parent.
package com.pr.validator;
public class PersonModelObject implements Serializable {
...
   public interface NameRule {
   }
}
In a flow definition, the equivalent of validation groups can be implemented using the validation-hints attribute on the <view-state />:
<!-- Flow definition file-->
<view-state id="enterPersonInfo" model="person" validation-hints="group1,group2">

   <transition on="submit" to="enterIdentityCardInfo">
     <evaluate expression="personValidator.check(person, messageContext)"/>
   </transition>
</view-state>
The validation groups are used to group together fields of the model object that are subjected to validation together.
@NotEmpty
@Size(min=2, max=50, groups={"group1,group2"})
public String firstName;

@NotEmpty
@Size(min=2, max=50, groups={"group1"})
public String lastName;
The validation-hints attribute is an expression that resolves to a comma-delimited string consisting of hints that are resolved by a ValidationHintResolver bean. By default, Spring uses a bean of type org.springframework.webflow.validation.
BeanValidationHintResolver matches the string values to class-based bean validation groups. In the preceding case, this bean looked for interfaces named Group1 and Group2 in the model or its parent. Fully qualified class names can also be provided.
A custom ValidationHintResolver can also be provided if necessary, but has to be set on the FlowBuilderServices in the web flow configuration. In the following, you can see an XML and Java Configuration sample:
  <!-- webflow-config.xml -->
<webflow:flow-builder-services id="flowBuilderServices"
           view-factory-creator="mvcViewFactoryCreator"
            conversion-service="conversionService"
            validation-hint-resolver="customValidationHintResolver" />

<!-- WebFlowConfig.class-->
@Bean
 public FlowBuilderServices flowBuilderServices() {
   return getFlowBuilderServicesBuilder()
                .setViewFactoryCreator(mvcViewFactoryCreator())
                .setValidator(this.mvcConfig.validator())
                .setConversionService(conversionService())
                .setValidationHintResolver(customValidationHintResolver())
                .setDevelopmentMode(true)
                .build();
}

@Bean
public CustomValidationHintResolver customValidationHintResolver(){
    return new CustomValidationHintResolver();
}

//CustomValidationHintResolver.java
import org.springframework.webflow.validation.BeanValidationHintResolver;
...
@Component("customValidationHintResolver")
public class CustomValidationHintResolver extends BeanValidationHintResolver {
        ...
}
![]() ! If you want to test your understanding so far, check if you understand how view-states, actions, and transactions interact in the context of a flow. You can take a break from reading and try to solve the 11-pr-webflow-actions-practice practice project. This project contains all the classes necessary to implement a flow that creates a Person instance in two steps. The view templates are provided, and in the newPerson-flow.xml, the view-states and transaction elements are already in place. The only thing you have to do is to complete the web flow definition by adding actions and model objects. (TODO 40) Figure 7-13 shows the elements of the flow definition and some hints about which actions should be used and where.
! If you want to test your understanding so far, check if you understand how view-states, actions, and transactions interact in the context of a flow. You can take a break from reading and try to solve the 11-pr-webflow-actions-practice practice project. This project contains all the classes necessary to implement a flow that creates a Person instance in two steps. The view templates are provided, and in the newPerson-flow.xml, the view-states and transaction elements are already in place. The only thing you have to do is to complete the web flow definition by adding actions and model objects. (TODO 40) Figure 7-13 shows the elements of the flow definition and some hints about which actions should be used and where.

Figure 7-13. Web Flow action practice project flow definition
A PersonModelObject class is provided to use an instance of this type in the flow definition. A class called PersonBuilder is defined with helper methods that can be used to create a person model object and save the person that the flow will create. The following are the steps executed by the web flow:
- The enterPersonInfo view-state is entered and a form with the minimal data required to create a person is displayed. Almost all properties of the person model object for this form must be binded and are required, except for the middleName. When this view is rendered, the list of hospitals must be populated. In this example, the hospitalList is only needed to render the view. Keep this in mind when deciding which scope this variable should be assigned to. When leaving this state, the personal object model must be created from all the data introduced by the user. The personal numerical code is generated by the application. Just add an action to call the buildPersonObject of the personBuilder bean and save the result to a variable. This variable must be accessible to all view-states from this step on, so take this into account when choosing the scope for it. Figure 7-14 depicts the view specific to this view-state.
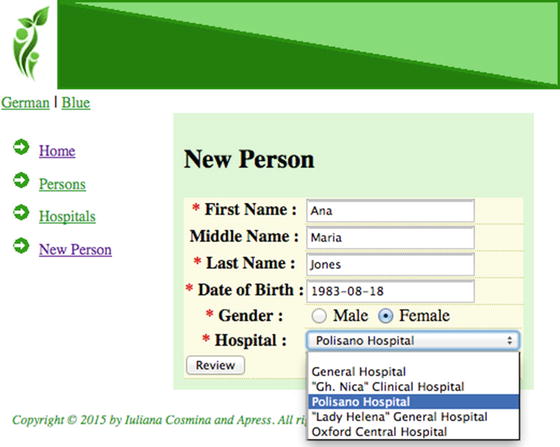
Figure 7-14. The enterPersonInfo view-state
- Clicking the Review button must direct the user to the reviewPerson view-state, where the information introduced by the user and the application-generated personal numeric code is displayed. Only the transition element is missing from the configuration state. The next state to go to is enterIdentityCardInfo. Figure 7-15 depicts the view specific to this view-state.

Figure 7-15. The reviewPerson view-state
- The enterIdentityCardInfo is entered, and in this state, the personal details introduced and generated so far are displayed. The view specific to this view-state also contains a form that is used to insert data for the IdentityCard instance. A Person instance cannot be created without an IdentityCard. The personal numerical code cannot be edited; to change it, you have to go back to the first step of the flow and change the data there. All the properties of the identityCard object model for this form must be binded and all are mandatory. Figure 7-16 depicts the view specific to this view-state.

Figure 7-16. The enterIdentityCardInfo view-state
To save a person’s data, just click the Save button. In the web flow definition, the savePersonEntity in the personBuilder bean call must be added when transitioning away to the end state. The IdentityCardValidator class defines a validator method that is applied automatically before saving an IdentityCard instance. The validation method is discovered and applied specifically when the flow is transitioning away from the enterIdentityCardInfo view-state, and checks if another person with the same personal numerical code already exists in the system. To try it out, just add a person born on January 8, 1942 at Oxford Hospital. You should get an error message like the one shown in Figure 7-17.

Figure 7-17. The enterIdentityCardInfo view-state when invalid data is inserted
![]() Note As an exercise, you could try to make the validation more precise by testing for number and series duplication in an identity card.
Note As an exercise, you could try to make the validation more precise by testing for number and series duplication in an identity card.
Action States
If you remember the first logical schema (see Figure 7-1) of the web flow execution that it is meant to be implemented after studying this chapter, you should remember that it had some decisional elements in the if-then-else style that made the navigation flow dynamic; because when transitioning based on the value of a variable, you can end up in different states. In the examples presented so far, this was not possible, because view-states and actions are not enough to do this. What can be done with view-states and actions, however, is preventing transitioning when an action fails, but not changing the state to transition to. To make this happen dynamically, two new state types are needed: action-states and decision-states.
An action state allows transition to a state that executes one or more actions using <evaluate /> and <set /> elements. The result of this action is raised as an event and a transition to another state is triggered. Different events can be raised to trigger different transitions dynamically, so an action state should be used when there is need of an action to be executed and the state to transition to is decided by the result of that action. Multiple <evaluate /> are allowed inside an action-state, but the last one is used to control the transition. The <set /> element can be used to define variables needed to execute that action and it is recommended for usage when transition control is not required.
The result of an action state can be any of the types in the following list, but it will always be converted to a string following the rules mentioned for each type, because to trigger a transition, the returned value must be mapped to an event:
- Boolean: Always evaluates to "yes" or "no".
- String: The name of the event to trigger.
- Enumerated types: The enumerated values is converted to String using the toString() method. The toString method must be defined in such a way that it returns acceptable values to transition on. Look at the following example; depending on the result of the evaluation of the getDecision(...) method, the transition is done to a different state.
 //ActionEnum.java
public enum ActionEnum {

    EDIT_ACCOUNT("accountEditState"),
    DELETE_ACCOUNT("accountDeleteState"),
    CREATE_ACCOUNT("accountCreateState");

    private String value;

    ActionEnum(String value) {
        this.value = value;
    }

    public String getValue() {
        return value;
    }

    @Override
    public String toString() {
        return value;
    }
}

//DecisionBean.java
@Component
public class DecisionBean implements Serializable {

    public ActionEnum getDecision(int decisionId) {
        switch (decisionId){
            case 0:
                return ActionEnum.EDIT_ACCOUNT;
            case 1:
                return ActionEnum.DELETE_ACCOUNT;
            case 2:
                return ActionEnum.CREATE_ACCOUNT;
        }
        throw new IllegalArgumentException("Option not supported!");
    }
}

//account-flow.xml
<flow...>
<action-state id="accountDecision">
    <evaluate
        expression="decisionBean.getDecision(requestParameters.decisionId)" />
    <transition on="EDIT_ACCOUNT" to="edit"/>
    <transition on="DELETE_ACCOUNT" to="delete"/>
    <transition on="CREATE_ACCOUNT" to="create"/>
</action-state>
<view-state id="edit" ... >
..
</view-state>

<view-state id="delete" ... >
..
</view-state>

< view-state id="create" ... >
..
</view-state>

</flow> - org.springframework.webflow.execution.Event: The transition will use the id of the event object converted to String.
- Any other value that evaluates to "success".
![]() ! When using an <evaluate /> expression inside a transition, a transition will occur if the result is any of the true(Boolean), “yes”, “true”(String), “success”. Enumerated types are converted to a String using its toString() method and the previous rule applies. Any other object is treated as “success”.
! When using an <evaluate /> expression inside a transition, a transition will occur if the result is any of the true(Boolean), “yes”, “true”(String), “success”. Enumerated types are converted to a String using its toString() method and the previous rule applies. Any other object is treated as “success”.
<view-state id="enterPersonInfo" model="person">
...

       <transition on="proceed" to="enterIdentityCardInfo" >
          <evaluate expression="personService.isNewPerson(person)"/>
           <!-- Must return "true", "yes",
               "success" or an object-->
       </transition>
</view-state>
So far, actions have been used in quite a simple manner and used to invoke methods on existing beans. These actions can be categorized as No action because they are used to invoke business services directly. The concept of “No action” might be confusing. The reason such a category exists is to categorize actions that are not defined by action classes.
 <!-- newPerson-flow.xml-->
<action-state id="checkDuplicate">
    <evaluate expression="personService.isNewPerson(person)"/>
    <transition on="success" to="enterIdentityCardInfo"/>
    <!-- Transition always occurs -->
</action-state>

// PersonService.java
@Service("personService")
public class PersonService {
    @Autowired
    PersonManager personManager;

    public boolean isNewPerson(Person person) {
        String pnc = PncBuilder.build(person);
        Person existingPerson = personManager.getByPnc(pnc);
        return existingPerson == null;
    }
}
But when the logic of an action becomes complicated, and even needs access to the flow context, actions can be implemented in different ways. The most simple way is to create a POJO (a bean), pass the flow context as an argument, and then invoke its methods by the flow. These are called the POJO actions.
![]() ! To mark POJO actions, developers usually create their own annotation and set it to be component-scanned. In the Personal Records Manager project, the annotation is called @WebFlowAction.
! To mark POJO actions, developers usually create their own annotation and set it to be component-scanned. In the Personal Records Manager project, the annotation is called @WebFlowAction.
 @Target({ElementType.TYPE})
 @Retention(RetentionPolicy.RUNTIME)
 @Documented
 @Component
 public @interface WebFlowAction {
   /**
    * The value may indicate a suggestion for a logical component name,
    * to be turned into a Spring bean in case of an autodetected component.
    * @return the suggested component name, if any
    */
   String value() default "";
 }
For Spring to scan for this annotation, you have to add it to the configuration:
 @Configuration
 @EnableWebMvc
 @ComponentScan(basePackages = {"com.pr, com.pr.persons,
   com.pr.hospitals, com.pr.validator"},
 includeFilters = @ComponentScan.Filter(
     value = WebFlowAction.class,
     type = FilterType.ANNOTATION
 ))
 @ImportResource({"classpath:spring/app-service-config.xml",
  "classpath:spring/db-config.xml"})
 public class MvcConfig extends WebMvcConfigurerAdapter {
 ...
 }
So, the following code can be written using a POJO action in the following manner:
  <!-- newPerson-flow.xml-->
<action-state id="checkDuplicate">
    <evaluate expression=
      "personAction.isNewPerson(requestContext)" />
      <transition on="success" to="enterIdentityCardInfo"/>
</action-state>

//PersonAction.java
import com.pr.WebFlowAction;
import org.springframework.webflow.execution.RequestContext;

@WebFlowAction
public class PersonAction {

    public String isNewPerson(RequestContext context) {
        Person person = (Person) context.getFlowScope().get("person");
        String pnc = PncBuilder.build(person);
        Person existingPerson = personManager.getByPnc(pnc);
        if (existingPerson == null) {
            return "success";
        } else{
            throw new DuplicatePersonException(existingPerson);
        }
    }
}
Notice how the context is declared as a parameter and set as an argument by the developer in the web flow action definition. They way that exceptions are handled in a web flow execution is covered later.
Another type of actions are the plain actions. For each action, a class is created that implements the org.springframework.webflow.execution.Action interface or extends the Spring-provided implementation, the org.springframework.webflow.action.AbstractAction class. The implementation provided by Spring provides some methods that can be used to generate events. For example, this class implements the org.springframework.beans.factory.InitializingBean interface (covered in Chapter 2) to receive an init callback when deployed within a Spring bean factory and exposes hooks to execute pre- (doPreExecute (RequestContext context)) and post- (doPostExecute(RequestContext context)) action execution.
The Action interface exposes only one method, named execute. Implementations of this interface are usually used to create singleton beans instantiated and managed by a Spring web application context. The request context is no longer declared as an argument in the flow definition, as an action defined this way is handled by Spring, which knows the argument to call the action method with. The advantages of using plain actions is that they can easily be parametrized with mocks and stubs in test environments. Also, action proxies may also be generated at runtime for delegating to POJO business operations that have no dependency on the Spring Web Flow API, which helps with decoupling components inside an application. They can be used to simplify a flow definition when an action is simple enough, because there is no need for a SpEL in the evaluate element or a method call; the name of the action component is enough for Spring to know what to do.
 package org.springframework.webflow.execution;
public interface Action {
    public Event execute(RequestContext context)
        throws Exception;
}
The previous example can be written using a plain action too, and the code will look as follows:
 <!-- newPerson-flow.xml -->
 <action-state id="checkDuplicate">
    <evaluate expression="personAction" />
      <transition on="success" to="enterIdentityCardInfo"/>
</action-state>
//PersonAction.java
import org.springframework.webflow.execution.Action;
...
 @WebFlowAction
public class PersonAction implements Action {

    @Autowired
    PersonManager personManager;

    @Override
    public Event execute(RequestContext context) throws Exception {
        Person person = (Person) context.getFlowScope().get("person");
        String pnc = PncBuilder.build(person);
        Person existingPerson = personManager.getByPnc(pnc);
        if (existingPerson == null) {
            return new Event(this, "success");
        } else{
           \ how an exception is handled in webflow context is covered
           \later in the chapter
            throw new DuplicatePersonException(existingPerson);
        }
    }
}
The context is automatically passed as an argument by Spring.
The most complex type of actions are the MultiActions. They are implemented by extending the org.springframework.webflow.action.MultiAction class, an extension of AbstractAction that provides multiple helper methods for returning events. All action methods must have the same signature as the execute method from the previous example; the context is also automatically passed as argument by Spring.
- success(), error(), yes(), no()
- result(), result(String), error(Exception)
The code in the previous example does not differ much when implemented with MultiAction, but it is added here to underline the differences between the two implementations:
 <!-- newPerson-flow.xml -->
 <action-state id="checkDuplicate">
    <evaluate expression="personAction.isNewPerson" />
      <transition on="success" to="enterIdentityCardInfo"/>
</action-state>

//PersonAction.java
import org.springframework.webflow.action.MultiAction;
...
 @WebFlowAction
public class PersonAction extends MultiAction {
    @Autowired
    PersonManager personManager;

    public Event isNewPerson(RequestContext context) throws Exception {
        Person person = (Person) context.getFlowScope().get("person");
        String pnc = PncBuilder.build(person);
        Person existingPerson = personManager.getByPnc(pnc);
        if (existingPerson == null) {
            return success();
        } else{
            throw new DuplicatePersonException(existingPerson);
        }
    }
}
In the previous examples, the same behavior was implemented using all types of actions, but technically, each type of action implementation is suitable to a certain case.
- No action: Easy to use: just plug in a business method call in the web flow definition. The main disadvantage here is the tight coupling between business logic and the flow definition, and the fact that business method calls can make your web flow definition look crowded. It is proper for usage in simple web flows in simple applications.
- POJO action: Can be used to glue the flow logic with the business login in a decoupled way and provides a flexible way to solve business layer exceptions; but the disadvantage is that the flow definitions might become more complex.
- Plain action: There are not many cases when this should be used, except of course, for explanatory exercises when teaching Spring Web Flow.
- MultiAction: Offers all the advantages of a POJO action, and the code for the implementation class might become quite complex.
It is recommended to use POJO actions and MultiActions, if possible, while taking into account the complexity of the flow definition vs. the complexity of the action class.
For any classes used to implement actions, the RequestContext is needed to obtain access to contextual information about the executing request. A new instance of this object is created every time there is a start, signalEvent(resume flow), or refresh to reconstruct the last viewed selection when the user requests a different response.
- getFlowScope(): Returns a map that can be used to get/set flowScope attributes.
- getRequestScope(): The same as getFlowScope(), but for the requestScope.
- getActiveFlow(), getCurrentState(), getFlowExecutionURL(): Access information about the flow itself; typically used for auditing and debugging applications.
- getMessageContext(): This can be used when an exception is thrown during an action execution on order to display an internationalized message regarding the error.
- getExternalContext(): Accesses information about the calling context.
Decision States
The decision state type is an alternative for an action state type; when based on an evaluated expression, there are multiple possibilities of transitioning. As you have seen so far with action-state, the only outcome is the transition to a "success" view-state or the reload of the current view-state to display an error message. The decision state allows for branching of the transition process by using a practical if/then/else syntax, which allows an easier transitioning control. Similar to if/then/else statements in Java, the condition returns a Boolean value that determines the next state to go. When more conditions are required, an action state is more suitable.
<!-- newPerson-flow.xml -->
<decision-state id="checkDuplicate">
   <if test="personService.isNewPerson(person)" then="enterIdentityCardInfo"
                   else="reviewExistingPerson"/>
  </decision-state>
A new view-state has been introduced in this example, reviewExistingPerson; it allows the user to inspect the person already in the system to verify that the existing person is the one he tried to insert.
A decision state can be used in the final proposed flow to implement in this chapter, which is to check if a person’s age is greater than 18 so that an account can be created; else, end the execution:
<!-- newPerson-flow.xml -->
<decision-state id="checkAdult">
   <if test="personService.isAdult(person)" then="enterAccountInfo"
                         else="end"/>
  </decision-state>

  //PersonService.java
  import java.time.*;
  ...
@Service("personService")
public class PersonService {

   // using Java 8 classes to determine age
   public boolean isAdult(Person person){
        Date input = person.getDateOfBirth();
        Instant instant = input.toInstant();
        ZonedDateTime zdt = instant.atZone(ZoneId.systemDefault());
        LocalDate birthday = zdt.toLocalDate();
        long yearsDelta = birthday.until(LocalDate.now(), ChronoUnit.YEARS);
        return yearsDelta>=18;
   }
}
Exception Handling
In the previous examples, the DuplicatePersonException exception class was mentioned. This class was introduced to throw an exception when the user tries to add an existing person to the system and to exemplify exception handling in the context of web flows.
  public class DuplicatePersonException extends RuntimeException {

    private Person person;

    public DuplicatePersonException(Person person) {
        super("The person already exists in the system.");
        this.person = person;
    }

    public Person getPerson() {
        return person;
    }
}
When exceptions are raised in the context of a flow execution, they can be taken care of in a few ways:
- Let the exception propagate and define the web flow in such a way that an exception will cause a transition to an exception view-state.
<transition on-exception="com.pr.problem.DuplicatePersonException"
to="errorEndState" /> - Handle any exception globally; define a state in which any other state will transition into when an exception is thrown.
<flow>
    ...
    <global-transitions>
        <transition
           on-exception="com.pr.problem.DuplicatePersonException"
                  to="errorEndState" />
    </global-transitions>
</flow> - Use an <exception-handler bean="flowExceptionHandler"/> element as a child element to any state type. The bean set by the bean attribute of this element is a bean of type org.springframework.webflow.engine.FlowExecutionExceptionHandler. It is recommended to avoid this option, as it can leave the flow in an invalid state when used incorrectly. The most simple way to create a flow executor handler is to extend the TransitionExecutingFlowExecutionExceptionHandler class that extends the previously mentioned interface. The following code snippet is the equivalent of the <global-transition /> element defined previously.
 import org.springframework.webflow.engine.support.
          TransitionExecutingFlowExecutionExceptionHandler;

public class PersonFlowExceptionHandler
    extends TransitionExecutingFlowExecutionExceptionHandler {

    public PersonFlowExceptionHandler() {
        super.add(DuplicatePersonException.class, "errorStateId");
    }
} - Catch the exception in an Action class and return an error event.
 //PersonAction.java
@WebFlowAction
public class PersonAction extends MultiAction {

    @Autowired
    PersonManager personManager;

    public Event isNewPerson(RequestContext context) throws Exception {
        Person person = (Person) context.getFlowScope().get("person");
        String pnc = PncBuilder.build(person);
        Person existingPerson = personManager.getByPnc(pnc);
        if (existingPerson == null) {
            return success();
        } else {
            return error();
        }
    }
}
![]() ! Before continuing further, take a look at the 12-pr-webflow-actions2-practice module project. This project is expected to create a new Person instance, add all the details for it, and also insert a bank account into the system. To do this, all the elements presented until now are used: actions, action-states, decision-states, and also exception handling. The flow in Figure 7-18 requires a Hospital instance to be selected to create a Person instance. But what if the Hospital instance does not already exist in the system and has to be created first? Adding extra logic to do this will make the definition of the flow complicated and will connect the Person and Hospital logic. The proper way to do this is to add a subflow with the specific purpose of creating a new Hospital instance.
! Before continuing further, take a look at the 12-pr-webflow-actions2-practice module project. This project is expected to create a new Person instance, add all the details for it, and also insert a bank account into the system. To do this, all the elements presented until now are used: actions, action-states, decision-states, and also exception handling. The flow in Figure 7-18 requires a Hospital instance to be selected to create a Person instance. But what if the Hospital instance does not already exist in the system and has to be created first? Adding extra logic to do this will make the definition of the flow complicated and will connect the Person and Hospital logic. The proper way to do this is to add a subflow with the specific purpose of creating a new Hospital instance.

Figure 7-18. Add person and account flow definition
Figure 7-18 depicts a logical schema of the web flow definition to be implemented in this project. All elements are required to be defined in the newPerson-flow.xml. The isNewPerson is represented as a triangle, a decision-state, and the confirmAdult is represented as a fancy rectangle, an action-state. The Cancel and the Error states can be reached form any other state using global transitions, so they are not connected to the schema because it would make it quite difficult to read.
In this example, some pieces of the flow definition are missing, but all the classes needed to wrap up the flow are fully developed and ready to use. The flow execution require three flow model objects: a PersonObjectModel instance, an IdentityCard, and an Account instance. The Account class was not used until now because every notion presented was covered without any complex logic being necessary. The Account class contains four fields that are populated by the user.
- The IBAN7 field is mandatory and is considered to be 10 to 30 characters long, all digits. An exception is thrown if the data introduced by the user does not match this restriction.
- The bank field is mandatory and a string representing a bank name is required.
- The status field represents the status of the account and is also mandatory.
- The amount field is the amount of money being held by the banking account; this field is not mandatory.
In the following list, they steps of the execution and resources are presented to you, in the order you have to use them in the newPerson-flow.xml definition:
- The enterPersonInfo view-state is the same as in the previous code sample; the initial state of the flow where a form is displayed to the user for basic personal information to be provided. All fields but middleName are mandatory and must be validated; the hospital drop-down list must be populated when the view-state is rendered. The event name that causes the transition to the next step is called next and the next state is called isNewPerson.
- The contents of the view-state definition are missing and must be implemented to behave as described previously. (TODO 41) After the implementation is done you should see the view as in Figure 7-19.
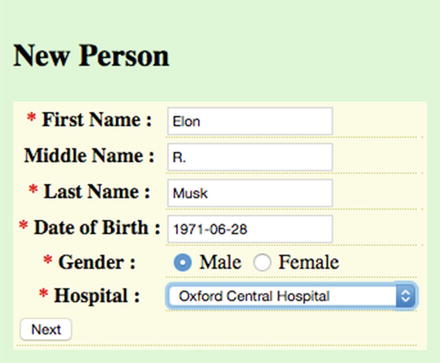
Figure 7-19. The enterPersonInfo view
- The isNewPerson is a decision state using the result returned by calling the personService.isNewPerson(person) method as a condition. The method is defined in the com.pr.servicePersonService class, and a bean of this type named personService is already defined. If the evaluation returns true, transitioning is done to the enterIdentityCardInfo state, otherwise to the reviewExistingPerson state. To test the transition to the reviewExistingPerson state, insert a person born on October 1, 1935 at General Hospital.
The content of this decision-state definition is missing and must be implemented to behave as described earlier. (TODO 42)
- The enterIdentityCardInfo is a view state that displays to the user a form requesting identification information: values for the fields in the identityCard object. All information is mandatory. The event to transition to the next state, confirmAdult, is called save. The transition is done after evaluation of the personBuilder.savePersonEntity(person, identityCard) method, and saving the result in flowScope.existingPerson, because this flow variable is later used to create an account.
- The content of this view-state definition is missing and must be implemented to behave as described earlier. (TODO 43) After the implementation is done you should see the view as in Figure 7-20.

Figure 7-20. The enterIdentityCardInfo view
- The reviewExistingPerson is a view-state that displays the basic information of an existing person in the system, with the same personal numerical code as the Person instance that the user is trying to create. The data to populate the view is extracted at rendering time by calling personManager.getByPnc(person.pnc). The personManager id one of the data management beans presented in Chapter 2. It is defined in the 01-pr-service module project. The result of calling this method is saved in the flowScope.existingPerson, because this flow variable is later used to create an account. From this state, the user can transition to the confirmAdult state by using the event named continue.
- The content of this view-state definition is missing and must be implemented to behave as described earlier. (TODO 44) After the implementation is done you should see the view as in Figure 7-21.

Figure 7-21. The reviewExistingPerson view
- The confirmAdult state is an action-state that evaluates the personActions.isAdult expression. The class providing the implementation for this is com.pr.PersonActions; it is a class extending the MultiAction class presented earlier. On success, transition is done to the enterAccountInfo, and on error, transition is done to end, because obviously the Person instance does not represent an adult so a bank account cannot be added for this instance, thus this is where the flow execution ends. (TODO 45) The content of this action-state definition is missing and must be implemented to behave as described earlier.
- The enterAccountInfo is a view state that displays a form requesting minimum information for a bank account. The IBAN of the account must be unique in the system. If you want to test the validation for this field, just insert the value US1301101250000000012300695. Using the add event, if the information introduced is valid, a transition is done to the end state that displays the created person and banking information existing for it in the system.
- The content of this view-state definition is missing and must be implemented to behave as described earlier. (TODO 46) After the implementation is done you should see the view as in Figure 7-22.

Figure 7-22. The enterAccountInfo view
- error is a view-state used to display explicit content of the exceptions thrown in the application. It was implemented this way so that while resolving this exercise, you have a practical way to debug your problems, if you have any. In a real production application, the error view is simpler and more user-friendly.
- cancel is an end-state that the flow transitions into any time the user presses the Cancel button in any view.
- end is an end-state that redirects the user to a view with all the existing data for that person in the system.
- The <global-transaction /> element has two transition elements: one for the cancel scenario, when any the flow transitions to cancel, and one for any exception that is being thrown in the flow transition to the error state.
- When your implementation is correct and the data you inserted is valid, a new person should be created in the system and a new bank account should be added for it, and after the flow execution, you should be redirected to a view that displays the information, which looks similar to the one shown in Figure 7-23.

Figure 7-23. The view that the flow should redirect to after a successful execution
IMPORTANT OBSERVATIONS
The bind="false" attribute is needed, so the form is not validated before transitioning to the cancel state, as validation errors will prevent the transition.
<global-transitions>
   <transition on="cancel" to="cancel" bind="false" />
   <transition on-exception="java.lang.Exception" to="error" />
</global-transitions>
When using web flows, the exception handling is the most undocumented part of Spring Web Flow. Unless a web flow exception handler is used, or action states that return error events and add the exception object to the flowScope, catching and treating exceptions is very tricky. Developers are basically forced into writing the code. That’s why all web flow exceptions in this project cause a transition to the error view that uses JSP scriptlets to display a very detailed stacktrace that help developers reading this book to easily identify the mistakes in the code and configuration. The exception can be retrieved using the request. As mentioned, this view is only to be used for development purposes; for production, a more user-friendly view implementation should be used.
<!-- webapp/WEB-INF/error.jsp -->
<div class="error">
 <%
  Exception exception =
    (Exception) request.getAttribute("flowExecutionException");
  Exception cause =
    (Exception) request.getAttribute("rootCauseException");
 %>
...
 <%
   exception.printStackTrace(new java.io.PrintWriter(out));
 %>
...
 <% if (cause != null) { %>
  <h3>Cause: <%=cause.getMessage()%></h3>
   <p>
     <%
        cause.printStackTrace(new java.io.PrintWriter(out));
     %>
   </p>
   <%} %>
</div>
In case you insert data that is invalid, you can use the browser Back button to go back to the previous state and change the information. To prevent browsing back to a state previous to a transition with the Back button, the history attribute of the transaction element can be used:
<transition on="confirm" to="end" history="discard">
<!-- or invalidate all previous visited views in the browser history -->
<transition on="confirm" to="end" history="invalidate">
The default value for this attribute is preserve, which allows returning to a state before the execution of the transition and the data for the state is still accessible.
discard prevents backtracking to the state, meaning that all information related to the state is discarded and using the browser Back button results in a 500 HTTP internal server error.
invalidate prevents backtracking to the state, as well as any previously entered view-state, and pressing the browser Back button has the same effect as the previous case.
The proposed solution for this project can be found in the 12-pr-webflow-actions2-solution project.
Subflows
A subflow is a flow that is being invoked by another flow. It has its own scope and the parent flow execution is suspended while the subflow is being executed. The conversation scope is the only scope that is shared between the parent flow and the subflows, as depicted in Figure 7-7. The subflow must be defined in the application in the same manner as any flow; it has its own views and language resources, because it is essentially a flow.
A subflow is launched from a special state in a parent flow called subflow-state. In the following example, the newPerson flow calls the newHospital subflow.
<!-- newPerson-flow.xml-->
<flow ...>
 <view-state id="enterPersonInfo" model="person">
     <binder>...</binder>
       <transition on="next" to="isNewPerson" />
      <transition on="addHospital" to="newHospital"/>
 </view-state>

 <subflow-state id="newHospital"
              subflow="hospitals/newHospital" >
           <output name="hospital"/>
       <transition on="saveHospital" to="enterPersonInfo">
           <evaluate expression="hospitalManager.save(hospital)"
                  result="flashScope.hospital" />
           <set name="flashScope.hospitalMessage"
                value="hospital.msg.success" />
       </transition>
       <transition on="cancel" to="enterPersonInfo" />
   </subflow-state>
</flow>
The subflow in the previous example allows the user to insert a new Hospital instance in the system so that it can be used when the person is created, if the state transitioning into is saveHospital. The id of the subflow-state is the id of this state inside the newPerson flow definition. The subflow attribute is used to link this flow invocation with the flow definition, and contains the path inside the WEB-INF, where the flow definition and resources can be found. In the previous case, the flow definition file is located at /WEB-INF/hospitals/newHospital/newHospital-flow.xml. Once registered with the FlowDefinitionRegistry, the subflow can be referred from any flow using its logical name, which is composed of the location and the flow name as a value for the subflow attribute:
 \WebFlowConfig.java
 @Configuration
public class WebFlowConfig extends AbstractFlowConfiguration {
...

@Bean
public FlowDefinitionRegistry flowRegistry() {
  return getFlowDefinitionRegistryBuilder(flowBuilderServices())
      .setBasePath("/WEB-INF")
      .addFlowLocation("/persons/newPerson/newPerson-flow.xml")
      .addFlowLocation("/hospitals/newHospital/newHospital-flow.xml")
      .build();
      }
}

  <subflow-state id="newHospital"
               subflow="hospitals/newHospital" >
  <!-- hospitals = directory for Hospital specific resources -->
  <!-- newHospital = flow name-->
The key values used for transitions inside the parent flow are the ids of end-states in the subflow:
 <!-- newHospital-flow.xml-->
<flow ..>
   <var name="hospital" class="com.pr.ents.Hospital"/>

   <view-state id="enterHospitalInfo" model="hospital">
       <binder>
           <binding property="name" required="true"/>
           <binding property="code" required="true"/>
           <binding property="address"/>
           <binding property="location" required="true"/>
       </binder>
       <transition on="save" to="saveHospital"/>
       <transition on="cancel" to="cancel" bind="false" />
   </view-state>

   <end-state id="saveHospital">
       <output name="hospital" value="hospital"/>
   </end-state>

   <end-state id="cancel"/>

</flow>
The flashScope.hospitalMessage variable is used to display a message telling the user that the Hospital instance was saved correctly and can be used.
Although the conversation scope is accessible to the parent flow and subflows, global variables usage is discouraged, because it reduces the readability of the code, so that passing parameters between the parent flow and the subflow is more appropriate.
The <output name="hospital"/> is an output parameter designed to return the Hospital instance created by the newHospital flow to the parent flow; it is assigned the flashScope (see the evaluate element marked with (1) in the following code snippet).
There are also input parameters, required or not, to provide a parent flow variable value to the subflow. In the previous case, there is nothing needed, but assuming that you would need to send a Person instance as a manager for the hospital we are trying to create, the preceding definitions will change a little. The instance given as parameter has the flowScope in both of the flows because it is defined right under the <flow /> element.
<!-- newPerson-flow.xml-->
 <flow ...>
 <var name="person" class="com.pr.ents.Person"/>

  <view-state id="enterPersonInfo" model="person">
      <binder>...</binder>
        <transition on="next" to="isNewPerson" />
       <transition on="addHospital" to="newHospital"/>
  </view-state>

  <subflow-state id="newHospital"
               subflow="hospitals/newHospital" >
           <input name="manager" value="person"/>
           <output name="hospital"/>

        <transition on="saveHospital" to="enterPersonInfo">
          (1) <evaluate expression="hospitalManager.save(hospital)"
                  result="flashScope.hospital" />
           <set name="flashScope.hospitalMessage"
                value="hospital.msg.success" />
        </transition>
        <transition on="cancel" to="enterPersonInfo" />
    </subflow-state>
 </flow>

<!-- newHospital-flow.xml-->
 <flow ...>

   <input name="manager" required="true"/>
   <var name="hospital" class="com.pr.ents.Hospital"/>

    <view-state id="enterHospitalInfo" model="hospital">
    ...
    </view-state>

 </flow>
When subflows are involved, unit testing is quite tricky; that’s why it is recommended to mock or stub them when the focus of the testing is on the parent flow. By overriding the configureFlowBuilderContext method from AbstractXmlFlowExecutionTests, a mock definition for the subflow can be added to the context:
import org.springframework.webflow.test.execution.AbstractXmlFlowExecutionTests;

public class NewPersonFlowTest extends AbstractXmlFlowExecutionTests {
...
@Override
    protected void configureFlowBuilderContext
             (MockFlowBuilderContext builderContext) {

        // setup newHospital subflow
        Flow newHospital = new Flow("newHospital");
        State start = new State(newHospital, "newHospital") {
             @Override
             protected void doEnter(RequestControlContext context)
                     throws FlowExecutionException {
                 // empty
             }
        };
        newHospital.setStartState(start);
        builderContext.registerSubflow(newHospital);
    }
    ...
}