
14 Laphroaig screams high five to the heavens!

Gott bewahre mich vor jemand, der nur ein Büchlein gelesen hat; эTO самиздат.
The MD5 hash of this PDF is5EAF00D25C14232555A51A50B126746C. March 20, 2017.
€0, $0 USD, $0 AUD, 10s 6d GBP, 0 RSD, 0 SEK, $50 CAD, 6 × 1029 Pengő (3 × 10⁸ Adőpengő).

Neighbors, please join me in reading this fifteenth release of the International Journal of Proof of Concept or Get the Fuck Out, a friendly little collection of articles for ladies and gentlemen of distinguished ability and taste in the field of reverse engineering and the study of weird machines. This release is a gift to our fine neighbors in Heidelberg, Canberra, and Miami.
After our paper release, and only when quality control has been passed, we will make an electronic release with a filename of pocorgtfo14.pdf. It is a valid PDF, ZIP, and a cartridge ROM for the Nintendo Entertainment System (NES).
On page 14, Vicki Pfau shares with us the story of how she reverse engineered the Pokémon Z-Ring, an accessory for the Nintendo 3DS whose wireless connection uses audio, rather than radio. In true PoC||GTFO spirit, she then re-implements this protocol for the classic GameBoy.
Pastor Manul Laphroaig is back with a new sermon on page 32 concerning Liet Kynes, Desert Studies, and the Weirding Way.
Taylor Hornby on page 37 shares with us some handy techniques for communicating between processors by reading shared memory pages, without writes.
Mike Myers on page 46 shares some tricks for breaking Windows user-mode keyloggers through the injection of fake events.
Niek Timmers and Albert Spruyt consider a rather specific, but in these days important, question in exploitation: suppose that there is a region of memory that is encrypted, but not validated or write-protected. You haven’t got the key, so you’re able to corrupt it, but only in multiples of the block size and only without a clue as to which bits will become what. On page 66, they calculate the odds of that corrupted code becoming the equivalent of a NOP sled in ARM and Thumb, in userland and kernel, on bare metal and in emulation.
In PoC||GTFO 13:4, Micah Elizabeth Scott shared with us her epic tale of hacking a Wacom tablet. Her firmware dump in that article depended upon voltage-glitching a device over USB, which is made considerably easier by underclocking both the target and the USB bus. That was possible because she used the synchronous clock on an SPI bus to shuffle USB packets between her underclocked domain and real-time. In her latest article, to be found on page 74, she explains how to bridge an underclocked Ethernet network by routing packets over GDB, OpenOCD, and a JTAG/SWD bus.
Geoff Chappell is back again, ready to take you to a Windows Wonderland, where you will first achieve a Mad Hatter’s enlightenment, then wonder what the Caterpillar was smoking. Seven years after the Stuxnet hype, you will finally get the straight explanation of how its Control Panel shortcuts were abused. Just as in 2010, when he warned that bugs might remain, and in 2015 when Microsoft admitted that bugs did in fact remain, Geoff still thinks that some funny behaviors are lurking inside of the Control Panel and .LNK files. You will find his article on page 89, and remember what the dormouse said!
With the recent publication of a collided SHA1 PDF by the good neighbors at CWI and Google Research, folks have asked us to begin publishing SHA1 hashes instead of the MD5 sums that we traditionally publish. We might begin that in our next release, but for now, we received a flurry of nifty MD5 collisions. On page 112, Greg Kopf will show you how to make a PostScript image that contains its own checksum. On page 122, Mako describes a nifty trick for doing the same to a PDF, and on page 130 is Kristoffer Janke’s trick for generating a GIF that contains its own MD5 checksum.
On page 138, the Evans Sultanik and Teran describe how they coerced this PDF to be an NES ROM that, when run, prints its own MD5 checksum.
14:02 Z-Ring Phreaking from a Gameboy
by Vicki Pfau
At the end of last year, following their usual three-year cycle, Nintendo released a new generation of Pokémon games for their latest portable console, the Nintendo 3DS. This time, their new entry in the series spectacularly destroyed several sales records, becoming the most pre-ordered game in Nintendo’s history. And of course, along with a new Pokémon title, there are always several things that follow suit, such as a new season of the long running anime, a flood of cheapo toys, and datamining the latest games into oblivion. This article is not about the anime or the datamining; rather, it’s about one of the cheapo toys.
The two new games, Pokémon Sun and Pokémon Moon, focus on a series of four islands known as Alola in the middle of the ocean. Alola is totally not Hawaii.0 The game opens with a cutscene of a mysterious girl holding a bag and running away from several other mysterious figures. Near the beginning of the game, the player character runs into this mystery girl, known as Lillie, as she runs up to a bridge, and a rare Pokémon named Nebby pops out of the bag and refuses to go back in. It shudders in fear on the bridge as it’s harried by a pack of birds—sorry, Flying type Pokémons. The player character runs up to protect the Pokémon, but instead gets pecked at mercilessly.
Nebby responds by blowing up the bridge. The player and Nebby fall to their certain doom, only to be saved by the Guardian Pokémon of the island, Tapu Koko, who grabs them right before they hit the bottom of the ravine. Tapu Koko flies up to where Lillie is watching in awe, and delivers the pair along with an ugly stone that happens to have a well-defined Z shape on it. This sparkling stone is crafted by the kahuna of the island1 into what is known as a Z-Ring. So obviously there’s a toy of this.

In the game, the Z-Ring is an ugly, bulky stone bracelet given to random 11-year old children. You shove sparkling Z-Crystals onto it, and it lets you activate special Z-Powers on your Pokémon, unlocking super-special-ultimate Z-Moves to devastate an opponent. In real life, the Z-Ring is an ugly, bulky plastic bracelet given to random 11-year old children. You shove plastic Z-Crystals onto it, and it plays super-compressed audio as lights flash, and the ring vibrates a bit. More importantly, when you activate a Z-Power in-game, it somehow signals the physical Z-Ring to play the associated sound, regardless of which cheap plastic polyhedron you have inserted into it at the time. How does it communicate? Some people speculated about whether the interface was Bluetooth LE or a custom wireless communication protocol, but I had not seen anyone else reverse it. I decided to dig in myself.
The toy is overpriced compared to its build quality, but having seen one at a store recently, I decided to pick it up and take a look. After all, I’d done only minimal hardware reversing, and this seemed to be a good excuse to do more. The package included the Z-Ring bracelet, three Z-Crystals, and a little Pikachu toy. Trying to unbox it, I discovered that the packaging was horrendous. It’s difficult to remove all of the components without breaking anything. I feel sorry for all of the kids who got this for Christmas and then promptly broke off Pikachu’s tail as they eagerly tried to remove it from the plastic.
The bracelet itself has slots on the sides to hold six Z-Crystals and one on the top that has the signature giant Z around it. The slot on the top has three pogo pins, which connect to pads on a Z-Crystal. The center of these is GND, with one pin being used to light the LED through a series resistor (R1, 56 Ω) and the other pin being used to sense an identity resistor (R2, 18 kΩ for green).

It also has a tri-state switch on the side. One setting (Mode I) is for synchronizing to a 3DS, another (Mode II) is for role-play and synchronizes with six tracks on the Sun/Moon soundtrack, and the final (neutral) setting is the closest thing it has to an off mode. A button on the side will still light up the device in the neutral setting, presumably for store demo reasons.
My first step in reverse engineering the device was figuring out how to pair it with my 3DS. Having beaten my copy of Pokémon Sun already, I presumably had everything needed in-game to pair with the device, but there was no explicit mention of the toy in-game. Included in the toy’s packaging were two tiny pamphlets, one of which was an instruction manual. However, the instruction manual was extremely minimal and mostly just described how to use the toy on its own. The only thing I could find about the 3DS interface was an instruction to turn up the 3DS volume and set the audio to stereo. There was also a little icon of headphones with a line through them. I realized that it didn’t pair with the 3DS at all. It was sound-triggered!
I pulled out my 3DS, loaded up the game, and tried using a Z-Power in-game with the associated Z-Crystal inserted into the top of the toy. Sure enough, with the sound all the way up, the Z-Ring activated and synchronized with what the game was doing.
Now that I knew I’d need to record audio from the game, I pulled up Audacity on my laptop and started recording game audio from the speakers. Expecting the audio to be in ultrasonic range, I cranked up the sample rate to 96 kHz (although whether or not my laptop microphone can actually detect sound above 22 kHz is questionable) and stared at it in Audacity’s spectrogram mode. Although I saw a few splotches at the top of the audible range, playing them back did not trigger the Z-Ring at all. However, playing back the whole recording did. I tried playing subsets of the sample until I found portions that triggered the Z-Ring. As I kept cropping the audio shorter and shorter, I finally found what I was looking for. The trigger wasn’t ultrasonic. It was in fact completely audible!
When you activate a Z-Power in the game, a short little jingle always plays. I had previously assumed that the jingle was just for flavor, but when I looked at it, there were several distinctive lines on the spectrogram. The very beginning of the jingle included seven different tones, so I tried playing back that section. Sure enough, the Z-Ring activated. I cropped it down to the first four tones, and the Z-Ring would reliably activate and play a specific sample whenever I played the audio back. Rearranging the tones, I got it to play back a different sample. That was how to signal the toy, but now the task was finding all of the samples stored on the Z-Ring without dumping the ROM.
Looking at the recording in the spectrogram, it was pretty clear that the first tone, which lasts all of 40 milliseconds and is a few hundred hertz lower than the rest of the signal, is a marker indicating that the next few tones describe which sample to play back. I quickly reconstructed the four tones as just sine waves in Audacity to test my hypothesis, and sure enough, I was able to trigger the tones using the constructed signal as well. However, that was a tedious process and did not lend itself to being able to explore and document all of the tone combinations. I knew I needed to write some software to help me quickly change the tones, so I could document all the combinations. Since it looked as if the signal was various combinations of approximately four different frequencies, it would take some exploration to get everything.
I’m lazy and didn’t feel like writing a tone generator and hooking it up to an audio output device and going through all of the steps I’d need to get sine waves of programmatically-defined frequencies to come out of my computer. However, I’m a special kind of lazy, and I really appreciate irony. The game is for the 3DS, right? What system is Pokémon famous for originating on? The original Game Boy, a platform with hardware for generating audible tones! Whereas the 3DS also has a microphone, the audio communication is only used in one direction. Perfect!
Now, I’d never written a program for the Game Boy, but I had implemented a Game Boy emulator. Fixing bugs on an emulator requires debugging both the emulator and the emulated software at the same time, so I’m quite familiar with the Game Boy’s unique variant of Z80, making the barrier of entry significantly lower than I thought it would be. I installed Rednex GameBoy Development System,2 one of the two most popular toolchains for compiling Game Boy homebrew ROMs, and wrote a few hundred lines of assembly. I figured the Game Boy’s audio channel 3, which uses 32-sample wavetables of four-bit audio, would be my best chance to approximate a sine wave. After a bit of experimenting, I managed to get it to create the right tones. But the first obstacle to playing back these tones properly was the timing. The first tone plays for 40 milliseconds, and the remaining tones each last 20 milliseconds. A frame on the gameboy is roughly 16 milliseconds long, so I couldn’t synchronize on frame boundaries, yet I found a busy loop to be impractical. (Yes, gameboy games often use busy loops for timing-sensitive operations.)
Fortunately, the gameboy has a built-in timer that can fire an interrupt after a given number of cycles, so, after a bit of math, I managed to get the timing right. Success! I could play back a series of tones from a table in RAM with the right timing and the right frequencies.
Sure enough, when I played this back in an emulator, the Z-Ring activated! The ROM plays the tones upon boot and had no user interface for configuring which tones to play, but recompiling the ROM was fast enough that it wasn’t really an issue.
The natural next step was uploading the program to a real Game Boy. I quickly installed the program onto a flash cart that I had purchased while developing the emulator. I booted up my original Game Boy, the tones played, and. . . the Z-Ring did not activate. No matter how many times I restarted the program, the tones would not activate the Z-Ring. I recorded the audio it was playing, and the tones were right. I was utterly confused until I looked a bit closer at the recording: the signal was getting quieter with every subsequent tone. I thought that this must be a bug in the hardware, as the Game Boy’s audio hardware is notorious for having different quirks between models and even CPU revisions. I tried turning off the audio channel and turning it back on again a few cycles later to see if that fixed anything. It still worked in the emulator, so I put it back on the flash cart, and this time it worked! I could consistently trigger one of the samples I’d seen, but some of the other ones seemed to randomly select one of three tones to play. Something wasn’t quite right with my tone generation, so I decided to halve the sample period, which would give me more leeway to finely adjust the frequency. This didn’t appear to help at all, unfortunately. Scoping out all of the combinations of the tones I thought were in range yielded about thirty responses out of the 64 combinations I tried. Unfortunately, many of the responses appeared to be the same, and many of them weren’t consistent. Additionally, samples I knew the Z-Ring had were not triggered by any of these combinations. Clearly something was wrong.

I needed a source of several unique known-good signals, so I scoured YouTube and found an “All Z-Moves” video. Sure enough, it triggered from the Z-Ring a bunch of reactions I hadn’t seen yet. Taking a closer look, I saw that the signal was actually all seven tones (not four), and extending the program to use seven tones suddenly yielded much more consistent results. Great! The bad news was that beyond the first, fixed tone, there were four variations of each subsequent tone, leading to a total of 46 combinations. That’s 4,096, a hell of a lot to scope out.
I decided to take another route and catalog every signal in the video as a known pattern. I could try other signals later. Slowly, I went through the video and found every trigger. It seemed that there were two separate commands per move: one was for the initial half of the scene, where the Pokémon is “surrounded by Z-Power,” and then the actual Z-Move was a separate signal. Unfortunately, three of the former signals had been unintentionally cropped from the video, leaving me with holes in my data. Sitting back and looking at the data, I started noticing patterns. I had numbered each tone from 0 (the lowest) to 3 (the highest), and every single one of the first 15 signals (one for each of the 18 Pokémon types in-game, minus the three missing types) ended with a 3. Some of the latter 18 (the associated Z-Powers per type) ended with a 1, but most ended with a 3. I wasn’t quite sure what that meant until I saw that other tones were either a 0 or a 2, and the remainder were either a 1 or a 3. Each tone encoded only one bit, and they were staggered to make sure the adjacent bits were differentiable!
This reduced the number of possibilities from over four thousand to a more manageable sixty-four. It also lent itself to an easy sorting technique, with the last bit being MSB and the first being LSB. As I sorted the data, I noticed that the first 18 fell neatly into the in-game type ordering, leaving three holes for the missing types, and the next 18 all sorted identically. This let me fill in the holes and left me with 36 of the 64 combinations already filled in. I also found 11 special, Pokémon-specific (instead of type-specific) Z-Moves, giving me 47 total signals and 17 holes left. As I explored the remaining holes, I found five audio samples of Pikachu saying different things, and the other 12 didn’t correspond to anything I recognized.
In the process, I added a basic user interface to the Game Boy program that lets you either select from the presets or set the tones manually. Given the naming scheme of these Z-Crystals,3 I naturally decided to name it Phreakium-Z.4
I thought I had found all of the Z-Ring’s sound triggers, but it was pointed out to me while I was preparing to publish my results that the official soundtrack release had six “Z-Ring Synchronized” tracks that interfaced with the Z-Ring. I had already purchased the soundtrack, so I took a look and tried playing back the tracks with the Z-Ring nearby. Nothing happened. More importantly, the distinctive jingle of the 5 kHz tones was completely absent from the tracks. So what was I missing? I tried switching it from Mode I into Mode II, and the Z-Ring lit up, perfectly synchronizing with the music. But where were the triggers? There was nothing visible in the 4–6 kHz range this time around. Although I could clip portions of tracks down to specific triggers, I couldn’t see anything in the spectrogram until I expanded the visible range all the way up to 20 kHz. This time the triggers were indeed ultrasonic or very nearly so.
Human hearing caps out at approximately 20 kHz, but most adults can only hear up to about 15 kHz. The sample rates of sound devices are typically no greater than 48 kHz, allowing the production of frequencies up to 24 kHz, including only a narrow band of ultrasonic frequencies. Given the generally poor quality of speakers at extremely high frequencies, you can imagine my surprise when I saw a very clear signal at around 19 kHz.

Zooming in, I saw the distinctive pattern of a lower, longer initial tone followed by several staggered data tones. However, this time it was a 9-bit signal, with a 60 ms initial tone at exactly 18.5 kHz and a 20 ms gap between the bits. Unfortunately, 18 kHz is well above the point at which I can get any fine adjustments in the Game Boy’s audio output, so I needed to shift gears and actually write something for the computer. At first I wrote something quick in Rust, but this proved to be a bit tedious. I realized I could make something quite a bit more portable: a JavaScript web interface using WebAudio.5
After narrowing down the exact frequencies used in the tones and debugging the JavaScript (as it turns out, I’ve gotten quite rusty), I whipped up a quick interface that I could use to explore commands. After all, 512 commands is quite a bit more than the 64 from Mode I.
Despite being a larger number of combinations, 512 was still a reasonable number to explore in a few hours. After I got the WebAudio version working consistently, I added the ability to take a number from 0 to 511 and output the correspondingly indexed tone, and I began documenting the individual responses generated.
I noticed that the first 64 indices of the 512 were in fact identical to the 64 Mode I tones, so that was quick to document. Once I got past those, I noticed that the responses from the Z-Ring no longer corresponded to game actions but were instead more granular single actions. For example, instead of a sequence of vibrations and light colors that corresponded to the animation of a Z-Move in game, a response included only one sound effect coupled with one lighting effect or one lighting effect with one vibration effect. There was also a series of sound effects that did not appear in Mode I and that seemed to be linked to individual Pokémon types. Many of the responses seemed randomly ordered, almost as though the developers had added the commands ad hoc without realizing that ordering similar responses would be sensible. Huge swaths of the command set ended up being the Cartesian product of a light color with a vibration effect. This ended up being enough of the command set that I was able to document the remainder of the commands within only a handful of hours.
Most of the individual commands weren’t interesting, but I did find eight additional Pikachu voice samples and a rather interesting command that — when played two or three times in a row — kicked the Z-Ring into what appeared to be a diagnostic mode. It performed a series of vibrations followed by a series of tones unique to this response, after which the Z-Ring stopped responding to commands. After a few seconds, the light on the bottom, which is completely undocumented in the manual and had not illuminated before, started blinking, and the light on top turned red. However, it still didn’t respond to any commands. Eventually I discovered that switching it to the neutral mode would change the light to blue for a few seconds, and then the toy would revert to a usable state. I’m still unsure of whether this was a diagnostic mode, a program upload mode, or something completely different.
By this point I’d put in several hours over a few days into figuring out every nook and cranny of this device. Having become bored with it, I decided to bite the bullet and disassemble the hardware. I found inside a speaker, a microphone, a motor with a lopsided weight for generating the vibrations, and a PCB. The PCB, although rather densely populated, did not contain many interesting components other than an epoxy blob labeled U1, an MX25L8006E flash chip labeled U2, and some test points. You will find a dump of this ROM attached.6 At this point, I decided to call it a week and put the Z-Ring back together; it was just a novelty, after all.
These are the 512 commands of the Z-Ring.
000: Normalium-Z
001: Firium-Z
002: Waterium-Z
003: Grassium-Z
004: Electrium-Z
005: Icium-Z
006: Fightium-Z
007: Poisonium-Z
008: Groundium-Z
009: Flyium-Z
00A: Psychium-Z
00B: Buginium-Z
00C: Rockium-Z
00D: Ghostium-Z
00E: Dragonium-Z
00F: Darkium-Z
010: Steelium-Z
011: Fairium-Z
012: Breakneck Blitz
013: Inferno Overdrive
014: Hydro Vortex
015: Bloom Doom
016: Gigavolt Havoc
017: Subzero Slammer
018: All-Out Pummeling
019: Acid Downpour
01A: Tectonic Rage
01B: Supersonic Skystrike
01C: Shattered Psyche
01D: Savage Spin-Out
01E: Continental Crush
01F: Never-Ending Nightmare
020: Devastating Drake
021: Black Hole Eclipse
022: Corkscrew Crash
023: Twinkle Tackle
024: Sinister Arrow Raid (Decidium-Z)
025: Malicious Moonsault (Incinium-Z)
026: Oceanic Operetta (Primarium-Z)
027: Catastropika (Pikachunium-Z)
028: Guardian of Alola (Tapunium-Z)
029: Stoked Sparksurfer (Aloraichium-Z)
02A: Pulverizing Pancake (Snorlium-Z)
02B: Extreme Evoboost (Eevium-Z)
02C: Genesis Supernova (Mewium-Z)
02D: Soul-Stealing 7-Star Strike (Marshadium-Z)
02E: (unknown)
02F: (unknown)
030: 10,000,000 Volt Thunderbolt (Pikashunium-Z)
031: (unknown)
032: (unknown)
033: (unknown)
034: (unknown)
035: (unknown)
036: (unknown)
037: (unknown)
038: (unknown)
039: Pikachu 1
03A: Pikachu 2
03B: Pikachu 3
03C: Pikachu 4
03D: Pikachu 5
03E: (unknown)
03F: (no response)
040: SFX/Light (Normal)
041: SFX/Light (Fire)
042: SFX/Light (Water)
043: SFX/Light (Grass)
044: SFX/Light (Electric)
045: SFX/Light (Ice)
046: SFX/Light (Fighting)
047: SFX/Light (Poison)
048: SFX/Light (Ground)
049: SFX/Light (Flying)
04A: SFX/Light (Psychic)
04B: SFX/Light (Bug)
04C: SFX/Light (Rock)
04D: SFX/Light (Ghost)
04E: SFX/Light (Dragon)
04F: SFX/Light (Dark)
050: SFX/Light (Steel)
051: SFX/Light (Fairy)
052: (no response)
053: Vibration (soft, short)
054: Vibration (soft, medium)
055: Vibration (pattern 1)
056: Vibration (pattern 2)
057: Vibration (pattern 3)
058: Vibration (pattern 4)
059: Vibration (pattern 5)
05A: Vibration (pattern 6)
05B: Vibration (pattern 7)
05C: Vibration (pattern 8)
05D: Vibration (pattern 8)
05E: Vibration (pattern 9)
05F: Vibration (pattern 10)
060: Vibration (pattern 11)
061: Vibration (pattern 12)
062: Vibration (pattern 13)
063: Vibration (pattern 14)
064: Light (yellow)
065: Light (pale blue)
066: Light (white)
067: Light (pattern 1)
068: Light (pattern 2)
069: Vibration (pattern 15)
06A: Vibration (pattern 16)
06B: Light/Vibration (red, very short)
06C: Light/Vibration (red, short)
06D: Light/Vibration (red, medium)
06E: Light (red)
06F: Light (yellow/green)
070: Light (green)
071: Light (blue)
072: Light (purple)
073: Light (pale purple)
074: Light (magenta)
075: Light (pale green)
076: Light (cyan)
077: Light (pale blue/purple)
078: Light (gray)
079: Light (pattern purple, pale purple)
07A: Light/Vibration (pale yellow, short)
07B: Light/Vibration (pale yellow, short)
07C: (no response)
07D: (no response)
07E: Self test/program mode? (reboots afterwards)
07F: Light (pale yellow)
080: Light (pale blue)
081: Light (pale magenta)
082: SFX/Vibration (Normal)
083: SFX/Vibration (Fire)
084: SFX/Vibration (Water)
085: SFX/Vibration (Grass)
086: SFX/Vibration (Electric)
087: SFX/Vibration (Ice)
088: SFX/Vibration (Fighting)
089: SFX/Vibration (Poison)
08A: SFX/Vibration (Ground)
08B: SFX/Vibration (Flying)
08C: SFX/Vibration (Psychic)
08D: SFX/Vibration (Bug)
08E: SFX/Vibration (Rock)
08F: SFX/Vibration (Ghost)
090: SFX/Vibration (Dragon)
091: SFX/Vibration (Dark)
092: SFX/Vibration (Steel)
093: SFX/Vibration (Fairy)
094: Pikachu 1
095: Pikachu 2
096: Pikachu 3
097: Pikachu 4
098: Pikachu 5
099: Vibration (speed 1, hard, 2x)
09A: Vibration (speed 1, hard, 4x)
09B: Vibration (speed 1, hard, 8x)
09C: Vibration (speed 1, hard, 16x)
09D: Vibration (speed 1, pattern, 2x)
09E: Vibration (speed 1, pattern, 4x)
09F: Vibration (speed 1, pattern, 8x)
0A0: Vibration (speed 1, pattern, 16x)
0A1: Vibration (speed 2, hard, 2x)
0A2: Vibration (speed 2, hard, 4x)
0A3: Vibration (speed 2, hard, 8x)
0A4: Vibration (speed 2, hard, 16x)
0A5: Vibration (speed 2, pattern, 2x)
0A6: Vibration (speed 2, pattern, 4x)
0A7: Vibration (speed 2, pattern, 8x)
0A8: Vibration (speed 2, pattern, 16x)
0A9: Vibration (speed 3, hard, 2x)
0AA: Vibration (speed 3, hard, 4x)
0AB: Vibration (speed 3, hard, 8x)
0AC: Vibration (speed 3, hard, 16x)
0AD: Vibration (speed 3, pattern, 2x)
0AE: Vibration (speed 3, pattern, 4x)
0AF: Vibration (speed 3, pattern, 8x)
0B0: Vibration (speed 3, pattern, 16x)
0B1: Vibration (speed 4, hard, 2x)
0B2: Vibration (speed 4, hard, 4x)
0B3: Vibration (speed 4, hard, 8x)
0B4: Vibration (speed 4, hard, 16x)
0B5: Vibration (speed 4, pattern, 2x)
0B6: Vibration (speed 4, pattern, 4x)
0B7: Vibration (speed 4, pattern, 8x)
0B8: Vibration (speed 4, pattern, 16x)
0B9: Vibration (speed 5, hard, 2x)
0BA: Vibration (speed 5, hard, 4x)
0BB: Vibration (speed 5, hard, 8x)
0BC: Vibration (speed 5, hard, 16x)
0BD: Vibration (speed 5, pattern, 2x)
0BE: Vibration (speed 5, pattern, 4x)
0BF: Vibration (speed 5, pattern, 8x)
0C0: Vibration (speed 6, hard, 16x)
0C1: Vibration (speed 6, hard, 2x)
0C2: Vibration (speed 6, hard, 4x)
0C3: Vibration (speed 6, hard, 8x)
0C4: Vibration (speed 6, hard, 16x)
0C5: Vibration (speed 6, pattern, 2x)
0C6: Vibration (speed 6, pattern, 4x)
0C7: Vibration (speed 6, pattern, 8x)
0C8: Vibration (speed 6, pattern, 16x)
0C9: Vibration (speed 7, hard, 2x)
0CA: Vibration (speed 7, hard, 4x)
0CB: Vibration (speed 7, hard, 8x)
0CC: Vibration (speed 7, hard, 16x)
0CD: Vibration (speed 7, pattern, 2x)
0CE: Vibration (speed 7, pattern, 4x)
0CF: Vibration (speed 7, pattern, 8x)
0D0: Vibration (speed 7, pattern, 16x)
0D1: Vibration (speed 8, hard, 2x)
0D2: Vibration (speed 8, hard, 4x)
0D3: Vibration (speed 8, hard, 8x)
0D4: Vibration (speed 8, hard, 16x)
0D5: Vibration (speed 8, pattern, 2x)
0D6: Vibration (speed 8, pattern, 4x)
0D7: Vibration (speed 8, pattern, 8x)
0D8: Vibration (speed 8, pattern, 16x)
0D9: Vibration (speed 9, hard, 2x)
0DA: Vibration (speed 9, hard, 4x)
0DB: Vibration (speed 9, hard, 8x)
0DC: Vibration (speed 9, hard, 16x)
0DD: Vibration (speed 9, pattern, 2x)
0DE: Vibration (speed 9, pattern, 4x)
0DF: Vibration (speed 9, pattern, 8x)
0E0: Vibration (speed 9, pattern, 16x)
0E1: Vibration (speed 10, hard, 2x)
0E2: Vibration (speed 10, hard, 4x)
0E3: Vibration (speed 10, hard, 8x)
0E4: Vibration (speed 10, hard, 16x)
0E5: Vibration (speed 10, pattern, 2x)
0E6: Vibration (speed 10, pattern, 4x)
0E7: Vibration (speed 10, pattern, 8x)
0E8: Vibration (speed 10, pattern, 16x)
0E9: Vibration (speed 11, hard, 2x)
0EA: Vibration (speed 11, hard, 4x)
0EB: Vibration (speed 11, hard, 8x)
0EC: Vibration (speed 11, hard, 16x)
0ED: Vibration (speed 11, pattern, 2x)
0EE: Vibration (speed 11, pattern, 4x)
0EF: Vibration (speed 11, pattern, 8x)
0F0: Vibration (speed 11, pattern, 16x)
0F1: Vibration (speed 12, hard, 2x)
0F2: Vibration (speed 12, hard, 4x)
0F3: Vibration (speed 12, hard, 8x)
0F4: Vibration (speed 12, hard, 16x)
0F5: Vibration (speed 12, pattern, 2x)
0F6: Vibration (speed 12, pattern, 4x)
0F7: Vibration (speed 12, pattern, 8x)
0F8: Vibration (speed 12, pattern, 16x)
0F9: Vibration (speed 13, hard, 2x)
0FA: Vibration (speed 13, hard, 4x)
0FB: Vibration (speed 13, hard, 8x)
0FC: Vibration (speed 13, hard, 16x)
0FD: Vibration (speed 13, pattern, 2x)
0FE: Vibration (speed 13, pattern, 4x)
0FF: Vibration (speed 13, pattern, 8x)
100: Vibration (speed 13, pattern, 16x)
101: Vibration (speed 14, hard, 2x)
102: Vibration (speed 14, hard, 4x)
103: Vibration (speed 14, hard, 8x)
104: Vibration (speed 14, hard, 16x)
105: Vibration (speed 14, pattern, 2x)
106: Vibration (speed 14, pattern, 4x)
107: Vibration (speed 14, pattern, 8x)
108: Vibration (speed 14, pattern, 16x)
109: Vibration (speed 15, hard, 2x)
10A: Vibration (speed 15, hard, 4x)
10B: Vibration (speed 15, hard, 8x)
10C: Vibration (speed 15, hard, 16x)
10D: Vibration (speed 15, pattern, 2x)
10E: Vibration (speed 15, pattern, 4x)
10F: Vibration (speed 15, pattern, 8x)
110: Vibration (speed 15, pattern, 16x)
111: Vibration (speed 16, hard, 2x)
112: Vibration (speed 16, hard, 4x)
113: Vibration (speed 16, hard, 8x)
114: Vibration (speed 16, hard, 16x)
115: Vibration (speed 16, pattern, 2x)
116: Vibration (speed 16, pattern, 4x)
117: Vibration (speed 16, pattern, 8x)
118: Vibration (speed 16, pattern, 16x)
119: Vibration (speed 17, hard, 2x)
11A: Vibration (speed 17, hard, 4x)
11B: Vibration (speed 17, hard, 8x)
11C: Vibration (speed 17, hard, 16x)
11D: Vibration (speed 17, pattern, 2x)
11E: Vibration (speed 17, pattern, 4x)
11F: Vibration (speed 17, pattern, 8x)
120: Vibration (speed 17, pattern, 16x)
121: Vibration (speed 18, hard, 2x)
122: Vibration (speed 18, hard, 4x)
123: Vibration (speed 18, hard, 8x)
124: Vibration (speed 18, hard, 16x)
125: Vibration (speed 18, pattern, 2x)
126: Vibration (speed 18, pattern, 4x)
127: Vibration (speed 18, pattern, 8x)
128: Vibration (speed 18, pattern, 16x)
129: Vibration (speed 19, hard, 2x)
12A: Vibration (speed 19, hard, 4x)
12B: Vibration (speed 19, hard, 8x)
12C: Vibration (speed 19, hard, 16x)
12D: Vibration (speed 19, pattern, 2x)
12E: Vibration (speed 19, pattern, 4x)
12F: Vibration (speed 19, pattern, 8x)
130: Vibration (speed 19, pattern, 16x)
131: Vibration (speed 20, hard, 2x)
132: Vibration (speed 20, hard, 4x)
133: Vibration (speed 20, hard, 8x)
134: Vibration (speed 20, hard, 16x)
135: Vibration (speed 20, pattern, 2x)
136: Vibration (speed 20, pattern, 4x)
137: Vibration (speed 20, pattern, 8x)
138: Vibration (speed 20, pattern, 16x)
139: Vibration (speed 21, hard, 2x)
13A: Vibration (speed 21, hard, 4x)
13B: Vibration (speed 21, hard, 8x)
13C: Vibration (speed 21, hard, 16x)
13D: Vibration (speed 21, pattern, 2x)
13E: Vibration (speed 21, pattern, 4x)
13F: Vibration (speed 21, pattern, 8x)
140: Vibration (speed 21, pattern, 16x)
141: Vibration (speed 22, hard, 2x)
142: Vibration (speed 22, hard, 4x)
143: Vibration (speed 22, hard, 8x)
144: Vibration (speed 22, hard, 16x)
145: Vibration (speed 22, pattern, 2x)
146: Vibration (speed 22, pattern, 4x)
147: Vibration (speed 22, pattern, 8x)
148: Vibration (speed 22, pattern, 16x)
149: Vibration (soft, very long)
14A: Pikachu 6
14B: Pikachu 7
14C: Pikachu 8
14D: Pikachu 9
14E: Pikachu 10
14F: Pikachu 11
150: Pikachu 12
151: Light/Vibration (red, pattern 1)
152: Light/Vibration (red, pattern 2)
153: Light/Vibration (red, pattern 3)
154: Light/Vibration (red, pattern 4)
155: Light/Vibration (red, pattern 5)
156: Light/Vibration (red, pattern 6)
157: Light/Vibration (red, pattern 7)
158: Light/Vibration (red, pattern 8)
159: Light/Vibration (red, pattern 9)
15A: Light/Vibration (red, pattern 10)
15B: Light/Vibration (red, pattern 11)
15C: Light/Vibration (red, pattern 12)
15D: Light/Vibration (red, pattern 13)
15E: Light/Vibration (red, pattern 14)
15F: Light/Vibration (red, pattern 15)
160: Light/Vibration (red, pattern 16)
161: Light/Vibration (red, pattern 17)
162: Pikachu 13
163: Light (pale magenta)
164: Vibration (pattern 15)
165: Light/Vibration (pattern)
166: Light (pale yellow/green)
167: Light (pale blue/purple)
168: Light (magenta)
169: Light (yellow/green)
16A: Light (cyan)
16B: Light (pale blue)
16C: Light (very pale blue)
16D: Light (pale magenta)
16E: Light (pale yellow)
16F: Light/Vibration (blue, pattern 1)
170: Light/Vibration (blue, pattern 2)
171: Light/Vibration (blue, pattern 3)
172: Light/Vibration (blue, pattern 4)
173: Light/Vibration (blue, pattern 5)
174: Light/Vibration (blue, pattern 6)
175: Light/Vibration (blue, pattern 7)
176: Light/Vibration (blue, pattern 8)
177: Light/Vibration (blue, pattern 9)
178: Light/Vibration (blue, pattern 10)
179: Light/Vibration (blue, pattern 11)
17A: Light/Vibration (blue, pattern 12)
17B: Light/Vibration (blue, pattern 13)
17C: Light/Vibration (blue, pattern 14)
17D: Light/Vibration (blue, pattern 15)
17E: Light/Vibration (blue, pattern 16)
17F: Light/Vibration (blue, pattern 17)
180: Light/Vibration (blue, pattern 18)
181: Light/Vibration (green, pattern 1)
182: Light/Vibration (green, pattern 2)
183: Light/Vibration (green, pattern 3)
184: Light/Vibration (green, pattern 4)
185: Light/Vibration (green, pattern 5)
186: Light/Vibration (green, pattern 6)
187: Light/Vibration (green, pattern 7)
188: Light/Vibration (green, pattern 8)
189: Light/Vibration (green, pattern 9)
18A: Light/Vibration (green, pattern 10)
18B: Light/Vibration (green, pattern 11)
18C: Light/Vibration (green, pattern 12)
18D: Light/Vibration (green, pattern 13)
18E: Light/Vibration (green, pattern 14)
18F: Light/Vibration (green, pattern 15)
190: Light/Vibration (green, pattern 16)
191: Light/Vibration (green, pattern 17)
192: Light/Vibration (green, pattern 18)
193: Light/Vibration (yellow/green, pattern 1)
194: Light/Vibration (yellow/green, pattern 2)
195: Light/Vibration (yellow/green, pattern 3)
196: Light/Vibration (yellow/green, pattern 4)
197: Light/Vibration (yellow/green, pattern 5)
198: Light/Vibration (yellow/green, pattern 6)
199: Light/Vibration (yellow/green, pattern 7)
19A: Light/Vibration (yellow/green, pattern 8)
19B: Light/Vibration (yellow/green, pattern 9)
19C: Light/Vibration (yellow/green, pattern 10)
19D: Light/Vibration (yellow/green, pattern 11)
19E: Light/Vibration (yellow/green, pattern 12)
19F: Light/Vibration (yellow/green, pattern 13)
1A0: Light/Vibration (yellow/green, pattern 14)
1A1: Light/Vibration (yellow/green, pattern 15)
1A2: Light/Vibration (yellow/green, pattern 16)
1A3: Light/Vibration (yellow/green, pattern 17)
1A4: Light/Vibration (yellow/green, pattern 18)
1A5: Light/Vibration (purple, pattern 1)
1A6: Light/Vibration (purple, pattern 2)
1A7: Light/Vibration (purple, pattern 3)
1A8: Light/Vibration (purple, pattern 4)
1A9: Light/Vibration (purple, pattern 5)
1AA: Light/Vibration (purple, pattern 6)
1AB: Light/Vibration (purple, pattern 7)
1AC: Light/Vibration (purple, pattern 8)
1AD: Light/Vibration (purple, pattern 9)
1AE: Light/Vibration (purple, pattern 10)
1AF: Light/Vibration (purple, pattern 11)
1B0: Light/Vibration (purple, pattern 12)
1B1: Light/Vibration (purple, pattern 13)
1B2: Light/Vibration (purple, pattern 14)
1B3: Light/Vibration (purple, pattern 15)
1B4: Light/Vibration (purple, pattern 16)
1B5: Light/Vibration (purple, pattern 17)
1B6: Light/Vibration (purple, pattern 18)
1B7: Light/Vibration (yellow, pattern 1)
1B8: Light/Vibration (yellow, pattern 2)
1B9: Light/Vibration (yellow, pattern 3)
1BA: Light/Vibration (yellow, pattern 4)
1BB: Light/Vibration (yellow, pattern 5)
1BC: Light/Vibration (yellow, pattern 6)
1BD: Light/Vibration (yellow, pattern 7)
1BE: Light/Vibration (yellow, pattern 8)
1BF: Light/Vibration (yellow, pattern 9)
1C0: Light/Vibration (yellow, pattern 10)
1C1: Light/Vibration (yellow, pattern 11)
1C2: Light/Vibration (yellow, pattern 12)
1C3: Light/Vibration (yellow, pattern 13)
1C4: Light/Vibration (yellow, pattern 14)
1C5: Light/Vibration (yellow, pattern 15)
1C6: Light/Vibration (yellow, pattern 16)
1C7: Light/Vibration (yellow, pattern 17)
1C8: Light/Vibration (yellow, pattern 18)
1C9: Light/Vibration (white, pattern 1)
1CA: Light/Vibration (white, pattern 2)
1CB: Light/Vibration (white, pattern 3)
1CC: Light/Vibration (white, pattern 4)
1CD: Light/Vibration (white, pattern 5)
1CE: Light/Vibration (white, pattern 6)
1CF: Light/Vibration (white, pattern 7)
1D0: Light/Vibration (white, pattern 8)
1D1: Light/Vibration (white, pattern 9)
1D2: Light/Vibration (white, pattern 10)
1D3: Light/Vibration (white, pattern 11)
1D4: Light/Vibration (white, pattern 12)
1D5: Light/Vibration (white, pattern 13)
1D6: Light/Vibration (white, pattern 14)
1D7: Light/Vibration (white, pattern 15)
1D8: Light/Vibration (white, pattern 16)
1D9: Light/Vibration (white, pattern 17)
1DA: Light/Vibration (white, pattern 18)
1DB: Light/Vibration (red, medium)
1DC: Light/Vibration (yellow/green, medium)
1DD: Light/Vibration (green, medium)
1DE: Light/Vibration (blue, very short)
1DF: Light/Vibration (blue, short)
1E0: Light/Vibration (blue, medium)
1E1: Light/Vibration (green, very short)
1E2: Light/Vibration (green, short)
1E3: Light/Vibration (green, medium)
1E4: Light/Vibration (yellow/green, very short)
1E5: Light/Vibration (yellow/green, short)
1E6: Light/Vibration (yellow/green, medium)
1E7: Light/Vibration (purple, very short)
1E8: Light/Vibration (purple, short)
1E9: Light/Vibration (purple, medium)
1EA: Light/Vibration (yellow, very short)
1EB: Light/Vibration (yellow, short)
1EC: Light/Vibration (yellow, medium)
1ED: Light/Vibration (white, very short)
1EE: Light/Vibration (white, short)
1EF: Light/Vibration (white, medium)
1F0: Light/Vibration (red, pattern 18)
1F1: Light (red, indefinite)
1F2: Light (yellow, indefinite)
1F3: Light (green, indefinite)
1F4: Light (blue, indefinite)
1F5: Light (purple, indefinite)
1F6: Light (pattern, indefinite)
1F7: SFX/Light (sparkle, gray)
1F8: (turn off light)
1F9: Light/Vibration (blue, medium)
1FA: Light/Vibration (pale purple, medium)
1FB: Light/Vibration (pattern, medium)
1FC: (no response)
1FD: (no response)
1FE: (no response)
1FF: (no response)

14:03 Concerning Desert Studies, Cyberwar, and the Desert Power
by Naib Manul Laphroaig0
Gather round, neighbors, as we close the moisture seals and relax the water discipline. Take off your face masks and breathe the sietch air freely. It is time for a story of the things that were and the things that will come.
Knowledge and water. These are the things that rule the universe. They are alike—and one truly needs to lack them to appreciate their worth. Those who have them in abundance proclaim their value—and waste them thoughtlessly, without a care. They make sure their wealth and their education degrees are on display for the world, and ever so hard to miss; they waste both time and water to put us in our place. Yet were they to see just one of our hidden caches, they would realize how silly their displays are in comparison.
For while they pour out the water and the time of their lives, and treat us as savages and dismiss us, we are working to change the face of this world.

Their scientists have imperial ranks, and their city schools teach—before and above any useful subject—respect for these ranks and for those who pose as “scientists” on the imperial TV. And yet, guess who knows more physics, biology, and planetary ecology that matters. Guess who knows how their systems actually work, from the smallest water valve in a stillsuit to the ecosystems of an entire planet. They mock Shai-hulud and dismiss us Fremen as the unwashed rabble tinkering to survive in the desert—yet their degrees don’t impress the sand.
The works of the ignorant are like sand. When yet sparse, they merely vex and irritate like loose grains; when abundant, they become like dunes that overwhelm all water, life, and knowledge. Verily, these are the dunes where knowledge goes to die. As the ignorant labor, sand multiplies, until it covers the face of the world and pervades every breath of the wind.
And then there was a Dr. Kynes. To imperial paymasters, he was just another official on the long roll getting ever longer. To the people of the city he was just another bureaucrat to avoid if they could, or to bribe if they couldn’t. To his fellow civil servants—who considered themselves scholars, yet spent more time over paperwork than most clerks—he was an odd case carrying on about things that mattered nothing to one’s career, as absolutely everybody knew; in short, they only listened to him if they felt charitable at the moment.
For all these alleged experts, the order of life was already scientifically organized about the best it could be. One would succeed by improving the standard model of a stillsuit, or just as well by selling a lot of crappy ones.
One did not succeed by talking about changing a planet. Planets were already as organized as they could be. A paper could be written, of course, but, to be published, the paper had to have both neatly tabulated results and a summary of prior work. There was no prior published work on changing planets, no journals devoted to it, and no outstanding funding solicitations. One would not even get invited to lecture about it. It was a waste of time, useless for advancement in rank.

Besides, highly ranked minds must have already thought about it, and did not take it up; clearly, the problem was intractable. Indeed, weren’t there already dissertations on the hundred different aspects of sand, and of desert plants, and of the native animals and birds? There were even some on the silly native myths. Getting on the bad side of the water-sellers, considering how much they were donating to the cause of higher learning, was also not a wise move.
But Kynes knew a secret: knowledge was water, and water was knowledge. The point of knowledge was to provide what was needed the most, not ranks or lectures. And he knew another secret: one could, in fact, figure out a thing that many superior minds hadn’t bothered with, be it even the size of the planet. And he may have guessed a third secret: if someone didn’t value water as life, there was no point of talking to them about water, or about knowledge. They would, at best, nod, and then go about their business. It is like spilling water on the sand.
That did not leave Kynes with a lot of options. In fact, it left him with none at all. And so he did a thing that no one else had done before: he left the city and walked out onto the sand. He went to find us, and he became Liet.
For those who live on the sand and are surrounded by it understand the true value of water, and of figuring things out, be they small or large. This Kynes sought, and this he found—with us, the Fremen.
His manner was odd to us, but he knew things of the sand that no city folk cared to know; he spoke of water in the sand as we heard none speak before. He must have figured it out—and there were just enough of us who knew that figuring things out was water and life. And so he became Liet.
His knowledge, rejected by bureaucrats, already turned into a water wealth no bureaucrat can yet conceive of. His peers wrote hundreds of thousands of papers since he left, and went on to higher ranks—and all of these will be scattered by the desert winds. A lot of useless technology will be sold and ground into dust on the sand—while Liet’s words are changing the desert slowly but surely.
Something strange has been going of late in their sheltered cities. There is talk of a “sand-war,” and of “sand warriors,” and of “sand power.” They are giving sand new names, and new certifications of “desert moisture security professionals” to their city plumbers. Their schools are now supposed to teach something they called SANDS, “Science, Agronomy, Nomenclature,1 Desert Studies,” to deliver a “sand superiority.” Their imperial news spread rumors of “anonymous senior imperial officials” unleashing “sand operations,” the houses major building up their “sand forces” and the houses minor demanding an investigation in the Landsraat.
Little do they know where the true sand power lies, and where the actual water and knowledge are being accumulated to transform the desert.
The sand will laugh at them—and one day the one who understands the true source of power will come after Liet, the stored water will come forth, the ecology will change—and a rain will fall.
Until then, we will keep the water and the knowledge. Until then, we, the Fremen, will train the new generations of those who know and those who figure things out!
14:04 Texting with Flush+Reload
by Taylor Hornby
Dear Editors and Readers of PoC||GTFO,
You’ve been lied to about how your computer works. You see, in a programming class they teach you just enough for you to get on with your job and no more. What you learn is a mere abstraction of the very complicated piece of physics sitting under your desk. To use your computer to its fullest potential, you must forget the familiar abstraction and finally see your computer for what it really is. Come with me, as we take a small step towards enlightenment.
You know what makes a computer—or so you think. There is a processor. There is a bank of main memory, which the processor reads, writes, and executes from. And there are processes, those entities that from time to time get loaded into the processor to do their work.
As we know, processes shouldn’t be trusted to play well together, and need to be kept separate. Many of the processor’s features were added to keep those processes isolated. It would be quite bad if one process could talk to another without the system administrator’s permission.
We also know that the faster a computer is, the more work it can do and the more useful it is. Even more features were introduced to the processor in order to make it go as fast as possible.
Accordingly, your processor most likely has a memory cache sitting between main memory and the processor, remembering recently-read data and code, so that the next time the processor reads from the same address, it doesn’t have to reach all the way out to main memory. The vendors will say this feature was added to make the processor go faster, and it does do a great job of that. But I will show you that the cache is also a feature to help hackers get around those annoying access controls that system administrators seem to love.

What I’m going to do is show you how to send a text message from one process to the other, using only memory reads. What!? How could this be possible? According to your programming class, you say, reads from memory are just reads, they can’t be used to send messages!
The gist is this: the cache remembers recently executed code, which means that it must also remember which code was recently executed. Processes are in control of the code they execute, so what we can do is execute a special pattern of code that the cache will remember. When the second process gets a chance to run, it will read the pattern out of the cache and recover the message. Oh how thoughtful it was of the processor designers to add this feature!
The undocumented feature we’ll be using is called “Flush + Reload,” and it was originally discovered by Yuval Yarom and Katrina Falkner.0 It’s available in most modern Intel processors, so if you’ve got one of those, you should be able to follow along.
It works like this. When Sally the Sender process gets loaded into memory, one copy of all her executed code gets loaded into main memory. When Robert the Receiver process loads Sally’s binary into his address space, the operating system isn’t going to load a second copy: that would be wasteful. Instead, it’s just going to point Robert’s page tables at Sally’s memory. If Sally and Robert could both write to the memory, it would be a huge problem since they could simply talk by writing messages to each other in the shared memory. But that isn’t a problem, because one of those processor security features stops both Sally and Robert from being able to write to the memory. How do they communicate then?
When Sally the Sender executes some of her code, the cache— the last-level cache, to be specific—is going to remember her most recently executed code. When Robert the Receiver reads a chunk of code in Sally’s binary, the read operation is going to be sent through the very same cache. So: if Sally ran the code not too long ago, Robert’s read will happen very fast. If Sally hasn’t run the code in a while, Robert’s read is going to be slow.
Sally and Robert are going to agree ahead of time on 27 locations in Sally’s binary. That’s one location for each letter of the alphabet, and one left over for the space character. To send a message to Robert, Sally is going to spell out the message by executing the code at the location for the letter she wants to send. Robert is going to continually read from all 27 locations in a loop, and when one of them happens faster than usual, he’ll know that’s a letter Sally just sent.
Page 14:04 contains msg.c, the source code for Sally’s binary. Notice that it doesn’t even explicitly make any system calls.
This program takes a message to send on the command-line and simply passes the processor’s thread of execution over the probe site corresponding to that character. To have Sally send the message “THE QUICK BROWN FOX JUMPS OVER THE LAZY DOG” we just compile it without optimizations, then run it.
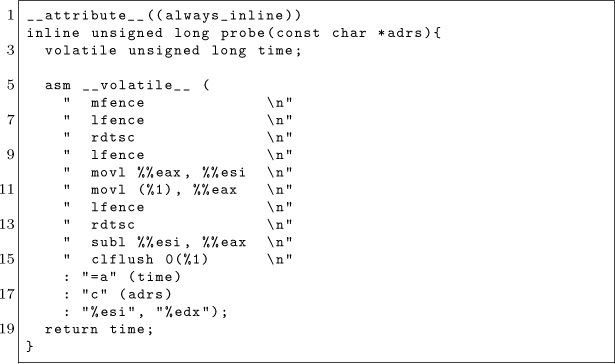
But how does Robert receive the message? Robert runs the program whose source code is at flush-reload/myversion. The key to that program is this bit of code, which times how long it takes to read from an address, and then flushes it from the cache.
By repeatedly running this code on those special probe sites in Sally’s binary, Robert will see which letters Sally is sending. Robert just needs to know where those probe sites are. It’s a matter of filtering the output of objdump to find those addresses, which can be done with this handy script:

Assuming this script works, it will output a list of command-line arguments for the receiver, enumerating which addresses to watch for getting entered into the cache:

The letter before the colon is the name of the probe site, followed by the address to watch after the colon. With those addresses, Robert can run the tool and receive Sally’s messages.

The -e option is the path to Sally’s binary, which must be exactly the same path as Sally executes. The -t parameter is the threshold that decides what’s a fast access or not. If the memory read is faster than that many clock cycles, it will be considered fast, which is to say that it’s in the cache. The -s option is how often in clock cycles to check all of the probes.
With Robert now listening for Sally’s messages, Sally can run this command in another terminal as another user to transmit her message.
$ ./ msg "The quick brown fox jumps over the lazy dog"
Robert sees the following output from the spy tool, where pipe characters separate successive scans over the probes, and between the pipe characters are all the names of the probes found to be in the cache during that scan.
WARNING: This processor does not have an invariant TSC.
Detected ELF type: Executable.
T|H|E|_|Q|U|I|C|K|_|_|B|B|R|O|W|N|_|F|O|X|_|J|U|M|P|S|_|
O|V|E|R|_|T|H|E|_|L|A|Z|Y|_|D|O|G|
There’s a bit of noise in the signal (note the replicated B’s), but it works! Don’t take my word for it, try it for yourself! It’s an eerie feeling to see one process send a message to another even though all they’re doing is reading from memory.
Now you see what the cache really is. Not only does it make your computer go faster, it also has this handy feature that lets you send messages between processes without having to go through a system call. You’re one step closer to enlightenment.
This is just the beginning. You’ll find a collection of tools and experiments that go much further than this.1 The attacks there use Flush+Reload to find out which PDF file you’ve opened, which web pages you’re visiting, and more.
I leave two open challenges to you fine readers:
1. Make the message-sending tool reliable, so that it doesn’t mangle messages even a little bit. Even cooler would be to make it a two-way reliable chat.
2. Extend the PDF-distinguishing attack in my poppler experiment2 to determine which page of pocorgtfo14.pdf is being viewed. As I’m reading this issue of PoC‖GTFO, I want you to be able to tell which page I’m looking at through the side channel.
Best of luck!
—Taylor Hornby


14:05 Anti-Keylogging with Noise
by Mike Myers
In PoC||GTFO 12:7, we learned that malware is inherently “drunk,” and we can exploit its inebriation. This time, our entonnoir de gavage will be filled with random keystrokes instead of single malt.
Gather ’round, neighbors, as we learn about the mechanisms behind the various Windows user-mode keylogging techniques employed by malware, and then investigate a technique for thwarting them all.

Background
Let’s start with a primer on the data flow path of keyboard input in Windows.
Figure 14.1 is a somewhat simplified diagram of the path of a keystroke from the keyboard peripheral device (top left), into the Windows operating system (left), and then into the active application (right). In more detail, the sequence of steps is as follows:
- The user presses down on a key.
- The keyboard’s internal microcontroller converts key-down activity to a device-specific “scan code,” and issues it to keyboard’s internal USB device controller.
- The keyboard’s internal USB device controller communicates the scan-code as a USB message to the USB host controller on the host system. The scan code is held in a circular buffer in the kernel.
- The keyboard driver(s) converts the scan code into a virtual key code. The virtual key code is applied as a change to a real-time system-wide data struct called the Async Key State Array.
- Windows OS process Csrcc.exe reads the input as a virtual key code, wraps it in a Windows “message,” and delivers it to the message queue of the UI thread of the user-mode application that has keyboard focus, along with a time-of-message update to a per-thread data struct called the Sync Key State Array.
- The user application’s “message pump” is a small loop that runs in its UI thread, retrieving Windows messages with GetMessage(), translating the virtual key codes into usable characters with TranslateMessage(), and finally sending the input to the appropriate callback function for a particular UI element (also known as the “Window proc”) that actually does something with the input, such as displaying a character or moving the caret.

Figure 14.1: Data flow of keyboard input in Windows.
For more detail, official documentation of Windows messages and Windows keyboard input can be found in MSDN MS632586 and MS645530.
User-Mode Keylogging Techniques in Malware
Malware that wants to intercept keyboard input can attempt to do so at any point along this path. However, for practical reasons input is usually intercepted using hooks within an application, rather than in the operating system kernel.
There are many reasons for this. First, hooking in the kernel requires Administrator privilege; including, today, a way to meet or circumvent the driver code-signing requirement. Hooking in the kernel before the keystroke reaches the keyboard driver only obtains a keyboard device-dependent “scan code” version of the keystroke, rather than its actual character or key value. Hooking in the kernel after the keyboard driver but before the application obtains only a “virtual key code” version of the keystroke, contextual with regard to the keyboard “layout” or language of the OS. Finally, hooking in the kernel means that the malware doesn’t know which application is receiving the keyboard input, because the OS has not yet dispatched the keystrokes to the active/focused application.
This is why, practically speaking, malware only has a handful of locations where it can intercept keyboard input: upon entering or leaving the system message queue, or upon entering or leaving the thread message queue.
Now that we know the hooking will likely be in user-mode, we can learn about the methods to do user-mode keystroke logging, which include:
- Hooking the Windows message functions TranslateMessage(), GetMessage(), and PeekMessage() to capture a copy of messages as they are retrieved from the per-thread message queue.
- Creating a Windows message hook for the WH_KEYBOARD message using SetWindowsHookEx().
- Similarly, creating a Windows message hook for the so-called “LowLevel Hook” (WH_KEYBOARD_LL) message with SetWindowsHookEx().
- Similarly, creating a Windows message hook for WH_JOURNAL-RECORD, in order to create a Journal Record Hook. Note that this method has been disabled since Windows Vista.
- Polling the system with GetAsyncKeyState().
- Similarly, polling the system with GetKeyboardState() or GetKeyState().
- Similarly, polling the system with GetRawInputData().
- Using DirectX to capture keyboard input (somewhat lower-level method).
- Stealing clipboard contents using, e.g., GetClipboardData().
- Stealing screenshots or enabling a remote desktop view (multiple methods).
The following table lists some pieces of malware and which method they use.
MALWARE |
KEYLOGGING TECHNIQUE |
Zeus |
Hooks TranslateMessage(), GetMessage(), PeekMessage(), and GetClipboardData(); uses GetKeyboardState().0 |
Sality |
GetMessage(), GetKeyState(), PeekMessage(), TranslateMessage(), GetClipboardData(). |
SpyEye |
Hooks TranslateMessage(), then uses GetKeyboardState(). |
Poison Ivy |
Polls GetKeyboardLayout(), GetAsyncKeyState(), GetClipboardData(), and uses SetWindowsHookEx(). |
Gh0st RAT |
Uses SetWindowsHookEx() with WH_GETMESSAGE, which is another way to hook GetMessage(). |
Anti-Keylogging with Keystroke Noise
One approach to thwarting keyloggers that might seem to have potential is to insert so many phantom keyboard devices into the system that the malware cannot reliably select the actual keyboard device for keylogging. However, based upon our new understanding of how common malware implements keylogging, it is clear that this approach will not be successful, because mal-ware does not capture keyboard input by reading it directly from the device. Malware is designed to intercept the input at a layer high enough as to be input device agnostic. We need a different technique.
Our idea is to generate random keyboard activity “noise” emanating at a low layer and removed again in a high layer, so that it ends up polluting a malware’s keylogger log, but does not actually interfere at the level of the user’s experience. Our approach, shown in Figure 14.2, is illustrated as a modification to the previous diagram.
Technical Approach
What we have done is create a piece of dynamically loadable code (currently a DLL) which, once loaded, checks for the presence of User32.dll and hooks its imported DispatchMessage() API. From the DispatchMessage hook, our code is able to filter out keystrokes immediately before they would otherwise be dispatched to a Window Proc. In other words, keystroke noise can be filtered here, at a point after potential malware would have already logged it. The next step is to inject the keystroke noise: our code runs in a separate thread and uses the SendInput() API to send random keystroke input that it generates. These keystrokes are sent into the keyboard IO path at a point before the hooks typically used by keylogging malware.
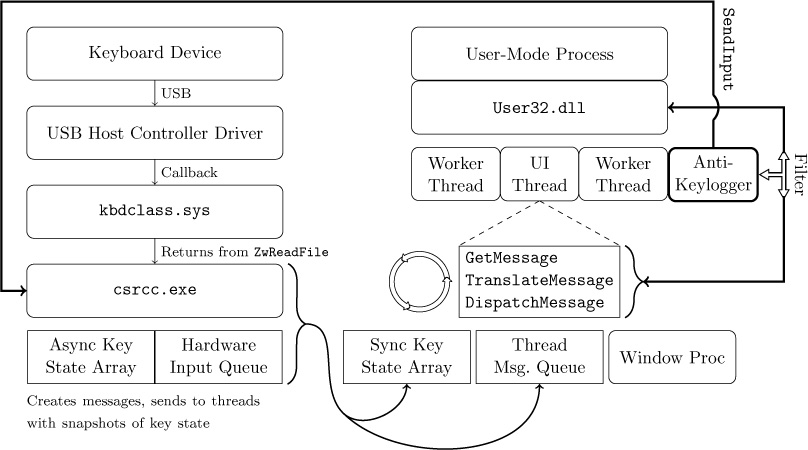
Figure 14.2: A noise generating anti-keylogger plugged into the Windows keyboard data flow.
In order avoid sending keystroke noise that will be delivered to a different application and therefore not filtered, our code must also use the SetWindowsHookEx() API to hook the WindowProc, in order to catch the messages that indicate our application is the one with keyboard focus. WM_SETFOCUS and WM_KILLFOCUS messages indicate gaining or losing keyboard input focus. We can’t catch these messages in our DispatchMessage() hook because, unlike keyboard, mouse, paint, and timer messages, the focus messages are not posted to the message queue. Instead they are sent directly to WindowProc. By coordinating the focus gained/lost events with the sending of keystroke noise, we prevent the noise from “leaking” out to other applications.
Related Research
In researching our concept, we found some prior art in the form of a European academic paper titled NoisyKey.1 They did not release their implementation, though, and were much more focused on a statistical analysis of the randomness of keys in the generated noise than in the noise channel technique itself. In fact, we encountered several technical obstacles never mentioned in their paper. We also discovered a commercial product called KeystrokeInterference. The trial version of KeystrokeInterference definitely defeated the keylogging methods we tested it against, but it did not appear to actually create dummy keystrokes. It seemed to simply cause keyloggers to gather incomplete data— depending on the method, they would either get nothing at all, only the Enter key, only punctuation, or they would get all of the keystroke events but only the letter “A” for all of them.
Thus, KeystrokeInterference doesn’t obfuscate the typing dynamics, and it appears to have a fundamentally different approach than we took. (It is not documented anywhere what that method actually is.)
Challenges
For keystroke noise to be effective as interference against a keylogger, the generated noise should be indistinguishable from user input. Three considerations to make are the rate of the noise input, emulating the real user’s typing dynamics, and generating the right mix of keystrokes in the noise.
Rate is fairly simple: the keystroke noise just has to be generated at a high enough rate that it well outnumbers the rate of keys actually typed by the user. Assuming an expert typist who might type at 80 WPM, a rough estimate is that our noise should be generated at a rate of at least several times that. We estimated that about 400 keystrokes per minute, or about six per second, should create a high enough noise to signal ratio that it is effectively impossible to discern which keys were typed. The goal here is to make sure that random noise keys separate all typed characters sufficiently that no strings of typed characters would appear together in a log.
Addressing the issue of keystroke dynamics is more complicated. Keystroke dynamics is a term that refers to the ability to identify a user or what they are typing based only on the rhythms of keyboard activity, without actually capturing the content of what they are typing. By flooding the input with random noise, we should break keystroke rhythm analysis of this kind, but only if the injected keystrokes have a random rhythm about them as well. If the injected keystrokes have their own rhythm that can be distinguished, then an attacker could theoretically learn to filter the noise out that way. We address this issue by inserting a random short delay before every injected keystroke. The random delay interval has an upper bound but no lower bound. The delay magnitude here is related to the rate of input described previously, but the randomness within a small range should mean that it is difficult or impossible to distinguish real from injected keystrokes based on intra-keystroke timing analysis.
Another challenge was detecting when our application had (keyboard) input focus. It is non-trivial for a Windows application to determine when its window area has been given input focus: although there are polling-based Windows APIs that can possibly indicate which Window is in the foreground (GetActiveWindow, GetForegroundWindow), they are neither efficient nor sufficient for our purposes. The best solution we have at the moment is that we installed a “Window Proc” hook to monitor for WM_SETFOCUS and other such messages. We also found it best to temporarily disable the keystroke noise generation while the user was click-dragging the window, because real keyboard input is not simultaneously possible with dragging movements. There are likely many other activation and focus states that we have not yet considered, and which will only be discovered through extensive testing.
Lastly, we had to address the need to generate keystroke noise that included all or most of the keys that a user would actually strike, including punctuation, some symbols, and capital letters. This is where we encountered the difficulty with the Shift key modifier. In order to create most non-alphanumeric keystrokes (and to create any capital letters, obviously), the Shift key needs to be held in concert with another key. This means that in order to generate such a character, we need to generate a Shift key down event, then the other required key down and up events, then a Shift key up event. The problem lies in the fact that the system reacts to our injected shift even if we filter it out: it will change the capitalization of the user’s actual keystrokes. Conversely, the user’s use of the Shift key will change the capitalization of the injected keys, and our filter routine will to fail recognize them as the ones we recently injected, allowing them through instead.
The first solution we attempted was to track every time the user hit the Shift key and every time we injected a Shift keystroke, and deconflict their states when doing our filter evaluation. Unfortunately, this approach was prone to failure. Subtle race conditions between Async Key State (“true” or “system” key state, which is the basis of the Shift key state’s affect on character capitalization) and Sync Key State (“per-thread” key state, which is effectively what we tracked in our filter) were difficult to debug. We also discovered that it is not possible to directly set and clear the Shift state of the Async Key State table using an API like SetKeyboardStateTable().
We considered using BlockInput() to ignore the user’s keyboard input while we generated our own, in order to resolve a Shift state confusion. However, in practice, this API can only be called from a High Integrity Level process (as of Windows Vista), making it impractical. It would probably also cause noticeable problems with keyboard responsiveness. It would not be acceptable as a solution.
Ultimately, the solution we found was to rely on a documented feature of SendInput() that will guarantee non-interleaving of inputs. Instead of calling SendInput() four times (Shift down, key down, key up, Shift up) with random delays in between, we would instead create an array of all four key events and call SendInput once. SendInput() then ensures that there are no other user inputs that intermingle with your injected inputs, when performed this way. Additionally, we use GetAsyncKeyState() immediately before SendInput in order to track the actual Shift state; if Shift were being held down by the user, we would not also inject an interfering Shift key down/up sequence. Together, these precautions solved the issue with conflicting Shift states. However, this has the downside of taking away our ability to model a user’s key-down-to-up rhythms using the random delays between those events as we originally intended.

Once we had made the change to our use of SendInput(), we noticed that these injected noise keys were no longer being picked up by certain methods of keylogging! Either they would completely not see the keystroke noise when injected this way, or they saw some of the noise, but not enough for it to be effective anymore. What we determined was happening is that certain keylogging methods are based on polling for keyboard state changes, and if activity (both a key down and its corresponding key up) happens in between two subsequent polls, it will be missed by the keylogger.
When using SendInput to instantaneously send a shifted key, all four key events (Shift key down, key down, key up, Shift key up) pass through the keyboard IO path in less time than a keylogger using a polling method can detect (at practical polling rates) even though it is fast enough to pick up input typed by a human. Clearly this will not work for our approach. Unfortunately, there is no support for managing the rate or delay used by SendInput; if you want a key to be “held” for a given amount of time, you have to call SendInput twice with a wait in between. This returns us to the problem of user input being interleaved with our use of the Shift key.
Our compromise solution was to put back our multiple SendInput() calls separated by delays, but only for keys that didn’t need Shift. For keys that need Shift to be held, we use the single SendInput() call method that doesn’t interleave the input with user input, but which also usually misses being picked up by polling-based keyloggers. To account for the fact that polling-based keyloggers would receive mostly only the slower unshifted key noise that we generate, we increased the noise amount proportionately. This hybrid approach also enables us to somewhat model keystroke dynamics, at least for the unshifted keystrokes whose timing we can control.

CPU and RAM usage of the PoC keystroke noise generator.
PoC Results
Our keystroke noise implementation produces successful results as tested against multiple user-mode keylogging methods.
Input-stealing methods that do not involve keylogging (such as screenshots and remote desktop) are not addressed by our approach. Fortunately, these are far less attractive methods to attackers: they are high-bandwidth and less effective in capturing all input. We also did not address kernel-mode keylogging techniques with our approach, but these too are uncommon in practical malware, as explained earlier.
Because the keystroke noise technique is an active technique (as opposed to a passive configuration change), it was important to test the CPU overhead incurred. As seen on page 60, the CPU overhead is incredibly minimal: it is less than 0.3% of one core of our test VM running on an early 2011 laptop with a second generation 2GHz Intel Core i7. Some of that CPU usage is due to the GUI of the demo app itself. The RAM overhead is similarly minimal; but again, what is pictured is mostly due to the demo app GUI.


Conclusions
Although real-time keyboard input is effectively masked from keyloggers by our approach, we did not address clipboard-stealing malware. If a user were to copy and paste sensitive information or credentials, our current approach would not disrupt malware’s ability to capture that information. Similarly, an attacker could take a brute-force approach of capturing what the user sees, and grab keyboard input that way. For approaches like these, there are other techniques that one could use. Perhaps they would be similar to the keystroke noise concept,2 but that is research that remains to be done.
Console-mode applications don’t rely on Windows messages, and as such, our method is not yet compatible with them. Console mode applications retrieve keyboard input differently, using the kbhit() and getkey() APIs. Likewise, any Windows application that checks for keyboard input without any use of Windows Messages (rare, but theoretically possible), by polling GetKeyboardState(), is also not yet compatible with our approach. There is nothing fundamentally incompatible; we would just need to instrument a different set of locations in the input path in order to filter out injected keyboard input before it is observed by console-mode applications or “abnormal” keyboard state checking of this sort.
Another area for further development is in the behavior of SendInput(). If we reverse engineer the SendInput API, we may be able to reimplement it in a way specifically suited for our task. Specifically we would like the timing between batched input elements to be controllable, while maintaining the input interleaving protection that it provides when called using batched input.
We discovered during research that a “low-level keyboard hook” (SetWindowsHookEx() with WH_KEYBOARD_LL) can check a flag on each callback called LLKHF_INJECTED, and know if the keystroke was injected in software, e.g., by a call to SendInput(). So in the future we would also seek a way to prevent win32k.sys from setting the LLKHF_INJECTED flag on our injected keystrokes. This flag is set in the kernel by win32k.sys!XxxKeyEvent, implying that it may require kernel-level code to alter this behavior. Although this would seem to be a clear way to defeat our approach, it may not be so. Although we have not tested it, any on-screen keyboard or remotely logged-on user’s key inputs supposedly come through the system with this flag set, so a keylogger may not want to filter on this flag. Once we propose loading kernel code to change a flag, though, we may as well change our method of injecting input and just avoid this problem entirely. By so doing we could also likely address the problem of kernel-mode keyloggers.

Acknowledgments
Funding for this work was provided in part by the Halting Attacks Via Obstructing Configurations (HAVOC) project under Mudge’s DARPA Cyber Fast Track program, Digital Operatives IR&D, and our famous Single Malt Gavage Funnel. With that said, all opinions and hyperbolic, metaphoric, gastronomic, trophic analogies expressed in this article are the author’s own and do not necessarily reflect the views of DARPA or the United States government.

14:06 How likely are random bytes to be a NOP sled on ARM?
by Niek Timmers and Albert Spruyt
Howdy folks!
Ever wonder how likely it is that random bytes will execute without crashing? We certainly do. The team responsible for analyzing the Nintendo 3DS might have wondered about an answer when they identified the first stage boot loader of the security processor is only encrypted and not authenticated.0 This allowed them to execute random bytes in the security processor by changing the original unauthenticated, but encrypted, image. Using a trial and error approach, they were able to get lucky when the image decrypts into code that jumps to a memory location preloaded with arbitrary code. Game over for the Nintendo 3DS security processor.
We generalize the potential attack primitive of executing random bytes by focusing on one question: What is the probability of executing random bytes in a NOP-like fashion? NOP-like instructions are those that do not impair the program’s continuation, such as by crashing or looping.
Writing NOPs into a code region is a powerful method which potentially allows full control over the system’s execution. For example, the NOPs can be used to remove a length check, leading to an exploitable buffer overflow. One can imagine various practical scenarios to leverage this attack primitive, both during boot and runtime of the system.
A practical scenario during boot is related to a common feature implemented by secure embedded devices: Secure Boot. This feature provides integrity and confidentiality of code stored in external flash. Such implementations are compromised using software attacks1 and hardware attacks.2 Depending on the implementation, it may be possible to bypass the authentication but not the decryption. In such a situation, similar to the Nintendo 3DS, changing the original encrypted image will lead to the execution of randomized bytes as the decryption key is likely unknown.
During runtime, secure embedded devices often provide hardware cryptographic accelerators that implement Direct Memory Access (DMA). This functionality allows on-the-fly decryption of memory from location A to location B. It is of utmost importance to implement proper restrictions to prevent unprivileged entities from overwriting security sensitive memory locations, such as code regions. When such restrictions are implemented incorrectly, it potentially leads to copying random bytes into code regions.
The block size of the cipher impacts the size directly: eight bytes for T/DES, sixteen bytes for AES. Additionally the cipher mode has an impact. When the image is decrypted using ECB, just one block will be randomized without propagating to other blocks. When the image is decrypted using CBC, just the one block will be randomized, but any changes in a cipher block will propagate directly into the plain text of the subsequent block. In other words, flipping a bit in the cipher text will flip the bit at the same position in the plain text of the subsequent block. This allows small modifications of the original plain text code which potential leads to arbitrary code execution.
The pseudo random bytes executed in these scenarios must be executed in a NOP-like fashion. This means they need too be decoded into valid instructions that have no side-effects on the program’s continuation. Whenever these requirements are not met, the device will likely crash.
We approximated the probability for executing random bytes in a NOP-like fashion for Thumb and ARM and under different conditions: QEMU, native user and native bare-metal. For each execution, the probability is approximated for executing 4, 8 and 16 random bytes. Other architectures or execution states are not considered here.
Executing in QEMU
The probability of executing random bytes in a NOP-like fashion is determined using a Python wrapper and an Thumb/ARM binary containing NOPs to be overwritten.

This is cross compiled for Thumb and ARM, then executed in QEMU.


Whenever the test program prints “FREE BEER!” the instructions executed between the two printf calls do not impact the program’s execution negatively; that is, the instructions are NOP-like. The Python wrapper updates the place holder bytes with random bytes, executes the binary, and logs the printed result.
The random bytes originate from /dev/urandom. Executing the updated binary results in: intended (NOP-like) executions, unintended executions (e.g. only “FREE” is printed) and crashes. The results of executing the binary ten thousand times, grouped by type, are shown in Table 14.1. A small percentage of the results are unclassified.
The results show that executing random bytes in a NOP-like fashion has potential for emulated Thumb/ARM code. The amount of random bytes impact the probability directly. The density of bad instructions, those which trigger a crash, is higher for Thumb than for ARM. Let’s see if the same probability holds up for executing native code.
Cortex A9 as a Native User in Linux
The code used to approximate the probability on a native platform in user mode is similar the one page from page 68. Differently, this code is executed natively on an ARM Cortex-A9 development board. The code is developed, compiled and executed within the Ubuntu 14.04 LTS operating system. A disassembled representation of the ARM binary is simple enough.

The results of performing one thousand experiments are listed in Table 14.2, showing that executing random bytes in a NOP-like fashion is very similar between emulated code and native user mode code. Let’s see if the same probability holds up for executing bare-metal code.
Cortex A9 as Native Bare Metal
The binary used to approximate the probability on native platform in bare metal mode is implemented in U-Boot. The code is very similar to that which we used in qemu and in userland. U-Boot is only executed during boot and therefore the platform is reset before each experiment. The target’s serial interface is used for communication. A new command is added to U-Boot which is able to receive random bytes via the serial interface, update the placeholder bytes and execute the code.
Type |
4 bytes |
8 bytes |
16 bytes |
NOP-like |
32% / 52% |
13% / 34% |
4% / 13% |
Illegal instruction |
11% / 20% |
14% / 29% |
15% / 41% |
Segmentation fault |
52% / 23% |
66% / 31% |
73% / 40% |
Unhandled CPU exception |
1% / 2% |
0% / 3% |
0% / 4% |
Unhandled ARM syscall |
1% / 0% |
1% / 1% |
1% / 1% |
Unhandled Syscall |
1% / 1% |
0% / 0% |
0% / 0% |
Unclassified |
5% / 3% |
6% / 2% |
6% / 1% |
Table 14.1: Probabilities for QEMU (Thumb / ARM)
Type |
4 bytes |
8 bytes |
16 bytes |
NOP-like |
36% / 61% |
13% / 39% |
2% / 12% |
Illegal instruction |
13% / 19% |
17% / 27% |
23% / 40% |
Segmentation fault |
48% / 19% |
66% / 33% |
71% / 46% |
Bus error |
0% / 1% |
0% / 1% |
0% / 2% |
Unclassified |
3% / 0% |
4% / 0% |
4% / 0% |
Table 14.2: Probabilities for native user (Thumb / ARM)
All ARM CPU exceptions are handled by U-Boot which allows us to classify the crashes accordingly. For example, the following exception is printed on the serial interface when the random bytes result in a illegal exception:
The results of performing one thousand experiments are listed in Table 14.3, showing that executing random bytes in a NOP-like fashion is similar for bare-metal code compared to emulated and native user mode code. There seems to be less difference between Thumb and ARM but that could be due to statistics.
Type |
4 bytes |
8 bytes |
16 bytes |
NOP-like |
53% / 63% |
32% / 41% |
7% / 19% |
Undefined Instruction |
16% / 20% |
19% / 34% |
25% / 51% |
Data Abort |
17% / 4% |
25% / 7% |
33% / 11% |
Prefetch Abort |
1% / 1% |
1% / 1% |
2% / 1% |
Unclassified |
15% / 12% |
23% / 18% |
33% / 18% |
Table 14.3: Probabilities for native bare metal (Thumb / ARM)
Conclusion
Let us wonder no more. We’ve shown that the probability for executing random bytes in a NOP-like fashion for Thumb an ARM is significant enough to consider it a potentially relevant attack primitive. The probability is very similar for execution of emulated code, native user-mode code and bare-metal code. The number of random bytes executed impact the probability directly which matches our common sense. In Thumb mode, the density of bad instructions which crash the program is higher than for ARM. One must realize the true probability for a given target cannot be determined in a truly generic fashion, thanks to memory mapping, access restrictions, and the surrounding code.

14:07 Routing Ethernet over GDB and SWD for Glitching
by Micah Elizabeth Scott
Hello again friendly and distinguished neighbors! As you can see, I’ve already started complimenting you, in part to distract from the tiny horrors ahead. Lately I’ve been spending some time experimenting on chips, injecting faults, and generally trying to guess how they are programmed. The results are a delightful topic that we have visited some in the past, and I’ll surely weave some new stories about my results in the brighter days to come. For now, deep in the thick of things, you see, the glitching is monotonous work. Today’s article is a tidbit about one particular solution to a problem I found while experimenting with voltage glitching a network-connected microcontroller.
Problem with Time Bubbles
Slow experiments repeat for days, and the experiments are often made slower on purpose by underclocking, broadening the little glitch targets we hope to peck at in order for the chip to release new secrets. To whatever extent I can, I like to control the clock frequency of a device under investigation. It helps to vary at least one clock to understand which parts of the system are driven by which clock sources. A slower clock can reduce the complexity of the tools you need for power analysis, accurate fault injection, and bus tracing.
If we had a system with a fully static design and a single clock, there wouldn’t be any limit to the underclocking, and the system would follow the same execution path even if individual clock edges were delivered bi-weekly by pigeon. In reality, systems usually have additional clock domains driven by free-running oscillators or phase-locked loops (PLLs). This system design can impose limits on the practical amount of underclock you can achieve before the PLL fails to lock, or a watchdog timer expires before the software can make sufficient progress. On the bright side, these individual limitations can themselves reveal interesting information about the system’s construction, and it may even be possible to introduce timing-related glitches intentionally by varying the clock speed.
These experiments create a bubble of alternate time, warped to your experiment’s advantage. Any protocol that traverses the boundary between underclocked and real-time domains may need to be modified to account for the time difference. An SPI peripheral easily accepts a range of SCLK frequencies, but a serial port expecting 115,200 baud will have to know it’s getting 25,920 baud instead. Most serial peripherals can handle this perfectly acceptably, but you may notice that operating systems and programming APIs start to turn their nose up at such a strange bit rate. Things become even less convenient with fixed-rate protocols like USB and Ethernet.
As fun as it would be to implement a custom Ethernet PHY that supports arbitrary clock scaling, it’s usually more practical to extend the time bubble, slowing the input clock presented to an otherwise mundane Ethernet controller. For this technique to work, the peripheral needs a flexible interfacing clock. A USB-to-Ethernet bridge like the one on-board a Raspberry Pi could be underclocked, but then it couldn’t speak with the USB host controller. PCI Express would have a similar problem.
SPI peripherals are handy for this purpose. My earlier Face-whisperer mashup of Facedancer and ChipWhisperer spoke underclocked USB by including a MAX3421E chip in the victim device’s time domain.0 This can successfully break free from the time bubble, thanks to this chip talking over an SPI interface that can run at a flexible rate relative to the USB clock.
At first I tried to apply this same technique to Ethernet, using the ENC28J60, a 10baseT Ethernet controller that speaks SPI. This is even particularly easy to set up in tandem with a (nonunderclocked) Raspberry Pi, thanks to some handy device tree overlays. This worked to a point, but the ENC28J60 proved to be less underclockable than my target microcontroller.
There aren’t many SPI Ethernet controllers to choose from. I only know of the ’28J60 from Microchip and its newer siblings with 100baseT support. In this case, it was inconvenient that I was dealing with two very different internal PHY designs on each side of the now very out-of-spec Ethernet link. I started making electrical changes, such as removing the AC coupling transformers, which needed somewhat different kludges for each type of PHY. This was getting frustrating, and seemed to be limiting the consistency of detecting a link successfully at such weird clock rates.
At this point, it seemed like it would be awfully convenient if I could just use the exact same kind of PHY on both sides of the link. I could have rewritten my glitch experiment request generator program as a firmware for the same type of microcontroller, but I preferred to keep the test code written in Python on a roomy computer so I could prototype changes quickly. These constraints pointed toward a fun approach that I had not seen anyone try before.


Figure 14.3: TM4C129x Firmware
Ethernet over GDB
When I’m designing anything, but especially when I’m prototyping, I get a bit alarmed any time the design appears to have too many degrees of freedom. It usually means I could trade some of those extra freedoms for the constraints offered by an existing component somehow, and save from reinventing all the boring wheels.
The boring wheel I’d imagined here would have been a firmware image that perhaps implements a simple proxy that shuttles network frames and perhaps link status information between the on-chip Ethernet and an arbitrary SPI slave implementation. The biggest downside to this is that the SPI interface would have to speak another custom protocol, with yet another chunk of code necessary to bridge that SPI interface to something usable like a Linux network tap. It’s tempting to implement standard USB networking, but an integrated USB controller would ultimately use the same clock source as the Ethernet PHY. It’s tempting to emulate the ENC28J60’s SPI protocol to use its existing Linux driver, but emulating this protocol’s quick turnaround between address and data without getting an FPGA involved seemed unlikely.
In this case, the microcontroller hardware was already well-equipped to shuttle data between its on-chip Ethernet MAC and a list of packet buffers in main RAM. I eventually want a network device in Linux that I can really hang out with, capturing packets and setting up bridges and all. So, in the interest of eliminating as much glue as possible, I should be talking to the MAC from some code that’s also capable of creating a Linux network tap.
This is where GDB, OpenOCD, and the Raspberry Pi really save the day. I thought I was going to be bit-banging the Serial Wire Debug (SWD) protocol again on some microcontroller, then building up from there all of the device-specific goodies necessary to access the memory and peripheral bus, set up the system clocks, and finally do some actual internetworking. It involves a lot of tedious reimplementation of things the semiconductor vendor already has working in a different language or a different format. But with GDB, we can make a minimal Ethernet setup firmware with whatever libraries we like, let it initialize the hardware, then inspect the symbols we need at runtime to handle packets.
At this point I can already hear some of you groaning about how slow this must be. While this debug bus won’t be smoking the tires on a 100baseT switch any time soon, it’s certainly enough for experimentation. In the specific setup I’ll be talking about in more detail below, the bit-bang SWD bus runs at about 10 Mbps peak, which turns into an actual sustained Ethernet throughput of around 130 kilobytes per second. It’s faster than many internet connections I’ve had, and for microcontroller work it’s been more than enough.
There’s a trick to how this crazy network driver is able to run at such blazingly adequate speeds. Odds are if you’re used to slow on-chip debugging, most of the delays have been due to slow round trips in your communication with the debug adapter. How bad this is depends on how low-level your debug adapter protocol happens to be. Does it make you schedule a USB transfer for every debug transaction? There goes a millisecond. Some adapters are much worse, some are a little better. Thanks to the Raspberry Pi 2 and 3 with their fast CPU and memory-mapped GPIOs, an OpenOCD process in userspace can bitbang SWD at rates competitive with a standalone debug adapter. By eliminating the chunky USB latencies we can hold conversations between hardware and Python code impressively fast. Idle times between SWD transfers are 10-50μs when we’re staying within OpenOCD, and as low as 150μs when we journey all the way back to Python code.
After building up a working network interface, it’s easy to go a little further to add debugging hooks specific to your situation. In my voltage glitching setup, I wanted some hardware to know in advance when it was about to get a specific packet. I could add some string matching code to the Python proxy, using the Pi’s GPIOs to signal the results of categorizing packets of interest. This signal itself won’t be synchronized with the Ethernet traffic, but it was perfect for use as context when generating synchronized triggers on a separate FPGA.
You’re being awfully vague. I thought there was a proof of concept here?
Okay, okay. Yes, I have one, and of course I’ll share it here. But I did have a point; the whole process turned out to be a lot more generic than I expected, thanks to the functionality of OpenOCD and GDB. The actual code I wrote is very specific to the SoC I’m working with, but that’s because it reads like a network driver split into a C and a Python portion.
If you’re interested in a flexibly-clocked Ethernet adapter for your Raspberry Pi, or you’re hacking at another network-connected device with the same micro, perhaps my code will interest you as-is, but ultimately I hope my humble PoC might inspire you to try a similar technique with other micros and peripherals.


Figure 14.4: DMA Descriptor Struct
Tiva GDBthernet
So the specific chip I’ve been working with is a 120 MHz ARM Cortex-M4F core with on-board Ethernet, the TM4C129x, otherwise known as the Tiva-C series from Texas Instruments. Luckily there’s already a nice open source project to support building firmware for this platform with GCC.1 The platform includes some networking examples based on the uIP and lwIP stacks. For our purposes, we need to dig a bit lower. The on-chip Ethernet MAC uses DMA both to transfer packet contents and to access a queue made from DMA Descriptor structures, shown in Figure 14.4.
This data structure is convenient enough to access directly from Python when we’re shuttling packets back and forth, but setting up the peripheral involves a boatload of magic numbers that I’d prefer not to fuss with. We can mostly reuse existing library code for this. The main firmware file gdbthernet.c uses a viscous wad of library calls to set up all the hardware we need, before getting itself stuck in a breakpoint loop, shown in Figure 14.3.
Everything in this file only needs to exist for convenience. The micro doesn’t need any firmware whatsoever, we could set up everything from GDB. But it’s easier to reuse whatever we can. You may have noticed the call to capture_phy_regs() above. We have only indirect access to the PHY registers via the Ethernet MAC, so it was a bit more convenient to reuse existing library code for reading those registers to determine the link state.
On the Raspberry Pi side, we start with a shell script proxy.sh that spawns an OpenOCD and GDB process, and tells GDB to run gdb_net_host.py. Some platform-specific configuration for OpenOCD tells it how to get to the processor and which micro we’re dealing with. GDB provides quite high-level access to parse expressions in the target language, and the Python API wraps those results nicely in data structures that mimic the native language types. My current approach has been to use this parsing sparingly, though, since it seems to leak memory. Early on in gdb_net_host.py, we scrape all the constants we’ll be needing from the firmware’s debug symbols. (Figure 14.5.)
From here on, we’ll expect to chug through all of the Raspberry Pi CPU cycles we can. There’s no interrupt signaling back to the debugger, everything has to be based on polling. We could poll for Ethernet interrupts, but it’s more expedient to poll the DMA Descriptor directly, since that’s the data we actually want. Here’s how we receive Ethernet frames and forward them to our tap device. (Figure 14.6.)
The transmit side is similar, but it’s driven by the availability of a packet on the tap interface. You can see the hooks for GPIO trigger outputs in Figure 14.7.
That’s just about all it takes to implement a pretty okay network interface for the Raspberry Pi. Attached you’ll find the few necessary but boring tidbits I’ve left out above, like link state detection and debugger setup. I’ve been pretty happy with the results. This approach is even comparable in speed to the ENC28J60 driver, if you don’t mind the astronomical CPU load. I hope this trick inspires you to create weird peripheral mashups using GDB and the Raspberry Pi. If you do, please be a good neighbor and consider documenting your experience for others.
Happy hacking!

Figure 14.5: Fetching Debug Symbols
Figure 14.6: Ethernet Frame RX
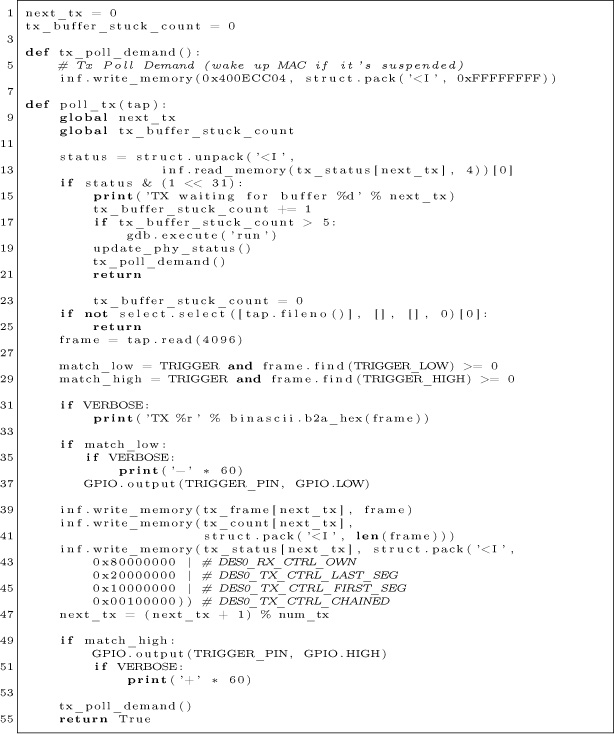
Figure 14.7: Ethernet Frame TX
14:08 Control Panel Vulnerabilities
by Geoff Chappell
Back in 2010, as what I then feared might be the last new work that I will ever publish, I wrote The CPL Icon Loading Vulnerability0 about what Microsoft called a Shortcut Icon Loading Vulnerability.1 You likely remember this vulnerability. It was notorious for having been exploited by the Stuxnet worm to spread between computers via removable media. Just browsing the files on an infected USB drive was enough to get the worm loaded and executing.
Years later, over drinks at a bar in the East Village, I brought up this case to support a small provocation that the computer security industry does not rate the pursuit of detail as highly as it might—or even as highly as it likes to claim. Thus did I recently reread my 2010 article, which I always was unhappy to have put aside in haste, and looked again at what others had written. To my surprise—or not, given that I had predicted “the defect may not be properly fixed”—I saw that others had revisited the issue too, in 2015 while I wasn’t looking. As reported by Dave Weinstein in Full details on CVE-2015-0096 and the failed MS10-046 Stuxnet fix,2 Michael Heerklotz showed that Microsoft had not properly fixed the vulnerability in 2010. Numerous others jumped on the bandwagon of scoffing at Microsoft for having needed a second go. I am writing about this vulnerability now because I think we might do well to have a third look!
Don’t get too excited, though. It’s not that Microsoft’s second fix, of a DLL Planting Remote Code Execution Vulnerability,3 still hasn’t completely closed off the possibilities for exploitation. I’m not saying that Microsoft needs a third attempt. I will show, however, that the exploitation that motivated the second fix depends on some extraordinarily quirky behaviour that this second fix left in place. It is not credibly retained for backwards compatibility. That it persists is arguably a sign that we still have a long way to go for how the computer security industry examines software for vulnerabilities and for how software manufacturers fix them.
CVE-2010-2568
You’d hope that Stuxnet’s trick has long been understood in detail by everyone who ever cared, but let’s have a quick summary anyway. Among the browsed files is a shortcut (.LNK) file that presents as its target a Control Panel item whose icon is to be resolved dynamically. Browsing the shortcut induces Windows to load and execute the corresponding CPL module to ask it which icon to show. This may be all well and good if the CPL module actually is registered, so that its Control Panel items would show when browsing the Control Panel. The exploitation is simply that the target’s CPL module is (still) not registered but is (instead) malware.
Chances are that you remember CVE-2010-2568 and its exploitation differently. After all, Microsoft had it that the vulnerability “exists because Windows incorrectly parses shortcuts” and is exploited by “a specially crafted shortcut.” Some malware analysts went further and talked of a “malformed .LNK file.”
But that’s all rubbish! A syntactically valid .LNK file for the exploitation can be created using nothing but the ordinary user interface for creating a shortcut to a Control Panel item. Suppose an attacker has written malware in the form of a CPL module that hosts a Control Panel item whose icon is to be resolved dynamically. Then all the attacker has to do at the attacker’s computer is
(1) copy this CPL module to the USB drive;
(2) register this CPL module to show in the Control Panel;
(3) open the Control Panel and find the Control Panel item; and,
(4) Ctrl-Shift drag this item to the USB drive to create a .LNK file.
Call the result a “specially crafted shortcut” if you want, but it looks to me like a very ordinary shortcut created by very ordinary steps. When the USB drive is browsed on the victim’s computer, attacker’s .LNK file on the USB drive is correctly parsed to discover that it’s a shortcut to a Control Panel item that’s hosted by the attacker’s CPL module on the USB drive. Though this CPL module is not registered for execution as a CPL module on the victim’s computer, it does get executed. The cause of this unwanted execution is entirely that the Control Panel is credulous that what is said to be a Control Panel item actually is one. What the Control Panel was vulnerable to was not a parsing error but a spoof.4
Microsoft certainly understood this at the time, for even though the words Control Panel do not appear in Microsoft’s description of the vulnerability (except in boilerplate directions for such things as applying patches and workarounds), the essence of the first fix was the addition to shell32.dll of a routine that symbol files tell us is named CControlPanelFolder::_IsRegisteredCPLApplet.

Control Panel Icons
This CControlPanelFolder class is the shell’s implementation of the COM class that is creatable from the Control Panel’s well-known CLSID. Asking which icon to show for a Control Panel item starts with a call to this class’ GetUIObjectOf method to get an IExtractIcon interface to a temporary object that represents the given item. Calling this interface’s GetIconLocation method then gets directions for where to load the icon from.
The input to GetUIObjectOf is a binary packaging of the item’s basic characteristics, which I’ll refer to collectively as the item ID. The important ones for our purposes are: a pathname to the CPL module that hosts the item; an index for the item’s icon among the module’s resources; and a display name for the item. The case of interest is that when the icon index is zero, the icon is not cached from any prior execution of the CPL module, but is to be resolved dynamically, i.e., by asking the CPL module. Proceeding to GetIconLocation causes the CPL module to be loaded, called and unloaded.
This is all by design. It’s a design with more moving parts than some would like, especially for just this one objective. But it fits the generality of shell folders so that highly abstracted and widely varying shell folders can present a broadly consistent user interface, while meeting a particular goal for the Control Panel. It’s what lets a Control Panel item, or a shortcut to one, change its icon according to the current state of whatever the item exists to control.
I stress this because more than a few commentators blame the vulnerability on what they say was a bad design decision decades ago to load icons from DLLs, as if this of itself risks getting the DLL to execute. What happens is instead much more specific. Though CPL modules are DLLs and do have icons among their resources, the reason a CPL module may get executed for its icon is not to get the icon but to ask explicitly which icon to get.
Note that I have not tied down who calls GetUIObjectOf or where the item ID comes from. The usual caller is SHELL32 itself, as a consequence of opening the Control Panel, e.g., in the Windows Explorer, to browse it for items to show. Each item ID is in this case being fed back to the class, having been produced by other methods while enumerating the items. In Stuxnet’s exploit the caller is again SHELL32, but in response to browsing a shortcut to one Control Panel item. The item ID is in this case parsed from a shortcut (.LNK) file. Another way the call can come from within SHELL32 is automatically when starting the shell if a Control Panel item has been pinned to the Start Menu. The item ID is in this case parsed from registry data. More generally, the call can come from just about anywhere, and the item ID can come from just about anywhere, too.
One thing is common to all these cases, however, because the binary format of this item ID is documented only as being opaque to everyone but the Control Panel. If everyone plays by the rules, any item ID that the Control Panel’s GetUIObjectOf ever receives can only have been obtained from some earlier interaction with the Control Panel. (Though not necessarily the same Control Panel!)
Input Validation
As security researchers, we’ve all seen this movie before—in multiple re-runs, even. Among the lax practices that were common once but which we now regard as hopelessly naive is that a program trusts what it reads from a file or a registry value, on the grounds that the storage was private to the program or anyway won’t have gotten messed with. Not very long ago, programs routinely didn’t even check that such input was syntactically valid. Nowadays, we expect programs to check not just the syntax of their input but the meaning, so that they are not tricked into actions for which the present provider is not authorised (or ought to not even know how to ask).
For the Control Panel, the risk is that even if the item ID has the correct syntax what actually gets parsed from it may be stale. The specified CPL module was perhaps registered for execution some time ago but isn’t now. Or, perhaps, it is still registered, but only for some other user or on some other computer. And this is just what can go wrong even though all the software that’s involved plays by the rules. As hackers, we know very well that not all software does play by the rules, and that some deliberately makes mischief. That the format of the item ID is not documented will not stop a sufficiently skilled reverse engineer from figuring it out, which opens up the extra risk that an item ID may be confected. (Stick with me on this, because we’ll do it ourselves later.)
Asking which icon to show for a Control Panel item gives an object-lesson in how messy the progress towards what we now think of as minimally prudent validation can be. Not until Windows 2000 did the Control Panel implementation make even the briefest check that an item ID it received was syntactically plausible. Worse, even though Windows NT 4.0 had introduced a second format, to support Unicode, it differentiated the two without questioning whether it had been given either. When the check for syntax did come, it was only that the item ID was not too small, and that the icon index was within a supported range.
Checking that the module’s pathname and the item’s display name, if present, were actually null-terminated strings that lay fully within the received data wasn’t even attempted until Windows 7. I say attempted because this first attempt at coding it was defective. A malformed item ID could induce SHELL32 to read a byte from outside the item ID—only as far as 10 bytes beyond, and thus unlikely to access an invalid address, but outside nonetheless. Even a small bug in code for input validation is surely not welcome, but what I want to draw attention to is that this bug conspicuously was not addressed by the fix of CVE-2010-2568. A serious check of the supposed strings in the item ID came soon, but not, as far as I know, until later in 2010 for Windows 7 SP1.

Please take this in for a moment. While Microsoft worked to close off the spoof by having GetUIObjectOf check that the CPL module as named in the item ID is one that can be allowed to execute, they described the vulnerability as a parsing error—yet did nothing about errors in pre-existing code that checked the item ID for syntax! Wouldn’t you think that if you’re telling the world that the problem is a parsing error, then you’d want to look hard into everything nearby that involves any sort of parsing?
The suggestion is strong that Microsoft’s talk of a parsing error was only ever a sleight of hand. As programmers, we’ve all written code with parsing errors. So many edge cases!5 To have such an error in your otherwise well-written code is only inevitable. Software is hand-crafted, after all. To talk of a parsing error is to appeal to the critics’ recognition of fallibility. A parsing error can be the sort of an easy slip-up that gets you a 99 instead of a 100 on a test.
Falling for a spoof, however, seems more like a conceptual design failure. It’s only natural that Microsoft directed attention to one rather than the other. My only question for Microsoft is how deliberate was the misdirection. Why so many security researchers went along with it, I won’t ever know. This, too, is a conceptual failure—and not just mine.

First Fix
Still, it’s a plus that fixing CVE-2010-2568 meant not only getting the item ID checked ever so slightly better for syntax, but also checking it for its meaning, too. Checking, however, is only the start. What do you do about a check that fails?
Were it up to me, thinking just of what I’d like for my own use of my own computer, I’d have all CControlPanelFolder methods that take an item ID as input return an error if given any item ID that specifies a CPL module that is not currently registered. My view would be that even if the item ID is only stale rather than confected (keep reading!), then wherever or whenever the specified CPL module is or was registered, it’s not registered now for my use on this computer—and so it shouldn’t show if I browsed the Control Panel. I’d rather not accept it for any purpose at all, let alone run the risk that it gets executed.
Microsoft’s view, whether for a good reason or bad, was nothing like this. First, it regarded the problem case as more narrow, not just that the specified CPL module is not currently registered (so that the item ID is at least stale, if not actually faked), but also that the specified icon index is zero (this being, we hope, the only route to unwanted execution) and anyway only for GetUIObjectOf when queried for an IExtractIcon interface. Second, the fix didn’t reject but sanitised.6 It let the problem case through, but as if the icon index were given as -1 instead of 0.
Perhaps this relaxed attitude was motivated just by a general (and understandable) desire for the least possible change. Perhaps there was a known case that had to be supported for backwards compatibility. I can’t know either way, but what I hope you’ve already woken to is the contrast between rejection and sanitisation. To reject suspect input may be more brutal than you need, but it has the merit of certainty. The suspect input goes no further, and any innocent caller should at least have anticipated that you return an error. To “sanitise” suspect input and proceed as if all will now be fine is to depend on the deeper implementation—which, as you already know, had not checked this input for itself!
What Lies Beneath
By deeper implementation I mean to remind you that GetUIObjectOf is just the entry point for asking which icon to show. There is still a long, long way to go: first for the temporary object that supplies the GetIconLocation method for the given item; and then, though apparently only if the preceding stage has zero for the icon index, to the more general support for loading and calling CPL modules. Moreover, this long, long way goes through old, old code, with all the problems that can come from that. To depend on any of it for fixing a bug, especially one that you know real-world attackers are probing for edge cases, seems—at best—foolhardy.
To sense how foolhardy, let’s have some demonstrations of where this deeper implementation can go wrong. An attacker whose one goal is to see if the first fix can be worked around would most easily follow the execution from GetUIObjectOf down. Many security researchers would follow, too—perhaps mumbling that their lot is always to be reacting to the attackers and never getting ahead. One way to get ahead is to study in advance as much of the general as you can so that you’re better prepared whenever you have to look into the specific. This is why, when I examine what might go wrong with trying to fix CVE-2010-2568 by letting sanitised input through to the deeper implementation, I work in what you may think is the reverse of the natural direction.
Loading and Calling
Where we look at first into the deeper implementation is therefore the general support for loading and calling of CPL modules, but particularly of a CPL module that hosts a Control Panel item whose icon is to be resolved dynamically. For my 2010 article, I presented such a simple example.7
Whenever this CPL module is loaded, the first call to its exported CPlApplet function produces a message box that asks “Did you want me?” and whose title shows the CPL module’s pathname. That much is done so that we can see when the CPL module gets loaded. What makes this CPL module distinctively of the sort we want to understand is that when we call to CPlApplet for the CPL_INQUIRE message, the answer for the icon index is zero.

Figure 14.8: CPL Module Registry Entry
InstallThere are several ways to register a CPL module for execution, but the easiest is done through—wait for it—the registry. Save the CPL module as test.cpl in some directory whose %path%, for simplicity and definiteness, contains no spaces and is not ridiculously long. Then create the following registry value shown in Figure 14.8.
To test, open the Control Panel so that it shows a list of items, not categories, and confirm that you don’t just see an item named Test, but also see its message box. Yes, our CPL module gets loaded and executed just for browsing the Control Panel. Indeed, it gets loaded and executed multiple times. (Watch out for extra message boxes lurking behind the Control Panel.) Though it’s not necessary for our purposes, you might, for completeness, confirm that the Test item does launch. When satisfied with the CPL module in this configuration as a base state, close any message boxes that remain open, close the Control Panel, too, and then try a few quick demonstrations.
By the way—I say it as if it’s incidental, even though I can’t stress it enough—two of these demonstrations begin by varying the circumstances as even a novice mischief-maker might. Each depends on a little extra step or rearrangement that you might stumble onto, especially if your experimental technique is good, but which is very much easier to add if its relevance is predicted from theoretical analysis.
If you doubt me, don’t read on right away, but instead take my cue about putting spaces in the pathname and see how easily you come up with suitably quirky behaviour. Of course, theoretical analysis takes hours of intensive work, and often comes to nothing. There’s a trade-off, but for investigating possibly subtle interactions with complex software the predictive power of theoretical analysis surely pays off in the long run.
But enough of my pleas to the computer security industry for investing more in studying Windows! Let us get on with the demonstrations.
Default File Extension?First, remove the file extension from the registry data. Open the Control Panel and see that the Test item no longer shows. Close the Control Panel. Rename test.cpl to test.dll. Open the Control panel and see that there’s still no Test item. Evidently, neither .cpl nor .dll is a default file extension for CPL modules. Close the Control Panel. Why did I have you try this? Create %path% est itself as any file you like, even as a directory. Open the Control Panel. Oh, now it executes test.dll!
Yes, if the pathname in the registry does not have a file extension, the Control Panel will load and execute a CPL module that has .dll appended, as if .dll were a default file extension—but only if the extension-free name also exists as at least some sort of a file-system object. Isn’t this weird?
SpacesFor our second variation, start undoing the first. Close the Control Panel, remove the subdirectory, and rename the CPL module to test.cpl. Then, instead of restoring the registry data to “%path% est.cpl” make it “%path% est.cpl rubbish.” Open the Control Panel. Of course, the Test item does not show. Close the Control Panel and make a copy of the CPL module as “test.cpl rubbish.” Open the Control Panel. See first that the copy named “test.cpl rubbish” gets loaded and executed. This, of course, is just what we’d hope. The quirk starts with the next message box. It shows that test.cpl gets loaded and executed, too!
Yes, if the registry data contains a space, the CPL module as registered executes as expected but then there’s a surprise execution of something else. The Control Panel finds a new name by truncating the registered filename—the whole of it, including the %path%—at the first space. And, yes, if the result of the truncation has no file extension, then .dll gets appended. (Though, no, the extension-free name doesn’t matter now.)
Please find another Zen-friendly moment for taking this in. This quirky Wonderland surprise execution surely counts as a parsing error of some sort. It means that to fix a case of surprise execution that Microsoft presented as a parsing error, Microsoft trusted old code in which a parsing error could cause surprise execution. So it goes.
LengthFinally, play with lengthening the pathname to something like the usual limit of MAX_PATH characters. That’s 260, but remember that it includes a terminating null. Close the Control Panel. Make a copy of test.cpl with some long name and edit the registry data to match the copy that has this long name. Open the Control Panel. Repeat until bored. Perhaps start with the 259 characters of
and work your way down—or start with
if you want to stay with the curious configuration where one CPL module is registered but two get executed. (My naming convention is that after the 16 characters of my chosen path, the filename part has each character show its 0-based index into the pathname, modulo 16, except that where the index is a multiple of 16 the character shows how many multiples. The ellipses each hide 160 characters.) Either way, for any version of Windows from the last decade, the Test item does not show, and the CPL module does not get loaded and executed—until you bring the pathname down to 250 characters, not including the terminating null.
This limit is deliberate. Starting with Windows XP and its support for Side-By-Side (SxS) assemblies, the Control Panel anticipates loading CPL modules in activation contexts. There are various ways that a CPL module can affect the choice of activation context. For one, the Control Panel looks for a file that has the same name as the CPL module, but with “.manifest” appended. Though this manifest need not exist, the Control Panel has, since Windows XP SP2, rejected any CPL module whose pathname is already too long for the manifest’s name to fit the usual MAX_PATH limit. (The early builds of Windows XP just append without checking. That they got away with it is a classic example of a buffer overflow that turns out to be harmless.)
The Exec Name
As we move toward the specifics of loading and calling a CPL module to ask which icon to show, it’s as well to observe that this lower-level code for loading and calling CPL modules in general is not just quirky in some of its behaviors, but also in how it gets its inputs. Reasons for that go back to ancient times and persist, so that CPL modules can be loaded and executed via the RUNDLL32.EXE program, the lower-level code for loading and calling CPL modules that receives its specification of a Control Panel item as text—as if it were supplied on a command line. For this purpose, the text appears to be known in Microsoft’s source code as the item’s exec name. It is composed as the module’s pathname between double-quotes, then a comma, and then the item’s display name.
Perhaps this comes from wanting to reuse as much legacy code as possible. The loading and executing of a CPL module specifically to ask which icon to show for one of that module’s Control Panel items—even though this task is no longer ever done on its own from any command line—is handled as a special case with a slightly modified exec name: the module’s pathname, a comma, a (signed) decimal representation of the icon index, another comma, and the item’s display name.8
The absence of double-quotes around the module’s pathname in this modified exec name is much of the reason for the quirky behaviour demonstrated above when the pathname contains a space. It goes further than that, however.
I ask you again to take another Wonderland Zen moment of reflection. The GetUIObjectOf method receives the module’s pathname, the item’s icon index, and the item’s display name— among other things—in a binary package. It parses them out of the package and then into this modified exec name, i.e., as text, which the deeper implementation will have to parse. What could go wrong with that?
The immediate answer is that the modified exec name is composed in a buffer that allows for 0x022A characters, but, until Microsoft’s second fix, only MAX_PATH characters are allowed for the copy that’s kept for the object that gets created to represent the Control Panel item for the purpose of providing an IExtractIcon interface. This mismatch of allowances is ancient. Worse, even though Windows Server 2003 (chronologically, but Windows XP SP2, by the version numbers) had seen Microsoft introduce the mostly welcome StringCb and StringCch families of helper routines for programmers to work with strings more securely, this particular copying of a string was not converted to these functions until Windows Vista—and even then the programmer could blow away much of its point by not checking it for failure.
If the CPL module’s pathname is just long enough, the saved exec name gets truncated so that it keeps the comma but loses at least some of the icon index. When the GetIconLocation method parses the (truncated) exec name, it sees the comma and infers that an icon index is present. If enough of the icon index is retained such that digits are present, including after a negative sign, then the only consequence is that the inferred icon index is numerically wrong. If the CPL module’s pathname is exactly the right length, meaning 257 or 258 characters (not including a terminating null), then the icon index looks to be empty or to be just a negative sign, and is interpreted as zero.9
It’s time for another of those Wonderland moments. To defeat a spoof that Microsoft misrepresented as a parsing error, Microsoft dealt with a suspect zero by proceeding as if the zero had been -1, but then an actual parsing error in the deeper implementation could turn the -1 back to zero!
The practical trouble with this parsing error, which is perhaps the reason it wasn’t noticed at the time, is that it kicks in only if the CPL module’s pathname is longer than the 250-character maximum that we demonstrated earlier. An item ID that could trigger this parsing error isn’t ever going to be created by the Control Panel. It can’t, for instance, get fed to GetUIObjectOf from a shortcut file that we created simply by a Ctrl-Shift drag. If we want to demonstrate this parsing error without resorting to a Windows version that’s so old that the Control Panel doesn’t have the 250-character limit, the item ID would need to be faked. We need a specially crafted shortcut file after all.
Shortcut CraftingMaking an uncrafted shortcut file is straightforward if you’re already familiar with programming the Windows shell. The shell provides a creatable COM object for the job, with interfaces whose methods allow for specifying what the shortcut will be a shortcut to, and for saving the shortcut as a .LNK file. The target, being an arbitrary item in the shell namespace, is specified as a sequence of shell item identifiers that generalise the pathname of a file-system object. To represent a Control Panel item, we just need to start with a shell item identifier for the Control Panel itself, and append the item ID such as we’ve been talking about all along. Where crafting comes into it is that we’ve donned hacker hats, so that the item ID we append for the Control Panel item is confected. But enough about the mechanism! You can read the source code.10
To build, use the Windows Driver Kit (WDK) for Windows 7. The 32-bit binary suffices for 64-bit Windows. You may as well build for the oldest supported version, which is Windows XP, but the program does nothing that shouldn’t work even for Windows 95.
To test, open a Command Prompt in some directory where you have a copy of test.cpl from the earlier demonstrations of general behaviour. Again, for simplicity and definiteness, start with a %path% that contains no spaces and is not ridiculously long. To craft a shortcut to what might be a Control Panel item named Test that’s hosted by this test.cpl, run the command
With the Windows Explorer, browse to this same directory. If running on an earlier version than Windows 7 SP1 without Microsoft’s first fix, you should see the CPL module’s message box even without having registered test.cpl for execution. For any later Windows version or if the first fix is applied, browsing the folder executes the CPL module only if it’s been registered.
For full confidence in this base state, re-craft the shortcut but specify any number other than zero for the icon index. Confirm that browsing does not cause any loading and executing unless the shortcut records that the CPL module is of the sort that always wants to be asked which icon to show.
Very Long NamesThe point to crafting the shortcut is that we can easily use it to deliver to GetUIObjectOf an item ID that we specify in detail. Do note, however, that the shortcut is only convenient, not necessary. We could instead have a program confect the item ID, feed it to GetUIObjectOf by calling directly, and then call GetIconLocation and report the result.
Either way, the details that we want to specify are the module’s pathname and the icon index. We’ll provide pathnames that are longer than the Control Panel accepts when enumerating Control Panel items, but which nonetheless result in the expected loading and execution when the icon index is zero. Then, we’ll demonstrate that when the pathname is just the right length, as predicted above, the loading and execution happen even when the icon index is non-zero. The assumption throughout is that the Windows you try this on does not have Microsoft’s second fix.
We know anyway not to bother with the very longest possible name (except as a control case), since the truncation loses the comma from the exec name such that it will seem to have no icon index at all. Instead make a copy of test.cpl that has a 258-character name such as
Craft a /icon:0 shortcut that has this same long name for the module’s pathname. If testing on a Windows that has the first fix, also edit this long name into the registry. Browse the directory that contains the shortcut—and perhaps be a little disappointed that the CPL module does not get loaded and executed.
But now remember that delicious quirk in which a space in the module’s pathname, within the 250-character limit, induces the loading and executing of two CPL modules, first as given and then as truncated at the first space. Copy test.cpl as
Re-craft the shortcut by giving this name to the /module switch in quotes. Update the registration if appropriate. Still, the copy with the long name doesn’t get loaded and executed—but, as you might have suspected, the copy we’ve left as test.cpl does! Indeed, because the copy with the long name doesn’t have to execute for this purpose, and because its Control Panel item won’t show in the Control Panel, it doesn’t need to be a copy. Even an empty file suffices!
Edge CasesBy repeating with ever shorter pathnames, but also trying non-zero values for the icon index, we can now demonstrate that CVE-2010-2568 has its own edge cases, as predicted from theoretical analysis. The general case has zero for the icon index. The edge cases are that if the pathname is very long but contains a space in the first 250 characters, then the icon index need not be zero. The following table summarises the behaviour on a Windows that does not have CVE-2010-2568 fixed.
The length does not include a terminating null. The icon index is assumed to be syntactically valid: negative means 0xFF000000 to 0xFFFFFFFF inclusive; positive means 0x00000001 to 0x00FFFFFF inclusive. Execution is of the CPL module that is named by truncating the very long pathname at its first space. (Also, if this has no file extension, appending .dll as a default.)
Length |
Icon Index |
Exec? |
Remarks |
259 |
Any |
No |
|
258 |
Zero |
Yes |
|
Non-Zero |
Yes |
Edge Case |
|
257 |
Zero |
Yes |
|
Negative |
Yes |
Edge Case |
|
Positive |
No |
||
Less |
Zero |
Yes |
If Registered11 |
Non-Zero |
No |
CVE-2015-0096
The point to Microsoft’s first fix of CVE-2010-2568 was to avoid execution unless the pathname in the item ID was that of a registered CPL module. But the decision to test the registration only if the icon index in the item ID was zero meant that the two edge cases were completely unaffected. Worse, when the icon index in the item ID was zero, changing the zero to –1 would turn the suspect item ID not into something harmless but into an edge case. Either way, the pathnames had to be so long that the edge cases turned into surprise execution only because of a quirk even deeper into the code such that the CPL module executes needed not to be the one specified.
CVE-2015-0096 appeared to be the first public recognition of this, not that you would ever guess it from the formal description or from anything that I have yet found that Microsoft has published about it. From Dave Weinstein’s explanation, it appears that the incompleteness of the first fix was found by following the mind of an attacker frustrated by the first fix and seeking a way around it.
The second fix plausibly does end the exploitability, at least for the purpose of using shortcuts to Control Panel items as a way to spread a worm. The edge cases exist only because of a parsing error caused by a buffer overflow. The second fix increases the size of the destination buffer so that it does not overflow when receiving its copy of the exec name. For good measure, it also tracks the icon index separately, so that it anyway does not get parsed from that copy.
But the CPL module’s filename continues to be parsed from that copy. If it contains a space, then the Control Panel still can execute two CPL modules, one as given and one whose name is obtained by truncating at the first space. Only because of this were the edge cases ever exploitable. Yet even as late as the original release of Windows 10—which is as far as I have yet caught up to for my studies—it remains true that if you can register “%path% est.cpl rubbish” or “%path%space test.cpl” for execution as a CPL module, then you can get %path% est.cpl or %path%space.dll loaded and executed by surprise. Is anyone actually happy about that?
Many ways seem to lead into this Wonderland, but is there a way out?
14:09 Postscript Shows its Own MD5
by Greg Kopf
Introduction
Playing with file formats to produce unexpected results has been a hacker past-time for quite a while. These odd results often include self-referencing code or data structures, such as zip bombs, self-hosting compilers, or programs that print their own source code–called quines. Quines are often posed as brain teasers for people learning new programming languages.
In the light of recent attacks on the cryptographic hash functions MD5 and SHA-1, it is natural to ask a related question: Is there a program that prints out its own MD5 or SHA-1 hash? A similar question has been posed on Twitter by Melissa.

The original tweet is from 2013. It appears that since then nobody provided a convincing solution because in March 2017 Ange Albertini declared that the challenge was still open. This brought the problem to my attention—the perfect little Sunday morning challenge.
A Bit of Context
Melissa’s challenge asks whether there is a document in a conventional format that prints its own MD5 or SHA-1 hash. At the first glance this question might appear to be a bit stronger than the question for a program that prints its own MD5 or SHA-1 hash. However, it is well known that several document formats actually allow for Turing-complete computation. Proving the Turing-completeness of exotic programming languages, such as Postscript files or the x86 mov instruction, is in fact another area that appears to attract the attention of several hackers. Considering that Postscript is Turing-complete, could one build a program that prints out its own MD5 or SHA-1 hash?
The problem of building such a program can be viewed from (at least) two different angles. One could view this hypothetical program as a modified quine: instead of printing its own source code, the program prints the hash of its own source code. If you are familiar with how quines can be generated, you can easily see that the following program is indeed a solution to the question:

While this method can likely be applied to Postscript documents as well, I did not like it very much. Computing the MD5 hash of the program at runtime felt like cheating.
The desired file is a modified fixpoint of the used hash function, in the same sense that this program is a modified quine. A plain fixpoint would be a value x where x = h(x). Here, h denotes the hash function. This problem has not yet, so far as I know, been solved constructively. (Statistics reveals that such fixpoints exist with a certain probability, however.)
Fortunately, we are looking for something a little easier. We are looking for an x that satisfies x = encode(h(x)) for some encoding function encode(). I decided to chase this idea: constructing such a value x, using MD5 as hash function h() and a function that builds a Postscript file as encode().
The Basics
When Wang et al., broke MD5 in 2005, there was considerable interest in what one could do with a chosen-prefix MD5 collision attack.0 Sotirov et al., have demonstrated in 2008 that one could exploit Wang’s work in order to build a rogue X.509 CA certificate—the final nail in MD5’s coffin.1
But there is another—even simpler—trick one can perform given the ability to create colliding MD5 inputs. One can create two executables with the same MD5 hash but with different semantics. The general idea is to generate two colliding MD5 inputs a and b. We can then write a program like the following.


And another program like this:

Both programs will have the same MD5 hash; in the second program, we only replaced a with b.
But why does this work? There are two things one needs to pay attention to. Firstly, we have to understand that while the inputs a and b might collide under MD5, the strings "foo" + a and "foo" + b may not necessarily collide. Fortunately, Wang’s attack allows us to rectify this. The attack does not only generate colliding MD5 inputs, it also allows to generate collisions that start with an arbitrary common prefix. (This is what chosen prefixes are all about.) This is precisely what is required, and we can now generate MD5 inputs that collide under MD5 and share the following prefix.

Secondly, we also need to keep in mind that in our programs we have appended some content after the colliding data. Fortunately, as MD5 is a Merkle–Damgård hash, given two colliding inputs a and b, the hashes MD5(a + x) and MD5(b + x) will also collide for all strings x. This property allows us to append arbitrary content after the colliding blocks.
Constructing the Target
This technique allows us to encode a single bit of information into a program without changing the program’s MD5 hash. Can we also encode more than one bit into such a program? Unsurprisingly, we can!
We start the same way that we have already seen, by generating two MD5 collisions a and b that share the following prefix.

This allows us to build two colliding programs that look like the following. (Exchange a with b to get the second program.)

And from here, we simply iterate the process, computing two colliding MD5 inputs c and d that share this prefix.
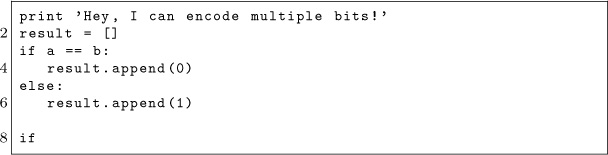
This allows us to build a program with two bits that might be adjusted without changing the hash.
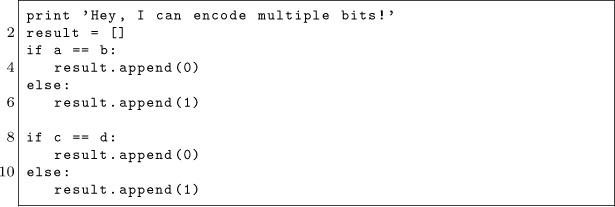
We can replace a with b, and we can replace c with d. In total, this yields four different programs with the same MD5 hash. If we add a statement like print result at the end of each program, we have four programs that output four different bit-strings but share a common MD5 hash!
How does this enable us to generate a program that outputs its own MD5 hash? We first generate a program into which we can encode 128 bits. Knowing that the MD5 hash of this program will not change independently from what bits we encode into the program. Therefore, we simply encode the 128 output bits of MD5 into the program without altering its hash value. In other words, the program prints the 128 output bits of its own hash value.


Application to Postscript
This technique can directly be applied to Postscript documents as Postscript is a simple, stack-based language. Please consider the following code snippet.

While this may look a bit cryptic, the program is in fact very simple. It compares the string literal “a” to the string literal “b”, and if both strings are equal, it pushes the numeric value 1 to the stack. Otherwise, it pushes a 0.
This examples highlights the manner in which we can build a Postscript file that we encode 128 bits of information into without changing the file’s MD5 hash. The program will push these desired bits to the stack. We can extend this program with a routine that pops 128 bits off the stack and encodes them in hex. To demonstrate the feasibility of this idea, we can inspect how one nibble of data would be handled by this routine.

This code excerpt will pop four bits off the stack. If all bits are zero, the string literal “0” will be pushed onto the stack. If the lowest bit is a one and all other bits are zero, the string literal “1” will be pushed, etc. The show statement at the end causes the nibble to be popped off the stack and written to the current page.
An example of such a Postscript document is included in the feelies.2 If you want to build such a document on your own, you could use the python-md5-collision library3 to build MD5 collisions with chosen prefixes.
Closing Remarks
We have seen two approaches for generating programs that print out their own hash values. The quine approach does not require a collision in the used hash function, however this comes at the cost of language complexity. In order to build such a modified quine, the chosen language must allow for self-referencing code as well as computing the selected hash function.
The fixpoint approach is computationally more expensive to implement, as several hash collisions must be computed. However, these hash calculations can be performed in any programming environment. With this approach, the target language can be comparably simple: it just needs conditionals, string comparison and some method to output the result.
14:10 A PDF That Shows Its Own MD5
by Mako
Even though MD5 is quite broken, you might easily assume that creating a file that contains its own MD5 is impossible. After all, surely changing the file would change its MD5? Let’s honor this publication’s fine history of PDF tricks by creating a PDF file that displays its own MD5 hash when viewed.
Our tactic will be to make each digit of the MD5 checksum a separate JPEG image, and make the MD5 hashes of all 16 possible images collide to the same value. We can then swap out images to display any combination of digits without affecting the file’s MD5. This requires fifteen collisions per digit, and since they depend on the MD5 of the preceding part of the document, we need to do this for each digit, for a total of 15 × 32 = 480 collisions. With a few compute-months of power we could just append chosen-prefix collisions to whatever images we liked and be done with it, but that’s too slow. If we could make do with faster shared-prefix MD5 collisions — for example Marc Stevens’ Fastcoll0 — we could be finished in an hour.
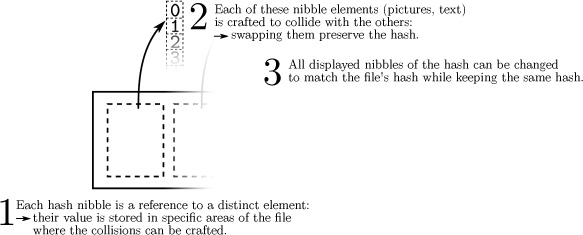
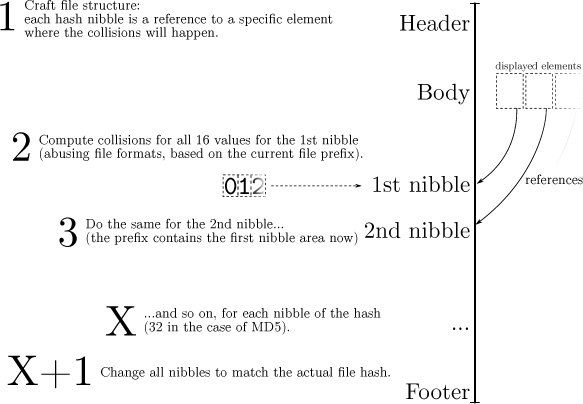

Figure 14.9: Colliding Block Relationship
This adds some restrictions. Everything other than the pairs of collision blocks must now be the same. Furthermore, the two versions of the first collision block have a fixed relationship, as shown in Figure 14.9.
If we could only get one of those bits to be in the length field of a JPEG comment marker, we could take loving inspiration from Ange Albertini’s trick in the SHAttered attack, colorfully explained by Hector Martin1 in Figure 14.10, to display two different images.
Unfortunately, they’re in the middle of the collision block, and worse, those message words are being used to satisfy these constraints on Q[5], Q[12] and Q[15]:2
Q[5] = 01000^01 11111111 11111111 11^^10^^ |
Q[12] = 0!0....0 ..!..01. ..1...1. 1....... |
Q[15] = 1.0....0 .......! 1....... ....0... |
. is don’t-care, |
^ is same as previous Q, |
! is inverted from previous Q. |
Hmmm. Q[15] is pretty lightly constrained. Maybe we could just set m[14] = (m[14]&0xff000000)|0x01feff and see what it does to Q[15]. That’d give a JPEG comment of length 256-383 bytes on one side and 128 bytes longer on the other, and we can try just generating new sets of values until they meet the constraints. Luckily this works often enough to be practical, though there are probably more elegant approaches.
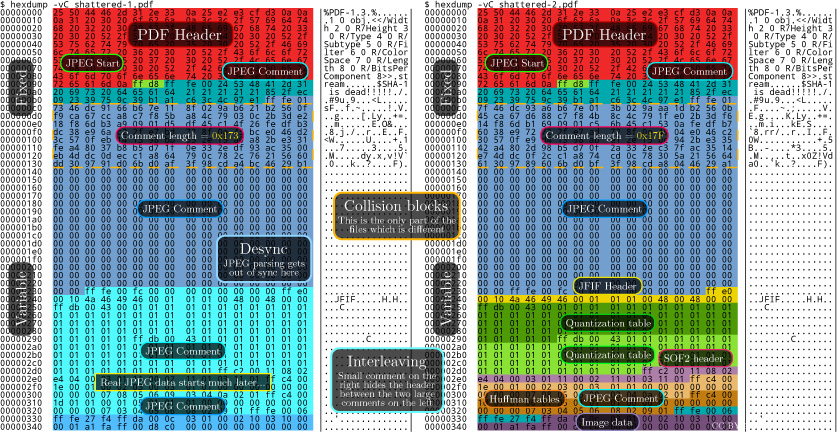
Figure 14.10: How the SHA-1 collision PDF format trick works
Now we can start colliding JPEGs! The structure is quite simple: we begin with an FF D8 start-of-image marker and the parts that are identical in all our images, such as the JFIF APP0 segment, then add a JPEG comment that will end at exactly byte 56 of our collision block. After padding to a 64-byte block boundary and creating a collision, we finally have two partial files with identical MD5 values but different JPEG comment lengths.
From here it’s straight sailing. In the short-comment version, the next JPEG marker parsed is a comment skipping past image 0. The long-comment version instead sees the contents of image 0 followed by another JPEG comment extending right to the end of the image, whose size we’ll hardcode for convenience. This lets us switch between image 0 and the other images without changing the MD5, and we repeat this process for images 1, 2, etc. The final image for F is displayed if no other image was selected, giving a total of fifteen collisions, repeated for each of the thirty-two digits.
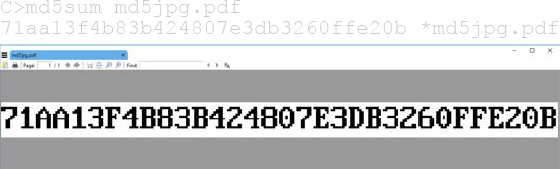
Since this doesn’t require any clever PDF tricks the file3 should work for any PDF, and because the image sizes are fixed in advance it could just have fixed-size placeholder images that are overwritten by the collision. Total running time is approximately an hour.
Alternatively, the PDF format has a feature called Form XObjects, effectively embedded mini-PDFs which can be displayed using /objectname Do and can be nested. If we can keep characters not allowed in a name out of the MD5 collision we can switch which XObjects get drawn and display the MD5 as actual text. (Thankfully enough PDFs draw text one character at a time that everything handles this cleanly.) block[15] is as unconstrained as 14 and can become the Do command, meeting the (mostly irrelevant) length limit on names in PDFs, and avoiding most character restrictions on the second collision block. This turns out to save quite a bit of hacking time and runtime.
Of course, then we have to deal with implementation-specific fixes like disguising the trailing garbage as a string because PDF.js gives up otherwise, banning 0x80 and 0xff which PDFium considers whitespace for some reason, and matching parentheses to properly terminate the dummy strings and keep Adobe Reader happy — but not counting escaped parentheses, or we’ll add too many closing parentheses and break PDF.js again.
That’s a lot of extra effort just to make copy-and-paste and pdftotext work, with no guarantee future software won’t break it. It works though.4
$ pdftotext -q md5text.pdf -
66DA5E07C0FD4C921679A65931FF8393
$ md5sum md5text.pdf
66da5e07c0fd4c921679a65931ff8393 md5text.pdf
– — — – — — — — – — –
— — — – — –
— — – — – – — – — — —
How we put the MD5 on the Front Cover of PoC‖GTFO 14
a short addendum by Philippe Teuwen
On page 138, you’ll see that this issue is a NES ROM polyglot that, when run, prints its own MD5 checksum. It would have been be a pity to not take advantage of the trick presented by Mako to get this very issue displaying the same MD5 on its cover page.
This required some weaponization of Mako’s PoC, moving from a stand-alone Python script that creates a PDF from scratch to something that can be integrated with our existing LATEX toolchain.
PdfTEX provides pdfximage as a mechanism for embedding graphic objects, which, combined with immediate, allows us to inject the sixteen JPEG tiles at the beginning of the PDF, right after the pseudo object containing the bulk of the NES ROM. This mechanism is accessed by means of pdflastximage and pdfrefximage wherever we want to use the injected tiles:

New tiles have been created to mimic the default LATEX monospace font under the constraint that they, with the extra colliding blocks, can fit under a single JPEG comment, i.e. a total size fitting in a 16-bit word and in fine an average of 3,500 bytes per tile. Alternatively, it would have been possible to include higher resolution tiles, at the cost of crafting chained comment blocks.
To get both NES and title page MD5 right, the operations have to be properly interleaved: compile LATEX sources with the pdfximage objects; integrate the ZIP; insert a first PDF object with the NES ROM; insert the ROM header in front of the PDF header; compute the collisions for the ROM; insert a first set of collisions in the ROM; compute the collisions for the PDF/JPEG tiles; insert a first set of collisions in the PDF/JPEG tiles; compute the complete file MD5; swap collisions in the ROM; swap collisions in the PDF/JPEG tiles.
As we like to see the correct MD5 while typesetting without having to recompute the collisions systematically, we use two caches of the collisions that need to be renewed only if the MD5 of the prefixes change. With a little luck, that’s only when the NES ROM or the JPEG tiles are modified.
Finally, we manually backport the collisions displaying the computed MD5 into the monoglot and inanimate PDF version of the issue provided to the print shop.
14:11 This GIF shows its own MD5!
by Kristoffer “spq” Janke
The recent successful attack on the SHA-1 hash algorithm0 has led to a resurgence of interest in hash collisions and their consequences.
A particularly well-broken hash algorithm is MD5, which allows for a myriad of ways to play with it. Here, we demonstrate how to assemble an animated GIF image that displays its own MD5 hash.1
$ md5sum md5.gif
f5ca4f935d44b85c431a8bf788c0eaca md5.gif

The GIF89a file format
A GIF89a file consists of concatenated blocks. A parser can read these blocks from the file in a serial fashion without needing to keep state.
A GIF file is made up of three parts.
HeaderSignature, Version and basic info like the Canvas Size and (optional) Color Map.
BodyImage, Comment, Text and Extension blocks, in any order.
TrailerThe byte 0x3b.
Of particular interest to us is the format of comment blocks. They begin with the two bytes 0x21 0xfe, followed by any number of comment chunks. Every chunk consists of one length byte and <length> bytes of arbitrary data. The end of the comment block is marked with a chunk having zero length.
This means that, by controlling the length bytes, we can make the parser skip any number of non-displayable bytes in comment chunks. These skipped bytes, of course, still affect the file’s MD5 hash. So two GIF files can show different content, while their skipped bytes are manipulated to make them have the same MD5 hash values. With some careful stitching, here we’ll build just such files—MD5 GIF collision pairs.

MD5 collisions
For MD5, appending the same data to both colliding files will still produce the same hash value. The same is true for appending another collision pair. So we can have four different files all having the same MD5 hash with this method.
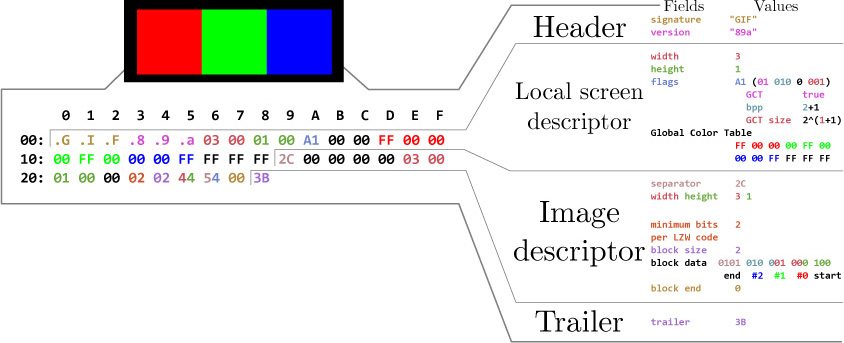
Or, instead of producing multiple files, we can produce just one file but later change one of the collisions in the produced file. This is the technique we’ll use here.
Fastcoll is a MD5 collision generator, created by Marc Stevens.2 From any input file, it generates two different output files, both having the same MD5 hash.
These output files consist of the 64-byte aligned, zero-padded input file, followed by 128 bytes of collision data generated by Fastcoll. Every byte from the generated collision data of both files appears to be random. Comparing these last 128 bytes in both output files, we can see that only nine bytes differ. These bytes can be found at indices 19, 45, 46, 59, 83, 109, 110 and 123. While the bytes at 46 and 110 do not show any pattern, the other bytes differ only and exactly in their most significant bit. This can be used to construct GIF comment chunks of different sizes.
Showing two different images
The GIF comment block format and the collisions generated by Fastcoll allow for the creation of two GIF files that have the same MD5 hash, but are interpreted differently.
By constructing the GIF such that one of the differing bytes in the collision data is interpreted as the length of a comment chunk, the interpretation of the remaining file will be different across the two colliding files.
Here, we chose the last differing byte at position 123. Due to the most significant bit having been flipped between the two collisions, the byte’s value differs by 128. In order to align this byte to the Length byte of comment chunk #2, the previous comment chunk #1 needs to contain the first 123 bytes of the collision data. As the collision is 64-byte aligned, the comment chunk #1 should contain some padding bytes. We’ll refer to these two colliding blocks as (X) and (Y).

One limitation arises when the value of the byte controlling the length of #2 is smaller than four. The reason for this limitation is that the comment chunk #2 needs to contain at least the remaining collision data (four bytes) in both files. When this requirement is not met, a new collision needs to be generated.
We now have two files with different-sized comment chunks, but the same MD5 hash. We can use this in one of the collisions by ending the comment block and starting an image block. The image block is followed by another comment block, which is sized such that it skips the remaining bytes of the difference to 128 and both collisions are aligned from there.
The diagram on page 136 shows the contents of the GIF file, which is interpreted differently depending upon which of the colliding blocks is found at Point F.
The file with the collision block X will have the body blocks B, I and N interpreted, while the file with Y will only have B and N interpreted, with I skipped over as part of a comment. In order to yield two GIFs with completely different images, one could use the blocks B and N for the two images and one or more dummy image with very high animation delay in block I. The result is a pair of animated GIF files, both having the desired images as first and last frames, but only the variant with X would have a delay of multiple minutes between the two frames.
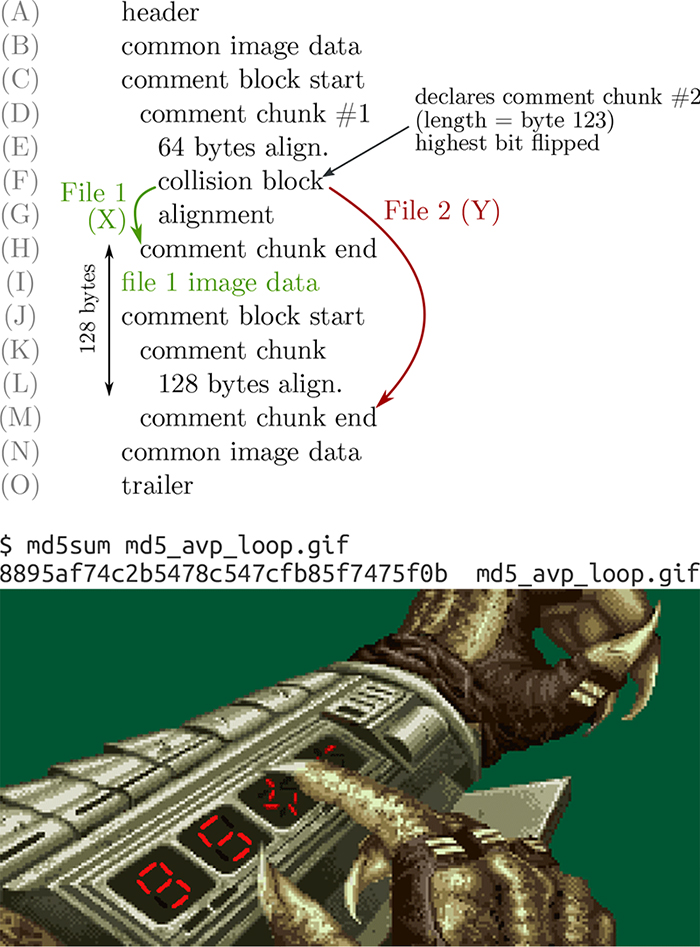
Showing the MD5 hash
I decided to use 7-segment optics for my PoC. For displaying the MD5 hash, I need 32 digits, each having seven segments. The background image with all 224 (32 × 7) segments visible is put into block (B), block (N) can be left empty. We repeat the blocks (D). . . (L) for every single segment and put an image masking that segment into block (I). Generating all 224 collisions required thirty minutes on my PC. When the file is completely generated, we calculate its MD5 hash. This will be the final hash, which the GIF file itself should show.
Every masking image will only be shown when the corresponding collision block is (X), otherwise a parser will only see comment chunks. We can switch between collision blocks (X) and (Y) for every image masking one of the segments. This switch will not change the MD5 hash value of the file but it allows us to control what is displayed. Once we have the final hash value, we choose the right collision for each segment and replace it in the file.3
That’s it!4 :)

14:12 This PDF is an NES ROM that prints its own MD5 hash!
by Evan Sultanik and Evan Teran
This PDF—in addition to being a ZIP, which is at this point de rigueur—is also a Nintendo Entertainment System (NES) ROM that prints out the PDF’s MD5 hash. In other words, it is a hash quine. This is how we did it!
First, we’re going to give a quick primer on the NES’s hardware architecture, which is necessary to understand the iNES file format, which is ubiquitous for storing ROMs. We then describe the PDF/iNES polyglot, followed by how we achieved the MD5 quine.
NES Hardware and ROMs
NES cartridges have two primary ROM chips: the PRG and CHR. That’s one of the reasons why a special file format such as iNES is necessary to store ROMS: Cartridges don’t have a single, contiguous ROM.
The PRG ROM contains the actual executable code of the game. It will typically be loaded into the addresses from 0x8000– 0xFFFF of the NES.
We have code, but do we have graphics? That’s what the CHR ROM is for!0 The Picture Processing Unit (PPU) is what renders the graphics of the NES; it will have either CHR ROM or CHR RAM attached to it. (Note that the PPU has its own address space separate from the CPU.)

Nintendo was clever. Very clever. They knew that the NES console had hardware limitations that developers would inevitably run up against, for example, the maximum 32 KiB of address space dedicated to the PRG ROM. They allowed cartridges to have custom chips that are able to intercept memory reads (and writes!) and have logic which can effect change based on them. These chips are called mappers. That’s essentially how the Game Genie works: it is a mapper that sits between the cartridge and the console.
The most basic capability of a mapper is to affect is paging. That’s right, around the same time that Intel was releasing the i386, the NES supported basic paging. One common way that this works is that the ROM would detect a write to a ROM at certain addresses, triggering the mapper to switch which pages of ROM were visible where. For example, a cartridge with a NESUNROM mapper chip would interpret a write of 0x04 to 0x8000 as a command to place the fourth 16 KiB page at address 0x8000– 0xBFFF. PRG ROM remapping is just the tip of the iceberg. Mapper hardware grew more and more complex over the years as NES games continued to push the limits of the system.
Mappers are another reason why a ROM format like iNES is required, since there were hundreds of different mapper chips, some specific to individual games. This also makes building an NES emulator very challenging, because each individual mapper chip must be emulated.
The iNES File Format
The de facto standard for storing NES ROMs is the iNES format, named after the file format popularized by an early NES emulator by Marat Fayzullin named iNES. While there have been competing file formats over the years such as the Universal NES Interchange Format (UNIF), virtually all ROMs you will encounter in the wild will be an iNES file.
It is worth noting that there is a successor to the iNES file format called “NES 2.0.” It is backwards compatible with iNES, and adds a few extra types of information, but is not different enough to require discussion for the purpose of creating polyglots. So let’s take a look at this format and see where we can place our PDF header safely.
Here is the iNES file format:

So, what is this strange beast that is a “Trainer”? The trainer section is not something that most ROMs need at all in modern emulators, but any iNES ROM is allowed to have one. Essentially, the trainer is a 512 byte block of code that the emulator will load at memory address 0x7000–0x71FF. Trainers were used by ROM dumpers to store patch code to make it easier to translate commands from an unsupported mapper to one that was supported.
Here is the format of the iNES header:
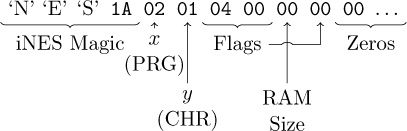
The third least significant bit of the first flag byte (offset 6) controls whether a trainer section exists. That is why we have set it to 04.
PDF/iNES Polyglot
As you might have guessed, the trainer is the perfect place to put our PDF header, since it starts at offset 16 of the iNES file and 512 bytes is more than enough for our PDF header. Ange Albertini first described this approach in PoC||GTFO 7:6. We can then create a PDF object to encapsulate the remainder of the ROM. Since PDF readers ignore everything that comes before the PDF header, the first sixteen bytes of the iNES header that come before the Trainer are ignored.
Emulators don’t care about data after the ROM section. In fact, you will often find iNES ROMs in the wild that have a URL appended to the end of the file. This causes no harm at all since an iNES file loader only needs to consider the trainer and ROM portions described by the header. Everything afterward—in our case, the remainder of the PDF—is ignored.
So, is it safe to put a PDF header into the trainer? No game which doesn’t currently have a trainer will do anything which interacts with code loaded at address 0x7000–0x71FF, so they won’t care at all what happens to be there. We had to create our own custom NES ROM to generate the MD5 quine anyways, so we might as well simply choose not to use the trainer code in the traditional way.
We fill the trainer with our standard PDF header, containing a PDF object stream to encapsulate the remainder of the NES ROM.
%PDF-1.5
%<D0><D4><C5><D8>
9999 0 obj
<<
/Length number of bytes remaining in the ROM
>>
stream
zeros for the remainder of the 512 Trainer bytes
the remainder of the iNES ROM
endstream
endobj
the remainder of the PDF
NES MD5 Quine
The next issue is getting the ROM to display its own MD5 hash. We used a technique similar to Greg Kopf’s method for a PostScript MD5 quine from article 14:09 on page 112, however, we were severely restricted by the NES’s memory limitations.
In the PostScript MD5 quine PoC, each bit of the MD5 hash was encoded as a two-block MD5 collision that was compared against a copy of itself. That meant that each of the 128 bits of the MD5 hash required four 64 byte MD5 blocks, or 32,768 bytes. That’s the size of an entire ROM of an NROM-256 cartridge!1 It’s twice the amount of memory that Donkey Kong, Duck Hunt, and Excite Bike required.
We wanted to avoid relying on a mapper. So in order to shrink the hash collision encoding to fit on an NROM-256 cartridge, we only encode one collision (two 64 byte blocks) per MD5 bit. That requires only 16,384 bytes. However, that doesn’t allow for the comparison trick that Greg used in the PostScript quine. One option would be to add a lookup table after the collisions: For each hash collision, encode a diff between the two collided blocks, specifying which block represents “0” and which represents “1.” A lookup table would only require an additional 256 bytes, two bytes per MD5 bit. Another option which uses even less space is to take advantage of the fact that Marc Stevens’ Fastcoll2 MD5 collision algorithm produces certain bits that always differ between the two collided blocks, as was described by Kristoffer Janke in article 14:11. So, we can check that bit and use it to determine parity. Either way, after the final PDF is generated and we know its final MD5 hash, we can then swap out each of the collided blocks in the NES ROM to produce the desired bit sequence, all without altering the overall MD5 hash.
This technique requires at most 16,640 bytes of the ROM. However, the MD5 encoding needs to start at the beginning of an MD5 block for the collision to work well. (It needs to start an address that is a multiple of 64 bytes.) That means we can’t put it at the very end of the PRG ROM, because the last six bytes of that ROM are reserved for the “VECTORS” segment. The NES’s CPU expects those six bytes to contain pointers to NMI, reset, and IRQ/BRK interrupt handlers. Therefore, we need to shift the start of the encoding a bit earlier to leave room. In fact, it is to our advantage to have the MD5 encoding occur as early as possible—having as much of our code occur after it as possible—because any changes that occur after the 16,640 bytes of MD5 encoding will not require recomputing the hash collisions. Therefore, we chose to store it starting at memory offset 0x9F70, which corresponds to byte 0x9F70–0x8000 = 0x1F70 in the PRG ROM, which corresponds to byte 16 + 512 + 0x1F70 = 0x2180 within this PDF. Feel free to take a gander!
The music in the ROM is Danger Streets, composed and released to the public domain by Shiru, also known as DJ Uranus.3
Colliding Block Reader