Chapter 2: Comparing Podman and Docker
As we learned from the previous chapter, container technology is not as new as we may think and therefore its implementation and architecture has been influenced over the years to reach its current status.
In this chapter, we’ll go through a bit of the history and the main architecture of Docker and Podman container engines, completing the picture with a side-by-side comparison to let readers with some Docker experience easily get on board and learn the main differences before going into a deep exploration of Podman.
If you don’t have much experience with Docker, you can easily jump to the next chapter and return to this one once you feel it is time to learn the differences between Podman and Docker container engines.
In this chapter, we’re going to cover the following main topics:
- Docker container daemon architecture
- Podman daemonless architecture
- The main differences between Docker and Podman
Technical requirements
This chapter does not require any technical prerequisites; feel free to read it without worrying too much about installing or setting up any kind of software on your workstation!
If you want to replicate some of the examples that will be described in this chapter, you’ll need to install and configure Podman and Docker on your workstation. As we described before, you can easily jump to the next chapter and come back to this one once you feel it’s time to learn the differences between Podman and Docker container engines.
Please consider that in the next chapter, you’ll be introduced to Podman’s installation and configuration, so you’ll be soon able to replicate any example you’ll see in this chapter and in the following ones.
Docker container daemon architecture
Containers are a simple and smart answer to the need to run isolated process instances. We can safely affirm that containers are a form of application isolation that works at many levels, such as filesystem, network, resource usage, process, and so on.
As we saw in Chapter 1, Introduction to Container Technology, in the Containers versus virtual machines section, containers also differ from virtual machines because containers share the same kernel with the host, while virtual machines have their own guest OS kernel. From a security point of view, virtual machines provide better isolation from potential attacks, but a virtual machine will usually consume more resources than a container. To spin up a guest OS, we usually need to allocate more RAM, CPU, and storage than the resources needed to start a container.
Back in 2013, the Docker container engine appeared in the container landscape, and it rapidly became very popular.
As we explained before, a container engine is a software tool that accepts and processes requests from users to create a container; it can be seen as a sort of orchestrator. On the other hand, a container runtime is a lower-level piece of software used by container engines to run containers in the host, managing isolation, storage, networking, and so on.
In the early stages, the Docker container engine used LXC as a container runtime but then replaced it after a while with their own implementation, libcontainer.
The Docker container engine consists of three fundamental pillars:
- Docker daemon
- Docker REST API
- Docker CLI
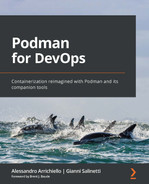
These three pillars are represented in the following architecture:
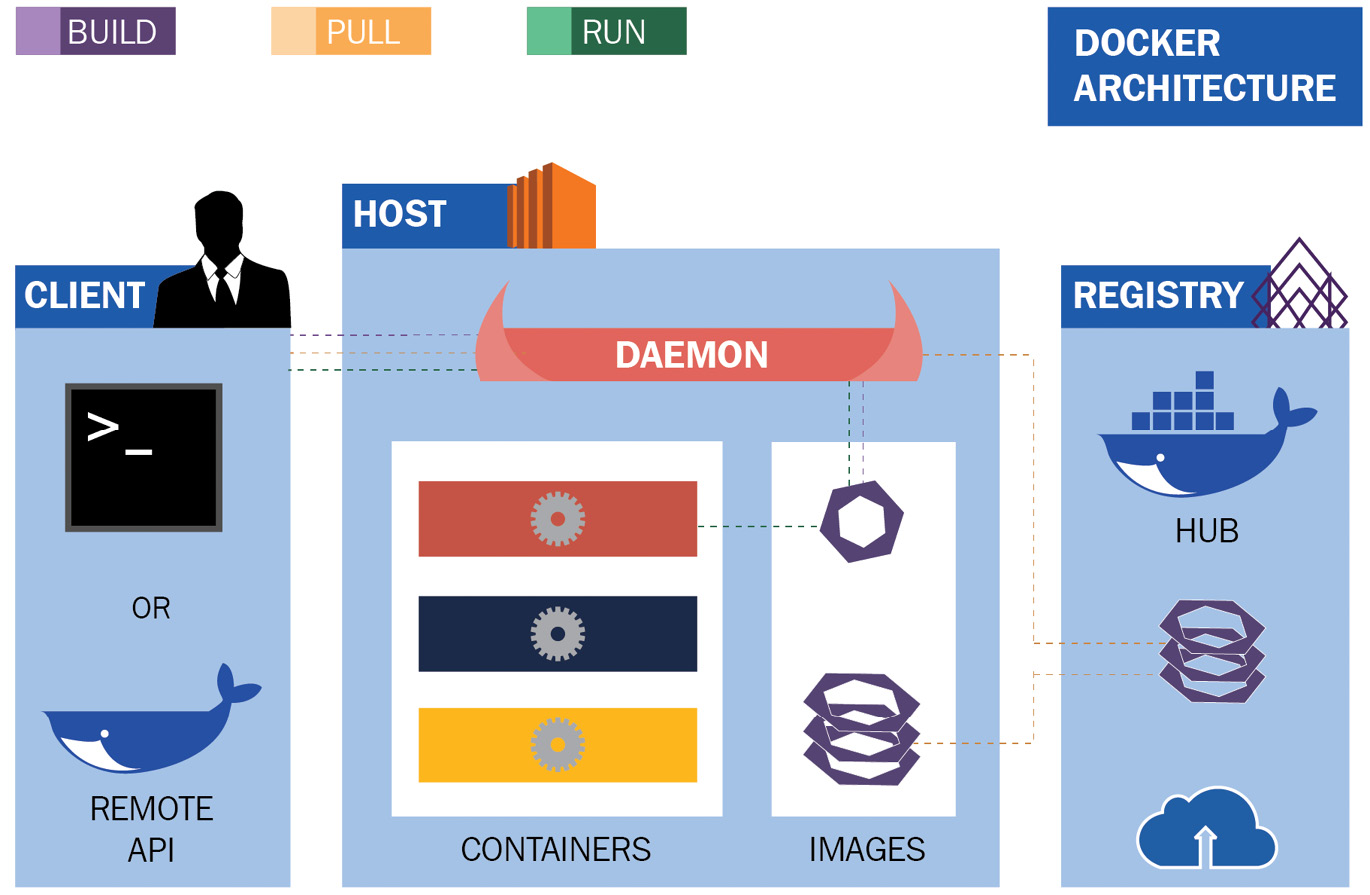
Figure 2.1 – Docker architecture
Once a Docker daemon is running, as shown in the preceding diagram, you can interact with it through a Docker client or a remote API. The Docker daemon is responsible for many local container activities as well as interacting with external registries to pull or push container images.
The Docker daemon is the most critical piece of the architecture, and it should always be up and running, otherwise your beloved containers will not survive for long! Let’s see its details in the next section.
The Docker daemon
A daemon is a process that runs in the background; it supervises the system or provides functionality to other processes.
The Docker daemon is the background process that is responsible for the following:
- Listening for Docker API requests
- Handling, managing, and checking for running containers
- Managing Docker images, networks, and storage volumes
- Interacting with external/remote container image registries
All these actions should be instructed to the daemon through a client or by calling its API, but let’s see how to communicate with it.
Interacting with the Docker daemon
The Docker daemon can be contacted through the socket of a process, usually available in the filesystem of the host machine: /var/run/docker.sock.
Depending on the Linux distribution of your choice, you may need to set the right permission for your non-root users to be able to interact with the Docker daemon or simply add your non-privileged users to the docker group.
As you can see in the following command, these are the permissions set for the Docker daemon in a Fedora 34 operating system:
[root@fedora34 ~]# ls -la /var/run/docker.sock
srw-rw----. 1 root docker 0 Aug 25 12:48 /var/run/docker.sock
There is no other kind of security or authentication for a Docker daemon enabled by default, so be careful not to publicly expose the daemon to untrusted networks.
The Docker REST API
Once a Docker daemon is up and running, you can communicate through a client or directly through the REST API. Through the Docker API, you can do every kind of activity you can perform through the command-line tool, such as the following:
- List containers
- Create a container
- Inspect a container
- Get container logs
- Export a container
- Start or stop a container
- Kill a container
- Rename a container
- Pause a container
The list goes on. Looking at one of these APIs, we can easily discover how they work and what the sample output returned by the daemon is.
In the following command, we are going to use the Linux command line tool curl for making an HTTP request to get details about any container image already stored in the daemon’s local cache:
[root@fedora34 ~]# curl --unix-socket /var/run/docker.sock http://localhost/v1.41/images/json | jq
[
{
“Containers”: -1,
“Created”: 1626187836,
“Id”: “sha256:be72532cbd81ba4adcef7d8f742abe7632e6f5b35 bbd53251e5751a88813dd5f”,
“Labels”: {
“architecture”: “x86_64”,
“build-date”: “2021-07-13T14:50:13.836919”,
“com.redhat.build-host”: “cpt-1005.osbs.prod.upshift.rdu2.redhat.com”,
“com.redhat.component”: “ubi7-minimal-container”,
“com.redhat.license_terms”: “https://www.redhat.com/en/about/red-hat-end-user-license-agreements#UBI”,
“description”: “The Universal Base Image Minimal is a stripped down image that uses microdnf as a package manager. This base image is freely redistributable, but Red Hat only supports Red Hat technologies through subscriptions for Red Hat products. This image is maintained by Red Hat and updated regularly.”,
“distribution-scope”: “public”,
“io.k8s.description”: “The Universal Base Image Minimal is a stripped down image that uses microdnf as a package manager. This base image is freely redistributable, but Red Hat only supports Red Hat technologies through subscriptions for Red Hat products. This image is maintained by Red Hat and updated regularly.”,
“io.k8s.display-name”: “Red Hat Universal Base Image 7 Minimal”,
“io.openshift.tags”: “minimal rhel7”,
“maintainer”: “Red Hat, Inc.”,
“name”: “ubi7-minimal”,
“release”: “432”,
“summary”: “Provides the latest release of the minimal Red Hat Universal Base Image 7.”,
“url”: “https://access.redhat.com/containers/#/registry.access.redhat.com/ubi7-minimal/images/7.9-432”,
“vcs-ref”: “8c60d5a9644707e7c4939980a221ec2927d9a88a”,
“vcs-type”: “git”,
“vendor”: “Red Hat, Inc.”,
“version”: “7.9”
},
“ParentId”: “”,
“RepoDigests”: [
“registry.access.redhat.com/ubi7/ubi-minimal@sha256:73b4f78b569d178a48494496fe306dbefc3c0434c4b 872c7c9d7f23eb4feb909”
],
“RepoTags”: [
“registry.access.redhat.com/ubi7/ubi-minimal:latest”
],
“SharedSize”: -1,
“Size”: 81497870,
“VirtualSize”: 81497870
}
]
As you can see in the preceding command, the output is in JSON format, very detailed with multiple metadata information, from container image name to its size. In this example, we pre-fetched a RHEL Universal Base Image version 7 in its minimal flavour that is only 80 MB!
Of course, APIs are not made for human consumption or interaction; they fit well with machine-to-machine interaction and so they are commonly used for software integration. For this reason, let’s now explore how the command-line client works and which options are available.
Docker client commands
The Docker daemon has its own companion that instructs and configures it – a command-line client.
The Docker command-line client has more than 30 commands with respective options that will enable any system administrator or Docker user to instruct and control the daemon and its containers. The following is an overview of the most common commands:
- build: Build an image from a Dockerfile
- cp: Copy files/folders between a container and the local filesystem
- exec: Run a command in a running container
- images: List images
- inspect: Return low-level information on Docker objects
- kill: Kill one or more running containers
- load: Load an image from a TAR archive or stdin
- login: Log in to a Docker registry
- logs: Fetch the logs of a container
- ps: List running containers
- pull: Pull an image or a repository from a registry
- push: Push an image or a repository to a registry
- restart: Restart one or more containers
- rm: Remove one or more containers
- rmi: Remove one or more images
- run: Run a command in a new container
- save: Save one or more images to a TAR archive (streamed to stdout by default)
- start: Start one or more stopped containers
- stop: Stop one or more running containers
- tag: Create a TARGET_IMAGE tag that refers to SOURCE_IMAGE
The list goes on. As you can see from this subset, there are many commands available for managing the container images and the running containers, even exporting a container image or building a new one.
Once you launch the Docker client with one of these commands and its respective options, the client will contact the Docker daemon, where it’ll instruct it in what is needed, and which action must be performed. Again, the daemon here is the key element of the architecture and it needs to be up and running, so ensure this before trying to use the Docker client as well as any of its REST APIs.
Docker images
A Docker image is a format introduced by Docker for managing binary data and metadata as a template for container creation. Docker images are packages for shipping and transferring runtimes, libraries, and all the stuff needed for a given process to be up and running.
As we mentioned in Chapter 1, Introduction to Container Technology, in the Where do containers come from? section, the creation of this format was really a game changer and significantly different from the various other container technologies that arose in the past.
Starting from version 1.12, Docker started adopting an image specification that has over the years evolved into the current version that adheres to the OCI Image Format Specification.
The first Docker Image Specification included many concepts and fields that are now part of the OCI Image Format Specification, such as the following:
- A list of layers
- Creation date
- Operating system
- CPU architecture
- Configuration parameters for use within a container runtime
A Docker image’s content (binaries, libraries, filesystem data) is organized in layers. A layer is just a set of filesystem changes that does not contain any environment variable or default arguments for a given command. This data is stored in the Image Manifest that owns the configuration parameters.
But how are these layers created and then aggregated in a Docker image? The answer is not so simple. The layers in a container image are composed together using image metadata and merged into a single filesystem view. This result can be achieved in many ways, but as anticipated in the previous chapter, the most common approach today is by using union filesystems – combining two filesystems and providing a unique, squashed view. Finally, when a container is executed, a new, read/write ephemeral layer is created on top of the image, which will be lost after the container is destroyed.
As we said earlier in this chapter, container images and their distribution were the killer feature of Docker containers. So, in the next section, let’s look at the key element for container distribution, Docker registries.
Docker registries
A Docker registry is just a repository of Docker container images that holds the metadata and the layers of container images for making them available to several Docker daemons.
A Docker daemon acts as a client to a Docker registry through an HTTP API, pushing and pulling container images depending on the action that the Docker client instructs.
Using a container registry could really help the use of containers on many independent machines that could be configured to ask to a registry some container images if they are not present in the Docker daemon local cache. The default registry that is preconfigured in Docker daemon settings is Dockerhub, a Software-as-a-Service container registry hosted by Docker company in the cloud. However, Dockerhub is not the only registry; many other container registries have appeared in recent years.
Almost every company or community working with containers created their own container registry with a different web interface. One of the free alternative services to Dockerhub is Quay.io, a Software-as-a-Service container registry hosted by the Red Hat company.
One great alternative to cloud services is the on-premises Docker registry, which can be created through a container on a machine running the Docker daemon with just one command:
$ docker run -d -p 5000:5000 --restart=always --name registry registry:2
It is not the objective of this book to go through the various Docker options and configuration, but if you want to know more about the Docker registry, you can refer to the main Docker documentation at https://docs.docker.com/registry/deploying/.
We have looked at a lot of stuff so far, namely the Docker API, client, daemon, images, and finally the registry, but, as we mentioned earlier, it’s all dependent on the correct usage of the Docker daemon that should be always healthy and up and running. So, let’s explore now what happens in the event that it stops working.
What does a running Docker architecture look like?
The Docker daemon is the central key element of the whole Docker architecture. We will explore in this section what a Docker daemon and a bunch of running containers look like.
We will not dive into the steps needed for installing and setting up the Docker daemon; instead, we will directly analyze a preconfigured operating system with it:
[root@fedora34 ~]# systemctl status docker
● docker.service - Docker Application Container Engine
Loaded: loaded (/usr/lib/systemd/system/docker.service; disabled; vendor preset: disabled)
Active: active (running) since Tue 2021-08-31 19:46:57 UTC; 1h 39min ago
TriggeredBy: ● docker.socket
Docs: https://docs.docker.com
Main PID: 20258 (dockerd)
Tasks: 12
Memory: 31.1M
CPU: 1.946s
CGroup: /system.slice/docker.service
└─20258 /usr/bin/dockerd -H fd:// --containerd=/run/containerd/containerd.sock
As you can see from the preceding command, we just verified that the Docker daemon is up and running, but it’s not the only container service running on the system. The Docker daemon has a companion that we skipped in the previous part to keep the description easy to understand: Containerd.
To better understand the workflow, have a look at the following diagram:

Figure 2.2 – Running a Docker container
Containerd is the project that decouples the container management (kernel interaction included) from the Docker daemon, and it also adheres to the OCI standard using runc as container runtime.
So, let’s check the status of Containerd in our preconfigured operating system:
[root@fedora34 ~]# systemctl status containerd
● containerd.service - containerd container runtime
Loaded: loaded (/usr/lib/systemd/system/containerd.service; disabled; vendor preset: disabled)
Active: active (running) since Wed 2021-08-25 12:48:17 UTC; 6 days ago
Docs: https://containerd.io
Process: 4267 ExecStartPre=/sbin/modprobe overlay (code=exited, status=0/SUCCESS)
Main PID: 4268 (containerd)
Tasks: 43
Memory: 44.1M
CPU: 8min 36.291s
CGroup: /system.slice/containerd.service
├─ 4268 /usr/bin/containerd
├─20711 /usr/bin/containerd-shim-runc-v2 -namespace moby -id 3901d2600732ae1f2681cde0074f290c1839b1a4b0c63ac 9aaccdba4f646e06a -address /run/containerd/containe>
├─20864 /usr/bin/containerd-shim-runc-v2 -namespace moby -id 78dc2eeb321433fc67cf910743c0c53e54d9f45cfee8d183 19d03a622dc56666 -address /run/containerd/containe>
└─21015 /usr/bin/containerd-shim-runc-v2 -namespace moby -id 7433c0613412349833b927efa79a4f589916b12c942003cd 616d45ed7611fc31 -address /run/containerd/containe>
As you can see from the preceding console output, the service is up and running and it has started three child processes: /usr/bin/containerd-shim-runc-v2. This matches perfectly what we just saw in Figure 2.2!
Now, let’s check our running containers interacting with the Docker CLI:
[root@fedora34 ~]# docker ps
CONTAINER ID IMAGE COMMAND CREATED STATUS PORTS NAMES
7433c0613412 centos/httpd-24-centos7:latest “container-entrypoin…” 26 minutes ago Up 26 minutes 8080/tcp, 8443/tcp funny_goodall
78dc2eeb3214 centos/httpd-24-centos7:latest “container-entrypoin…” 26 minutes ago Up 26 minutes 8080/tcp, 8443/tcp wonderful_rubin
3901d2600732 centos/httpd-24-centos7:latest “container-entrypoin…” 26 minutes ago Up 26 minutes 8080/tcp, 8443/tcp relaxed_heisenberg
As you can see, the Docker client confirms that we have three running containers on our system, all started through the runc container runtime, managed by the Containerd system service and configured through a Docker daemon.
Now that we have introduced this new element, Containerd, let’s look at it in more depth in the next section.
Containerd architecture
Containerd architecture is composed of several components that are organized in subsystems. Components that link different subsystems are also referred to as modules in the Containerd architecture, as can be seen in the following diagram:

Figure 2.3 – Containerd architecture
The two main subsystems available are the following:
- The bundle service that extracts bundles from disk images
- The runtime service that executes the bundles, creating the runtime containers
The main modules that make the architecture fully functional are the following:
- The Executor module, which implements the container runtime that is represented in the preceding architecture as the Runtimes block
- The Supervisor module, which monitors and reports container state that is part of the Containers block in the preceding architecture
- The Snapshot module, which manages filesystem snapshots
- The Events module, which collects and consumes events
- The Metrics module, which exports several metrics via the metrics API
The steps needed by Containerd to place a container in a running state are too complex to be described in this section, but we can sum them up as follows:
- Pull metadata and content through a Distribution Controller.
- Use the Bundle Controller to unpack the retrieved data, creating snapshots that will compose bundles.
- Execute the container through the bundle just created through the Runtime Controller:

Figure 2.4 – Containerd data flow diagram
In this section, we have described the key features and design principles of the Docker container engine, with its daemon-centric approach. We can now move on to analyze the Podman daemonless architecture.
Podman daemonless architecture
Podman (short for POD MANager) is a daemonless container engine that enables users to manage containers, images, and their related resources such as storage volumes or network resources. First-time users installing Podman soon realize that there is no service to start after the installation is complete. No background running daemon is required to run containers with Podman!
Once installed, the Podman binary acts both as a command-line interface (CLI) and as a container engine that orchestrates the container runtime execution. The following subsections will explore the details of the Podman behavior and building blocks.
Podman commands and REST API
The Podman CLI provides a growing set of commands. The curated list is available at https://docs.podman.io/en/latest/Commands.html.
The following list explores a subset of the most commonly used commands:
- build: Build an image from a Containerfile or Dockerfile
- cp: Copy files/folders between a container and the local filesystem
- exec: Run a command in a running container
- events: Show Podman events
- generate: Generate structured data such as Kubernetes YAML or systemd units
- images: List local cached images
- inspect: Return low-level information on containers or images
- kill: Kill one or more running containers
- load: Load an image from a container TAR archive or stdin
- login: Log in to a container registry
- logs: Fetch the logs of a container
- pod: Manage pods
- ps: List running containers
- pull: Pull an image or a repository from a registry
- push: Push an image or a repository to a registry
- restart: Restart one or more containers
- rm: Remove one or more containers
- rmi: Remove one or more images
- run: Run a command in a new container
- save: Save one or more images to a TAR archive (streamed to stdout by default)
- start: Start one or more stopped containers
- stop: Stop one or more running containers
- system: Manage Podman (disk usage, container migration, REST API services, storage management, and pruning)
- tag: Create a TARGET_IMAGE tag that refers to SOURCE_IMAGE
- unshare: Run a command in a modified user namespace
- volume: Manage container volumes (list, pruning, creation, inspection)
In the upcoming chapters of the book, we will cover the preceding commands in greater detail and understand how to use them to manage the full container life cycle.
Users who have already worked with Docker will immediately spot the same commands they used to execute with the Docker CLI. Podman CLI commands are compatible with Docker ones to help a smooth transition between the two tools.
Differently from Docker, Podman does not need a running Docker daemon listening on a Unix socket to execute the preceding commands. Users can still choose to run a Podman service and make it listen to a Unix socket to expose native REST APIs.
By running the following command, Podman will create a socket endpoint on a path of preference and listen to API calls:
$ podman system service -–time 0 unix://tmp/podman.sock
If not provided, the default socket endpoint is unix://run/podman/podman.sock for rootful services and unix://run/user/<UID>/podman/podman.sock for rootless containers.
As a result, users can then make REST API calls to the socket endpoint. The following example queries Podman for the available local images:
curl --unix-socket /tmp/podman.sock http://d/v3.0.0/libpod/images/json | jq .
The Podman project maintains OpenAPI-compliant documentation of available REST API calls at https://docs.podman.io/en/latest/_static/api.html.
The piped jq command in the preceding example is useful to produce a more readable JSON-pretty output. We will explore the Podman REST API and systemd socket-based activation in greater detail in the post-installation customization section of Chapter 3, Running the First Container. Let’s now describe Podman building blocks in greater detail.
Podman building blocks
Podman aims to adhere to open standards as much as possible; therefore, most of the runtime, build, storage, and networking components rely on community projects and standards. The components described in the following list can be seen as the main Podman building blocks:
- The container life cycle is managed with the libpod library, already included in the Podman main repository: https://github.com/containers/podman/tree/main/libpod.
- The container runtime is based on the OCI specs implemented by OCI-compliant runtimes, such as crun and runc. We will see in this chapter how container runtimes work and the main difference between the above-mentioned ones.
- At the same time, image management implements the containers/image library (https://github.com/containers/image). This is a set of Go libraries used both by container engines and container registries.
- Container and image storage is implemented adopting the containers/storage library (https://github.com/containers/storage), another Go library to manage filesystem layers, container images, and container volumes at runtime.
- Image builds are implemented with Buildah (https://github.com/containers/buildah), which is both a binary tool and a library for building OCI images. We will cover Buildah later in this book.
- Container runtime monitoring and communication with the engine is implemented with Conmon, a tool for monitoring OCI runtimes, used by both Podman and CRI-O (https://github.com/containers/conmon).
Container networking support is implemented through the Kubernetes Container Network Interface (CNI) specs. This also helps shape Podman networking with a plugin-oriented approach. By default, Podman uses the basic bridge CNI plugin. An extended list of plugins is available in the following repository: https://github.com/containernetworking/plugins.
As stated earlier, Podman orchestrates the container life cycle thanks to the libpod library, described in the next subsection.
The libpod library
Podman core foundations are based on the libpod library, which is also adopted by other open source projects such as CRI-O. This library contains all the necessary logic to orchestrate the container life cycle and we can safely say that the development of this library was the key to the birth of the Podman project as we know it today.
The library is written in Go and is thus accessed as a Go package and is intended to implement all the high-level functionalities of the engine. According to the libpod and Podman documentation, its scope includes the following:
- Managing container image format, which includes both OCI and Docker images. This includes the full image life cycle management, from authenticating and pulling from a container registry, and local storage of the image layers and metadata, to the building of new images and pushing to remote registries.
- Container life cycle management – from container creation (with all the necessary preliminary steps involved) and running the container to all the other runtime functionalities such as stop, kill, resume, and delete, process execution on running containers, and logging.
- Managing both simple containers and pods, which are groups of sandboxed containers that share namespaces together (notably UTC, IPC, Network, and recently Pid) and are also managed together as a whole.
- Supporting rootless containers and pods that can be executed by standard users with no need for privilege escalation.
- Managing container resource isolation. This is achieved at a low level with CGroup but Podman users can interact using CLI options during container execution to manage memory and CPU reservation or limit read/write rate on a storage device.
- Supporting a CLI that can be used as a Docker-compatible alternative. Most Podman commands are the same as in the Docker CLI.
- Providing a Docker-compatible REST API with local Unix sockets (not enabled by default). Libpod REST APIs provide all the functionalities provided by the Podman CLI.
The lidpod package interacts, at a lower level, with container runtimes, Conmon, and packages such as container/storage, container/image, Buildah, and CNI. In the next section, we will focus on the container runtime execution.
The runc and crun OCI container runtimes
As illustrated in the previous chapter, a container engine takes care of the high-level orchestration of the container life cycle, while the low-level actions necessary to create and run the container are delivered by a container runtime.
An industry standard has emerged in the last few years, with the help of the major container environment contributors: the OCI Runtime Specification. The full specification is available at https://github.com/opencontainers/runtime-spec.
From this repository, the Runtime and Lifecycle document provides a full description of how the container runtime should handle the container creation and execution: https://github.com/opencontainers/runtime-spec/blob/master/runtime.md.
Runc (https://github.com/opencontainers/runc) is currently the most widely adopted OCI container runtime. Its history leads back to 2015, when Docker announced the spin out of all its infrastructure plumbing into a dedicated project called runC.
RunC fully supports Linux containers and OCI runtime specs. The project repository includes the libcontainer package, which is a Go package for creating containers with namespaces, cgroups, capabilities, and filesystem access controls. Libcontainer was an independent Docker project before, and when the runC project was created, it was moved inside its main repository for the sake of consistence and clarity.
The libcontainer package defines the inner logic and the low-level system interaction to bootstrap a container from scratch, from the initial isolation of namespaces to the execution as PID 1 of the binary program inside the container itself.
The runtime recalls the libcontainer library to fulfil the following tasks:
- Consume the container mount point and the container metadata provided by Podman
- Interact with the kernel to start the container and execute the isolated process using the clone() and unshare() syscalls
- Set up CGroup resource reservations
- Set up SELinux Policy, Seccomp, and App Armor rules
Along with running processes, libcontainer handles the initialization of namespaces and file descriptors, the creation of the container rootFS and bind mounts, exporting logs from container processes, managing security restrictions with seccomp, SELinux and AppArmor, and creating and mapping users and groups
The libcontainer architecture is quite a complex topic for this book and obviously needs further investigation to better understand its internals.
For readers interested in viewing the code and understanding Podman internals, the container interface that adheres to the OCI runtime specs is defined in the https://github.com/opencontainers/runc/blob/master/libcontainer/container.go source file.
The methods for the Linux OS that implement the interface are defined in https://github.com/opencontainers/runc/blob/master/libcontainer/container_linux.go.
The low-level execution of clone() and unshare() syscall to isolate the process namespaces is handled by the nsenter package, more precisely by the nsexec() function. This is a C function embedded in the Go code thanks using cgo.
The code of nsexec() can be found here:
https://github.com/opencontainers/runc/blob/master/libcontainer/nsenter/nsexec.c
Along with runC, many other container runtimes have been created. An alternative runtime we will discuss in this book is crun (https://github.com/containers/crun), a fast and low-memory-footprint OCI container runtime fully written in C. The idea behind crun was to provide an improved OCI runtime that could leverage the C design approach for a cleaner and lightweight runtime. Since they are both OCI runtimes, runC and crun can be used interchangeably by a container engine.
For example, in 2019, the Fedora project made a brave move and chose to release Fedora 31 with CGroup V2 as the default (https://www.redhat.com/sysadmin/fedora-31-control-group-v2). At the time of this choice, runC was not yet capable of managing containers under CGroup V2.
Consequently, the Podman release for Fedora adopted crun as the default runtime since it was already capable of managing both CGroup V1 and V2. This switch was almost seamless for end users, who continued to use Podman in the same way with the same commands and behaviors. Later, runC finally introduced support for CGroup V2, from v1.0.0-rc93, and can now be used on newer distributions seamlessly.
However, the CGroup topic was not the only differentiator between runC and crun.
crun provides some interesting advantages against runC, such as the following:
- Smaller binary: A crun build is approximately 50 times smaller than a runC build.
- Faster execution: crun is faster on instrumenting the container than runC under the same execution conditions.
- Less memory usage: crun consumes less than half the memory of runC. A smaller memory footprint is extremely helpful when dealing with massive container deployments or IoT appliances.
crun can also be used as a library and integrated in other OCI-compliant projects. Both crun and runC provide a CLI but are not meant to be used manually by end users, who are supposed to use a container engine such as Podman or Docker to manage the container life cycle.
How easy is it to switch between the two runtimes in Podman? Let’s see the following examples. Both examples run a container using the –runtime flag to provide an OCI runtime binary path. The first one runs the container using runC:
podman --runtime /usr/bin/runc run --rm fedora echo “Hello World”
The second line runs the same container with the crun binary:
podman --runtime /usr/bin/crun run --rm fedora echo “Hello World”
The examples assume that both runtimes are already installed in the system.
Both crun and runC support eBPF and CRIU.
eBPF stands for Extended Berkeley Packet Filter and is a kernel-based technology that allows the execution of user-defined programs in the Linux kernel to add extra capabilities to the system without the need to recompile the kernel or load extra modules. All eBPF programs are executed inside a sandbox virtual machine and their execution is secure by design. Today, eBPF is gaining momentum and attracting industry interest, leading to wide adoption in different use cases, most notably networking, security, observability, and tracing.
Checkpoint Restore in Userspace (CRIU) is a piece of software that enables users to freeze a running container and save its state to disk for further resume. Data structures saved in memory are dumped and restored accordingly.
Another important architectural component used by Podman is Conmon, a tool for monitoring container runtime status. Let’s investigate this in more detail in the next subsection.
Conmon
We may still have some questions about runtime execution.
How do Podman (the container engine) and runC/crun (the OCI container runtime) interact with each other? Which is responsible for launching the container runtime process? Is there a way to monitor the container execution?
Let’s introduce the Conmon project (https://github.com/containers/conmon). Conmon is a monitoring and communication tool that sits between the container engine and the runtime.
Every time a new container is created, a new instance of Conmon is launched. It detaches from the container manager process and runs daemonized, launching the container runtime as a child process.
If we attach a tracing tool to a Podman container, we can see in the following the order it’s written in:
- The container engine runs the Conmon process, which detaches and daemonizes itself.
- The Conmon process runs a container runtime instance that starts the container and exits.
- The Conmon process continues to run to provide a monitoring interface, while the manager/engine process has exited or detached.
The following diagram shows the logical workflow, from Podman execution to the running container:

Figure 2.5 – Running a Podman container
On a system with many running containers, users will find many instances of the Conmon process, one for every container created. In other words, Conmon acts as a small, dedicated daemon to the container.
Let’s look at the following example, where a simple shell loop is used to create three identical nginx containers:
[root@fedora34 ~]# for i in {1..3}; do podman run -d --rm docker.io/library/nginx; done
592f705cc31b1e47df18f71ddf922ea7e6c9e49217f00d1af8 cf18c8e5557bde
4b1e44f512c86be71ad6153ef1cdcadcdfa8bcfa8574f606a0832 c647739a0a2
4ef467b7d175016d3fa024d8b03ba44b761b9a75ed66b2050de3fe c28232a8a7
[root@fedora34 ~]# ps aux | grep conmon
root 21974 0.0 0.1 82660 2532 ? Ssl 22:31 0:00 /usr/bin/conmon --api-version 1 -c 592f705cc31b1e47df18f71ddf922ea7e6c9e49217f00d1af8 cf18c8e5557bde -u 592f705cc31b1e47df18f71ddf922ea7e6c9e49217f00d1af8 cf18c8e5557bde -r /usr/bin/crun [..omitted output]
root 22089 0.0 0.1 82660 2548 ? Ssl 22:31 0:00 /usr/bin/conmon --api-version 1 -c 4b1e44f512c86be71ad6153ef1cdcadcdfa8bcfa8574f606a0832 c647739a0a2 -u 4b1e44f512c86be71ad6153ef1cdcadcdfa8bcfa8574f606a0832 c647739a0a2 -r /usr/bin/crun [..omitted output]
root 22198 0.0 0.1 82660 2572 ? Ssl 22:31 0:00 /usr/bin/conmon --api-version 1 -c 4ef467b7d175016d3fa024d8b03ba44b761b9a75ed66b2050de3f ec28232a8a7 -u 4ef467b7d175016d3fa024d8b03ba44b761b9a75ed66b2050de3f ec28232a8a7 -r /usr/bin/crun [..omitted output]
After running the containers, a simple regular expression pattern applied to the output of the ps aux command shows three Conmon process instances.
Even if Podman is not running anymore (since there is no daemon), it is still possible to connect to the Conmon process and attach to the container. At the same time, Conmon exposes console sockets and container logs to log files or the systemd journal.
Conmon is a lightweight project written in C. It also provides Go language bindings to pass config structures between the manager and the runtime.
Rootless containers
One of the most interesting features of Podman is the capability to run rootless containers, which means that users without elevated privileges can run their own containers.
Rootless containers provide better security isolation and let different users run their own container instances independently and, thanks to fork/exec, a daemonless approach adopted by Podman, rootless containers are amazingly easy to manage. A rootless container is simply run by the standard user with the usual commands and arguments, as in the following example:
$ podman run –d –-rm docker.io/library/nginx
When this command is issued, Podman creates a new user namespace and maps UIDs between the two namespaces using a uid_map file (see man user_namespaces). This method allows you to have, for example, a root user inside the container mapped to an ordinary user in the host.
Rootless containers and image data are stored under the user home directory, usually under $HOME/.local/share/containers/storage.
Podman manages network connectivity for rootless containers in a different way than rootful containers. An in-depth technical comparison between rootless and rootful containers, especially from the network and security point of view, will be covered later in this book.
After an in-depth analysis of the runtime workflow, it is useful to provide an overview of the OCI image specs used by Podman.
OCI images
Podman and the container/image package implement the OCI Image Format Specification. The full specification is available on GitHub at the following link and pairs with the OCI runtime specification: https://github.com/opencontainers/image-spec.
An OCI image is made of the following elements:
- Manifest
- An image index (optional)
- An image layout
- A filesystem layer changeset archive that will be unpacked to create a final filesystem
- An image configuration document to define layer ordering, as well as application arguments and environments
Let’s see in detail what kinds of information and data are managed by the most relevant of the preceding elements.
Manifest
An image manifest specification should provide content-addressable images. The image manifest contains image layers and configurations for a specific architecture and operating system, such as Linux x86_64.
Specification: https://github.com/opencontainers/image-spec/blob/main/manifest.md
Image index
An image index is an object that contains a list of manifests related to different architectures (for example, amd64, arm64, or 386) and operating systems, along with custom annotations.
Specification: https://github.com/opencontainers/image-spec/blob/main/image-index.md
Image layout
The OCI image layout represents the directory structure of image blobs. The image layout also provides the necessary manifest location references as well as image index (in JSON format) and the image configuration. The image index.json contains the reference to the image manifest, stored as a blob in the OCI image bundle.
Specification: https://github.com/opencontainers/image-spec/blob/main/image-layout.md
Filesystem layers
Inside an image, one or more layers are applied on top of each other to create a filesystem that the container can use.
At a low level, layers are packaged as TAR archives (with compression options with gzip and zstd). The filesystem layer implements the logic of layers stacking and how the changeset layers (layers containing file changes) are applied.
As described in the previous chapter, a copy-on-write or union filesystem has become a standard to manage stacking in a graph-like approach. To manage layers stacking, Podman uses overlayfs by default as a graph driver.
Specification: https://github.com/opencontainers/image-spec/blob/main/layer.md
Image configuration
An image configuration defines the image layer composition and the corresponding execution parameters such as entry points, volumes, execution arguments, or environment variables, as well as additional image metadata.
The image JSON holding the configurations is an immutable object; changing it means creating a new derived image.
Specification: https://github.com/opencontainers/image-spec/blob/main/config.md
The following diagram represents an OCI image implementation, composed of image layer(s), image index, and image configuration:

Figure 2.6 – OCI image implementation
Let’s inspect a realistic example from a basic, lightweight alpine image:
# tree alpine/
alpine/
├── blobs
│ └── sha256
│ ├── 03014f0323753134bf6399ffbe26dcd75e89c6a7429adfab 392d64706649f07b
│ ├── 696d33ca1510966c426bdcc0daf05f75990d68c4eb820f615 edccf7b971935e7
│ └── a0d0a0d46f8b52473982a3c466318f479767577551a53ffc9074 c9fa7035982e
├── index.json
└── oci-layout
The directory layout contains an index.json file, with the following content:
{
“schemaVersion”: 2,
“manifests”: [
{
“mediaType”: “application/vnd.oci.image.manifest.v1+json”,
“digest”: “sha256:03014f0323753134bf6399ffbe26dcd75e89c6a7429adfab 392d64706649f07b”,
“size”: 348,
“annotations”: {
“org.opencontainers.image.ref.name”: “latest”
}
}
]
}
The index contains a manifests array with only one item inside. The object digest is a SHA256 and corresponds to filename as one of the blobs listed previously. The file is the image manifest and can be inspected:
# cat alpine/blobs/sha256/03014f0323753134bf6399ffbe26dcd75e89c6a7429adfab392 d64706649f07b | jq
{
“schemaVersion”: 2,
“config”: {
“mediaType”: “application/vnd.oci.image.config.v1+json”,
“digest”: “sha256:696d33ca1510966c426bdcc0daf05f75990d 68c4eb820f615edccf7b971935e7”,
“size”: 585
},
“layers”: [
{
“mediaType”: “application/vnd.oci.image.layer.v1.tar+gzip”,
“digest”: “sha256:a0d0a0d46f8b52473982a3c466318f47976 7577551a53ffc9074c9fa7035982e”,
“size”: 2814446
}
]
}
The manifest contains references to the image configuration and layers. In this particular case, the image has only one layer. Again, their digests correspond to the blob filenames listed before.
The config file shows image metadata, environment variables, and command execution. At the same time, it contains DiffID references to the layers used by the image and image creation information:
# cat alpine/blobs/sha256/696d33ca1510966c426bdcc0daf05f75990 d68c4eb820f615edccf7b971935e7 | jq
{
“created”: “2021-08-27T17:19:45.758611523Z”,
“architecture”: “amd64”,
“os”: “linux”,
“config”: {
“Env”: [
“PATH=/usr/local/sbin:/usr/local/bin:/usr/sbin:/usr/bin:/sbin:/bin”
],
“Cmd”: [
“/bin/sh”
]
},
“rootfs”: {
“type”: “layers”,
“diff_ids”: [
“sha256:e2eb06d8af8218cfec8210147357a68b7e13f7c485b991c 288c2d01dc228bb68”
]
},
“history”: [
{
“created”: “2021-08-27T17:19:45.553092363Z”,
“created_by”: “/bin/sh -c #(nop) ADD file:aad4290d27580 cc1a094ffaf98c3ca2fc5d699fe695dfb8e6e9fac 20f1129450 in / “
},
{
“created”: “2021-08-27T17:19:45.758611523Z”,
“created_by”: “/bin/sh -c #(nop) CMD [”/bin/sh”]”,
“empty_layer”: true
}
]
}
The image layer is the third blob file. This is a TAR archive that could be exploded and inspected. For space reasons, in this book the example is limited to an inspection of the file type:
# file alpine/blobs/sha256/a0d0a0d46f8b52473982a3c466318f47 9767577551a53ffc9074c9fa7035982e
alpine/blobs/sha256/a0d0a0d46f8b52473982a3c466318f479767577 551a53ffc9074c9fa7035982e: gzip compressed data, original size modulo 2^32 5865472
The result demonstrates that the file is a TAR gzipped archive.
The main differences between Docker and Podman
In the previous sections, we went through the key features of Docker and Podman, looking into the underlying layer, discovering the companion open source projects that made these two tools unique in their container engine role, but now it’s time to compare them.
As we saw earlier, the significant difference between the two is that Docker has a daemon-centric approach while Podman instead has a daemonless architecture. The Podman binary acts as CLI as well as a container engine and uses Conmon to orchestrate and monitor the container runtime.
Looking under the hood into the internals of both projects, we will also find many other differences but, in the end, once the container has started, they both leverage OCI standard container runtimes but with some differences: Docker uses runc while Podman uses crun in most distributions, with some exceptions; for example, it still uses runc in the most conservative Red Hat Enterprise Linux 8 with crun as an option.
Despite the crun performance advantages described in the previous section, it is not the objective of this book to make a detailed performance comparison between the two. Anyway, readers interested in the topic will easily find literature about the performance differences between the two runtimes.
Another big gap that was recently filled by the Docker team was the rootless container. Podman was the first container engine to bring out this excellent feature that increases security and improve the usage of containers in many contexts but, as we mentioned, this feature is now available in Docker too.
But let’s go more practical in the next sections, by comparing them side by side through the command line first and then by running a container.
Command-line interface comparison
In this section, we will go through a side-by-side comparison looking at the Docker and Podman CLIs.
Looking at the available commands for both CLIs, it is easy to spot the many similarities. The following table was truncated to improve readability:

Table 2.1 – Comparison of Docker and Podman commands
As we stated many times in the preceding section, as well as in the previous chapter, Docker was born in 2013 while Podman only arrived 4 years later in 2017. Podman was built keeping in mind how experienced container administrators were with the most famous container engine available at that time: Docker. For this reason, the Podman development team decided to not change too much the look and feel of the command-line tools for improving Docker users’ migration to the new-born Podman.
There was a claim, in fact, at the beginning of the distribution of Podman that if you have any existing scripts that run Docker you can create an alias and it should work (alias docker=podman). It was also created a package that places a fake Docker command under /usr/bin that points to Podman binary instead. For this reason, if you are a Docker user, you can expect a smooth transition to Podman once you are ready.
Another important point is that the images created with Docker are compatible with the OCI standard, so you can easily migrate or pull again any image you previously used with Docker.
If we take a deep look into the command options available for Podman, you will notice that there are some additional commands that are not present in Docker, while some others are missing.
For example, Podman can manage, along with containers, pods (the name Podman is quite telling here). The pod concept was introduced with Kubernetes and represents the smallest execution unit in a Kubernetes cluster.
With Podman, users can create empty pods and then run containers inside them easily using the following command:
$ podman pod create --name mypod
$ podman run –-pod mypod –d docker.io/library/nginx
This is not as easy with Docker, where users must first run a container and then create new ones attaching to the network namespace of the first container.
Podman has additional features that could help users to move their containers in Kubernetes environments. Using the command podman generate kube, Podman can create a Kubernetes YAML file for a running container that can be used to create a pod inside a Kubernetes cluster.
Running containers as systemd services is equally easy with the podman generate systemd command, which takes a running container or pod and generates a systemd unit file that can be used to automatically run services at system startup.
A notable example: the OpenStack project, an open source cloud computing infrastructure, adopted Podman as the default manager for its containerized services when deployed with TripleO. All the services are executed by Podman and orchestrated by systemd in the control plane and compute nodes.
Having checked the surface of these container engines and having looked at their command lines, let’s recap the under-the-hood differences in the next section.
Running a container
Running a container in a Docker environment, as we mentioned earlier, consists of using the Docker command-line client to communicate with the Docker daemon that will do the actions required to get the container up and running. Just to summarize the concepts we explained in this chapter, we can take a look the following diagram:

Figure 2.7 – Docker simplified architecture
Podman, instead, interacts directly with the image registry, storage, and with the Linux kernel through the container runtime process (not a daemon), with Conmon as a monitoring process executed between Podman and the OCI runtime, as we can schematize in the following diagram:
Figure 2.8 – Podman simplified architecture
The core difference between the two architectures is the daemon-centric Docker vision versus the fork/exec approach of Podman.
This book does not get into the pros and cons of the Docker daemon architecture and features. Anyway, we safely can tell that a significant number of Docker users were concerned about this daemon-centric approach for many reasons, for example:
- The daemon could be a single point of failure.
- If for some reason a failure occurs, then there will be orphaned processes.
- The daemon owns all the running containers as child processes.
Despite the architectural differences, and the aliasing solutions described before to easily migrate projects without changing any script, running a container from the command line with Docker or Podman is pretty much the same thing for the end user:
$ docker run –d -–rm docker.io/library/nginx
$ podman run –d -–rm docker.io/library/nginx
For the same reason, most of the command-line arguments of CLI commands have been kept as close as possible to the original version in Docker.
Summary
In this chapter, we have discussed the main differences between Podman and Docker, both from architectural and usage points of view. We described the main building blocks of the two container engines and highlighted the different community projects that fuel the Podman project, especially OCI specifications and the runC and crun runtimes.
The purpose of this book is not to debate why and how Podman could be a better choice than Docker. We think that everybody who works with containers should be extremely grateful to the Docker company and community for the great work they did in bringing containers to the masses and freeing them from niche adoption.
At the same time, the evolutionary approach of open source software facilitates the birth of new projects that try to compete to be adopted. Ever since it was born, the Podman project has grown exponentially and gained a wider user base day by day.
Understanding the engine internals is still an important task, anyway. For troubleshooting, performance tuning, or even just curiosity, investing time in understanding how each component relates to each other, reading the code, and testing builds is a smart choice that will pay back someday.
In the next chapters, we will uncover in detail the features and behavior of this great container engine.
Further reading
For more information about the topics covered in this chapter, you can refer to the following:
- https://developers.redhat.com/blog/2020/09/25/rootless-containers-with-podman-the-basics
- https://developers.redhat.com/blog/2020/11/19/transitioning-from-docker-to-podman
- https://github.com/opencontainers/runc/blob/master/docs/cgroup-v2.md
- https://www.redhat.com/sysadmin/introduction-crun
- https://ebpf.io/what-is-ebpf/