In the previous chapters, you learned about Docker and its associated terminologies, took a deeper look into how you can build Docker images using the Dockerfile, understood how to persist data generated by containers, and linked various running containers with the help of Docker’s network features.
In this chapter, you will look at Docker Compose, which is a tool for running multi-container applications, bringing up various linked, dependent containers, and more—and all with just one config file and a command.
Overview of Docker Compose
As software becomes more complicated and as you move more toward the microservices architecture, the number of components that need to be deployed increases considerably as well. While microservices might help keep the overall system fluid by encouraging loosely coupled services, from an operations point of view, things get more complicated. This is especially challenging when you have dependent applications. For instance, for a web application to start working correctly, it needs its database to be working before the web tier can start responding to requests.
Docker makes it easy to tie each microservice to a container. Docker Compose makes orchestration of all of these containers very easy. Without Docker Compose, the container orchestration steps would involve building the various images, creating the required networks, and then running the application using a series of docker run commands in the necessary order. As and when the number of containers increases and as the deployment targets increase, running these steps manually becomes unreasonable and you will need to go toward automation.
From a local development point of view, bringing up multiple, linked services manually gets very tedious and painful. Docker Compose simplifies this a lot. By just providing a YAML file describing the containers required and the relationship between the containers, Docker Compose lets you bring up all the containers with a single command. And it’s not just about bringing up the containers—Docker Compose also lets you do the following:
Build, stop, and start the containers associated with the application.
Tail the logs of the running containers, saving you the trouble of having to open multiple terminal sessions for each container.
View the status of each container.
Docker Compose helps you enable Continuous Integration. By providing multiple, disposable, reproducible environments, Docker Compose lets you run integration tests in isolation, allowing for a clean-room approach to these automated test cases. It lets you run the tests, validate the results, and then tear down the environment cleanly.
Installing Docker Compose
Docker Compose comes pre-installed as part of Docker Install and doesn’t require any additional steps to get started on macOS and Windows systems. On Linux systems, you can download the Docker Compose binary from its GitHub Release page, available at https://github.com/docker/compose/releases. Alternatively, you can run the following curl command to download the correct binary.
If you have Python and pip installed, you can also use pip to install docker-compose using the following command:
pip install docker-compose
Note
Ensure that the version number in the pip install docker-compose command matches the latest version of Docker Compose on the GitHub Releases page. Otherwise, you will end up with an outdated version.
Once the binary has been downloaded, change the permissions so that it can be executed using the following command:
sudo chmod +x /usr/local/bin/docker-compose
If the file was downloaded manually, copy the downloaded file to the /usr/local/bin directory before running the command. To confirm that the install was successful and is working correctly, run the following command:
docker-compose version
The result should be versions of Docker Compose, something similar to this:
docker-compose version 1.29.1, build 5becea4c
docker-py version: 5.0.0
CPython version: 3.9.0
OpenSSL version: OpenSSL 1.1.1g 21 Apr 2020
Docker Compose Basics
Unlike the Dockerfile, which is a set of instructions to the Docker Engine about how to build the Docker image, the Compose file is a YAML configuration file that defines the services, networks, and volumes that are required for the application to be started. Docker expects the Compose file to be present in the same path where the docker-compose command is invoked and to be called docker-compose.yaml (or docker-compose.yml). This can be overridden using the -f flag followed by the path to the Compose filename.
Docker Compose Version Overview
With Docker Desktop version 3.4, Docker introduced a newer version of Docker Compose, known as Compose V2. Compose V2 is supposed to be a drop-in replacement for the older version of compose. Docker extracted the YAML file model of the Compose file, created a community around it, and submitted it as a specification, known as the Compose specification. Compose V2 implements the Compose specification. However, it is not yet at feature parity with Compose V1 and can be enabled from within Experimental Settings of Docker Desktop settings. Given the lack of feature parity, this chapter focuses on Compose V1. If you need specific features that are present in Compose V2, such as support for GPU devices and profiles, you can use the rest of the chapter as a guide. Just replace the docker-compose command (with the hyphen) with docker compose (replace the hyphen with a space) and the commands should still work.
Compose File Versioning and the Compose Spec
Although the Compose file is a YAML file, Docker uses the version key at the start of the file to determine which features of the Docker Engine are supported. There are three versions of the Compose file format. With Docker Compose v1.27.0 and Docker Compose V2, Docker has unified the version 2.x and 3.x of the Compose file format and submitted it to the Community as a specification. Here’s a brief description of the previous three versions of the Compose file format:
Version 1: Version 1 is considered a legacy format. If a Docker Compose file doesn't have a version key at the start of the YAML file, Docker considers it to be a version 1 format. Version 1 has been deprecated and is no longer supported.
Version 2.x: Version 2.x identified by the version 2.x key at the start of the YAML file.
Version 3.x: Version 3.x identified by the version 3.x key at the start of the YAML file.
Compose spec: The compose spec unifies versions 2.x and 3.x of the Compose file format and has been submitted it to the Community as a specification. The Compose specification also deprecates the version key.
The differences between the three major versions are discussed in the following sections.
Version 1
Docker Compose files that do not have a version key at the root of the YAML file are considered to be Version 1 compose files. Version 1 will be deprecated and removed in a future version of Docker Compose, so I do not recommend writing Version 1 files. Besides the deprecation, Version 1 has the following major drawbacks:
Version 1 files cannot declare named services, volumes, or build arguments.
Container discovery is enabled only by using the links flag.
Version 2
Docker Compose Version 2 files have a version key with a value of 2 or 2.x. Version 2 introduces a few changes, which makes version 2 incompatible with previous versions of Compose files. These include:
All services must be present in the services key.
All containers are located on an application-specific default network and the containers can be discovered by the hostname, which is specified by the service name.
Links are made redundant.
The depends_on flag is introduced allowing for you to specify dependent containers and the order in which the containers are brought up.
Version 3
Docker Compose Version 3 files have a version key with a value 3 or 3.x. Version 3 removes several options that were deprecated, including volume_driver, volumes_from, and many more. Version 3 also adds a deploy key, which is used for deployment and running of services on Docker Swarm.
Compose Specification
Docker unified versions 2.x and 3.x of the Compose file format and introduced the Compose specification. With Docker Compose version 1.27 and above, Docker implements the Compose spec as the current latest format. Docker has also declared the previous versions as legacy, although they are still supported. The Compose Specification also deprecates the version key in the Compose file. The Compose Specification allows you to define container applications not tied to any specific Cloud provider, comprising fundamental building blocks required for multi-container application:
Services key defines the compute aspects, implemented as one or more containers.
Networks key defines how services communicate with each other.
Volumes key defines how services store persistent data.
A sample reference Compose file is shown in Listing 7-1.
services:
database:
image: mysql
environment:
MYSQL_ROOT_PASSWORD: dontusethisinprod
volumes:
- db-data:/var/lib/mysql
webserver:
image: 'nginx:alpine'
ports:
- 8080:80
depends_on:
- cache
- database
cache:
image: redis
volumes:
db-data:
Listing 7-1
A Sample Docker Compose File
Similar to the Dockerfile, the Compose file is very readable and makes it easy to follow along. This compose file is for a typical web application that includes a webserver, a database server, and a caching server. The Compose file declares that when Docker Compose runs, it will bring up three services—the webserver, the database server, and the caching server. The webserver depends on the database and the cache service, which means that unless the database and the cache service are brought up, the webservice will not be brought up. The cache and the database keys indicate that for cache, Docker must bring up the Redis image and the MySQL image for the database.
To bring up all the containers, issue the following command:
docker-compose up -d
[+] Running 4/4
⠿ Network code_default Created 0.1s
⠿ Container code_database_1 Started 1.2s
⠿ Container code_cache_1 Started 1.1s
⠿ Container code_webserver_1 Started 2.3s
Once the command is issued, Docker will bring up all the services in the background. Note that even though the Compose file has the definition of the database first, the webserver second, and the cache as the last, Docker still brings up the caching container and the database container before bringing up the webserver container. This is because you defined the depends_on key for the webserver as follows:
depends_on:
- cache
- database
This tells Docker to bring up the cache and the database containers first before bringing up the webserver. Docker Compose, however, will not wait and check that the cache container is ready to accept connections and then bring up the database container—it merely brings up the containers in the specified order.
You can see the logs by typing the following command:
docker-compose logs
webserver_1 | [notice] 1#1: nginx/1.21.1
database_1 | [Note] [Entrypoint]: Switching to dedicated user 'mysql'
cache_1 | # Server initialized
cache_1 | * Ready to accept connections
Docker will aggregate the STDOUT of each container and will be streaming them when run in the foreground. By default, docker-compose logs will only show a snapshot of the logs. If you want the logs to be streamed continuously, you can append the -f or --follow flag to tell Docker to keep streaming the logs. Alternatively, if you want to see the last n logs from each container, you can type this:
docker-compose logs --tail=n
where n is the required number of lines that you want to see. Stopping the containers is as simple as issuing the stop command, as shown here:
docker-compose stop
[+] Running 3/3
⠿ Container code_webserver_1 Stopped 0.5s
⠿ Container code_database_1 Stopped 1.4s
⠿ Container code_cache_1 Stopped 0.4s
To resume the stopped containers, issue the start command:
docker-compose start
[+] Running 3/3
⠿ Container code_database_1 Started 1.8s
⠿ Container code_cache_1 Started 1.9s
⠿ Container code_webserver_1 Started 0.7s
To completely tear down the containers, issue the following command:
docker-compose down
This will stop all containers and will also remove the associated containers, networks, and volumes that were created when docker-compose up was issued.
[+] Running 4/4
⠿ Container code_webserver_1 Removed 0.5s
⠿ Container code_cache_1 Removed 0.6s
⠿ Container code_database_1 Removed 1.3s
⠿ Network code_default Removed 0.2s
Docker Compose File Reference
Recall that the Compose file is a YAML file for configuration that Docker reads and sets up the Compose job. This section explains what the different keys in a Docker Compose file do.
Services Key
Services is the first root key of the Compose YAML and it’s the configuration of the container that needs to be created.
Build Key
The build key contains the configuration options that are applied at build time. The build key can be a path to the build context or a detailed object consisting of the context and optional Dockerfile location:
services:
app:
build: ./app
services:
app:
build:
context: ./app
Dockerfile: dockerfile-app
Context Key
The context key sets the context of the build. If the context is a relative path, the path is considered relative to the Compose file’s location.
build:
context: ./app
Dockerfile: dockerfile-app
Image Key
If the image tag is supplied along with the build option, Docker will build the image, and then name and tag the image with the supplied image name and tag.
services:
app:
build: ./app
image: sathyabhat:app
environment/env_file Key
The environment key sets the environment variables for the application, while env_file provides the path to the environment file that’s read to set the environment variables. Both environment and env_file can accept a single file or multiple files as an array.
In the following example, for the app service, two environment variables—PATH and API_KEY, with values /home and thisisnotavalidkey, respectively—are set to the app service.
services:
app:
image: mysql
environment:
PATH: /home
API_KEY: thisisnotavalidkey
In the following example, the environment variables from a file called .env are fetched, and the values are assigned to the app service.
services:
app:
image: mysql
env_file: .env
In the following example, multiple environment files defined under the env_file key are fetched, and the values are assigned to the app service.
services:
app:
image: mysql
env_file:
- common.env
- app.env
- secrets.env
depends_on Key
This key is used to set the dependency requirements across various services. Consider this config:
services:
database:
image: mysql
webserver:
image: nginx:alpine
depends_on:
- cache
- database
cache:
image: redis
When docker-compose up is issued, Docker will bring up the services as per the defined dependency order. In the previous case, Docker brings up the cache and database services before bringing up the webserver service.
Caution
With the depends_on key, Docker will only bring up the services in the defined order; it will not wait for each service to be ready and then bring up the successive service.
Image Key
This key specifies the name of the image to be used when a container is brought up. If the image doesn’t exist locally, Docker will attempt to pull it if the build key is not present. If the build key is in the Compose file, Docker will attempt to build and tag the image.
services:
database:
image: mysql
ports Key
This key specifies the ports that will be exposed to the port. When providing this key, you can specify both ports (i.e., the Docker host port to which the container port will be exposed or just the container port), in which case, a random, ephemeral port number on the host is selected.
services:
database:
image: nginx
ports:
- "8080:80"
services:
database:
image: nginx
ports:
- "80"
Volumes Key
Volumes is available as a top-level key as well as a suboption available to a service. When volumes are referred to as top-level keys, it lets you provide the named volumes that will be used for services at the bottom. The configuration for this looks like this:
services:
database:
image: mysql
environment:
MYSQL_ROOT_PASSWORD: dontusethisinprod
volumes:
- "dbdata:/var/lib/mysql"
webserver:
image: nginx:alpine
depends_on:
- cache
- database
cache:
image: redis
volumes:
dbdata:
In the absence of the top-level volumes key, Docker will throw an error when creating the container. Consider the following configuration, where the volumes key has been skipped:
services:
database:
image: mysql
environment:
MYSQL_ROOT_PASSWORD: dontusethisinprod
volumes:
- "dbdata:/var/lib/mysql"
webserver:
image: nginx:alpine
depends_on:
- cache
- database
cache:
image: redis
Trying to bring up the containers throws an error, as shown here:
docker-compose up
service "database" refers to undefined volume dbdata: invalid compose project
It is possible to use bind mounts as well. Instead of referring to the named volume, all you have to do is provide the path. Consider this configuration:
services:
database:
image: mysql
environment:
MYSQL_ROOT_PASSWORD: dontusethisinprod
volumes:
- ./dbdir:/var/lib/mysql
webserver:
image: nginx:alpine
depends_on:
- cache
- database
cache:
image:redis
The volume key has a value of ./dbdir:/var/lib/mysql, which means Docker will mount dbdir in the current directory to the /var/lib/mysql directory of the container. Relative paths are considered in relation to the directory of the Compose file.
Restart Key
The restart key provides the restart policy for the container. By default, the restart policy is set as no, which means Docker will not restart the container, no matter what. The following restart policies are available:
no: Container will never restart
always: Container will always restart after exit
on-failure: Container will restart if it exits due to an error
unless-stopped: Container will always restart unless exited explicitly or if the Docker daemon is stopped
Docker Compose CLI Reference
The docker-compose command comes with its own set of subcommands. The following sections explain them.
The build Subcommand
The build command reads the Compose file, scans for build keys, and then proceeds to build and tag the image. The images are tagged as project_service. If the Compose file doesn’t have a build key, Docker will skip building any images. The usage is as follows:
docker-compose build <options> <service...>
If the service name is provided, Docker will proceed to build the image for just that service. Otherwise, it will build images for all the services. Some of the commonly used options are as follows:
--compress: Compresses the build context
--no-cache Ignore the build cache when building the image
The down Subcommand
The down command stops the containers and will proceed to remove the containers, volumes, and networks. Its usage is as follows:
docker-compose down
The exec Subcommand
The compose exec command is equivalent to the docker exec command. It lets you run ad hoc commands on any of the containers. Its usage is as follows:
docker-compose exec <service> <command>
The logs Subcommand
The logs command displays the log output from all the services. Its usage is as follows:
docker-compose logs <options> <service>
By default, logs will only show the last logs and for all services. You can show logs for just one service by providing the service name. The -f option follows the log output.
The stop subcommand
The stop command stops the containers. Its usage is as follows:
docker-compose stop
Exercises
Building and Running a Mysql Database Container With a Web UI for Managing the Database
In this exercise, you will build a multi-container application consisting of a container for the MySQL database and another container for adminer, a popular Web UI for MySQL. Since you already have prebuilt images for MySQL and adminer, you won’t need to build them.
Tip The source code, Dockerfile, and docker-compose files associated with this exercise are available on the GitHub repo of this book at https://github.com/Apress/practical-docker-with-python, in the source-code/chapter-7/exercise-1 directory.
You can start with the Docker Compose file, as follows:
services:
mysql:
image: mysql
environment:
MYSQL_ROOT_PASSWORD: dontusethisinprod
ports:
- 3306:3306
volumes:
- dbdata:/var/lib/mysql
adminer:
image: adminer
ports:
- 8080:8080
volumes:
dbdata:
This Compose file combines everything that you learned in this book into one concise file. Since you are targeting the Compose spec, you can omit the version tag. Under Services, define two services—one for the database, which pulls in a Docker image called mysql. When the container is created, an environment variable, MYSQL_ROOT_PASSWORD, sets the root password for the database and port 3306 from the container is published to the host.
The data in the MySQL database is stored in a volume known as dbdata and is mounted to the /var/lib/mysql directory of the container. This is where MySQL stores the data. In other words, any data saved to the database in the container is handled by the volume named dbdata. The other service, called as adminer, just pulls in a Docker image called adminer and publishes port 8080 from the container to the host.
Validate the Compose file by typing the following command:
docker-compose config
If everything is okay, Docker will print out the Compose file as it as parsed; it should look like this:
services:
adminer:
image: adminer
networks:
default: null
ports:
- mode: ingress
target: 8080
published: 8080
protocol: tcp
mysql:
environment:
MYSQL_ROOT_PASSWORD: dontusethisinprod
image: mysql
networks:
default: null
ports:
- mode: ingress
target: 3306
published: 3306
protocol: tcp
volumes:
- type: volume
source: dbdata
target: /var/lib/mysql
volume: {}
networks:
default:
name: docker-compose-adminer_default
volumes:
dbdata:
Run all containers by typing the command as follows:
docker-compose up -d
The containers will start in the background, as shown here:
docker-compose up -d
[+] Running 3/3
⠿ Network docker-compose-adminer_default Created 0.1s
⠿ Container docker-compose-adminer_adminer_1 Started 1.0s
⠿ Container docker-compose-adminer_mysql_1 Started 1.1s
Now take a look at the logs. Type the following command:
docker-compose logs
adminer_1 | PHP 7.4.22 Development Server (http://[::]:8080) started
mysql_1 | [Note] [Entrypoint]: Entrypoint script for MySQL Server 8.0.26-1debian10 started.
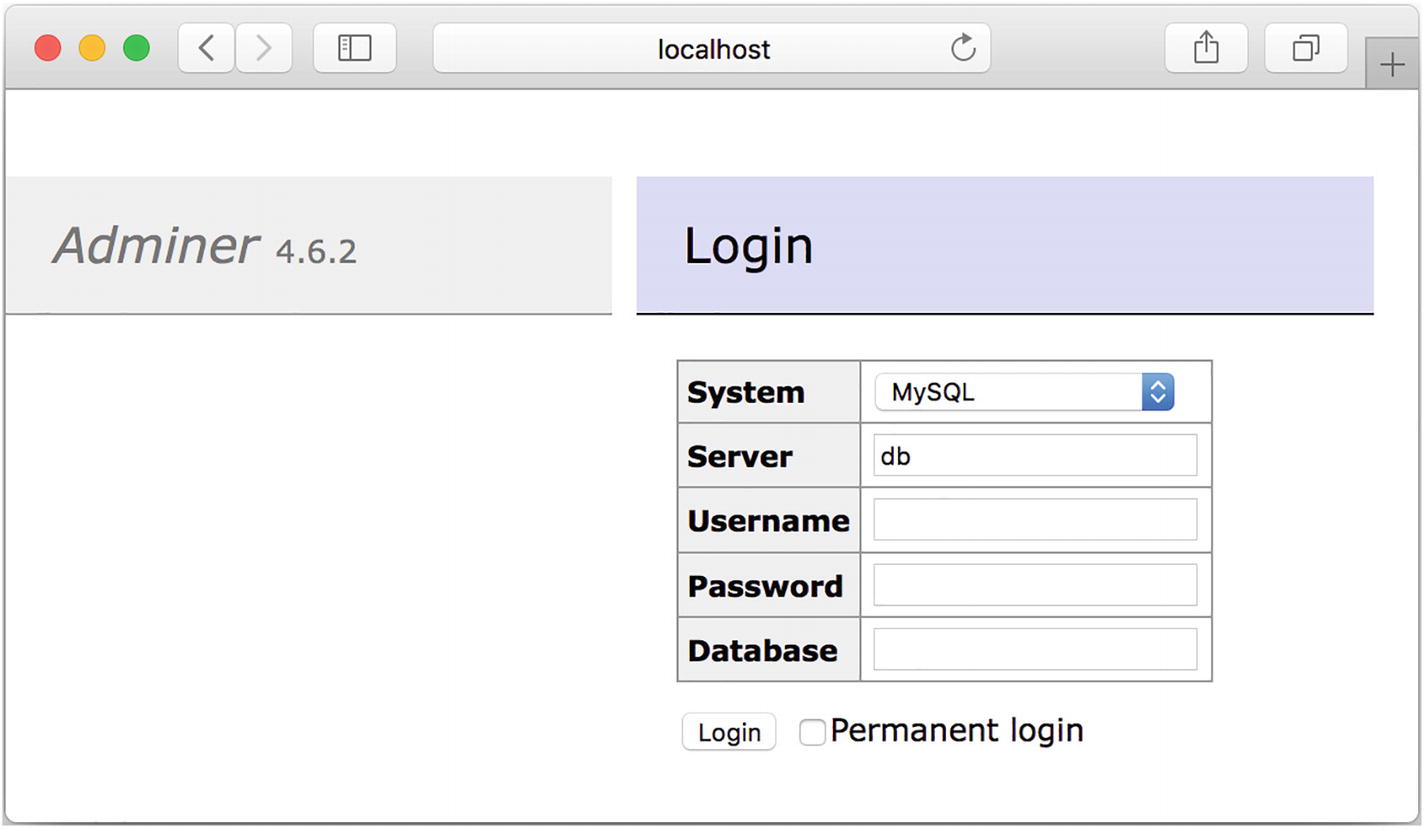
This tells you that the adminer UI and MySQL database are ready. Try logging in by navigating to http://localhost:8080. The adminer login page (see Figure 7-1) should load.
Figure 7-1
adminer login page
Notice that the server has been populated with the value db. Since docker-compose creates its own network for the application, the hostname for each container is the service name. In this case, the MySQL database service name is mysql and the database will be accessible via the mysql hostname. Enter the username as root and the password as the one entered in the MYSQL_ROOT_PASSWORD environment variable (see Figure 7-2).
Figure 7-2
adminer login details
If the details are correct, you should see the database page shown in Figure 7-3.
Figure 7-3
Database details available once you’re logged in
Converting Newsbot to a Docker Compose Project
In the exercise in Chapter 6, you added volumes to Newsbot and the data was persisted to a MySQL container. You also brought up the newsbot and mysql containers separately and connected them to the common bridge network. In this exercise, you will write a Docker Compose file containing the Newsbot container and MySQL container, with an attached volume to persist the data. In this exercise, you will see how easy Docker Compose makes it to bring up multiple containers, each with their associated properties.
Tip The source code, Dockerfile, and docker-compose files associated with this exercise are available on the GitHub repo of this book at https://github.com/Apress/practical-docker-with-python, in the source-code/chapter-7/exercise-2 directory.
Let’s create a new Docker Compose file and add the following contents:
services:
newsbot:
build: .
depends_on:
- mysql
restart: "on-failure"
environment:
- NBT_ACCESS_TOKEN=${NBT_ACCESS_TOKEN}
networks:
- newsbot
mysql:
image: mysql
volumes:
- newsbot-db:/var/lib/mysql
environment:
- MYSQL_ROOT_PASSWORD=dontusethisinprod
networks:
- newsbot
volumes:
newsbot-db:
networks:
newsbot:
Since you need two services, one for Newsbot and one for the MySQL server, there are keys corresponding to each of them. For Newsbot, you add a depends_on key with a value of mysql to indicate that the MySQL container should be started before Newsbot. But as you saw earlier, Docker doesn’t wait for the MySQL container to be ready, so Newsbot has been modified to wait 60 seconds before attempting to connect to the mysql container. There is also a restart policy to restart the newsbot container on failure of the application.
Newsbot requires the Telegram bot API token, which you pass to the container environment variable NBT_ACCESS_TOKEN from the same host environment variable. Each of the two services also has a network key indicating that the containers are to be connected to the newsbot network. Finally, you add the top-level keys for volume and network, declared as newsbot-db for persisting MySQL data for the volume and newsbot as the network.
You can verify that the Compose file is correct and valid by typing the config command shown here:
docker-compose config
Docker prints the config of the Compose that you wrote, similar to the Compose file itself.
services:
mysql:
environment:
MYSQL_ROOT_PASSWORD: dontusethisinprod
image: mysql
networks:
newsbot: null
volumes:
- type: volume
source: newsbot-db
target: /var/lib/mysql
volume: {}
newsbot:
build:
context: exercise-2/newsbot-compose
dockerfile: exercise-2/newsbot-compose/Dockerfile
depends_on:
mysql:
condition: service_started
environment:
NBT_ACCESS_TOKEN: ""
networks:
newsbot: null
restart: on-failure
networks:
newsbot:
name: newsbot-compose_newsbot
volumes:
newsbot-db:
name: newsbot-compose_newsbot-db
Now run the Compose application. Don’t forget to pass the <token> with the value of the Newsbot API key that you generated in Chapter 3.
NBT_ACCESS_TOKEN=<token> docker-compose up
You should see the containers being built and started up, like this:
[+] Running 4/4
⠿ Network newsbot-compose_newsbot Created 0.0s
⠿ Volume "newsbot-compose_newsbot-db" Created 0.0s
⠿ Container newsbot-compose_mysql_1 Started 1.6s
⠿ Container newsbot-compose_newsbot_1 Started 1.8s
Attaching to mysql_1, newsbot_1
newsbot_1 | INFO: <module> - Starting up
newsbot_1 | INFO: <module> - Waiting for 60 seconds for db to come up
mysql_1 | [System] [MY-013577] [InnoDB] InnoDB initialization has ended.
mysql_1 | [System] [MY-010931] [Server] /usr/sbin/mysqld: ready for connections. Version: '8.0.26' socket: '/var/run/mysqld/mysqld.sock' port: 3306 MySQL Community Server - GPL.
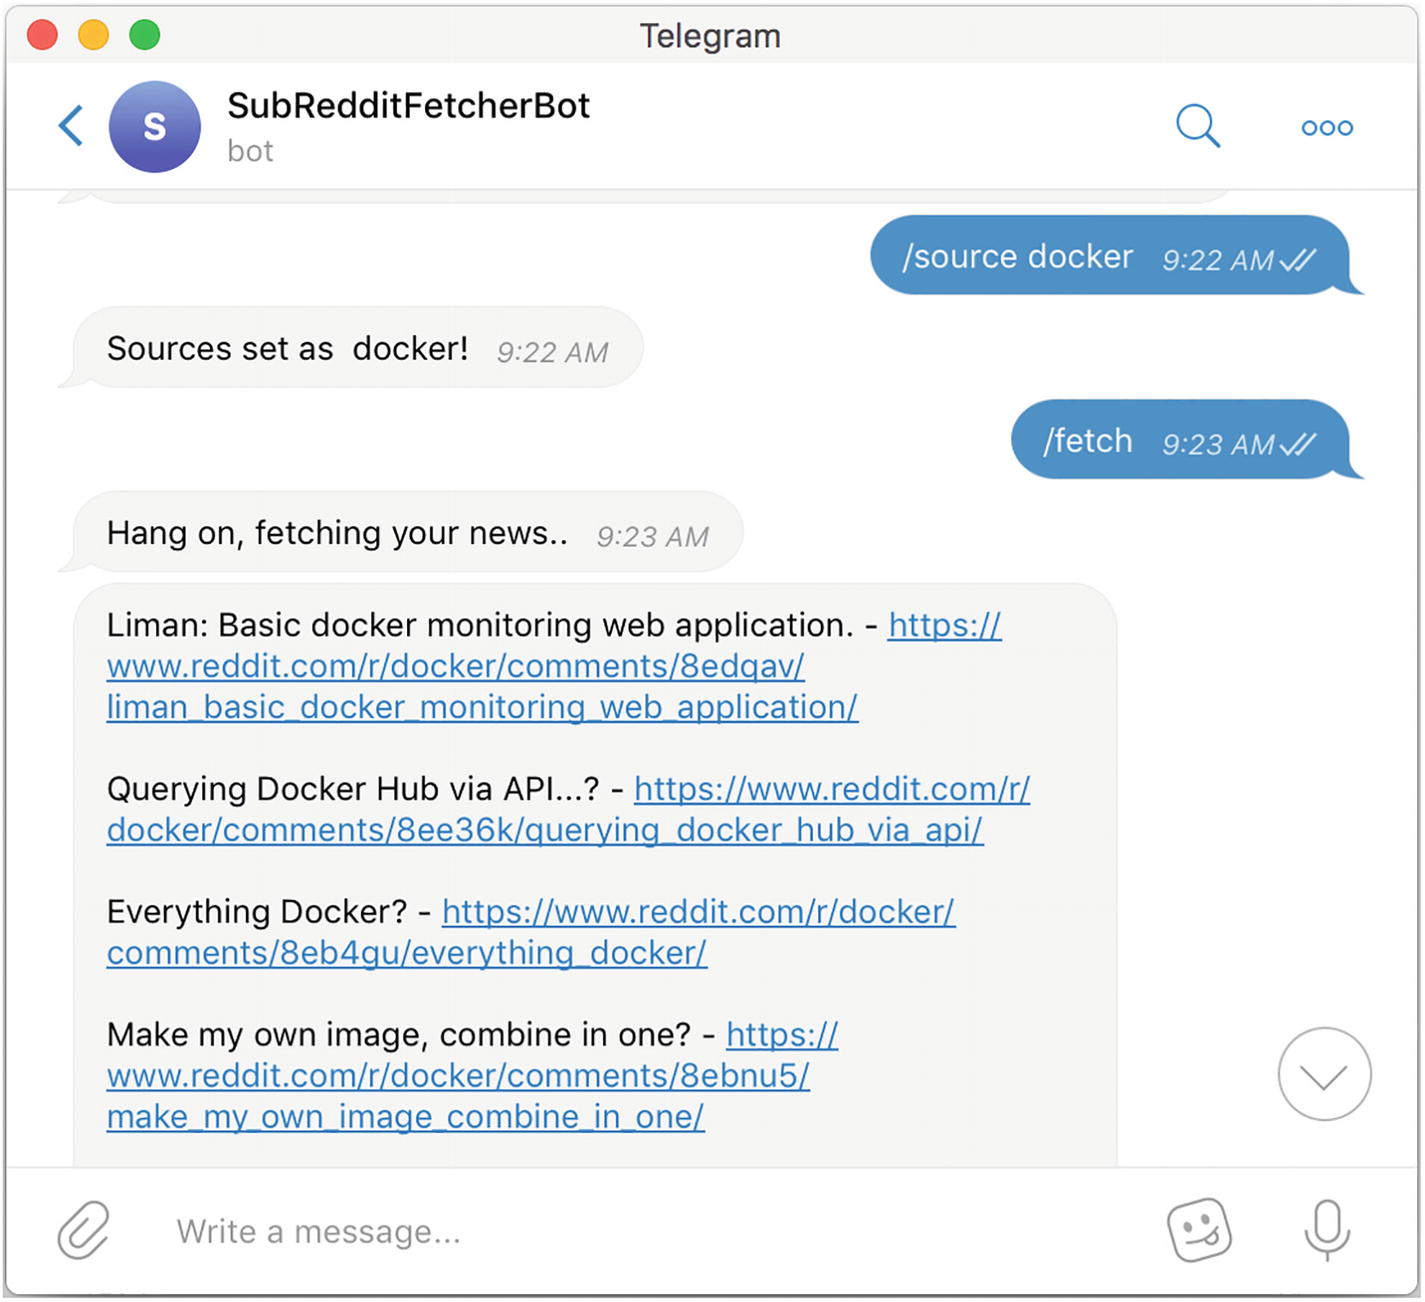
The last line indicates that the bot is working. Try setting a source and fetching the data by typing /sources docker and then /fetch into the Telegram bot. If all goes well, you should see the result in Figure 7-4.
Figure 7-4
The subreddit fetcher bot in action
You can go one step further by modifying the Compose file to include the adminer service so that you have a WebUI to check that the contents are being saved to the database. Modify the existing Docker compose file to include the adminer service as shown here and save it to a file called docker-compose.adminer.yml:
services:
newsbot:
build: .
depends_on:
- mysql
restart: "on-failure"
environment:
- NBT_ACCESS_TOKEN=${NBT_ACCESS_TOKEN}
networks:
- newsbot
mysql:
image: mysql
volumes:
- newsbot-db:/var/lib/mysql
environment:
- MYSQL_ROOT_PASSWORD=dontusethisinprod
networks:
- newsbot
adminer:
image: adminer
ports:
- 8080:8080
networks:
- newsbot
volumes:
newsbot-db:
networks:
newsbot:
Confirm that the Compose file is valid by typing the config command as follows:
Since the data is persisted to volumes, you shouldn’t be worried about data loss.
Bring up the service again using the following command. Don’t forget to pass the <token> with the value of the Newsbot API key that you generated in Chapter 3.
NBT_ACCESS_TOKEN=<token> docker-compose -f docker-compose.adminer.yml up
Running 4/4
⠿ Network newsbot-compose_newsbot Created 0.1s
⠿ Container newsbot-compose_adminer_1 Started 7.1s
⠿ Container newsbot-compose_mysql_1 Started 7.1s
⠿ Container newsbot-compose_newsbot_1 Started 5.1s
Attaching to adminer_1, mysql_1, newsbot_1
mysql_1 | [System] [MY-010931] [Server] /usr/sbin/mysqld: ready for connections. Version: '8.0.26' socket: '/var/run/mysqld/mysqld.sock' port: 3306 MySQL Community Server - GPL.
newsbot_1 | INFO: <module> - Starting up
newsbot_1 | INFO: <module> - Waiting for 60 seconds for db to come up
Navigate to adminer by heading to http://localhost:8080. Log in using the root username, with the password set in the MYSQL_ROOT_PASSWORD value and the Server value as mysql. Click the Newsbot database, source as the table, and then choose Select Data. You should see the subreddit that you earlier set to source (see Figure 7-5).
Figure 7-5
The project running with data saved to the database
Success! The application is running, and the data is saved to the MySQL database and persisted, despite removing and re-creating the containers.
Summary
In this chapter, you learned about Docker Compose, including how to install it and why it is used. You also took a deep dive into the Docker Compose file and the CLI. You ran some exercises on building multi-containers applications with Docker Compose. You also learned how to extend the Newsbot project to a multi-container application using Docker Compose, by adding a linked database and a Web UI to edit the database.