
![]()
MVC with Ext JS 4
Working with JavaScript libraries poses an important challenge to developers in the form of lack of modularity. JavaScript does not provide any facility to modularize the code, unlike languages like Java that provide concepts like packages to organize our code. Creating and developing applications in JavaScript usually leads to code that is very hard to maintain and reuse. One of the significant advantages of Ext JS 4 is the ability to create maintainable code by providing a template to implement the Model-View-Controller (MVC) architecture.
Ext JS 4 helps you to develop applications that implement the MVC architecture. You can segregate your code into Models, Views, and Controllers and build an application that can be maintained easily. This approach also paves way for extensibility and reusability, usually rare in JavaScript applications.
In this chapter you’ll learn to develop Ext JS 4 applications that implement the MVC architecture. We’ll discuss the API support for implementing MVC architecture and build an application using MVC.
Most Java, C#, Rails, or Grails developers who have built Web applications will be aware of the MVC architecture. It’s a widely adapted software pattern in Web applications. If you know the basics of MVC, you can safely skip this section.
MVC is a simple mechanism by which you organize your code into three categories: the models, views and controllers.
The View entity represents the UI or the display. It’s the UI component (such as a form) that the user interacts with. The user interacts with the View and provides input. A View accepts input from the user and displays output to the user.
The Model entity represents the data models. It contains the data and business logic. The View populates the Model with user input and pulls out the data from the Models and displays it to the users.
The Controller entity controls the flow in the application. It takes in the input from the Views, gives it to the Models and creates the output View and gives it to the users. You can read more about MVC at http://en.wikipedia.org/wiki/Model-view-controller .
As mentioned earlier Ext JS 4 application is organized into models, views and controllers. Table 9-1 shows the classes that make up the models, views and controllers.
Table 9-1. The Models, Views and Controller Classes
| Entity | Class | Description |
|---|---|---|
| Model | Ext.data.Model | The Model classes that are used in data handling. Custom Ext JS 4 classes with business logic also fall under this category. |
| View | Ext.Component | All the Ext.Component classes fall under the View category. |
| Controller | Ext.app.Controller | This class serves as the controllers where you write the event handling and navigation logic. |
All the controller classes that we create will extend the Ext.app.Controller class. We will manage the views and models in the controller classes. There are no hard and fast rules on the number of controllers that you can create. Practically you will have a controller for a group of related operations or a use case. For instance, you can have a Controller class for user authentication related operations like login, logout, forgotten password, etc. The Controller class provides a number of useful attributes and methods. Here’s a list of attributes in the Controller class.
- The models attribute represents an array of Model names that will be loaded before instantiating the Controller.
- The stores attribute represents an array of Store names that will be loaded before instantiating the Controller
- The views attribute represents an array of View component names that will be loaded before instantiating the Controller.
- The refs attribute represents an array of references to UI components. Each reference has a reference variable name and an expression to resolve the UI component. The expression is resolved by the Ext.ComponentQuery class. The variable names will have a getter method generated automatically. For example, in the statement refs: [{ref:"username",selector:"#usernametextfield"}], the username ref refers to the UI component with an id usernametextfield. You’ll have a getUsername() method generated automatically to access the component
Table 9-2 shows the list of methods in the Controller class.
Table 9-2. Methods in Controller Class
| Method | Description |
|---|---|
| Init | Acts like a constructor of the Controller class. It’s called even before the Ext.Viewport is created. |
| Control | This method is used to add event handlers for the UI components. The general format of this method is "component selector expression" : { eventName : this.eventHandlerFunction } The component selector expression is resolved by Ext.ComponentQuery class. |
| getApplication | Used to access the Ext.app.Application instance. I’ll discuss the Application class in detail later. |
| getStore | This method is used to access the Store instance. If the store instance is not available, a new instance is created and returned. |
Listing 9-1 shows a skeleton of Controller class definition.
Listing 9-1. Custom Controller Class
Ext.define("MyController",{
  extend : "Ext.app.Controller",
  refs : [
      {ref:"referenceVariable1", selector:"component selector expression"},
      {ref:"referenceVariable2", selector:"component selector expression"},
  ],
  models : [],
  stores : [],
  views : [],
  init : function(){
    this.control({
        "component selector expression1" : {
           eventName : this.eventHandlerFunction1
        },
        "component selector expression2" : {
           eventName : this.eventHandlerFunction2
        }
      },
    });
  },
  eventHandlerFunction1 : function(){},
  eventHandlerFunction2 : function(){}
});
As shown in Listing 9-1, the MyController class extends Ext.app.Controller and overrides the init() method. We’ve registered the events with event handler functions using control() method. The MyController class has the views, models, stores, and refs attributes. I’ll discuss a practical example where you can create controller classes later in this chapter.
The Models, Views, Stores and Controllers in an Ext JS 4 application are brought together by Ext.app.Application class. This class represents the complete application. The Application instance binds all the entities of an Ext JS 4 application.
You can create an instance of the Application class by using Ext.application() method. Listing 9-2 shows the code for instantiating an Application object.
Listing 9-2. Creating an Application
Ext.application({
  name : "NameOfTheApplication",
  appFolder : "",
  controllers : [],
  launch : function(){

  }
});
In the code snippet shown in Listing 9-2, an Application object is created when we call Ext.application() method.
- The Ext.application() method is configured with a name attribute that represents the name of the application. This name also serves as the root namespace for all the classes in our application.
- The appFolder attribute is supplied with the folder that contains all the MVC classes. The appFolder has a value called “app” by default.
- The controllers array is supplied with the list of Controller names that are loaded and instantiated before the Application object is created.
- The launch() method is the last piece of code to be executed. You can create the root view instance usually a Viewport, in this method.
At any point of time in your application, you can access the instance of the Application class by calling the getApplication() method on the root namespace. For example, if you have written Ext.application({name:"MVC"}), you can get the instance of Application by calling MVC.getApplication() method.
You can access the models, stores, views, and controllers using the getModel(), getStore(), getView(), and getController() methods, respectively, on the Application instance.
We discussed that the models, views, stores, and controllers are configured in arrays and are loaded before the Application instance is created. So, where are these entities loaded from? As mentioned earlier, the appFolder contains all these entities. If your appFolder attribute is configured as Chapter09, the application structure will look as shown in Figure 9-1.
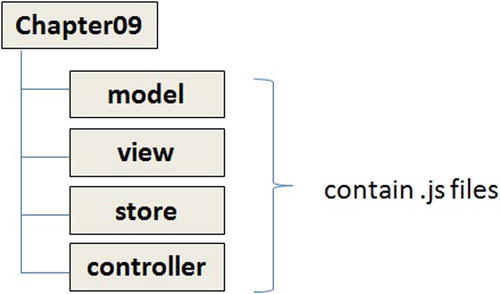
Figure 9-1. Structure of an MVC application
Let’s build an application using MVC architecture. For brevity’s sake we will keep it simple and focus on the important concepts. Figure 9-2 shows the screen shots of the application we will develop. It has a login page and a home page. On clicking the login button in the login page, the home page is displayed. The home page displays has a placeholder for displaying a menu at the top of the page. The body of the home page displays a data grid and the details of each row in the grid.
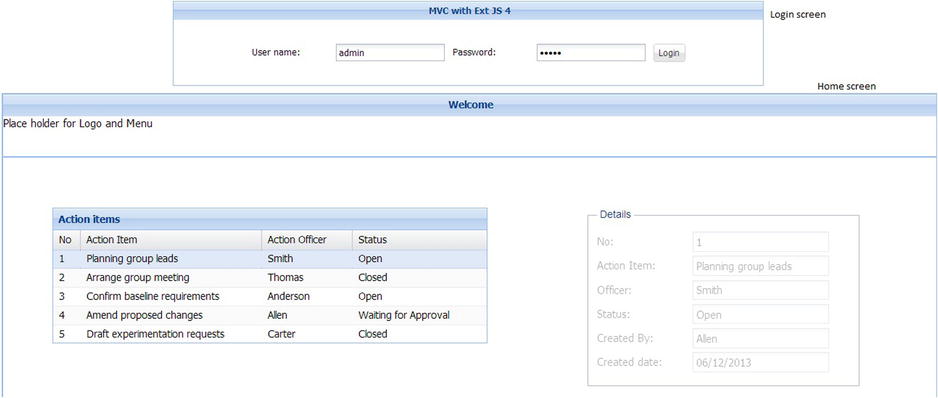
Figure 9-2. Sample MVC application
Let’s split the application into views, models, stores, and controllers as shown in the list below.
- We have two main view entities login screen and home screen.
- The login screen has the basic login form. We will define this view in a class say LoginScreen.
- The home screen is composed of a grid Panel and a panel where we display the details. The grid panel displays the project action items. The details panel displays the detail of every action item. Let’s define the view for the home in a class HomeScreen. We’ll define the grid and details panel in separate classes ProjectActionItemGrid and ProjectActionItemDetailsPanel.
- We can create a controller for login screen where we have the event handling logic for the login button and navigation logic to navigate to the home screen. Let’s define a controller called LoginController for this purpose.
- We’ll create a controller for handling the logic like populating the grid and displaying the details of an action item in the panel, whenever a row in the grid is selected. Let’s define a controller called HomeController for this purpose.
- Let’s define a model class ProjectActionItem and a store ProjectActionItemStore to load the list of all action items. We’ll have the sample data for the action items in a file actionitems.txt.
Now that we have a basic idea of the list of classes that we may need for implementing this application, let’s create an application with the folder structure for storing all these classes in individual files. Let’s create an Ext JS 4 application called MVCWithExtJS4 with all the entities stored in a folder called app. Figure 9-3 shows the structure of the application MVCWithExtJS4 with all the files created.
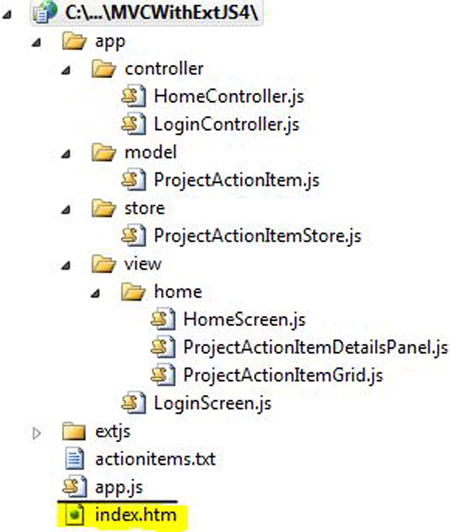
Figure 9-3. Structure of MVCWithExtJS4 application
You can generate the application using Sencha Cmd, which will create the basic folder structure along with the index.htm and app.js files. We can build our components using the structure created. You will learn about generating a sample application using Sencha Cmd in Chapter 10. In this chapter you can create the application and the folder structure manually.
There are different ways to implement this application using MVC architecture. As our focus is to learn the nuances of MVC architecture in Ext JS 4, we’ll keep it simple so that it’s easier to understand the concepts.
Let’s start coding with the index.htm file as shown in Listing 9-3.
Listing 9-3. index.htm
<!DOCTYPE html>
<html>
<head>
    <link href="extjs/resources/css/ext-all.css" rel="stylesheet" type="text/css" />
    <script src="extjs/ext-all.js"></script>
    <script src="app.js"></script>
</head>
<body>
</body>
</html>
In the code above we have added the reference to the ext-all.css, ext-all.js, and app.js files. When you use Sencha Cmd to create the project, the index.htm is automatically created with the reference to these files added. As mentioned earlier, you’ll learn about Sencha Cmd in Chapter 10.
The next step is to create the app.js file and configure the Ext.app.Application object. Listing 9-4 shows the code snippet for app.js file.
Listing 9-4. app.js
Ext.Loader.setConfig({ enabled: true });

Ext.application({
  name: "Chapter09",
  appFolder: "app",
  controllers: ["LoginController","HomeController"],
  launch: function () {
    this.viewport = Ext.create("Ext.container.Viewport", {
      renderTo: Ext.getBody(),
      layout: "card",
      items: [
        //We'll add the view later
       ]
  });
    }
});
Here’s a description of the contents of the app.js file.
- The first line of app.js has the Ext.Loader configured to load the dependent JavaScript files. This line enables loading of the controller, model, view, and store files.
- The name of the application is configured to be Chapter09. The root namespace of all the classes that we create in this application henceforth will be Chapter09.
- We have configured the LoginController and HomeController files in the controllers array.
- In the launch() function, we have created an instance of Ext.container.Viewport class with a card layout and rendered it to the body of the page. The items array of the Viewport is empty right now. We’ll add the items once we complete the creation of the views.
- The Viewport instance is assigned to a variable called viewport in the Application instance.The code this.viewport = Ext.create("Ext.container.Viewport",{...}) creates an instance of Viewport class and assigns to a viewport variable. You can now access the Viewport instance from anywhere in the application by writing this.application.viewport
Let’s build the application by developing the data components first.
Developing the data components
Our application involves loading JSON data from the server and displaying it in a grid panel. The data provides the list of action items in a project. Each action item has a serial number, description of the item, creation date, status, and the names of the officer and the person who created it. We’ll define this JSON data in actionitems.txt file as shown in Listing 9-5.
Listing 9-5. actionitems.txt
{
   "actionitems" : [
      {"sno":1,"item":"Planning group leads","officer":"Smith","status":"Open","createdby":"Allen","createddate":"06/12/2013"},
     {"sno":2,"item":"Arrange group meeting ","officer":"Thomas","status":"Closed","createdby":"Thomas","createddate":"05/28/2013"},
     {"sno":3,"item":"Confirm baseline requirements","officer":"Anderson","status":"Open","createdby":"Carter","createddate":"06/14/2013"},
     {"sno":4,"item":"Amend proposed changes","officer":"Allen","status":"Waiting for Approval","createdby":"Yong","createddate":"06/27/2013"},
     {"sno":5,"item":"Draft experimentation requests","officer":"Carter","status":"Closed","createdby":"Turner","createddate":"06/01/2013"}
  ]
}
Let’s define the Model class for the project action item. Listing 9-6 shows the ProjectActionItem model class defined with the fields.
Listing 9-6. ProjectActionItem.js
Ext.define("Chapter09.model.ProjectActionItem", {
    extend : "Ext.data.Model",
    fields : ["sno","item","officer","status","createdby","createddate"]
});
Let’s define the Store class for loading the data from actionitems.txt file. Listing 9-7 shows the ProjectActionItemStore class. The Store class is defined using an Ajax proxy and a JSON reader. We will configure the autoLoad attribute to be false for the store. Later in our Controller class we’ll populate the store dynamically.
Listing 9-7. ProjectActionItemStore.js
Ext.define("Chapter09.store.ProjectActionItemStore", {
    extend: "Ext.data.Store",
    model: "Chapter09.model.ProjectActionItem",
    proxy: {
        type: "ajax",
        url: "actionitems.txt",
        reader: {
            type : "json",
            root : "actionitems"
        }
    }
});
Let’s build the view classes now.
Developing the View Components
Let’s create the login screen with the username and password text fields and a login button. We’ll not handle any event in this view class. Listing 9-8 shows the code snippet for login screen.
Listing 9-8. LoginScreen.js
Ext.define("Chapter09.view.LoginScreen", {
    extend: "Ext.form.Panel",
    xtype: "login",
    layout: {
        type : "hbox",
        pack : "center",
        align : "middle"
    },
    defaults : {margin:5},
    title: "MVC with Ext JS 4",
    titleAlign: "center",
    padding : 250,
    items: [
        {
            xtype: "textfield",
            id: "usernametext",
            fieldLabel: "User name"
        },
        {
            xtype: "textfield",
            id: "passwordtext",
            fieldLabel: "Password",
            inputType: "password"
        },
        {
            xtype: "button",
            id: "loginbutton",
            text: "Login"
        }
    ]
});
In Listing 9-8 we have a defined a class LoginScreen with login as the xtype. The LoginScreen class inherits the Ext.panel.Panel class and is configured to have a horizontal box layout.
In our application we have a login screen and a home screen. The home screen contains the grid panel and the detail panel. We’ll define the grid panel in a separate class. Listing 9-9 shows the ProjectActionItemGrid class that extends the Ext.grid.Panel class.
Listing 9-9. ProjectActionItemGrid.js
Ext.define("Chapter09.view.home.ProjectActionItemGrid", {
    extend: "Ext.grid.Panel",
    xtype: "projectactionitemgrid",
    title: "Action items",
    store: null,
    columns: [
                 { header: "No", dataIndex: "sno", width: 30 },
                 { header: "Action Item", dataIndex: "item", width: 200 },
                 { header: "Action Officer", dataIndex: "officer" },
                 { header: "Status", dataIndex: "status", width: 150 }
             ]
});
As shown in Listing 9-9, the code contains the ProjectActionItemGrid class. The xtype of the class is configured to be projectactionitemgrid. The class contains the columns configured. We have configured the store to be null. You can wire up the ProjectActionItemStore with the store attribute, but it’s better to remove the coupling and wire up the store dynamically using the reconfigure() method of the grid panel class.
Listing 9-10 shows the ProjectActionItemDetailsPanel class, which is the detailed panel where you will display the details of the project action item.
Listing 9-10. ProjectActionItemDetailsPanel.js
Ext.define("Chapter09.view.home.ProjectActionItemDetailsPanel", {
    extend : "Ext.form.Panel",
    xtype: "projectactionitemdetails",
    border: false,
    items: [
       {
         xtype: "fieldset", title: "Details",
         defaults: { xtype: "textfield", disabled: true },
         items: [
              { name: "sno", fieldLabel: "No" },
              { name: "item", fieldLabel: "Action Item" },
              { name: "officer", fieldLabel: "Officer" },
              { name: "status", fieldLabel: "Status" },
              { name: "createdby", fieldLabel: "Created By" },
              { name: "createddate", fieldLabel: "Created date" },
         ]
       }
    ]
});
As shown in Listing 9-10, the code contains the ProjectActionItemDetailsPanel class. The xtype of the class is configured to be projectactionitemdetails. This class extends Ext.form.Panel class and has a fieldset and textfields where we’ll display the details of the project action item. The textfield components in this class have the name attribute configured to be the field name in the ProjectActionItem model class.
Let’s create a HomeScreen class that’s composed of the ProjectActionItemGrid and ProjectActionItemDetailsPanel instances as shown in Listing 9-11.
Listing 9-11. HomeScreen.js
Ext.define("Chapter09.view.home.HomeScreen", {
    extend: "Ext.panel.Panel",
    xtype: "home",
    layout: "border",
    padding: 30,
    items: [
        { region: "north", height: 70,
          title:"Welcome",titleAlign:"center",
          html: "Place holder for Logo and Menu"
        },
        {
          region: "center",
          items: [
            {
              xtype: "panel", layout: "hbox",
              defaults: { margin: 5, padding: 50 },
              border: false,
              items: [
               { xtype: "projectactionitemgrid", width: 580 },
               { xtype: "projectactionitemdetails", width: 400, height: 400 }
             ]
           }
    ]
  },
 ]
});
As shown in Listing 9-11, the code contains the HomeScreen class. The xtype of the class is configured to be home. This class extends Ext.panel.Panel class and is configured with a border layout with the north and center regions. The north region can be configured with a menu, logo, etc. We have left this region intentionally blank for brevity’s sake.
The center region of the HomeScreen contains a panel that has the projectactionitemgrid and the projectionactionitemdetails instances.
We have created the ProjectActionItemGrid.js, ProjectActionItemDetailsPanel.js and HomeScreen.js in the view/home folder. You’ll notice that the namespace of these classes are Chapter09.view.home.
Let’s bind the model, store and the view classes together by creating the controller classes.
Developing the Controller Components
Listing 9-12 shows the LoginController class, which has the authenticate() function that’ll be called when login button is clicked. This method will just check if the credentials are equal to admin. If the authentication is successful, you will display the home screen. You‘ll display an error dialog otherwise.
Listing 9-12. LoginController.js
Ext.define("Chapter09.controller.LoginController", {
    extend: "Ext.app.Controller",
    refs: [
        { ref: "userName", selector: "login textfield[id=usernametext]" },
        { ref: "password", selector: "#passwordtext" }
    ],
    views: ["LoginScreen"],
    init: function () {
        this.control({
            "#loginbutton": {
                click: this.authenticate
            }
        });
    },
    authenticate: function () {
        if (this.getUserName().getValue() == "admin" &&
            this.getPassword().getValue() == "admin") {
            this.application.viewport.add({ xtype: "home", id: "homescreen"});
            this.application.viewport.getLayout().setActiveItem(1);
        }
        else
            Ext.Msg.alert("Invalid credentials");
    }
});
Here’s a list of things to notice in the LoginController class defined in Listing 9-12.
- The LoginController class has two reference variables—namely, userName and password defined. The username variable refers to the selector expression "login textfield[id=usernametext]". This expression searches for a textfield with usernametext as the id inside the login xtype—i.e., the LoginScreen object. The password variable is mapped to the expression "#passwordtext". The different selector expressions have been used differently to only highlight various options.
- The actual loading of the LoginScreen.js file happens only when LoginController class is instantiated. The views array has the LoginScreen configured.
- The authenticate() function validates the credentials. On successful validation the HomeScreen instance is created and added to the Viewport.
Let’s define the HomeController class as shown in Listing 9-13.
Listing 9-13. HomeController.js
Ext.define("Chapter09.controller.HomeController", {
    extend: "Ext.app.Controller",
    id: "HomeController",
    refs: [
       { ref: "actionItemsGrid", selector: "home grid" },
       { ref: "actionItemDetailsPanel", selector: "home form" }
    ],
    models: ["ProjectActionItem"],
    stores: ["ProjectActionItemStore"],
    views: ["home.ProjectActionItemDetailsPanel", "home.ProjectActionItemGrid", "home.HomeScreen"],
    init: function () {
        this.control({
            "home": {
                beforerender: this.loadProjectActionItems
            },
            "home grid": {
                itemclick: this.displayProjectActionItemDetails
            }
        });
    },
    displayProjectActionItemDetails: function (src, record) {
        this.getActionItemDetailsPanel().loadRecord(record);
    },
    loadProjectActionItems: function () {
        var store = Ext.getStore("ProjectActionItemStore");
        store.load();
        this.getActionItemsGrid().reconfigure(store);
    }
});
Here’s a list of things that we’ve written in the HomeController class defined in Listing 9-13.
- The class has the ProjectActionItem and ProjectActionItemStore files configured in the models and stores attributes, respectively.
- The views attribute has home.ProjectActionItemGrid, home.ProjectActionItemDetailsPanel, and home.HomeScreen files configured. The home. prefix is due to the home folder where these files are stored.
- We’ve handled the beforerender event of the home xtype. We load the ProjectActionItemStore only before the home screen is rendered to the page.
- The Ext.getStore() method is used to access the ProjectActionItemStore instance. If the instance is available, it returns a reference to the same. If the instance is not available, a new one is created and returned. All the store instances are essentially available as global variables that you can access from anywhere in your application using the Ext.getStore() method. It’s usually a good practice to access Store instances from the Controller classes only as it’s easier to maintain.
- The ProjectActionItemStore instance is wired up to the grid using the reconfigure() method.
- The displayProjectActionItemDetails() method is used to display the details of the selected row in the grid. The update() method on the ProjectActionItemDetailsPanel instance is invoked by passing the selected record.
As we’ve completed creating all the entities, let’s modify the app.js code shown in Listing 9-4. We’ll create an instance of the LoginScreen and add it to the Viewport as shown here.
this.viewport = Ext.create("Ext.container.Viewport", {
  renderTo: Ext.getBody(),
  layout: "card",
  items: [
     {
       xtype: "login"
     }
   ]
  });
You can execute index.htm file and get the output as shown in Figure 9-2.
Summary
In this chapter I discussed developing Ext JS 4 applications following the MVC architecture. The complete Ext JS 4 code is organized into separate folders for storing the models, views, stores, and controllers. The Ext.app.Application is the class that holds references to the Controller, Model, Store, and View objects. Ext.application() method is used to create an instance of Application class and configure the application. The controller classes extend Ext.app.Controller. The controller classes have the event handling and navigation logic of the application.
In the next chapter you will learn about customizing the Ext JS 4 API. You will also learn packaging and deploying Ext JS 4 applications. We’ll discuss unit testing Ext JS 4 applications using the Jasmine unit-testing library.