© Johan Abildskov 2020
J. AbildskovPractical Githttps://doi.org/10.1007/978-1-4842-6270-2_4

4. Complex Branching

Johan Abildskov1 
(1)
Tilst, Denmark
 

In the last chapter, we looked at a linear history. This can be fine for trivial repositories, but if we are confident working with branches, it will introduce almost no overhead, so we can wield the power of branches, even for our simplest projects.

There are many benefits from working actively with branches in Git. We will cover collaboration with multiple developers in the next chapter, but even for a solo developer, there are wins from branches. They primarily derive from the fact that we can use branches to isolate our work. When we isolate our work, we can mitigate some of the cost of multitasking. By isolating our work on a branch, we can always create a new branch, should an urgent task need to be developed. We can safely run experiments on a branch and only integrate our experiment if it comes out in a favorable way. As mentioned before, branches are a great cause of confusion around how Git works. This is very unfortunate as they are the key to both gaining the full value of Git and understanding many concepts including working with remote repositories and all but the simplest collaboration schemes.

In this chapter, we will focus on getting a healthy mental model around multiple branches and get enough hands-on experience that you will be able to use and reason about branches.

Creating Branches

We have covered that a branch is a pointer to a commit. Concretely, that means that a branch is a file in the repository containing the sha to the commit the branch points at. This can be seen in Listing 4-1.
$ cat .git/refs/heads/master
5355b7b7f01b6d69c1ae94b428f54952139eb2f8
$ git log --oneline --decorate -n 1
5355b7b (HEAD -> master, origin/master, origin/HEAD) [Chapter 7] Add aliases exercise
Listing 4-1

A branch is a file containing the sha of the commit it points to

We can use the command git branch to manipulate and list branches. There are subtleties when it comes to remote branches, but we will cover those in the next chapter. When we use the command without arguments, we list the (local) branches.

We also create branches using the branch command. We call with two arguments: git branch <branch-name> <commit>. As an example: git branch my-branch master. This will create a branch in the repository. It will be called my-branch and point to the same commit as master. This can be seen in Figure 4-1.
../images/495602_1_En_4_Chapter/495602_1_En_4_Fig1_HTML.jpg
Figure 4-1

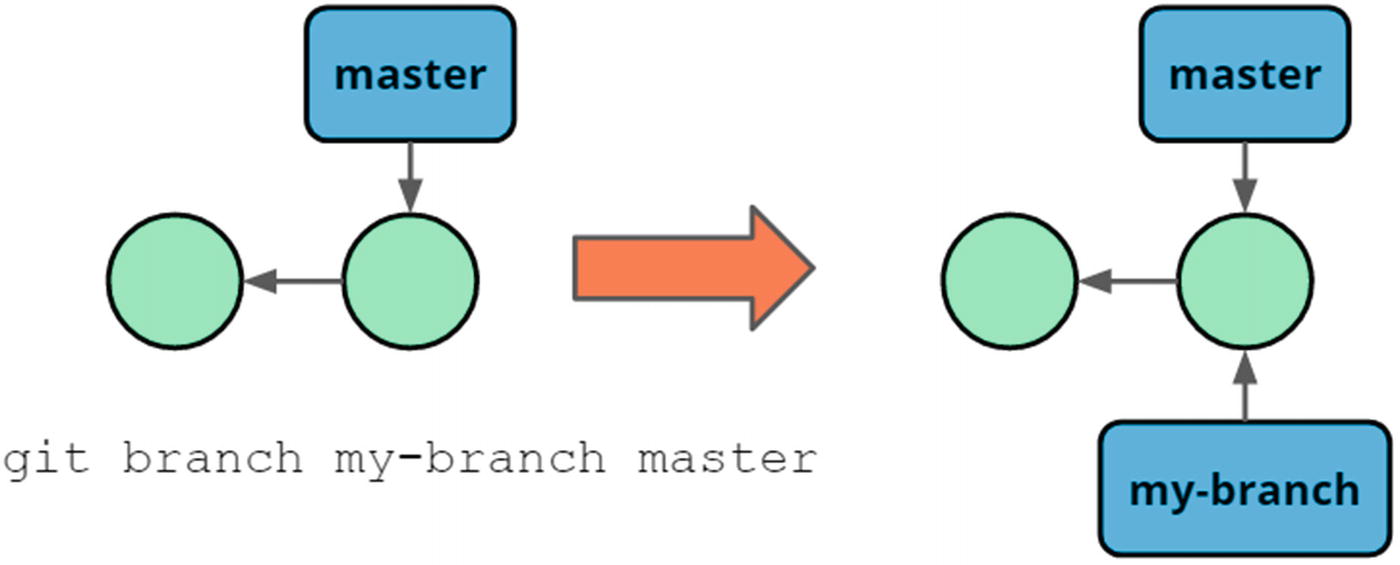
Creating a branch from a reference

Now that we have created a branch, we can do some work on the different branches. Depending on what HEAD currently is pointing at, new commits will be created at an appropriate location, with the currently checked-out branch updated to point at the new commit. This can be seen in Figure 4-2.
../images/495602_1_En_4_Chapter/495602_1_En_4_Fig2_HTML.jpg
Figure 4-2

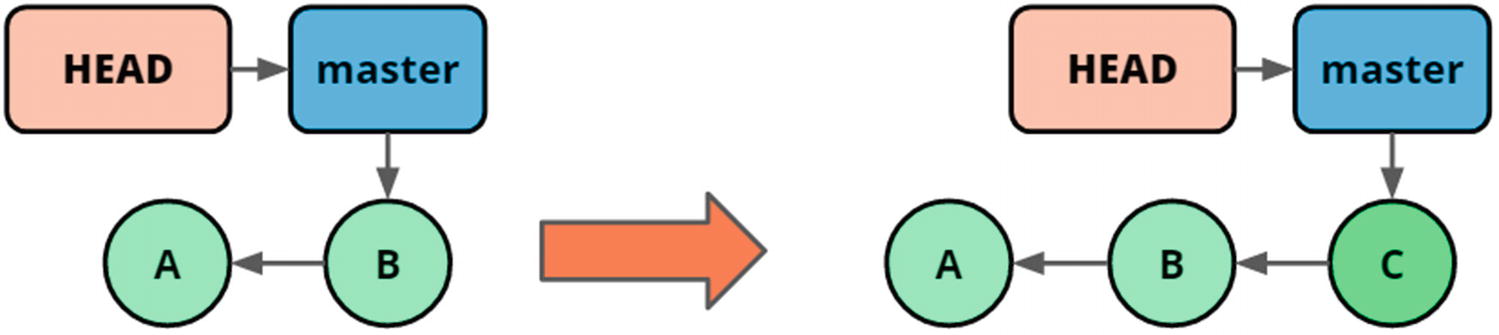
Creating commits on a branch will add the commit and update the branch pointer

Now that we have seen how it looks when we create commits on branches, we are ready for the next step in branching

Working with Multiple Branches

In Git, it really does not make any sense to work without any branches, and we are by default always working on one branch: the master branch. But the true power comes from juggling multiple branches. There are two primary tasks when working with multiple branches. One is keeping our work separate on different branches. We have covered that earlier. The other part is getting changes made on multiple branches into the same branch. This is commonly referred to as merging. There are multiple ways to do this. In this chapter, we are going to cover merging and rebasing.

Conceptually, when we want to merge two branches, we create a new commit containing the joint changeset from the two branches. This works by finding the point at which the branches diverged and joining the two changesets. This can be seen in Figure 4-3.
../images/495602_1_En_4_Chapter/495602_1_En_4_Fig3_HTML.jpg
Figure 4-3

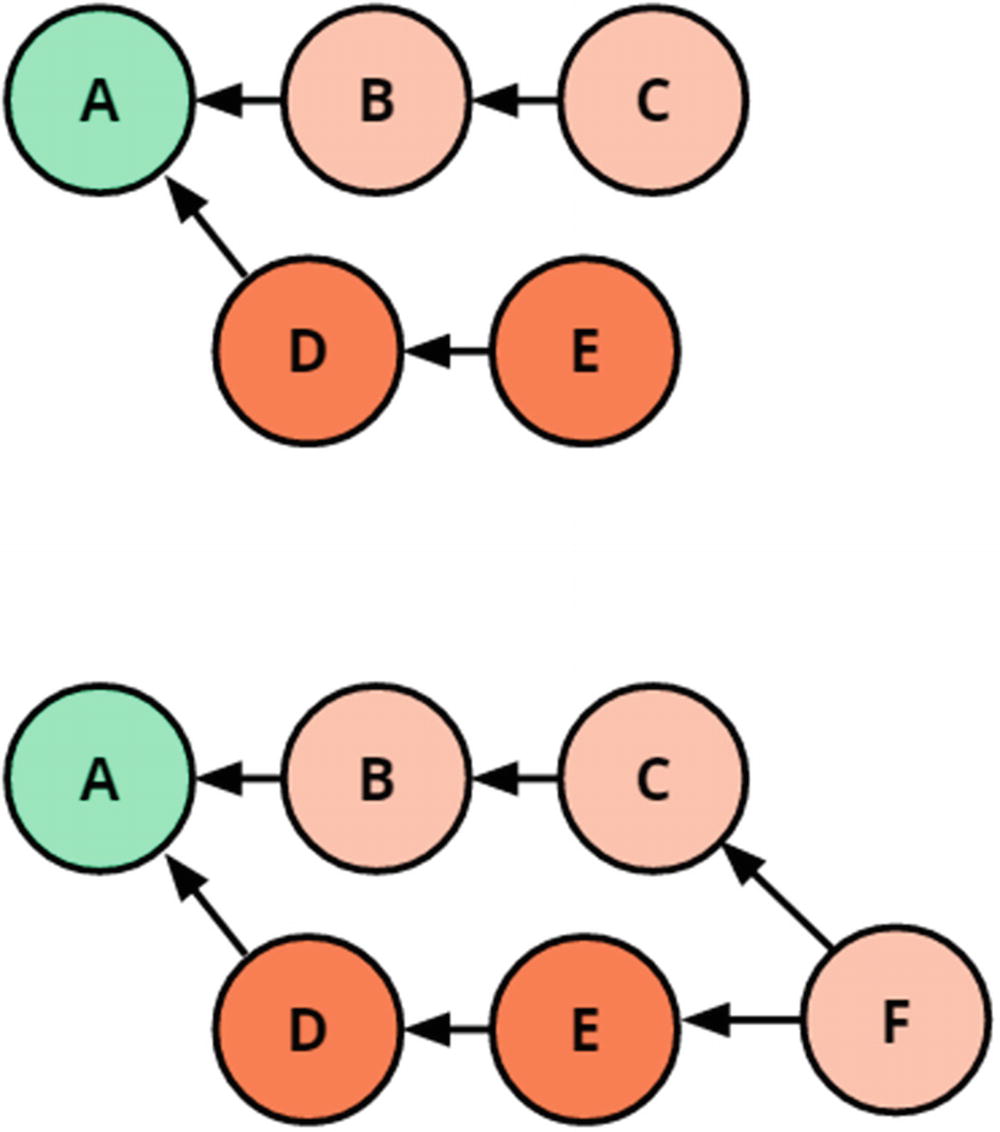
A common merge, merging the branches pointing to C and E, respectively

In the case that the changesets are compatible, Git will handle everything for us. If the changesets are not compatible, or Git fails to merge them, we will end up in a merge conflict. We will cover these later in this chapter. In most code bases I’ve been working with, merge conflicts have been uncommon.

Merge

Merging is another place where our language can come in the way of our understanding of Git. We both talk about the abstract merging of branches, disregarding how we intend to do this, and we talk about the command `git merge`.

The common way to use the merge command is with the form `git merge branch` which will merge the changeset from branch into the branch currently checked out, for example, git merge feature-123. There are other options, but I like this way of working as we then only change the branch that we are on, which is good as it leads to relatively few issues. This merge is how Figure 4-3 was created.

Fast-Forward Merges

Fast-forward merges are the simplest form of merges in Git. Unfortunately, there is also a bit of misunderstanding around how they work. This section will hopefully leave you in a state where you love fast-forward merges.

A fast-forward merge happens when there has been no divergence between the branches you are merging. This occurs when a branch is a continuation of another. In Figure 4-4, we can see this scenario as the feature branch is linearly ahead of master. To merge the change in feature, all we need to do is to move the master branch pointer to the commit feature points at. As all the changes contained in the master branch are already part of the feature branch.
../images/495602_1_En_4_Chapter/495602_1_En_4_Fig4_HTML.jpg
Figure 4-4

Doing a fast-forward merge does not result in any new commits, but is a simple operation

This also means that there is no possibility for any conflict doing a fast-forward merge. For this reason, fast-forward merges can be considered safe.

Note

Some workflows use a Git feature where a new commit is created to mark the merge of a branch. This creates a merge commit, without a changeset, to mark that at this point the branches were merged. This is done with the command git merge --no-ff <branch>.

FAST FORWARD
In this exercise, we are going to start with only the master branch. It has two commits on it. We are going to create a branch called feature, create a commit, and merge that into master. This exercise can be found in the exercise folder as chapter4/fast-forward/.
$ git log --oneline --decorate
fa8d7db (HEAD -> master) second commit
35b6a68 Initial Commit
$ git checkout -b feature
Switched to a new branch 'feature'
$ git add 1.txt
$ git commit -m "Adding file1"
[feature 4b346fe] Adding file1
 1 file changed, 0 insertions(+), 0 deletions(-)
 create mode 100644 1.txt
$ git log --oneline --decorate
4b346fe (HEAD -> feature) Adding file1
fa8d7db (master) second commit
35b6a68 Initial Commit
At this point, the feature branch contains a commit that is not on master, but master contains nothing that is not also reachable from the feature branch.
$ git checkout master
Switched to branch 'master'
$ git merge feature
Updating fa8d7db..4b346fe
Fast-forward
 1.txt | 0
 1 file changed, 0 insertions(+), 0 deletions(-)
 create mode 100644 1.txt
Git tells us it is doing a fast-forward and from which commit it moves the pointer.
$ git log --oneline
4b346fe (HEAD -> master, feature) Adding file1
fa8d7db second commit
35b6a68 Initial Commit

If we compare this out with the one from the log statement before the fast-forward merge, we can see the commit ID is identical. This means that no new commit has been created and the change has been purely a branch update.

As can be seen from the preceding exercise, fast-forward merges by default do not result in new commits. This means that this type of merges is a very quick operation as it is simply a two-step procedure: write updated sha to the branch file, and then check out the workspace at that revision.

Three-Way Merges

In the previous section, we covered trivial or fast-forward merges, where there are no divergence and no possibility of conflicts. In this section, we will treat the plain merge or the three-way merge. These occur when both of the branches that we are merging contain work that is only on one branch. This divergence is wholly natural and happens in most situations where multiple developers are collaborating on a single source base. Commonly, what happens is that while we were developing on our feature branch, some other developer has delivered some changes to the master branch. As such, the point at which we branched out from the master branch is no longer the newest commit on the master branch. As commits represent a specific state of the workspace, we need to create a new commit that contains the state of the workspace after grabbing both changesets. In Figure 4-5, you can see how this looks on the Git graph before and after a merge. In the next exercise, we will cover how it looks on disk.
../images/495602_1_En_4_Chapter/495602_1_En_4_Fig5_HTML.jpg
Figure 4-5

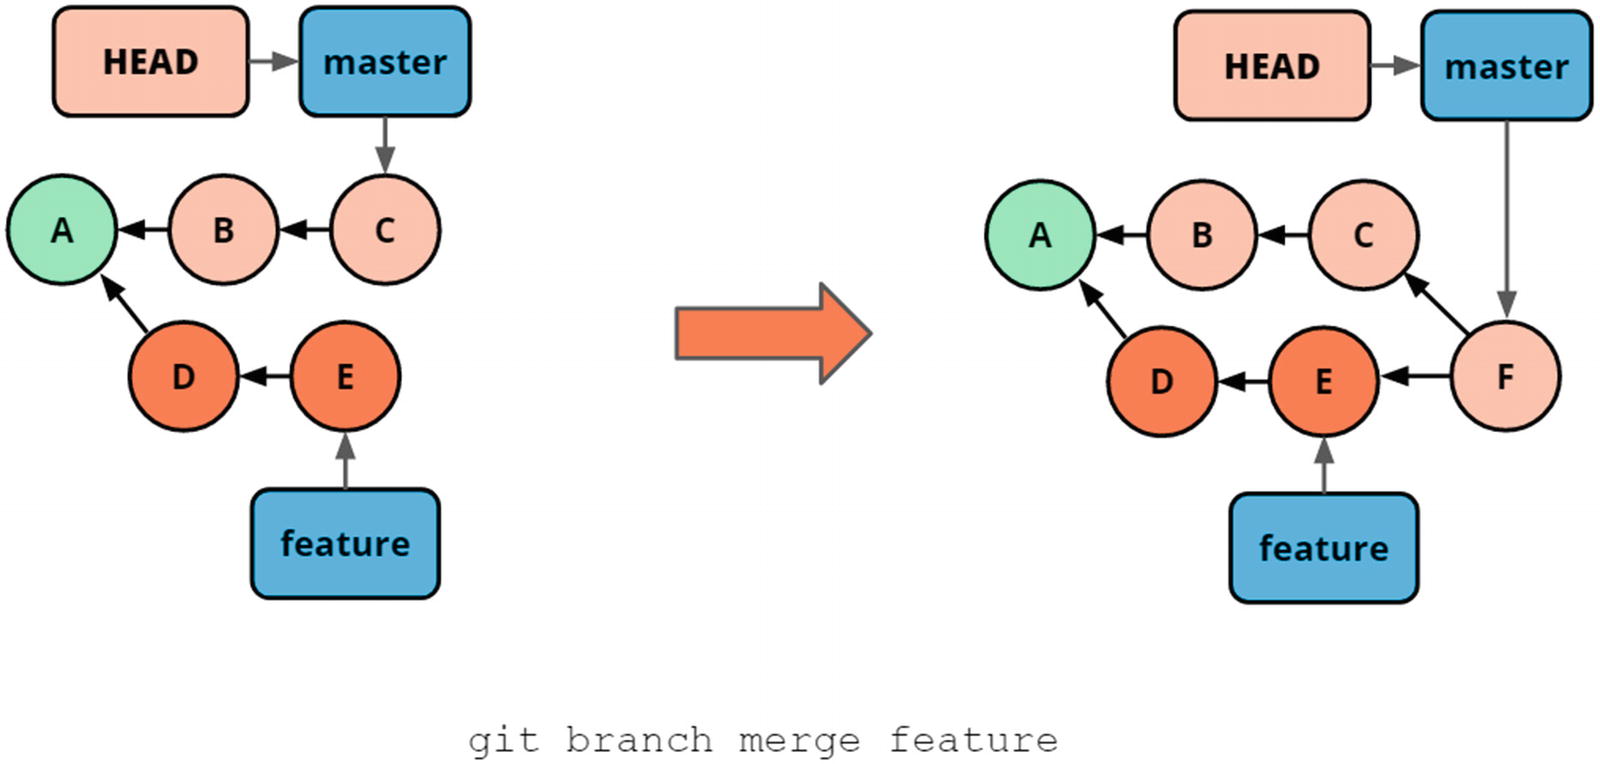
Merging two branches creates a new commit and updates a branch pointer

Three-way merges are named as such because three points are involved in the merge – both end states as well as the point from which both branches depart. We name these the source, target, and merge base, respectively. This can be seen in Figure 4-6.
../images/495602_1_En_4_Chapter/495602_1_En_4_Fig6_HTML.jpg
Figure 4-6

The different components of a three-way merge: source, target, and merge base

Git uses the merge base to determine the different changesets and calculate whether they overlap and thus cannot be automatically fused by Git. The result will be a commit and the receiving branch will be updated. When we have completed a three-way merge in one direction, if we do the merge in the other direction, it will always be a fast-forward merge.

THREE-WAY MERGE
In this exercise, we have two branches with different content that we like to merge. We will first merge the content from master into feature. Then, we will update the master to the feature branch. This is a common workflow as you can first test out the end state in your feature branch before delivering to master. The repository for this exercise can be found in the exercises as chapter4/three-way-merge/.
$ git log --all --graph --oneline
* d03b0bd (HEAD -> feature) Add feature.txt
| * 390d440 (master) Add master.txt
|/
* ea2b9f5 second commit
* f90da57 Initial Commit
We see that we have two branches that have diverged.
$ git merge master
Merge made by the 'recursive' strategy.
 master.txt | 0
 1 file changed, 0 insertions(+), 0 deletions(-)
 create mode 100644 master.txt
When we merge the changes from master into the feature branch, the merge is solved using the three-way merge. It is using the recursive strategy which is an implementation detail we can safely ignore.
$ git log --all --graph --oneline
*   ddeeef9 (HEAD -> feature) Merge branch 'master' into feature
|
| * 390d440 (master) Add master.txt
* | d03b0bd Add feature.txt
|/
* ea2b9f5 second commit
* f90da57 Initial Commit
The three-way merge led to a new commit ddeeef9. Note that the master branch still points at the same commit it did before.
$ git checkout master
Switched to branch 'master'
$ git merge feature
Updating 390d440..ddeeef9
Fast-forward
 feature.txt | 0
 1 file changed, 0 insertions(+), 0 deletions(-)
 create mode 100644 feature.txt
Now that we merge the branches in the other direction, we get a fast-forward merge. This is true because all the content reachable from master is also reachable from feature, and Git thus considers this merge already solved. Many workflows only allow fast-forward merges on master, and this is how to achieve it.
$ git log --all --graph --oneline
*   ddeeef9 (HEAD -> master, feature) Merge branch 'master' into feature
|
| * 390d440 Add master.txt
* | d03b0bd Add feature.txt
|/
* ea2b9f5 second commit
* f90da57 Initial Commit

In the preceding code, we walked through a three-way merge and noticed that repeating a three-way merge in the other direction caused a fast-forward merge.

The preceding exercise went through the happy path scenario. When our merges are simple, Git can easily resolve them automatically and we feel powerful. Unfortunately, it is not always the case that Git can resolve merges for us. We cover this in the next section.

Merge Conflicts

It can be the case that Git is unable to determine what the result should be from merging branches. In this case, Git will ask for the user to resolve the merge and resume the process. This situation is called a merge conflict. Git will drop to the prompt and mark files as being in a state of conflict. Listing 4-2 shows this through a status command.
$ git status
On branch master
You have unmerged paths.
  (fix conflicts and run "git commit")
  (use "git merge --abort" to abort the merge)
Unmerged paths:
  (use "git add <file>..." to mark resolution)
        both modified:   mergesort.py
no changes added to commit (use "git add" and/or "git commit -a")
Listing 4-2

Git status shows that we are in a state of an unresolved merge conflict and instructs as to what our next steps are

The simplest way that I can explain how to resolve a merge conflict is you need to make the workspace look like you want the merge to be and then tell Git that you are done. Git outputs so-called markers in the conflicted files. This can be seen in Listing 4-3.
$ cat mergesort.py
from heapq import merge
def merge_sort2(m):
    """Sort list, using two part merge sort"""
    if len(m) <= 1:
        return m
    # Determine the pivot point
    middle = len(m) // 2
    # Split the list at the pivot
<<<<<<< HEAD
    left = m[:middle]
    right = m[middle:]
=======
    right = m[middle:]
    left = m[:middle]
>>>>>>> Mergesort-Impl
<Rest of file truncated>
Listing 4-3

Merge markers in a file show origin of different changes

If you encounter complex merge conflicts, often it helps to use an external merge tool such as meld or kdiff. Under normal circumstances must merge conflicts are simple to resolve and can simply be handled in your normal editor. Editors, such as Visual Studio Code, understand the markers that Git put in your files and this makes it easier to resolve the merge conflict.

There can be multiple merge conflicts in the same file. Git looks at smaller chunks, to figure out similarities between versions of files. This makes it easier to handle merge conflicts as you do not have to decide on an entire file in one go, but rather can decompose into smaller segments to compare.

MERGE CONFLICT
In this exercise, we will go through the same situation as in the previous exercise except that the diverging branches will have noncompatible changes. This will lead to a merge conflict that we will resolve. This exercise can be found in the examples under chapter4/merge-conflict/.
$ ls
0.txt  master.txt
$ cat master.txt
feature
$ git log --oneline --decorate --graph --all
* 6ce4209 (HEAD -> feature) Add feature.txt
| * c301b9a (master) Add master.txt
|/
* f237b8b second commit
* 7e48076 Initial Commit
$ git checkout master
Switched to branch 'master'
$ cat master.txt
master
Now, we have gotten our bearing in the repository. Two branches have diverged. Each has added the file master.txt with different content.
$ git merge feature
Auto-merging master.txt
CONFLICT (add/add): Merge conflict in master.txt
Automatic merge failed; fix conflicts and then commit the result.
After we initiate the merge, Git detects the merge conflict and pauses the merge, prompting us to resolve the merge.
$ git status
On branch master
You have unmerged paths.
  (fix conflicts and run "git commit")
  (use "git merge --abort" to abort the merge)
Unmerged paths:
  (use "git add <file>..." to mark resolution)
        both added:      master.txt
no changes added to commit (use "git add" and/or "git commit -a")
Using git status to show us where we have problems, lets us know that Git was unable to merge the file master.txt.
$ cat master.txt
<<<<<<< HEAD
master
=======
feature
>>>>>>> feature
Git has put merge markers showing the different changesets in master.txt. This shows that the current state is the file containing master and the incoming change is the file containing feature.
$ echo master > master.txt
$ git add master.txt
warning: LF will be replaced by CRLF in master.txt.
The file will have its original line endings in your working directory.
Most often, we want to complete the merge inside of our editor or merge tool, but in this case, I simply select the state that I want. Note that this state can be either of the solutions or some combination of them. This is why Git needs human intervention – it is unaware of the semantics of our source. We use add to mark the file as being in a resolved state.
$ git status
On branch master
All conflicts fixed but you are still merging.
  (use "git commit" to conclude merge)
$ git commit
[master 3be77eb] Merge branch 'feature'
$ git log --oneline --decorate --graph --all
*   3be77eb (HEAD -> master) Merge branch 'feature'
|
| * 6ce4209 (feature) Add feature.txt
* | c301b9a Add master.txt
|/
* f237b8b second commit
* 7e48076 Initial Commit

Having resolved the merge conflict, we see we are in a similar situation as the happy path three-way merge. We just had to help Git a little bit along the way.

As can be seen in this exercise, it is not a daunting task to resolve a merge conflict. It can however be difficult in complex scenarios and when working with a code base that we are not comfortable with.

Rebase

An alternative to the three-way merge is the rebase. In contrast to the three-way merge that creates a new commit representing the workspace resulting from merging two branches, the rebase intuitively moves the commits. This is technically wrong, but we’ll keep the intuition for now. When we rebase our branch on top of another branch, intuitively we move the commits on our branch and apply them on top of the target branch. This can be seen in Figure 4-7.
../images/495602_1_En_4_Chapter/495602_1_En_4_Fig7_HTML.jpg
Figure 4-7

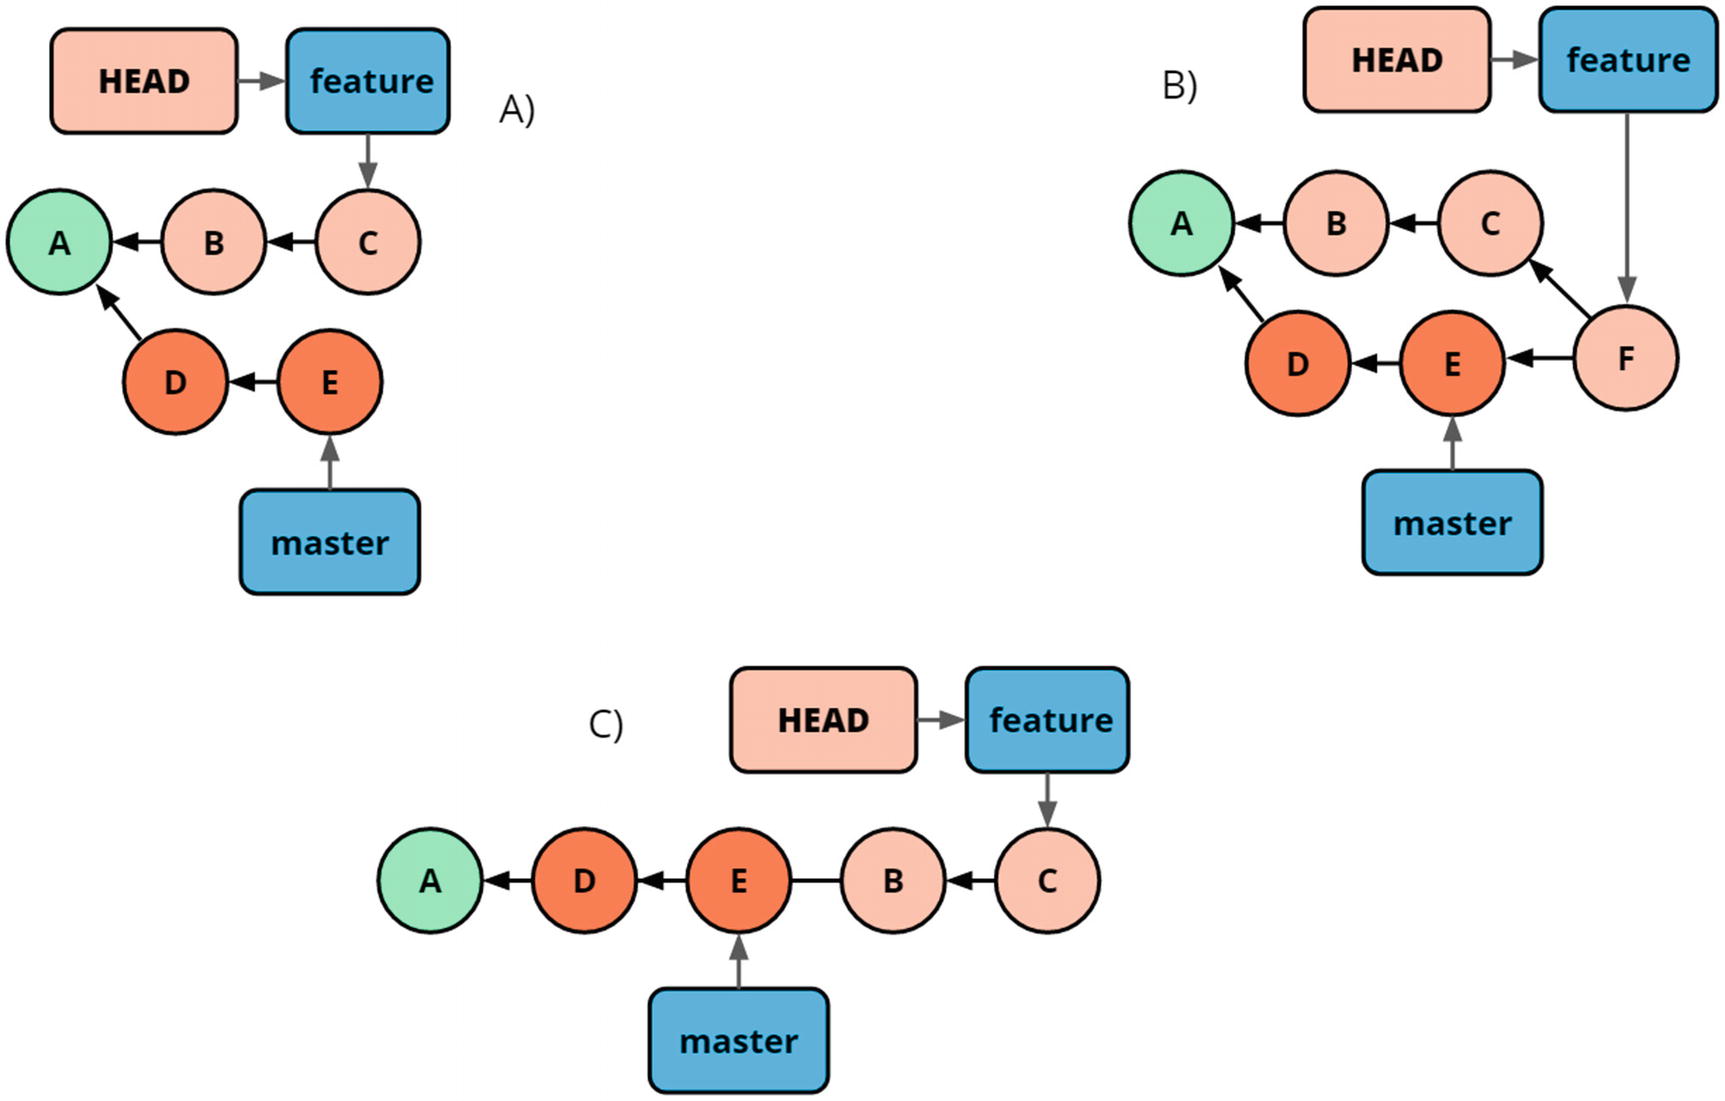
Rebase vs. merge. Starting from A, B is the result from merging master to feature, while C is the result of rebasing feature onto master

We use the git rebase <target> command to rebase HEAD on top of <target>. Assuming feature is checked out, we would write git rebase master to rebase the feature branch on top of master. This can be seen in Figure 4-7(c).

REBASE EXERCISE
In this exercise, we start with the same situation as we do in the three-way-merge exercise, but instead of merging the branches, we are going to rebase feature on top of master instead. The repository can be found in the exercise folder as chapter4/rebase/.
$ git log --oneline --graph --all
* b188294 (HEAD -> feature) Add feature.txt
| * 8cab888 (master) Add master.txt
|/
* 6fb6ffc second commit
* 2a97e8c Initial Commit
$ git rebase master
First, rewinding head to replay your work on top of it...
Applying: Add feature.txt
$ git log --oneline --graph --all
* 449abd2 (HEAD -> feature) Add feature.txt
* 8cab888 (master) Add master.txt
* 6fb6ffc second commit
* 2a97e8c Initial Commit
There is one huge difference between the outcome of this rebase, rather than the merge. Namely, we have not increased the amounts of commits, and we have reduced the complexity of the Git graph. In particular, this is a good way to work when updating your branch to contain the newest from master while you are developing your code. Notice that feature is pointing to a new commit sha.
$ git show b18829
commit b1882942ed4722828d595e3428fbac75522bb587
Author: Johan Abildskov <[email protected]>
Date:   Mon May 4 09:34:52 2020 +0200
    Add feature.txt
diff --git a/feature.txt b/feature.txt
new file mode 100644
index 0000000..e69de29

Here, we use show to see the commit that feature previously pointing to is still present, and thus we can recover safely from the rebase.

Note

While our intuition around a rebase is that we move a branch, this is not the case. New commits are made on top of the merge base, and the old commits are left without any references to them. They can thus be recovered until garbage collection occurs.

There are many diverse opinions on the case of rebasing or merging. I have a few opinions on this. First, it is key that the entire team works in a way that results in a consistent history no matter who delivers a given changeset. This most likely means everyone rebases or everyone merges. There can also be implications coming from the workflow that the team is using to develop. If, however, the workflow dictates whether you can use merges or rebases from a technical perspective, it probably needs to be looked at, and you need to reevaluate whether it is a sane way of working.

Second, if you are not working on a shared branch, you should always rebase. This leaves your history clean and bundles your commits nicely together for a concise delivery. This also makes it easier for you to manipulate your local history before you deliver, as we will cover in a later chapter. As rebasing changes the commit shas, it is considered bad practice to rebase branches that are public. However, you might be working on a public branch that are your own. It could be published to get a build from a continuous integration system , or feedback from a peer. In these cases, you should not refrain from rebasing your own, but public branch.

Tags

So far in this chapter, we have covered branches and how they are lightweight and easy to move around. There are many uses for a named reference for a commit that is more static. In Git, we have tags to supply that functionality. A tag is a reference to a commit. Commonly, tags are used to mark released versions of our source code, so we have a named reference to the source code that produced any given version of our software.

There are two types of tags, lightweight and annotated. Lightweight tags are like branches except they are static. This means that they are simply a reference to a commit with no additional information. Annotated tags are full objects in the Git object database, takes a message, and provides additional information. Annotated commits are created by adding -a, -s, or -m to the tag command. The tag command looks like this: git tag <target> for lightweight tags. For example, git tag v1.6.2 a233b will create a lightweight tag pointing at the commit with the prefix a233b.

If we omit the target, the tag will be created at HEAD.

TAGGING
In this exercise, we will go into a simple repository and add some tags and investigate them. The repository for this exercise can be found in chapter4/tags/.
$ git tag
First, we notice there are no tags. This is consistent with the output from the flowing log command.
$ git log --oneline --all
f203381 (HEAD -> feature) Add feature.txt
0a664dc (master) Add master.txt
810eb22 second commit
0cae311 Initial Commit
Now, we create a tag at the commit with the sha 810eb22. We use a unique prefix of the commit.
$ git tag v1.0 810eb
The tags now both show up when we list all tags, and as a reference on the log.
$ git tag
v1.0
$ git log --oneline --decorate --graph --all
* f203381 (HEAD -> feature) Add feature.txt
| * 0a664dc (master) Add master.txt
|/
* 810eb22 (tag: v1.0) second commit
* 0cae311 Initial Commit
The previous commit was made using a commit sha directly. In the following, we repeat the same flow, but rather than using a commit, we create a tag from a reference.
$ git tag v2.0 master
$ git tag
v1.0
v2.0
$ git log --oneline --decorate --graph --all
* f203381 (HEAD -> feature) Add feature.txt
| * 0a664dc (tag: v2.0, master) Add master.txt
|/
* 810eb22 (tag: v1.0) second commit
* 0cae311 Initial Commit
The previous tags are lightweight tags and are pure references. We can create full tag objects by, for instance, attaching a message to the tag.
$ git tag v3.0 feature -m "pre-release"
Having created the tag, we can see the full information on both the tag and the commit that is tagged. Contrast this with the same information on the lightweight tag.
$ git show v3.0
tag v3.0
Tagger: Johan Abildskov <[email protected]>
Date:   Mon May 4 10:04:34 2020 +0200
pre-release
commit f203381f79576e69f4de2a75cd6289ea635f3543 (HEAD -> feature, tag: v3.0)
Author: Johan Abildskov <[email protected]>
Date:   Mon May 4 10:02:12 2020 +0200
    Add feature.txt
diff --git a/feature.txt b/feature.txt
new file mode 100644
index 0000000..e69de29
$ git show v1.0
commit 810eb22a50a1bd94facd9917531295ddddd27bb7 (tag: v1.0)
Author: Johan Abildskov <[email protected]>
Date:   Mon May 4 10:02:11 2020 +0200
    second commit
diff --git a/0.txt b/0.txt
index 303ff98..36db9be 100644
--- a/0.txt
+++ b/0.txt
@@ -1 +1,2 @@
 first file
+ additional content

As we have seen in this exercise, tags can be used to mark places in our history that has some significance.

Detached HEAD

If you have had any Git experience at all before you started reading this book, it is likely that you have found yourself in a detached head situation, and it is likely that it scared you. I know because it at least took me some time before this situation did not make me feel like I did something that I should not have done.

Detached head is a completely normal situation and it is easily remedied. A detached head simply means that HEAD is pointing to a commit rather than a branch. The consequence of this is that commits created while in a detached head situation do not have any references pointing to them. This can make them disappear from git log, become garbage collected, or simply be unnecessarily difficult to get back to. The two most common ways to end up in detached HEAD are by explicitly checking out a commit or by checking out a tag. An example of this is given in Figure 4-8.
../images/495602_1_En_4_Chapter/495602_1_En_4_Fig8_HTML.jpg
Figure 4-8

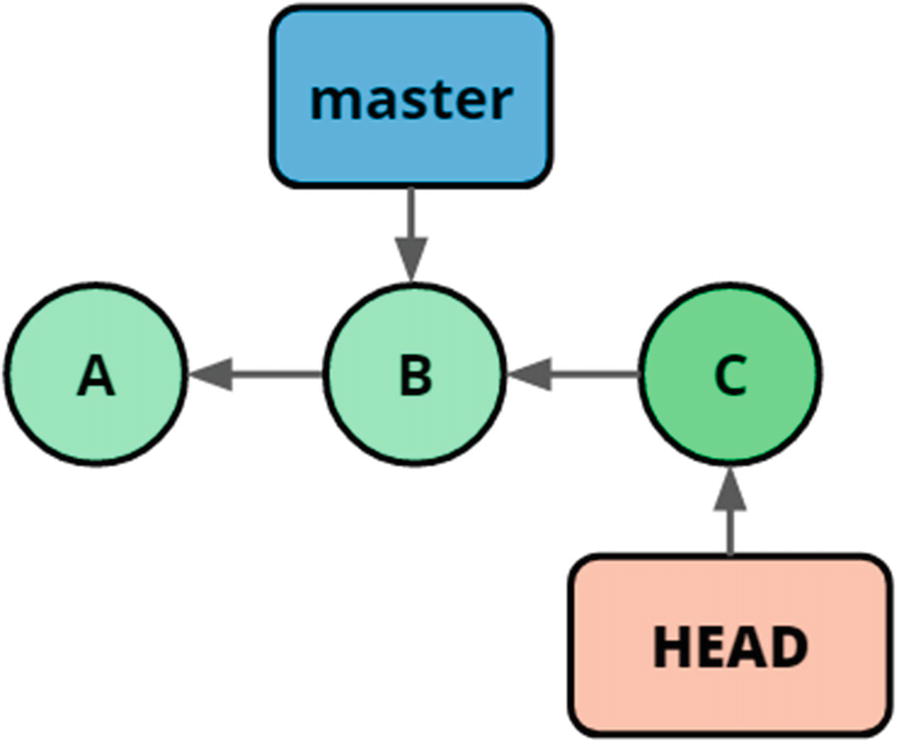
Detached head, with a dangling commit

If the purpose of ending up in a detached head situation is to simply look at code, to see what the state of the repository was at that point in time, there are no problems, and we can stay in the detached head state until we are ready to return to the branch we are working on. If we want to make changes, we are better off creating a branch; this can be most easily done at checkout time using the flag -b that will create a branch at the target we are checking out. This looks like git checkout -b <branch-name> <target>. If we want to create a branch called bugfix at the tag v1.2.7, we use the command git checkout -b bugfix v1.2.7.

DETACHED HEAD
In this exercise, we will put ourselves in the detached head state and recover from it. The repository for this exercise can be found in the examples as chapter4/detached-head/.
$ git log --oneline --decorate --graph --all
* adfcb1d (HEAD -> feature) Add feature.txt
| * ca3e69b (tag: v1.0, master) Add master.txt
|/
* 66d6ce7 second commit
* 66d93b9 Initial Commit
We check out the tag that is pointing to the same branch as the master branch.
$ git checkout v1.0
Note: checking out 'v1.0'.
You are in 'detached HEAD' state. You can look around, make experimental
changes and commit them, and you can discard any commits you make in this
state without impacting any branches by performing another checkout.
If you want to create a new branch to retain commits you create, you may
do so (now or later) by using -b with the checkout command again. Example:
  git checkout -b <new-branch-name>
HEAD is now at ca3e69b... Add master.txt
The preceding wall of text is the primary reason that a detached head feels dangerous. Note that even though there are references pointing to the commit we checked out, HEAD is not pointing to them, but directly to the commit.
$ git log --oneline --decorate --graph --all
* adfcb1d (feature) Add feature.txt
| * ca3e69b (HEAD, tag: v1.0, master) Add master.txt
|/
* 66d6ce7 second commit
* 66d93b9 Initial Commit
$ git checkout -b new-branch
Switched to a new branch 'new-branch'
Note that we have simply created and checked out a branch at HEAD. Depending on our use case, we could have checked out the master branch and continued from there.
$ git log --oneline --decorate --graph --all
* adfcb1d (feature) Add feature.txt
| * ca3e69b (HEAD -> new-branch, tag: v1.0, master) Add master.txt
|/
* 66d6ce7 second commit
* 66d93b9 Initial Commit

As can be seen from the following exercise, there is no reason to be afraid of the detached head, and it is easy to recover from.

Git Katas

In order to support the learning goals of this chapter, I recommend you go through the following katas:
  • Basic-branching

  • Three-way-merge

  • Merge-conflict

  • Merge-mergesort

  • Rebase-branch

  • Git-tag

  • Detached-head

Summary

In this chapter, we came far about talking about branches in Git and how they work. We covered the different types of merges and contrasted merges to rebases. We walked through resolving merge conflicts. We closed off the chapter with a brief description of how we can use tags to mark interesting points in our code base. Finally, we deflated the detached head situation.

Now that we have the foundations for branches in order, we can move on to collaboration using Git.

..................Content has been hidden....................

You can't read the all page of ebook, please click here login for view all page.
Reset
3.141.27.244