
Git is an engineer’s tool, built by engineers. This means that while Git works a certain way out of the box, the real power is unleashed when we start customizing Git to match our way of working. With Git, we can do a lot in terms of simple configurations, creating shortcuts for the tasks that we often use, or have repository-specific configurations to help us manage the different contexts in which we work.
But Git does not stop there. Using hooks, we can inject scripts into the normal workflow of Git operations, to better support our workflows, and using Git attributes and filters, we can change the most basic operation of Git, how files are moved between the repository and the workspace. In this chapter, we will go through everything from the most basic configuration and alias to customization that changes some of the fundamental behaviors of Git.
Configuring Git

In the global configuration, user.name is set to briana, while in Repo A, there is a .gitconfig file specifying user.name to be phillip. Thus, in global scope and Repo B, user.name will resolve to briana, while it will resolve to phillip in Repo A. In the system configuration, the default editor is set to emacs
Applying configurations in Git is done through the interface git config. If we add --list to the command, we will read rather than set values. We use a key/value pair to set a configuration. Using the flags --global and --system, we can set user or system configurations, rather than the default repository local configurations. To set the pull strategy to always rebase for the current user, we would run the command git config --global pull.rebase true. If we rather wanted to set it for either the system, we would use --system, or to put it in the repository configuration, drop the --global flag. There are many configurations in Git, and we will not cover them here. Specific configurations can be found in the Git documentation. We will however cover Git configurations in the sense that they enable the next three sections.
In this exercise, we go through tweaking Git configurations. The repository for this exercise can be found in the exercises delivered with the book in the folder chapter7/.
In this repository, we notice that the local user.email is not set, so we access the user defined instead. We verify this using --show-origin.
This concludes the exercise. We have gone through the user and local scope and how you can have different configurations in different repositories. This can be particularly useful if you use the same computer to personal, open source, and company projects.
Aliases
In Git, we can use aliases to construct shortcuts or extend Git’s functionality. We can either use commands that are native to Git or invoke external commands. A frequent target for aliases is making your logs aligned perfectly with your particular tastes. My go-to log command is git log --oneline --decorate --graph --all which is a long string to type, leaving ample room for typos and other errors. Commonly, I am unable to spell --oneline correctly. In this scenario, I could create an alias for that command. There is no direct alias command, but we can use git config to set aliases. Note that this also means that we can have differently scoped aliases.
In this exercise, we are going to set up some aliases for common tasks in our repository. The repository for this exercise can be found in chapter7/aliases.
While these aliases are simple, they should show how powerful a tool they are and how you can both make shortcuts for your often-used commands and extend Git with additional functionality. If you have a common set of things you do in your workflow, you can create aliases for each of these and share them with your team. It is a good way to align on your way of working.
As we have seen, we can quickly create shortcuts for custom commands or even substitute complex parts of our workflow with an alias. Aliases are a massively underused Git feature when it comes to ordinary developers. From now on, you are obligated to create aliases for those things you find yourselves typing out often. You might also once in a while need a complex piece of magic, and the next time you do so, create an alias for it, so it will always be ready at hand.
Attributes
Git attributes are a somewhat advanced part of Git’s feature set. It is one of the places where we can fundamentally change the way Git writes objects in its internal database. They are commonly used to enforce line endings or how to handle binary files, but can also be used to convert to specific coding styles on check-in. As this is something that happens client-side, if we truly want to enforce anything, we need to implement it server-side or in automation engines.
Setting the -text attribute on a path stops Git from treating matching paths as text files. The most common scenarios for tweaking existing Git behavior come from either removing the text behavior as shown earlier or forcing Git to treat line endings in a particular way.

The clean filter applies when going from the working directory to the staging area and the other direction for smudge
In my experience, Git attributes are rarely necessary unless you have some complexity in your context, such as multiple different platforms on which you check out code using tools that are fragile when it comes to line endings. Of course, the right solution is to fix the fragility or complexity, but until then, Git attributes can help work around the problems.
On branch master
nothing added to commit but untracked files present (use "git add" to track)
This exercise showed a simple way to use Git attributes to change the way Git works. There are more advanced things to do with Git attributes, but they are beyond the scope of this book.
Diff and Merge Tools
While the command-line or IDE extensions are enough for most use cases, there are situations where your domain sets you up for some challenging diffs and merges. If this is the case, we can configure Git to use external tools to handle this. Perhaps unsurprising, we set up the tools in git config and can then invoke them through the command line. The process is similar for merge and diff tools. If we have configured a diff tool, we can invoke it through git difftool, and if we have configured a merge tool, the command is git mergetool. There are both free, open source, and proprietary merge tools available. We are using the open source tool meld in the exercise, while a popular paid tool is BeyondCompare. Your team or department might have a preferred tool. If so, it is a good idea to align on that.
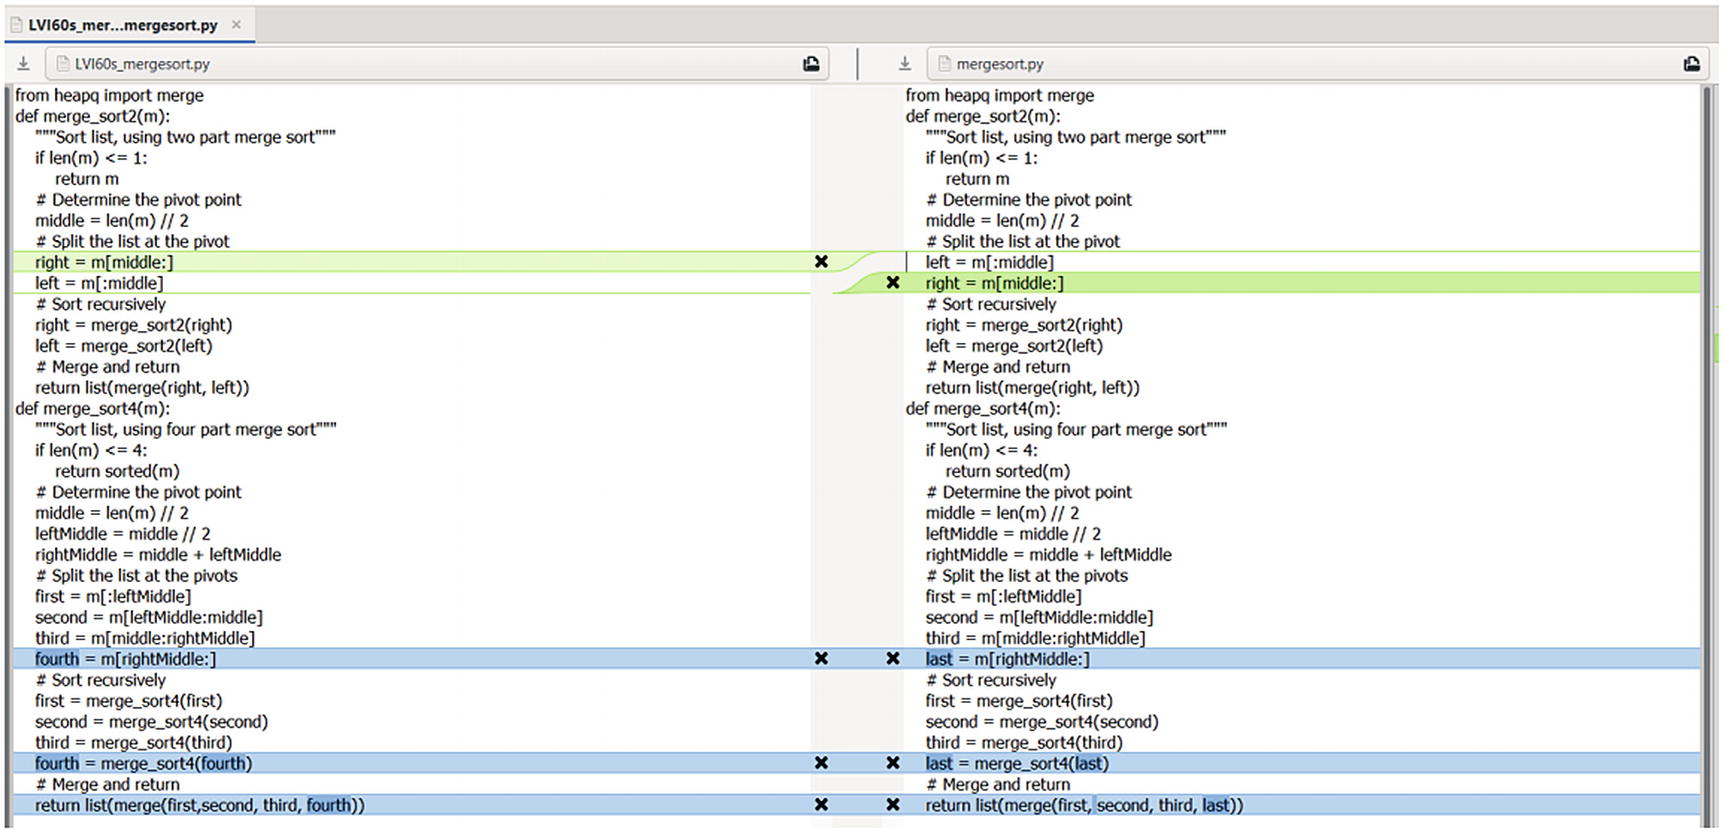
This exercise assumes that you have installed the meld merge tool (meldmerge.com) and that you are on Windows. If you are on a different platform, I recommend you follow the platform-specific guides for configuring meld and mergetools, but you will likely have an easier time than those on Windows. First, we will configure meld as the mergetool, and then we will revisit the merge-mergesort kata to see how the merge looks when we use a merge tool to resolve the conflict.
Now, we have a more visual view.

So, we get a visual way of resolving our merges, rather than manually setting the state of the conflicted path.
This can be useful if you work with particular file types or have complex merge conflicts, but I rarely encounter an actual need for these tools in practice. In most cases, the merge conflicts do not appear, and when they do, IDEs come with excellent tool facilitation out of the box.
Hooks
The final configuration option that we cover is Git hooks. Hooks are small shell scripts that allow us to inject functionality in the flow of Git actions. Hooks can help prevent us doing things that we shouldn’t or prepare data for Git.
Hooks are available server-side and client-side. In this book, we only cover client-side hooks, but if you ever notice that a server rejects a push because of non-fast-forward merges, you have seen a server-side hook in action. Other often-used server-side hooks check for a referenced issue or prevent you from accidentally adding large files to your repository.
When it comes to client-side hooks, the same phrase that I’ve used many times is still valid. You can only support workflows client-side if you want to enforce anything you have to do in server-side. Hooks reside in the folder .git/hooks, and when you git init a repository, there is a set of sample hooks that you can check out to see examples of Git hooks in action. If hooks exit with a nonzero exit code, the current action is aborted. We use this in the next exercise to prevent commits on the master branch using the pre-commit hook. In the case of the prepare-commit-msg hook, we can both check for something, that is, the presence of curse words in the commit message or the lack of a referenced issue ID. Thus, hooks help us do the right thing, and through the path of least resistance, we improve. We can, of course, circumvent this locally. Note that hooks are not shared across distributed repositories as this would pose a security issue.
Our hook runs, but as we are on a different branch, the commit is allowed through. This can be useful to way those oops moments.
This is the reason that I have been saying that we need to handle enforcement server-side. One might argue that --no-verify is a bad practice, or couldn’t we just disable it? But consider that the hooks reside in the local repository and there is nothing hindering the user from simply deleting the hook altogether.
At least --no-verify provides us with a proper way to skip the hook.
Katas
Git-attributes
Pre-push
To supplement this, you can go into any local Git repository and look at the sample hooks in the .git/hooks folder.
Summary
In this chapter, we covered many different ways that you can customize your Git installation to work more efficiently and support arbitrary workflows and constraints.
We covered how config files allow us to have global, user, and repository local configurations and how we could use those configurations to extend Git functionality.
We built our own shortcuts and called external commands using aliases. We investigate Git attributes and how we could use them to both tweak Git’s default performance and completely change the base functionality of Git. We covered how you can get a custom merging experience using mergetools. Finally, we covered how we can interfere in the standard Git Flow using hooks to facilitate our workflows.